Web Systems and Technologies Course Note
Made by Mike_Zhang
Notice
PERSONAL COURSE NOTE, FOR REFERENCE ONLY
Personal course note of EIE4432 Web Systems and Technologies, The Hong Kong Polytechnic University, Sem1, 2023/24.
Mainly focus on front-end programming: HTML, CSS, Bootstrap, JavaScript, Web Storage, jQuery, JSON, AJAX; back-end programming: Node.js, Express.js, MongoDB; and Web Security.
提示
个人笔记,仅供参考
本文章为香港理工大学2023/24学年第一学期 网络系统和技术 (EIE4432 Web Systems and Technologies) 个人的课程笔记。
Unfold Study Note Topics | 展开学习笔记主题 >
1. Client-side Programming: HTML, CSS
- Web Development Trends
- Web Hosting Services
- 2 - Tier Architecture & 3-Tier Architecture
- Introduction to Client Side Programming
- Client Server Design
- Internet Address, Domain Name & URL, File Naming Convention
- IDE Suggestion, Programming Language & Markup Language
- DOCTYPE Declaration
- HTML Tags & CSS Properties
- HTTP Method for Form Request
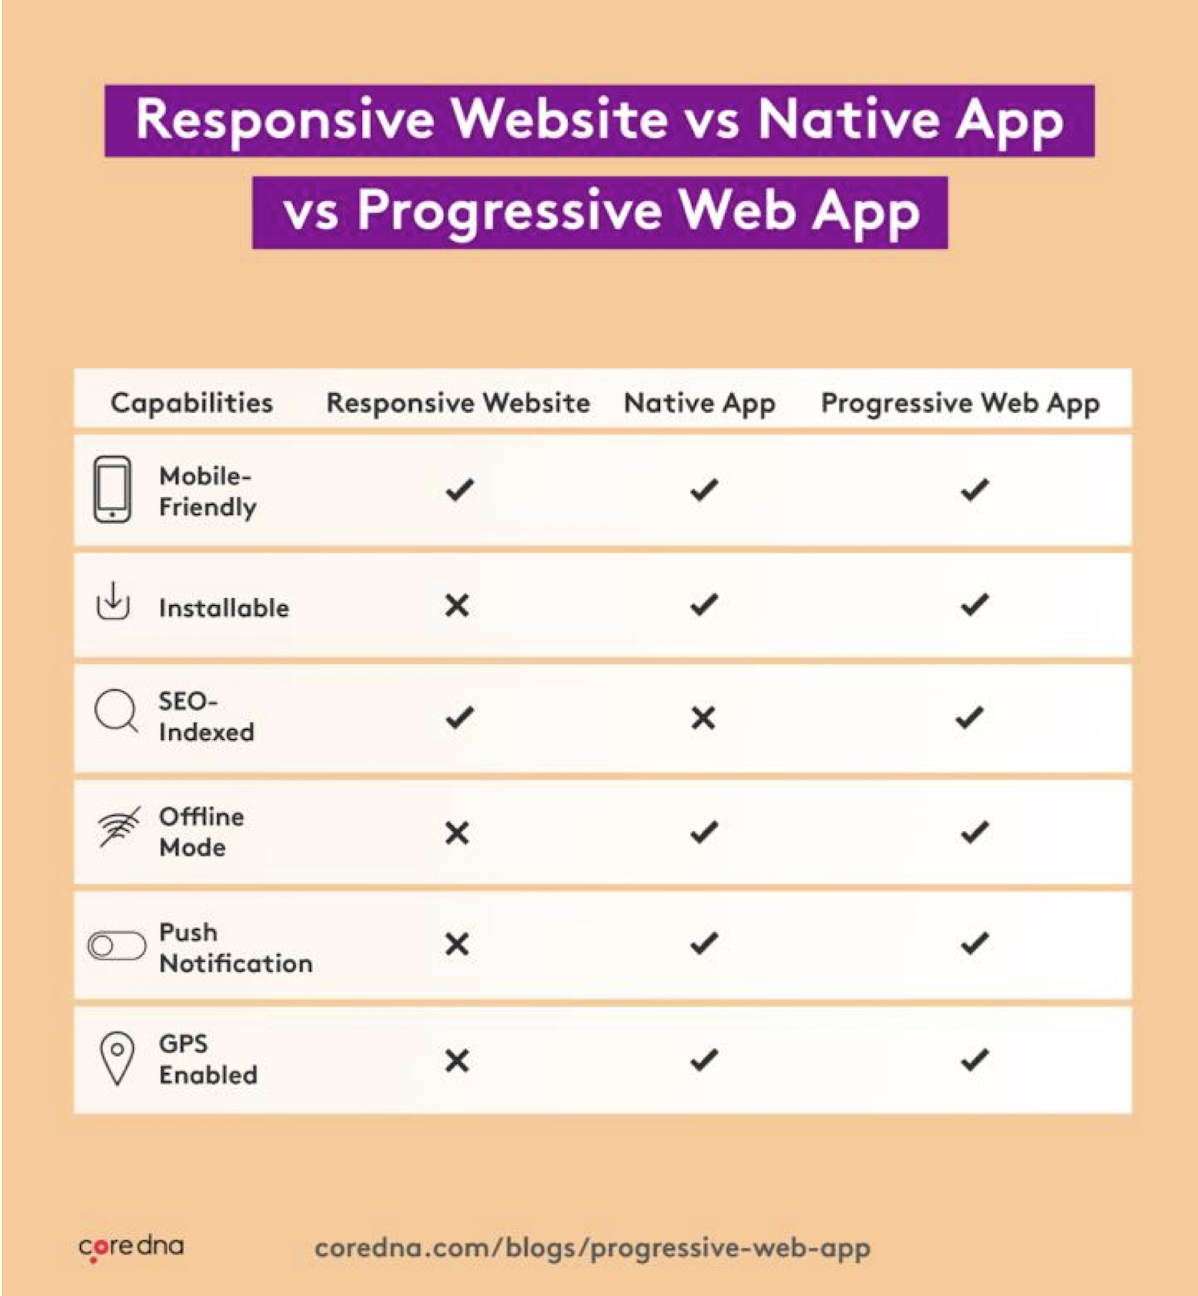
1.1 Web Development Trends
3 ways to reach users on mobile
- Responsive Website
- Native App
- Progressive Web App
Some Example of PWAs
- Spotify
- Telegram
- The Washington Post
- AliExpress
- BMW
Progressive Web App (PWA)
- Web apps with native-like features
- PWAs offer app-like functionalities such as offline access and push notifications
- Cross-platform compatibility
- PWAs work across various devices and platforms, including desktop and mobile
- Responsive and adaptive
- PWAs adapt to different screen sizes and orientations for a seamless user
experience
- PWAs adapt to different screen sizes and orientations for a seamless user
- Installable and discoverable
- PWAs can be installed on a user’s device and discovered through app stores or search engines
Headless Content Management System (CMS)
- Technology agnostic
- Allows developers to use their preferred frontend frameworks and programming languages
- Streamlined content management
- Simplifies content editing and updates without impacting frontend implementation
Headless CMS
- API-driven approach
- Provides content via APIs, enabling multiple channels and devices to consume it
- No content preview
Decoupled CMS - Provides extra functionalities such as WYSIWYG editing, templating tools
- Separates content creation from presentation, allowing flexible frontend implementations
JavaScript Frameworks and Libraries
- Efficient web development tools
- Frameworks and libraries provide pre-built components and functionalities for faster development
- Enhanced user interfaces
- Enable interactive and dynamic UIs for a better user experience
- Modular and reusable
- Encourage code organization and reusability, promoting maintainability and scalability
- Community support and resources
- Extensive developer communities provide documentation, tutorials, and support for learning and troubleshooting
1.2 Web Hosting Services
- GitHub Pages
- Free for hosting static websites and open-source projects
- Limited to static websites and doesn’t offer built-in scalability features
- AWS Elastic Beanstalk
- Pay for the AWS resources used (compute, storage, etc.) along with any additional services
- Offers automatic scaling based on the application’s needs
- Can handle both small and large-scale deployments
- Microsoft Azure App Service
- Pay for the Azure resources used along with any additional services
- Provides automatic scaling and can handle small to large-scale deployments. Offers horizontal and vertical scaling options
- DigitalOcean
- Offers various pricing plans based on the resources required
- Allows easy scaling of resources
- Hostinger
- Provides affordable hosting plans starting at low prices
- Offers scalable hosting solutions, allowing you to upgrade your plan or migrate to more powerful hosting options as your website grows
- Vercel
- Offers both free and paid plans
- Provides automatic scaling and can handle high-traffic websites and web applications. Offers serverless functions for efficient scaling
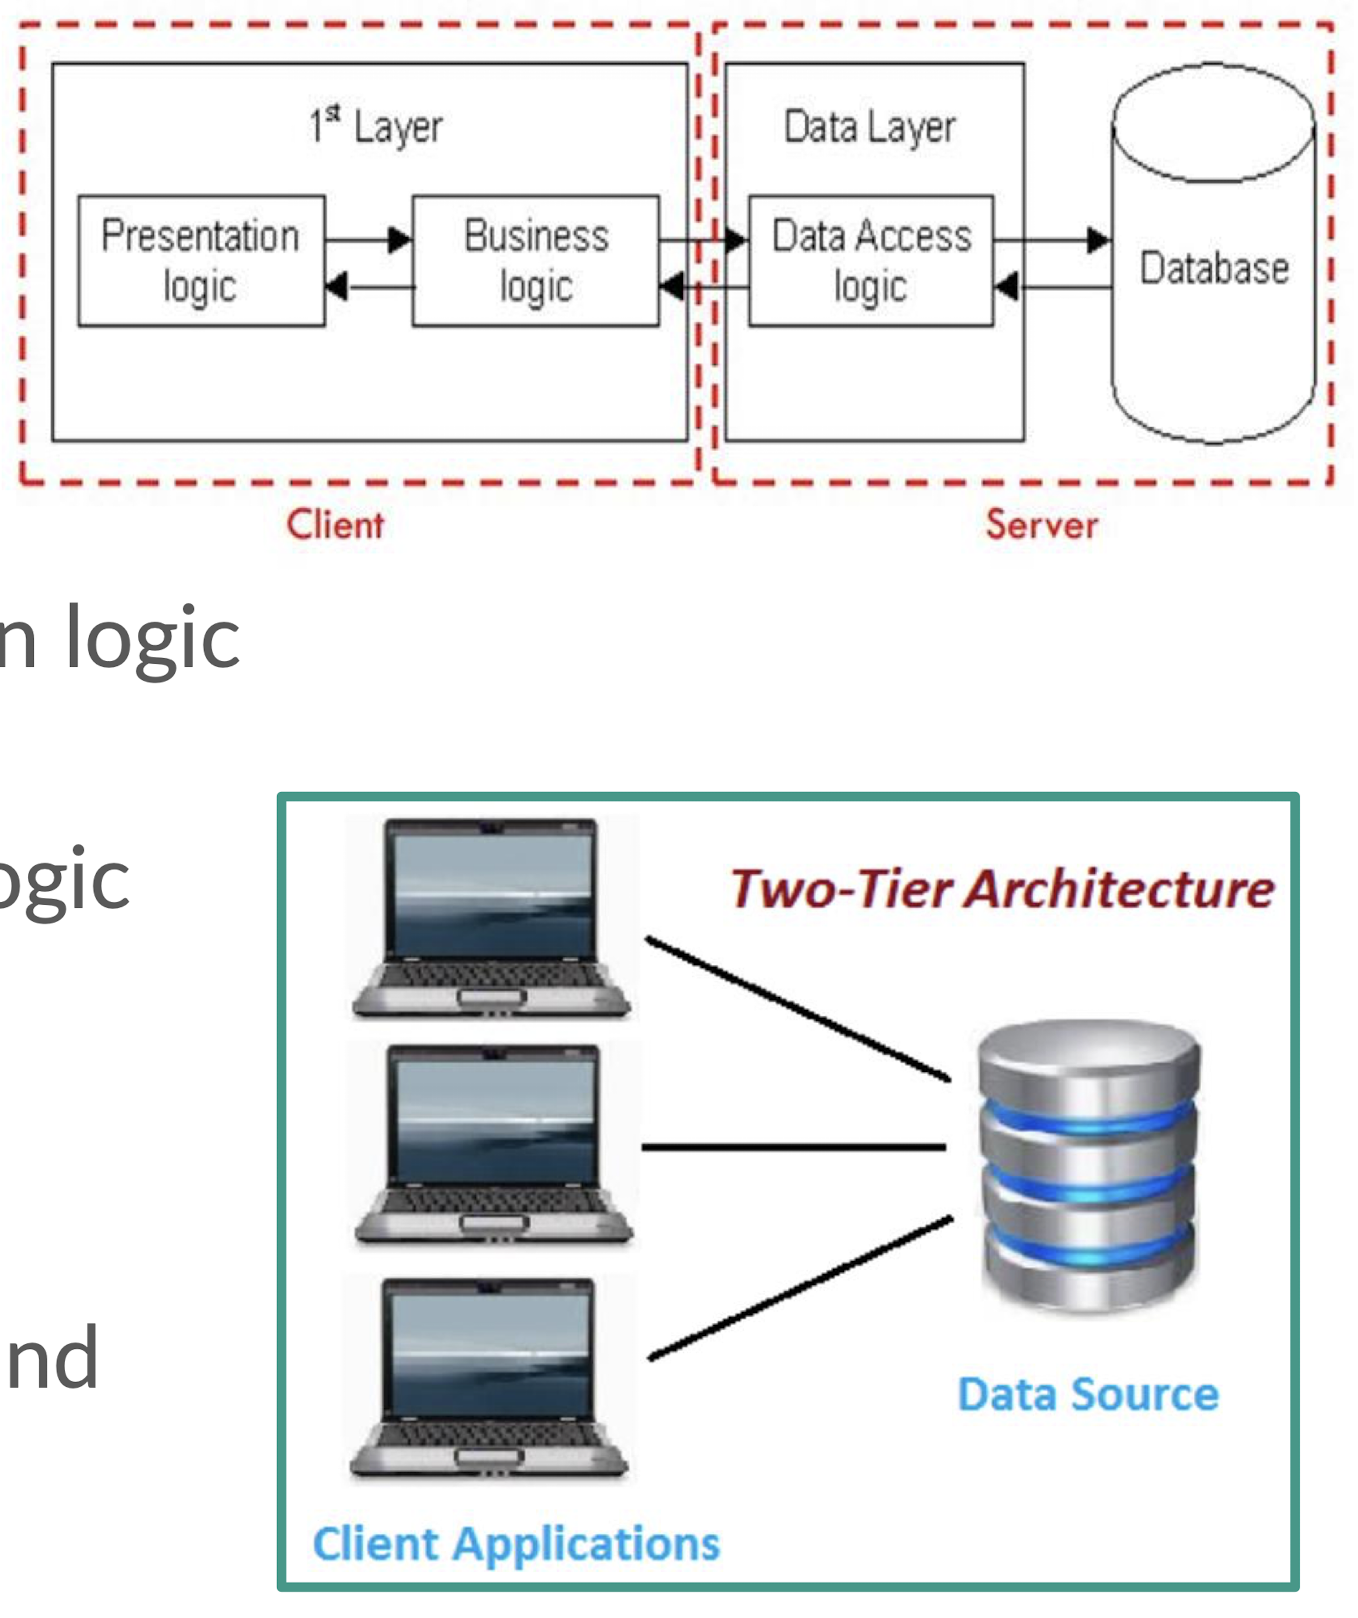
1.3 2-Tier Architecture
- Client Tier
- Handles user interface and application logic
- Server Tier
- Manages data storage and business logic processing
- Direct communication between client and server without an intermediary layer
- Simple and efficient, but lacks scalability and separation of concerns
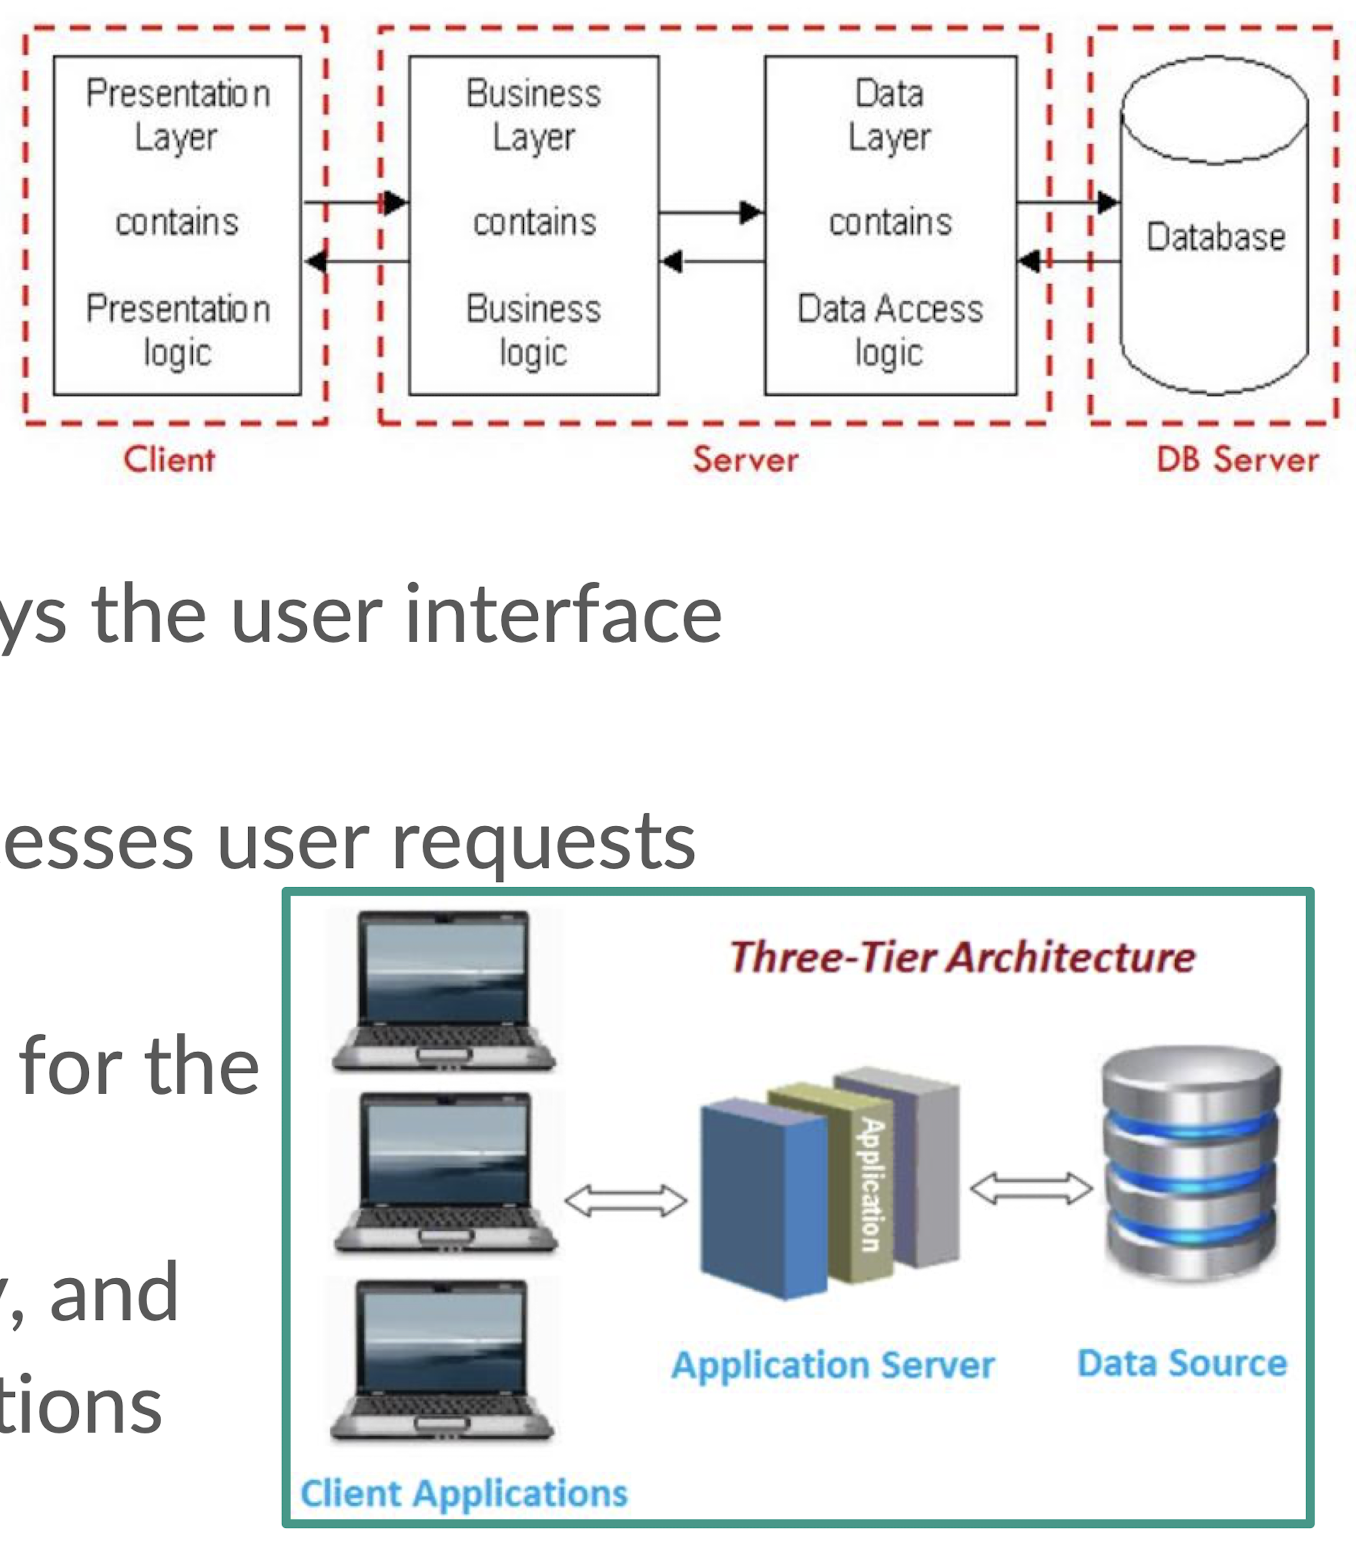
1.4 3-Tier Architecture
- Presentation Tier
- Handles user interaction and displays the user interface
- Application Tier
- Implements business logic and processes user requests
- Data Tier
- Manages data storage and retrieval for the system
- Separates concerns, improves scalability, and enhances maintainability in web applications
1.5 2-Tier Architecture vs 3-Tier Architecture
| \ | 2-Tier Architecture | 3-Tier Architecture |
|---|---|---|
| Structure | Client tier and server tier | Client tier, application tier, and server tier |
| Communication | Direct communication between client and server | Client communicates with the application tier, which then interacts with the server tier |
| Scalability | Scaling is limited to the server tier | Better scalability with independent application tier scaling |
| Maintenance | Mixing of responsibilities in the client tier | Improved maintainability with separate tiers and easier updates to specific tiers |
| Separation of Concerns | Presentation and application logic combined in the client tier | Clear separation of presentation, application, and data layers for better modularity and abstraction |
1.6 Client-side Programming
- HTML
- Structure and content creation with tags and attributes for web pages
- Ensures correct interpretation and display by browsers
- CSS
- Controls presentation and layout of HTML documents
- Defines visual aspects like colors, fonts, and spacing on pages
- JavaScript
- Enhances web pages with interactivity and dynamic behavior
- Enables form validation, interactive content, and real-time updates without reloading
1.7 Client Server Design
1.8 What is Web Application?
- Software application accessed through a web browser over the
internet - Provides functionality and services for tasks like data manipulation
and transactions - Built using web technologies like HTML, CSS, and JavaScript
- Offers cross-platform compatibility and can be accessed on various devices
1.8 Internet Address
- Internet addresses are based on the Internet Protocol (IP) addressing scheme
- An IP address is a unique series of numbers that point to a folder on a Web server
- For example: 104.18.23.19points to World Wide Web consortium site (W3C; at time of writing)
- IP addresses would be hard to use every time you need to access a Web site! Instead we use domain names, for example:
1.9 Domain Name & URL
- A domain name refers to an IP address
- A Uniform Resource Locator (URL) consists of:
- A domain name, for example http://www.polyu.edu.hk
- Followed by an optional list of folders based on the
- folder indicated by the domain name
- Followed by a specific file name and extension
- For example: https://www.polyu.edu.hk/eee/

1.10 File Naming Convention
- Descriptive and meaningful names
- Choose names that accurately describe the file’s content
- Enhances organization and understanding of multiple files
- Lowercase letters and hyphens
- Use lowercase letters & separate words with hyphens(“-“)
- Improves readability and ensures compatibility across
platforms
- Consistency and standardization
- Establish a consistent naming convention throughout the project or organization
- Facilitates file identification and collaboration
- Appropriate file extensions
- Utilize proper file extensions to indicate the file type or format
- Examples:
.htmlfor HTML files,.cssfor CSS stylesheets,.jsfor JavaScript
files
- Avoid special characters and spaces
- Do not use special characters, spaces, or non-alphanumeric characters
- Stick to alphanumeric characters and standard symbols in file names
- Good Example
contact-form.html,style.css
- Bad Example
file123.html,finalversion-new-copy-final-final.html
1.11 IDE Suggestions
- Highly Recommended: Visual Studio Code (VS Code)
- User-Friendly Interface
- Cross-Platform Compatibility
- Powerful IDE Features
- See “Installation Guidelines” on Blackboard
- Alternative 1: Sublime Text 4
- Alternative 2: Atom
- Alternative 3: Notepad++
- Online IDE: Replit(https://replit.com)
- Account Registration is required
1.12 Programming Language VS Markup Language
- A program is a sequence of instructions
- A programming language provides syntax and instructions to process data and run programs
- Programmers use high-level programming languages
- Each language consists of specificwords, symbols and operators
- C++, C#, Java, BASIC, COBOL, Fortran, Ada, Pascal, PHP, Python, perl.
1.13 Markup Language - HTML
- HTML defines semantic elements with English names for document
structure - Element references are enclosed in tags (
<>) for attributes and values - Opening tags contain element name and attributes; closing tags don’t

1.13.1 DOCTYPE Declaration
1 | |
- Appear at the beginning of a given web document
- Identifies the version of HTML against which that document should validate
- Special declaration that tells the browser, which version of HTML is being used
- Specifies HTML5, the current version of HTML
The declaration is not an HTML tag. It is an “information” to the browser about what document type to expect. In HTML 5, the declaration is simple: <!DOCTYPE html>
[Example]
1 | |
- Create “index.html” file
- DOCTYPE Declaration
<html>: defines the beginning and end of an HTML document<head>&<body>inside<html>tag pair- Basic meta data for defining:
- Character encoding
- Viewport behavior and responsiveness
1.13.2 Essential HTML Tag <head></head>
- Define the header section of an HTML document
- Contains meta-information about the document
- title, character encoding, linked stylesheets, scripts, and other metadata
<title>, <meta>, <style>, <link>, <scripts>
- Content placed within the
<head>tag is not directly visible on the webpage
1.13.3 Essential HTML Tag <title></title>
- Define the title of a webpage
- Placed within the
<head>section of an HTML document - Text specified within the
<title>tag is displayed as the title of the browser window or tab - Example:
<title>EIE4432 Lecutre 1</title>
1.13.4 Essential HTML Tag <body></body>
- Defines the main content area of an HTML document that is visible on the webpage
- Contains all the elements that will be displayed on the webpage
- headings, paragraphs, images, links, forms, and more
<h1>, <p>, <img>, <a>, <form>
- Content within the
<body>tag is what users see and interact with when they visit the webpage
1.13.5 Comment Syntax
- Add explanatory or descriptive notes within your code
- Ignored by the browser when rendering the webpage
- Helpful reminders or explanations for yourself or other developers
<!-- ... -->
- HTML Comment Syntax
Anything placed between
<!--and-->will be treated as a commentCSS Comment Syntax
- Single-line comments: //
- Multi-line comments: / … /
1.13.6 Essential HTML Tag <h1></h1> to <h6></h6>
- Define headings of different levels
<h1>: the highest level heading<h2>: subheading that is slightly lower in importance than<h1><h3>to<h6>: a decreasing level of importance
[Example]
1 | |
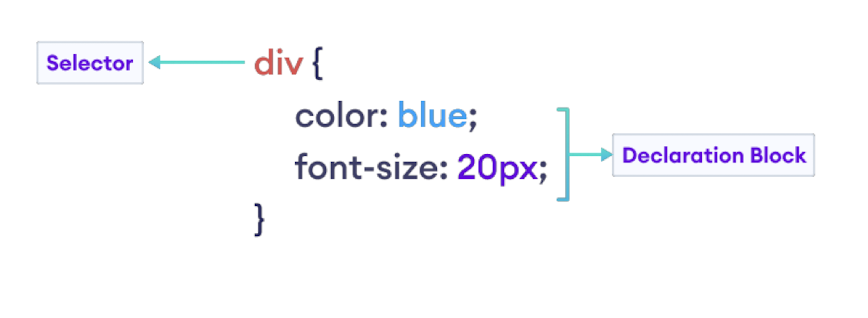
1.13.7 Getting Started with CSS
- Defines styles and layouts to enhance the appearance of web pages
- Selectors target HTML elements to apply styling rules
- 3 ways to insert stylesheet:
- Inline CSS
- Internal CSS
- External CSS
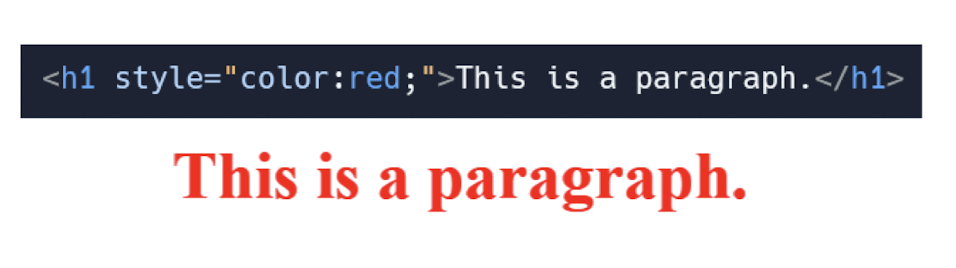
1.13.8 Inline CSS
- Applied directly within HTML elements
- Using “style” attribute in opening tag
- Takes precedence over external and internal stylesheets
- Example & Syntax
[Example]
1 | |
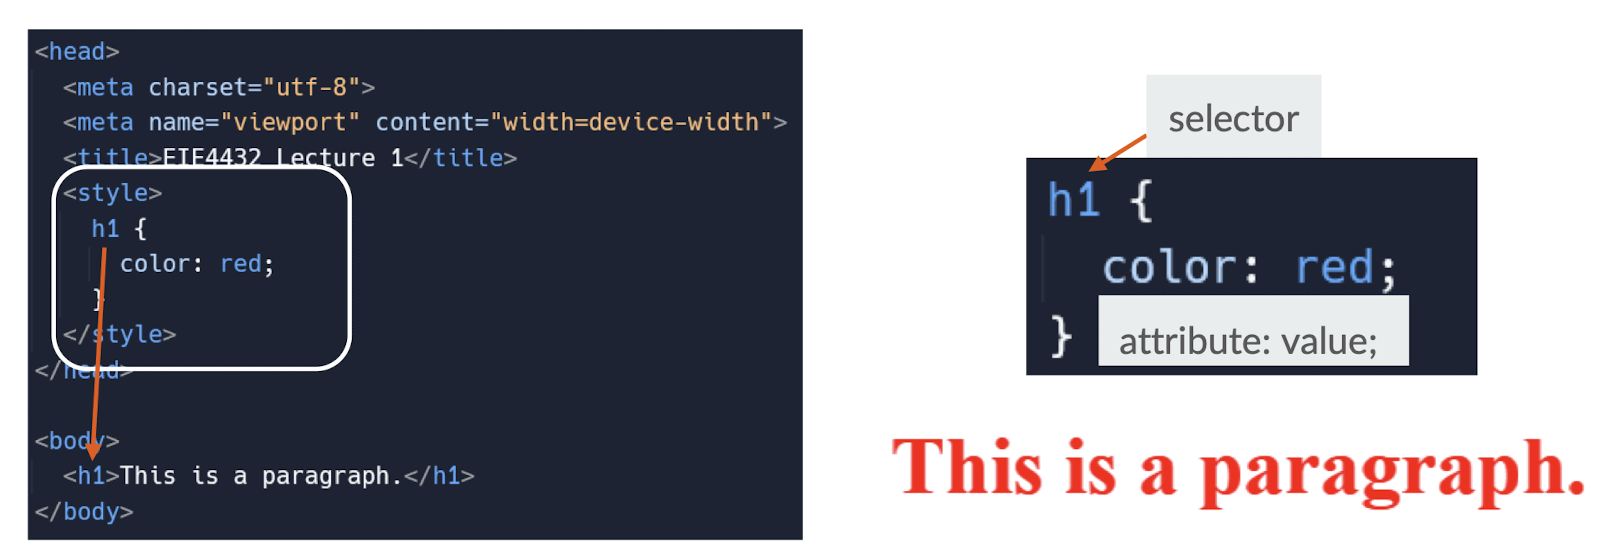
1.13.9 Internal CSS
- Defined within the
<style>tag in the HTML document - Applies styles to multiple elements within the same document
- The precedence of internal CSS is lower than inline CSS
1.13.10 External CSS
- Stored in a separate file with a
.cssextension - HTML document links to the external CSS file using the
<link>tag - Syntax in separate CSS file is the same as internal CSS
- The precedence of external CSS is lower than inline CSS
1 | |

1.13.11 Essential CSS properties for Font
color: Sets the color of the text in element- Color name / Hexcode
font-size: Adjusts the size of the text within element- In unit of px, em, rem, etc…
text-align: Specifies the horizontal alignment of the element- left, right, center, justify
font-weight: Controls the thickness or boldness of the text in
element- normal, bold, bolder, lighter, 100- 900
[Example]
- Put “Welcome!” to center
- Modify “EIE4432” to orange in color (use color name only)
- Modify “Web System and Technologies” to #555555 (use hexcode only)
1 | |

1.13.12 Essential HTML Tag <p></p>
- An HTML element used for paragraph-level text
- Creates a block of text with a line break before and after
- Commonly used for long-form content and article paragraphs
1 | |
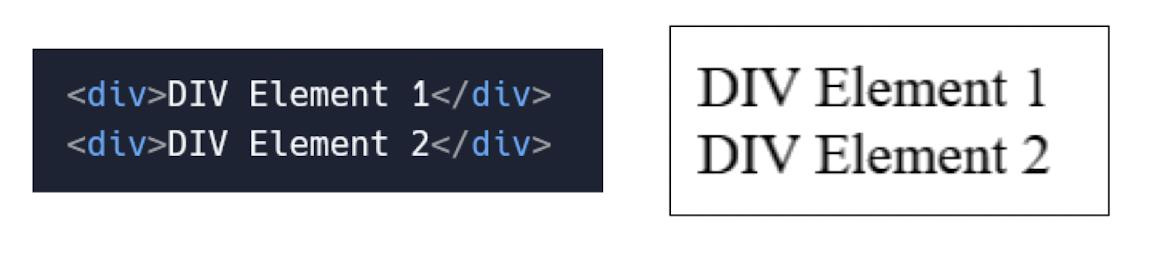
1.13.13 Essential HTML Tag <div></div>
- Like a container
- Block HTML element: holds and organizes content on a webpage
- Group related elements together, like paragraphs, images, or sections
- Using attributes “
id“ or “class“
- Using attributes “
- We can style
<div>using CSS to change its appearance, like colors or spacing
1 | |
1.13.14 Essential HTML Tag <span></span>
- Inline HTML element used for styling text
- Used to apply specific styles to a small portion of content
<span>is often used in combination with CSS for targeted styling
1 | |

1.13.15 Essential CSS properties for Elements
- We use attributes “
id“ or “class“ to apply CSS properties to elements - ID: unique identifier used to target a specific element
- Class: reusable identifier used to group multiple elements
- IDs are unique within a document, while classes can be reused
- Both IDs and classes are used to apply styles and JavaScript functionality

1.13.16 Essential CSS properties for Elements
background-color: Defines the background color of the element- Color name / Hexcode
border:Specifies the border style, width, and color around the
elementborder-width: in unit of px, %, em, rem…border-style: solid, dashed, dotted, double…border-color: use color name / hexcode
display: Defines how an element is displayed- block, inline, inline-block, none, flex, grid…
[Examples]
- Create a gray container box
- Set the background color to gray
- Add a gray border
- Inside the container, display the text “skill check exercise” with the following styles:
- Set the text color to blue
- Make the font bold
- Apply a light yellow background color
- Make use of “id” or “class”for easier identification in CSS stylesheet
- Use either way of inserting styles (inline/internal/external)
1 | |
1 | |
Box model:

Content - The content of the box, where text and images appear
Padding - Clears an area around the content. The padding is transparent
Border - A border that goes around the padding and content
Margin - Clears an area outside the border. The margin is transparent
1.13.17 Block Element
- Block elements take up the full width available space
- Create a new line before and after the element
- Examples:
<div>, <p>, <h1> to <h6>, <ul>, <li>, and <section> - Used for larger structural elements
- Create distinct blocks of content on a webpage
- They can have width, height, margin, padding, and can contain other block and inline elements
1.13.18 Inline Element
- Only take up the necessary space to fit their content without creating
line breaks - Examples:
<span>, <a>, <strong>, <em>, <img>, and <input> - Used for smaller elements or to style specific parts of a block
element’s content - They cannot have width, height, margin, or padding defined
- Do not create line breaks

Ref: https://dev.to/akshayjaagirdhar/differences-between-html-inline-and-blocks-elements-43d7
1.13.19 Essential HTML Tag <img>
- Used to display images on a webpage
- Requires the
srcattribute to specify the image file - Can include additional attributes like alt, width, and height
- Example:
<img src="image.jpg" alt="Example Image"> altattribute provides alternative text for an image- Shows when the image is unavailable to display
1 | |
1.13.20 Essential HTML Tag <a></a>
- Creates a hyperlink to another web page or resource
- Requires an “
href“ attribute to specify the destination URL - Can display text, images, or other elements as a clickable link
1 | |
1.13.21 Essential HTML Tag <br> & <hr>
<br>
- Inserts a line break, forcing content to the next line
- Self-closing tag, doesn’t require a closing tag
- ie. no
</br>
- ie. no
- Often used to create space or separate content vertically
<hr>
- Inserts a
horizontal lineto visually divide sections - Self-closing tag, doesn’t require a closing tag
- ie. no
</hr>
- ie. no
- Can be styled using CSS for different appearances
1.13.22 HTML Form <form></form>
- Collects user inputs through various form elements
- User fills out the form and submits it
- Form data is sent to a server using HTTP request
- Server processes the data and may send a response back
HTML Form:
- Creates a container for input controls and form elements
- Uses various input elements like text fields, checkboxes, or buttons
- Allows user input to be submitted to a server for processing
action: Specifies the URL or destination where the form data will be submittedmethod: Defines the HTTP method to be used when submitting the form, such as GET or POST
1 | |
1.13.23 HTTP Method for Form Request
GET Request
- Retrieves data from a server using URL parameters
- Information is appended to the URL, visible in the browser
- Caching is possible, and data can be bookmarked or shared
- NEVER submit sensitive information using GET request
POST Request
- Sends data to a server for processing or storage
- Information is sent in the body of the HTTP request
- More secure for sensitive data, not visible in the URL
1.13.24 HTML Form <fieldset></fieldset> and <legend></legend>
<fieldset></fieldset>
- Groups related form elements together
- Helps structure and visually organize a form
- Can be used with a
<legend>tag to provide a title or description
<legend></legend>
- Provides a title or caption for a
<fieldset>element - Describes the purpose or meaning of the grouped form elements
- Typically placed as the first child within a
<fieldset>

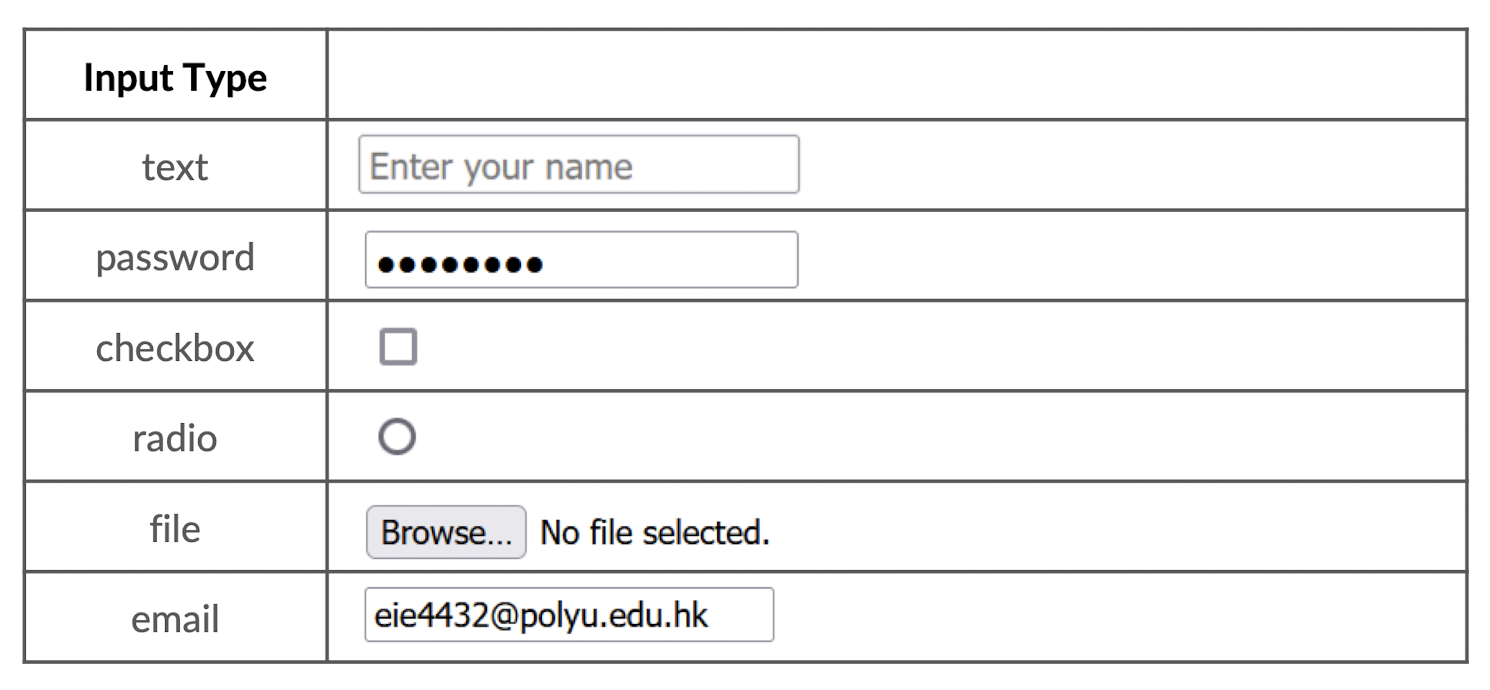
1.13.25 HTML Form <input>
- Creates an interactive input field for user data entry
- Uses attributes like “
type“, “name“, and “value“ for customization
| Input Type | Description | Code |
|---|---|---|
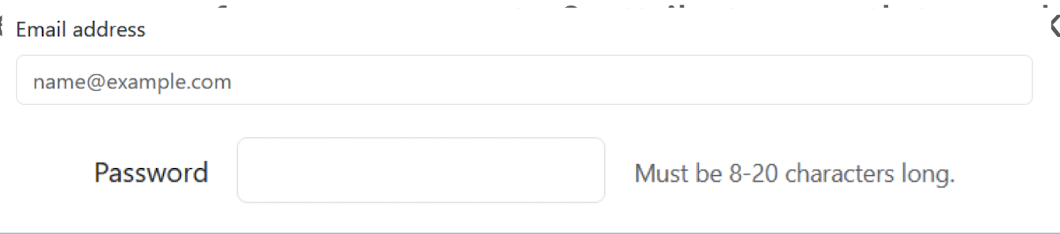
| text | Allows users to enter single-line text input | <input type="text" placeholder="Enter your name"> |
| password | Hides the entered text, commonly used for password input | <input type="password" placeholder="Enter password"> |
| checkbox | Represents a checkbox for multiple selections | <input type="checkbox" name="option" value="1"> |
| radio | Represents a radio button for single selection from a group | <input type="radio" name="choice" value="option1"> |
| file | Enables users to upload files from their device | <input type="file" name="fileUpload"> |
| Accepts and validates an email address input from the user | <input type="email" placeholder="Enter your email"> |
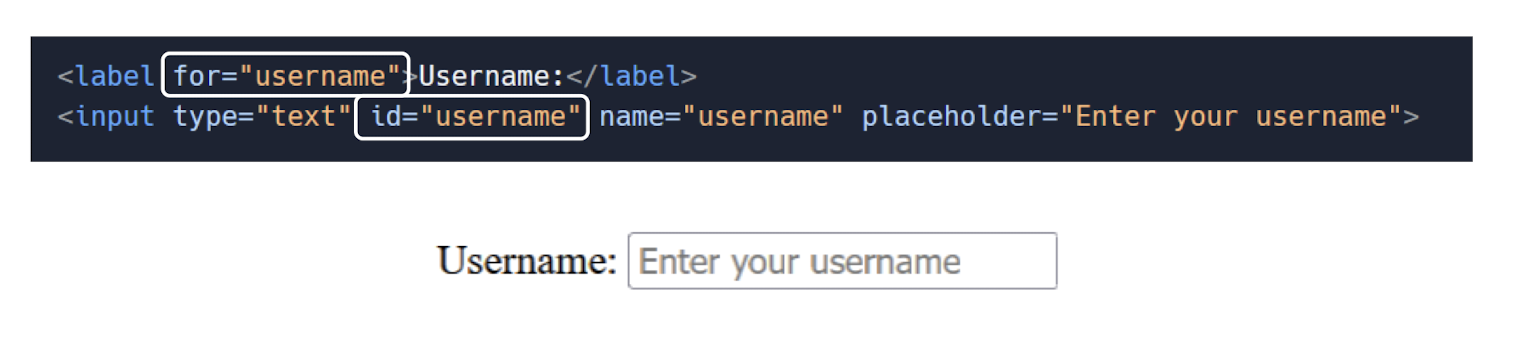
1.13.26 HTML Form <label></label>
- Associates a text label with a form input element using id
- Enhances accessibility and usability of form elements
- Clicking on the label focuses or activates the associated input
for->id
1 | |
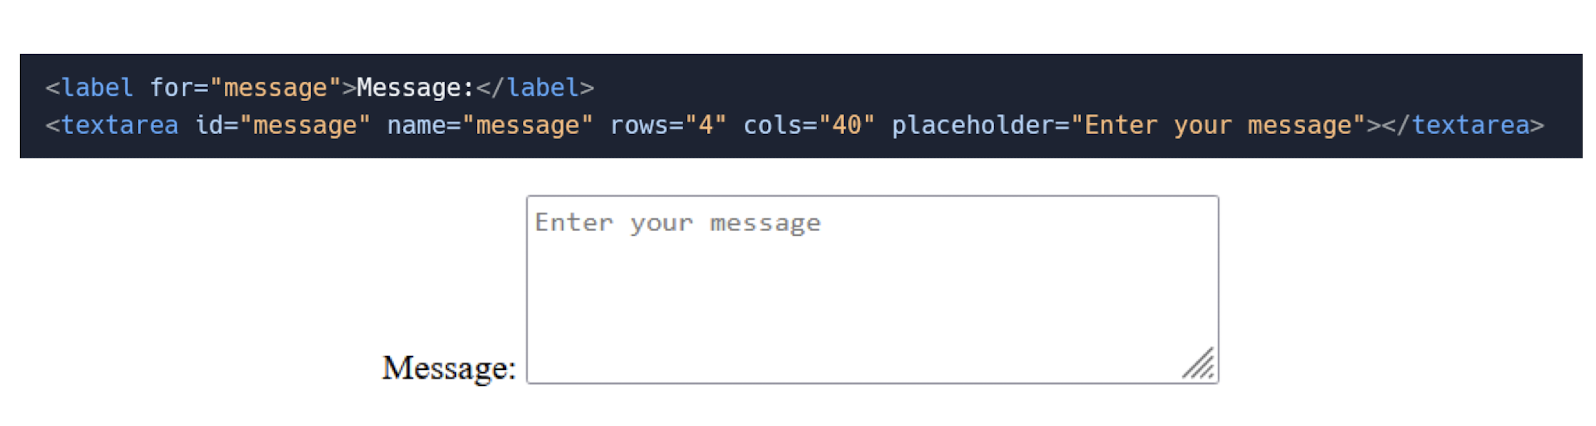
1.13.27 HTML Form <textarea></textarea>
- Creates a multi-line text input area
- Allows users to enter and edit multiple lines of text
- Can specify rows and columns using attributes for size control
1 | |
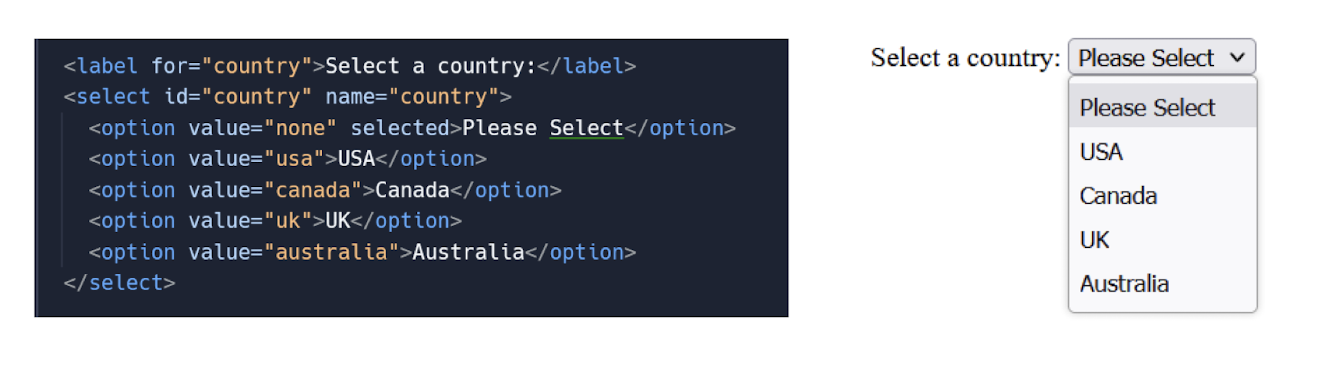
1.12.28 HTML Form <select></select>
- Displays a drop-down list of options for user selection
- Uses
<option>tags to define individual options - Allows users to choose one or multiple options based on the attribute
"selected”attribute: preselect an option in a dropdown select field
1 | |
1.13.29 HTML Form <button></button>
- Creates a clickable button on the webpage
- Can trigger actions like form submission or JavaScript functions
- Supports text, images, or other HTML elements as button content
- 3 types of button
button: trigger custom JavaScript functions or actionssubmit: submits a form, sending the form data to a server for processing through form action pathreset: resets the form, clearing all the input fields to their initial values
- Can be styled using CSS, e.g. color, background-color, etc…
1 | |

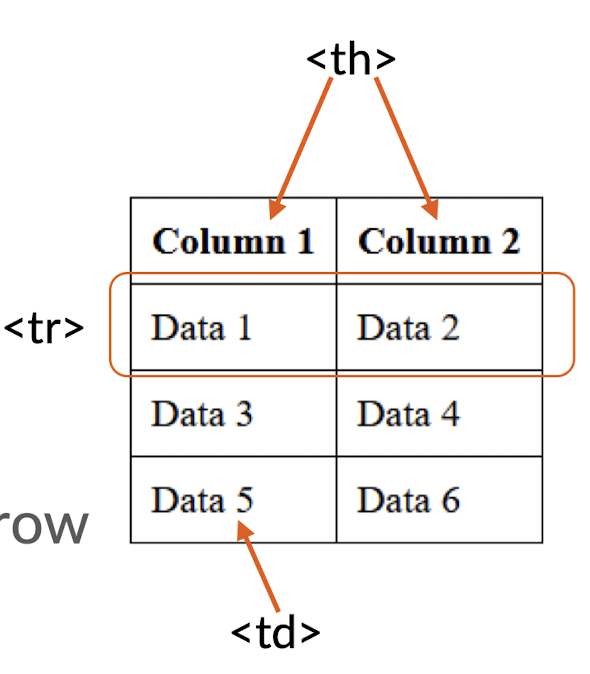
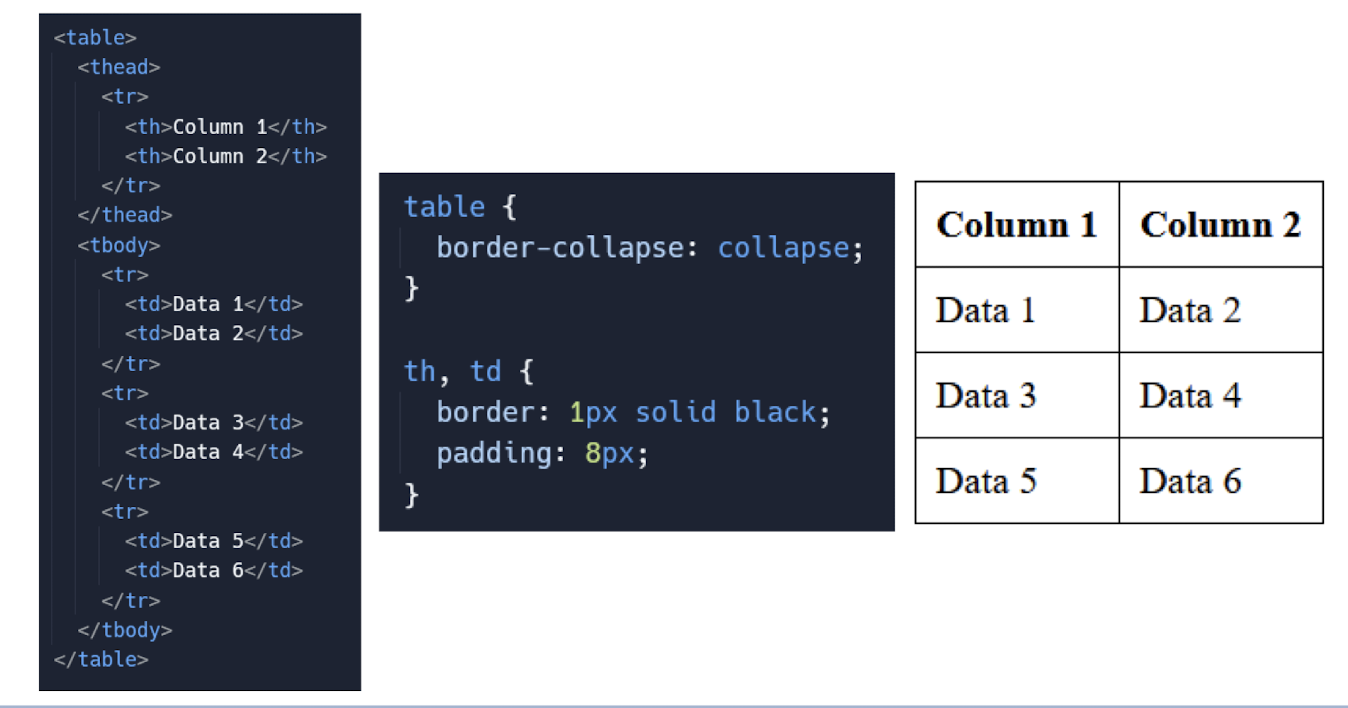
1.13.30 Table <table></table>
Structures tabular data: Organizes data into rows and columns
<thead>: Defines the table header section<tbody>: Represents the table body section<th>: Defines a header cell within a table row<tr>: Defines a table row<td>: Represents a standard data cell within a table row
1 | |
1.13.31 Table <table></table>
- Some common CSS properties for table styling
border: Sets the border properties of the tablewidth: Specifies the width of the table or its elementsbackground-color: Sets the background color of the table or its elementstext-align: Aligns the text within table cellspadding: Controls the space between the content and cell borders
1 | |
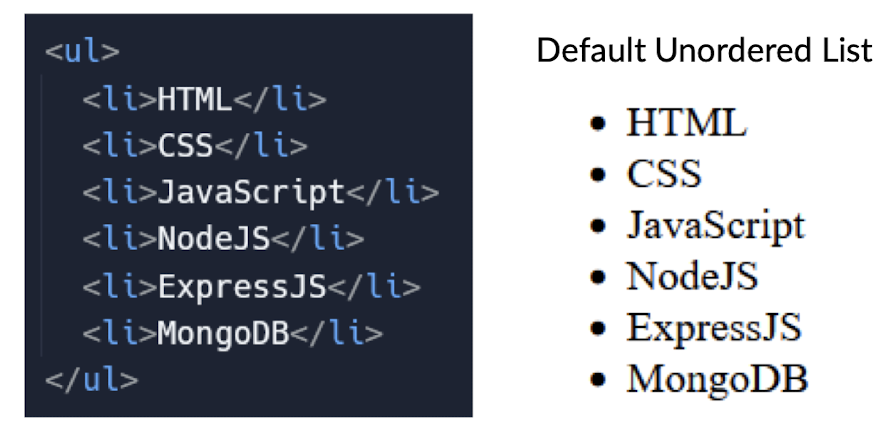
1.13.32 Unordered List <ul></ul>
- Represents a list without any specific order
- Each
<li>represents a list item - Displays bullet points by default
- Provides visual markers for list items
1 | |
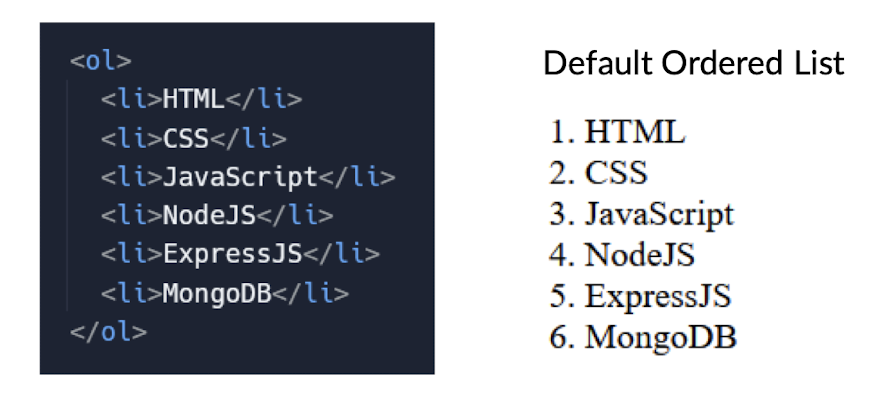
1.13.33 Ordered List <ol></ol>
- Represents a list with a specific order
- Each
<li>represents a list item - Displays numbers or letters
- Provides sequential numbering or alphabetic markers
1 | |
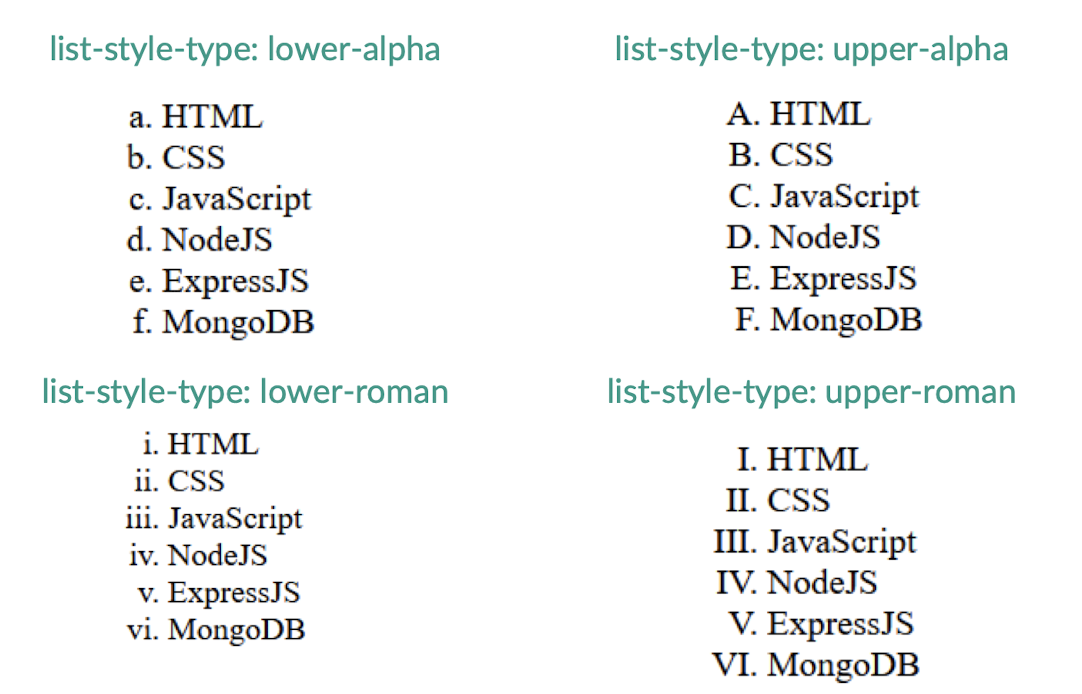
list-style-type: lower-alphalist-style-type: lower-romanlist-style-type: upper-romanlist-style-type: upper-alpha
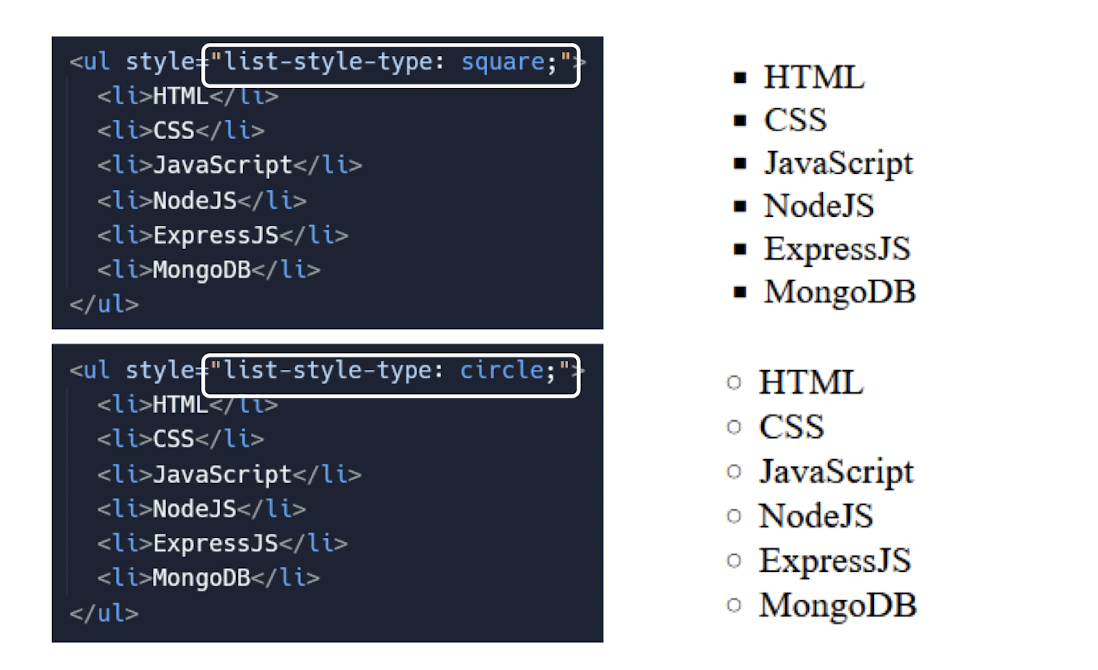
1.13.34 Essential CSS properties for List
list-style-type: Specifies the style of the bullet point or markermargin: Controls the spacing around the list elementpadding: Sets the padding around the content within the list elementbackground-color: Defines the background color of the list elementtext-indent: Indents the text within the list item
Self-learning
- There are many more HTML tags available than those described here (https://www.w3schools.com/html/)
- Each tag allows the use of a number of attributes
- A useful tool at https://www.w3schools.com/html/tryit.asp?filename=tryhtml_default
2. Client-side Programming: CSS, Bootstrap, JavaScript
- More on CSS Properties
- HTML Graphics
- Bootstrap (HTML, CSS & JS Library)
- JavaScript
1 | |
| Selector | Example | Example description |
|---|---|---|
#id |
#firstname | Selects the element with id=”firstname” |
.class |
.intro | Selects all elements with class=”intro” |
element.class |
p.intro | Selects only <p> elements with class=”intro” |
* |
* |
Selects all elements |
element |
p | Selects all <p> elements |
element,element,.. |
div, p | Selects all <div>elements and all <p>elements |
2.1 More on CSS Properties
Unlocking the Power of Styling and Layout Techniques
2.1.1 Display using CSS
- Control how elements are rendered and
displayedon web pages - Common display values include:
block, inline, inline-block, flex, grid, and none
- Block elements take up the full width and stack vertically
- Inline elements flow within the text and do not create line breaks
- Inline-block elements are similar to inline but can have dimensions and margins
- Flex: Enable flexible box layout for responsive and dynamic content arrangement
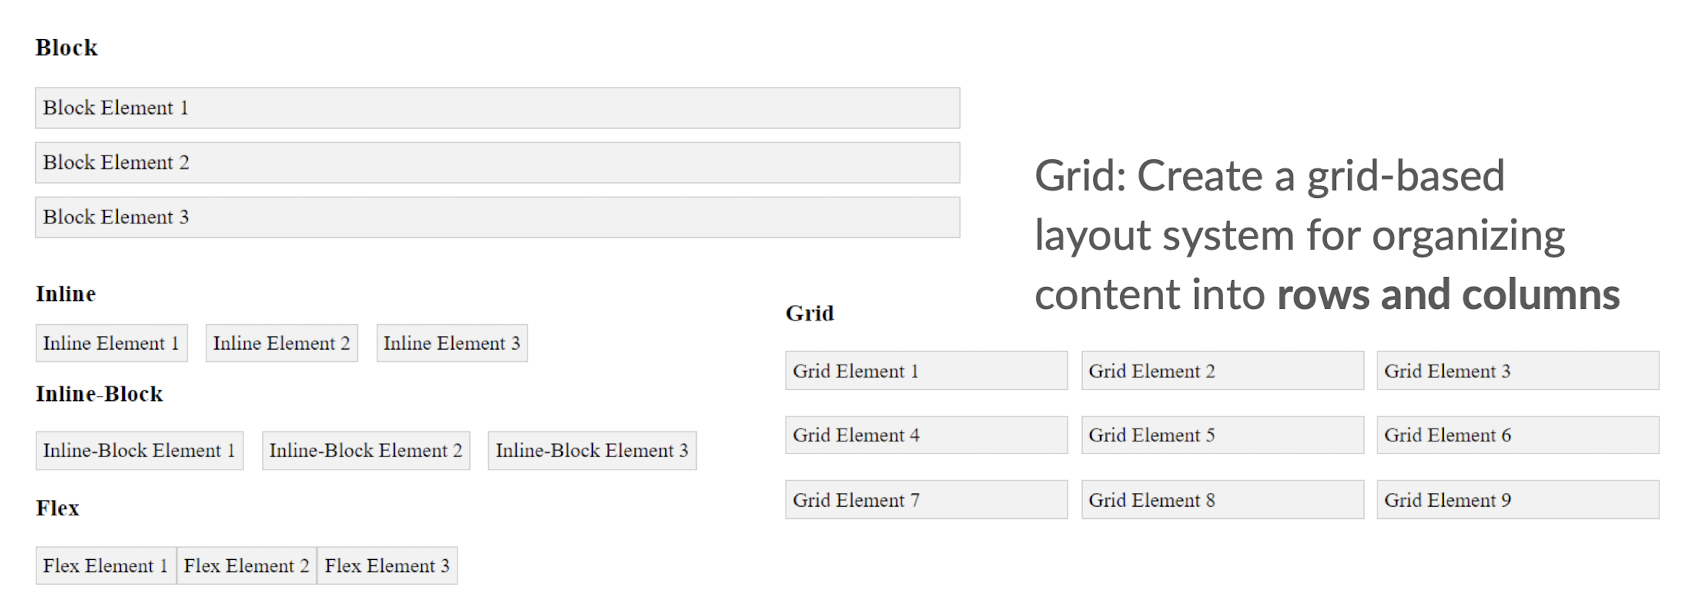
Grid: Create a grid-based layout system for organizing content into rows and columns
More on Flexbox: https://i.redd.it/rofzm44oka091.png
| Display Type | Flow Behaviour | Dimensions | Margins and Padding | Alignment and Ordering | |
|---|---|---|---|---|---|
| Block | Stacks | vertically | Full width | All sides | Not applicable |
| Inline | Flows within text | Content-based | Horizontal only | Not applicable | |
| Inline-block | Flows within text | Dimensions allowed | All sides | Not applicable | |
| Flex | Flexible and responsive | Content-based | All sides | Easily adjustable |
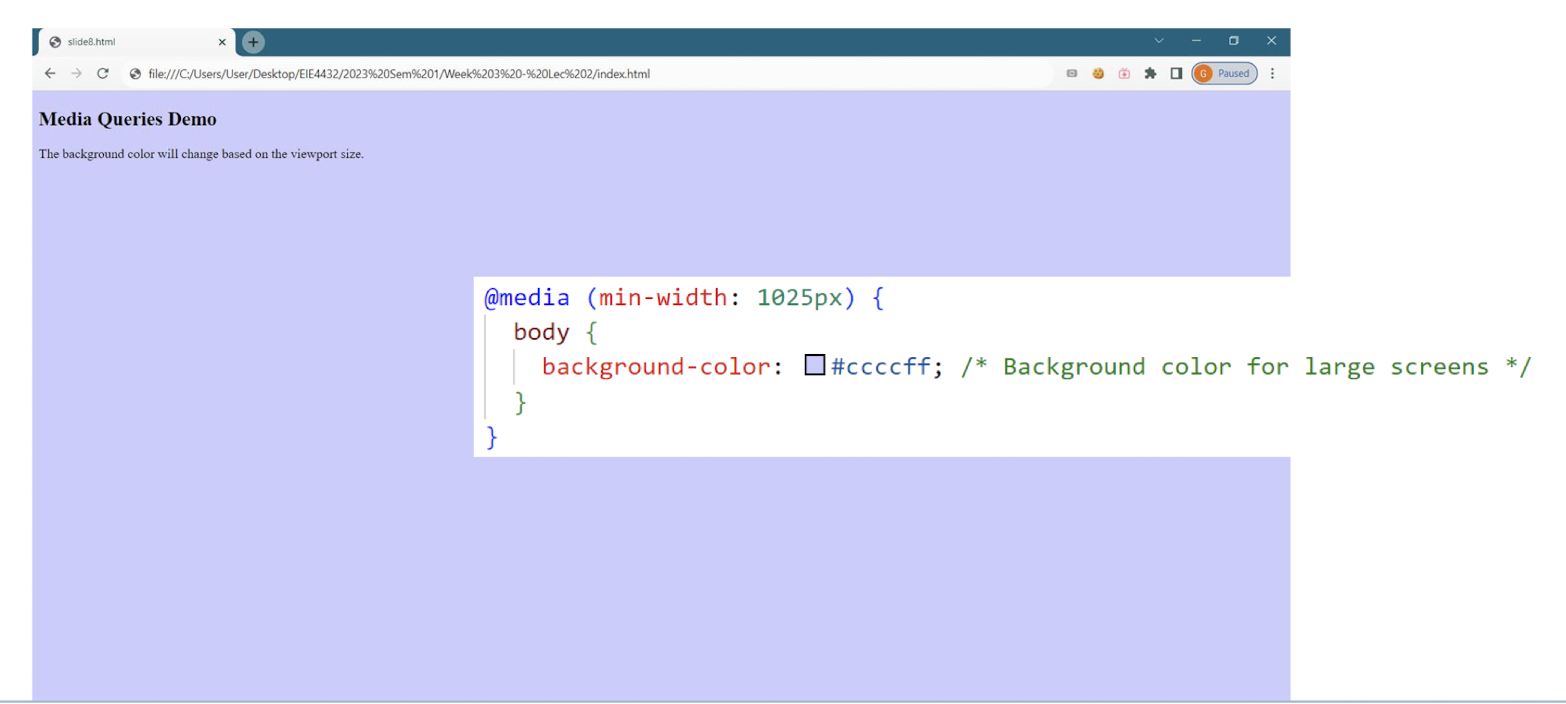
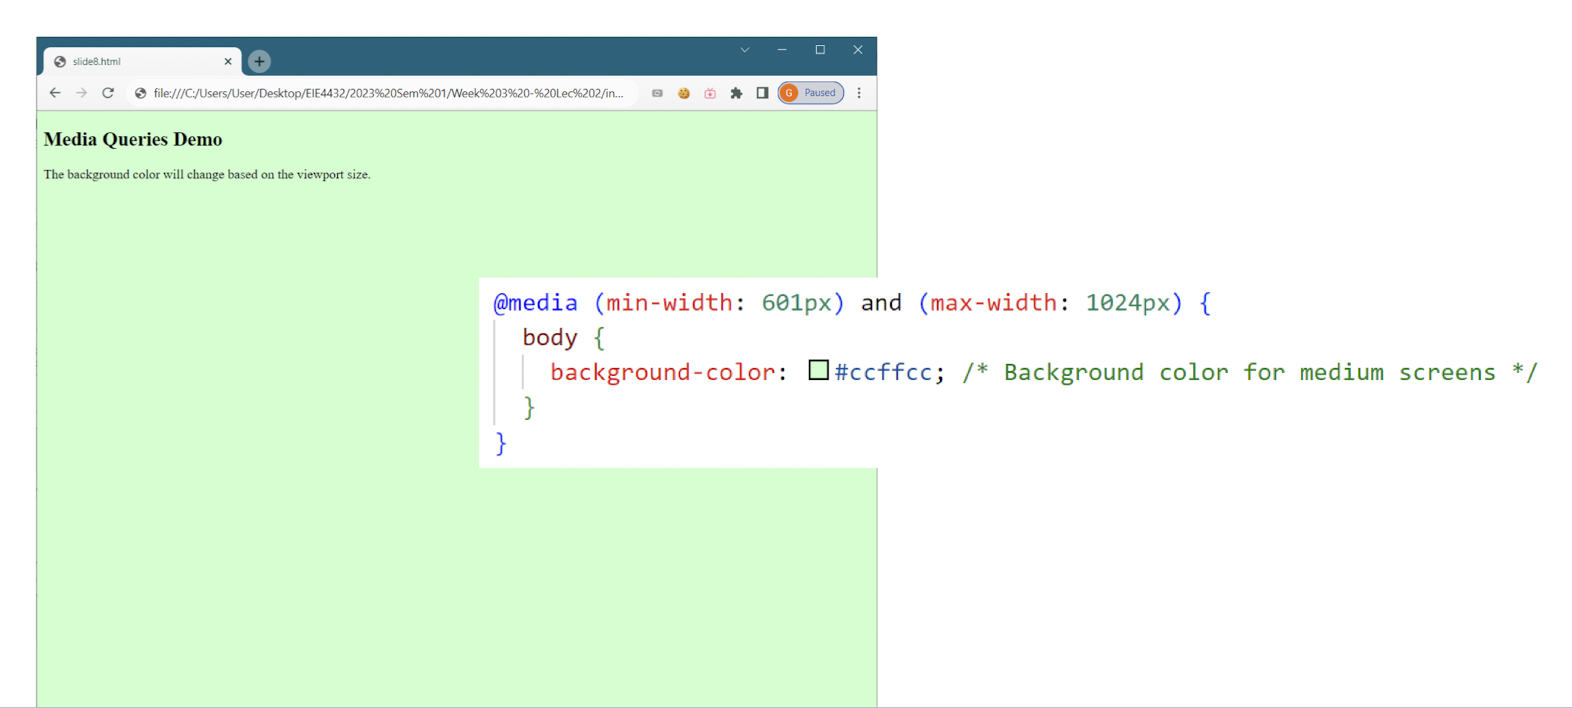
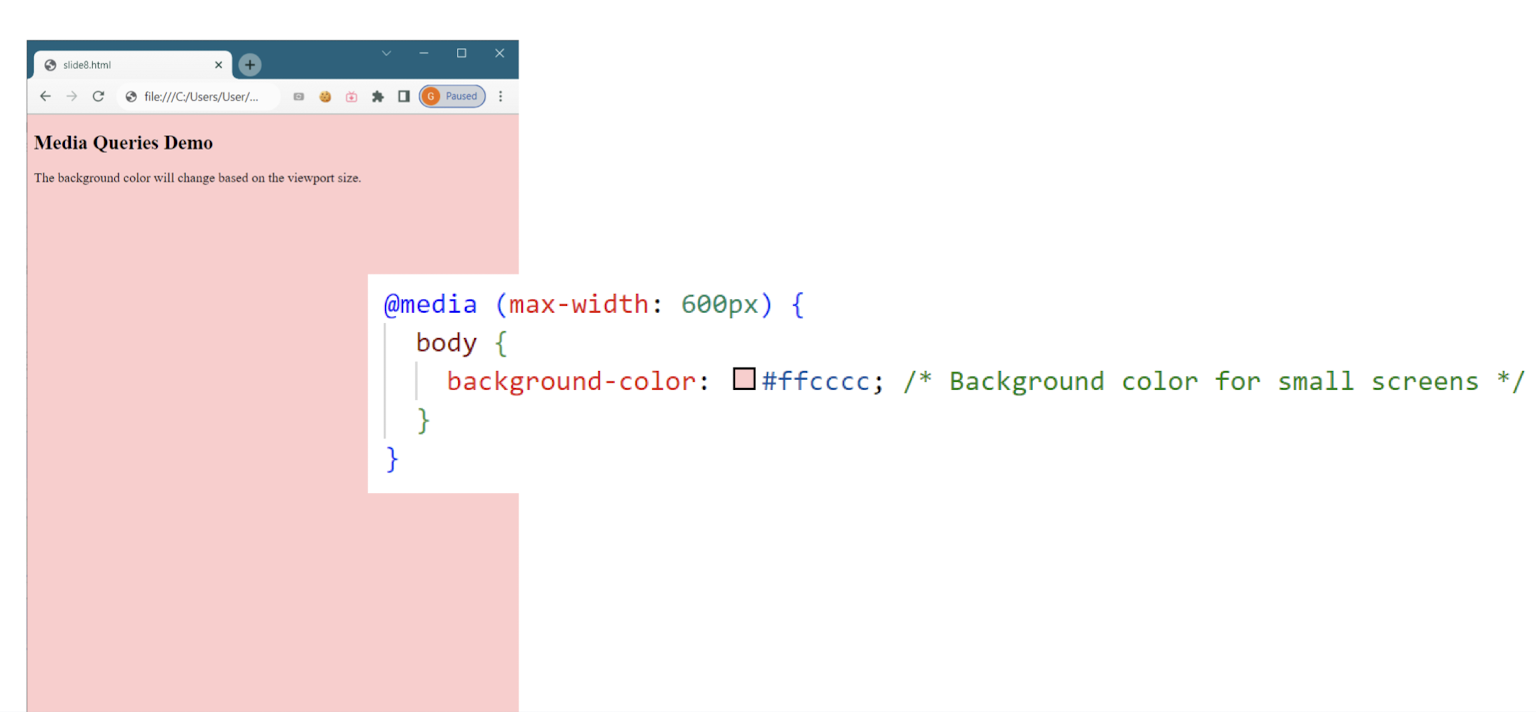
2.1.2 CSS Media Queries
- Apply styles based on device characteristics like screen size
- Allows responsive design and adaptation to different devices and screen resolutions
- Uses @media rule to specify conditions for applying styles
- Enables targeted styling for specific devices, such as mobile, tablet, or desktop
- Reference: https://www.w3schools.com/css/css_rwd_mediaqueries.asp
2.1.3 CSS Combinators
- Descendant Selector (space): Selects elements that are descendants of another element (all A inside B)
- Child Selector (>): Selects elements that are direct children of another element (only A inside B, one level down only)
- Adjacent Sibling Selector (+): Selects elements that are immediately preceded by another element (immediately following)
- General Sibling Selector (~): Selects elements that are siblings of another element
- Reference: https://www.w3schools.com/css/css_combinators.asp
2.1.4 Basic Animation with CSS
- Transition: Smoothly transition between different CSS property values over a specified duration
- Transform: Apply 2D or 3D transformations like scaling, rotating, and translating elements
- Keyframes: Define a series of keyframes with specific CSS property values to create complex animations
- Animation: Combine keyframes, timing, and other properties to create dynamic and interactive animations
2.1.5 Self-learn on CSS
- w3schools: https://www.w3schools.com/css/css_intro.asp
- Frontend Mentor: https://www.frontendmentor.io/
- web.dev: https://web.dev/learn/css/
- Before learning any CSS frameworks, you must have basic concepts on CSS first, don’t jump before you learn to walk!
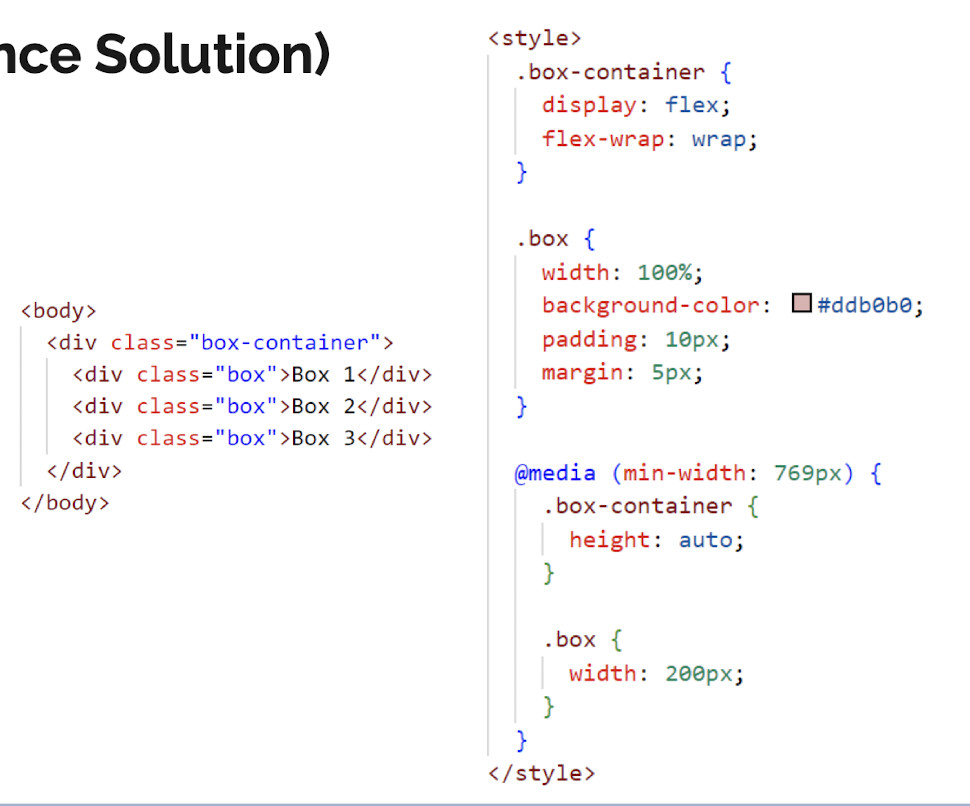
2.1.6 Skills Check
- Implement a responsive box layout using flexbox and media queries
- Ensure that the boxes adjust their width based on the screen size
- Maintain consistent styling for the boxes, including background color, padding, and margin
- Design a mobile-first layout with vertical stacking and a horizontal layout for larger screens 15
Reference Solution
- There are many ways for implementation
- As long as you can achieve the outcome, that would be the solution
2.2 HTML Graphics
Leveraging HTML for Dynamic and Interactive Graphics
2.2.1 HTML Graphics
- HTML5 Canvas
- Create 2D graphics and animations using JavaScript and the HTML canvas element
- SVG
- Scalable Vector Graphics allow for resolution-independent, scalable, and interactive graphics
- Image Tag
- Display static raster images using the HTML
<img>tag
- Display static raster images using the HTML
- Multimedia Elements
- Embed audio and video content using HTML multimedia elements
2.2.2 HTML Graphics - Canvas
- HTML5 Canvas allows for dynamic rendering of 2D graphics and animations
- Canvas is manipulated and animated using JavaScript for interactive experiences
- Fine-grained control over individual pixels, lines, shapes, and images within the canvas
- Canvas is used for games, data visualization, image editing, and interactive web elements
2.2.3 HTML Graphics -SVG
- SVG uses XML markup to create resolution-independent, scalable graphics (Vector-based Graphics)
- Images can be scaled without loss of quality or pixelation
- SVG supports interactivity and animation with JavaScript and CSS
- SVG is supported by major web browsers, making it widely compatible
2.2.4 Drawing Polygon using SVG
- Use the
<svg>element to create an SVG container - Define the polygon using the
<polygon>element and specify the points attribute - The points attribute defines the coordinates of the polygon’s vertices
- Separate the coordinates with commas and use a space to separate each vertex
- Reference: https://www.w3schools.com/graphics/svg_polygon.asp
1 | |
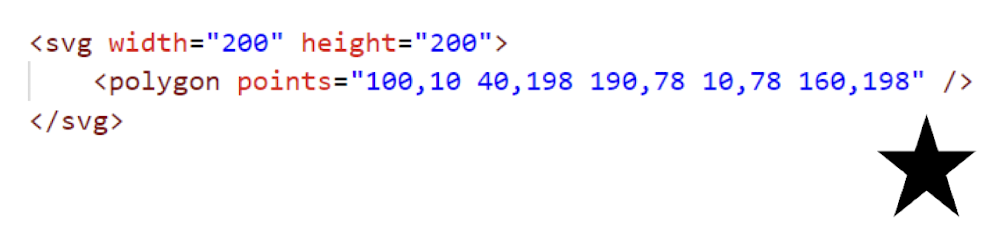
- 5 vertices defined by their x and y coordinates
- “points” attribute specifies these coordinates
- Polygon element is used to create the shape
2.2.5 Drawing Circle using SVG
- Use the
<svg>element to create an SVG container - Define the circle using the
<circle>element and specify the cx, cy, and r attributes - The cx and cy attributes define the center coordinates of the circle
- Use the fill attribute to specify the color of the circle
- Reference: https://www.w3schools.com/graphics/svg_circle.asp
1 | |
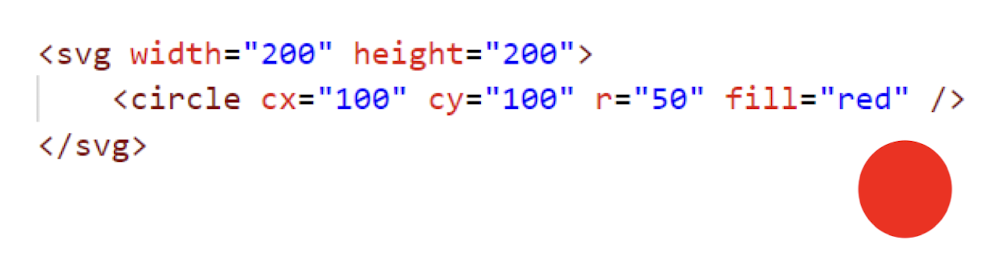
- Center is defined by the
cxandcyattributes rattribute specifies the radius- fill attribute is used to set the color of the circle to red.
2.2.6 Drawing Text using SVG
- Use the
<svg>element to create an SVG container - Define the text using the
<text>element and specify the x and y attributes - x and y attributes define the starting position of the text
- Provide the text content between the opening and closing
<text>tags - Reference: https://www.w3schools.com/graphics/svg_text.asp
1 | |
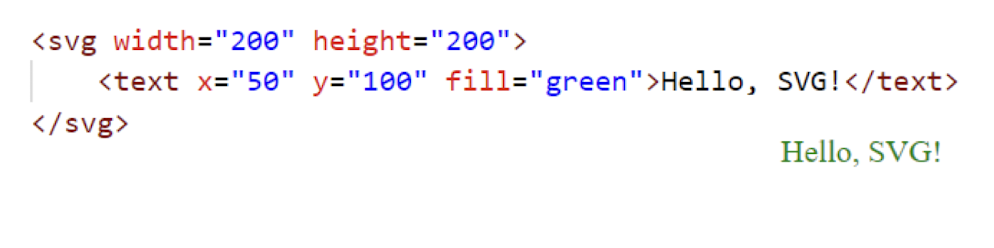
xandyattributes define the starting position- Content of the text is specified between the
<text>tags - In this case, it’s “Hello, SVG!”
2.2.7 Interact with SVG Elements
- Use JavaScript to access SVG elements through the DOM
- Attach event listeners to SVG elements for interactivity
- Manipulate SVG element attributes or properties dynamically using JavaScript
- Respond to user interactions, such as clicks or mouse movements, with JavaScript functions
- We will learn JavaScript in later section of this lecture
2.2.8 Application of SVG Graphics
- Drawing Seat Map
- Interactive seat map for ticket selling with seat selection and availability
- Data Visualization
- Interactive charts, graphs, and diagrams to visualize complex data
- Interactive Maps
- For zooming, panning, and accessing information on specific regions
- User Interface Components
- Design interactive UI components like buttons, sliders, and tooltips
[Example]

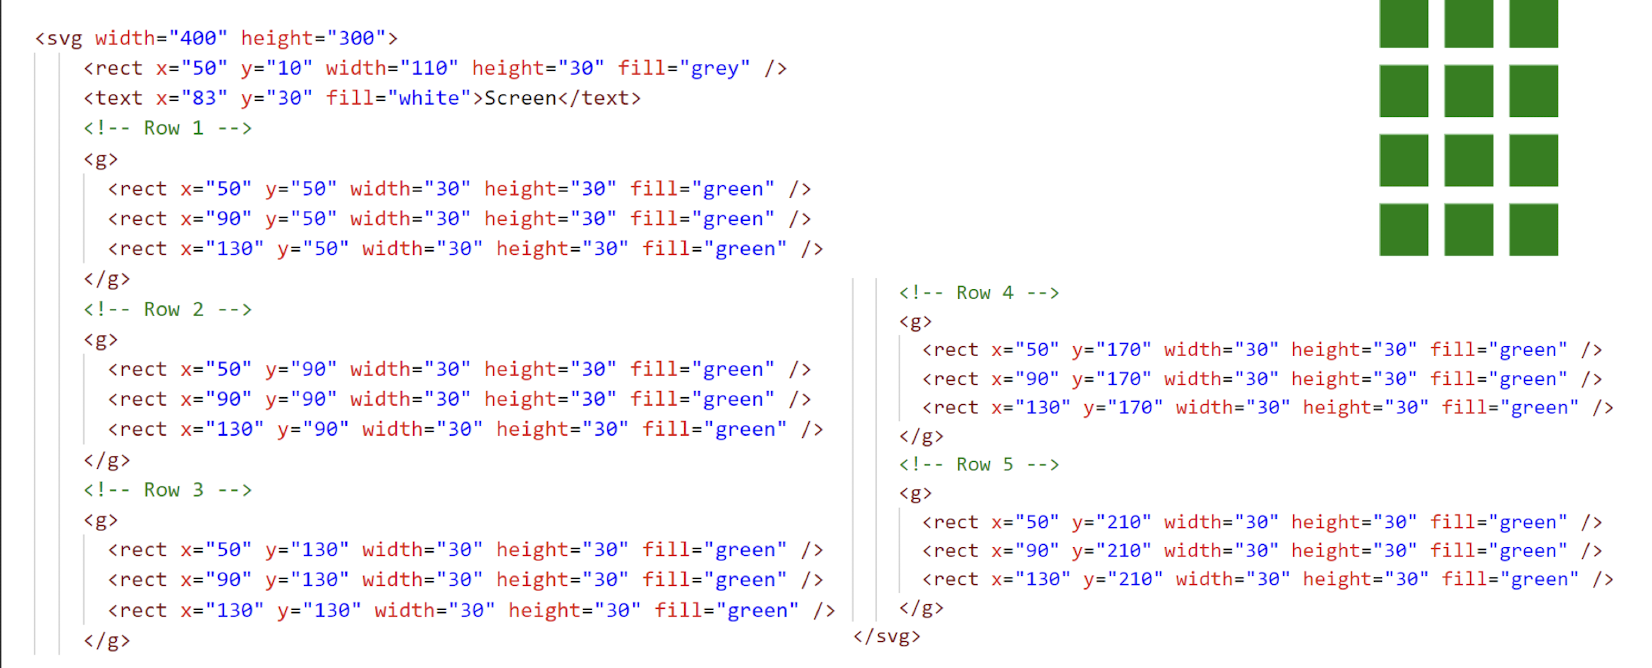
- Set up SVG container with dimensions
- Define seat shapes using SVG elements
- e.g.,
<rect>,<circle>
- e.g.,
- Group seats using
<g>elements for each row - Create seat elements for each row and column, adjusting attributes and positions
2.2.9 Skills Check
- Based on the seat map diagram in last slide, generate it using SVG code
- The layout is 5x3 venue
- Display the position of “Screen” is a must
- Optional: grey out some seats that is unavailable/sold out
- Just SVG code, no need to use any JavaScript to do iteration
Reference Solution
2.3 Bootstrap
A Comprehensive Overview of the Popular Front-End Framework
2.3.1 What is Bootstrap?
- Front-End Framework
- Popular front-end framework for building responsive websites
- Pre-built Components
- Provides a library of pre-built HTML, CSS, and JavaScript components
- Responsive Design
- Bootstrap ensures that websites are mobile-friendly and adapt to different screen sizes
- Simplified Development
- Offers a consistent and efficient way to develop modern web interfaces
- Official Website: https://getbootstrap.com/
- It is currently in version 5.3
2.3.2 Why Bootstrap?
- Rapid Development
- Provides pre-built components and styles, saving development time
- Responsive Design
- Offers built-in responsiveness, ensuring consistent user experiences across devices
- Cross-Browser Compatibility
- Handles browser inconsistencies, reducing compatibility issues for developers
- Consistent Design
- Enforces a consistent design language, improving visual coherence and UX
2.3.3 Popular CSS libraries
- Bootstrap (https://getbootstrap.com/)
- Versatile framework with extensive pre-built components and responsive design for rapid development
- Tailwind CSS (https://tailwindcss.com/)
- Flexible utility-first approach allows for highly customizable and efficient UI development
- Material UI (https://mui.com/)
- Implements visually appealing Material Design principles with a rich library of ready-to-use components
2.3.4 Setup for Bootstrap
- There are 2 ways to include Bootstrap into web application project
- Reference: https://getbootstrap.com/docs/5.3/getting-started/download/
- Include it locally
- Download the Compiled CSS and JS from above link
- Move to the project folder and include by
<link>&<script>tag
- Include by CDN
- Find “CDN via jsDelivr” & copy the links from 1st box
- Include them to
<head>of your HTML file
- If you are running a Node.js project, it is always recommended to use npm for setup (Will be discussed in lecture 4)
- To get started, visit https://getbootstrap.com/docs/5.3/getting-started/introduction/
2.3.5 Mechanism of Bootstrap
- CSS Class Integration
- Applies predefined styling by assigning specific classes to HTML elements
- Grid System Implementation
- Utilizes a responsive grid system to create flexible and responsive layouts
- Component Styling
- Provides pre-styled components that can be easily integrated into HTML structure
1 | |
2.3.6 Grid System
- Responsive Layout
- Enables the creation of responsive and flexible page layouts
- Columns and Rows
- 12 - column grid structure, organized into rows and columns
- Column Sizing
- Columns can be assigned different widths based on screen breakpoints using predefined classes
- Nesting and Offset
- Grid columns can be nested and offset to achieve complex layout arrangements
- Reference: https://getbootstrap.com/docs/5.3/layout/grid/
2.3.7 Container
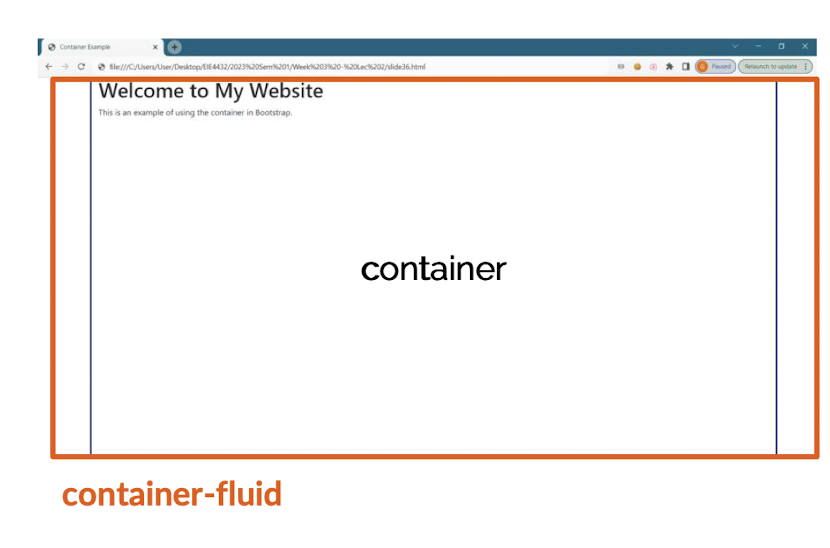
.container:- Provides a fixed-width container for content
.container-fluid:- Creates a full-width container that spans the entire viewport
- Responsive Padding
- Containers automatically add horizontal padding to ensure proper alignment and spacing
2.3.8 Responsive Breakpoint
- Breakpoint Categories
- Defines four responsive breakpoint categories: xs, sm, md, and lg
- Device Width Ranges
- Each breakpoint category corresponds to a specific range of device widths
- Grid System Adaptation
- Grid system adjusts column layouts based on these breakpoints
- Media Query Integration: Breakpoints are implemented using CSS media queries for responsive design
- Reference: https://getbootstrap.com/docs/5.3/layout/breakpoints/
| Breakpoint | Class infix | Dimensions |
|---|---|---|
| Extra small | None | <576px |
| Small | sm | ≥576px |
| Medium | md | ≥768px |
| Large | lg | ≥992px |
| Extra large | xl | ≥1200px |
| Extra extra large | xxl | ≥1400px |
2.3.9 Utilities: Typography
- Provide a default set of font styles for headings, paragraphs, and other text elements
- Typography in Bootstrap is designed to be responsive and adjust based on device sizes
- Offer a range of utility classes to modify text alignment, color, and other properties
1 | |
2.3.10 Utilities: Color Classes
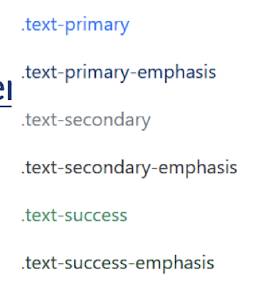
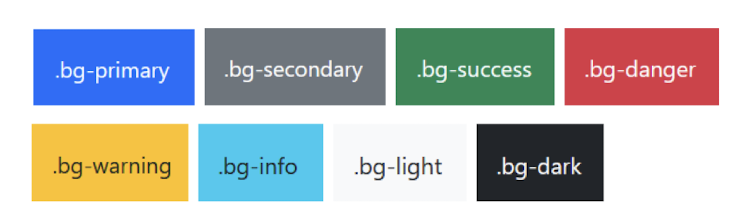
- Provide utility classes to easily change the text color & its opacity of elements
- Similarly, utility classes can be used to modify the background color of components
- Offer a predefined color palette with contextual classes for alerts, buttons, and more
- Reference
1 | |
2.3.11 Utilities: Spacing
- The utility offers options for different spacing sizes, such as m-1, p-2, etc
- m: margin, p: padding
- Only 0-5 & auto are allowed
- It allows adding spacing in specific directions, like mt-3 for top margin
- t: top, b: bottom
- s: start (right), e: end (left)
- x: right & left, y: top & bottom
- Reference:
https://getbootstrap.com/docs/5.3/utilities/spacing/#margin-and-padding
1 | |
2.3.12 Utilities: Visibility & Display
- Provide classes to control the visibility of elements, such as d-none and d-block
- Equivalent to native CSS values
- Offer classes to control element display based on different screen sizes
- eg. d-lg-block, means display element as block in large viewport
- Include classes to easily manipulate the display and alignment of flexbox elements
- justify-content, align-items, align-self
- Reference
1 | |
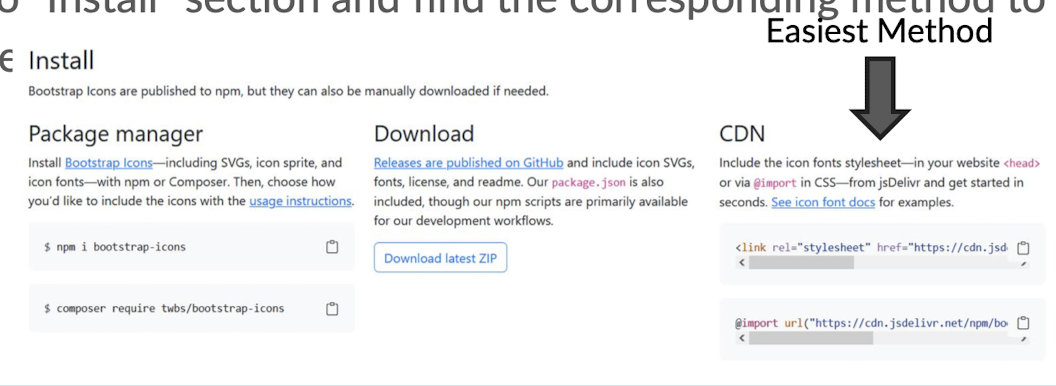
2.3.13 Utilities: Icons
- Icon library called “Bootstrap Icons” with a wide range of icons
- Icons can be easily added to your website using HTML and CSS classes
- Icon utility allows for resizing, styling, and customization of icons
- Go to “Install” section and find the corresponding method to include it to web application Easiest Method
1 | |
2.3.14 Components: Navigation
- Provide customizable navbars for creating responsive navigation menus
- Navbars can be styled with different colors, layouts, and responsive behaviors
- Offer dropdown menus to create nested, multi-level navigation structures easily
- Reference

1 | |
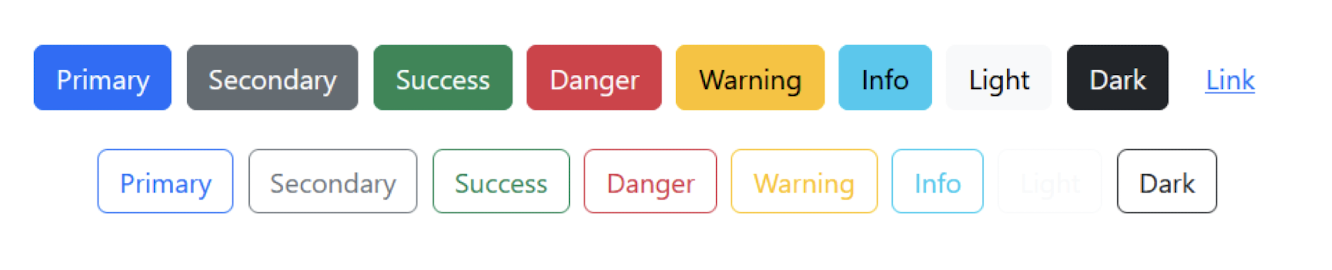
2.3.15 Components: Buttons
- Provide a variety of button styles and sizes for different use cases
- Buttons can be easily added to your website using HTML and CSS classes
- Support hover effects, click interactions, and disabled states
- Reference: https://getbootstrap.com/docs/5.3/components/buttons/
1 | |
2.3.16 Components: Form
- Provide stylized form elements like inputs, selects, checkboxes, and more
- Form controls come with built-in styles and validation options for improved user experience
- Automatically adjust their appearance for different screen sizes and devices
- Reference: https://getbootstrap.com/docs/5.3/forms/form-control/
- There are many form components & attributes worth to work with
1 | |
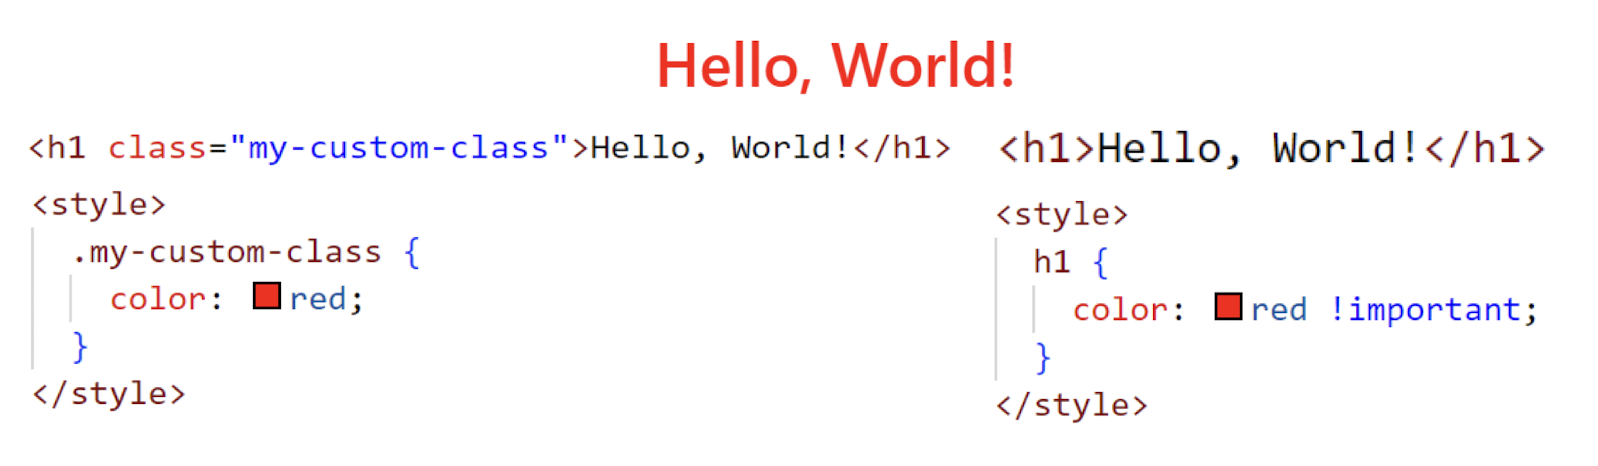
2.3.17 CSS Overriding
- Override Bootstrap styles by using more specific CSS selectors
- Use customized class instead of Bootstrap classes directly
- Add
!importantto a CSS rule to forcefully override Bootstrap styles
2.3.18 Use of Templates
- Developers seldom create a website with Bootstrap from scratch
- Find suitable templates and modify it to expected outcome
- Combining different templates is an option too
- Here are some useful links to find Bootstrap Templates:
2.3.19 Reminder on learning Bootstrap
- There are many components from Bootstrap that we can’t cover all in the lecture
- Encourage you to explore the Docs of Bootstrap more often
- Try & practice more, it can ease the pain of doing native CSS for frontend development
:) - Always no model answer for specific output, as long as you can create the decent UI
2.4 JavaScript
Essential Tools for Web Interactions and User Engagement
2.4.1 What is JavaScript?
- A dynamic programming language used for client-side and server-side scripting
- Enables interactive web features like form validation, animations, and DOM manipulation
- JavaScript runs on various platforms, including web browsers, servers, and mobile devices
- It has a vast ecosystem of libraries and frameworks for building complex web applications
2.4.2 Synchronous VS Asynchronous Programming
| - | Synchronous Programming | Asynchronous Programming | |
|---|---|---|---|
| Execution Order | Executes tasks sequentially in a blocking manner | Executes tasks | concurrently without blocking |
| Blocking Nature | Blocks the execution until a task is completed | Does not block execution, allowing tasks to run independently | |
| Response Time | Waits for each task to complete before moving to the next one | Initiates tasks and continues execution, handling responses later | |
| Complexity | Simpler to understand and reason about | Requires handling callbacks, promises, or async/await syntax | |
| Use Cases | Suitable for simple and sequential operations | Suitable for network requests, I/O operations, and parallel tasks |
2.4.3 Version of JavaScript
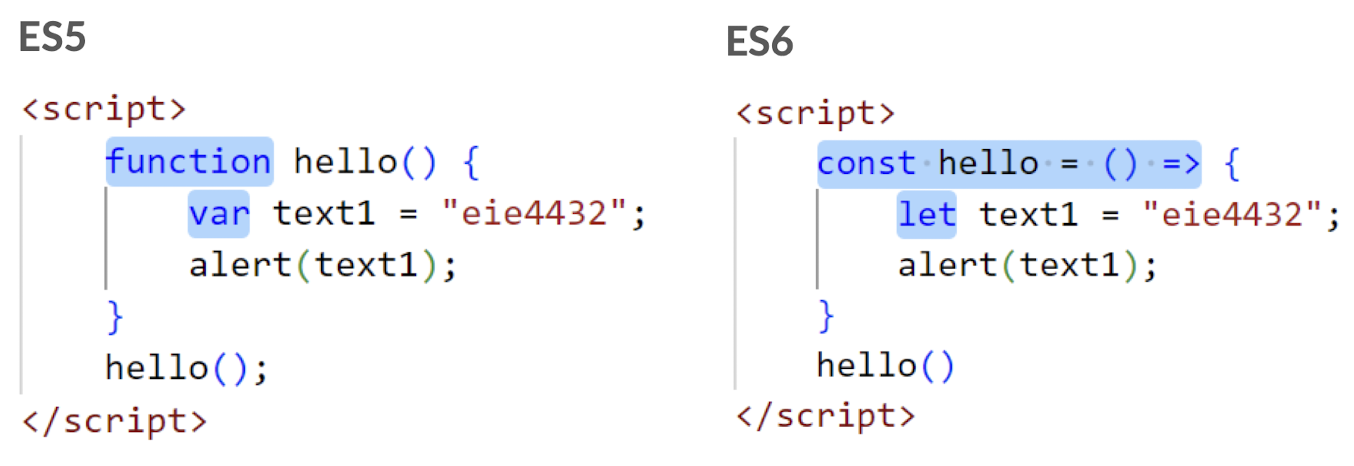
ES5 (ECMAScript 5):
- Introduced in 2009, widely supported by browsers
- Lacks certain modern features like arrow functions and classes
- Uses var for variable declarations and has function-level scope
- No native support for modules; relies on external module systems like
CommonJS
ES6 (ECMAScript 2015):
- Released in 2015, introduces significant enhancements and new features
- Introduces arrow functions, classes, let and const for block-level scoping
- Offers native support for modules using the import/export syntax
- Provides additional features like template literals, destructuring, and spread/rest operators
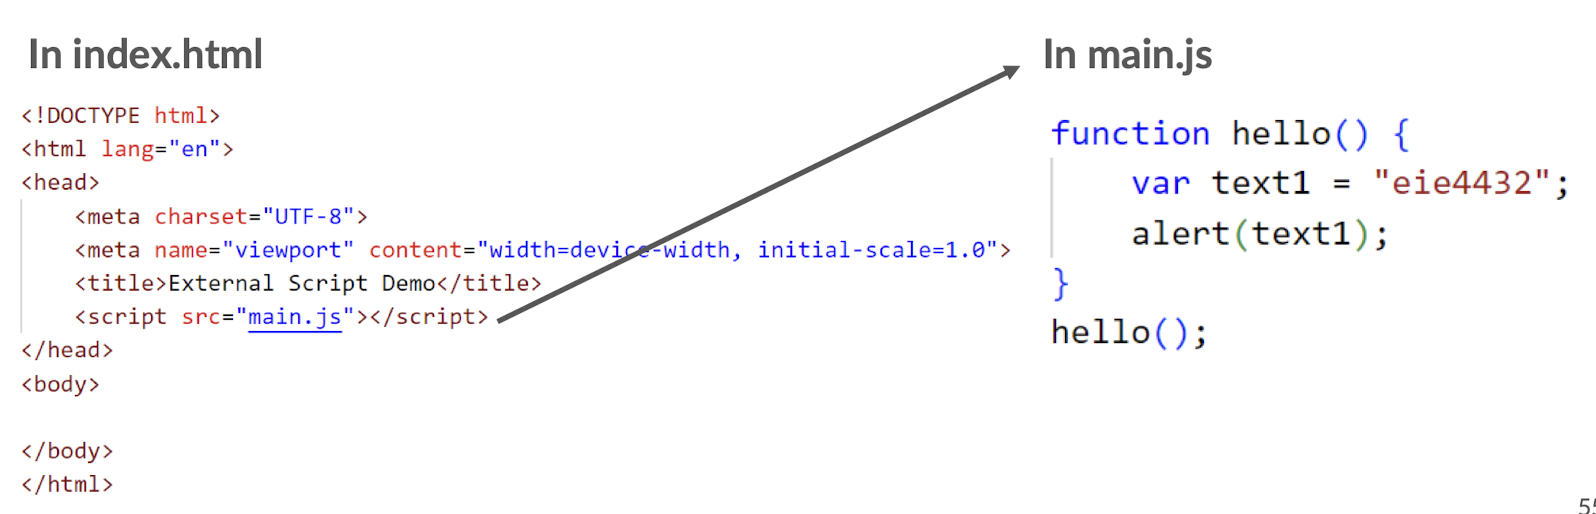
2.4.4 Hello World to JavaScript
- Internal Script: Add
<script>tag in<head>section, usually below<title>and<style>tags - Write the JavaScript functions in the
<script>tag
- External Script: Use another file with .js extension to place the scripts
- Put the name of the script file in the src attribute of a
<script>tag
2.4.5 Variable Declaration
var: traditional variable declaration in JS with function-level scope- var x = 5;
1 | |
let(ES6): declares block-scoped variables that can be reassigned- let y = 10;
1 | |
const(ES6): declares block-scoped variables that are read-only (immutable)- const z = 15;
- Hoisting: Variable declarations are hoisted to the top of their scope during execution
- console.log(a); // Output: undefined
- var a = 20; 56
2.4.6 Data Types in JavaScript
- String
- Represents a sequence of characters
- Enclosed in single (‘ ‘) or double (“ “) quotes
- Example: let name = “John”;
- Number
- Represents numeric values
- Can be integers, floating-point numbers, or special values like Infinity and NaN
- Example: let age = 25;
- Object
- Represents a collection of key-value pairs or properties.
- Can contain various data types and functions.
- Example:
1 | |
- Null
- Represents the intentional absence of any object value.
- It is a special value denoting the absence of an object reference.
- Example: let person = null;
- Boolean
- Represents a logical value, either true or false.
- Used for conditional statements and boolean operations.
- Example: let isStudent = true;
- Reference: https://www.w3schools.com/js/js_datatypes.asp
2.4.7 Operators
| Logical Operator | Description | ||
|---|---|---|---|
&& |
logical and | ||
| `\ | \ | ` | logical or |
! |
logical not |
| Comparison Operator | Description |
|---|---|
== |
Equal to |
=== |
Equal value and Equal type |
!= |
Not equal to |
> / >= |
Greater than (or equal to) |
< / <= |
Less than (or equal to) |
! |
Not |
| Assignment Operator | Description |
|---|---|
= |
Same as x = y |
+= |
Same as x = x + y |
-= |
Same as x = x -y |
Reference: https://www.w3schools.com/js/js_operators.asp
2.4.8 Conditional Statements
if...then...else- if statement
- Executes a block of code if a specified condition is true
- else statement
- Executes a block of code if the condition in the if statement is false
- else if statement
- Allows multiple conditions to be checked sequentially
- switch statement
- Evaluates an expression and executes different cases based on its value.
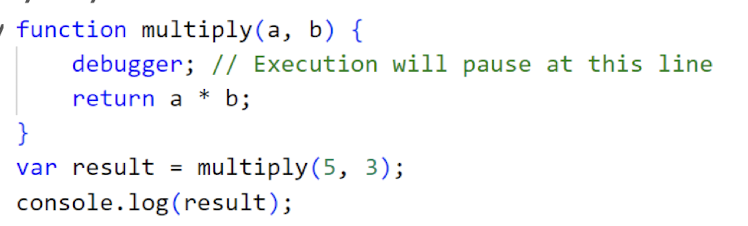
2.4.9 Debugger
- Activate debugging in your browser with F12, and select “Console” in the debugger menu
- To debug with JavaScript, there are 2 methods:
console.log()- Outputs messages or values to the console, which is a tool built into web browsers and developer tools
debugger keyword- Insert the debugger keyword directly in your JavaScript code at the line where you want to pause the execution
2.4.10 Arrays Declaration
- Arrays: a collection of values stored in a single variable
- Creates an array using square brackets [] and comma-separated values
- Creates an array using the Array() constructor function
1 | |
2.4.11 Arrays Methods
push(): Adds one or more elements to the end of an arraypop(): Removes the last element from an array and returns that elementshift(): Removes the first element from an array and returns that elementunshift(): Adds one or more elements to the beginning of an array
2.4.12 Function Declaration
- Declares a named function that can be called later
- Parameter in bracket is not compulsory
- It helps generalizing the code, makes it more reusable
- Functions can be reused multiple times throughout the code. parameter
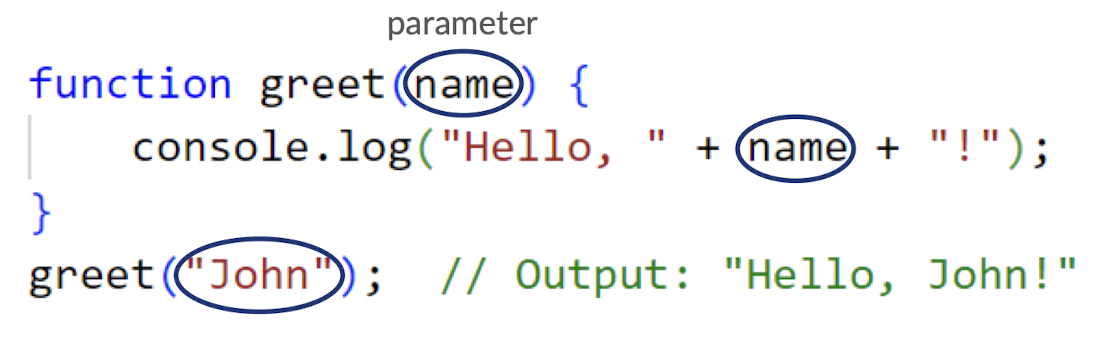
2.4.13 Function Parameters
- Required Parameters
- Function parameters that must be provided with a value when the function is called
- Optional Parameters
- Function parameters that have default values and can be omitted when calling the function

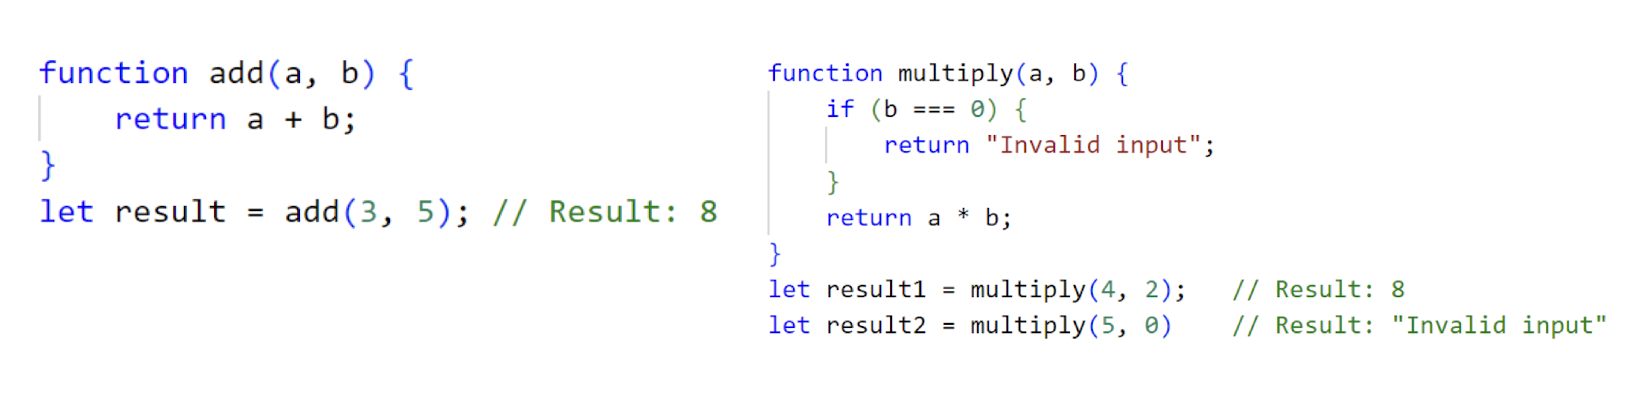
2.4.14 Return Statement
- Specifies the value to be returned by a function
- Function Result: The return statement ends the function execution and returns a value
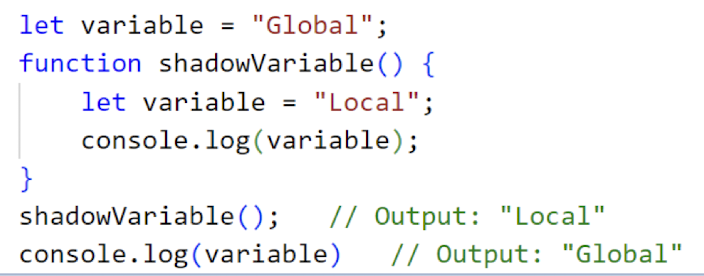
2.4.15 Variable Scope
- Global Scope
- Variables declared outside of any function have global scope
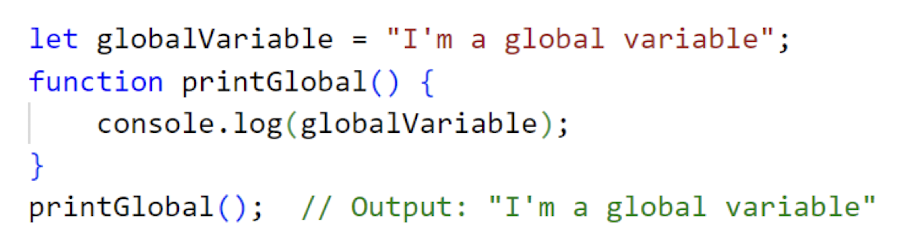
- Local Scope
- Variables declared inside a function have local scope, accessible only within the function
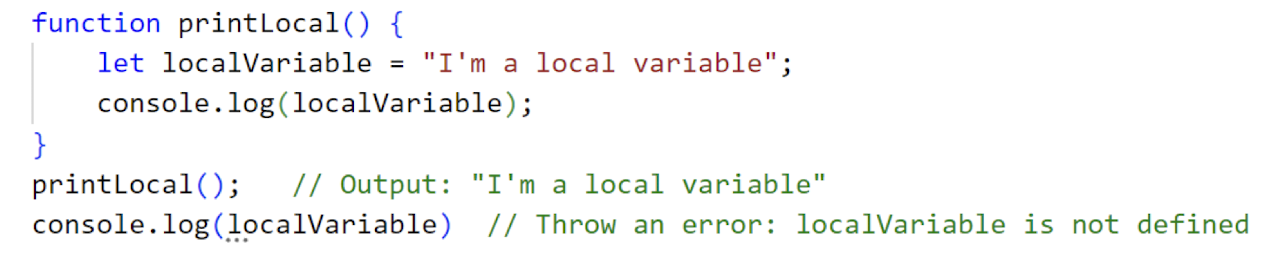
- Scope Hierarchy: Functions can access variables from their own scope or outer scopes
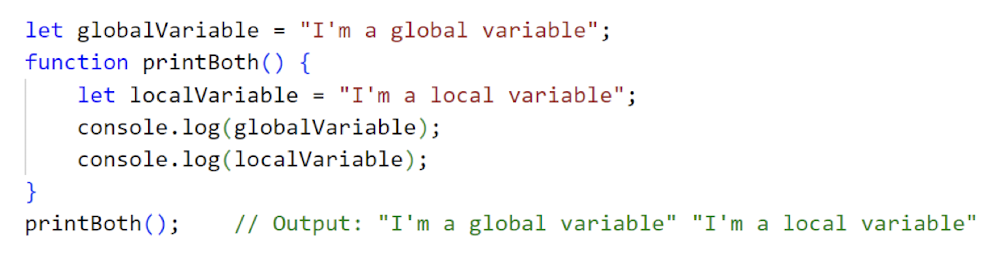
- Variable Shadowing: A local variable with the same name as a global variable can “shadow” it, a global one has higher priority
2.4.16 Arrow Functions
- A concise way to declare functions using the => arrow syntax
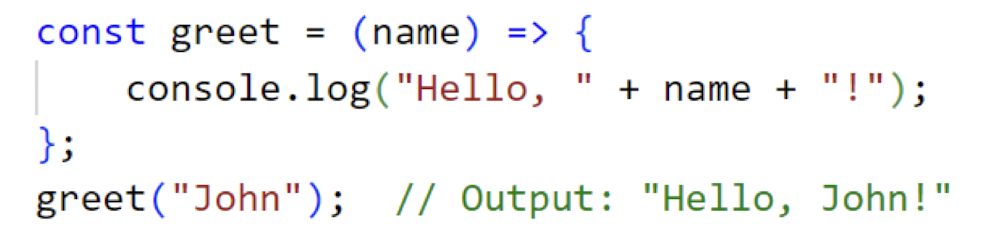
1 | |
- Arrow functions are more concise compared to traditional function expressions

1 | |
2.5.17 While Loop
- Repeats a block of code while a specified condition is true
- The loop continues as long as the condition evaluates to true

2.5.18 Skills Check
- Write a countdown iteration from 5 to 1 using JS while loop
- Expected Output:
- 5, 4, 3, 2, 1
- Hint: The loop stops when the condition evaluates to false
Reference Solution
1 | |
2.5.19 For Loop
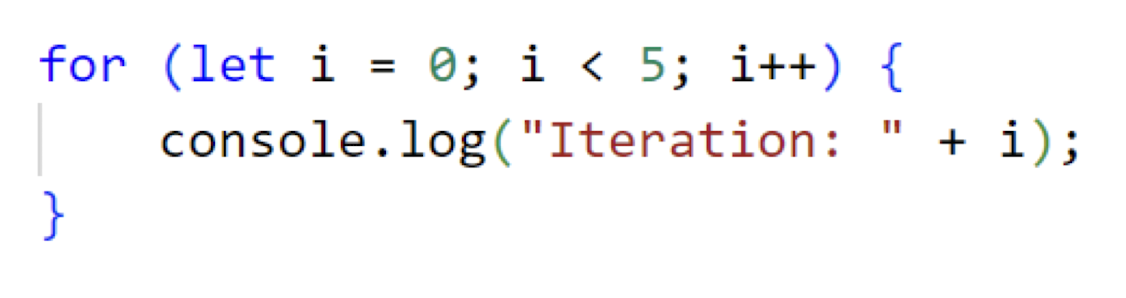
- Executes a block of code for a specified number of iterations
- The loop starts by initializing the i variable to a value
- The loop continues as long as the condition (i < 5) is true
- The i variable is incremented or decremented after each iteration
- Guess what is the output?
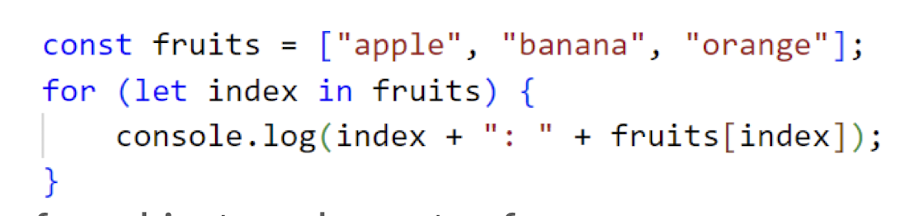
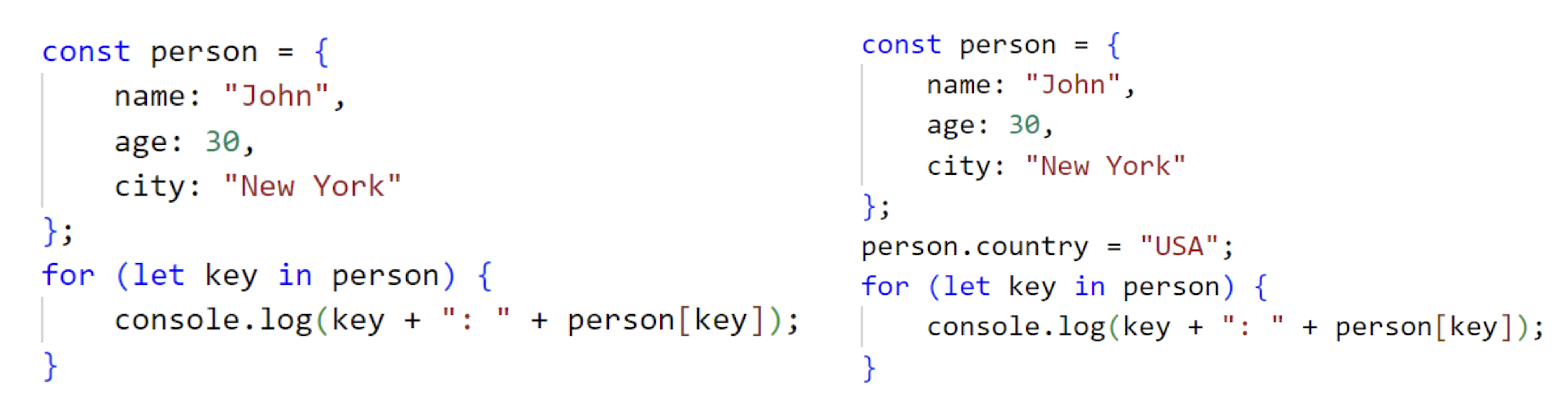
- Iterates over the properties of an object or elements of an array
- The loop iterates over the enumerable properties of an object
- The loop iterates over the indices or keys of an array
- The loop includes non-numeric properties in object iteration
- Add the
letto create a variable inside the loop
- Iterates over the elements of an iterable object (e.g., arrays, strings)
- The loop directly iterates over the elements of an array
- The loop does not include non-numeric properties in object iteration
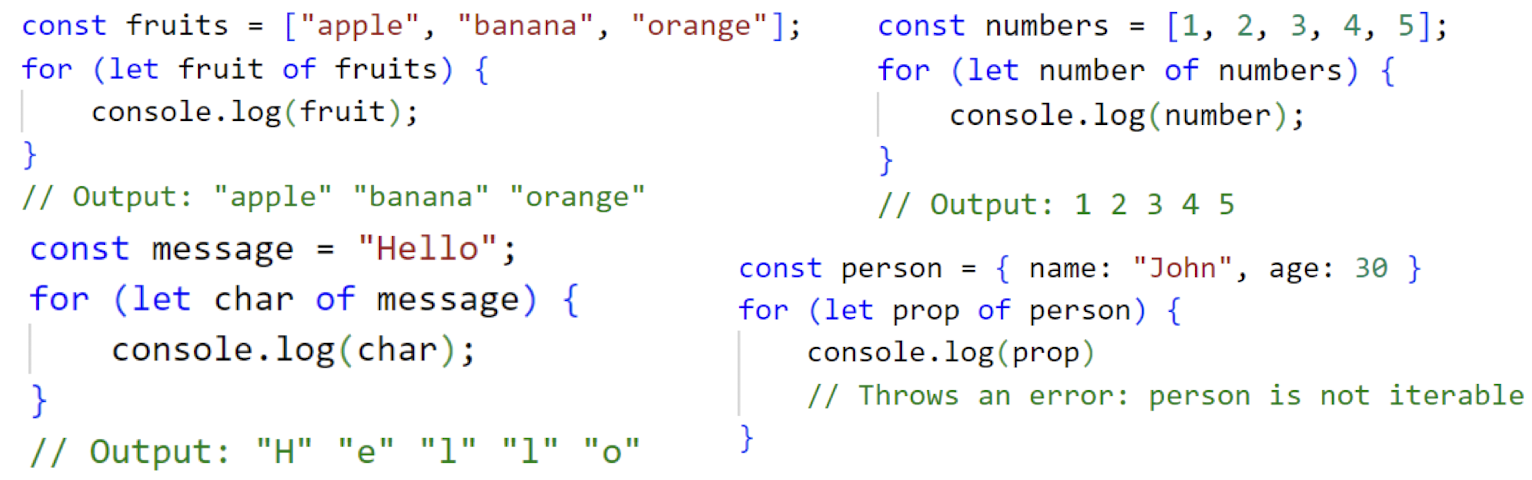
- dictionary is not iterable, so it will throw an error
2.5.20 Advanced Array Methods
- map: Creates a new array by transforming each element based on a provided function

- reduce: Applies a function to reduce the array to a single value

- filter: Creates a new array with elements that pass a specified condition

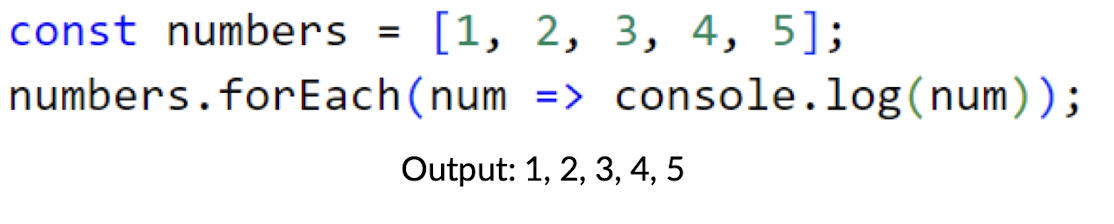
- forEach: Executes a function for each element in the array
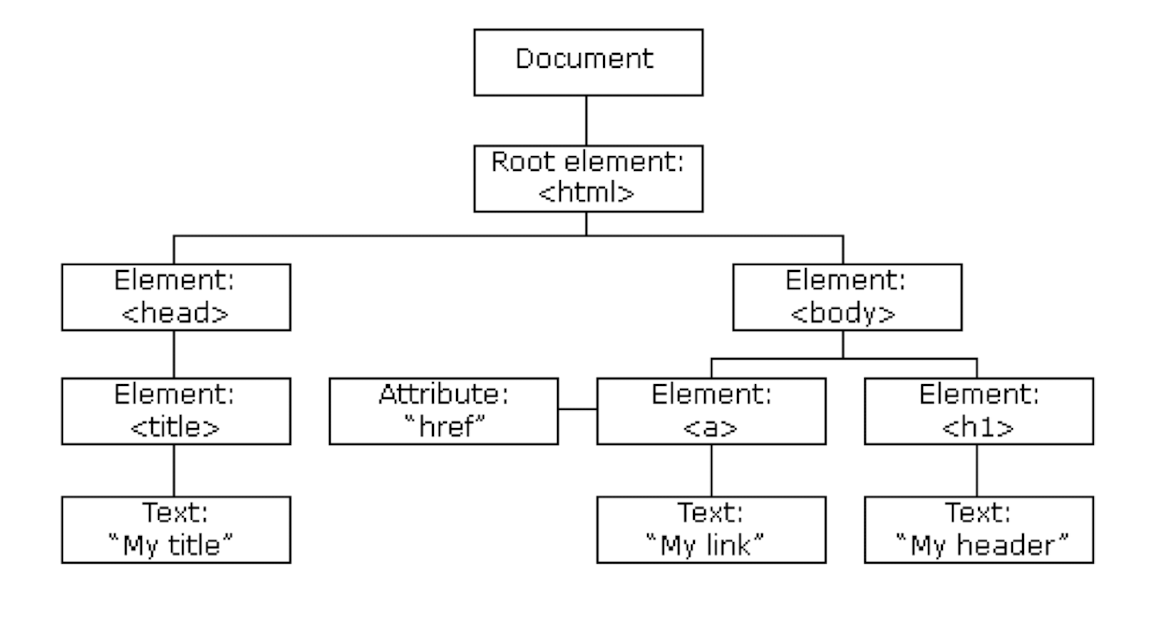
2.5.21 Document Object Model (DOM)
- Represents the structure of an HTML document
- JavaScript interacts with and manipulates DOM elements
- Enables dynamic updates and event handling in web applications to provide interactivity
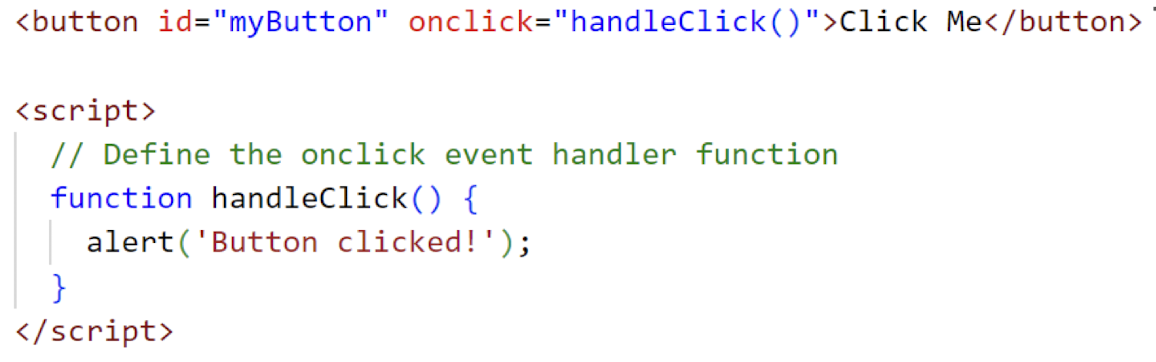
2.5.22 Interact with DOM
- Listens for and responds to events in web applications
- Events include clicks, keystrokes, mouse movements, and form submissions
- JavaScript functions are executed when events occur, enabling interactivity
- Example of event trigger:
- onclick, onfocus, onblur, onkeydown, onkeyup, etc…
- onclick is an event triggered when an element is being clicked by
mouse - Add the event to the tag desired, tell which function to trigger when
the event happens - The function(s) should be placed inside
<script>tag or external JS file
2.5.23 Update Content of HTML Elements
- Create an HTML button element and assign an ID to it
- Define a function to handle the button click event
- Use JavaScript to access the HTML element you want to update
- Inside the event handler function, modify the content of the element
- Try to describe the outcome of the code snippet
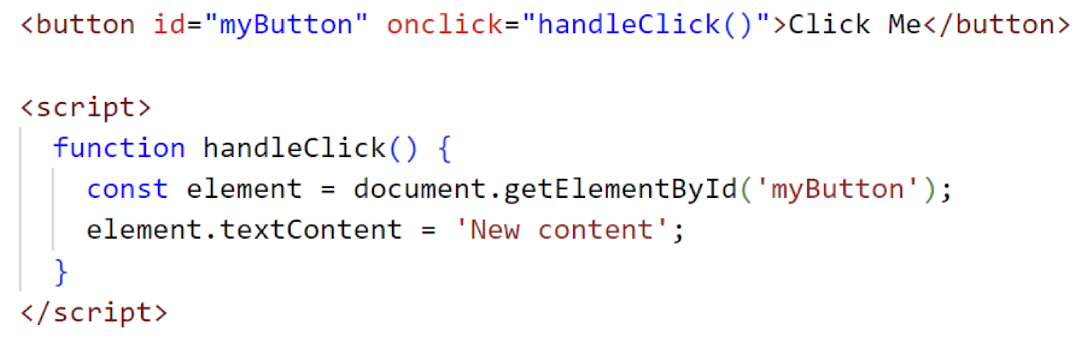
- Use
getElementById()to access an element by its unique ID - Use
getElementsByClassName()orgetElementsByTagName()to select elements by class or tag name - Use the
innerHTMLproperty to update the HTML content of an element - Use the
textContentproperty to update the text content of an element

2.5.24 Modify Style of HTML Elements
- Create an HTML button element and assign an ID to it
- Define a function to handle the button click event
- Use JavaScript to access the HTML element you want to modify
- Inside the event handler function, modify the
styleproperties of the element
2.5.25 Retrieve Data from HTML Form
- Create an HTML form element with input fields and a submit button
- Define a function to handle the form submission event
- Use JavaScript to access the form element you want to submit
- value attribute always help to get what user entered/selected
- Inside the event handler function, submit the form using the submit method

1 | |
1 | |
2.5.26 Event Listener
- A callback function that waits for and responds to specific events
- Registers an event listener using
addEventListener(eventType, callbackFunction)
- Removes an event listener using
removeEventListener(eventType, callbackFunction)
2.5.27 Random
- It is very important to generate some random ID, numbers or values
- Here is how to generate a random number from 1 to 10
1 | |
Math.random()generates a random decimal number between 0 and 1- Multiplying
Math.random()by 10 will give us a random decimal number between 0 and 9.999… (exclusive) Math.floor()rounds down the decimal number to the nearest whole number, giving us a random integer between 0 and 9 (inclusive)- Finally, adding 10 to the result shifts the range to be between 1 and 10 (inclusive)
2.5.28 Skills Check
- Write a code to generate a number from 100 to 900
- Think about:
- (1) How many numbers in the range?
- (2) What is the start of the range?
1 | |
- Math.random() generates a random decimal number between 0 and 1
- Multiplying Math.random() by 801 will give us a random decimal number between 0 and 800.999… (exclusive)
- Math.floor() rounds down the decimal number to the nearest whole number, giving us a random integer between 0 and 800 (inclusive)
- Finally, adding 100 to the result shifts the range to be between 100 and 900 (inclusive)
Formula:
- To generate a random number between
minandmax, use the following formula: Math.floor(Math.random() * (max - min + 1)) + min;
2.5.29 Random
- To random pick an item from array, here is the way:
- Use
Math.floor()andMath.random()to get a random index for selecting an array element
- Use
- The returned result is an item value from the array

2.5.30 Math
- Math object provides built-in mathematical functions and constants
- Here are commonly used Math functions:
Math.ceil(): Rounds a number up to the nearest integer (ceiling)Math.abs(): Returns the absolute (positive) value of a numberMath.round(): Rounds a number to the nearest whole number (integer), rounding halfway cases up or downMath.max(): Returns the largest value among the given numbers or array of numbers
- Reference: https://www.w3schools.com/js/js_math.asp
2.5.31 Date Methods
- Date object is used to work with dates and times
new Date(): Creates a new Date object representing the current date
and timegetDate(): Returns the day of the month (from 1 to 31) of a Date objectgetMonth(): Returns the month (from 0 to 11) of a Date objectgetFullYear(): Returns the four-digit year of a Date objecttoISOString(): Returns a date as string, using the ISO standard- Reference: https://www.w3schools.com/jsref/jsref_obj_date.asp

2.5.32 Error Handling
- Mechanism to handle and manage errors in JavaScript programs
try: Encloses code that may potentially throw an errorcatch: Catches and handles the thrown error, allowing graceful error handlingthrow: Manually throws a custom error with a specified message or objectfinally: Optional block that executes regardless of whether an error occurred or not- Here is an example of data validation error handling in JavaScript
3. Client-side Programming: Web Storage, jQuery, JSON, AJAX
Agenda of Lecture 3
- Web Storage (Cookies, Session, localStorage)
- jQuery
- JSON
- AJAX
3.1 Web Storage
Persistent Client-Side Data Storage
3.1.1 What is Web Storage?
- Client-side data storage mechanism provided by web browsers
- Enable persistent storage of data on user’s browser
- Types:
- cookies, sessionStorage, and localStorage
- Improve user experiences by storing and retrieving data on the client-side
3.1.2 Benefits and Advantages
- Persistent storage
- Data stored in web storage remains available even after the browser is closed
- Large storage capacity
- Web storage provides more storage space compared to traditional cookies
- Efficient data handling
- Web storage offers simple and efficient methods to read, write, and delete data
- Local to the client
- Data is stored locally on the client-side, reducing server load and improving performance
3.1.3 Difference with DB (Database) Services?
- Limited storage capacity compared to DB services
- Client-side storage, accessible only by the browser running the application
- Suitable for small amounts of data and simple key-value storage needs
- Does not require server-side operations for read/write actions
3.1.4 What is Cookies?
- Small text files stored on the client-side by a website
- Used to store user-specific information or tracking data
- Sent between the client and server with each request/response
- Limited in size (typically a few kilobytes) and can be set with an expiration time
- Setting, preference, tracking, etc…
3.1.5 Benefits of Cookies
- Personalized user experience by storing user-specific preferences or settings
- Session management for maintaining user login state and tracking session data
- Tracking and analytics capabilities to gather information about user behaviour and website performance
- Easier implementation compared to other storage methods, as cookies are automatically included in HTTP requests
3.1.6 Types of Cookies
- Session Cookies
- Stored temporarily and deleted when the browser is closed
- Within the session
- Stored temporarily and deleted when the browser is closed
- Persistent Cookies
- Remain on the user’s device for a specified duration
- First-party cookies
- Set by the website visited by the user
- Third party cookies
- Set by external domains and used for tracking and advertising purposes
3.1.7 Lifecycle of Cookies
- To create cookies using JavaScript, you can use the
document.cookieproperty
1 | |

document.cookieproperty is assigned a string value that represents the cookie to be created- The string includes the cookie name (username) and its value (John Doe), along with optional attributes like expiration (expires) and path (path)
- To update and delete cookies using JavaScript, you can utilize the same
document.cookieproperty
1 | |

- To update a cookie, simply set a new value for the desired cookie
- To delete a cookie, set its value to an empty string (“”) and specify an expiration date in the past
3.1.8 What is Session Storage?
- Store data on the client-side browser for the duration of the current browser session
- Data is accessible across multiple windows/tabs within the same session
- Data is cleared when the session ends or the browser is closed
- Provides a simple key-value storage interface similar to local storage
3.1.9 Store Data in Session Storage
sessionStorage.setItem()method is used to store data in the session storage- 1st parameter “username”: key or name under which the data is stored
- 2nd parameter “John Doe”: value associated with the key
- The data will remain in session storage until the browser session ends or is closed
1 | |

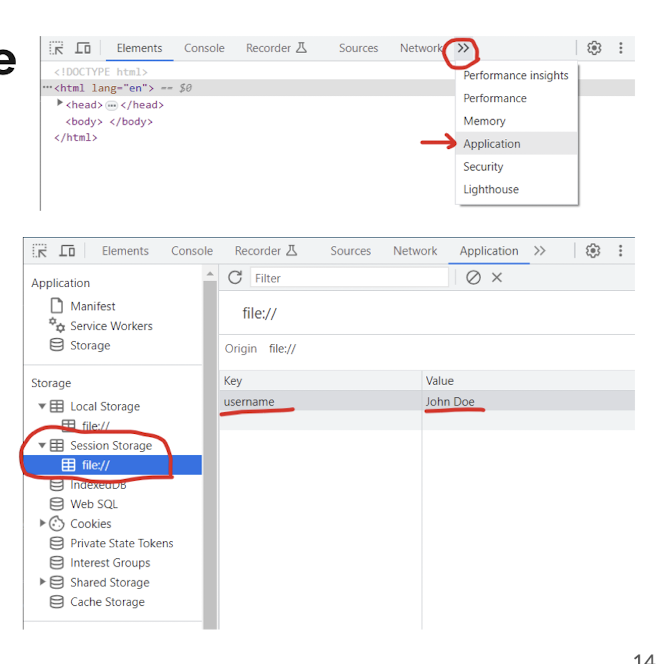
- To view the data stored in session storage in browser Open DevTools by pressing F12 / right click context menu
- In Google Chrome, find “Application” tab
- Safari & Firefox: “Storage”
- Edge: “Application”
- Look for “Session Storage”, you may need to expand the tab
3.1.10 Retrieve & Update Data from Session Storage
sessionStorage.getItem(): provide the corresponding key to retrieve data from session storagesessionStorage.setItem(): provide the corresponding key to update data from session storageUpdated value is now stored in the session storage, replacing the previous value associated with the key “username”
1 | |

3.1.11 Remove Data from Session Storage
sessionStorage.removeItem(): provide the key and remove data from session storage- The specified key-value pair associated with the key “username” will be removed from the session storage
- After executing this code, the “username” data will no longer be available in the session storage
1 | |

3.1.12 Use Cases of Session Storage
- Storing temporary user data during a browsing session, such as form inputs or user preferences
- Implementing client-side caching for faster retrieval of frequently accessed data
- Sharing data between multiple tabs/windows of the same browser within a session
- Storing session-specific information for authentication or authorization purposes
3.1.13 What is Local Storage?
- Store data on the client-side browser with no expiration date
- Data remains persistent even after closing the browser or restarting the device
- Provide a larger storage capacity compared to cookies
- Accessed through JavaScript APIs for storing and retrieving data
3.1.14 Store Data in Local Storage
localStorage.setItem(): method is used to store data in the local storage1st parameter “username”: key or name under which the data is stored
- 2nd parameter “John Doe”: value associated with the key
- The data will remain in the local storage even after closing the browser or restarting the device
- To view
localStoragevalue, same steps as viewing session storage, but select Local Storage tab instead

3.1.15 Retrieve & Update Data from Local Storage
localStorage.getItem(): provide the corresponding key and retrieve data from local storagelocalStorage.setItem(): prove the key (“username”) along with the new value (“Jane Doe”) to update data in local storage- The updated value is now stored in the local storage, replacing the previous value associated with the key “username”

3.1.16 Remove Data from Local Storage
localStorage.removeItem(): provide the key to remove data from local storage- The specified key-value pair associated with the key “username” will be removed from the local storage
- After executing this code, the “username” data will no longer be available in the local storage

3.1.17 Use Cases of Local Storage
- Storing user preferences and settings for a web application
- Implementing client-side caching for frequently accessed data
- Storing session-independent data for seamless user experience across multiple sessions
- Storing data for offline usage or when the network connection is unreliable
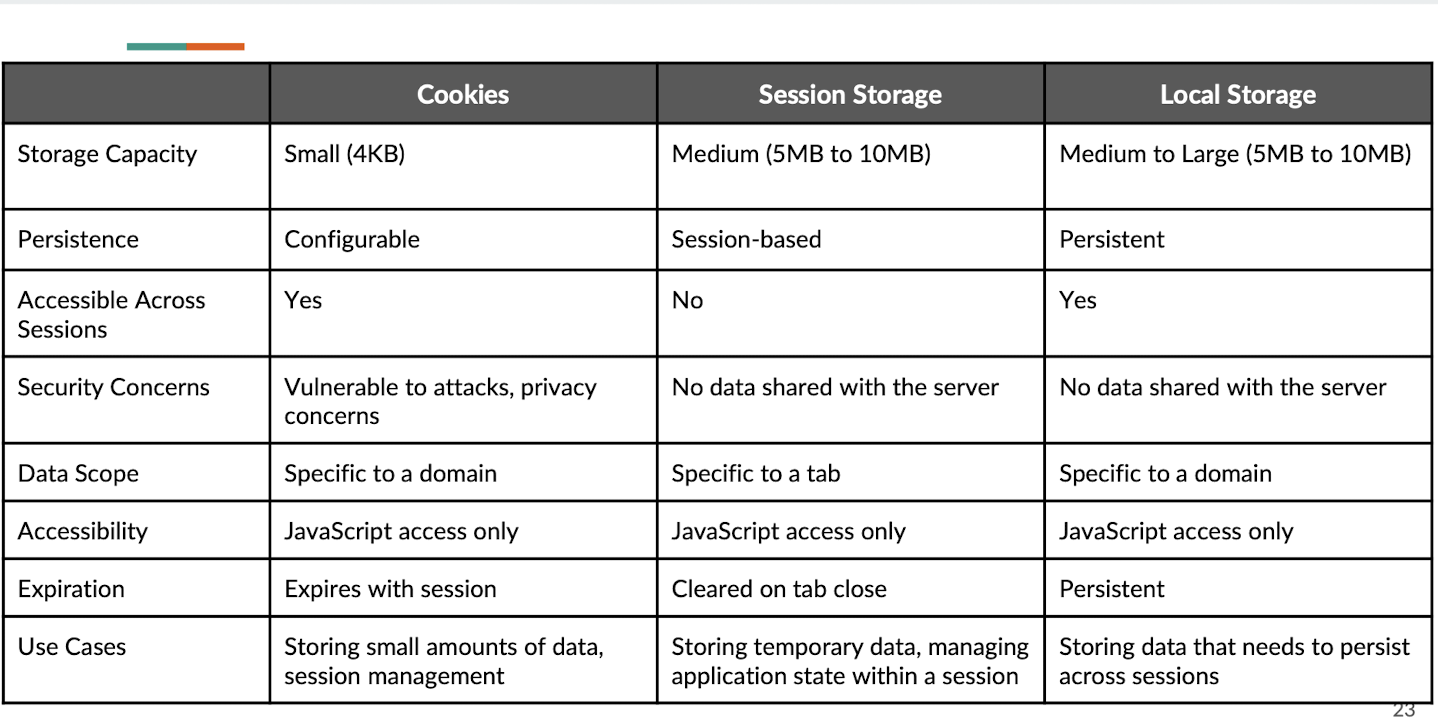
3.1.18 Summary
3.2 jQuery
Simplifying JavaScript Development
3.2.1 What is jQuery?
- A fast and concise JavaScript library simplifying HTML document traversal, event handling, and animation
- Provide cross-browser compatibility and a wide range of utility functions for web development
- Support AJAX for making asynchronous HTTP requests and updating parts of a webpage dynamically
- Used to enhance interactivity, manipulate the DOM, and create interactive web experiences with ease
3.2.2 Why use jQuery?
- Simplified DOM manipulation with shorter code and easier-to-read syntax
- Cross-browser compatibility handled by jQuery, reducing the need for browser-specific workarounds
- Convenient AJAX implementation with built-in methods for making asynchronous requests and handling responses
- Extensive plugin ecosystem providing ready-to-use solutions for various common web development tasks
- It can always mix with JavaScript to use
3.2.3 Setup & Download Options
- Similar to Bootstrap, there are few ways to integrate jQuery into your development
- Go to the official website of jQuery (https://jquery.com/)
- Click “Download” to get the latest version of jQuery
- Currently latest version: v3.7.1
Method 1: Download file locally
- Right click on “Download the compressed, production jQuery v3.7.1” link
- Select “Save as…” from the menu
- Save it into your project folder directly
- Include the file using
<script>tag in<head>, as external JS file
Method 2: Use jQuery’s CDN
- Scroll to the following section
- Click the link “https://releases.jquery.com”
- Find the correct version, and click “minified”
- A pop-up window would be shown
- Click the “copy” icon and paste the code to
<head>section of HTML file
3.2.4 Hello World Syntax
- Add
<script>inside<body>- Ensure jQuery code runs after elements are rendered
- Use the
$symbol to access and manipulate elements - Select elements using CSS-like selectors
- Perform actions or apply modifications using jQuery methods
1 | |
3.2.5 html()
- Retrieve or set the HTML content of an element
- Retrieve the HTML content when called without any argument
- Set the HTML content when called with an argument
- Useful for dynamically updating or replacing HTML content within an element
1 | |
3.2.6 text() click()
$(ele).text()method:- Retrieve or set the text content of an element
- Retrieve the text content when called without any argument
- Set the text content when called with an argument
- Useful for dynamically updating or replacing textwithin an element
$(ele).click()method:- Attache a click event handler to the selected element(s)
- Execute a function when the element is clicked
- Can be used to trigger actions or perform specific tasks upon clicking
- Useful for interactive functionality and user interactions
1 | |
3.2.7 value(), blur()
- $(ele).val() method:
- Retrieve or set the value of form elements like input, select, and textarea
- Retrieve the value when called without any argument
- Set the value when called with an argument
- Useful for getting or updating user input in form fields
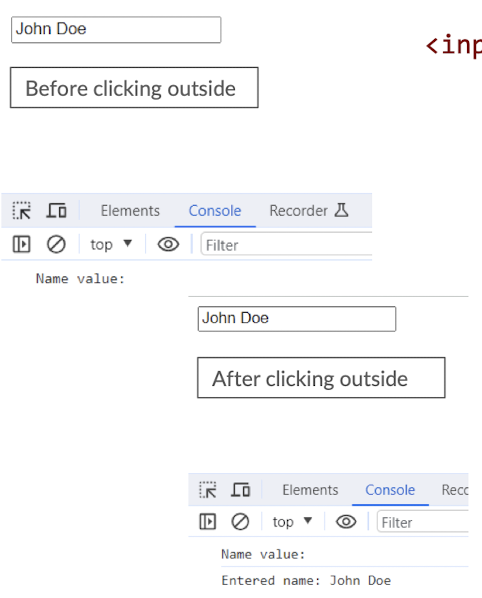
- $(ele).blur() method:
- Attach a blur event handler to the selected element(s)
- Execute a function when the element loses focus
- Can be used to perform validation or trigger actions when the user finishes interacting
- Useful for handling user input events and performing actions based on focus changes
1 | |
3.2.8 css()
- Retrieve or sets CSS properties of selected element(s)
- Retrieve the value of a CSS property when called with the property name
- Set CSS properties when called with property-value pairs or an object
- Useful for dynamically applying or modifying styles to elements
1 | |
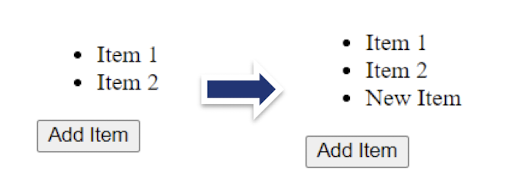
3.2.9 append()
- Append content to the selected element(s) as the last child
- Add HTML elements, text, or jQuery objects to the end of the element’s content
- Useful for dynamically adding or inserting content within an element
- Preserves existing content while extending it with new elements or text
1 | |
3.2.10 prepend()
- Prepends content to the selected element(s) as the first child
- Adds HTML elements, text, or jQuery objects to the beginning of the element’s content
- Useful for dynamically adding or inserting content at the beginning of an element
- Preserves existing content while extending it with new elements or text
1 | |
3.2.11 after()
- Insert content after the selected element(s)
- Add HTML elements, text, or jQuery objects immediately after the targeted element(s)
- Useful for dynamically inserting content adjacent to an element
- Preserves the existing structure while extending it with new elements or text
1 | |
3.2.12 before()
- Insert content before the selected element(s)
- Add HTML elements, text, or jQuery objects immediately before the targeted element(s)
- Useful for dynamically inserting content adjacent to an element
- Preserves the existing structure while extending it with new elements or text
1 | |

3.2.13 remove()
- Remove the selected element(s)from the DOM
- DeleteHTML elements and their associated data and event handlers
- Useful for dynamically removing elements from a page
- Provides a way to clean up or toggle visibility of elements
1 | |
3.2.14 empty()
- Remove all child elements and content from the selected element(s)
Clear the inner HTML of the targeted element, leaving it empty
Useful for dynamically clearing/resetting the contento f elements
Provides a way to remove existing content without removing the element itself
1 | |
3.2.15 addClass()
- Add one or more CSS classes to the selected element(s)
- Modify the class attribute of the targeted element(s) to include the specified class(es)
- Useful for dynamically applying styles or toggling visual effects
- Allows for easy management of CSS classes without directly manipulating the class attribute
1 | |
3.2.16 removeClass()
- Remove one or more CSS classes from the selected element(s)
- Modify the class attribute of the targeted element(s) to exclude the specified class(es)
- Useful for dynamically removing styles or toggling visual effects
- Allows for easy management of CSS classes without directly manipulating the class attribute
1 | |

3.2.17 toggleClass()
- Toggle one or more CSS classes on the selected element(s)
- Add the class(es) if they are not present and removes them if they are
- Provides a convenient way to toggle styles or visual effects based on user interaction
- Allows for easy management of CSS classes without directly manipulating the class attribute
1 | |
3.2.18 hide(), show()
$(ele).hide()- Hide the selected element(s) by setting their display property to “none”
- Make the element(s) invisible and remove them from the document flow
- Useful for hiding elements dynamically or creating toggle effects
- Allow for easy control over the visibility of elements without directly manipulating CSS
$(ele).show()- Show the selected element(s) by setting their display property to its default value
- Make the element(s) visible and include them in the document flow
- Useful for displaying hidden elements or creating toggle effects
- Allows for easy control over the visibility of elements without directly manipulating CSS
1 | |
3.2.19 fadeIn(), fadeout()
$(ele).fadeIn(time interval)- Fade in the selected element(s) by gradually increasing their opacity
- Transition the element(s) from being hidden to fully visible
- Useful for creating smooth fade-in effects or revealing hidden content gradually
- Provide options to control the duration and easing of the fade-in animation
$(ele).fadeOut(time interval)- Fade out the selected element(s) by gradually decreasing their opacity
- Transition the element(s) from being visible to completely hidden
- Useful for creating smooth fade-out effects or hiding content gradually
- Provide options to control the duration and easing of the fade-out animation
- https://www.w3schools.com/jquery/jquery_fade.asp
1 | |

3.2.20 slideUp(), slideDown()
$(ele).slideUp(time interval)- Slide up the selected element(s) by gradually reducing their height
- Animate the element(s) to move vertically and hide from view
- Useful for creating smooth slide-up effects or collapsing sections of content
- Provide options to control the duration and easing of the slide-up animation
$(ele).slideDown(time interval)- Slide down the selected element(s) by gradually increasing their height
- Animate the element(s) to move vertically and become visible
- Useful for creating smooth slide-down effects or expanding hidden content
- Provide options to control the duration and easing of the slide-down
animation
1 | |
3.2.21 Event Handling
$(ele).click()- Directly binds a click event handler to the selected element(s)
- Work only for the elements that exist at the time of binding
- Simpler syntax but limited flexibility in handling dynamically added elements
- Suitable for static elements or when event delegation is not required
$(ele).on("click", function)- Attach a click event handler to the selected element(s) and allows event delegation
- Work for both existing and dynamically added elements within the selected
element(s) - Provide flexibility to handle events for current and future elements dynamically
- Suitable for handling events on dynamically added elements or implementing event delegation
1 | |
1 | |
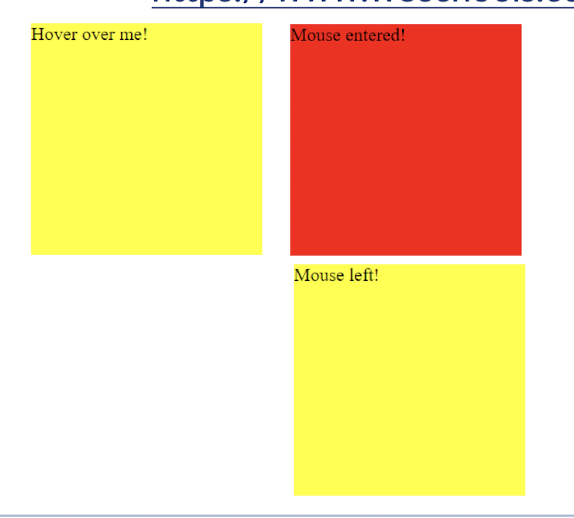
$(ele).hover()- Bind functions to both mouseenter and mouse leave events for the selected element(s)
- Execute the first function when the mouse enters the element, and the second function when it leaves
- Provide a convenient way to handle both events simultaneously
- Useful for creating hover effects and triggering actions when the mouse enters or leaves an element
- https://www.w3schools.com/jquery/event_hover.asp
1 | |
$(ele).focus()- Set the focus on the selected element(s) programmatically
- Highlight or activate the selected element, often used with input fields or interactive elements
- Useful for improving user experience by automatically focusing on specific elements
- Can be combined with other events or functions to perform actions upon focus
1 | |
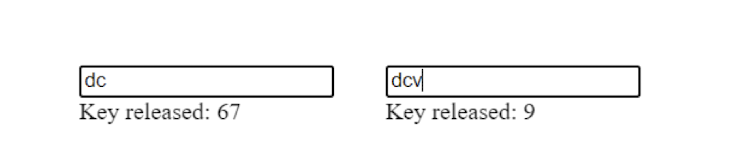
$(ele).keydown()- Bind functions to the keydown event for the selected element(s)
- Execute the function when a key is pressed down
- Useful for capturing user input or triggering actions based on specific key presses
- Provide information about the key pressed, such as the key code or key value
- Check keycode: https://www.toptal.com/developers/keycode
1 | |

$(ele).keyup()- Bind functions to the keyup event for the selected element(s)
- Execute the function when a key is released after being pressed
- Useful for capturing user input or triggering actions based on specific key releases
- Provide information about the released key, such as the key code or key value
1 | |
$(ele).change()- Bind functions to the change event for the selected element(s)
- Execute the function when the value of an input element is changed and loses focus
- Useful for capturing user input changes or triggering actions based on value changes
- Work well with form fields like input, select, and text area elements
this: refers to the current element or set of elements being operated upon
1 | |

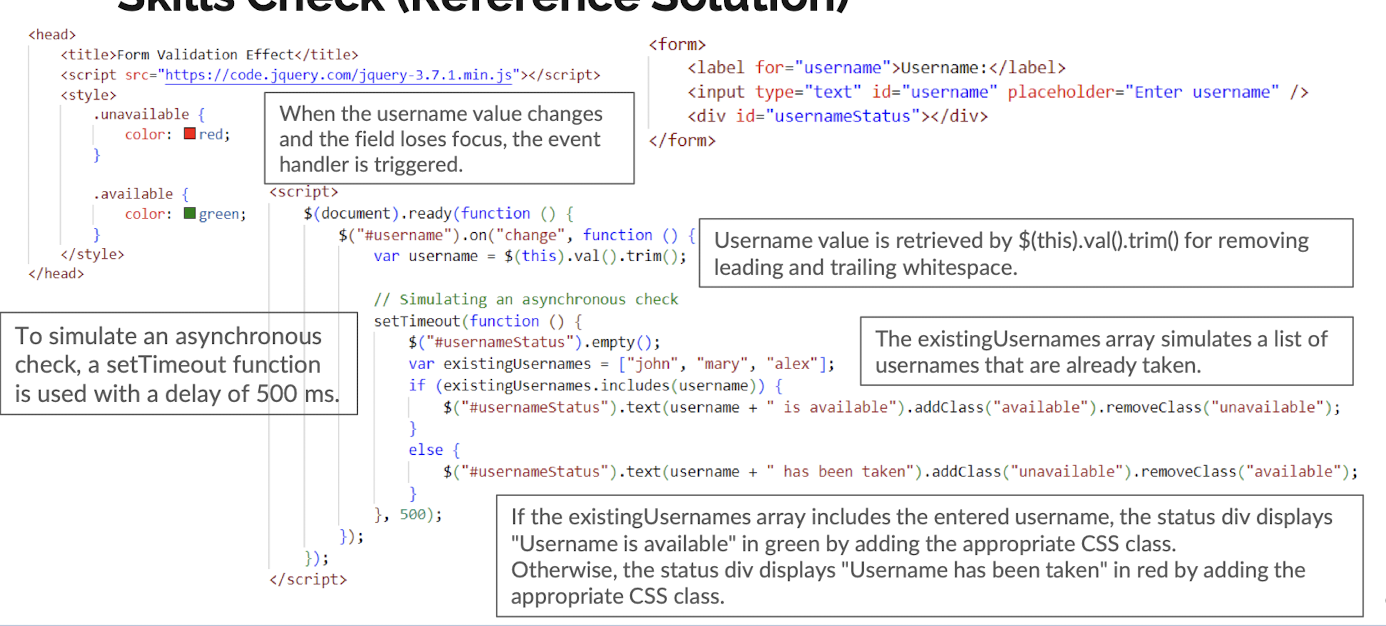
3.2.22 Skills Check
- Form validation effect
- When user is typing username, show if it is being occupied or not
- Check the username status on every 0.5 seconds to stimulate an instant check
- see setTimeout() method:
- If it is occupied, display “
<xxx>has been taken” in red color - If it is good to go, display “
<xxx>is available” in green color - Use an array to store some usernames to stimulate storage/database
- What event to use to trigger the checking?
- No model answer, use your own way first!
Useful Self-Learning Materials
- jQuery Official Website: https://api.jquery.com
- jQuery Learning Center: https://learn.jquery.com/
- YouTube is also a resources
3.3 JSON
Efficient Data Exchange and Serialization in Web Applications
3.3.1 What is JSON?
- JSON (JavaScript Object Notation) is a data interchange format commonly used in web applications:
- Lightweight data format for storing and transmitting structured data
- Human-readable and easy to parse and generate with programming languages
- Supports arrays, objects, strings, numbers, booleans, and null values
- Widely used for APIs, configuration files, and exchanging data between client and server
3.3.2 Basic Syntax
- JSON data is represented using key-value pairs enclosed in curly braces
{} - Each key is a string enclosed in double quotes
- e.g. “name”, “age”, “isStudent”
- Single quotes would cause error
- The key-value pairs are separated by commas
- Values can be of different types:
- strings, numbers, booleans, arrays, objects, or null
1 | |
3.3.3 JSON Conversion
JSON.stringify(): a method that converts a JavaScript object into a JSON string
- It serializes the JavaScript object, allowing it to be transmitted or stored as a string
The resulting JSON string can be sent to a server, stored in a database, or used for other purposes
1 | |
JSON.parse(): method that converts a valid JSON string into a JavaScript object
- It allows you to deserialize JSON data, enabling easier manipulation and access to its properties
- The resulting JavaScript object can be used to dynamically update HTML content or perform other operations
- https://www.w3schools.com/js/js_json_parse.asp
JSON object cannot display directly as HTML content
But it can display in console
1 | |
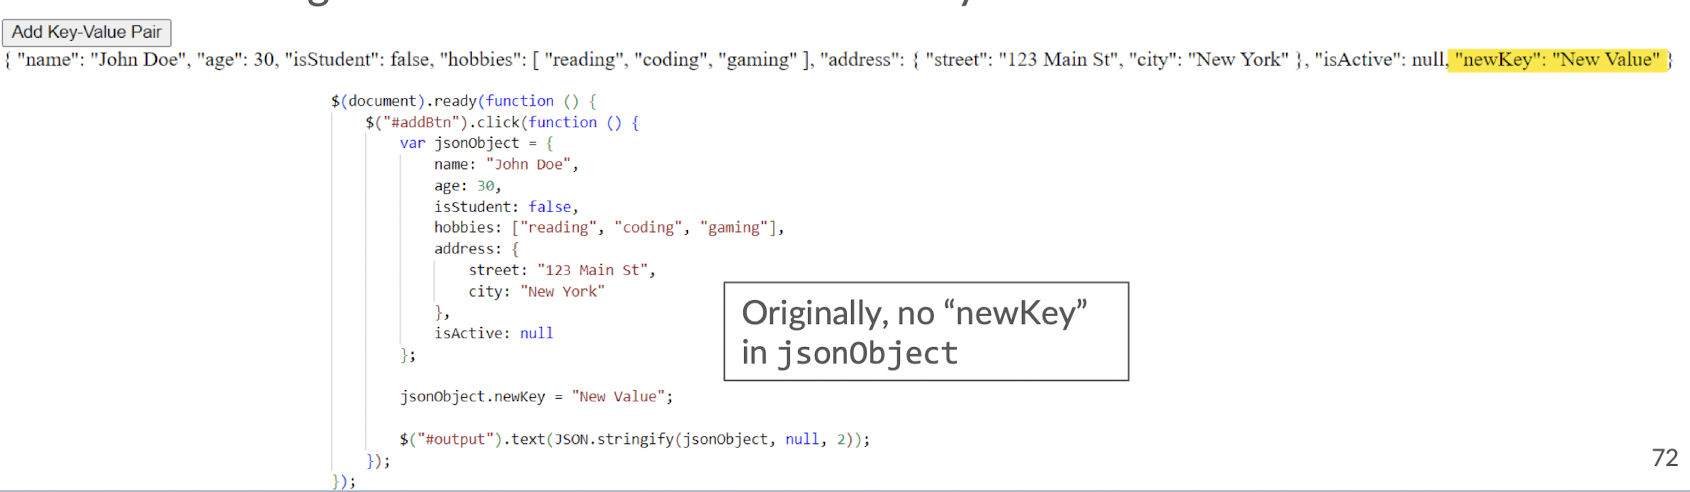
3.3.4 Add Item to JSON data
- Access the existing JSON object
- Use dot notation or bracket notation to add a new key-value pair
- Assign the new value to the desired key
1 | |
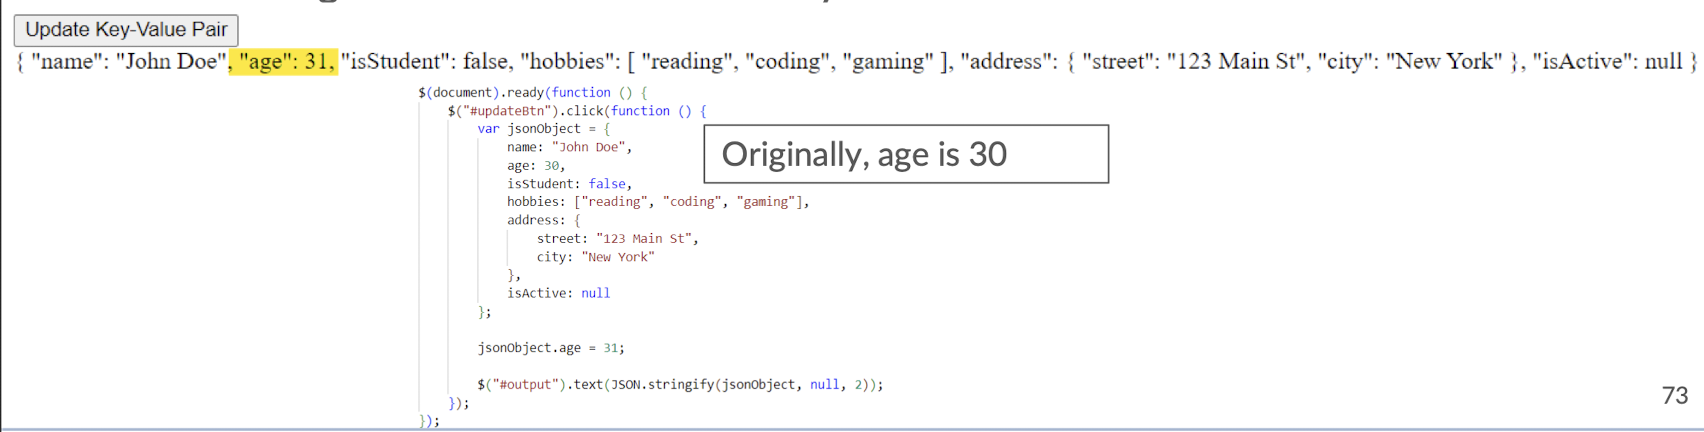
3.3.5 Update Item from JSON Data
- Access the existing JSON object
- Use dot notation or bracket notation to update the value of the desired key
- Assign the new value to the key
1 | |
3.3.6 Remove Item from JSON Data
- Access the existing JSON object
- Use the
deletekeyword to remove the desired key-value pair - Specify the key that you want to remove from the JSON object
1 | |

3.3.7 JSON Array
- An ordered list of values enclosed within square brackets ([])
- Can contain values of different data types (e.g., numbers, strings, objects, arrays, booleans, null)
- Elements are separated by commas
1 | |
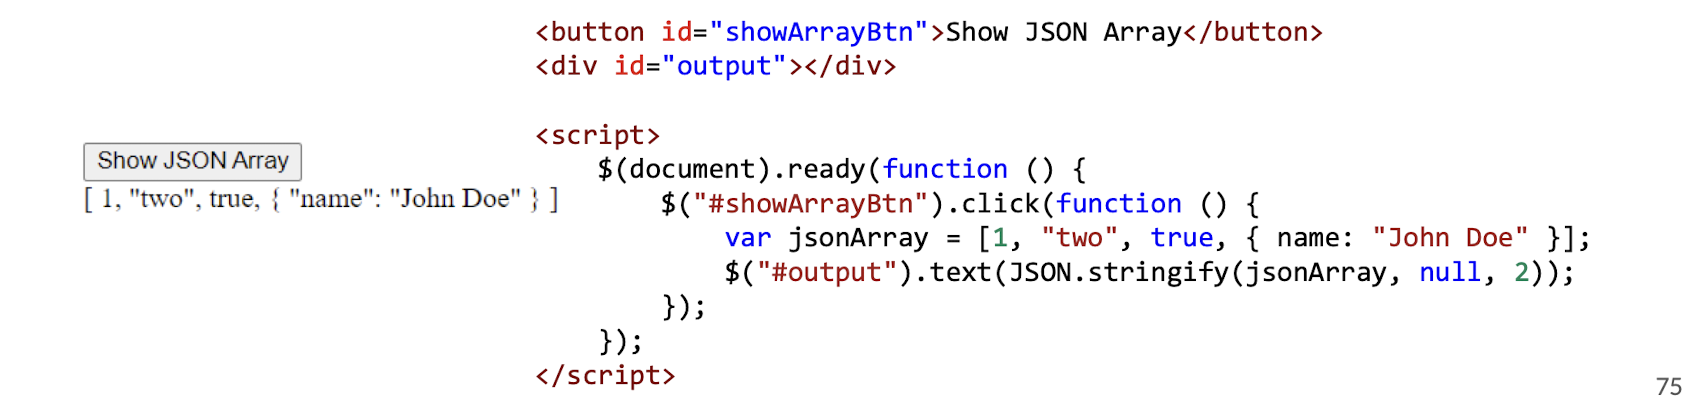
3.3.8 Use Cases
- Storing and transmitting data in web applications, such as sending form data to a server
- Configuring settings and preferences in applications, allowing for easy customization
- Exchanging data between different systems or platforms in a standardized format
- Caching and storing data locally in browsers for offline functionality and faster access
3.4 AJAX
Seamless Asynchronous Data Retrieval and Dynamic Content Updates
3.4.1 What is AJAX?
- AJAX = Asynchronous JavaScript And XML
- A technique for making asynchronous HTTP requests from web browsers
- Allow updating parts of a web page without reloading the entire page
- Use JavaScript to send and receive data in various formats, not just XML
- Enhances user experience by providing real-time updates and interactivity in web applications
3.4.2 Traditional AJAX
- Uses XMLHTTPRequest object to send and receive data from a server without page reload
- Typically sends and receives data in XML or plain text format
- Manually handles the callbacks for success, error, and handling the response
- Example: Fetching weather data from a server and updating the webpage without refreshing
1 | |
3.4.3 AJAX Basics with jQuery
- Simplifies AJAX calls with jQuery‘s
$.ajax()or$.get()and$.post()methods - Provides shorthand methods for common request types, such as GET and POST
- Handles success and error callbacks more efficiently with built-in functions
- Example: Fetching data from a server and updating a webpage using jQuery’s AJAX methods
3.4.4 AJAX GET Request with jQuery
- When the document is ready:
- The click event on the element with ID “fetchDataBtn” is listened to
- An alert dialog displays the message “Fetching”
- An AJAX GET request is made to the URL “https://catfact.ninja/fact“
- The response data is expected to be in JSON format
- If the request is successful:
- The response data is displayed in the “output” element after converting it to a JSON string
- If there is an error during the request:
- The “output” element is updated with an error message
1 | |
1 | |
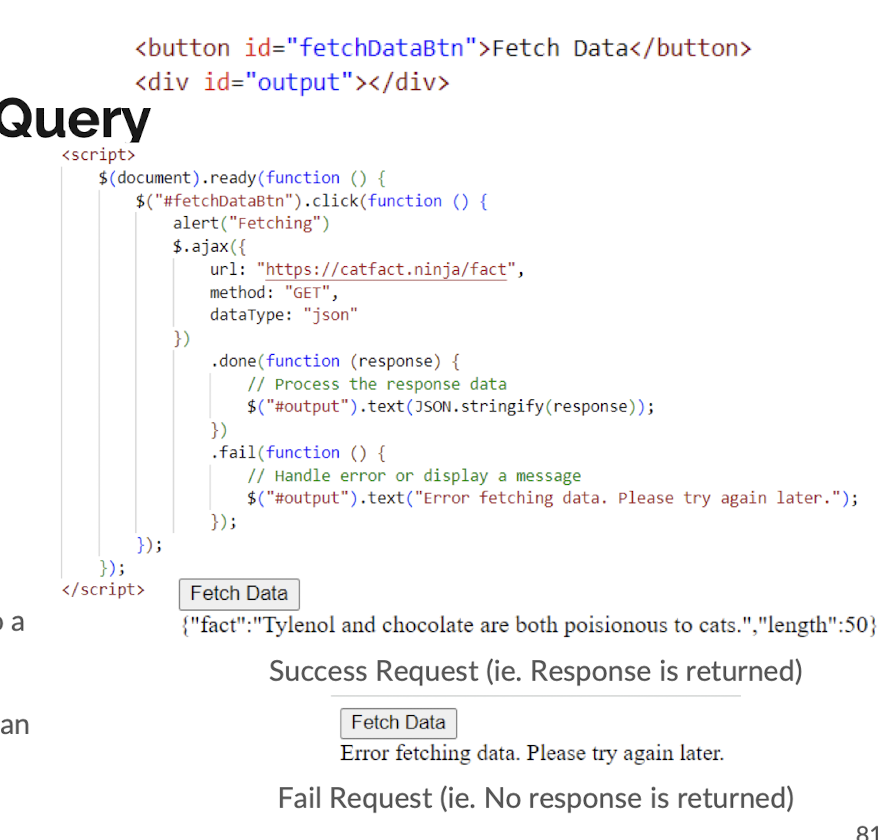
3.4.5 AJAX POST Request with jQuery
- AJAX POST request sends data to a server using HTTP POST method
- It allows transferring data from the client to the server for processing
- The data is typically sent in the request body
- jQuery provides shorthand methods like $.post() to simplify making AJAX POST requests
Note: the example URL is dummy, it is not a workable link to submit data Usually, it will be the own route developed, such as “/submit” You will know more about it in Part 2 Lecture
1 | |
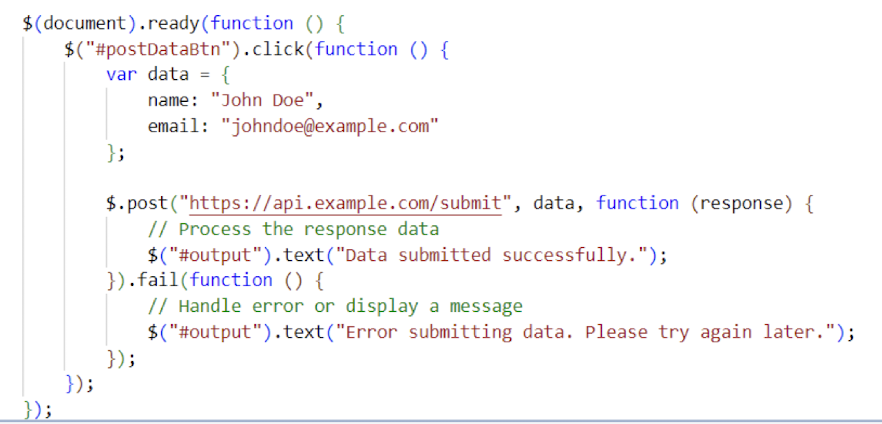
4: NODE.JS SERVER-SIDE PROGRAMMING
After this lecture, you should understand …
- Client-side VS server-side programming
- Javascript running in browsers VS in Node.js environment
- Synchronous VS asynchronous code
- Three types of asynchronous programming model in Node.js and why async is important
- Node.js File I/O, HTTP module basics
- Node Package Management with package.json
- Express.js as an alternative to the plain HTTP module
- Express.js routing, router modules, and middleware
4.1 Server-side Web Programming
Client and server usually work together to deliver complete and interactive user experience. This lecture will mainly focus on server-side web programming.
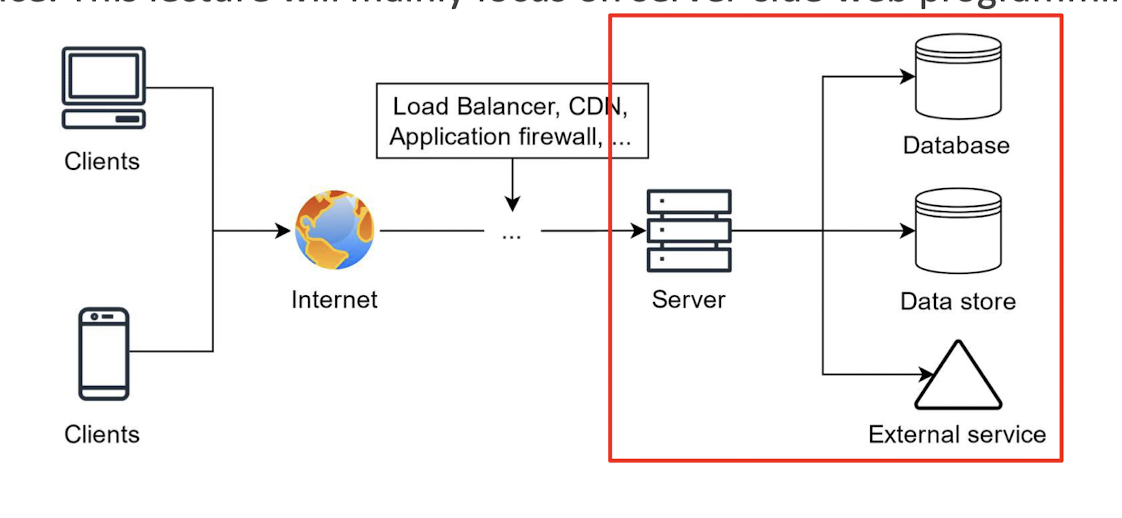
4.1.1 Characteristics of client-side programming
With client-side programming, all the code and data is executed and stored locally (client side).
- Mainly for user interface (UI) rendering, i.e., animations, user control
- Immediate handling of user actions
- Computing resources are limited to local
- Difficult to share data across devices and users
- Difficult to ensure data integrity since local data can be modified easily
4.1.2 Benefit of server-side programming
With server-side programming, all the code and data is executed and stored remotely
- Handle business logic, data processing, heavy computational tasks and database operation
- Perform user authentication (name & password, who you are) and authorization (right, read and write the file)
- Enforce data integrity since the server has full control on the data
- Share data across devices and locations
- Connect with database, storages and other external services
4.1.3 Limitation of server-side programming
Server-side programming relies on network communication to interact with clients, there are several limitations:
- Latency
- Since network latency is significantly high comparing to local processing, server may need to offload the latency-sensitive tasks to client side, i.e., UI rendering
- Scalability concern
- Server-side code need to write in the way such that it can run in distributed system to maximize the server performance, increased complexity
- Scale up: add more resources to the server
- Scale out: add more servers, buy more smaller servers, distributed
- Limited client control
- Difficult to ensure consistent behavior across different client devices
- Rely on client-side software and capabilities to achieve certain functionalities
4.1.4 Server-side Web Programming
Server-side programming usually integrates with database for data storage and retrieval, also makes use of frameworks to simplify the development process.
The following software or toolkits will be covered in this course:
Node.js runtime
Express.js (API server)
MongoDB (NoSQL database)
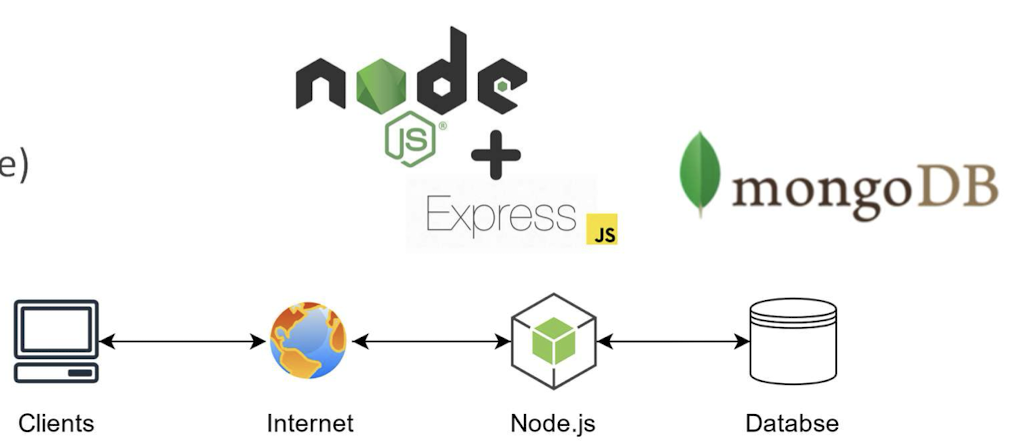
4.2 Introduction to Node.js
- Node.js is an open-source server environment
- Node.js is free
- Node.js runs on various platforms (Windows, Linux, Unix, Mac OS X, etc.)
- Node.js uses JavaScript on the server
4.2.1 Key Features of Node.js
- Asynchronous and Non-blocking
- JavaScript Everywhere
- NPM - Node Package Manager
- Scalability
- Microservices Architecture
4.2.2 Why use Node.js in server-side?
Fast and performant
- V8 use JIT (Just-In-Time)-based engine show greater server-side performance than other programming languages, like PHP.
Large community and high popularity
- Node.js are used by 42.65% developers (2023 Developer Survey - Stackoverflow)
Used by many famous companies
- Netflix
- Twitter (Now X)
- Walmart
- And more ….
Single language in both client and server-side programming
https://survey.stackoverflow.co/2023/#technology-most-popular-technologies
4.2.3 What Can Node.js Do?
- Node.js can generate dynamic page content
- Node.js can create, open, read, write, delete, and close files on the server
- Node.js can collect form data
- Node.js can add, delete, modify data in your database
Use Cases for Node.js:
- Web Applications
- Real-time Applications
- Streaming Applications
- API Gateways
4.2.4 What is a Node.js File?
- Node.js files contain tasks that will be executed on certain events
- A typical event is someone trying to access a port on the server
- Node.js files must be initiated on the server before having any effect
- Node.js files have extension “
.js“ (CommonJS or ES Module)
4.2.5 Node.js vs Javascript in Browsers
Use same Javascript syntax, i.e., Array, Object, if-else, switch-case and other basic data types
In the browser js (client), there are document and window objects so that you can interact with the HTML DOM and other Web Platform APIs like cookies, while Node.js does not have.
Differ from the browser js, Node.js provides a lot of native APIs through its modules, like File I/O and other native system access, while data access in browser js is strictly restricted to the sandboxed environment and website-specific storage.
4.3 Node.js Get Started
Reference: https://www.w3schools.com/nodejs/
Download Node.js
The official Node.js website has installation instructions for Node.js: https://nodejs.org
4.3.1 Getting Started
Once you have downloaded and installed Node.js on your computer, let’s try to display “Hello World” in a web browser.
Create a Node.js file named “myfirst.js”, and add the following code:
myfirst.js
1 | |
Save the file on your computer: C:\Users\Your Name\myfirst.js
The code tells the computer to write “Hello World!” if anyone (e.g. a web browser) tries to access your computer on port 8080.
For now, you do not have to understand the code. It will be explained later.
Create a new file called “package.json” under the directory you want to run the code with the following
content:
1 | |
Without this setting, you will encounter SyntaxError: Cannot use import statement outside a module.
With this minimal configuration, you enable the ESM module support for Node.js. It is the newer module system for Node.js.
In this lecture, most of the example would be written in ESM module. I will explain ESM later.
4.3.2 Initiate the Node.js File
The file you have just created must be initiated by Node.js before any action can take place.
Start your command line interface, and navigate to the folder that contains the file “myfirst.js”.
Write node myfirst.js and hit enter:
C:\Users\Your Name>node myfirst.js
Now, your computer works as a server!
If anyone tries to access your computer on port 8080, they will get a “Hello World!” message in return!
Start your internet browser, and type in the address: http://localhost:8080
4.4 Asynchronous programming
4.4.1 Synchronous vs asynchronous
Synchronous programming
- Executed sequentially
- Waits for each task to be completed before moving on to the next one.
- Predictable execution flow
Asynchronous programming
- Executed concurrently
- Continue executing other tasks while waiting for the completion of asynchronous tasks in the background.
- Especially useful for waiting for I/O operation, i.e., remote call and File I/O
- No need to be multithreaded Assume
cbN()is the callback functions run after thefN()completed
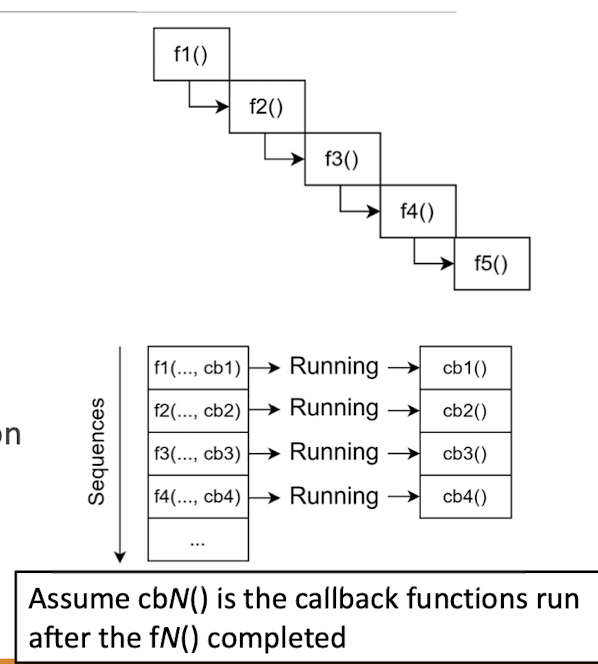
4.4.2 Asynchronous programming
Asynchronous programming in Node.js can be achieved in
- Callback handlers (Old way)
- Promise
- Async/await syntax (A syntactic sugar for Promise)
It is essential for all I/O operations so that the I/O will not block the main thread.
4.4.3 Callback
In the past, due to the nature of asynchronous Javascript, many Javascript functions accept a callback argument that allow you define code to be run after the task is completed (or failed). Usually, callbacks are only used when doing I/O,
i.e., downloading files, doing File I/O, waiting for remote replies.
Here is a common example of reading a file:
1 | |
This readFile method returns nothing but provide the result to data argument of the provided callback (err, data) => { ... } once reading file is done.
4.4.4 Callback hell
It is ok only if the logic is simple. The code can be difficult to maintain when the logic becomes complex.
There are a famous term called “callback hells” to describe where callbacks are nested within other callbacks, resulting in deeply nested and hard-to- read code.
Imagine when you have tasks depends on the result of an async task, you would have to nest the code inside the callback!
The code would become unreadable and hard to maintain!
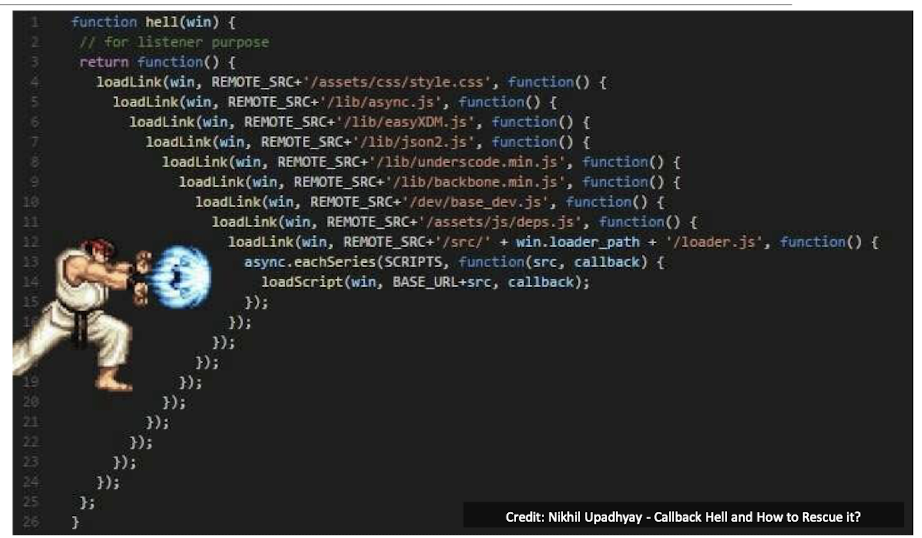
4.4.5 Promise
A Promise in Javascript represents the eventual completion (or failure) of an asynchronous operation and its resulting value. It is a new mechanism to handle asynchronous operations compared to traditional callbacks.
A Promise is in one of these states:
- pending: Initial state
- resolved: The operation was completed successfully
- rejected: The operation was failed
It can chain handlers or callbacks for the resolved and rejected conditions.
1 | |
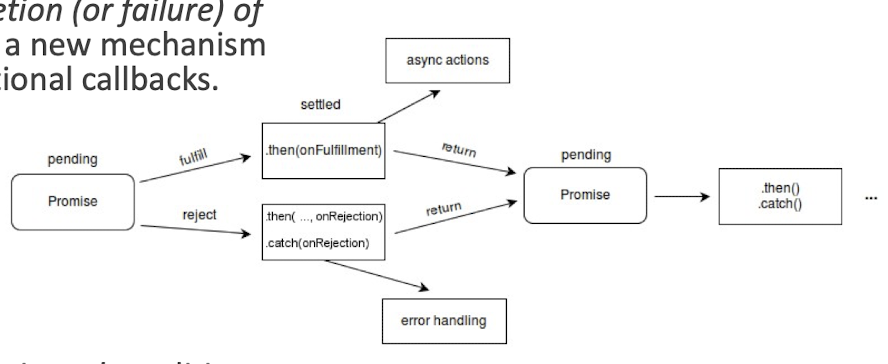
- Each .then() returns a new Promise object, so we can handle the error in the last .catch() statement
Promise allows defined callbacks to be run after the tasks completed or settled in a chained way.
Assume Task C depends on Task B depends on Task A:
1 | |
When a Promise is completed, the attached handlers will be called in order in which the .then methods are declared.
Note that .catch attaches the error handler
4.4.6 Callback vs Promise
Callback1
2
3
4
5
6
7
8
9
10
11import fs from 'fs';
function read_file() {
fs.readFile('demo.txt', 'utf-8', (err, data) => {
if (err !== null) {
console.error('error', err);
return;
}
console.log(data);
});
}
read_file();
Promise1
2
3
4
5
6
7
8
9
10
11import fs from 'fs/promises';
function read_file() {
fs.readFile('demo.txt', 'utf-8')
.then((data) => {
console.log(data);
})
.catch((err) => {
console.error('error', err);
});
}
read_file();
Both programs do exactly the same task:
Output the content of demo.txt to the console
4.4.7 Async/await
The async/await is a newer syntax to simplify asynchronous programming in JavaScript.
- This syntax is built on top of Promises, as a syntactic sugar
- Allow writing asynchronous code to look like synchronous code
- await/async syntax can only be used inside an
asyncfunction - async function is a Promise
- Use try/catch block to handle the error, i.e., rejected Promise.
- E.g. const c = await fetch(…)
- if network error, fetch will reject the promise.
- While using await/async syntax, this line will throw an exception instead
1 | |
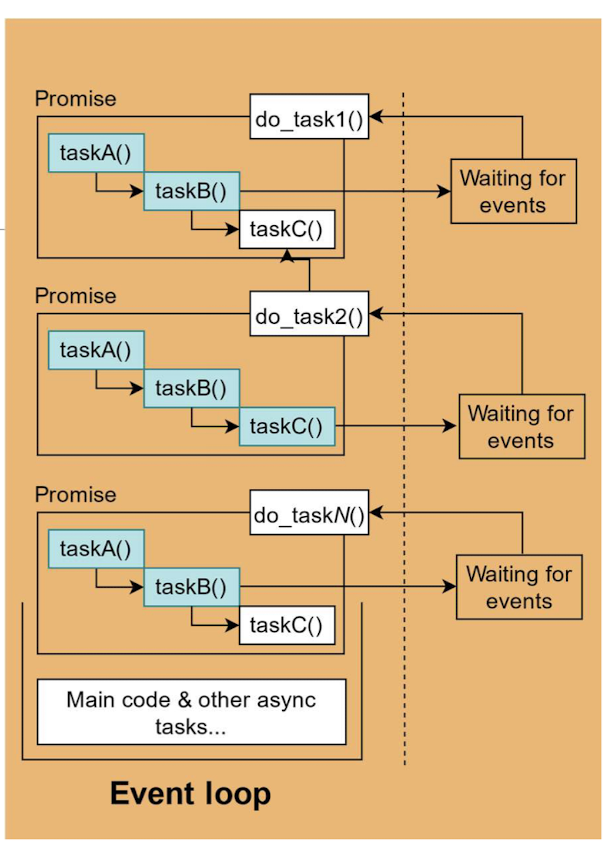
HTTPS://YOUTU.BE/LI7FZDHYZPC?SI=A22CZ45QBKDV4ABX
4.4.8 Promise vs async/await syntax
Promise1
2
3
4
5
6
7
8
9
10
11import fs from 'fs/promises';
function read_file() {
fs.readFile('demo.txt', 'utf-8')
.then((data) => {
console.log(data);
})
.catch((err) => {
console.error('error', err);
});
}
read_file();
Async/await syntax1
2
3
4
5
6
7
8
9
10import fs from 'fs/promises';
async functionread_file() {
try {
const data = await fs.readFile('demo.txt', 'utf-8');
console.log(data); // wait the above line to complete
} catch (err) {
console.error('error', err);
}
}
read_file();
Both programs do exactly the same task:
Output the content of demo.txt to the console
4.5 Node.js Modules
What is a Module in Node.js?
- Consider modules to be the same as JavaScript libraries.
- A set of functions you want to include in your application.
Built-in Modules
- Node.js has a set of built-in modules which you can use without any further installation.
- Refer to Built-in Modules Reference for a complete list of modules.
https://www.w3schools.com/nodejs/ref_modules.asp
4.5.1 Include Modules
To include a module, use the import with the name of the module:
- ESM:
import http from 'http'; - CommonJS:
const http = require('http');
1 | |
Now your application has access to the HTTP module, and is able to create a server:
1 | |
4.5.2 Create Your Own Modules
You can create your own modules and easily include them in your applications.
The following example creates a module that returns a date and time object:
1 | |
Use the export keyword to make properties and methods available outside the module file.
Save the code above in a file called “myfirstmodule.js“
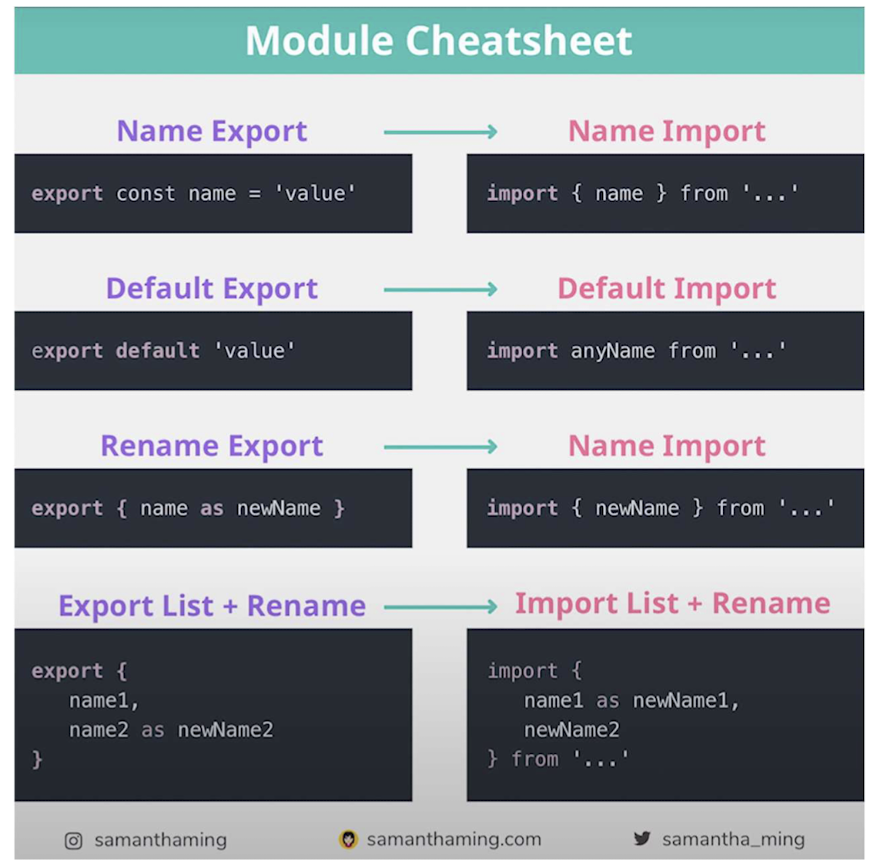
- Without
default, import with {} - With
default, import without {}
https://www.youtube.com/watch?v=qgRUr-YUk1Q
4.5.3 Include Your Own Module
Now you can include and use the module in any of your Node.js files.
Example
Use the module “myfirstmodule“ in a Node.js file:
1 | |
Notice that we use ./ to locate the module, which means that the module is located in the same folder as the Node.js file.
Save the code above in a file called “demo_module.js”, and initiate the file.
Result
Press Ctrl-C to stop initiating the previous NodeJS file.
Initiate demo_module.js:
C:\Users\Your Name>node demo_module.js
If you have followed the same steps on your computer, you will see the same result as the example: http://localhost:8080
4.5.4 Require() vs ESM Import syntax
When looking for Node.js code sample, you often see the following two different module import syntaxes:
1 | |
The former is part of the CommonJSmodule import syntax, while the latter uses ESM(ECMAScript 2015) module import/export syntax.
Even though they have similar behaviors on module import, they are two different module systems. ES6 modules are more commonly used in modern web development.
4.5.5 ComonJS vs ESM Import/Export Syntax
ESM Import1
2
3
4
5import http from 'http';
http.createServer(function (req, res) => {
res.writeHead(200, {'Content-Type': 'text/html'});
res.end('Hello World!');
}).listen(8080);
ESM Export1
2
3
4const MyDateTime= function () {
return Date();
}
export { MyDateTime };
CommonJS import1
2
3
4
5const http = require('http');
http.createServer(function (req, res) => {
res.writeHead(200, {'Content-Type':'text/html'});
res.end('Hello World!');
}).listen(8080);
CommonJS export1
2
3exports.MyDateTime= function () {
return Date();
}
Start Using ES Modules Now
https://www.youtube.com/watch?v=lMWUqWKEGgQ
4.6 Node.js HTTP modules
The Built-in HTTP Module
Node.js has a built-in module called HTTP, which allows Node.js to transfer data over the Hyper Text Transfer Protocol (HTTP).
To include the HTTP module, use the import syntax:
1 | |
4.6.1 Node.js as a Web Server
The HTTP module can create an HTTP server that listens to server ports and gives a response back to the client.
Use the createServer() method to create an HTTP server:
1 | |
Result
The function passed into the http.createServer() method, will be executed when someone tries to access the computer on port 8080.
Save the code above in a file called “demo_http.js”, and initiate the file:
Press Ctrl-C to stop initiating the previous NodeJS file.
Initiate demo_http.js:C:\Users\Your Name>node demo_http.js
If you have followed the same steps on your computer, you will see the same result as the example: http://localhost:8080
4.6.2 Add an HTTP Header
If the response from the HTTP server is supposed to be displayed as HTML, you should include an HTTP header with the correct content type:
1 | |
The first argument of the res.writeHead() method is the status code, 200 meant that all is OK, the second argument is an object containing the response headers.
4.6.3 Read the Query String
The function passed into the http.createServer() has a req argument that represents the request from the client, as an object (http.IncomingMessage object).
This object has a property called “url“
- which holds the part of the url that comes after the domain name:
1 | |
Result
Save the code above in a file called “demo_http_url.js” and initiate the file:
Initiate demo_http_url.js:
C:\Users\Your Name>node demo_http_url.js
If you have followed the same steps on your computer, you should see two different results when opening these two addresses:
http://localhost:8080/EIE4432
print out: /EIE4432
http://localhost:8080/Web Systems
print out: /Web%20Systems
4.6.4 The Built-in URL Module
The URL module splits up a web address into readable parts.
To include the URL module, use the import syntax:
import { URL } from 'url';
Create a new URL object with an address, and it will return a URL object with each part of the address as properties.
1 | |
const adr = 'http://localhost:9999/index.htm?code=eie4432&subj=websystems'
Host name: http://localhost:9999
Path name: /index.htm
Query string: ?code=eie4432&subj=websystems
Fragment identifier: No
4.6.5 Split the Query String
To split the query string into individual key-value pairs in Node.js, you can use the URLSearchParams constructor along with the get() or forEach() method.
1 | |
Result:
1 | |
Split the query string into readable parts:
req.headers.host: get the hostname and port of the requestnew URL(req.url, http://${req.headers.host});: the full URL of the request
1 | |
Result
Save the code above in a file called “demo_querystring.js” and initiate the file:
Initiate demo_querystring.js:
C:\Users\Your Name>node demo_querystring.js
4.7 Node.js File I/O
4.7.1 Node.js File System Module
The Node.js file system module allows you to work with the file system on your computer.
To include the File System module, use the import syntax:
1 | |
Common use for the File System module:
- Read files
- Create files
- Update files
- Delete files
- Rename files
4.7.2 Read Files
The fs.readFile() method is used to read files on your computer.
Assume we have the following HTML file (located in the same folder as Node.js file):
demofile1.html
1 | |
Create a Node.js file that reads the HTML file, and return the content:
1 | |
Result
Save the code above in a file called “demo_readfile.js”, and initiate the file:
Initiate demo_readfile.js:
C:\Users\Your Name>node demo_readfile.js
If you have followed the same steps on your computer, you will see the same
result as the example: http://localhost:8080
4.7.3 Create Files
The File System module has methods for creating new files:
- fs.appendFile()
- fs.open()
- fs.writeFile()
4.7.3.1 Create file by appendFile()
The fs.appendFile() method appends specified content to a file.
If the file does not exist, the file will be created:
Create a new file using the appendFile() method:
1 | |
4.7.3.2 Create file by open()
The fs.open() method takes a “flag“ as the second argument, if the flag is “w” for “writing”, the specified file is opened for writing. If the file does not exist, an empty file is created:
Create a new, empty file using the open() method:
1 | |
4.7.3.3 Create file by writeFile()
The fs.writeFile() method replaces the specified file and content if it exists. If the file does not exist, a new file, containing the specified content, will be created:
Create a new file using the writeFile() method:
1 | |
4.7.4 Update Files
The File System module has methods for updating files:
fs.appendFile(), at the end.fs.writeFile()
4.7.4.1 Update file by appendFile()
The fs.appendFile() method appends the specified content at the end of the specified file:
Append “This is my text.” to the end of the file “mynewfile1.txt”:
1 | |
4.7.4.2 Update file by writeFile()
The fs.writeFile() method replaces the specified file and content:
Replace the content of the file “mynewfile3.txt”:
1 | |
4.7.5 Delete files
To delete a file with the File System module, use the fs.unlink() method.
The fs.unlink() method deletes the specified file:
Delete “mynewfile2.txt”:
1 | |
4.7.6 Rename files
To rename a file with the File System module, use the fs.rename() method.
The fs.rename() method renames the specified file:
Rename “mynewfile1.txt” to “myrenamedfile.txt”:
1 | |
4.7.7 Upload Files
The Formidable Module
There is a very good module for working with file uploads, called “Formidable”.
The Formidable module can be downloaded and installed using NPM:
C:\Users\Your Name>npm install formidable
After you have downloaded the Formidable module, you can include the module in any application:
1 | |
formidable is a Node.js module for parsing form data, especially file uploads.
https://www.npmjs.com/package/formidable
Step 1: Create an Upload Form
Now you are ready to make a web page in Node.js that lets the user upload files to your computer:
Create a Node.js file that writes an HTML form, with an upload field:
This code will produce an HTML form:
1 | |
Step 2: Parse the Uploaded File
Include the Formidable module to be able to parse the uploaded file once it reaches the server.
When the file is uploaded and parsed, it gets placed on a temporary folder on your computer.
1 | |
Step 3: Save the File
When a file is successfully uploaded to the server, it is placed on a temporary folder.
The path to this directory can be found in the “files” object, passed as the third argument in theparse()method’s callback function.
To move the file to the folder of your choice, use the File System module, and rename the file:
1 | |
4.8 Node Package Management
4.8.1 Package
What is a Package?
- A package in Node.js contains all the files you need for a module. Modules are JavaScript libraries you can include in your project.
Download a Package
- Downloading a package is very easy.
- Open the command line interface and tell NPM to download the package you want.
- I want to download a package called “xyz”:
C:\Users\Your Name>npm install xyz(npm i xyz)- Now you have downloaded and installed ‘xyz’ package!
- NPM creates a folder named “node_modules”, where the package will be placed. All packages you install in the future will be placed in this folder.
Using a Package
- Once the package is installed, it is ready to use.
- Import the “xyz” package the same way you import any other module.
4.8.2 What is NPM?
NPM is a package manager for Node.js packages, or modules.
www.npmjs.com hosts thousands of free packages to download and use.
The NPM program is installed on your computer when you install Node.js
NPM is already ready to run on your computer!
1 | |
4.8.3 How to use npm?
There are two ways to install a package using npm: globally and locally.
- Globally: This method is generally used to install development tools and CLI based packages. To install a package globally, use the following code.
- Install for all project on the computer
npm install -g <package-name>
- Locally: This method is generally used to install frameworks and libraries. A locally installed package can be used only within the directory it is installed. To install a package locally, use the same command as above without the
-gflag. - Put the package in the current directory
npm install <package-name>
Whenever we create a project using npm, we need to provide a package.json file, which has all the details about our project.
4.8.4 package.json–Basic configuration
This package.json is the main project configuration file for Node.js project
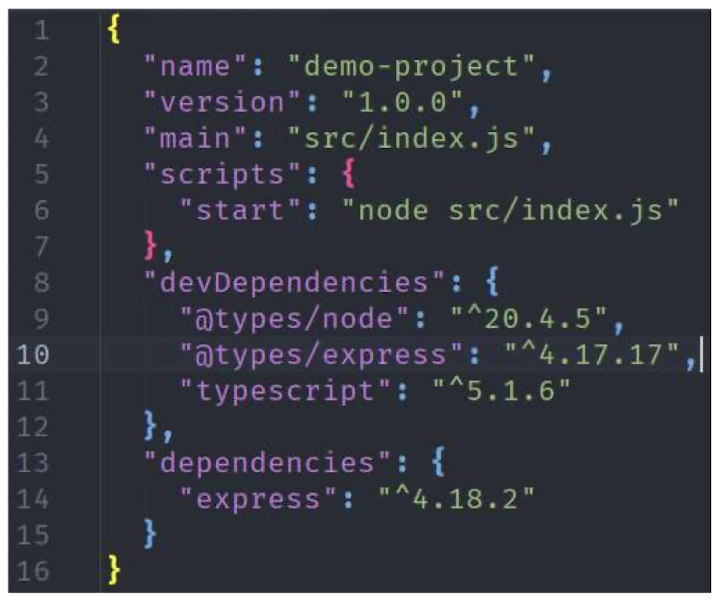
name: The name of the project
version: The version of the project
main: The entry point of the project
script: Set of commands to be run by the package manager
devDependencies: Development-only dependencies
dependencies: Project dependencies
Run the start script
npm start: (npm run start) -> node src/index.jsnpm run xxx(npm xxx) (Not allowed)
Download and install ALL the project dependencies:
npm install
Install and add as development-only dependencies
npm install typescript --save-dev
Install and add as runtime dependencies
npm install expressornpm i express
4.8.5 Semantic versioning
1 | |
| Package name | express |
|---|---|
| Version | ^4.18.2 |
^4.18.2 mean compatible major version with 4.18.2 (Release from 4 .18.2 to <5.0.0)
- First digit: Major version
- Second digit: Minor version
- Third digit: Patch version
~4.18.2 mean compatible minor version with 4.18.2 (Release from 4.18.2 to <4.19.0)
Reference: https://docs.npmjs.com/about-semantic-versioning
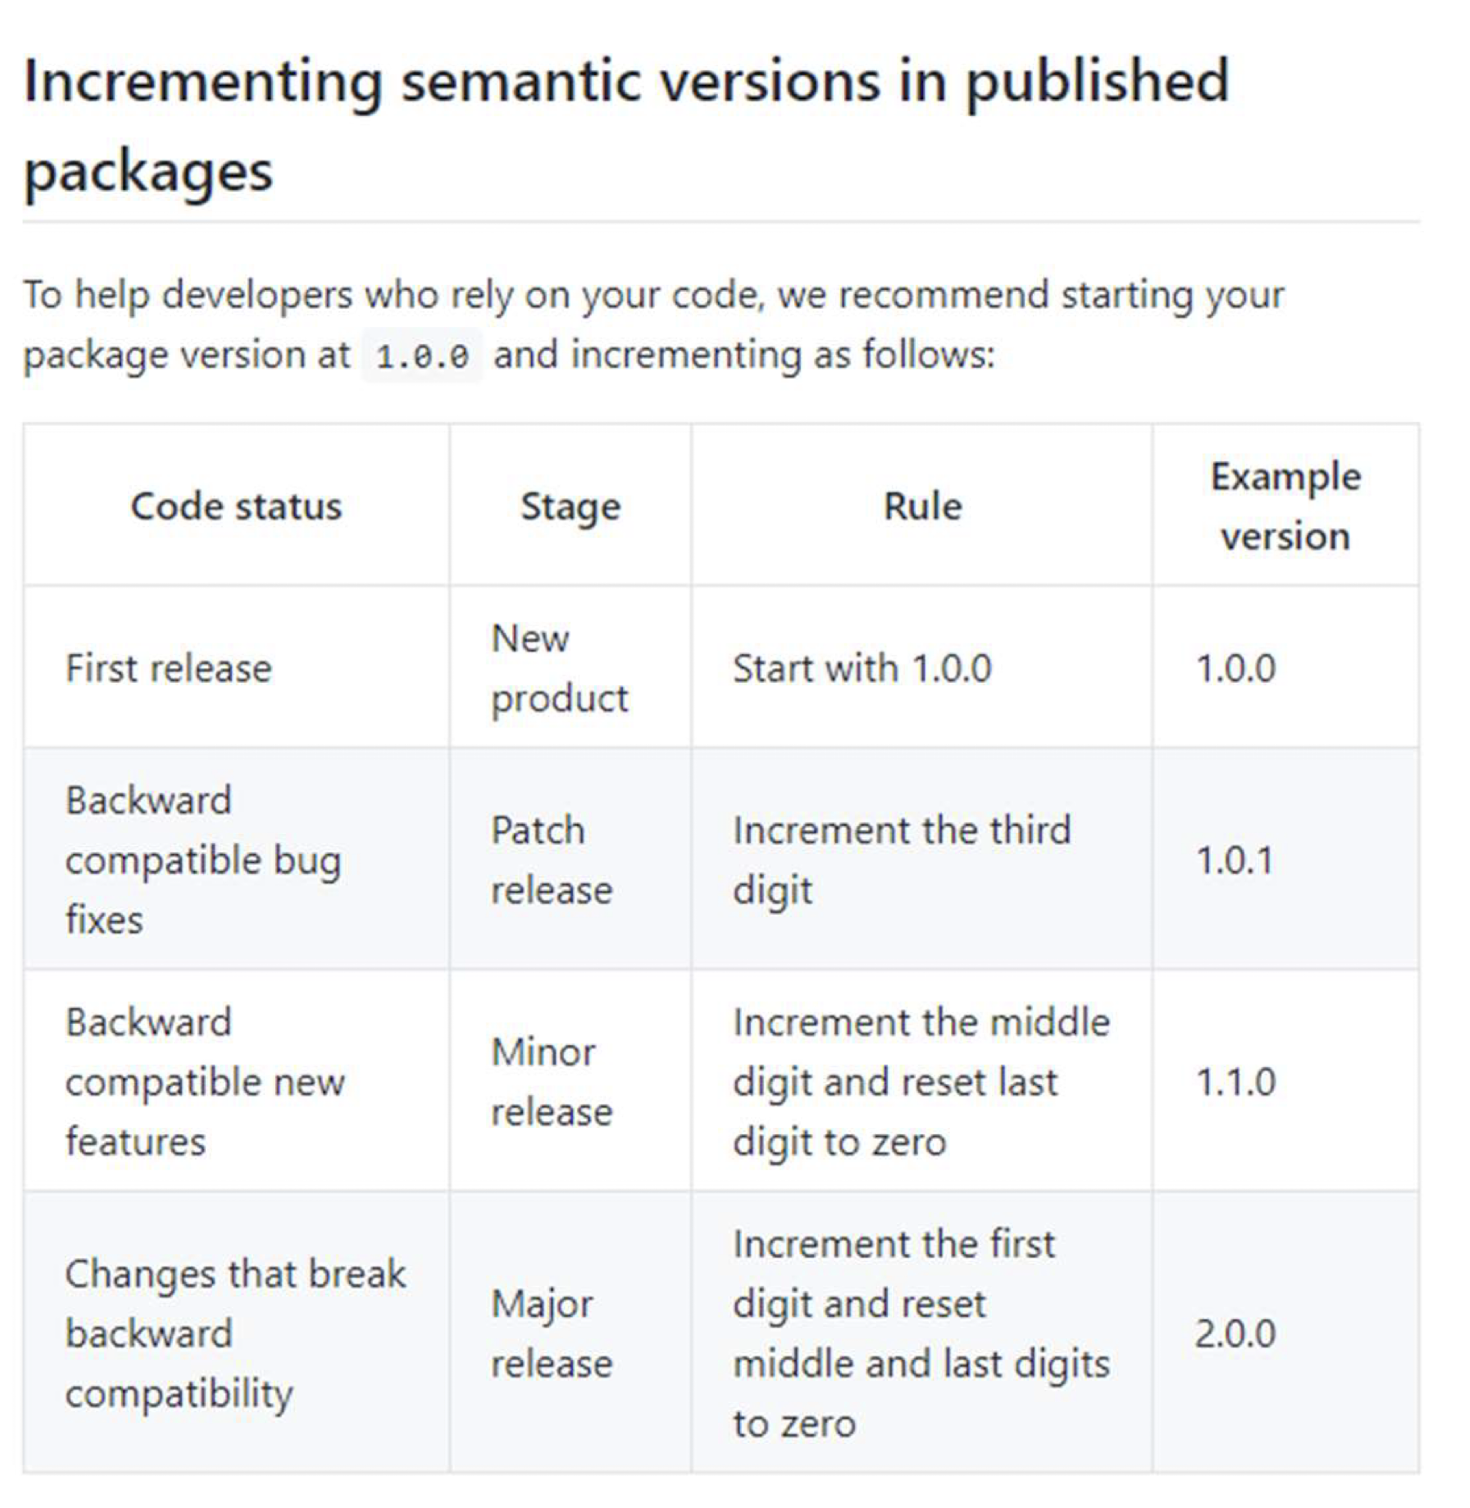
4.9 Express.js
Reference: https://www.tutorialspoint.com/expressjs/index.htm
4.9.1 Overview
- Express is a minimal and flexible Node.js web application framework that provides a robust set of features for web and mobile applications.
- It is an open-source framework developed and maintained by the Node.js foundation.
- It provides you with a simple API to build websites, web apps and backends.
- With ExpressJS, you need not worry about low-level protocols, processes, etc.
- Express provides a minimal interface to build our applications.
- It provides us with the tools that are required to build our app.
- It is flexible as there are numerous modules available on npm, which can be directly plugged into Express.
4.9.2 Why use Express.js instead of the built-in HTTP server?
Recall the server code using the built-in http module:
- All incoming request will share a same request handler, regardless the HTTP method used and request path.
If you want to handle API request by path, you need to handle the flow of control manually:
- Express.js route on GET /
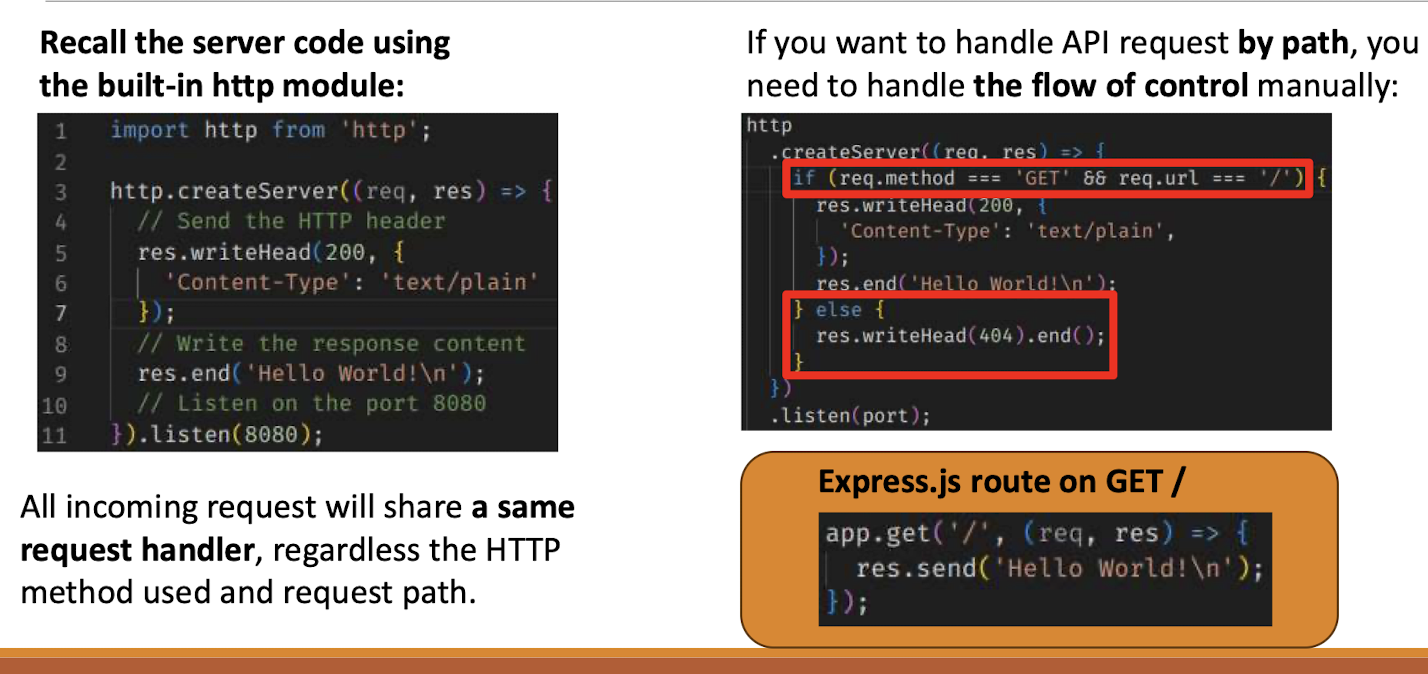
Simplicity
- Abstracts away many low-level details and simplifies the process of handling HTTP requests and responses.
Routing
- Express.js provides a flexible routing system that allows you to define routes for different URL patterns and HTTP methods.
Middleware
- Modify request and response objects
- Authentication
- Handle errors
- And more…
4.9.3 Install express
You can install a package using
npm install <package-name>
Whenever we create a project using npm, we need to provide a package.json file, which has all the details about our project.
npm makes it easy for us to set up this file. Let us set up our development project.
Step 1 − Start your terminal/cmd, create a new folder named hello- world and cd (change directory) into it.
Step 2 − Now to create the package.json file using npm, use the following code.
npm init- It will ask you for the following information.
Just keep pressing enter, and enter your name at the “author name” field.
Step 3 − Now we have our package.json file set up, we will further install Express. To install Express and add it to our package.json file, use the following command −
npm install --save express
This is all we need to start development using the Express and install ALL framework.
Tip
- The
--saveflag can be replaced by the-Sflag. This flag ensures that Express is added as a dependency to our package.json file. This has an advantage, the next time we need to install all the dependencies of our project we can just run the commandnpm installand it will find the dependencies in this file of them for us.
To confirm that Express has installed correctly, run the following code.
dir node_modules
4.9.4 Install nodemon
To make our development process a lot easier, we will install a tool from npm, nodemon.
This tool restarts our server as soon as we make a change in any of our files, otherwise we need to restart the server manually after each file modification.
- mon for monitor
To install nodemon, use the following command:
npm install -g nodemon
You can now using nodemon to initiate the NodeJS file.
4.9.5 Error in running nodemon

Solution:
- Open Windows PowerShell as “Administrator”(cannot set using ordinary user identity)
- set-ExecutionPolicy RemoteSigned
- Press [Y] and Enter
- get-ExecutionPolicy RemoteSigned
- you should see “RemoteSigned”
- set-ExecutionPolicy RemoteSigned -Scope Process
- Press [Y] and Enter
- The Processs cope only affects the current PowerShell session. The execution policy is saved in the environment variable$env:PSExecutionPolicyPreference, rather than the registry. When the PowerShell session is closed, the variable and value are deleted.
4.9.6 ExpressJS-Hello World
We have set up the development, now it is time to start developing our first app using Express.
Create a new file called index.js and type the following in it.
1 | |
Result
Save the file, go to your terminal and type the following.
node index.js or nodemon index.js
This will start the server. To test this app, open your browser and go to http://localhost:3000 and a message will be displayed as in the following screenshot.
4.9.7 How the App Works?
The first line imports Express in our file, we have access to it through the variable express. We use it to create an application and assign it to const app.
app.get(route, callback)
- This function tells what to do when a get request at the given route is called.
- The callback function has 2 parameters,
request(req)andresponse(res). - The
request object(req)represents the HTTP request and has properties for the request query string, parameters, body, HTTP headers, etc. - Similarly, the
response objectrepresents the HTTP response that the Express appends when it receives an HTTP request.
res.send()
- This function takes an object as an input and sends this to the requesting client. Here we are sending the string “Hello World!”.
4.9.8 How the App Works?
app.listen(port, [host], [backlog], [callback]])
This function binds and listens for connections on the specified host and port. Port is the only required parameter here.
| S. No. | Argument & Description |
|---|---|
| 1 | port: A port number on which the server should accept incoming requests. |
| 2 | host: Name of the domain. You need to set it when you deploy your apps to the cloud. |
| 3 | backlog: The maximum number of queued pending connections. The default is 511. |
| 4 | callback: An asynchronous function that is called when the server starts listening for requests. |
4.9.9 ExpressJS-Routing
Web frameworks provide resources such as HTML pages, scripts, images, etc. at different routes.
The following function is used to define routes in an Express application −
app.METHOD(path, handler)
- This
METHODcan be applied to any one of the HTTP verbs –get, post, set, put, delete. An all method also exists, which executes independent of the request type. Pathis the route at which the request will run.Handleris a callback function that executes when a matching request type is found on the relevant route.
1 | |
- If we run our application and go to
localhost:3000/hello, the server
receives a get request at route “/hello“, our Express app executes the callback function attached to this route and sends”Hello World!” as the
response.
We can also have multiple different methods at the same route. For example,
1 | |
- To test the POST request, open your terminal and use cURL to execute the following request −
curl -X POST "http://localhost:3000/hello"
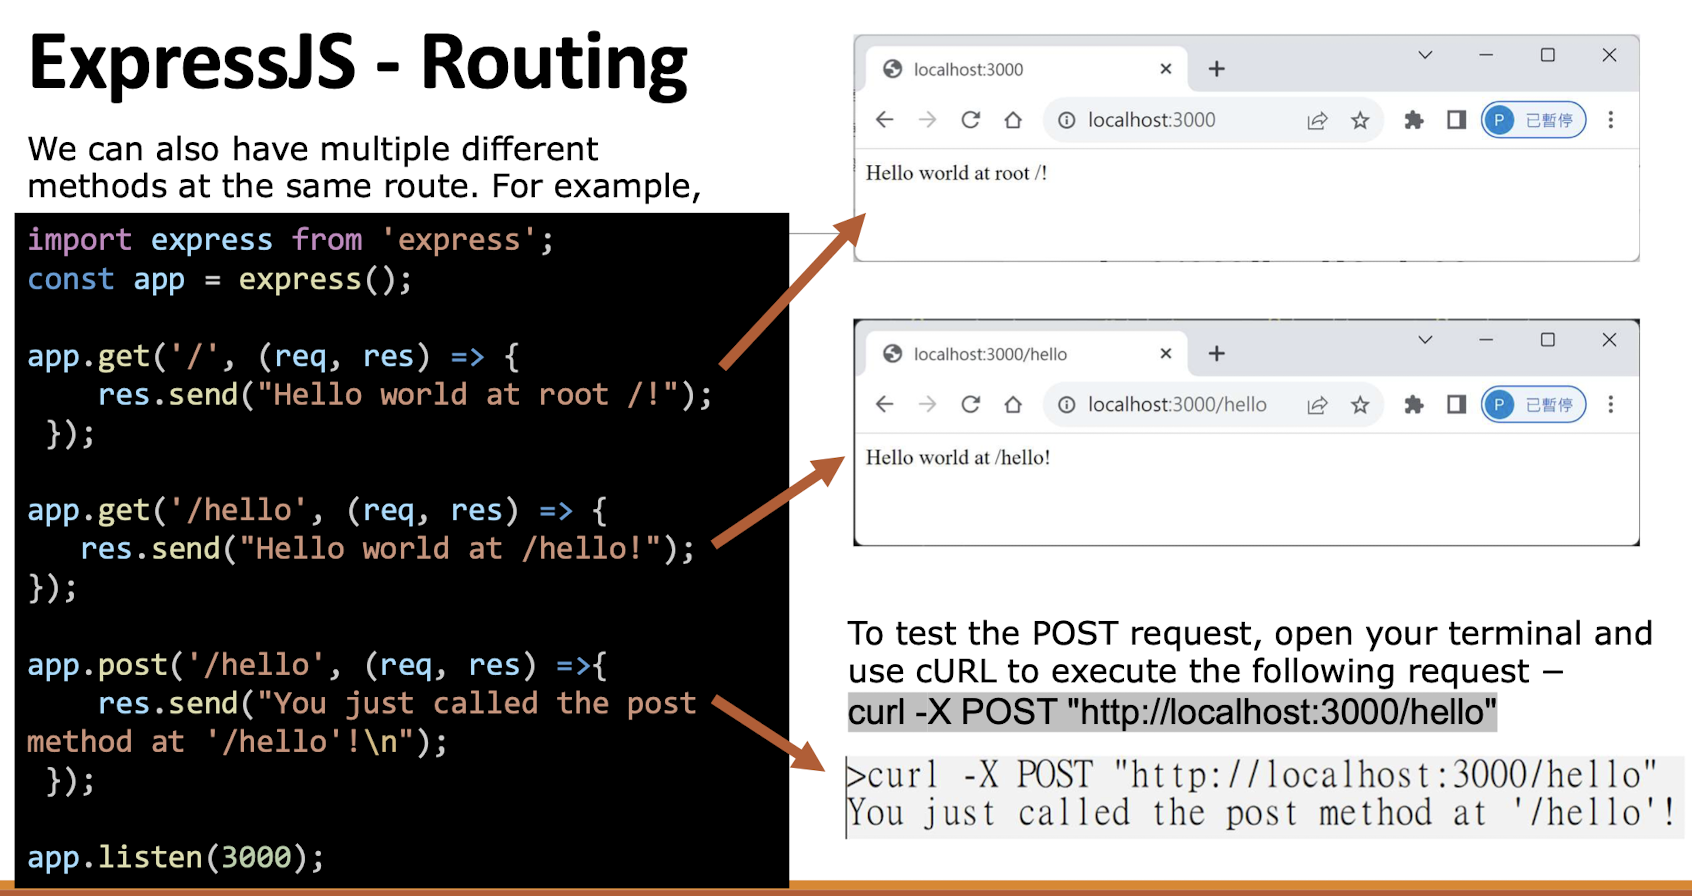
A special method, all, is provided by Express to handle all types of http methods at a particular route using the same function. To use this method, try the following.
1 | |
To test the POST request, open up your terminal and use cURL to execute the following request −
curl -X POST "http://localhost:3000/test"
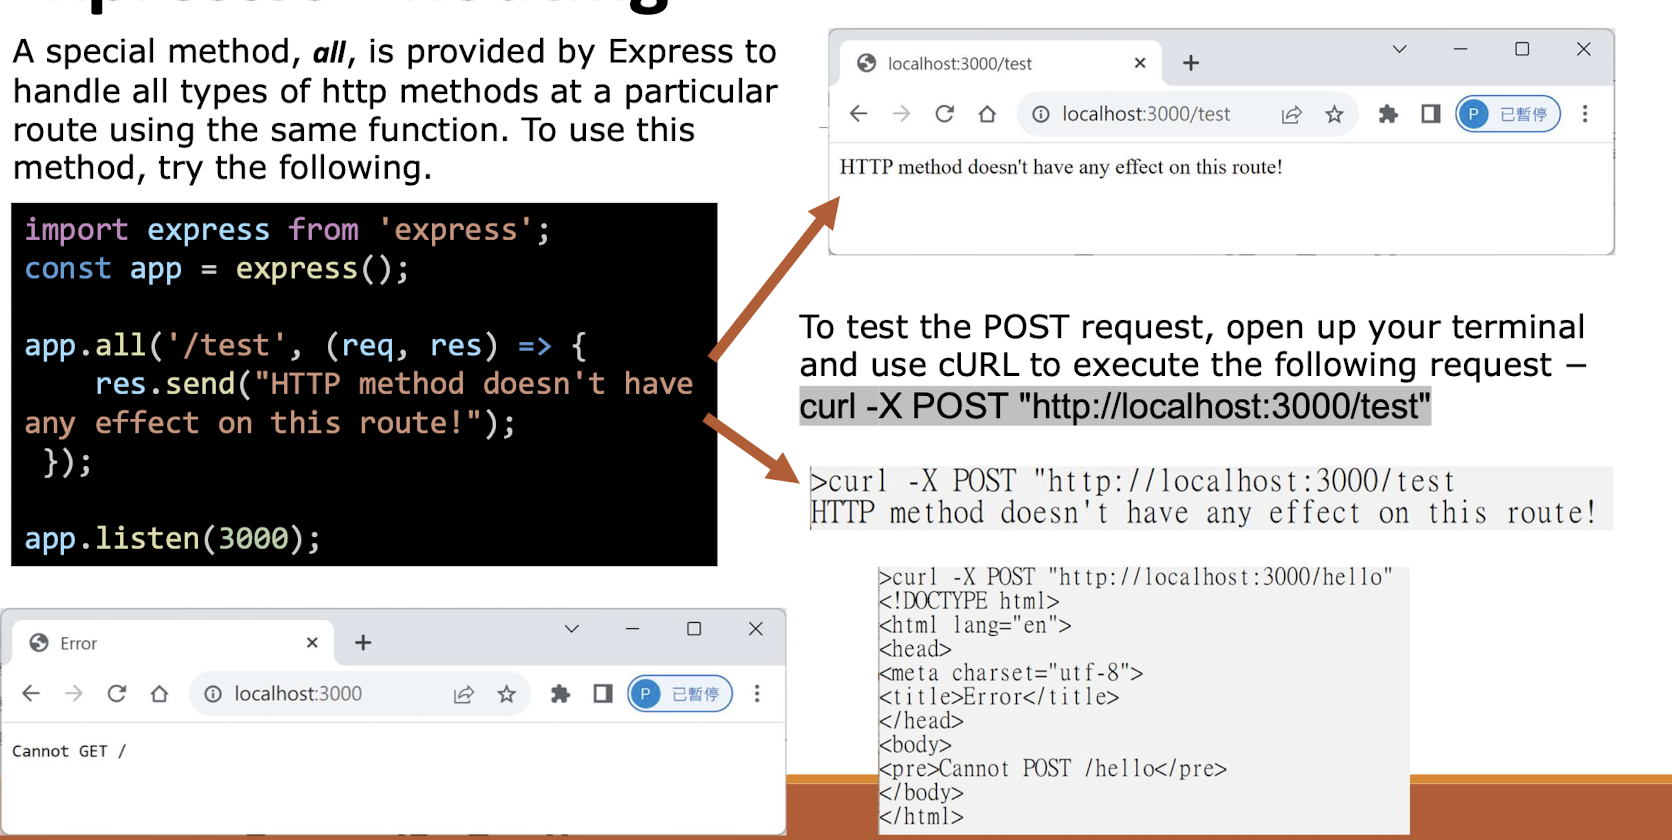
4.9.10 Router
Defining routes like above is very tedious to maintain. To separate the routes from our main index.js file, we will use Router from Express.
- Create a new file called
things.jsand type the following in it.
1 | |
Now to use this router in our index.js, type in the following before the app.listen function call.
1 | |
Result
The app.use function call on route ‘/things‘ attaches the things router with this route. Now whatever requests our app gets at the ‘/things’, will be handled by our things.js router. The ‘/‘ route in things.js is actually a subroute of ‘/things’. Visit localhost:3000/things/ and you will see the
following output.
/things/test/->/testin things.js
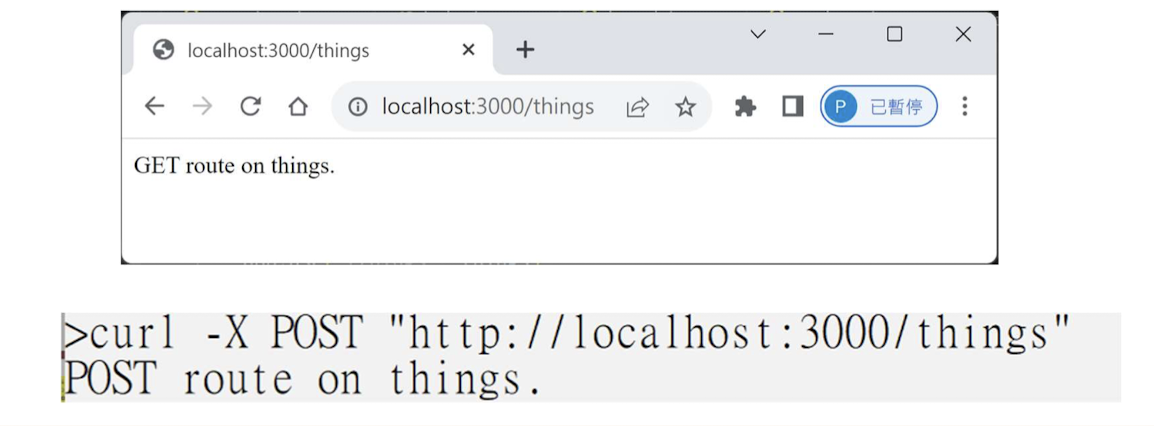
4.9.11 ExpressJS-HTTP Methods
The HTTP method is supplied in the request and specifies the operation that the client has requested.
This table lists the most used HTTP methods.
| S.No. | Method & Description |
|---|---|
| 1 | GET: The GET method requests a representation of the specified resource. Requests using GET should only retrieve data and should have no other effect. |
| 2 | POST: The POST method requests that the server accept the data enclosed in the request as a new object/entity of the resource identified by the URI. |
| 3 | PUT: The PUT method requests that the server accept the data enclosed in the request as a modification to existing object identified by the URI. If it does not exist then the PUT method should create one. |
| 4 | DELETE: The DELETE method requests that the server delete the specified resource. |
These are the most common HTTP methods. To learn more about the methods,
visithttp://www.tutorialspoint.com/http/http_methods.htm.
4.9.12 ExpressJS-URL Building
We can now define routes, but those are static or fixed. To use the dynamic routes, we SHOULD provide different types of routes. Using dynamic routes allows us to pass parameters and process based on them.
Here is an example of a dynamic route −
1 | |
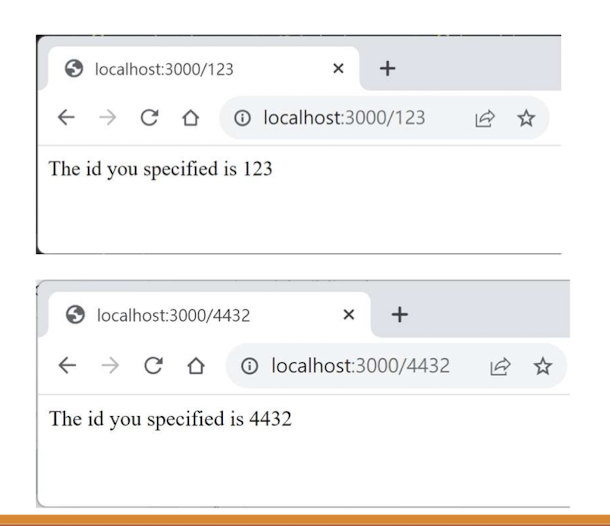
4.9.13 Pattern Matched Routes
You can also use regex to restrict URL parameter matching. Let us assume you need the id to be a 5-digit long number. You can use the following route definition.
1 | |
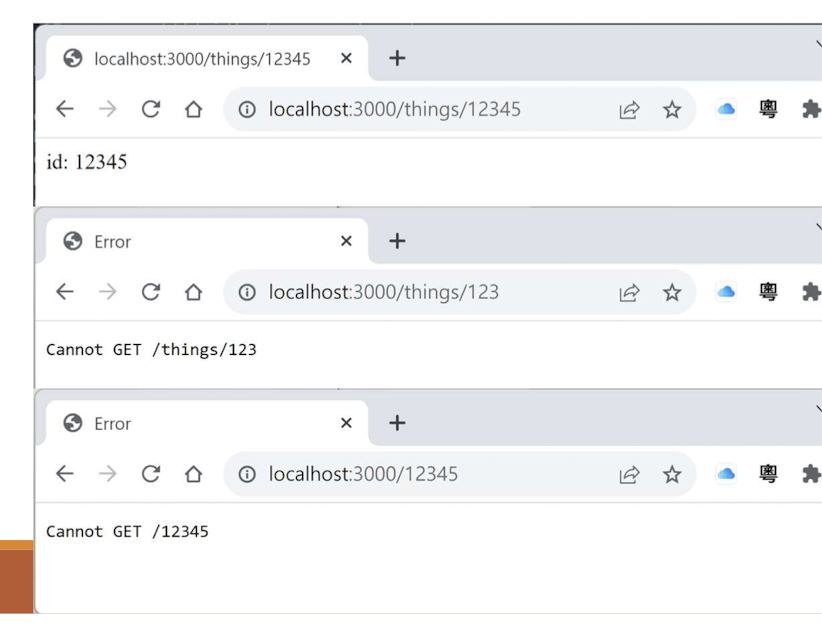
Route paths can be strings, string patterns, or regular expressions.
The characters ?, +, *, and () are subsets of their regular expression counterparts. The hyphen (-) and the dot (.) are interpreted literally by string-based paths.
String pattern in the form of regular expression syntax
- “*”: Represent arbitrary string
- “?”: Represent zero or one character/group
- “+”: Represent at least one or more character/group
- “[]”: Find any character between the brackets, i.e., “[abc]” match a, b or c
- “-” and “.” keep its literal meaning here
- $: Represent the end of the string
JavaScript regular expressions in the form of /<regex>/<modifier>
- Example: “
/.*fly$/” match any string end with “fly” - This route path will match butterfly and dragonfly, but not butterflyman,
dragonflyman, and so on.
References:
Note that this will only match the requests that have a 5-digit long id. You can use more complex regexes to match/validate your routes. If none of your routes match the request, you’ll get a “Cannot GET <your-request-route>“message as response. This message can be replaced by an invalid URL page using this simple route.
1 | |
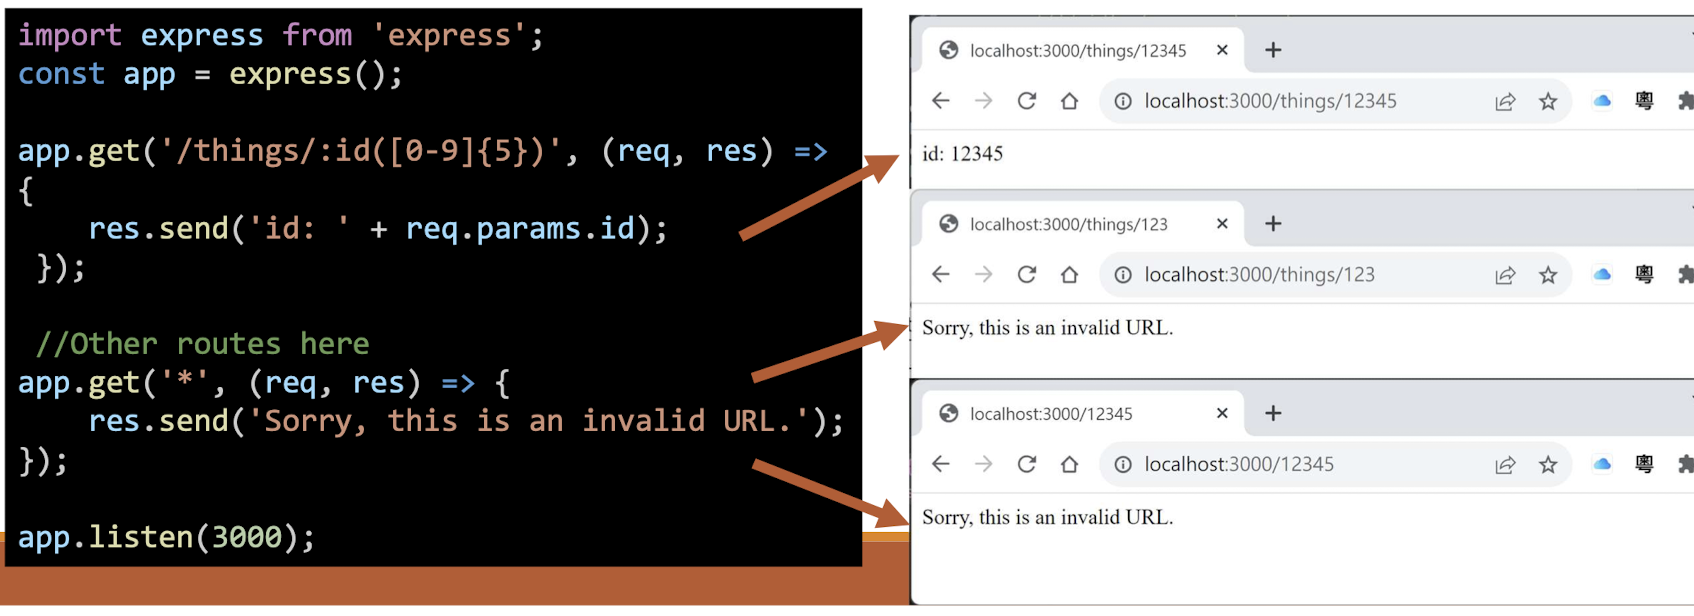
Important − This should be placed after all your routes, as Express matches routes from start to end of the index.js file, including the external routers you imported.
- Only find the first match route
If swapping the order:
1 | |
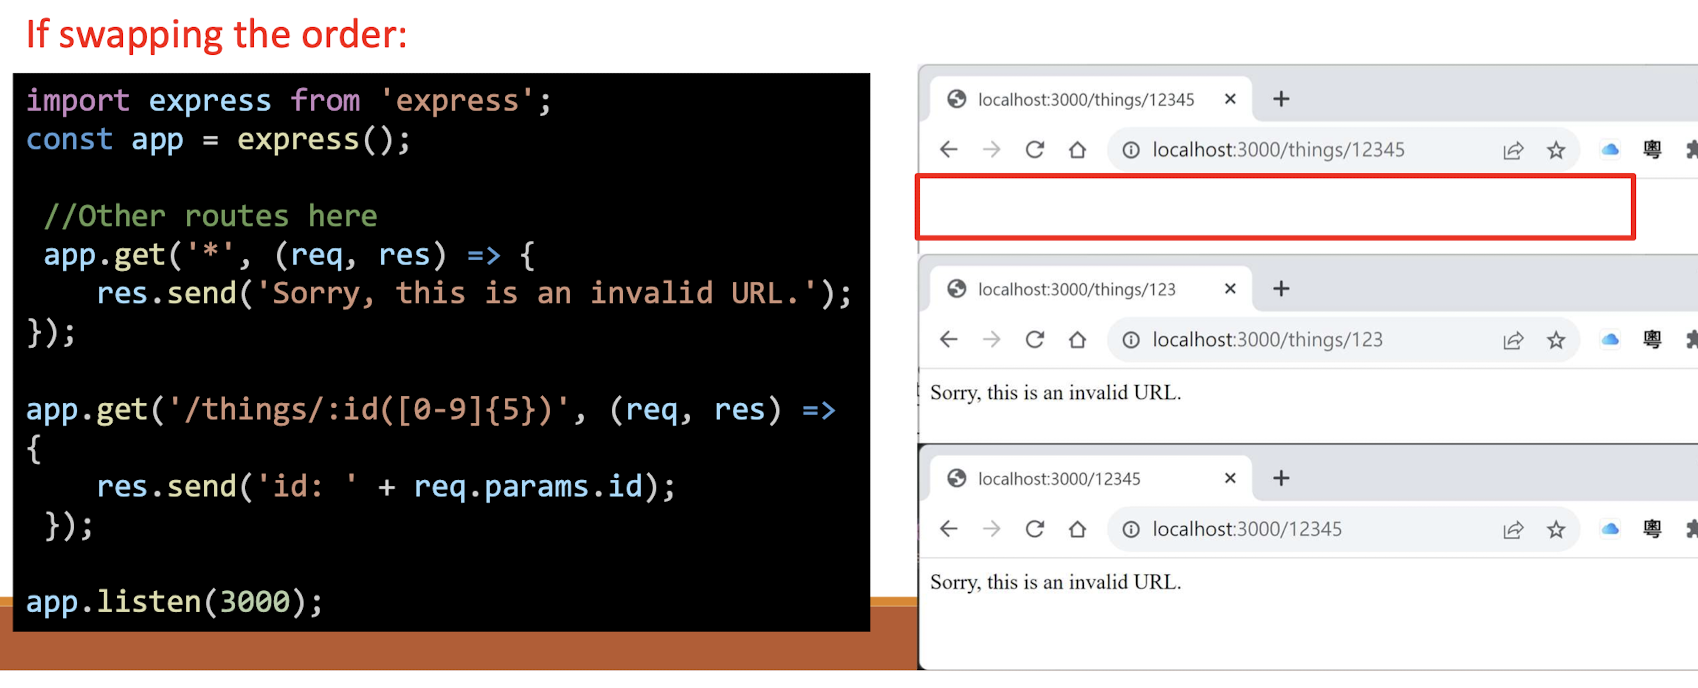
- All are “Sorry…”
4.9.14 ExpressJS-Middleware
Middleware functions are functions that have access to the request object (req), the response object (res), and the next middleware function in the application’s request-response cycle. These functions are used to modify req and res objects for tasks like parsing request bodies, adding response headers, etc.
Here is a simple example of a middleware function in action
1 | |
- This middleware is called for every request on the server.
- So after every request, we will get the following message in the console −
A new request received at 1467267512545
To restrict it to a specific route (and all its subroutes), provide that route as the first argument of app.use(). For Example,
1 | |
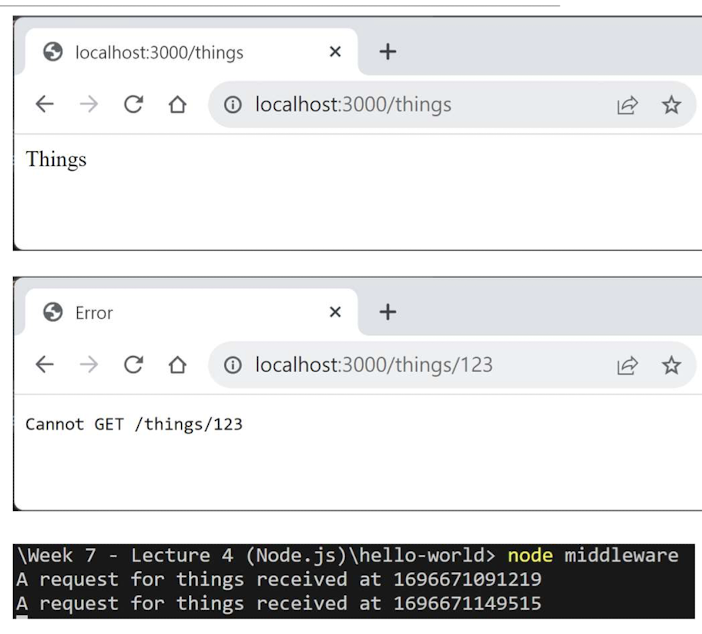
4.9.14.1 Order of Middleware Calls
One of the most important things about middleware in Express is the order in which they are written/included in your file; the order in which they are executed, given that the route matches also needs to be considered.
For example, in the following code snippet, the first function executes first, then the route handler and then the end function.
This example summarizes how to use middleware before and after route handler; also how a route handler can be used as a middleware itself.
1 | |
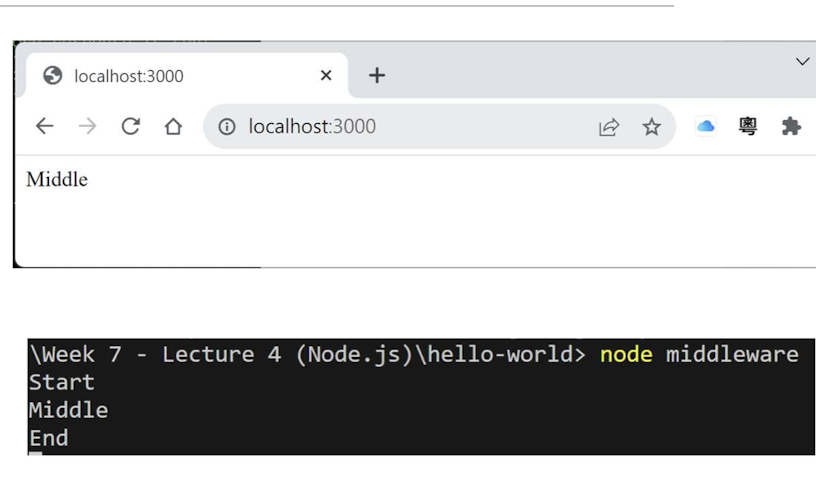
The following diagram summarizes what we have learnt about middleware −
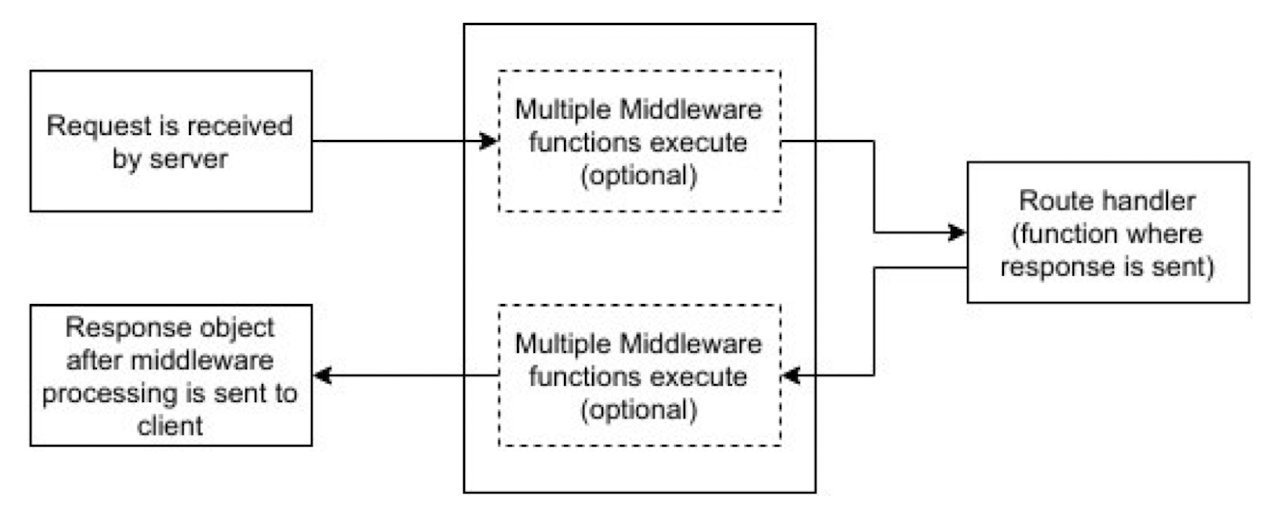
Now that we have covered how to create our own middleware. A list of third-party middleware for Express is available here:
Here are some of the most commonly used middleware: body-parser, cookie-parser, express-session.
4.9.15 ExpressJS-Serving static files
Static files are files that clients download as they are from the server.
Create a new directory, public.
Express, by default, does not allow you to serve static files.
You need to enable it using the following built-in middleware.
app.use(express.static(‘public’));
Note − Express looks up the files relative to the static directory, so the name of the static directory (e.g. ‘public’ in here) is not part of the URL.
Note that the root route is now set to your public dir, so all static files you load will be considering public as root. To test that this is working fine, add any image file in your new public dir.
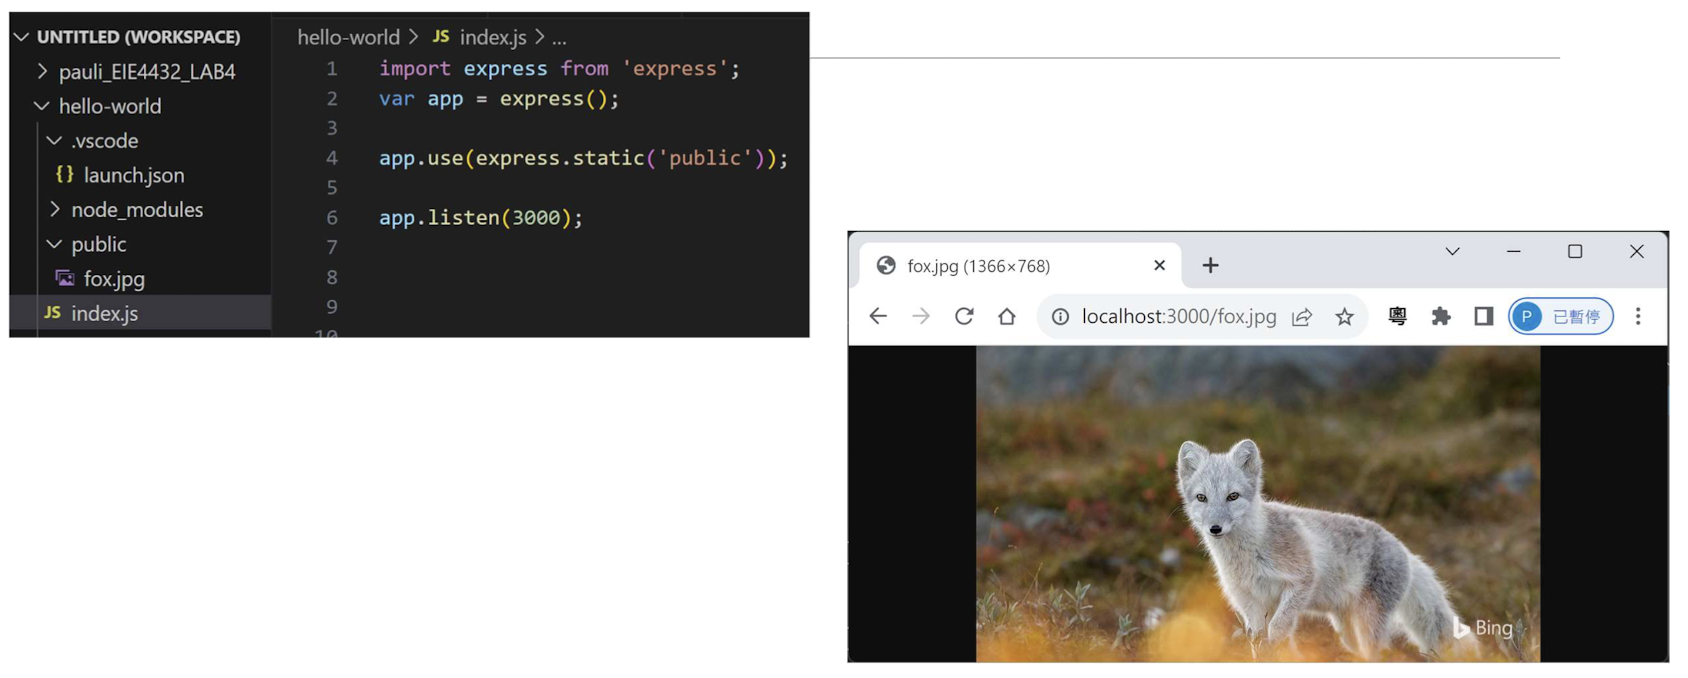
4.9.16 Multiple Static Directories
We can also set multiple static assets directories using the following program
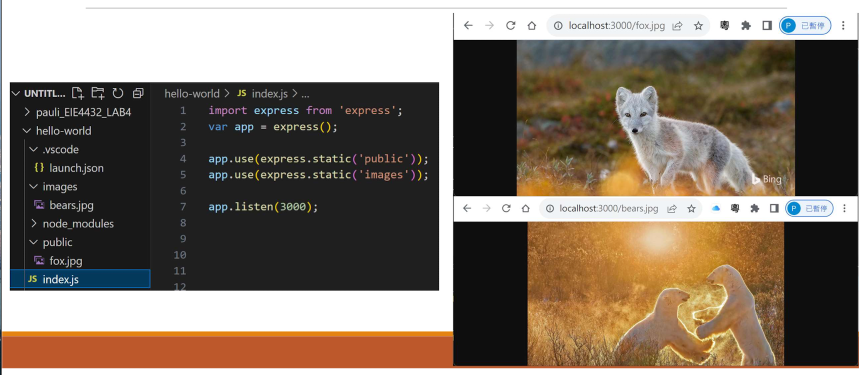
4.9.17 Virtual Path Prefix
We can also provide a path prefix for serving static files. For example, if you want to provide a path prefix like ‘/static‘, you need to include the following code in your index.js file
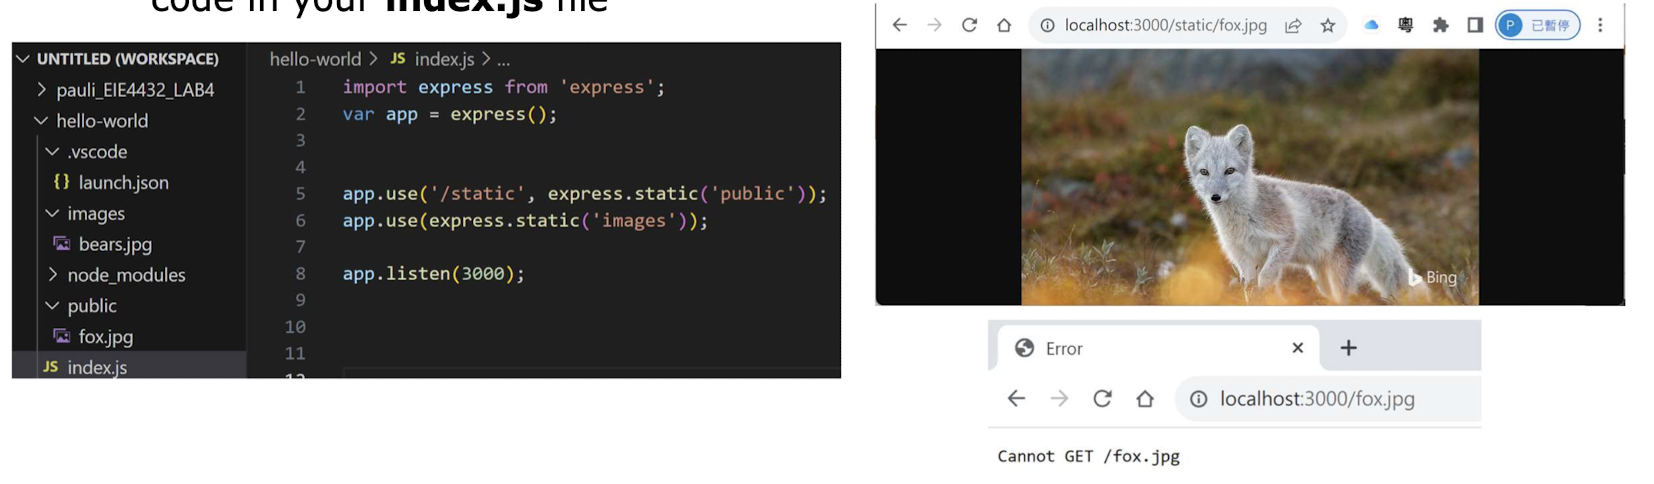
1 | |
Now whenever you need to include a file, for example, a script file called main.js residing in your public directory, use the following script tag −
<script src = "/static/main.js" />
This technique can come in handy when providing multiple directories as static files. These prefixes can help distinguish between multiple directories.
Self-learning
- Node.js provides rich set of API and libraries that we cannot cover in this lecture
- Official document provides very detailed API usage and examples
- https://nodejs.org/docs/latest/api/
- https://www.w3schools.com/nodejs/
- Express.js is a RESTful API framework and has a large ecosystem of plugin and modules
- https://expressjs.com/en/4x/api.html
- There are many middleware modules and its document maintained by official team
- https://expressjs.com/en/resources/middleware.html
5. ExpressJS Part 2 and NoSQL
5.1 ExpressJS Part 2
Expected learning outcomes
- How to receive upload file with multer
- Handling cookie/session with express-session
5.1.1 ExpressJS - Form data
Forms are an integral part of the web. Almost every website we visit offers us forms that submit or fetch some information for us. To get started with forms, we will first install the body-parser (for parsing JSON and url-encoded data) and multer (for parsing multipart/form data) middlewares.
To install the body-parser and multer , go to your terminal and use:
npm install --save body-parser multer
References:
http://expressjs.com/en/resources/middleware/body-parser.html
http://expressjs.com/en/resources/middleware/multer.html
5.1.2 ExpressJS - Form data
Create your form.html file contents with the following code and put it under /public folder.
1 | |
Create your form.js file contents with the following code
1 | |
After importing the body parser and multer, we will use the body-parser for parsing json and x-www-form-urlencoded header requests, while we will use multer for parsing multipart/form-data.
Result
Run your server using the following.
node form.js or nodemon form.js
Have a look at your console; it will show you the body of your request as a JavaScript object as in the following screenshot −
Now go to localhost:3000/; it will be redirected to /form.html Fill out the form as you like and submit it. The following response will be displayed −

5.1.3 ExpressJS – Upload Files
Multeris a express.js middleware for handling multipart/form-data request, which is primarily used for uploading files.
This example save the received files to ./upload/file/path
1 | |
Note that upload.any() must be placed before the user handlers,
- and an array of files will be stored in req.files.
- Other types of fields will be stored in req.body as usual.
HTML upload form
1 | |
Notes: upload.any() accepts any number of files
5.1.4 Express.js: Receive Files
The available field of each File in req.files:
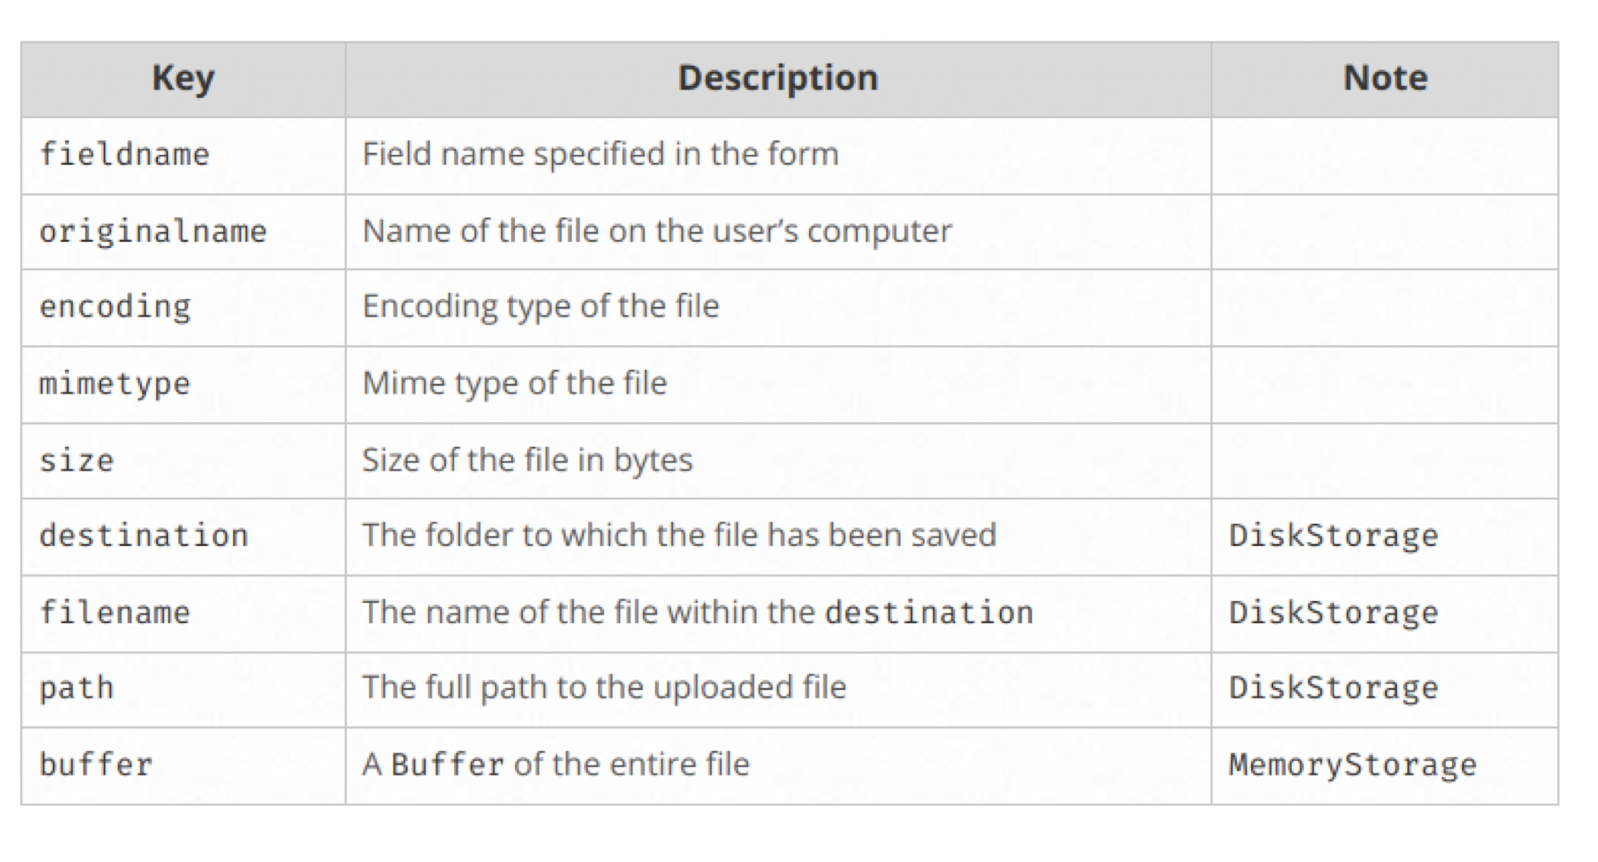
Create your form_upload.html file contents with the following code and put it under /public folder.
1 | |
Create your form_upload.js file contents with the following code
1 | |
Result
Have a look at your console; it will show you req.body as a null prototype, and req.files with different field values as in the following screenshot −
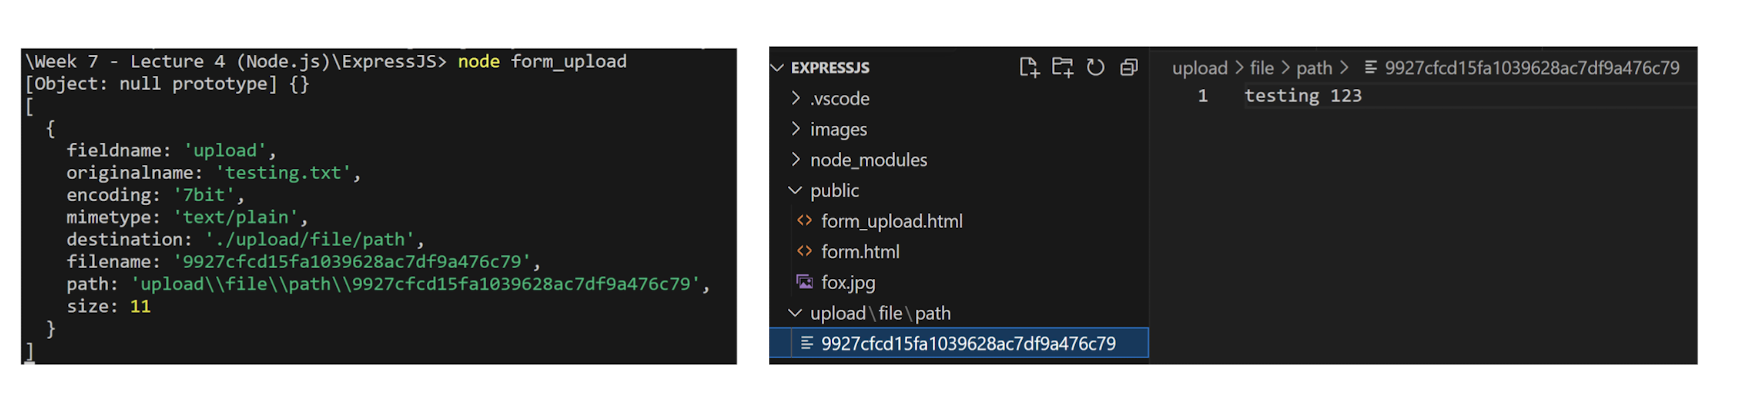
You can find the uploaded file in the destination path with a temporary file name.
5.1.5 ExpressJS – Upload Files
Modify the above program form_upload.js to change the temporary file name to the original file name.
1 | |
Knowledge Check (Fill in the blanks)
Create your UploadFileMulter.js file contents with the following code1
2
3
4
5
6
7
8
9
10
11
12
13
14
15
16
17
18
19
20
21
22import express from 'express';
import multer from 'multer';
const upload = multer({ dest: './uploaded' });
const app = express();
app.get('/', (req, res) => {
res.writeHead( 200 , { 'Content-Type': 'text/html'
});
res.write('<form action="/fileupload" method="post" enctype="multipart/form-data">');
res.write('<input type="file" name="filetoupload" <br>');
res.write('<input type="submit">');
res.write('</form>');
res.end();
});
app.post('/fileupload', upload.any(), (req, res) => {
const file = req.files[ 0 ];
res.send(`File uploaded to ${file.path}`);
res.end()
});
app.listen( 3000 );
Recall the file upload code with Formidable in the last lecture. Both code do the same task.
1 | |
Express.js with Multer is more readable and handier.
POST /fileupload(Upload file)
1 | |
GET / (Return the HTML form)
1 | |
5.1.6 ExpressJS - Cookies
Cookies are simple, small files/data that are sent to the client with a server response and stored on the client side.
Every time the user loads the website back, this cookie is sent to the server with the request.
This helps us keep track of the user’s actions.
The following are the numerous uses of the HTTP Cookies:
- Session management
- Personalization (Recommendation systems)
- User tracking
To use cookies with Express, we need the cookie-parser middleware. To install it, use the following code −
npm install --save cookie-parser
Now to use cookies with Express, we will import the cookie-parser. cookie- parser is a middleware which parses cookies attached to the client request object. To use it, we will import it in our cookie.js file; this can be used the same way as we use other middleware. Here, we will use the following code.
import cookieParser from 'cookie-parser';
app.use(cookieParser());
cookie-parser parses Cookie header and populates req.cookies with an object keyed by the cookie names.
To set a new cookie, let us define a new route in your Express app like
1 | |
The browser also sends back cookies every time it queries the server.
To view cookies from your server, on the server console in a route, add the following code to that route.
1 | |
Next time you send a request to this route, you will receive the following output.
5.1.7 Adding Cookies with Expiration Time
You can add cookies that expire. To add a cookie that expires, just pass an object with property expire set to the time when you want it to expire. For example,
1 | |
Another way to set expiration time is using maxAge property. Using this property, we can provide relative time instead of absolute time. Following is an example of this method.
1 | |
5.1.8 Deleting Existing Cookies
To delete a cookie, use the clearCookie function. For example, if you need to clear a cookie named ’name’ , use the following code.
1 | |
5.1.9 Express.js: Cookie/Session
In Express.js, session management can be achieved by the express-session package.
Server send the signed Session ID to the client as a cookie.
Client send requests with this cookie to identify the current session.
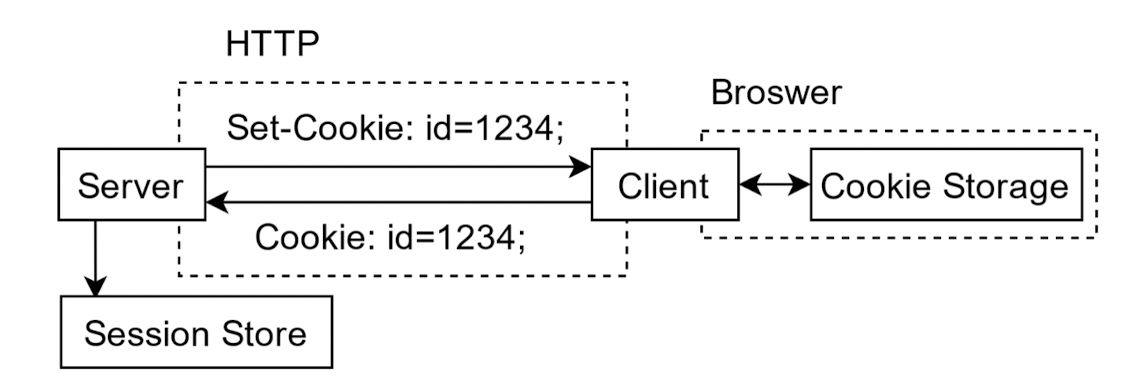
5.1.10 ExpressJS - Sessions
HTTP is stateless. In order to associate a request to any other request, you need a way to store user data between HTTP requests.
Cookies and URL parameters are both suitable ways to transport data between the client and the server. But they are both readable and on the client side.
Sessions solve exactly this problem.
You assign the client an ID and it makes all further requests using that ID. Information associated with the client is stored on the server linked to this ID.
We will need the express-session, so install it using the following code.
npm install --save express-session
In this example, we will use the default store for storing sessions, i.e., MemoryStore. Never use this in production environments. The session middleware handles all things for us, i.e., creating the session, setting the session cookie and creating the session object in req object.
Whenever we make a request from the same client again, we will have their session information stored with us (given that the server was not restarted). We can add more properties to the session object. In the following example, we will create a view counter for a client.
1 | |
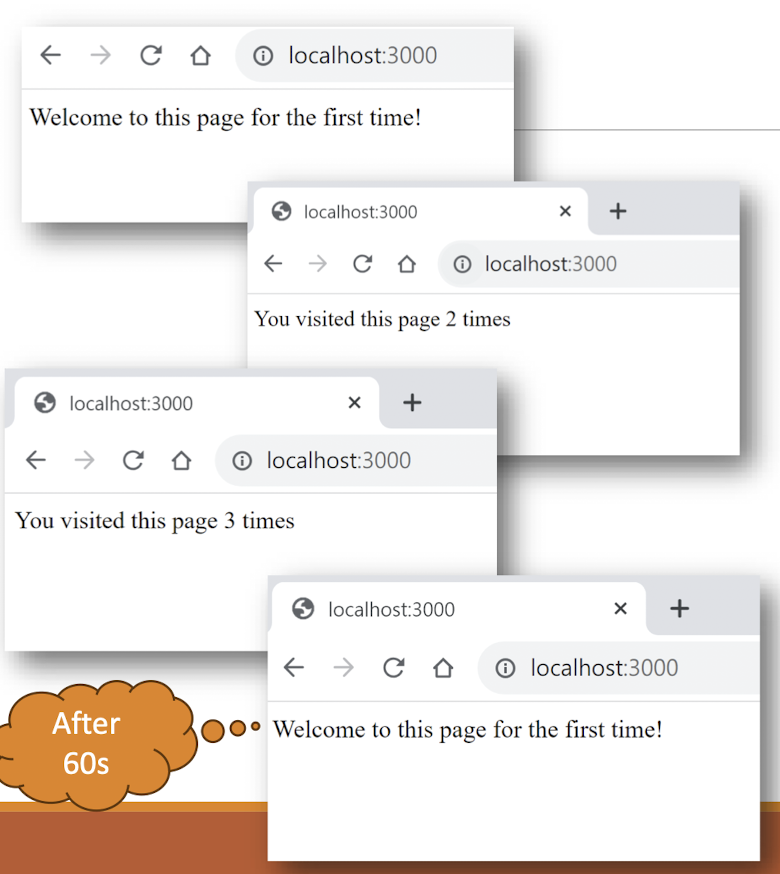
5.2 NoSQL database
RDBMS
- Stands for “Relational Database Management System”
- Enforced structured data model based on tables with predefined schemas
- Each table in a database schema has a unique name and defines the structure of the data it stores, including:
- Data types of the data columns
- Relationships between tables
- Constraints
- Primary keys
- Foreign keys
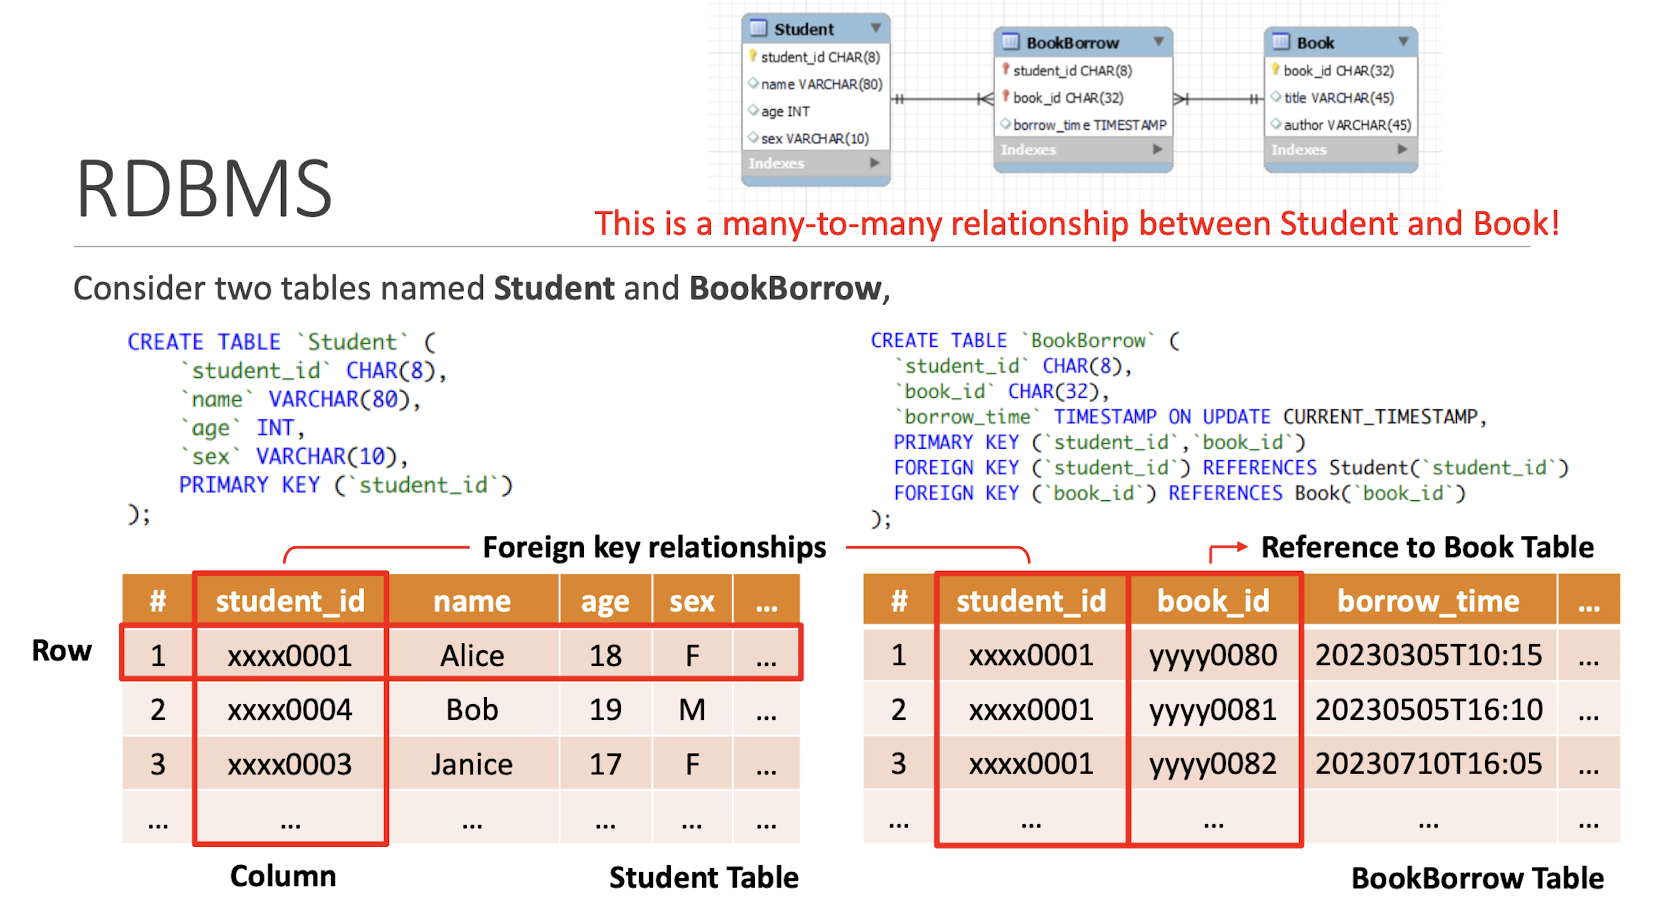
5.2.1 What is the problem of RDBMS?
Fixed schema
- Need to alter the table structure if you changed the schema $\to$ complex and time-consuming
- Cannot have dynamic fields on demand, i.e., add a field for specific records.
Rely on vertical scaling
- Need to scale up the single server when data size grows
- Not designed to be distributed
- Use centralized architecture
Scale up (Vertical scaling)
- Add more resource to a single server
- Expensive
Scale out (Horizontal scaling)
- Add more servers
- Distribute the workload to different servers
5.2.1 NoSQL
- Often interpreted as “Not Only SQL”
- A class of schema-less database system
- Allows dynamic data structures
- Horizontal scalability
- Distribute data across multiple servers to handle large volumes of data
- Support different types of data models
5.2.2 NoSQL Types
- Key-value stores
- Graph databases
- Document-oriented (json-like)
- Column family
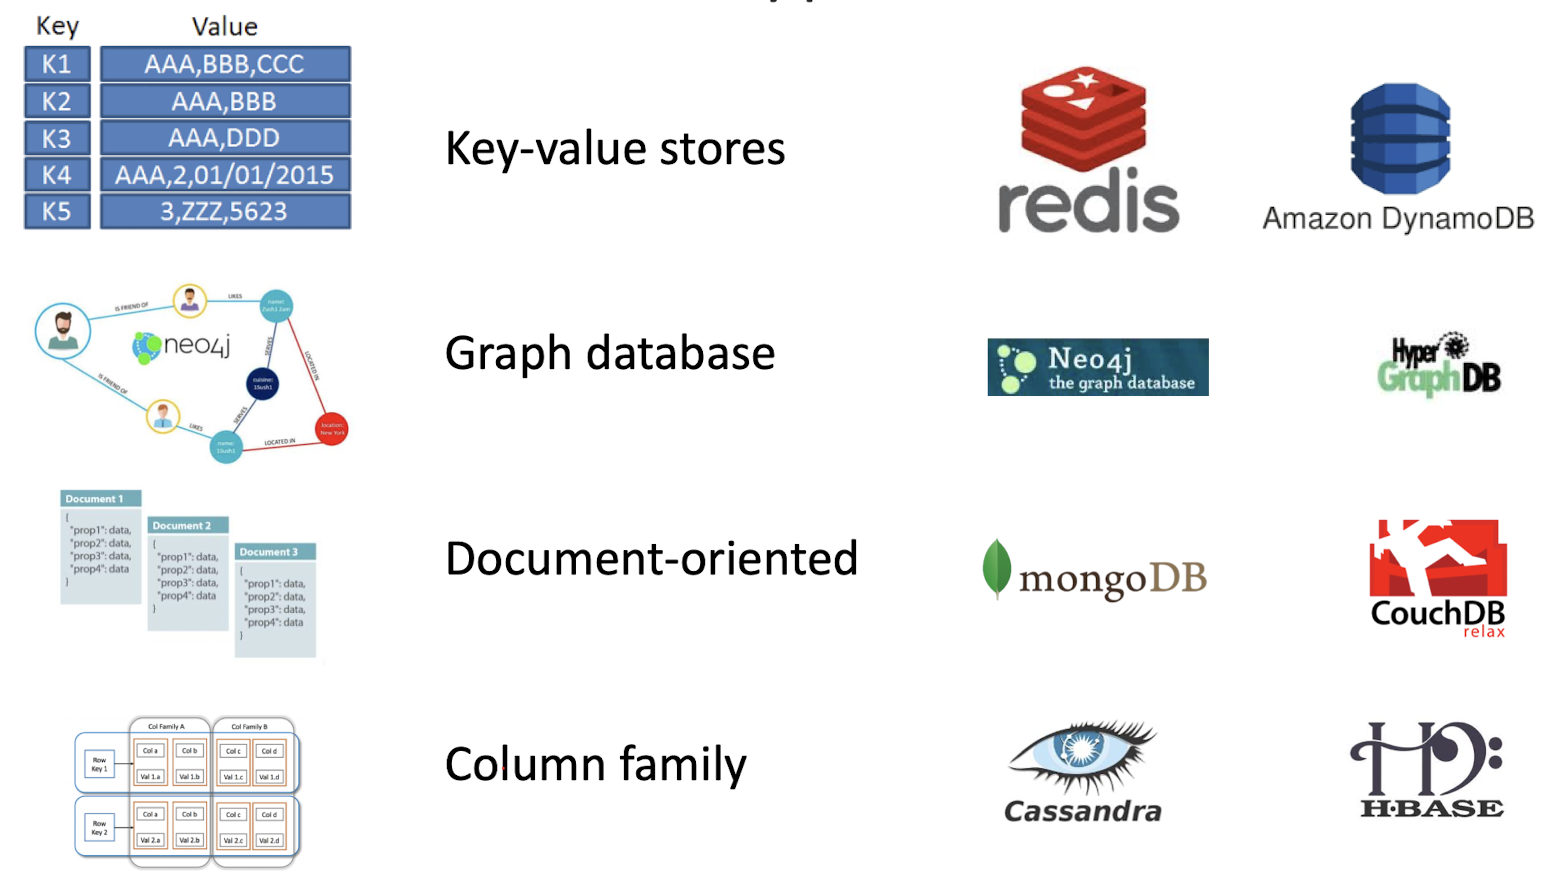
Document Object Example
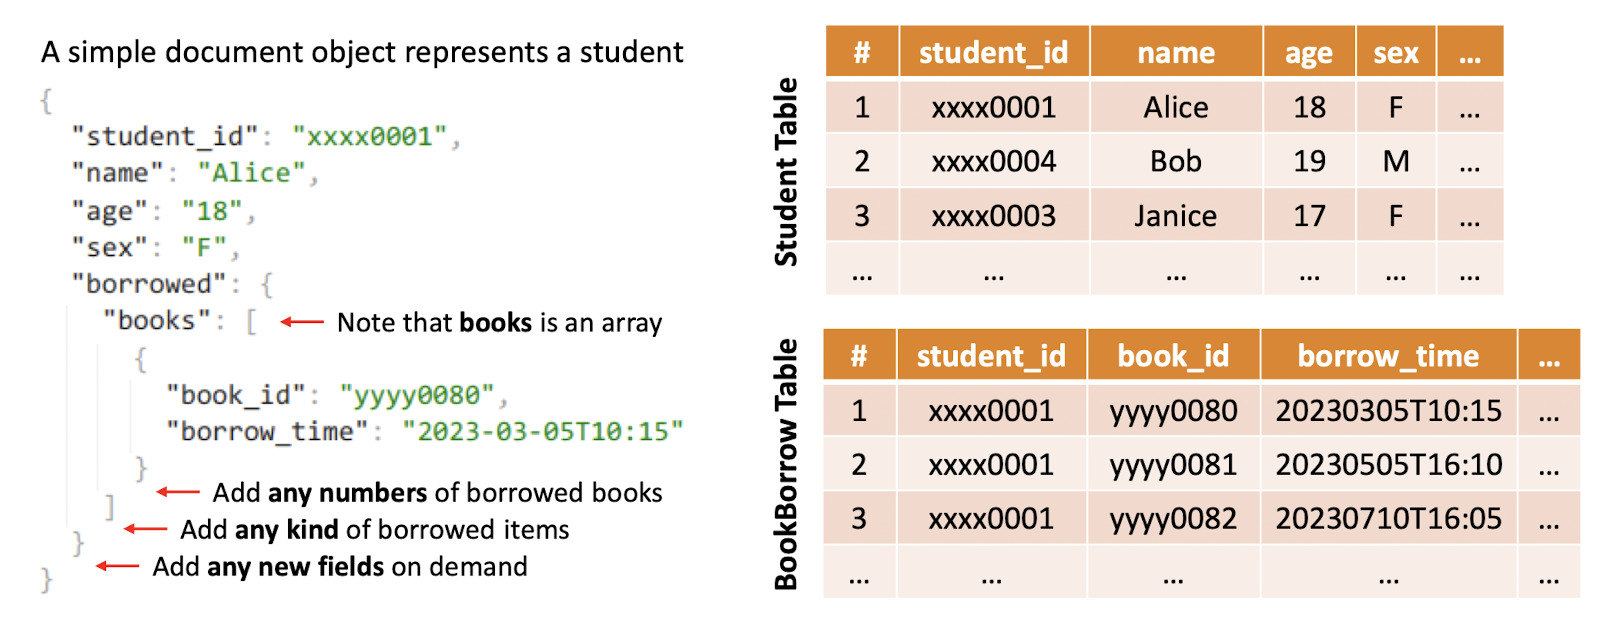
5.2.3 SQL vs NoSQL
NoSQL database provides a mechanism for storage and retrieval of data that is modeled in means other than the tabular relations used in relational databases.
| SQL | NoSQL |
|---|---|
| Relational Database Management System (RDBMS) | Non-relational or distributed database system. |
| These databases have fixed or static or predefined schema | They have dynamic schema |
| These databases are best suited for complex queries | These databases are not so good for complex queries |
| Vertically Scalable | Horizontally scalable |
5.2.4 MongoDB
References:
https://www.tutorialspoint.com/mongodb/index.htm
https://www.w3schools.com/mongodb/index.php
5.2.5 What is MongoDB?
- MongoDB is an open source, document-oriented database designed with both scalability and developer agility in mind.
Instead of storing your data in tables and rowsas you would with a relational database, in MongoDB you store JSON-like documents with dynamic schemas (schema-free, schema-less).
_id: Primary key
1 | |
5.2.6 MongoDB is Easy to Use
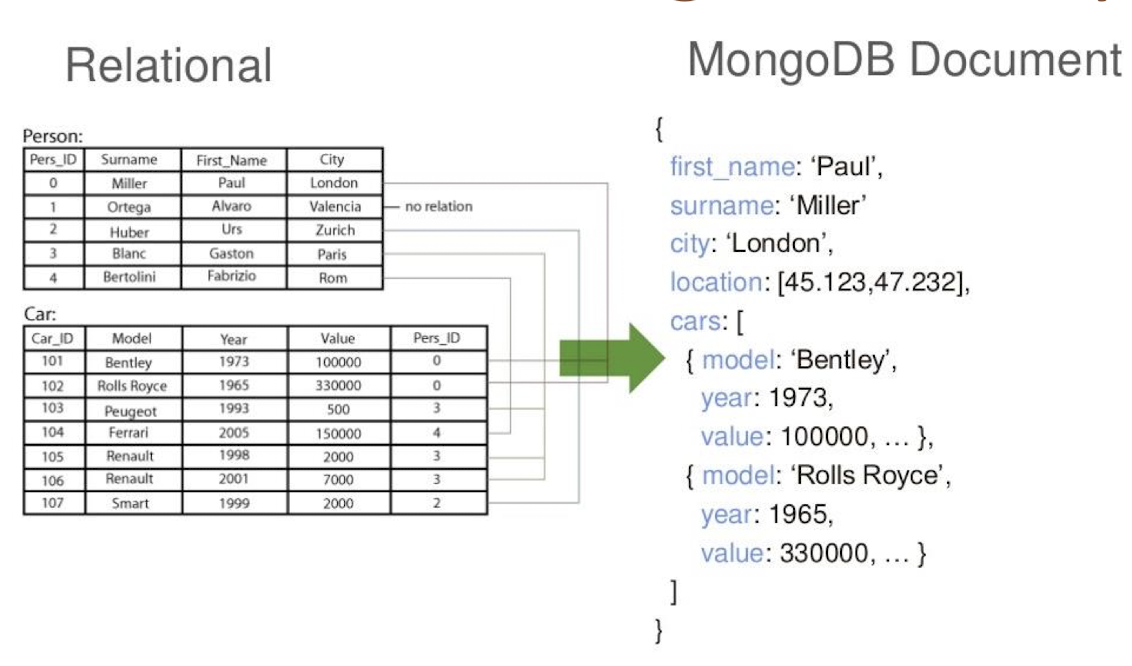
Knowledge-check exercise:
- Please pick a person, other than Paul Miller, from the relationship DB and write down the MongoDB Document for this person. You may ignore the location attribute.
Terminologies
RDBMS | MongoDB
—- | —-
Database | Database
Table | Collection
Row/Tuple/Record | Document(JSON, BSON (Binary JSON))
Column | Field
Index | Index
Table Join | Embedded Document
Primary Key | Primary Key ( _id, can be auto-generated or custom)
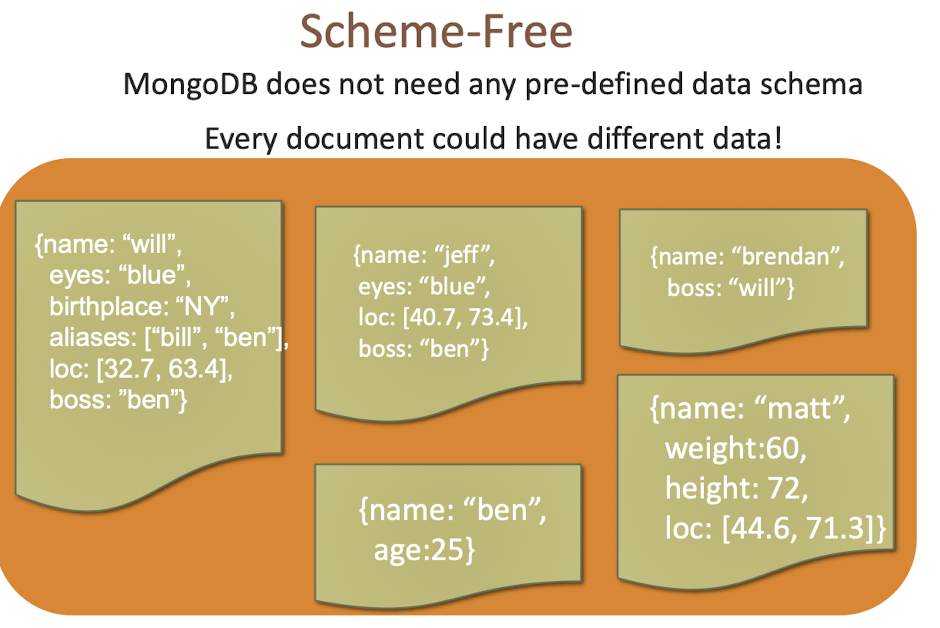
5.2.7 Features Of MongoDB
- Document-oriented database
- Built-in horizontal scalability (scale out)
- High performance and indexing
- Rich queries and data aggregations
- Integration with vary application frameworks, i.e., MongoDB Node Drivers
- Large ecosystem and community
Why MongoDB?
https://db-engines.com/en/ranking
5.2.8 Local vs Cloud Database
MongoDB can be installed locally, which will allow you to host your own MongoDB server on your hardware. This requires you to manage your server, upgrades, and any other maintenance.
You can download and use the MongoDB open source Community Server on your hardware for free.
However, for this course we are going to use MongoDB Atlas, a cloud database platform. This is much easier than hosting your own local database.
To be able to experiment with the code examples, you will need access to a MongoDB database.
Sign up for a free MongoDB Atlas account to get started.
5.2.9 Creating a Cluster to Deploy Database
To deploy your database, set up a free “Shared Cluster” then choose your preferred cloud provider and region.
By default, MongoDB Atlas is completely locked down and has no external access.
You will need to set up a user and add your IP address to the list of allowed IP addresses.
Under “Database Access”, create a new user and keep track of the username and password.
Next, under “Network Access”, add your current IP address to allow access from your computer.
Or you may set up a user and add your IP address to the list of allowed IP addresses during creation of a database.
5.2.10 Deploy your database
Install MongoDB Shell (mongosh)
There are many ways to connect to your MongoDB database.
We will start by using the MongoDB Shell, mongosh.
Use the official instructions to install mongoshon your operating system.
https://www.mongodb.com/docs/mongodb-shell/install/
https://www.mongodb.com/try/download/shell
To verify that it has been installed properly, open your terminal and type:
(You may need to add themongoshbinary to yourPATHenvironment variable first)
You should see that the latest version is installed.
mongosh --version
The version used in this tutorial is v2.0.1.
5.2.11 Connect to the database
To connect to your database, you will need your database-specific connection string.
In the MongoDB Atlas dashboard, under “Database”, click the “Connect” button for your Cluster.
Next, choose “Connect with the MongoDB Shell”.
Copy your connection string.
Paste your connection string into your terminal and press enter.
You will be prompted to enter your database user password that you created earlier.
You are now connected to the database!
5.2.12 MongoDB CRUD Operations
CRUD operations refer to create , read , update , and delete documents.
- Create
- Create or insert operations add new documents to a collection
- Read
- Retrieve documents from a collection
- Update
- Modify existing documents in a collection
- Delete
- Remove documents from a collection
Reminder
- Document is the basic unit of data, and each write operations apply to a collection atomically.
5.2.13 MongoDB mongosh Create Database
See which database you are using
After connecting to your database using mongosh, you can see which database you are using by typing db in your terminal.
If you have used the connection string provided from the MongoDB Atlas dashboard, you should be connected to the test database.
Show all databases
To see all available databases, in your terminal type show dbs.
Notice that test is not listed. This is because the database is empty. An empty database is essentially non-existant.
Change or Create a Database
You can change or create a new database by typing use then the name of the database.
We are now in the blog database.
Remember:
- In MongoDB, a database is not actually created until it gets content!
MongoDB mongosh Create Collection (table)
There are 2 ways to create a collection.
Method 1
- You can create a collection using the
createCollection()database method. - Remember: In MongoDB, a collection is not actually created until it gets content!
Method 2
- You can also create a collection during the insert process.
- Example
- We are here assuming object is a valid JavaScript object containing post data:
db.posts.insertOne(object) - This will create the “posts” collection if it does not already exist.
5.2.14 Create documents
(record/row)
insertOne()andinsertMany()method is used to insert a new document and multiple documents at once respectivelyEach document is a JSON object
MongoDB will add the “_id” field to the document if not specified
- If the “_id” is specified, it must be unique within the collection
Add a new student
1 | |
Add multiple students1
2
3
4
5
6
7
8
db.students.insertMany([{
"_id": "xxxx0004",
"name": "Bob",
"age": 19,
...},
...
])
5.2.15 MongoDB mongosh Insert documents
There are 2 methods to insert documents into a MongoDB database: insertOne() and insertMany()
insertOne()
To insert a single document, use the insertOne() method.
This method inserts a single object into the database.
Note: When typing in the shell, after opening an object with curly braces “{“ you can press enter to start a new line in the editor without executing the command. The command will execute when you press enter after closing the braces.
1 | |
Note: If you try to insert documents into a collection that does not exist, MongoDB will create the collection automatically.
insertMany()
To insert multiple documents at once, use theinsertMany()method.
This method inserts an array of objects into the database.
1 | |
- Note that it is an array
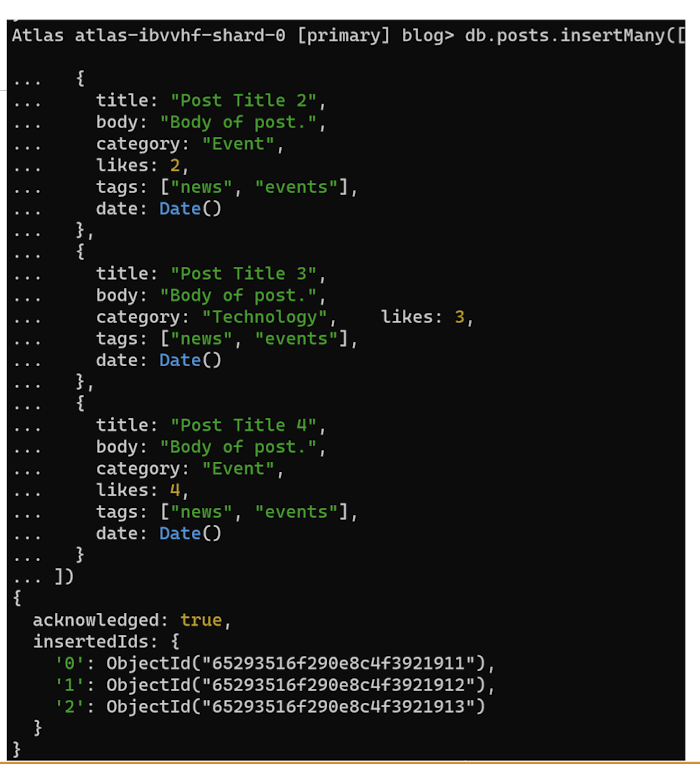
5.2.16 MongoDB mongosh Find
Find Data
There are 2 methods to find and select data from a MongoDB collection,find() and findOne().
find()
To select data from a collection in MongoDB, we can use the find() method.
This method accepts a query object. If left empty, all documents will be returned.
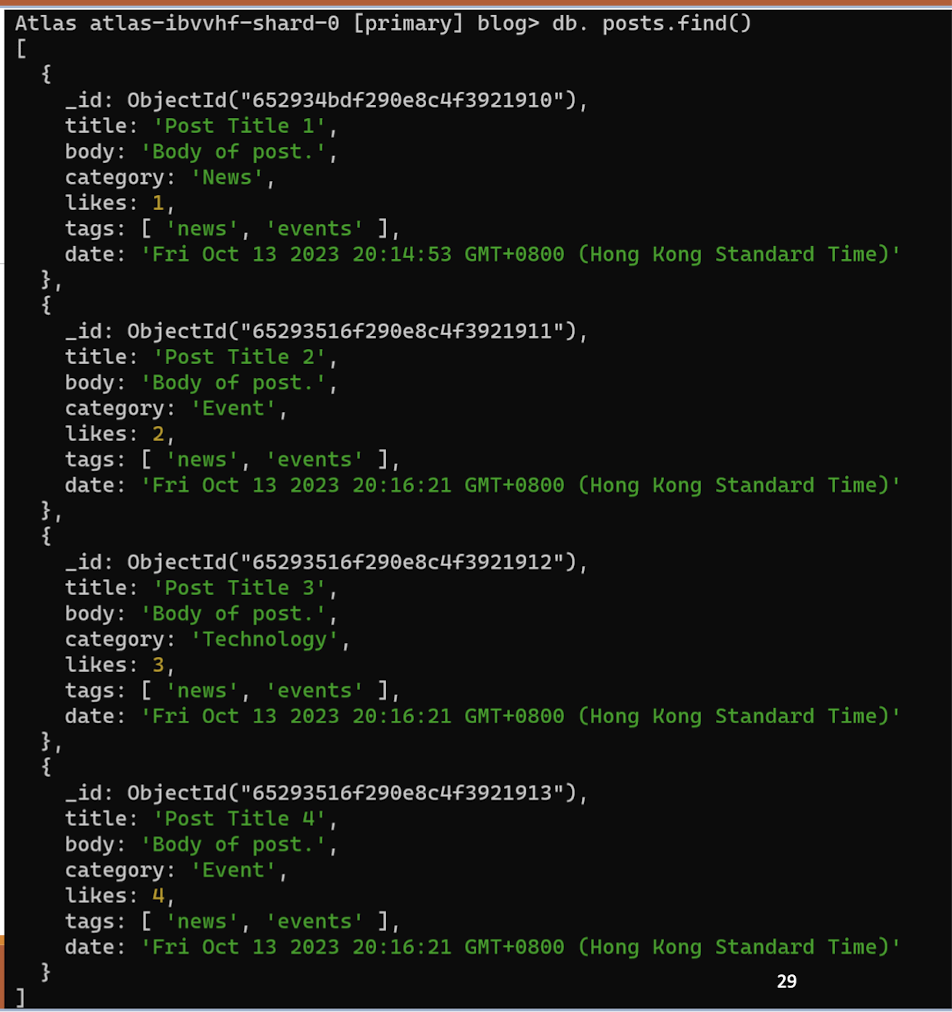
findOne()
To select only one document, we can use the findOne() method.
This method accepts a query object. If left empty, it will return the first document it finds.
- Note: This method only returns the first match it finds.
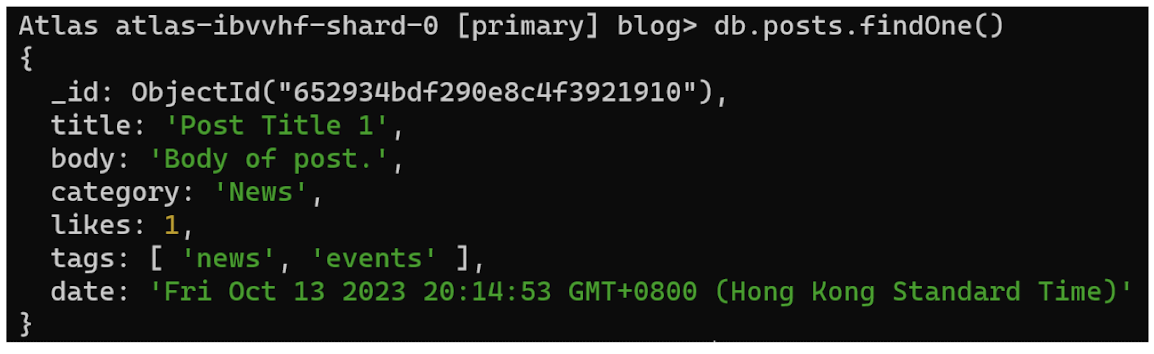
Querying Data
To query, or filter, data we can include a query in our find() or findOne() methods.
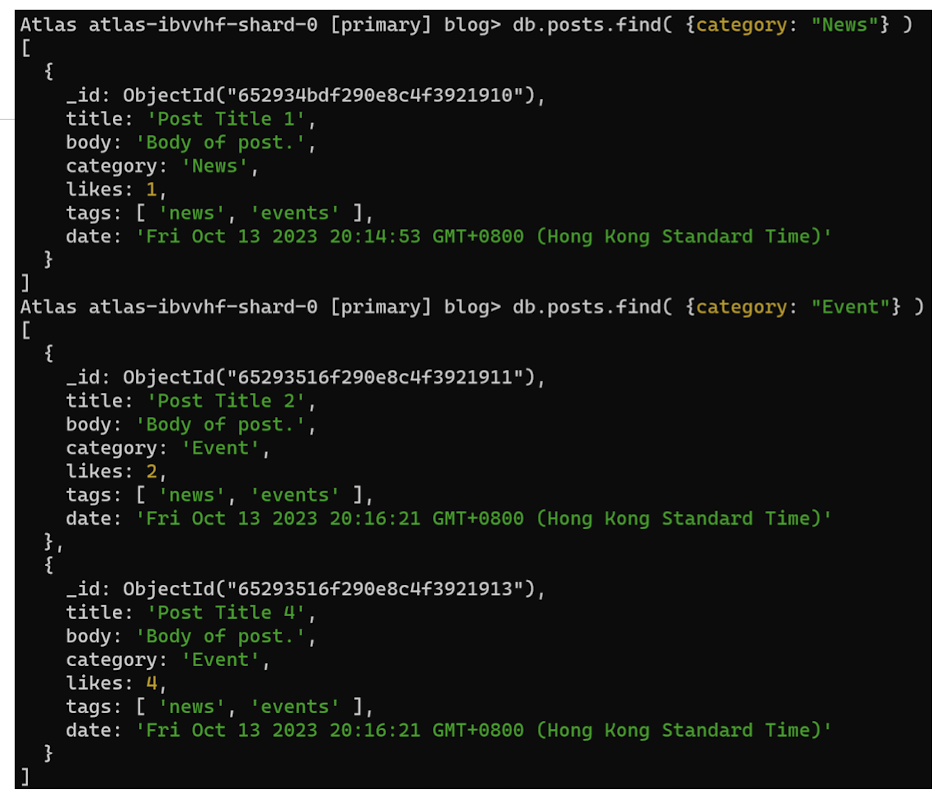
Projection
Both find methods accept a second parameter called projection.
This parameter is an object that describes which fields to include in the results.
- like
SELECT title, datain SQL - Note: This parameter is optional. If omitted, all fields will be included in the results.
This example will only display the title and date fields in the results.
- Notice that the
_idfield is also included. This field is always
included unless specifically excluded.
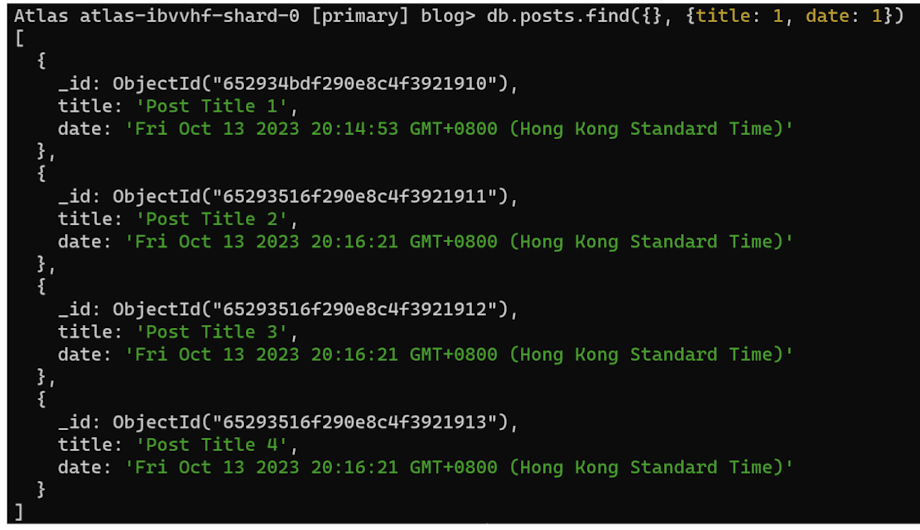
We use a 1 to include a field and 0 to exclude a field.
This time, let’s exclude the _id field.
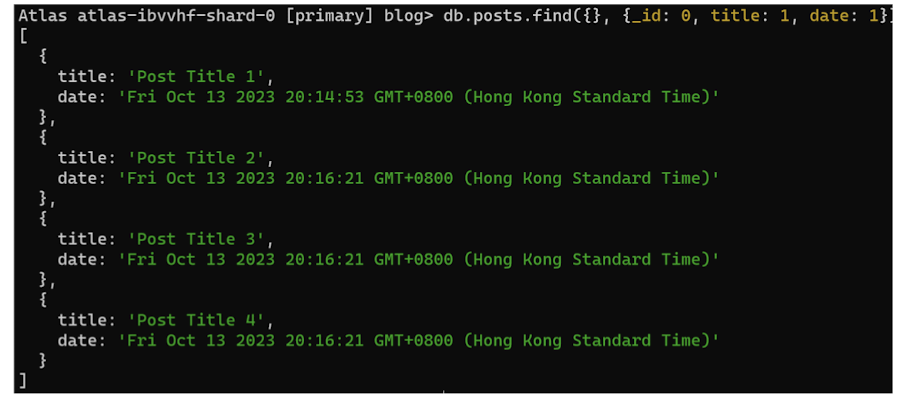
- Note: You cannot use both 0 and 1 in the same object. The only exception is the
_idfield. You should either specify the fields you would like to include or the fields you would like to exclude.
Let’s exclude the category field.
All other fields will be included in the results.
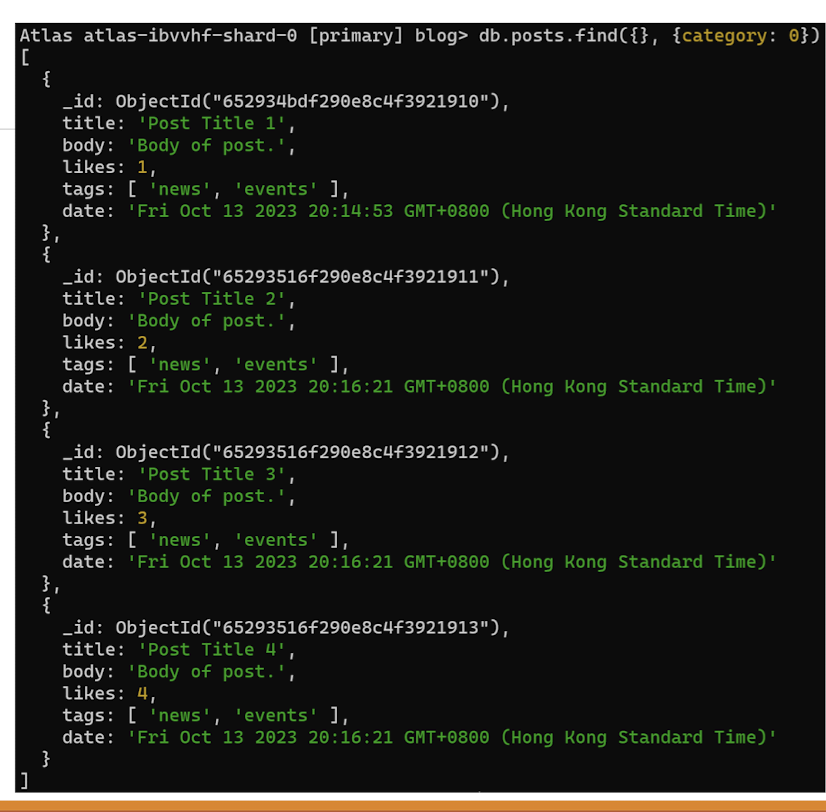
We will get an error if we try to specify both 0 and 1 in the same object.

- Note: You cannot use both 0 and 1 in the same object. The only exception is the_idfield. You should either specify the fields you would like to include or the fields you would like to exclude.
5.2.17 MongoDB mongosh Update
Update Document
- To update an existing documentwe can use the updateOne() or updateMany() methods.
- The first parameter is a query object to define which document or documents should be updated.
- The second parameter is an object defining the updated data.
updateOne()
- The
updateOne()method will update the first document that is found matching the provided query. - Let’s update the “likes” on this post to 2. To do this, we need to use the
$setoperator.

Insert if not found
- If you would like to insert the document if it is not found, you can use the
upsertoption.
Update the document, but if not found insert it:
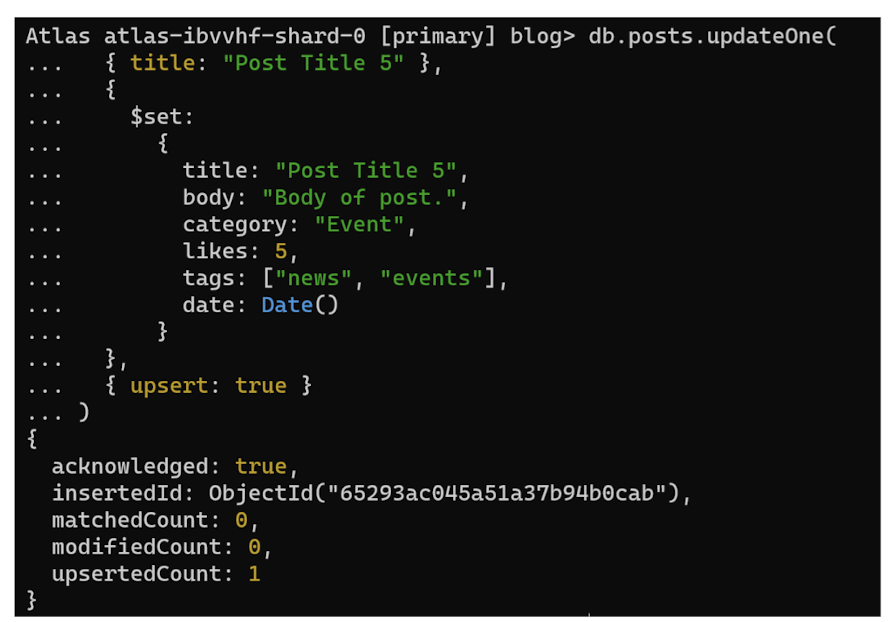
updateMany()
- The updateMany() method will update all documents that match the provided querys.
- Increment likes on all documents by 1. For this we will use the
$inc(increment) operator:
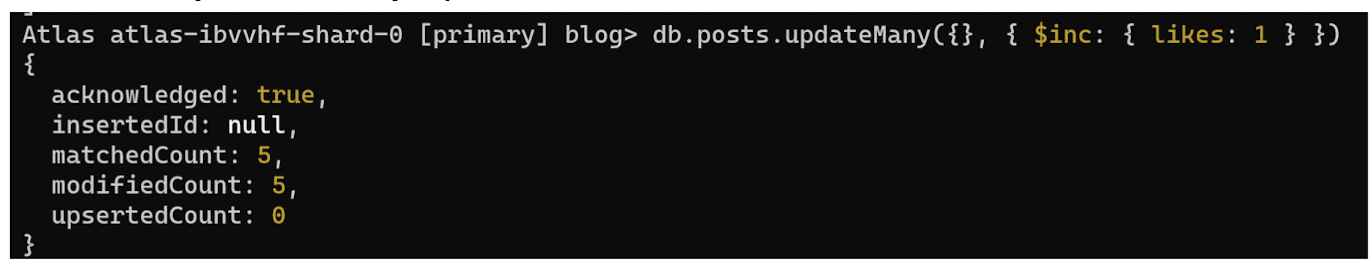
- Use db.posts.find() to check the likes in all of the documents before and after the update.
- You will see that they have all been incremented by 1.
5.2.18 MongoDB mongosh Delete
Delete Documents
We can delete documents by using the methods deleteOne() or deleteMany().
These methods accept a query object. The matching documents will be deleted.
deleteOne()
- The
deleteOne()method will delete the first document that matches the query provided.
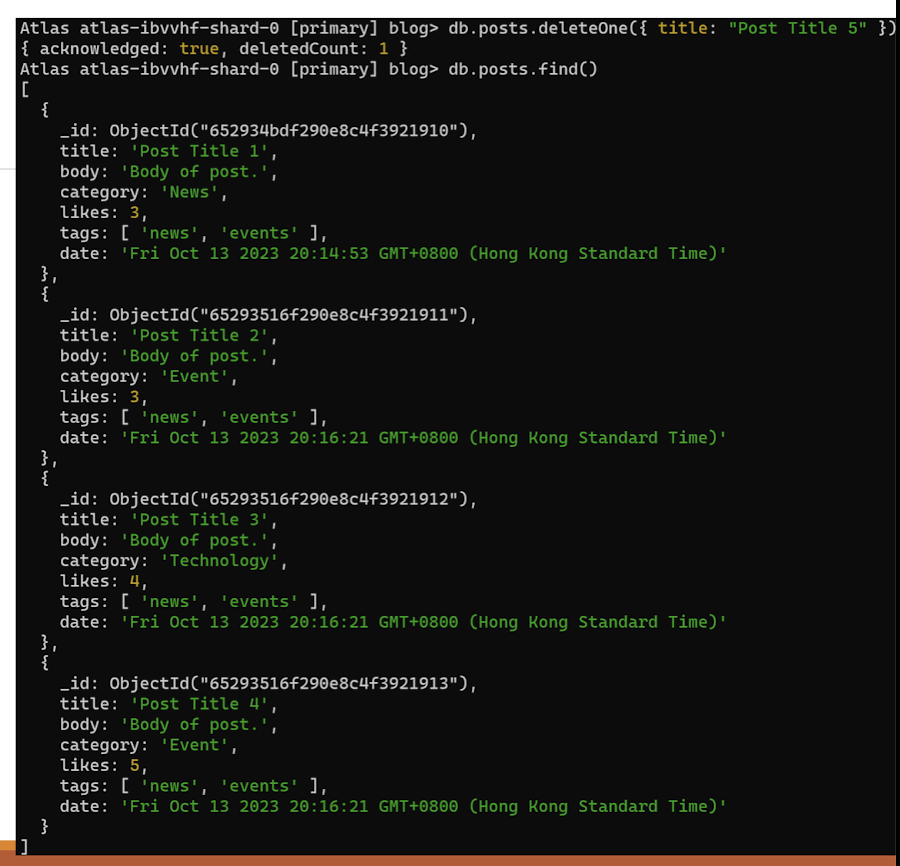
deleteMany()
- The
deleteMany()method will delete all documents that match the query provided.
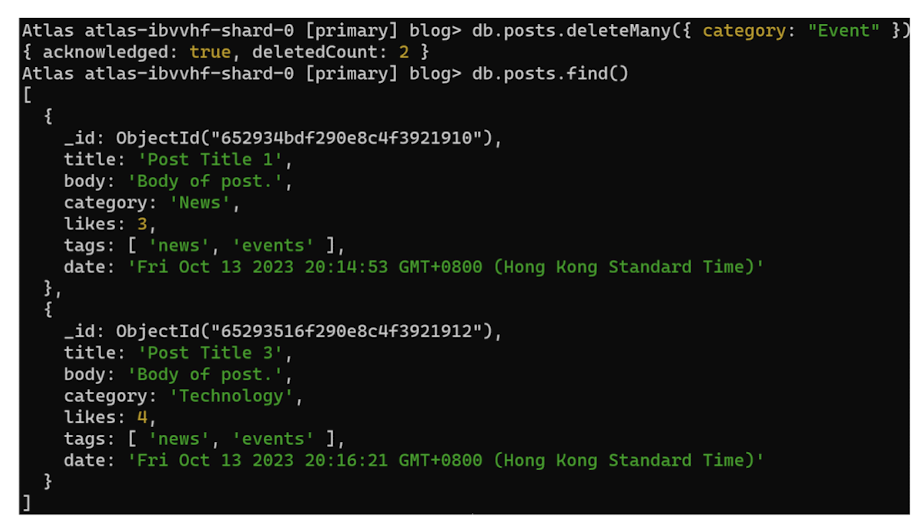
5.2.19 MongoDB mongosh Drop
drop()
- The
drop()method will remove a collection or view from the database.
The following operation drops theposts2 collection in the current database.
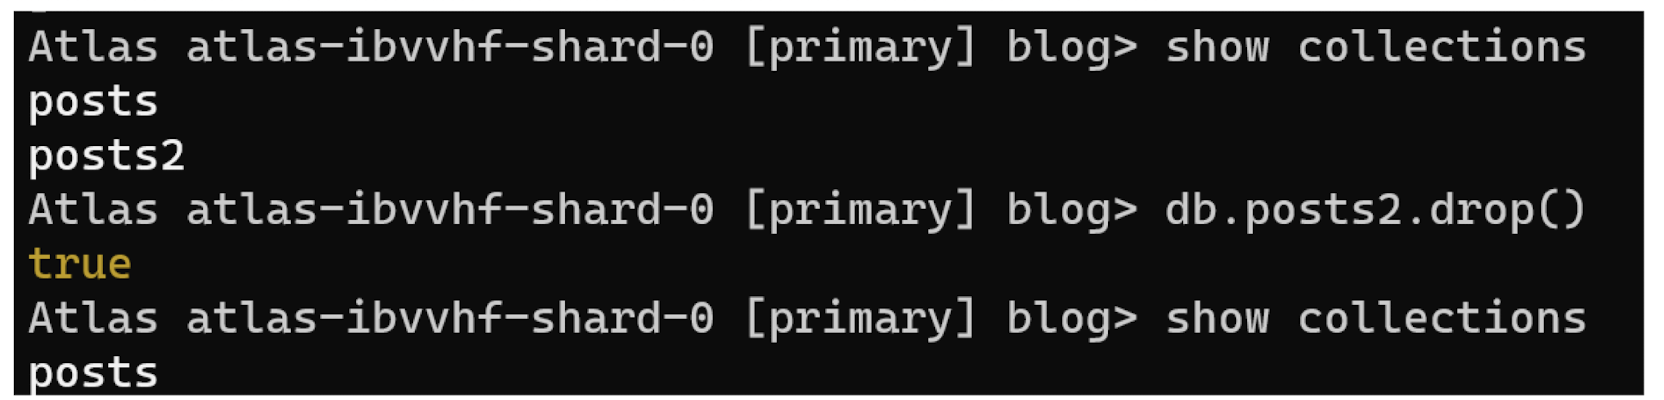
5.2.20 Basic query
- MongoDB Query Language (MQL) is used for querying and manipulating data
Used to specify query filters or criteria to identify the documents to return or modify
find()andfindOne()method can be used to query a collectionfindOne()will only return the first document that matches the query criteria
[Example query]
Select students collection
1 | |
$gtis query selector matching value greater than specific value, i.e., age> 18- Query criteria →
age > 18 AND sex == "F"age and sex are the fields of the documents in the collection. - Reminder
- Call
find()orfindOne()without argument implies matching all
- Call
- MQL is based on a JSON-like syntax, so it provides a familiar and readable way to express these queries as a Javascript object.
- Valid query expression formats
{ "key ": value , ...}where value is an exact value- E.g. {“sex”: “F”}
{ "key ": {"$selector" : expression, ...}, ...}(Surrounded by braces{ … })- E.g.
{"age": {"$gt": 18}, "sex": "F"}
- E.g.
{"$selector" : expression , ... }- E.g.
{"$not": {"age": {"$gt": 12}}}
- E.g.
{"$selector" : [expression, ...] , ... }(Some selectors requires an array […])- e.g.
{"$in": ["Alice", "Bob", "Joey"]}}
- e.g.
- Empty {} means matching all documents
- Each key-value pair in the query must be satisfied
MQL support a varietyof query selectors
Comparison
($lt, $ge, $eq, $in, ...)- Example:
{"age": {"$gt": 18 }}→ age is greater than 18 - Example:
{"name": {"$in": ["Alice", "Bob", "Joey"]}}→ name is either Alice, Bob or Joey
- Example:
- Logical
($or, $and, ...)- Example:
{"$or": [{"age": {"$gt": 12}}, {granted: true}]}→ age greater than 12 OR is granted - Example:
{"$not": {"age": {"$gt": 12}}}→ IS NOT age greater than 12
- Example:
- Array
($all, $elemMatch) - Element
($exist) - Note
- Selectors that need multiple values input use array
[...], like$in , $and , $or.
- Selectors that need multiple values input use array
https://www.mongodb.com/docs/v7.0/reference/operator/query
{ " _key_ ": { " _$selector"_ : expression, ...}, ...}
- A single expression can contain multiple conditions, which implies the AND operation
- All conditions in the query must be satisfied
- A common example like
{ "x": { "$gt": 0, "$lt: 10}} - Matches field x with a value greater than 0 ANDless than 10
- This characteristic only applies to query on values.
- Query on array has a different way of handling
5.2.21 MongoDB Query Operators
Comparison
The following operators can be used in queries to compare values:
$eq: Values are equal$ne: Values are not equal$gt: Value is greater than another value$gte: Value is greater than or equal to another value$lt: Value is less than another value$lte: Value is less than or equal to another value$in: Value is matched within an array
Logical
The following operators can logically compare multiple queries.
$and: Returns documents where both queries match$or: Returns documents where either query matches$nor: Returns documents where both queries fail to match$not: Returns documents where the query does not match
Evaluation
The following operators assist in evaluating documents.
$regex: Allows the use of regular expressions when evaluating field values$text: Performs a text search$where: Uses a JavaScript expression to match documents
There are many query operators that can be used to compare and reference document fields.
https://www.mongodb.com/docs/v7.0/reference/operator/query/
5.2.22 MongoDB Update Operators
There are many update operators that can be used during document updates.
Fields
The following operators can be used to update fields:
$currentDate: Sets the field value to the current date$inc: Increments the field value$rename: Renames the field$set: Sets the value of a field$unset: Removes the field from the document
Array
The following operators assist with updating arrays.**
$addToSet: Adds distinct elements to an array$pop: Removes the first or last element of an array$pull: Removes all elements from an array that match the query$push: Adds an element to an array
5.2.23 MongoDB Drivers
The MongoDB Shell (mongosh) is great, but generally you will need to use MongoDB in your application. To do this, MongoDB has many language drivers. The language drivers allow you to interact with your MongoDB database using the methods you’ve learned so far in mongosh but directly in your application.
These are the current officially supported drivers:
- C
- C++
- C#
- Go
- Java
- Node.js
- PHP
- Python
- Ruby
- Rust
- Scala
- Swift
5.2.24 MongoDB Node.js Database Interaction
Sample Data
- For this tutorial, we will use a MongoDB Atlas database.
- We will load sample data into our database.
- From the MongoDB Atlas dashboard, go to Database. Click the ellipsis “…” and select “Load Sample Dataset”. This will load several sample datasets into your database. (It might take several minutes. Please be patient.)
- We will use the “sample_mflix” database loaded from our sample data.
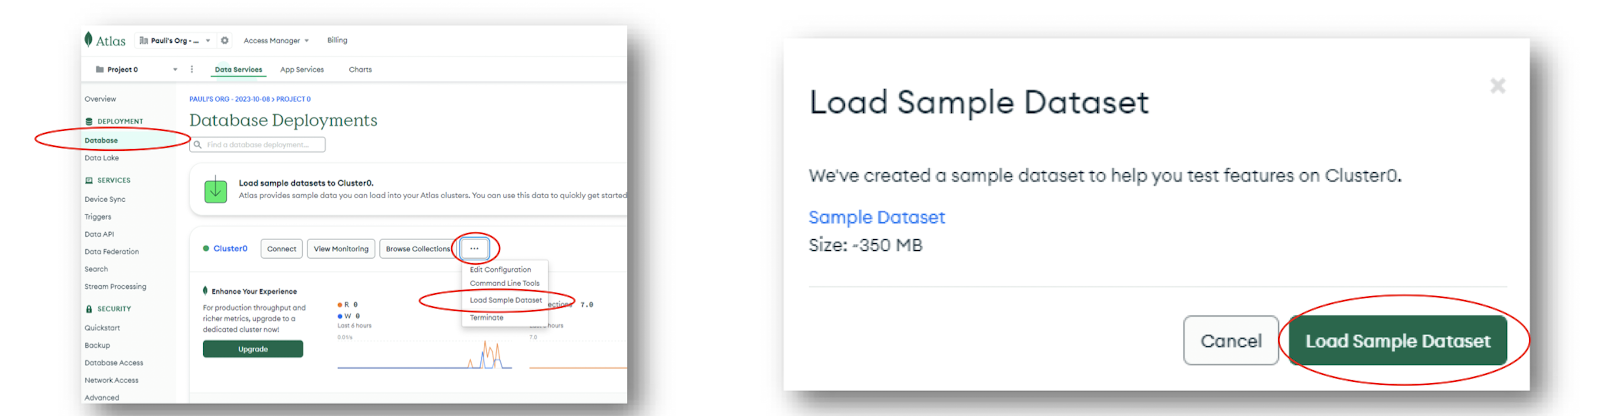
We will also use the “sample_mflix” database loaded from our sample data.
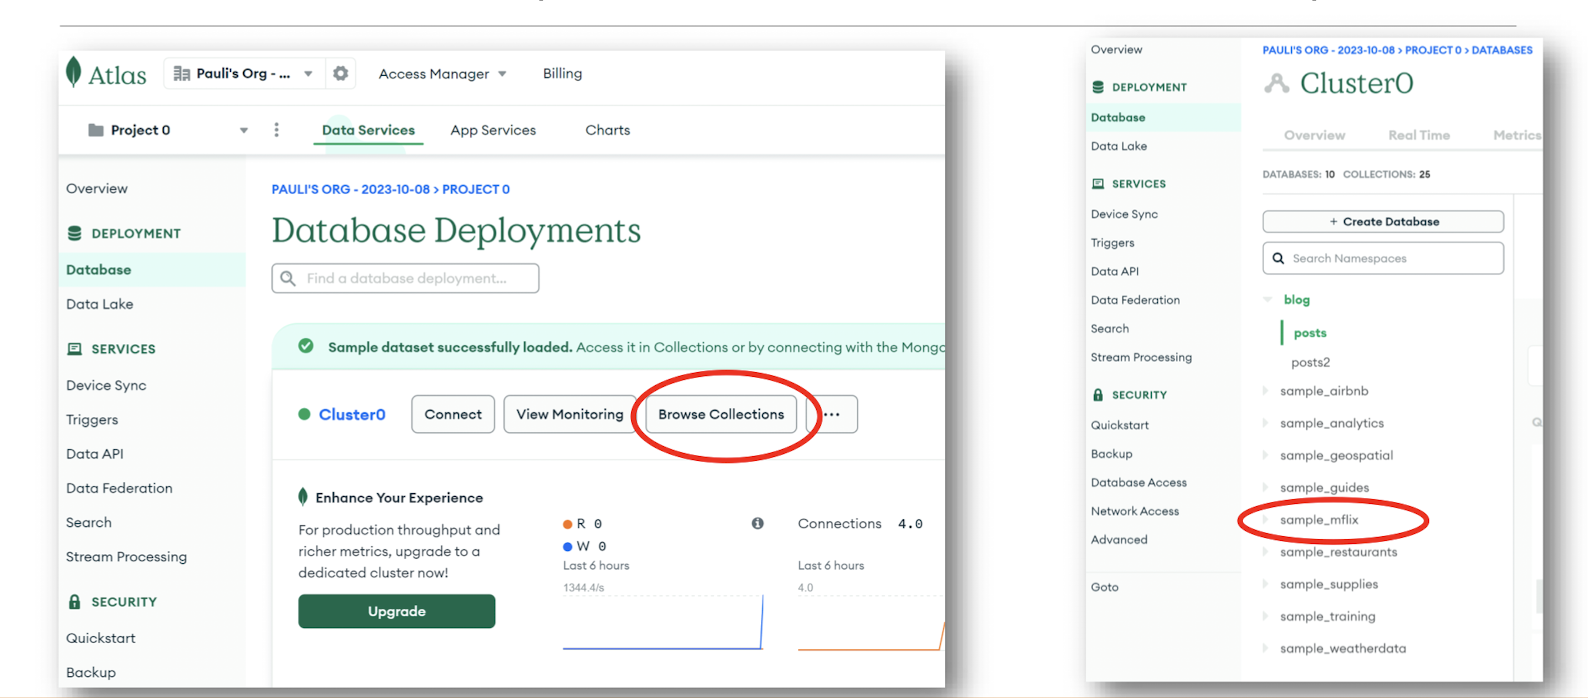
5.2.25 MongoDB Node.js Driver Installation
To use MongoDB with Node.js, you will need to install the mongodb package in your Node.js project.
Use the following command in your terminal to install the mongodb package:
npm install mongodb
We can now use this package to connect to a MongoDB database.
Create an index.js file in your project directory.
import { MongoClient } from 'mongodb';
5.2.26 Connection String
In order toconnect to our MongoDB Atlas database, we’ll need to get our connection string from the Atlas dashboard.
Go to Database then click the CONNECT button on your Cluster.
Choose MongoDB for VS Code then copy your connection string.
Example:mongodb+srv://<username>:<password>@<cluster.string>.mongodb.net/
You will need to replace the <username>, <password>, and <cluster.string> with your MongoDB Atlas username, password, and cluster string.
5.2.27 Connecting to MongoDB
1 | |
Result
Run this file in your terminal.
> node index.js
You should see the first document logged to the console.
5.2.28 CRUD
Just as we did using mongosh, we can use the MongoDB Node.js language driver to create, read, update, and delete in the database.
Expanding on the previous example, we can replace the collection.findOne() with find(), insertOne(), insertMany(), updateOne(), updateMany(), deleteOne(), or deleteMany().
Give some of those a try.
6 Web Security
6.1 Importance of Web Security
- Protection of sensitive data
- Encryption techniques like SSL protect data transmission between users and websites.
- Secure storage mechanisms, such as hashing and encryption , safeguard sensitive information from unauthorized access.
- Compliance with data protection regulations (e.g., GDPR ) helps ensure user data is handled securely.
- Implementing access controls and user authentication mechanisms restrict unauthorized data access.
SSL
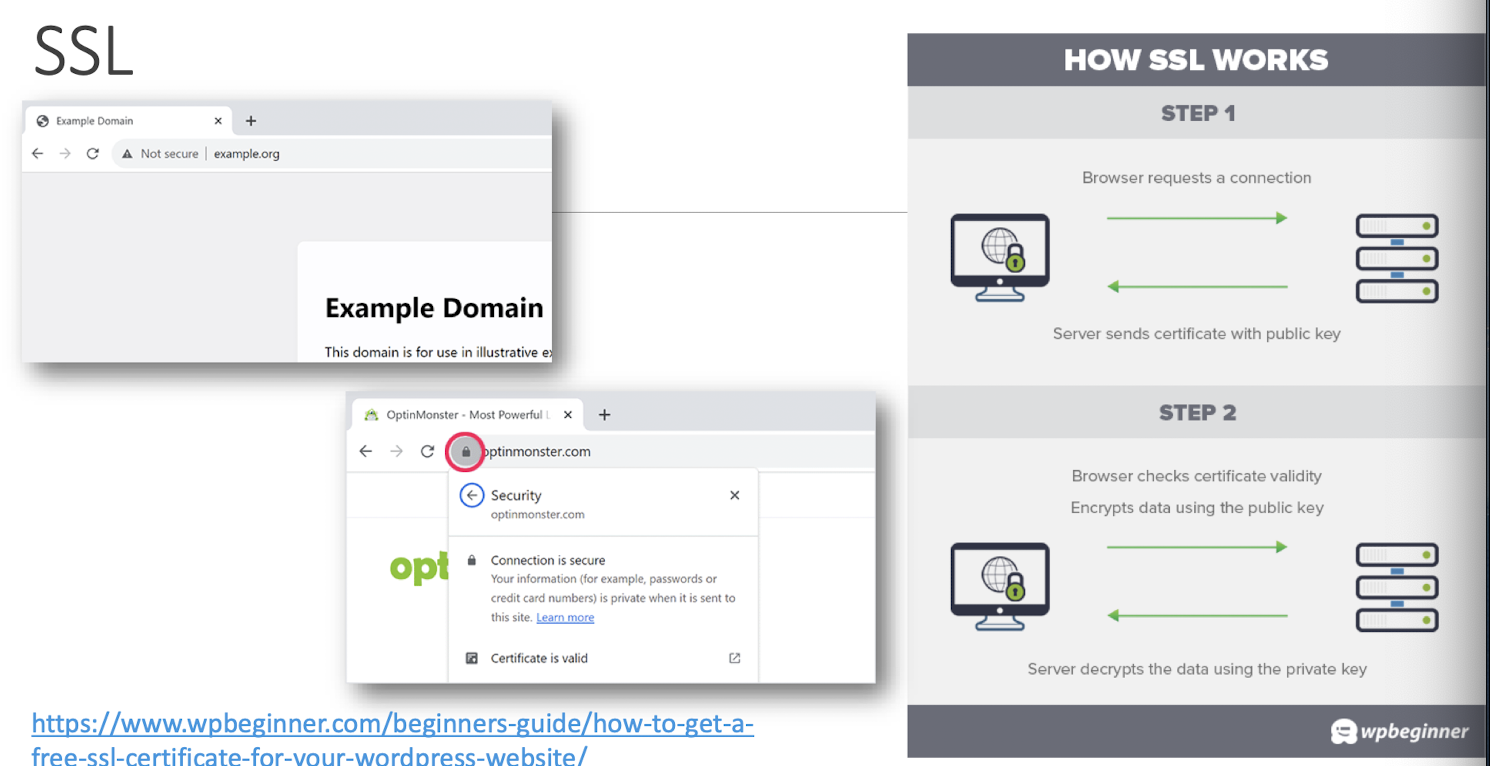
GDPR
Key elements of the GDPR
The GDPR requires organisations handling personal data to do so according to its six data processing principles:
a) it is processed fairly, lawfully and transparently
b) it is collected and processed for specific reasons and stored for specific periods of time, and that it is not used for reasons beyond its original purpose
c) only the data necessary for the purpose it is intended is collected, and not more
d) it is accurate and that reasonable steps are taken to ensure it remains accurate
e) it is kept in a form that allows individuals to be identified only as long as is necessary
f) it is kept securely and protected from unlawful access, accidental loss or damage
https://theconversation.com/what-does-gdpr-mean-for-me-an-explainer- 96630
- Safeguarding user privacy and maintaining trust
- Web security measures like anonymization and pseudonymization protect user identities and personal information.
- Secure login systems, such as two-factor authentication (2FA) , enhance user privacy and account security.
- Clear privacy policies and transparent data handling practices build user trust in the organization.
- Regular security audits and vulnerability assessments demonstrate commitment to user privacy.
2FA
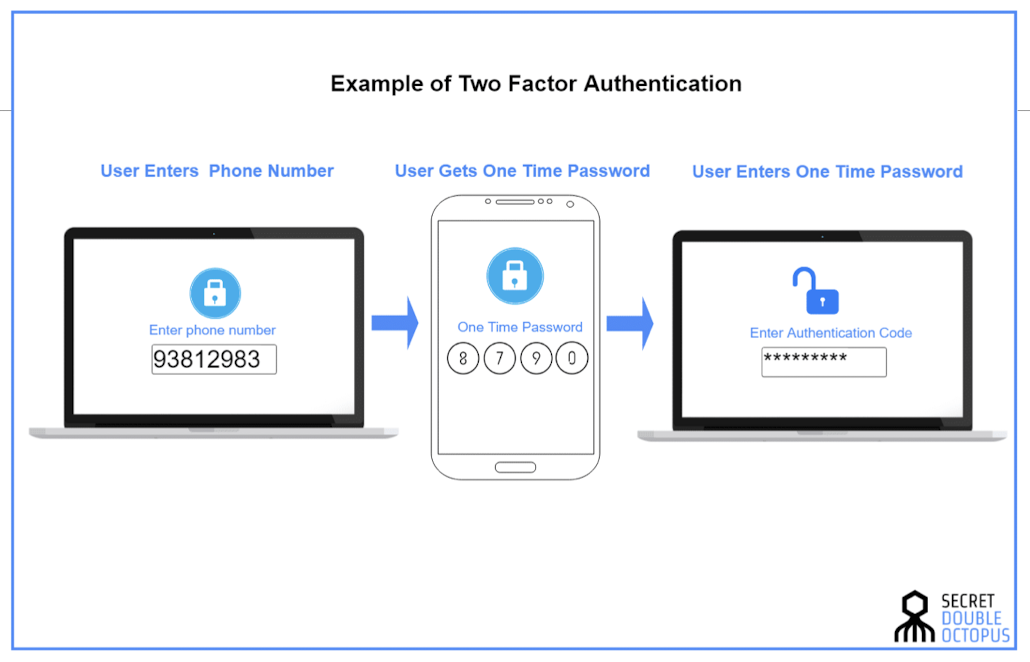
Source: https://doubleoctopus.com/security-wiki/authentication/what-is-2fa/
- Preventing unauthorized access and data breaches
- Implementing strong user authentication mechanisms (e.g., passwords, biometrics) mitigates the risk of unauthorized access.
- Regular security updates and patches address vulnerabilities that could be exploited by attackers.
- Implementing secure coding practices helps prevent common attack vectors like injection attacks.
https://fully-verified.com/user-authentication-methods/
6.2 Common Threats & Vulnerabilities
- Cross-Site Scripting (XSS) attacks
- SQL injection attacks
- Cross-Site Request Forgery (CSRF)
- Phishing and social engineering attacks
- Malware and viruses
- Brute-force attacks and password cracking
- Denial of Service (DoS) attacks
6.2.1 Cross-Site Scripting (XSS) attacks
- Exploiting vulnerabilities in web applications to inject malicious scripts into web pages viewed by users.
- Can lead to session hijacking, cookie theft, and unauthorized access to user data.
- Prevention measures:
- Input validation
- Output encoding
- Using security frameworks that mitigate XSS attacks
- Regular security testing and code reviews help identify and address XSS vulnerabilities.
https://youtu.be/EoaDgUgS6QA?si=EE_gOwFhsyS8Oyzt&t=186
cross-site scripting
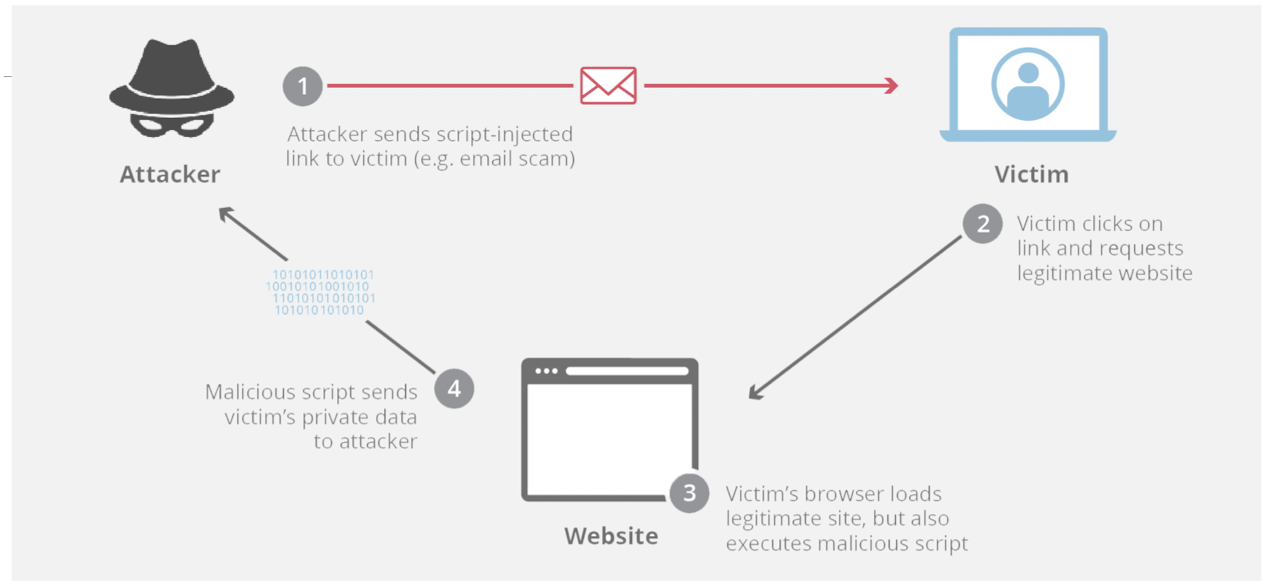
Source: https://www.cloudflare.com/learning/security/threats/cross-site-scripting/
Full story on session hijacking, cookie theft, and unauthorized access to user data (7 min)
https://youtu.be/cbmBDiR6WaY?si=0rQOuHZq0myojV3E
XSS
https://youtu.be/DqK_OYat-3M?si=L81leTSN6Edsvje
6.2.2 SQL injection attacks
- Exploiting poorly sanitized user input to execute unauthorized SQL queries on a database.
- Can lead to unauthorized data disclosure, modification, or deletion.
- Prevention measures:
- Using prepared statements or parameterized queries
- Input validation
- Enforcing least privilege access controls
- Regular security assessments and code reviews can help identify and mitigate SQL injection vulnerabilities.
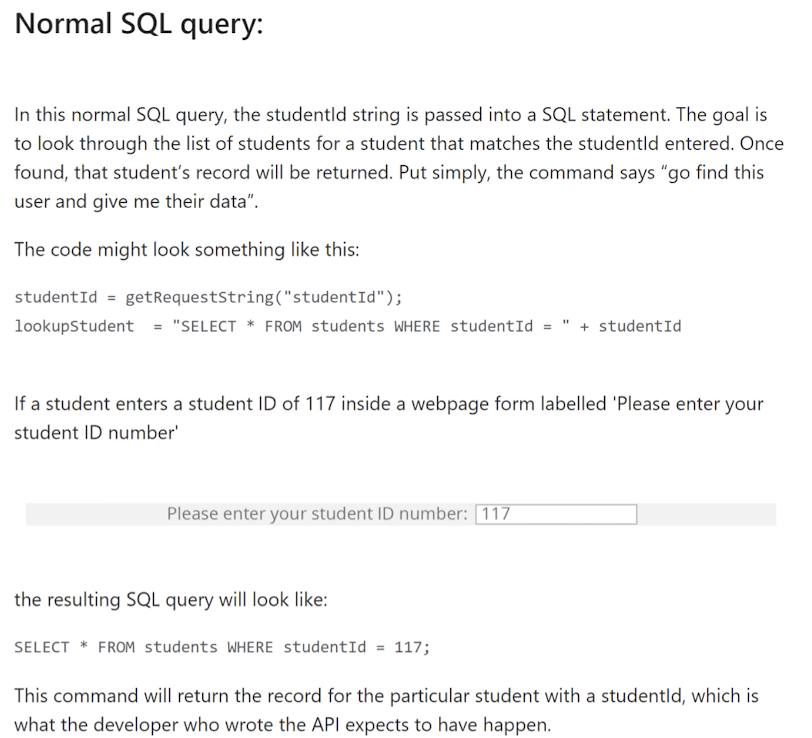
Source: https://www.cloudflare.com/learning/security/threats/sql-injection/
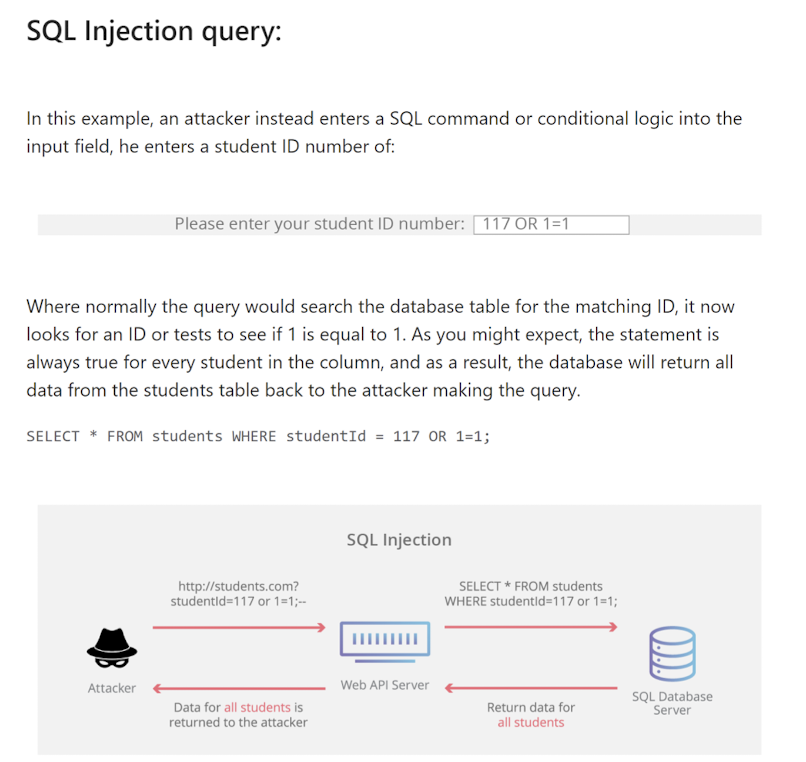
Source: https://www.cloudflare.com/learning/security/threats/sql-injection/
6.2.4 Phishing and social engineering attacks
- Social engineering is a security attack that relies on human interaction to trick users into breaking standard security procedures.
- Deceptive techniques to trick users into revealing sensitive information or performing malicious actions.
- Can include fake emails, websites, or phone calls impersonating legitimate entities.
- Prevention measures:
- User education and awareness
- Spam filters
- Multi-factor authentication
What is Social Engineering?
Source: https://www.skysnag.com/blog/what-is-social-engineering-definition-types-more/
https://youtu.be/9U-JgdUkaTQ?si=nKPYYGMlsSdNMJff
6.2.7 Denial of Service (DoS) attacks
- Overwhelming a web server or network with a flood of requests , rendering it inaccessible to legitimate users.
- Can exploit vulnerabilities in network infrastructure or consume server resources to cause service disruptions.
What is a DDoS attack?
DDoS: Distributed Denial of Service
- Use many computers to launch a DoS attack
Source: https://www.cloudflare.com/learning/ddos/what-is-a-ddos-attack/
DDoS Attack Explained
https://youtu.be/ilhGh9CEIwM?si=tVN9L0cS_bCjl4uz
Real-life examples of DDoS
What was the largest DDoS attack of all time?
The biggest DDoS attack to date took place in September of 2017. The attack targeted Google services and reached a size of 2.54 Tbps. Google Cloud disclosed the attack in October 2020.
The attackers sent spoofed packets to 180,000 web servers, which in turn sent responses to Google. The attack was not an isolated incident: the attackers had directed multiple DDoS attacks at Google’s infrastructure over the previous six months.
What are some other famous DDoS attacks?
- The February 2020 attack reported by AWS
- The February 2018 GitHub DDoS attack
- And more …
Source: https://www.cloudflare.com/learning/ddos/famous-ddos-attacks/
Preventive measures for DDoS attacks
- DDoS Protection Services
- Network Traffic Monitoring
- Load Balancing and Scalability
- Firewalls and Intrusion Prevention Systems (IPS)
- Rate Limiting and Traffic Shaping
- Web Application Firewall (WAF)
- Incident Response Plan
- Regular Updates and Patching
- Employee Awareness and Training
- Redundancy and Backup
6.3 Cryptographic Hash Functions
- Hashing
- Data transformation into fixed-size output for integrity verification and unique identification.
- Deterministic and irreversible process with properties like speed, uniqueness, and data integrity.
- Not the same as encryption; focuses on data integrity and non-reversible transformation.
- Key tool in password storage , digital signatures, data integrity verification, and certificate fingerprinting.
- There are 3 common types of hashing function:
- MD5
- SHA- 1
- SHA- 256
MD5:
- Widely used hash function, but considered weak due to vulnerabilities and collision attacks.
- Produces a 128-bit hash value, commonly represented as a 32-character hexadecimal string.
- Fast and efficient, but not recommended for security-critical applications.
SHA-1:
- Commonly used , but considered weak and vulnerable to collision attacks.
- Produces a 160-bit hash value, commonly represented as a 40-character hexadecimal string.
- Deprecated for security purposes and replaced by more secure hash functions.
SHA-256:
- Part of the SHA-2 family, widely adopted and considered secure for most applications.
- Produces a 256-bit hash value, commonly represented as a 64-character hexadecimal string.
- Provides a higher level of security compared to MD5 and SHA-1.
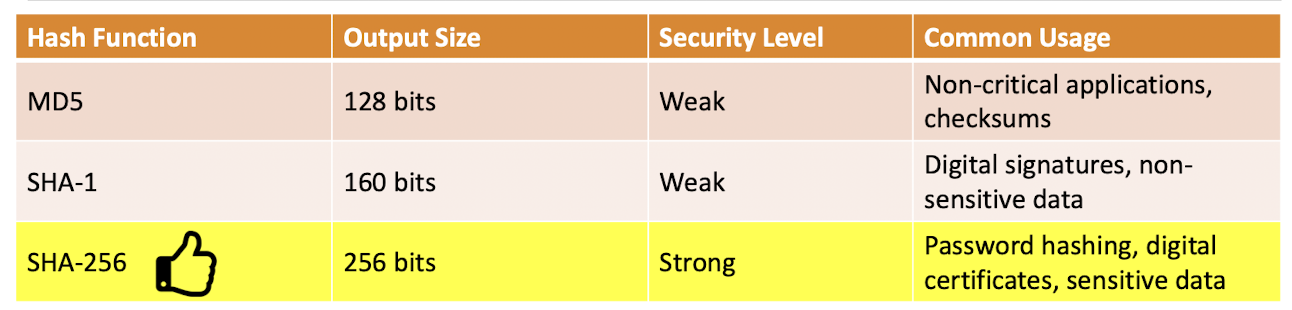
Salting in SHA- 256
- Adding a unique random value to input data before hashing.
- Each salted hash becomes unique, preventing precomputed attacks like rainbow tables.
- Increases complexity, making it harder for attackers to crack passwords.
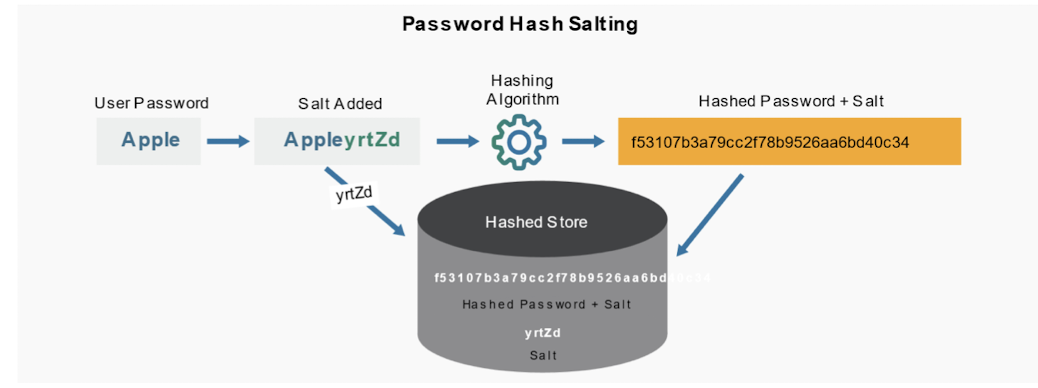
Applications
Application of Hash Function in Web App: Password Hashing
- Protect user passwords by converting them into irreversible , hashed representations that are more secure against unauthorized access.
Online Tool to try: https://emn178.github.io/online-tools/sha256.html
- Imagine you are inputting a password.
- The tool will convert your password string into another uncrackable string for storing your hashed-password in database.the
JavaScript can be used to implement the password hashing function as well
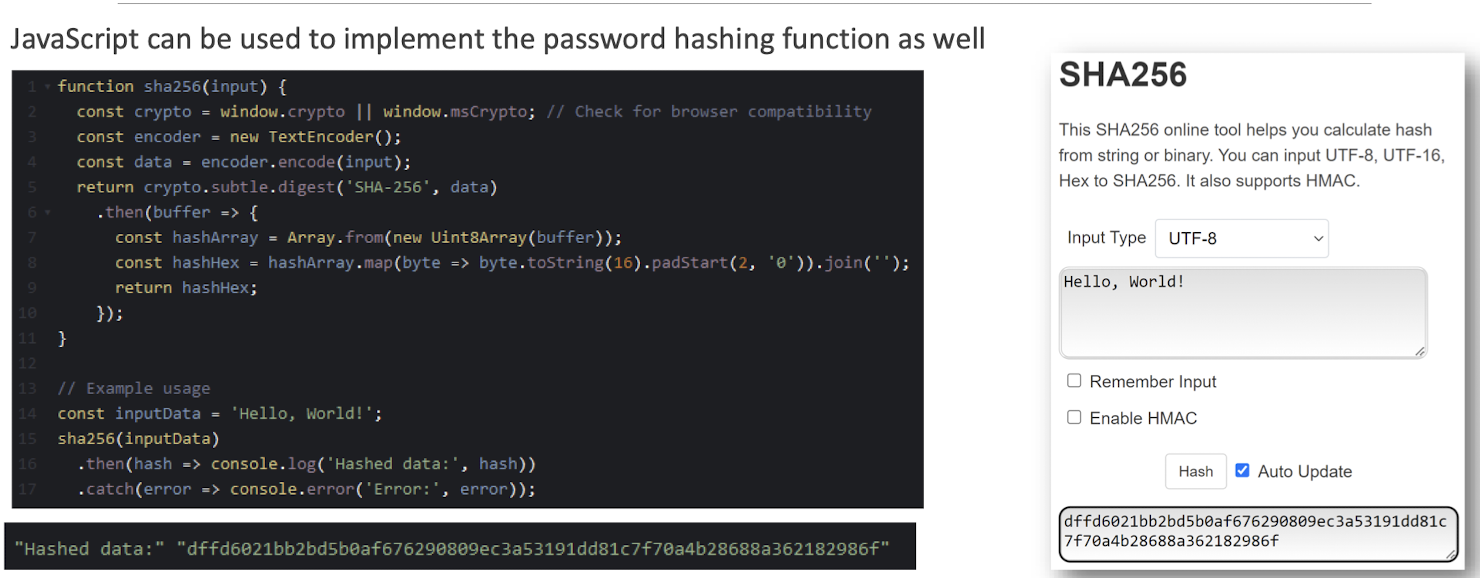
Password Hashing, Salts, Peppers | Explained!
https://youtu.be/--tnZMuoK3E?si=eX65Jhe0b730cw8Z
6.4 Secure Communication: HTTPS
- HTTPS is the secure version of HTTP , employing SSL/TLS encryption for secure web communication.
- SSL/TLS ensures confidentiality, integrity, and authentication of data transmitted between clients and servers.
- Visual indicators like padlock icon and “https://“ signify a secure HTTPS connection.
- HTTPS protects sensitive information from eavesdropping and tampering, enhancing overall security on the web.
Digital certificates and public key infrastructure ( PKI ):
- Digital certificates bind public keys to entities identities, establishing trust in secure communication.
- Certificate Authorities ( CAs ) issue and verify certificates, acting as trusted third-party organizations.
- Certificate chains and trust hierarchy ensure the authenticity and integrity of certificates in the PKI.
- Certificate validation involves:
- Checking expiration
- Revocation status
- Verifying digital signatures to ensure trustworthiness

https://www.thesecuritybuddy.com/blockchain/public-key-infrastructure-and-blockchain/
Benefits of HTTPS in securing web communications:
- Data encryption ensures confidentiality, preventing unauthorized access to sensitive information.
- HTTPS protects against tampering and ensures data integrity during transmission.
- Authentication verifies the identity of the server, protecting against impersonation and man-in-the-middle attacks.
- HTTPS improves user trust, search engine ranking s, and overall website credibility.
What is PKI? How does PKI work?
Back in the days
- Frameworks or tools are born in response to a certain problem that needs to be solved.
- The most critical task of the front-end is to visualize data and status.
- In the past, when using native JavaScript to perform DOM operations, you had to use a long list of programs to capture elements (such as document.getElementsByClassName(‘.el’)) before the web page elements could interact with users.
- → jQuery was born, and we only needed to use
$(' el')can easily do the same thing, and also solves annoying cross-browser problems.
- The next thing we face is the problem of status management.
- Everything was plugged into the HTML page → Spaghetti Code
- Separation of concerns at the presentation level → separated HTML, CSS and JavaScript
- Separation of concerns at the architecture level → The MVC design pattern divides the program into data logic layer (Model), operation interface layer (View), and operation management layer (Controller).
- Vue and Angular use the concept of MVVM to extend the two-way binding of data and logic. These frameworks make development more focused on data status.
- It’s not that outdated technologies or tools cannot be used now, it’s just that as time passes and technology advances, we have better methods,
- → the old technologies slowly fade away. Learning libraries or frameworks created to solve inconveniences
6.5 Web Development Framework
- A comprehensive toolset for building efficient, scalable, and feature-rich web applications
- React - A popular JavaScript library for building reusable UI components and efficient user interfaces
- Angular - A comprehensive framework by Google for scalable web applications with declarative syntax
- Vue - A flexible JavaScript framework with a gentle learning curve for building intuitive web applications
6.5 React.js
- In 2011, Facebook needed a faster, more dynamic user interface to enhance user experience
- Created by Jordan Walke, simplified development with reusable components and structured interfaces
- Initially used in Facebook’s newsfeed, React revolutionized web development and gained popularity in the JavaScript ecosystem
- React’s innovative DOM manipulation approach quickly gained traction in the open-source community
6.5.1 IS REACT A FRAMEWORK?
React is a JavaScript library that’s used for building reactive websites. While it’s not a framework, React does have a dedicated framework called Create React App (CRA) that can be used to build web applications.
Developers generally use the terms “library” and “framework” interchangeably, but they’re not the same. The main criteria for frameworks are:
- Frameworks provide ready-to-use tools, standards and templates for fast application development, while libraries don’t.
- Frameworks control the calling of libraries for our code.
- Frameworks give rules and guidelines on writing your code and structuring files and folders.
- Frameworks are consistent with APIs, compilers, toolsets and libraries within.
- When you use a framework, the control is inverted. The framework controls the flow and calls your code. In contrast, libraries let you control the flow of the application.
React does not match these criteria and thus, is not a framework.
6.5.2 Pros of React.js
- Component-based architecture:
- Components can be independently created, maintained, and reused, enhancing modularity.
- Loose coupling allows components to work together and bring out the best in the application.
- High Performance:
- Virtual DOM optimizes DOM updates, resulting in faster rendering and improved user experience.
- Efficiently handles changes caused by user interactions, reducing performance bottlenecks.
- Easy to Learn:
- Familiarity with HTML and JavaScript is sufficient to start learning React.
- Offers flexibility without enforcing specific patterns, allowing developers to choose their own style.
- Mobile App Development:
- React Native enables the creation of interactive and high-performance mobile apps.
- Same concepts and syntax can be used for web and mobile applications, reducing the learning curve.
6.5.3 Cons of React.js
High Pace of Development:
- Rapid changes in React’s ecosystem requires developers to constantly update their code.
- Can be challenging for teams working on critical applications or those resistant to frequent changes.
Flexibility and Lack of Conventions:
- React’s flexibility may result in a lack of standardized conventions.
- Requires experiences team members to maintain a well-structured and stable codebase.
Introduction to JSX:
- Learning React does not require any prerequisite. However, JSX does not come in handy to a lot of developers while learning React development.
- In addition to JSX, developers complaint about the inline scripting feature in React, which is also a tedious task for developers.
6.5.4 Sample code – React.js
- 2 buttons for incrementing and decrementing a counter value, with the counter value displayed between the buttons

6.6 Web Development Framework – Angular
- Angular, originally known as AngularJS, was first released by Google in October 2010.
- It was developed by a team led by Misko Hevery, a developer at Google.
- AngularJS was a JavaScript-based open-source front-end web application framework designed to simplify the development of dynamic web applications.
- Google took over the development and maintenance of AngularJS due to its success.
- In 2014, Google announced a complete rewrite called Angular (Angular 2.0).
- Angular introduced new features, expanded capabilities, and changed the expression syntax.
- However, it is important to note that AngularJS (version 1.x) and Angular (version 2 and onwards) are distinct frameworks with significant differences in architecture and features.
- Angular (version 2 and onwards) was a complete rewrite of AngularJS and was released in September 2016.
6.6.1 Pros of Angular
- Trustworth for Future: Since Angular is backed by Google, developers have an enormous amount of trust for building large-scale applications, knowing that it would be maintained for the long term.
- Documentation: The documentation of Angular is detailed and very well explains the functionality and working of Angular. Moreover, each concept is explained with an example and easy language that is even useful for beginners.
- Scalable: Working on an Angular project as a team is highly scalable, as any minor changes done by any member of the team do not require you to update the entire structure of the project. Moreover, the code base is highly consistent and readable, which increases the efficiency of the project.
6.6.2 Cons of Angular
- Learning Curve: Angular requires you to be skilled in TypeScript, which according to the StackOverflow survey, is favored by 30% of developers. Therefore, learning Angular requires greater effort than other frameworks.
- Size of the Project: The size of the project defines a lot of parameters for an application. However, it is only noticeable in small applications, whereas in large applications, all the projects would weigh around similarly.
6.6.3 Sample code – Angular
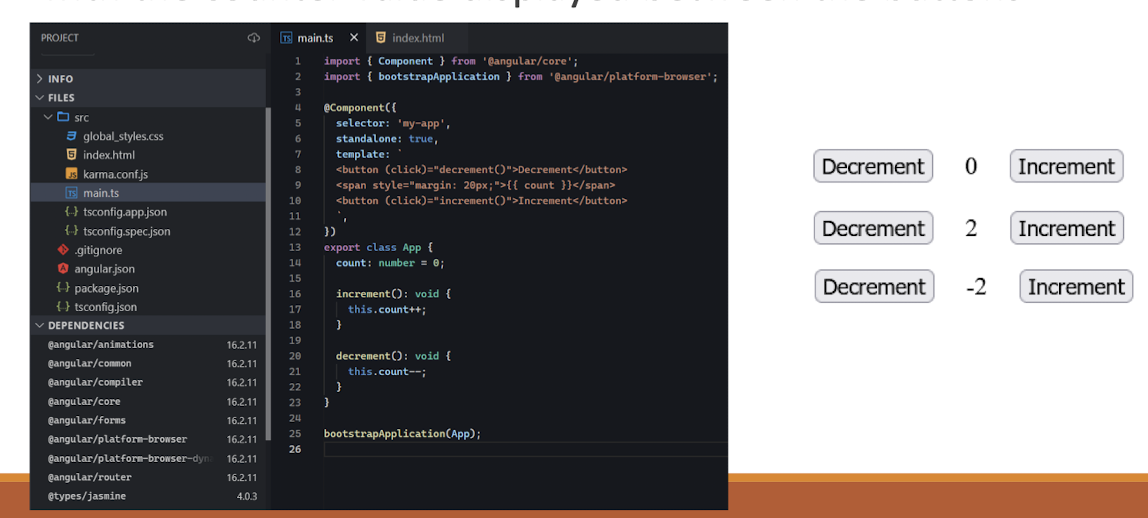
- 2 buttons for incrementing and decrementing a counter value, with the counter value displayed between the buttons
6.7 Web Development Framework – Vue.js
- Vue.js was initially released in February 2014 by Evan You, the creator of Vue.js
- Angular inspired the creators of Vue to discover Vue, based on bringing all the best parts of Angular under one roof and neglecting all the limitations of Angular to create build a lightweight framework.
- Vue focuses on beginner developers helping them create dynamic web applications without having to go through any prior tedious learning.
- Vue.js is a progressive JavaScript framework used for building user interfaces. It is often referred to as a “progressive” framework because it can be incrementally adopted into existing projects or used to build full-scale single- page applications.
- It offers built-in and user-defined directives to extend HTML with additional functionality.
6.7.1 Pros of Vue.Js
- Short Learning Curve: In React and Angular, you are required to have to be skilled in TypeScript and JavaScript, respectively. However, Vue is beginner-friendly and does not mandate any prior skills.
- Project Size: The size of your Vue project has several advantages, such as directly affecting the SEO of your webpage, as google search console rejects showing heavy websites in the front, which takes more time to load.
- Forums and Community: The forums and other community support are very important when heading out in a direction to pick a technology. It helps in maintaining and learning any technology in a further good curve.
6.7.2 Cons of Vue.Js
- Ecosystem: The ecosystem plays a vital role in applications to adapt to several browsers and operating systems. Vue has a very narrow ecosystem, therefore, does not render in older versions of operating systems and web browsers.
- Developers: Other frameworks such as Angular and React are backed by Google and Facebook, which automatically build trust among the people, however, Vue is generally not trustworthy among the audiences.
6.7.3 Sample code – Vue.js
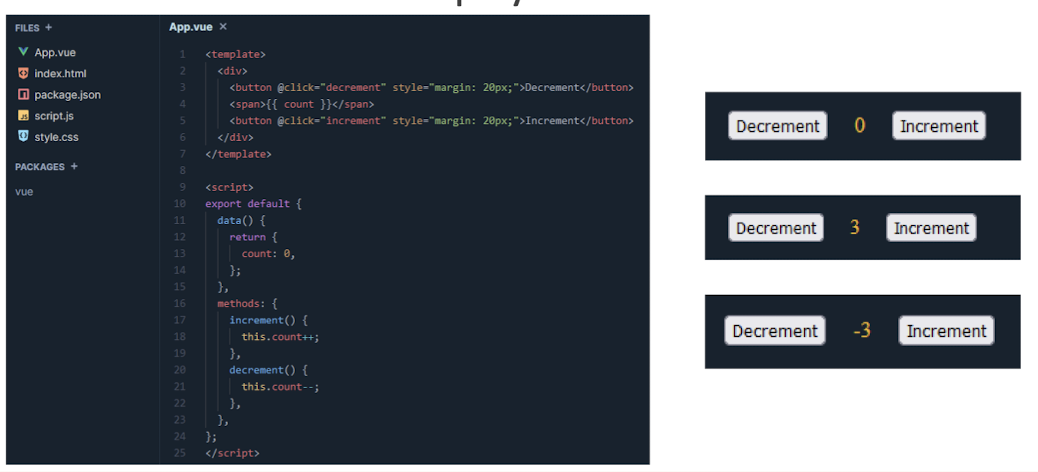
- 2 buttons for incrementing and decrementing a counter value, with the counter value displayed between the buttons
6.8 Core Differences: Angular vs React vs Vue
| Parameter | Angular | React | Vue |
|---|---|---|---|
| Initial Release | 2016 | 2011 | 2014 |
| Support | Community | ||
| Type | Framework | Library | Framework |
| Size | Medium | Small | Very small |
| Language | TypeScript | JavaScript/JSX | JavaScript |
| Performance | Good | Good | Good |
| Data Binding | Both | Unidirectional | Bidirectional |
| Learning Curve | Steep | Easy | Easy |
| Popular Websites | Paypal, Samsung, Upwork | Netflix, Twitter, Amazon | Alibaba, Grammarly, GitLab |
6.9 So, how to choose a front-end framework?
If jQuery or even native JavaScript can solve your needs, then you may not need to use a front-end framework.
If your project is complicated, using frameworks can reduce the difficulty of development.
Ease of Learning: Vue > React (JSX) > Angular (Typescript)
Number of jobs: React > Angular > Vue
Popularity: React > Angular > Vue
Richness of features: Angular > React > Vue
References
Slides of EIE4432 Web Systems and Technologies, The Hong Kong Polytechnic University.
个人笔记,仅供参考
PERSONAL COURSE NOTE, FOR REFERENCE ONLY
Made by Mike_Zhang