Mobile Systems and Application Development Course Note
Made by Mike_Zhang
Notice
PERSONAL COURSE NOTE, FOR REFERENCE ONLY
Personal course note of EIE3109 Mobile Systems and Application Development, The Hong Kong Polytechnic University, Sem1, 2023/24.
Mainly focus on Embedded Systems, Swift Programming, Swift - Views and Controls, Android, Android - Activities and Intents, Android - Views and ViewGroups, Android - Data Persistence, and Networking.
提示
个人笔记,仅供参考
本文章为香港理工大学2023/24学年第一学期 移动系统和应用程序开发 (EIE3109 Mobile Systems and Application Development) 个人的课程笔记。
Unfold Study Note Topics | 展开学习笔记主题 >
1. Introduction to Embedded Systems
- Definitions of Embedded System
- Embedded Hardware, Application Software and RTOS (Real-time Operating System)
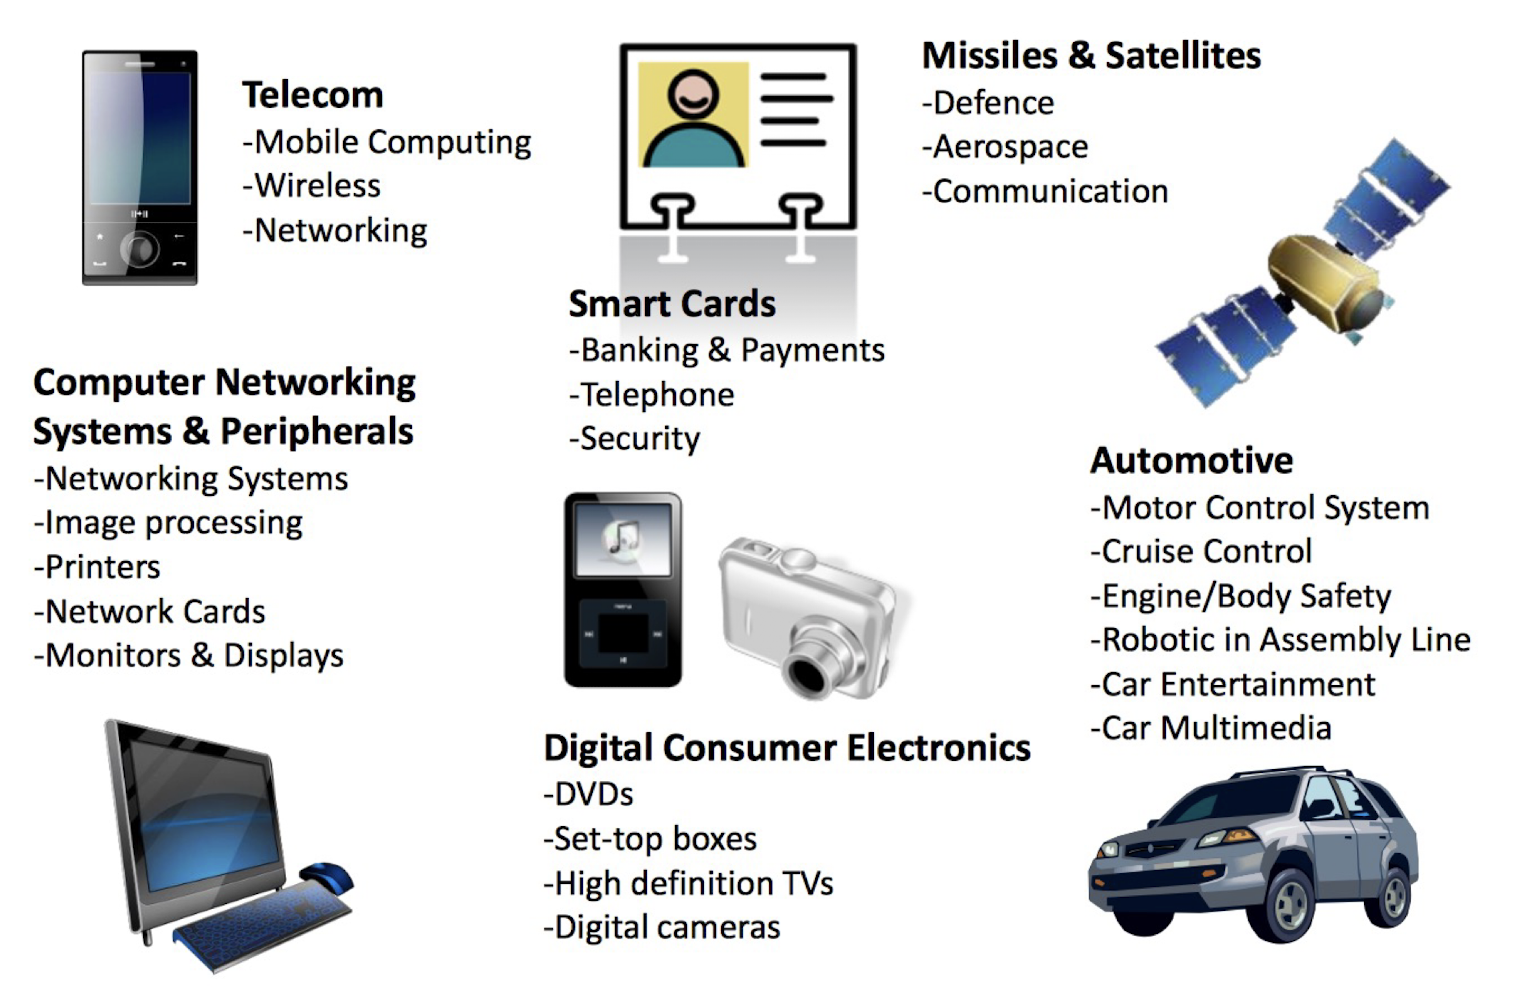
- Exemplary Application-areas
- Sophisticated Embedded System Characteristics
- System & Design Constraints
- Cutting-edge Applications of Embedded Systems
1.1 What Is a System?
- A system is a group of interrelated components that work together to achieve a common goal or purpose, according to a fixed set of rules, program, or plan.
- It can be defined as a collection of elements or parts that are interconnected and organized in a structured manner to perform specific functions or tasks.
- Examples:
- A watch (time display system)
- A washing machine (automatic cloth washing system)
1.2 System Examples
An analog watch can indeed be considered an example of a system. Let’s break down its components and characteristics:
Components of an Analog Watch:
- Case: The outer housing that protects the internal components and provides structural support.
- Dial: The face of the watch, typically marked with hour markers and minute/second indicators.
- Hands: The hour, minute, and sometimes second hands that move across the dial to indicate the current time.
- Movement: The internal mechanism that drives the motion of the hands. It consists of gears, springs, and other components that enable the measurement and display of time.
- Crown: The knob on the side of the watch used for setting the time and winding the watch (in mechanical watches).
Characteristics of an Analog Watch as a System:
- Interconnected Components: The various components of an analogwatch, including the case, dial, hands, movement, and crown, are interconnected and work together to measure and display time.
- Purpose and Goal: The purpose of an analogwatch is to accurately and visually represent the current time. Its goal is to provide a convenient and portable timekeeping device.
- Inputs and Outputs: The user provides input by adjusting the crown to set the time. The outputs are the position and movement of the hands on the dial, which visually display the time.
- Behavior and Interactions: The behavior of an analog watch involves the precise movement of the hands in response to the internal mechanism. The hands move continuously or step by step, indicating the passage of Cme.
- Boundaries: The boundaries of an analog watch are defined by its physical structure. It operates within a specific range of Cme measurement and has limitations on accuracy and functionality.
Summary:
- An analog watch exemplifies a system because it consists of interconnected components that work together to achieve a specific purpose—timekeeping.
- The movement of the hands, driven by the internal mechanism, provides an output that visually represents the current time.
- Understanding the system’s components, interactions, and behavior helps in analyzing and designing watches, improving accuracy, and incorporating additional features.
- Washing Machine
- What is the task?
- Automatic clothes washing
- What are the units (parts)?
- Display panel, switch and dials, motor, power supply, water level sensor, valves.
- What are the rules?
- Wash
- Rinse
- Dry
1.3 What Is an Embedded System?
- https://youtu.be/oPn_adlC1Q
- https://youtu.be/Qpc1M-BntaM
- Can you summarize what an embedded system is after these 2 videos?
- Hardware + Software
- Microprocessor or micro controller system on chip, FPGA (Field Programmable Gate Array)
- Not a computer, computer is multi purpose, write application on top of the os
- Specific Application
- Part of a larger system
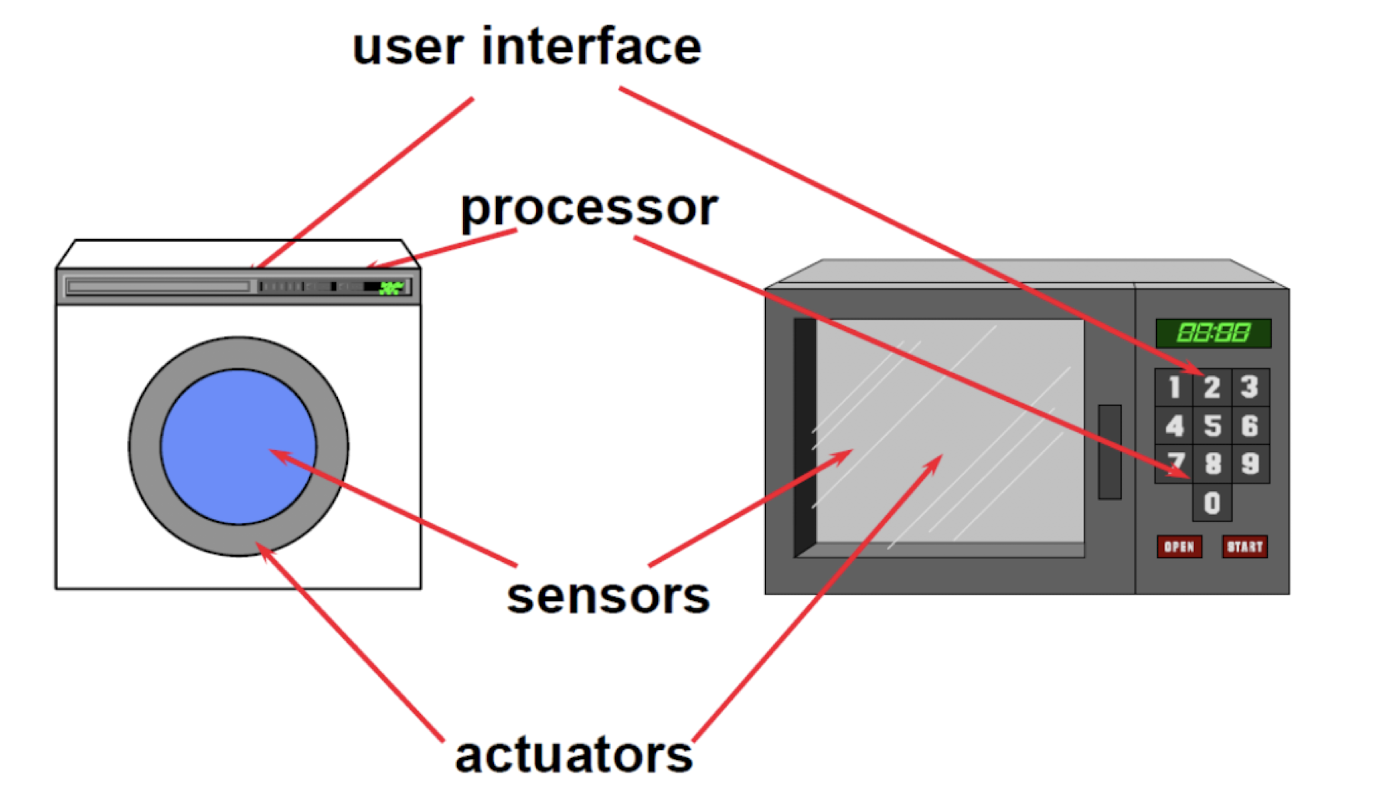
- User interface
- “An embedded system is a system that has embedded software in a computer hardware. The system is dedicated for either an application(s) or specific part of an application or product of a larger system.” Raj Kamal, Embedded Systems, Architecture, Programming, and Design
- Can be a part of other system
- Embedded Systems are the electronic systems that contain a microprocessor or a microcontroller, but we do not think of them as computers – the computer is hidden or embedded in the system. Todd D Morton, Embedded Microcontrollers
- It is any device that includes a programmable computer but is NOT itself intended to be a general-purpose computer. Wayne Wolf, Computer as Components – Principles of Embedded Computing System Design
- An embedded system is one that has a dedicated purpose software embedded in a computer hardware.
- It is a dedicated computer-based system for an application(s) or product. It may be an independent system or a part of large system. Its software usually embeds into a ROM (Read Only Memory) or Flash.
- An embedded system is not designed to be programmed by the end user in the same way that a PC is.
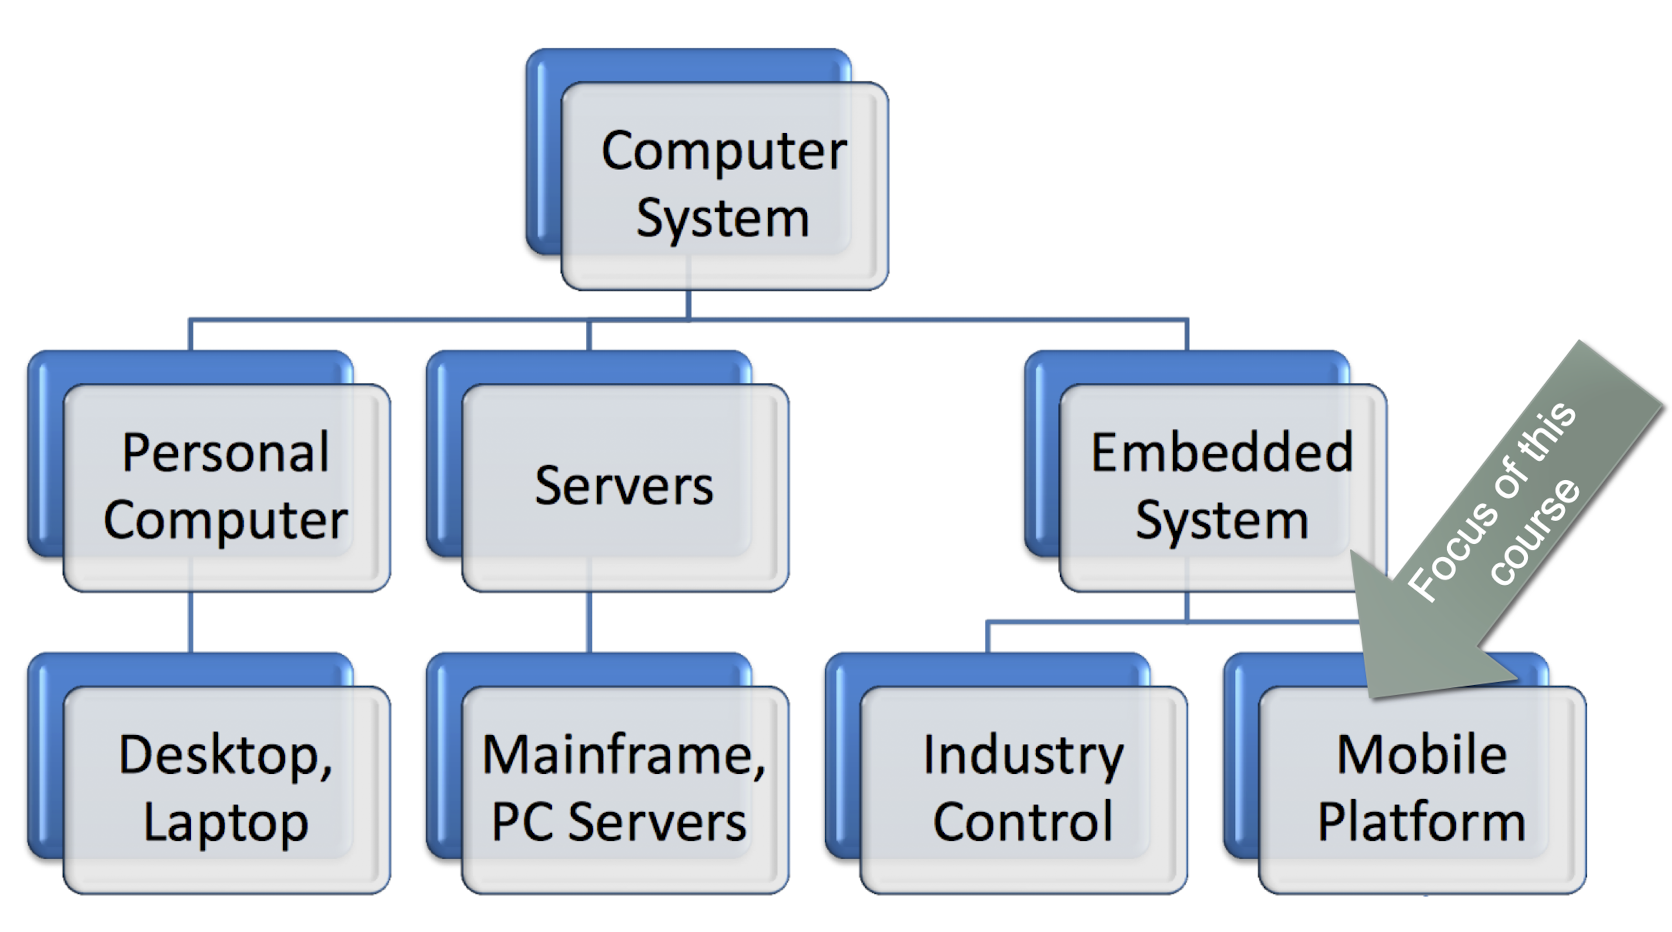
1.4 Computer System Family Tree
1.5 iOS vs Android
- iOS
- Xcode
- Swift
- Android
- Android Studio/Eclipse
- Java/Kotlin
- Cross-Platform
- React Native
- Xamarin
- Flutter
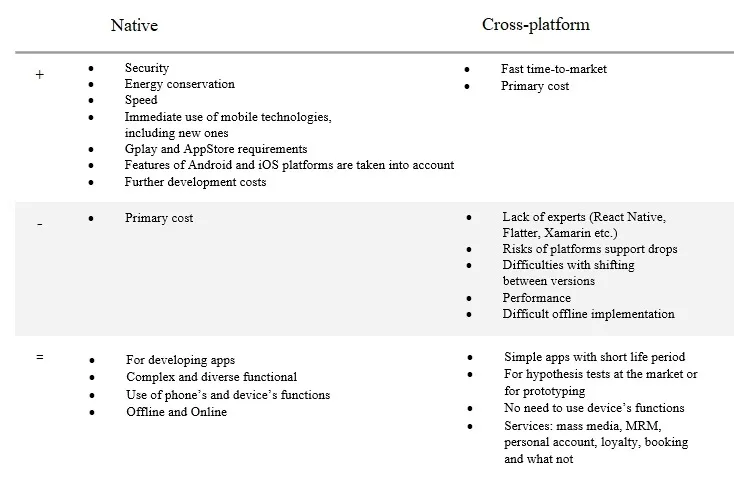
1.6 Native vs. Cross-platform
- What are the pros and cons of native and cross-platform development?
There is a possibility that Apple may prohibit coding for iOS on cross-pla9orm in the near future and you will have to make the app natve.
Native Development:
Pros:
- Performance: Native development allows you to leverage the full power and capabilities of the target platform, resulting in high- performance applications. Native apps are typically optimized for the specific operating system and can take advantage of platform-specific features and APIs.
- User Experience: Native apps can provide a seamless and intuitive user experience as they adhere to the design guidelines and standards of the target platform. They can make use of native UI components, animations, and gestures, resulting in a familiar and consistent user interface.
- Access to Platform Features: Native development provides direct access to platform-specific features, such as camera, GPS, push notifications, and sensors. This enables developers to create rich and integrated experiences that leverage the full capabilities of the device.
- Development Tools and Support: Native platforms often provide robust development tools, such as IDEs, emulators, and debugging utilities. They also have extensive documentation and community support, making it easier to develop and maintain native applications.
Cons:
- Development Time and Cost: Developing native apps for multiple platforms (e.g., iOS and Android) requires separate codebases and development efforts. This can increase development time and cost compared to cross-platform development.
- Skill Set and Resources: Native development typically requires expertise in platform-specific programming languages and frameworks. It may require separate development teams or resources for each platform, which can be a challenge for smaller teams or organizations.
Cross-Platform Development:
Pros:
- Code Reusability: Cross-platform development allows you to write code once and deploy it across multiple platforms. This can significantly reduce development time and effort, as you can maintain a single codebase for multiple platforms.
- Cost-Effectiveness: By sharing code across platforms, cross-platform development can be more cost-effective compared to native development. It reduces the need for separate development teams or resources for each platform.
- Faster Time to Market: Cross-platform development streamlines the app development process, enabling faster deployment and updates. This can be advantageous when time to market is critical.
- Community and Ecosystem: Cross-platform frameworks, such as React Native, Flutter, or Xamarin, have vibrant communities and ecosystems. They offer extensive libraries, plugins, and resources, providing developers with a wide range of tools and support.
Cons:
- Performance Trade-off: Cross-platform frameworks often abstract away some platform-specific details, which can result in a performance trade-off compared to fully optimized native apps. However, modern cross-platform frameworks have made considerable improvements in this regard.
- A extra layer of abstraction to run both iOS and Android, which reduce the performance
- Limited Platform-Specific Features: Cross-platform development may face limitations in accessing certain platform-specific features or APIs. While cross-platform frameworks provide plugins and modules to bridge this gap, some features may not be fully supported or may require custom native code integration.
- UI and User Experience: Achieving a native-like user interface and experience can be challenging in cross-platform development. Although cross-platform frameworks provide UI components, they may not perfectly match the native look and feel, requiring additional customization.
- Dependency on Frameworks: Cross-platform development relies on frameworks or libraries, and any limitations or issues with these frameworks can impact the development process. It’s important to consider the stability, community support, and long-term viability of the chosen framework.
- Performance Trade-off: Cross-platform frameworks often abstract away some platform-specific details, which can result in a performance trade-off compared to fully optimized native apps. However, modern cross-platform frameworks have made considerable improvements in this regard.
- Ultimately, the choice between native and cross-platform development depends on factors such as project requirements, target audience, budget, timeline, and development team’s expertise.
- Native development offers superior performance and access to platform-specific features but requires more resources and time.
- Cross-platform development provides code reusability and cost-effectiveness but may have some performance trade-offs and limitations in accessing platform-specific features.
1.7 Let’s Consider a Computer
- A computer is an example of general-purpose computing system and has the following or more components
- A microprocessor
- A set of special purpose processors, for example graphic, input-output and network processor
- A large memory comprising:
- (a) Caches in the processor
- (b) Primary memory (semiconductor memories - RAM, ROM and fast accessible caches)
- (c) Secondary memory (magnetic memory located in hard disks, diskettes and cartridge tapes, optical memory in CD- ROM or memory stick) which different user programs can load into the primary memory and can be run
- I/O units such as touch screen, modem, etc.
- Input units such as keyboard, mouse, digitizer, scanner, etc.
- Output units like LCD screen, video monitor, printer, etc.
- Networking units like Ethernet card, front-end processor-based
server, bus drivers, etc. - Operating system (OS) enables use of hardware resources by the programs and support execution of multiple programs at the same time. The OS schedules and runs the tasks such that the system input and output, and computing performance maximizes.
- General purpose user interfaces and application software, mostly in secondary memory
- Program first loads in the RAM and the computer runs general-purpose programs, programs of multiple users and multiple tasks
- Requires an Operating System
- Runs complex algorithms fast
- Provides a complex set of graphic or touch-screen user interfaces (GUIs)
- The system has little constraints of memory and no time deadlines to finish the execution of the tasks of a program
1.8 Now Consider an Embedded System
- Three main embedded components
- Embeds hardware to give computer like functionalities. The hardware includes embedded memory, peripheral and input-output devices.
- Embeds main application software generally into flash, ROM, or media card and the application software performs concurrently multiple tasks. The system most often does not have a secondary hard disk.
- Embeds a real time operating system (RTOS), which supervises the application software tasks running on the hardware and organizes the accesses to system resources according to priorities and timing constraints of tasks in the system
- Program is preloaded or embedded in the ROM(s) or flash memory
- System functions in real time
- The tasks execute according to priorities and reacts to the events, interrupts in predetermined time interval and schedules responses according to priorities
- System controls the latencies of tasks, events, and then interrupts and responds. Latency means time interval between the instance of need to respond and start of the actual execution
1.9 Embedded System RTOS
- Enables execution of concurrent processes or threads or tasks
- Provides a mechanism to let the processor run each process as per scheduling and to do context-switch between the various processes (threads or tasks)
- RTOS sets the rules during execution of application processes to enable finishing of a process within the assigned time interval and with assigned priority
1.10 Examples of Embedded Systems
- Electronic Control Unit (ECU) is a generic term for any Embedded systems in computer systems that are designed to perform specific functions within larger systems or devices.
- They are often dedicated to a specific task and are integrated into various products and applications.
Automotive Systems: Modern automobiles contain several embedded systems and ECUs that control various functionalities.
Car as an integrated control, communication and information system
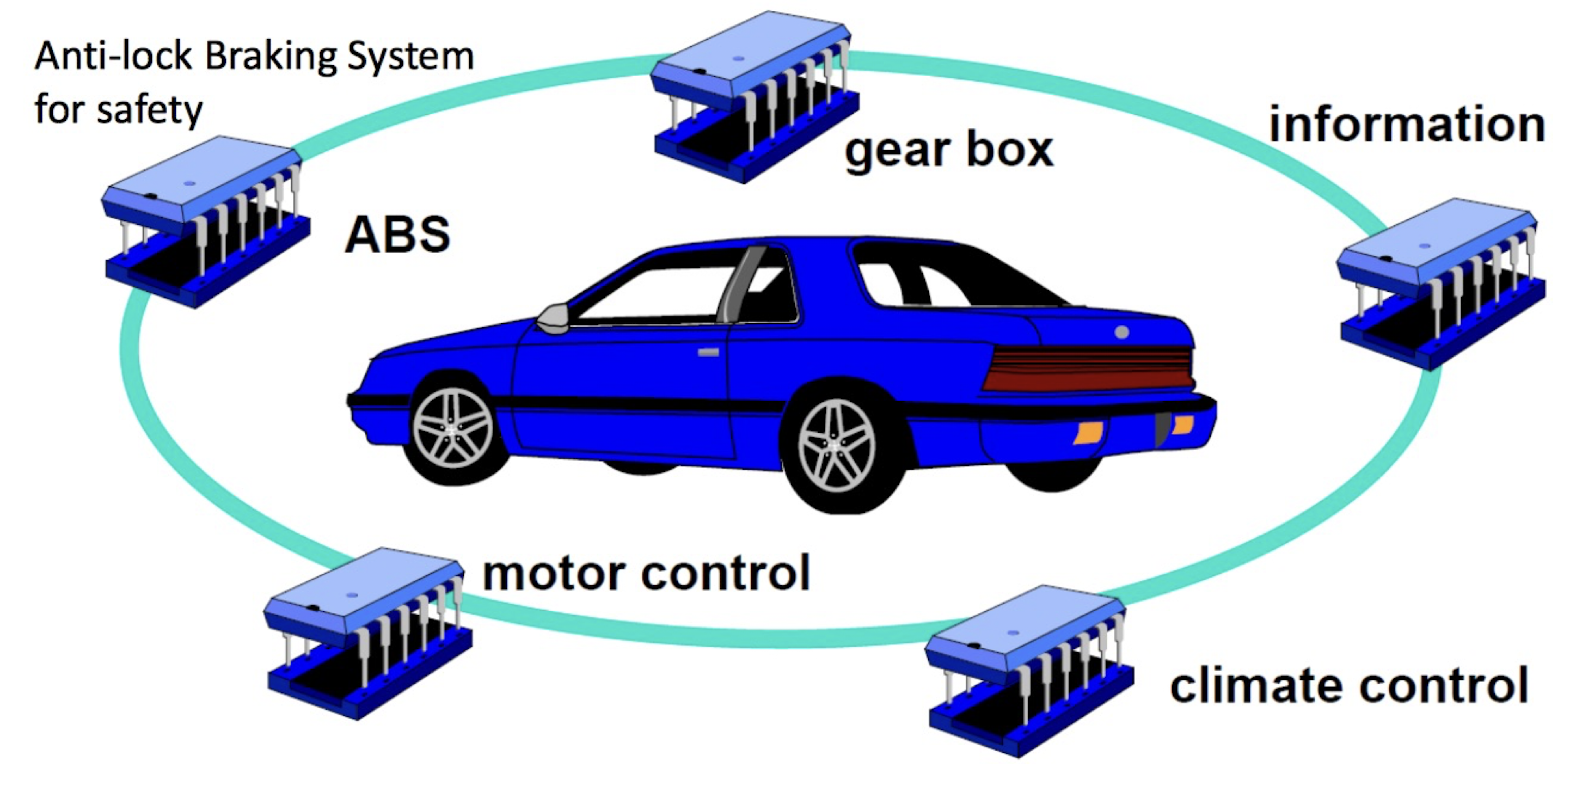
- Electronic Control Unit (ECU) is a generic term for any embedded system that controls one or more electrical systems in a vehicle
- A modern vehicle may have 100+ ECU’s
- The ECU provides instructions for various electrical systems, instructing them on what to do and how to operate
Types of ECU include:
- Engine Control Module
- Transmission Control Module
- Anti-lock Braking System
- Electric Power Steering Control Unit
- Airbag Control Unit
- Cruise Control System
- …
Home Appliances: Many home appliances, such as washing machines, refrigerators, and air conditioners, contain embedded systems. These systems control the appliance’s operations, such as temperature regulation, motor control, and user interfaces.
- Consumer Electronics: Devices like smartphones, smart TVs, and gaming consoles incorporate embedded systems to manage their functionalities, user interfaces, and connectivity features.
- Consumer electronics, for example music player, digital camera, home electronics, …
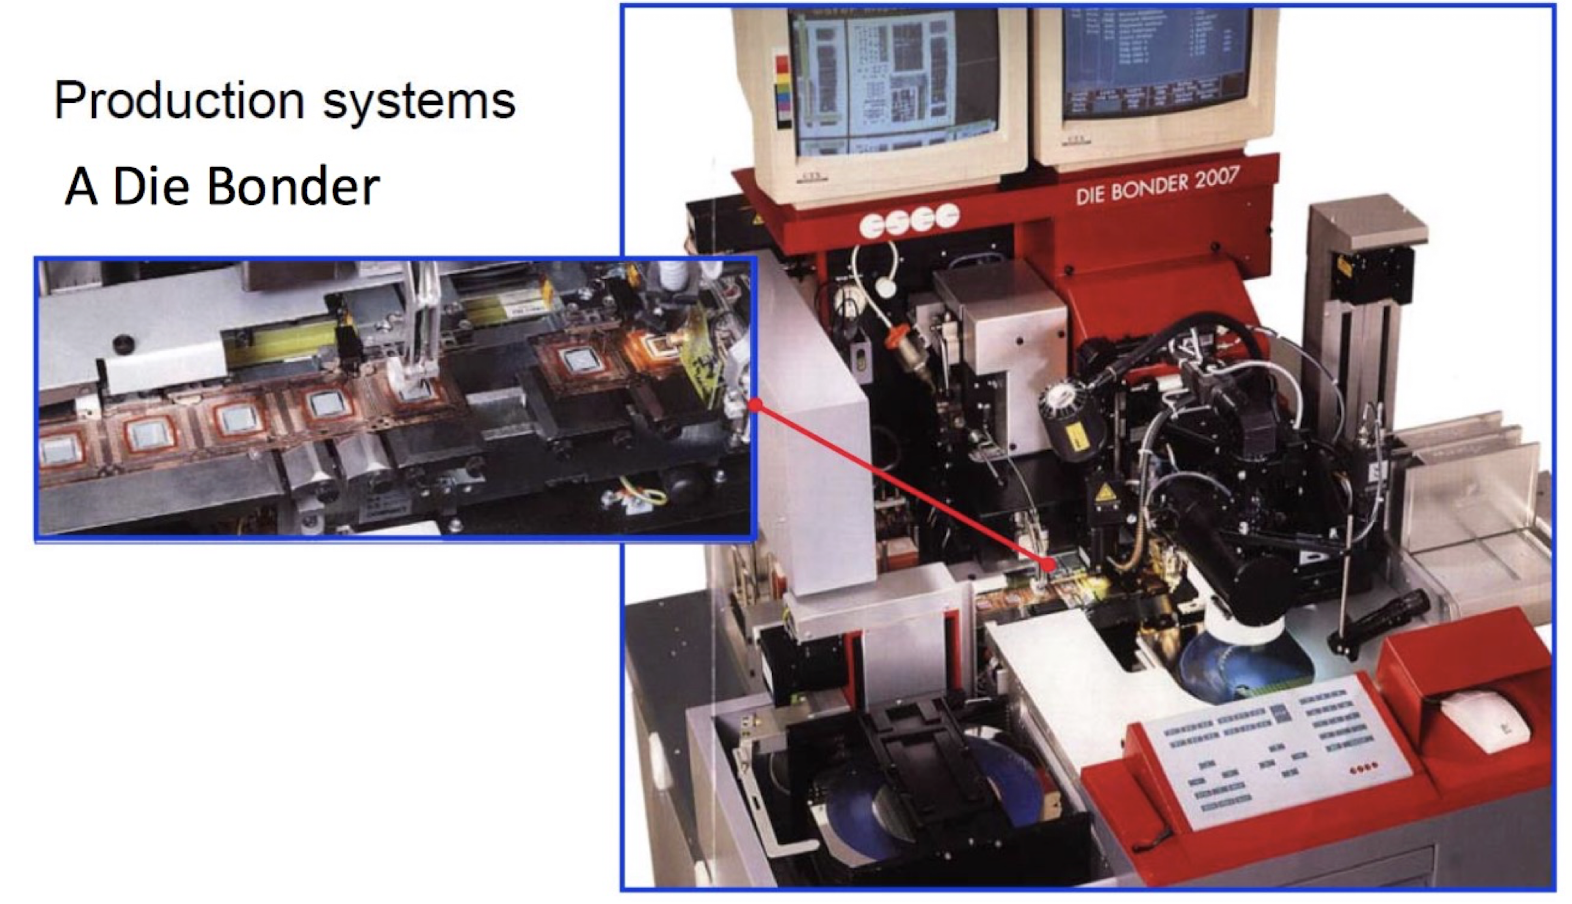
- Industrial Automation: Embedded systems play a crucial role in industrial automation systems. Programmable Logic Controllers (PLCs) are one type of embedded system used for controlling and monitoring machinery in manufacturing processes.
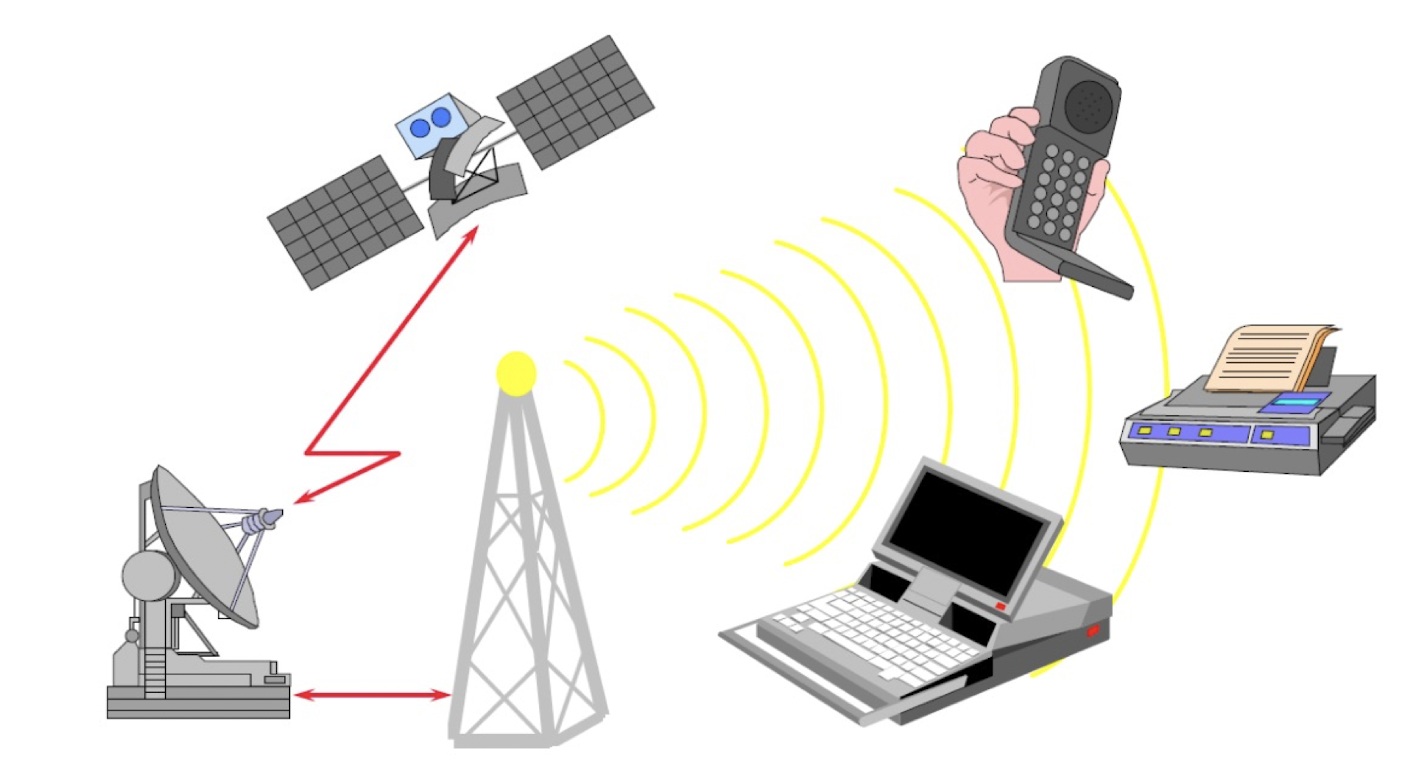
IoT Devices: Internet of Things (IoT) devices and Information systems, such as smart thermostats, security cameras, and wearable devices, rely on embedded systems to connect to the internet, process data, and control their functions.
Information systems, for example wireless communication (mobile phone, Wireless LAN, …), end-user equipment, router, …
- Medical Devices: Medical devices often utilize embedded systems for monitoring, control, and data processing. Examples include pacemakers, insulin pumps, patient monitoring systems, and diagnostic equipment.
- Aerospace and Defense: Embedded systems are extensively used in aerospace and defense applications, including aircraft avionics systems, missile guidance systems, unmanned aerial vehicles (UAVs), and military communication systems.
1.11 Characteristics of Embedded Systems
- Must be dependable:
- Reliability: R(t) = probability of system working correctly provided that it was working at t=0
- Maintainability: M(d) = probability of system working correctly d time units after error occurred
- Availability: probability of system working at time t
- Safety: no harm to be caused
- Security: confidential and authentic communication
- Even perfectly designed systems can fail if the assumptions about the workload and possible errors turn out to be wrong
- Making the system dependable must NOT be an after-thought, it must be considered from the very beginning
- Must be efficient:
- Energy efficient
- Code-size efficient (especially for systems on a chip)
- Run-time efficient
- Weight efficient
- Cost efficient
- Dedicated towards a certain application: Knowledge about behavior at design time can be used to minimize resources and to maximize robustness
- Dedicated user interface (no mouse, keyboard and screen)
- Many ES must meet real-time constraints:
- A real-time system must react to stimuli from the controlled object (or the operator) within the time interval dictated by the environment
- For real-time systems, right answers arriving too late (or even too early) are wrong
- “A real-time constraint is called hard, if not meeting that constraint could result in a catastrophe” [Kopetz, 1997]
- Frequently connected to physical environment through sensors
- Hybrid systems (analog + digital parts).
- Typically, ES are reactive systems:
- “A reactive system is one which is in continual interaction with its environment and executes at a pace determined by that environment” [Bergé, 1995]
- Behavior depends on input and current state: automata model
Consideration:
- Available system-memory
- Available processor speed
- Limited power dissipation when running the system continuously in cycles of the system start, wait for event, wake-up and run, sleep and stop.
1.12 Comparison
| Embedded Systems | General Purpose Computing |
|---|---|
| Few applications that are known at design-time | Broad class of applications |
| Not programmable by end user | Programmable by end user |
| Fixed run-time requirements (additional computing power not useful) | The faster the better |
| Criteria: - Cost - Power consumption - Predictability | Criteria: - Cost - Average speed |
Raspberry Pi 3B+
- A 900MHz quad-core ARM Cortex-A7 CPU
- 1GB RAM
- SD Card (16 GB)
- 40 GPIO (General-purpose input/output) pins
- $300
Lenovo IdeaPad S145
- Intel Core i3-8145U (2.1 GHz, up to 3.9 GHz, 2- core, HT, 4MB cache) 1GB RAM
- 4GB (on-board) DDR4-2400
- 128GB M.2 2242 PCIe SSD
- $2999*
1.13 Case Study : Cutting-edge Applications of Embedded Systems (1)
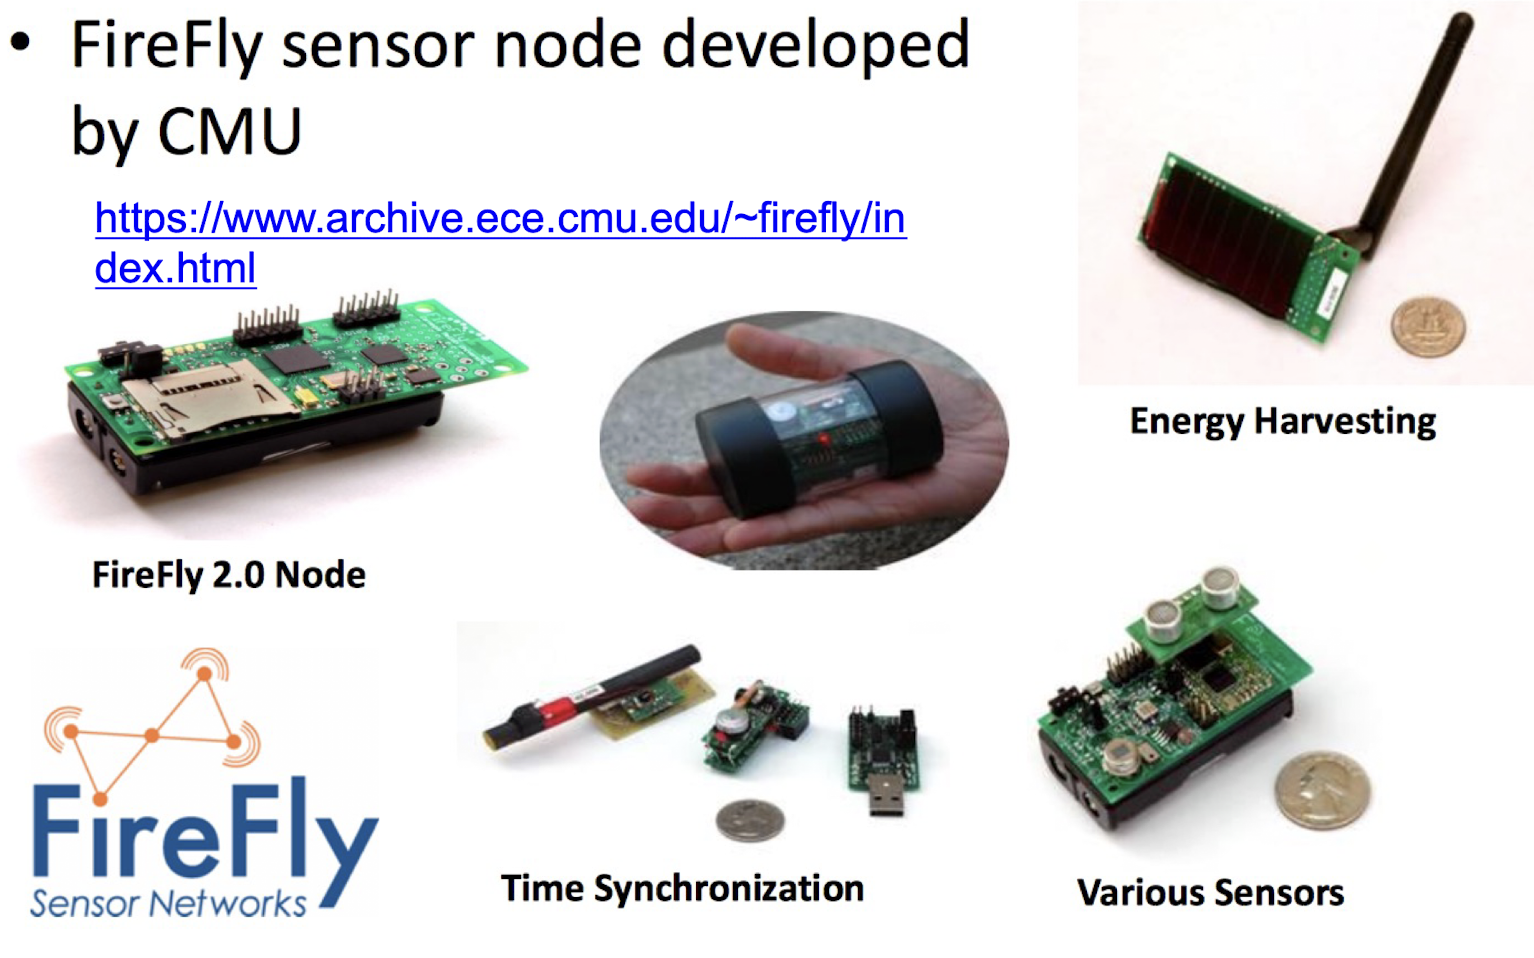
https://www.archive.ece.cmu.edu/~firefly/index.html
- FireFly is a low-cost wireless sensor network platform capable of data acquisition, processing & multi-hop mesh communication
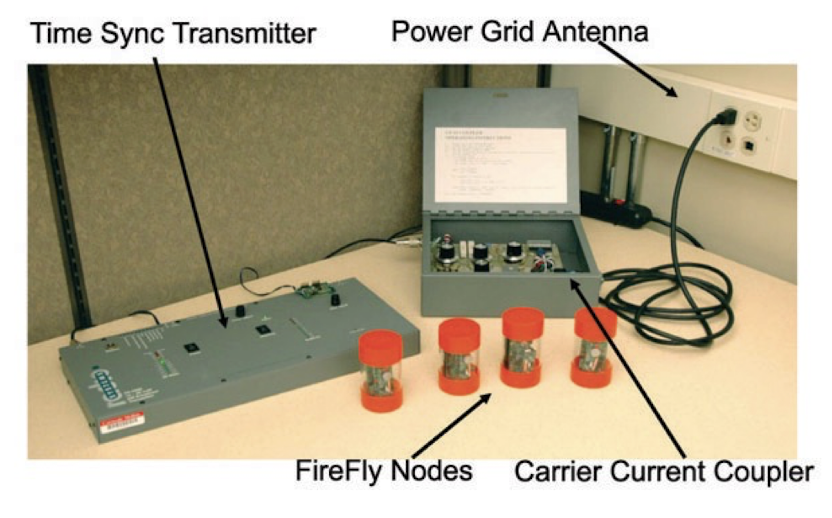
- Each battery-operated node functions with scalable & economical global time-synchronization and delivers a lifetime of 1.5-2 years
- Fixed and mobile nodes can dynamically form a network and facilitate applications such as utility monitoring, surveillance, location tracking and voice communication
- Coal Mine Monitoring
- Accidents in coal mines
- Miners are trapped several thousand feet below the surface for several hours
- Rescuers try to find the miners location and attempt to communicate with them
- The normal practice to check the status of the trappedminers is to drill a narrow hole of 1 - 2 inch radius from the surface to a mine tunnel and drop a microphone, camera, and air quality sensors at different location around the disaster area
- Another method of communication to the miners is by installing a loop antenna that is several miles long, over the surface of the mine.
- This scheme uses a low-frequency transmitter on the surface to send one-way broadcast of short text message and is unable to get feedback about the status or location from the miners below
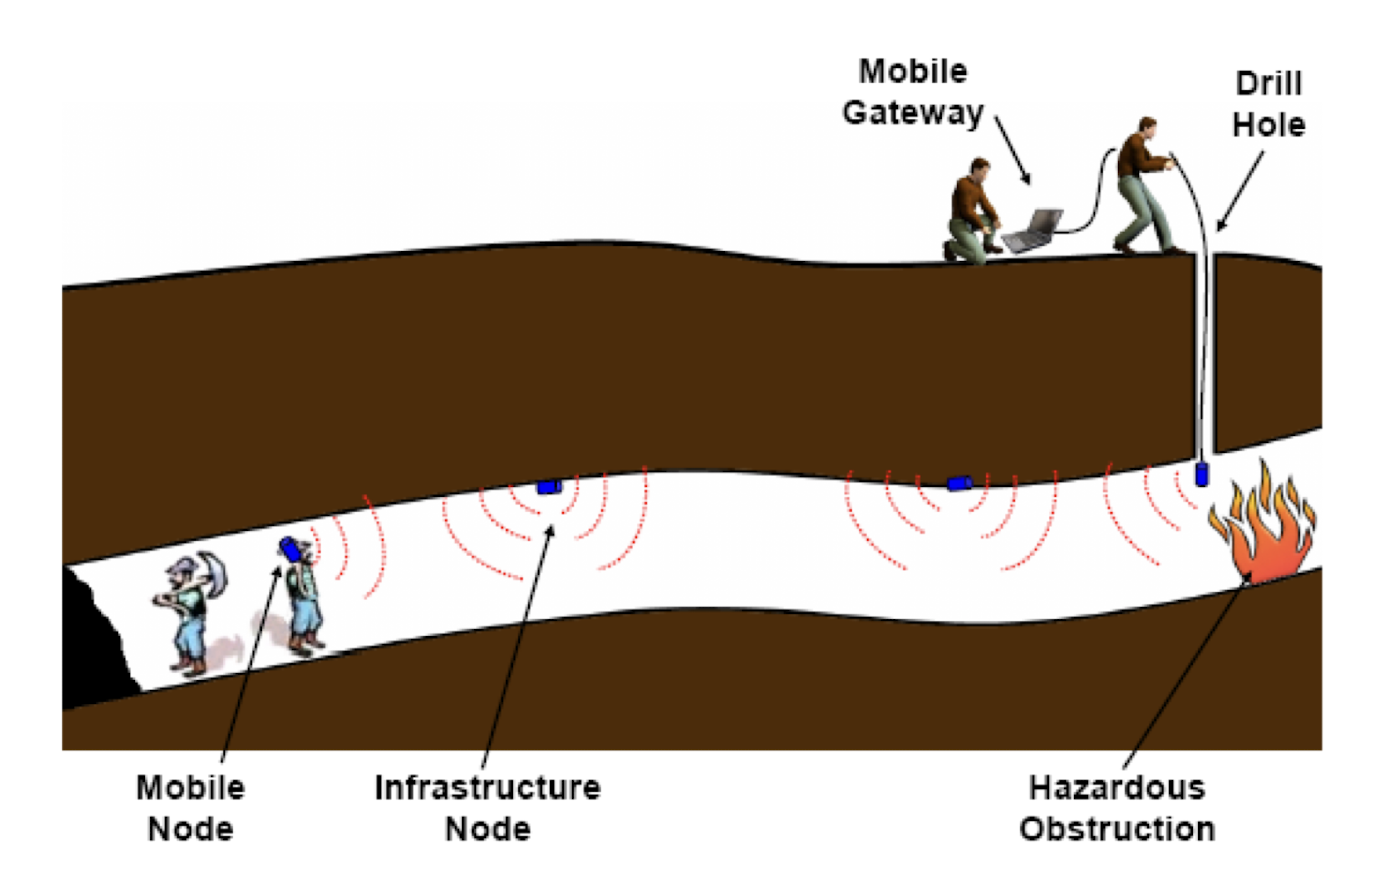
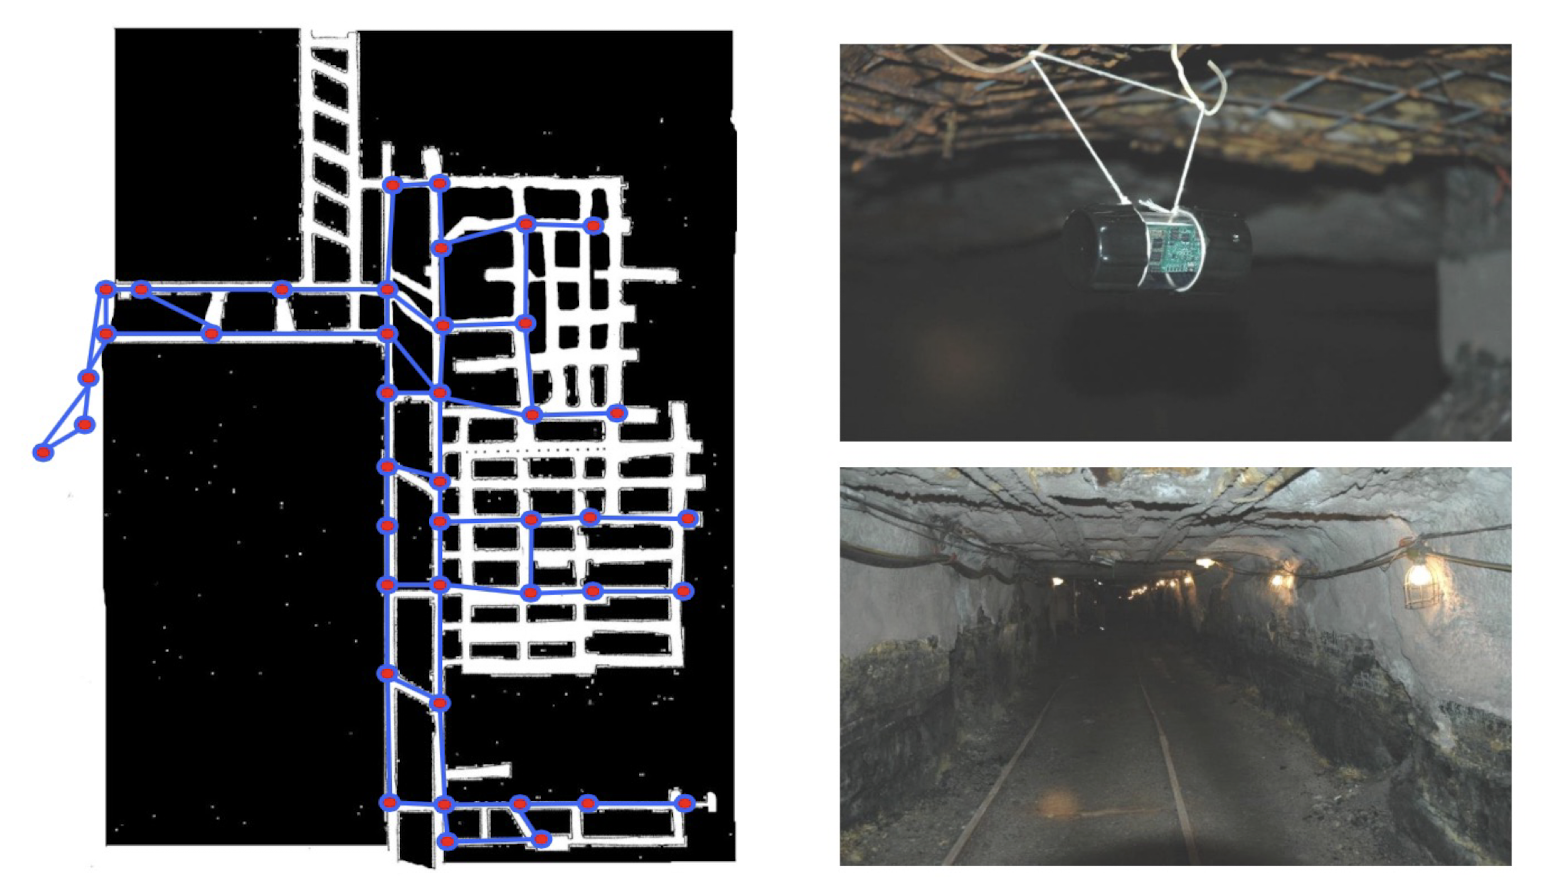
- Nodes are installed in the tunnels to track miners

- Implementation
1.14 Case Study : Cutting-edge Applications of Embedded Systems (2)
- Pollution Sensing
- MESSAGE project (Imperial College London): Use wireless sensors mounted on vehicles to sense pollution generated by traffic

- The Mobile Environmental Sensing System Across Grid Environments ( MESSAGE ) initiative is led by Imperial College London
- Bring together the fields of e-Science, transport, sensors and communications technologies from the Universities of Cambridge, Leeds, Newcastle and Southampton
- Scientists deploy three new types of sensors, measuring multiple types of traffic emissions and noise pollution. The team receives data from 100 sensors deployed in different locations
- Researchers can now measure and model air quality in unprecedented detail to improve their understanding about pollution hotspots and analyse the factors such as bad urban design that contribute to poor air quality
- The scientists will also model pollution clouds in 3-D, by attaching sensors to traffic lights and street lamps
- They aim to understand how the pollution forms in high emission zones.
https://www.imperial.ac.uk/news/70261/mobile-pollution-monitors-trialled-across-uk/
1.15 Case Study : Cutting-edge Applications of Embedded Systems (3)
- Infrastructure Monitoring
- WINES project (Cambridge University & Imperial College): Wireless sensor networks for monitoring of tunnels, bridges and water systems

- Wired and Wireless Intelligent Networked Systems ( WINES )
- The Smart Infrastructure Project is a collaborative project between the University of Cambridge, Imperial College London
- Civil infrastructure, including water supply and sewer systems as well as tunnels and bridges, is rapidly ageing
- Wireless sensor networks offer a cost-effective method for monitoring the infrastructure
- They are relatively low cost and fast to deploy, especially in difficult-to-access areas
- Wireless networks are scalable, allowing for dynamic system growth and extension
- Adaptive network configuration and operation in case of node failure and unexpected events result in improved reliability over wired systems
- Coupled with low power sensors and local processing, wireless sensor networks offer long term monitoring advantages.
http://www-civ.eng.cam.ac.uk/geotech_new/WinesInfrastructure/index.html
1.16 Case Study : Cutting-edge Applications of Embedded Systems (4)
- Wireless Mesh Routers with embedded RTOS
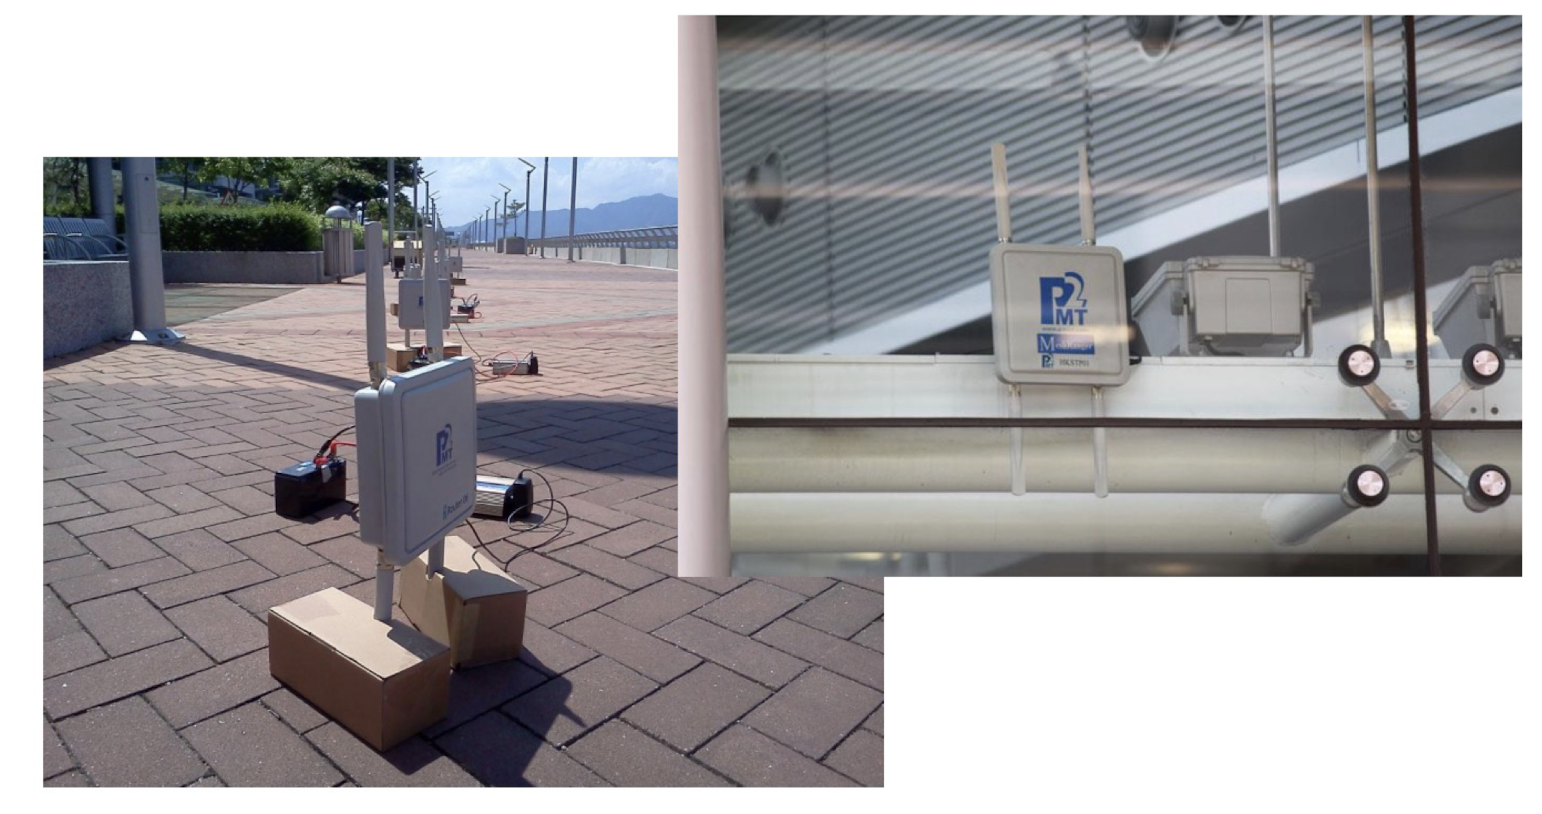
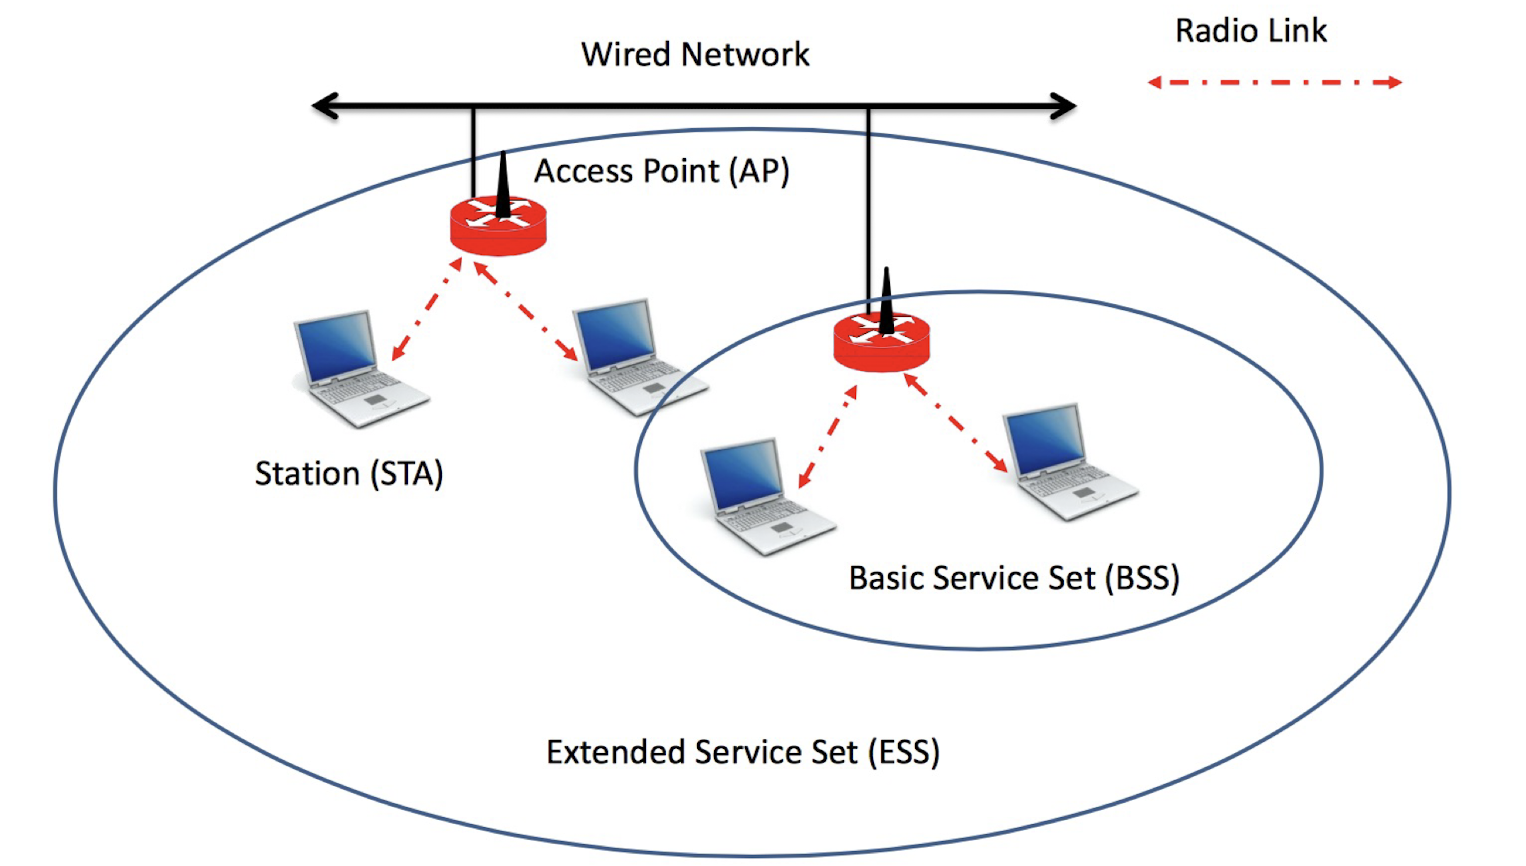
- Wireless Local Area Network (WLAN)
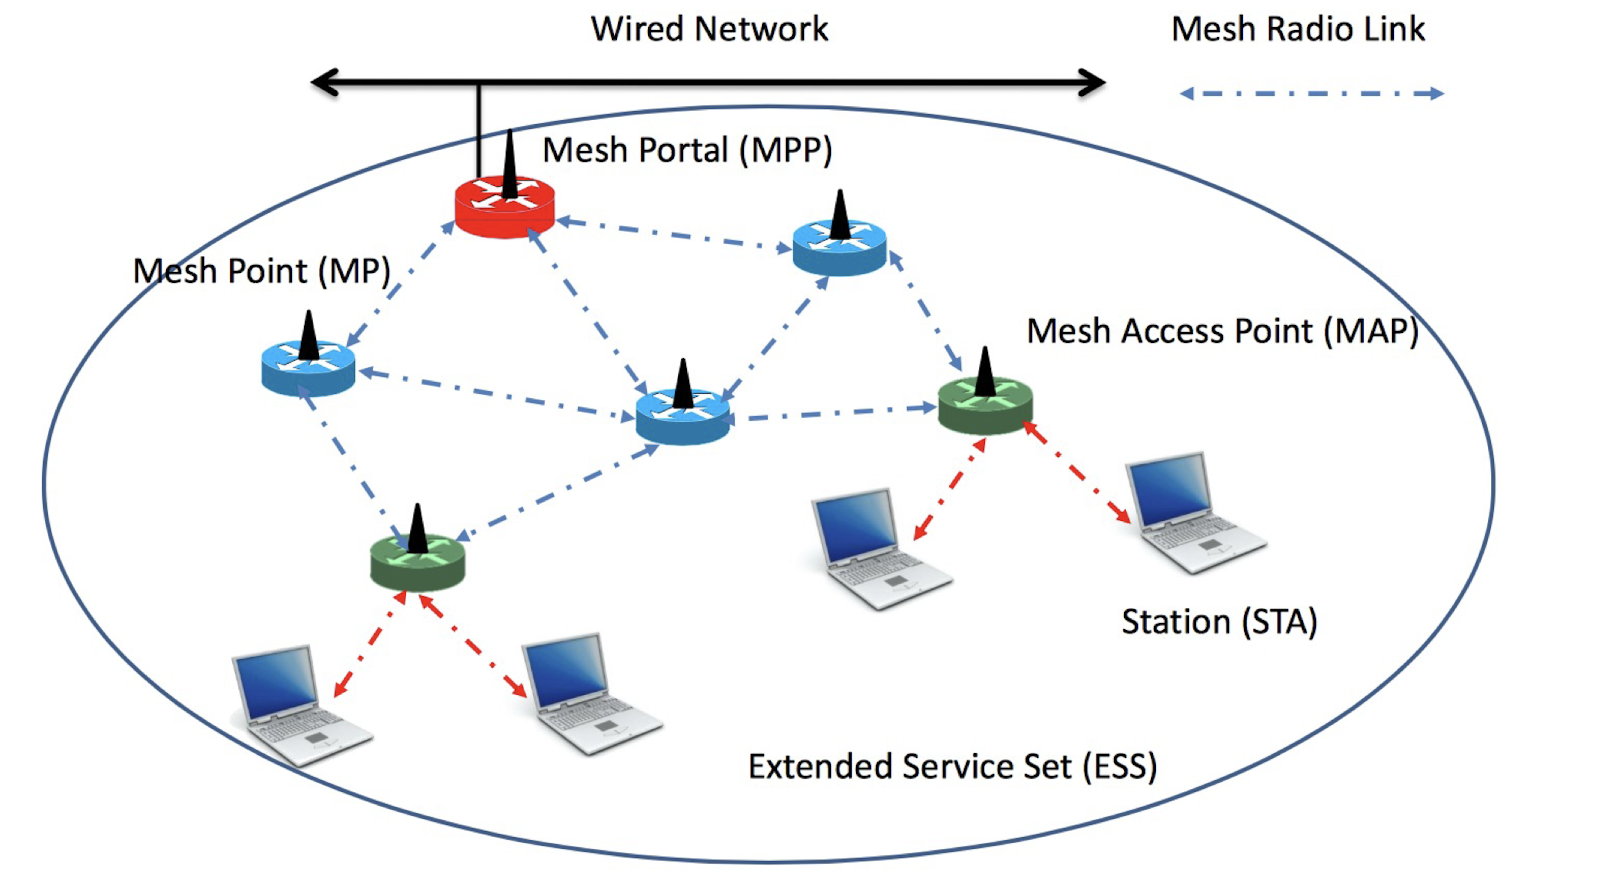
- Wireless Mesh Network (WMN)
1.17 Summary
- Definitions of Embedded System
- Embedded Hardware, Application Software and RTOS
- Embedded system Application-areas
- Embedded System Characteristics
- System & Design Constraints
- Case studies of Applications of Embedded Systems
Tutorial 1A: Appendix: Cutting-edge Applications of
Embedded Systems
- Embedded systems are continuously evolving, and they find applications in various cutting-edge fields. Here are some examples of cutting-edge applications of embedded systems:
- Internet of Things (IoT): Embedded systems play a crucial role in IoT applications, where interconnected devices communicate and exchange data. They enable smart homes, smart cities, industrial automation, and wearable devices. Embedded systems in IoT applications often require low power consumption, wireless connectivity, and real-time processing capabilities.
- Autonomous Vehicles: Embedded systems are at the heart of autonomous vehicles, controlling various functions such as sensor fusion, perception, decision-making, and actuation. These systems handle complex algorithms and real-time data processing to ensure safe and efficient operation of self-driving cars, drones, and robotic vehicles.
- Edge Computing: With the proliferation of IoT devices and the need for real-time data processing, embedded systems are used in edge computing. They bring computational power closer to the data source, reducing latency and improving efficiency. Edge computing enables applications such as real-time analytics, AI-based decision-making, and local data processing in resource-constrained environments.
- Medical Devices: Embedded systems are extensively used in medical devices, from wearable health monitors to advanced imaging systems. They provide real-time monitoring, data analysis, and control capabilities for devices used in diagnostics, treatment, patient monitoring, and telemedicine. Embedded systems in medical devices require high reliability, security, and regulatory compliance.
- Robotics and Automation: Embedded systems are the backbone of robotics and automation applications, controlling the movement, perception, and decision-making of robots. They enable industrial automation, collaborative robots (cobots), drones, and autonomous machines. Embedded systems in robotics require precise control, sensor integration, and real-time response.
- Smart Energy Systems: Embedded systems are used in smart grid systems and energy management applications. They enable monitoring, control, and optimization of energy generation, distribution, and consumption. Embedded systems help in demand response, energy efficiency, renewable energy integration, and grid stability.
- Augmented Reality (AR) and Virtual Reality (VR): Embedded systems are employed in AR and VR devices, providing real-time rendering, tracking, and sensor integration. They enable immersive experiences, interactive simulations, and training applications across industries like gaming, education, healthcare, and design.
- Cybersecurity: Embedded systems play a critical role in ensuring the security of devices and systems. They implement encryption, authentication, intrusion detection, and secure communication protocols to protect against cyber threats. Embedded systems are used in secure hardware modules, smart cards, and network security appliances.
- These are just a few examples of the cutting-edge applications of embedded systems. As technology continues to advance, embedded systems will find even more innovative and transformative applications across various industries.
2. Swift Programming 1
- Swift Basic Syntax
- Data Type, Variables, Constants, Operators
- Controls and Loop Structures
- The Optional Type
- Array
- Function and Class
2.1 Swift Background
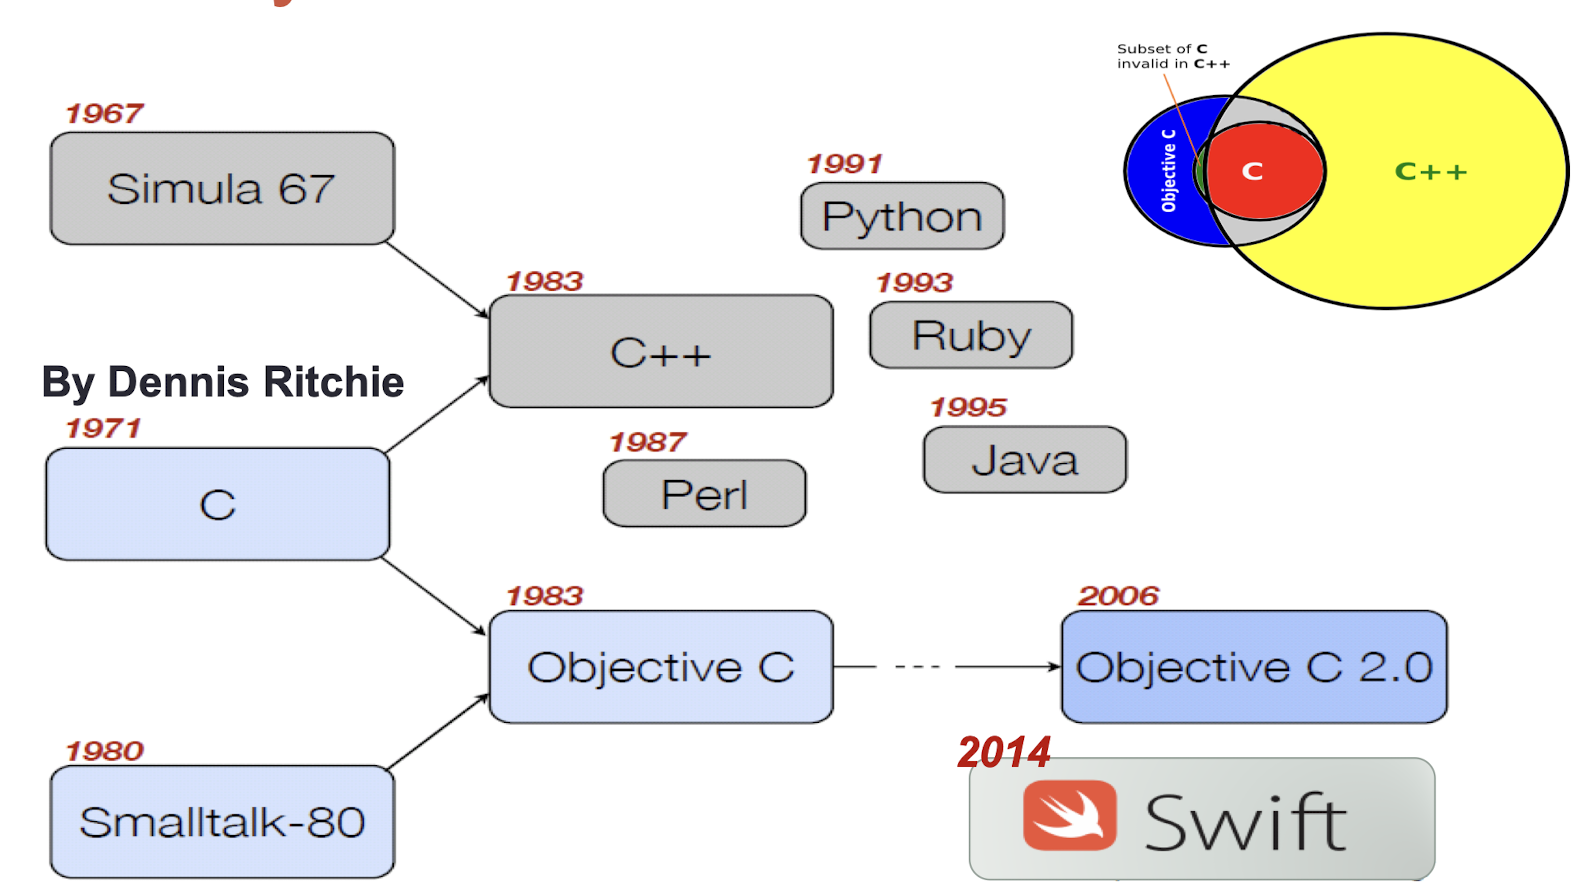
- Apple first released Swift in 2014 to replace Objective-C in iOS app and MAC app development.
- According to Apple, Swift is “friendly” to new programmers.
- Swift defines away large classes of common programming errors:
- Variables are always initialized before use.
- Array indices are checked for out-of-bounds errors.
- Integers are checked for overflow.
- Optionals ensure that nil values are handled explicitly
- Memory is managed automatically.
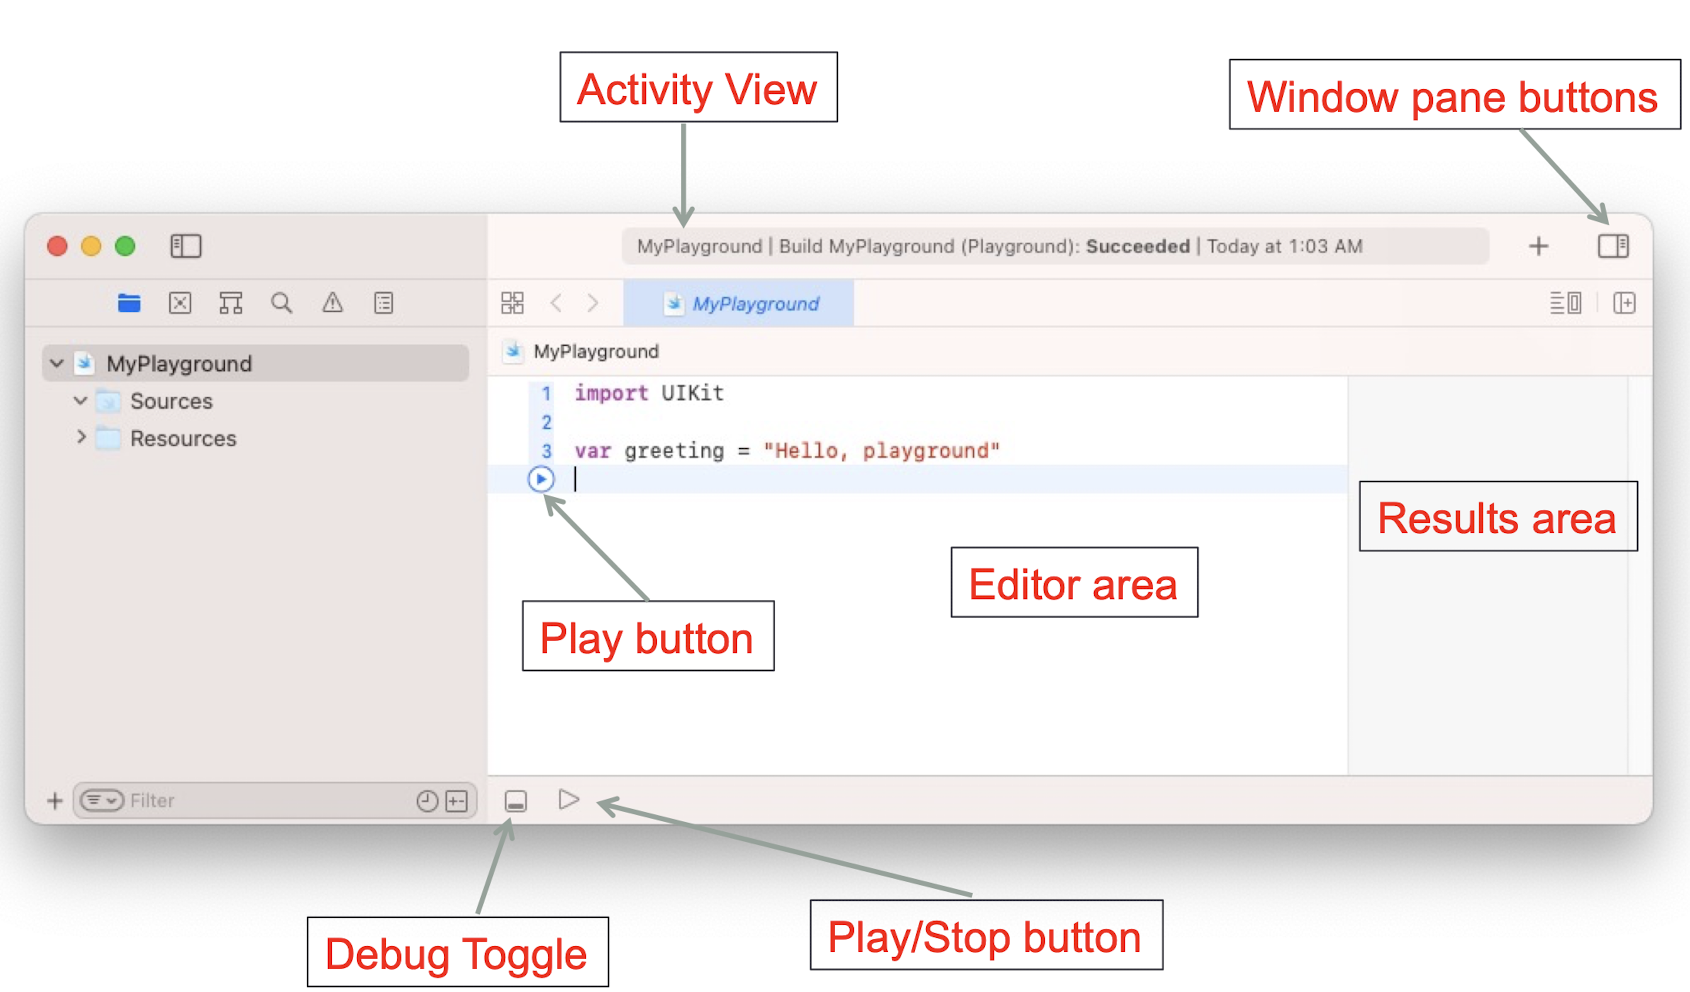
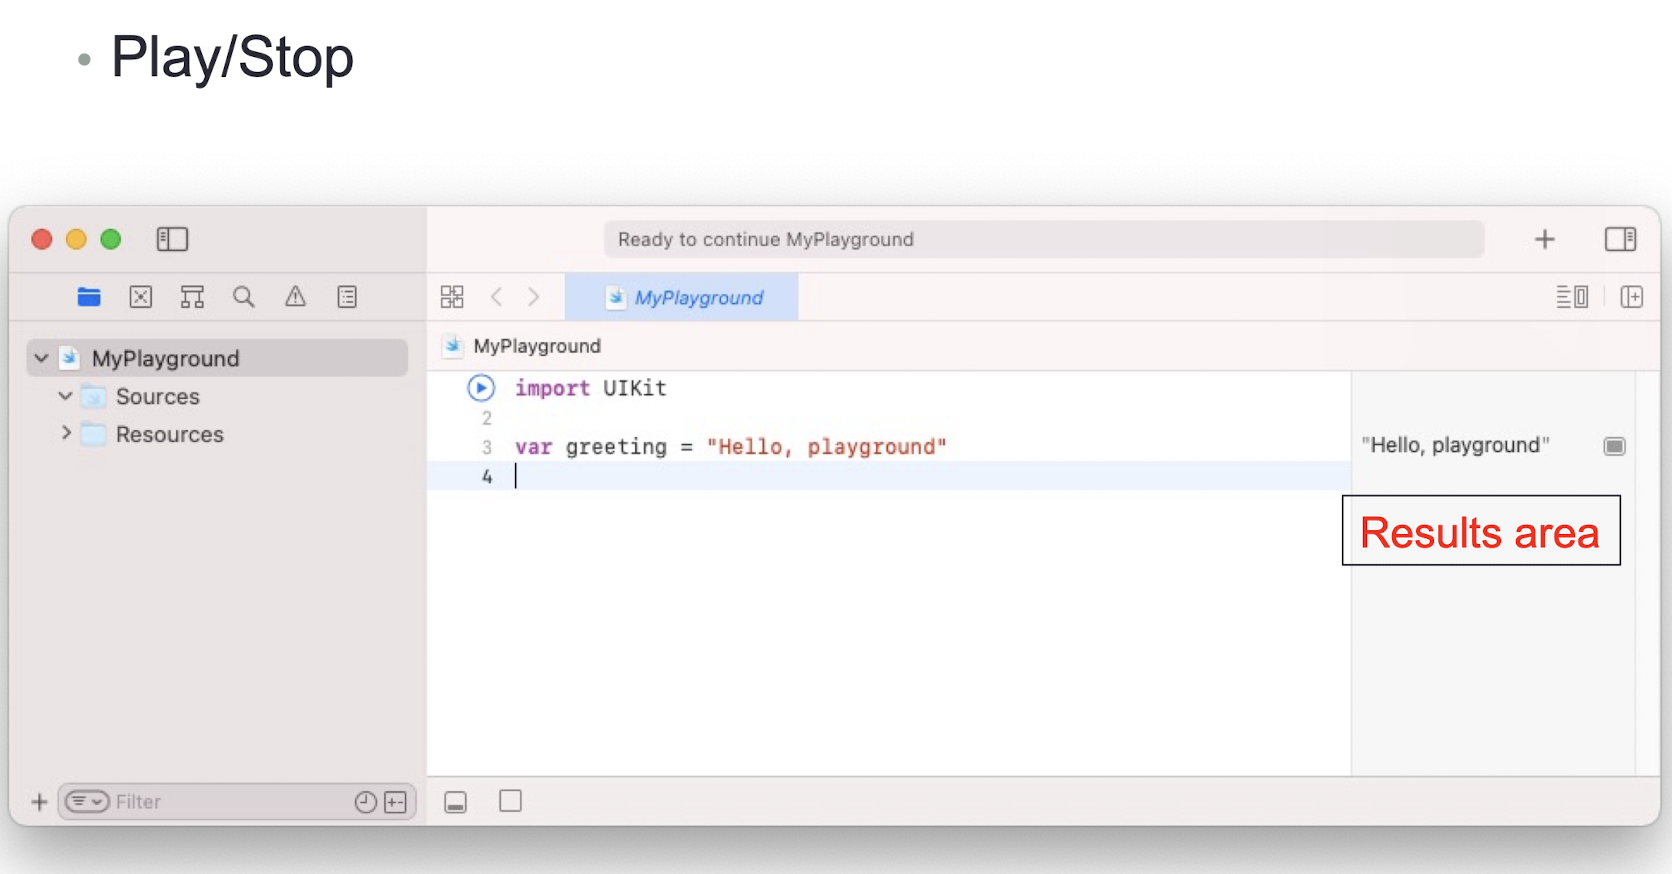
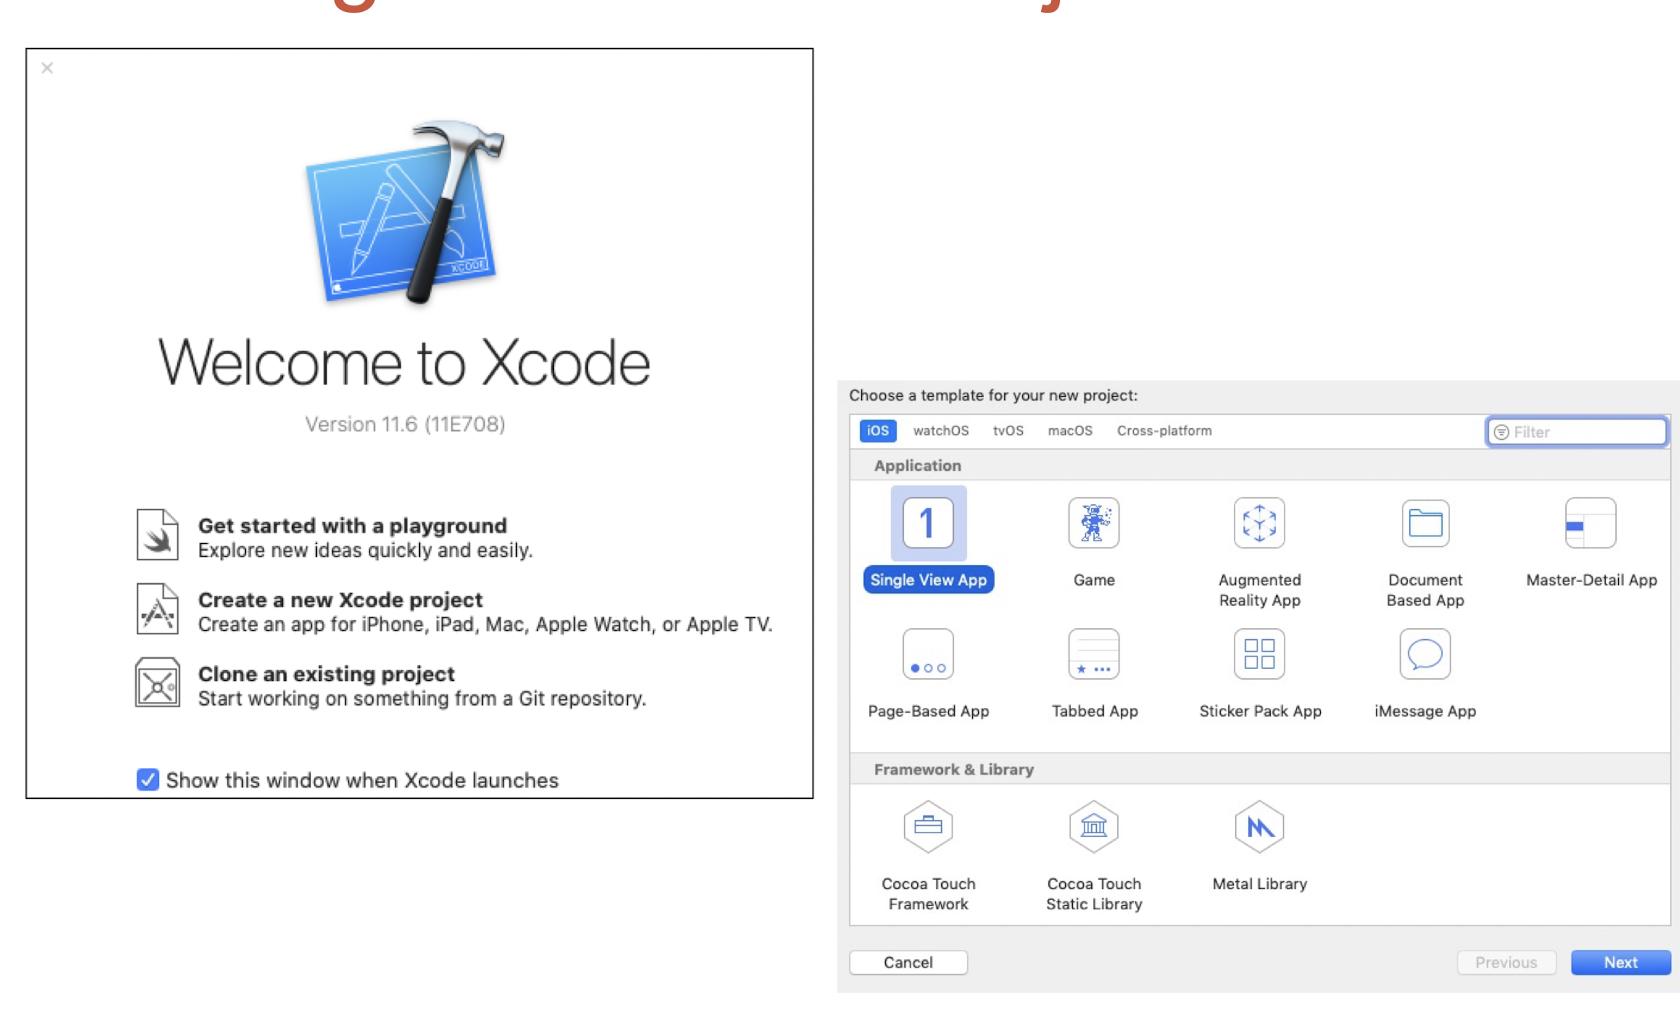
2.2 Xcode Playground
- There is a “Playground” in Xcode for learning purpose
- File -> New -> Playground…
2.2.1 Understanding Playground
2.3 Basic Syntax
Semicolon
- Swift does not require a semicolon after each statement
- Require semicolon only for multiple statements in the same line
Comments
- Comments are ignored by the compiler
- Single-line comment are written using
//at the beginning of the comment - Multi-line comments start with
/*and end with*/
Identifiers
- An identifier is to identify a variable, function, or user-defined item
- An identifier starts with an alphabet A to Z or a to z or an underscore
_followed by letters, underscore and digits - Swift does not allow special characters within identifiers
- Identifiers are case sensitive
- Example of identifiers:
- _temp , abc123 , first_name
Keywords
- Keywords are reserved and cannot be used as identifiers
- Swift’s common keywords
- func
- import
- enum
- struct
- class
- while
- ifs
- …
Print statement
- Print has three different properties.
- Items – Items to be printed
- Separator – separator between items, default value: a space
- Terminator – the value with which line should end, default value: a new line
2.4 Data Type
- Int or UInt
- Float
- Double
- Bool
- String
- Character
- Optional
- Tuples
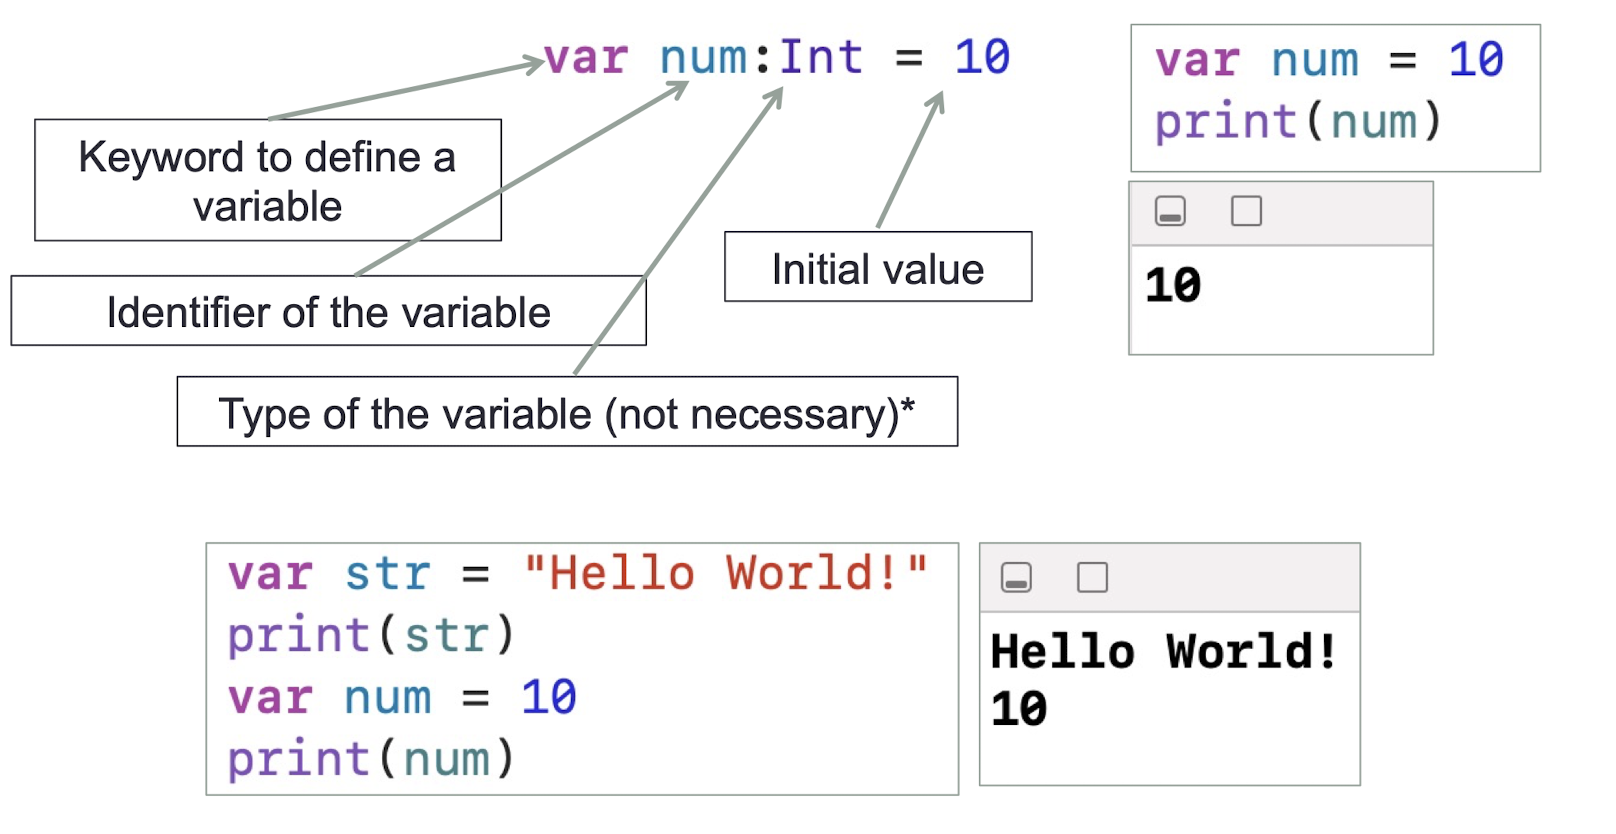
2.5 Variables
- Variable declaration
1 | |
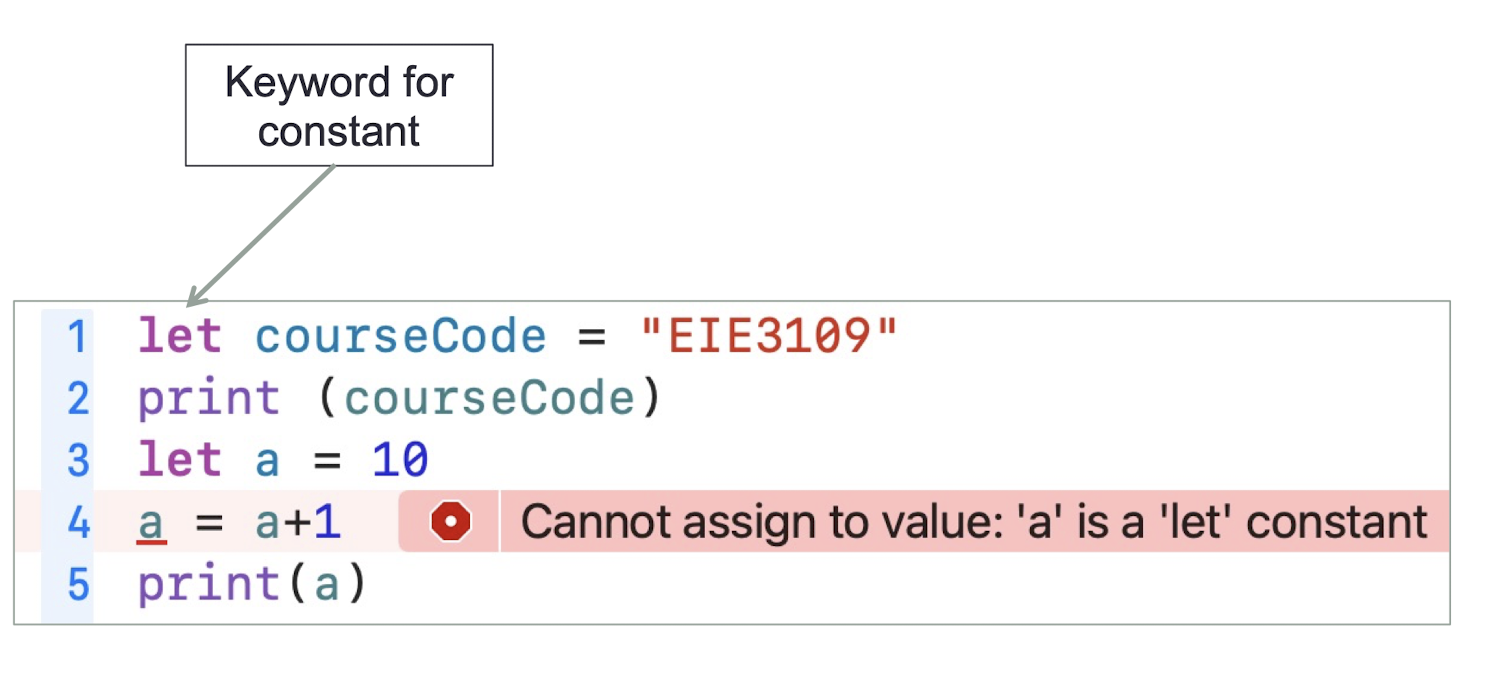
2.6 Constants
- Constants are like variables except their values cannot be modified after declaration
Keyword for constant: let
1 | |
2.7 Operators
- Same as C++, there are many operators.
- Arithmetic Operators
+(Add),-(Subtract),*(Multiply), and/(Divide)+=(Increment),- =(Decrement),%(Module)
- Comparison Operators
==,!=,>,>=,<,<=
- Logical Operators
&&,||,!
- Bitwise Operators
&,|,^,~,>>,<<
Operators can only work with operands of the same type.
1 | |
- You’ll get an error message, Binary operator ‘+’ cannot be applied to operands of type ‘Int’ and ‘Double’. This is because a and b are different types.
- Convert the value in a to a floating-point number
1 | |
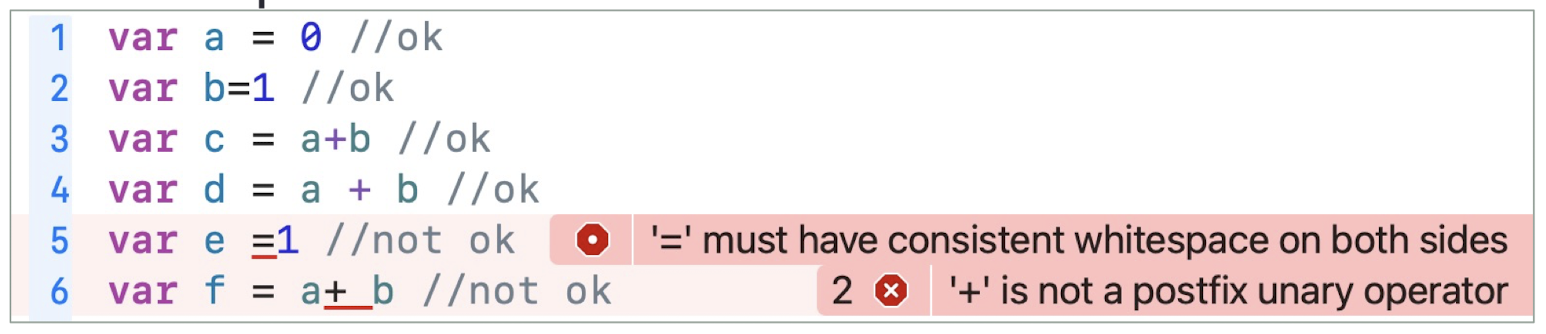
2.8 Operators and Whitespaces
Join two strings together using the + operator
1 | |
String interpolation is done by typing the name of a constant or variable between \( and ) in a string.
1 | |
- Whitespaces
2.9 Controls
If statement
- If statement in Swift is similar to C++,
1 | |
No need to use ( ) for the condition
Switch statement
- Every switch statement consists of multiple possible cases , each of which begins with the
casekeyword - Not need to use
breakafter each case - Every switch statement must be exhaustive (with the help of
default)
1 | |
2.10 Loops
For-in loop
1 | |
- Using _
1 | |
While loop
1 | |
Repeat-while loop
1 | |
2.11 Exercise 2.1
- While loop
- Repeat-while loop
- How many times do the 2 loops run? What are the values of sum after the loop execution?
- 9 times, 1023
- Give a situation where the while-loop and the repeat-while loop perform differently i.e. The values of sum are different after the loop execution even if the condition, initial value of sum, and the code inside the loop are the same
- Change 1000 to 1
- How many times do the 2 loops run? What are the values of sum after the loop execution?
1 | |
https://www.tutorialspoint.com/compile_swift_online.php
2.12 Optional
- Up until now, every time you declare a variable or constant, you assign a value immediately
- Swift does not allow you to declare a variable or constant without a value

- We can fix it by assigning a value
1 | |
- This makes the error go away, but -1 is still a value, and what can we do if we don’t want age to have a value?
- Optional is a variable type like
Int,Float,Double… There are two stages for the optional type:
- Not set ( nil ) or Set (got an associated value and Swift will infer the corresponding type all the time)
Why Optional?
- E.g., we could have a button without a currentTitle (not set)
?: Optional type
- When these is no value assigned to it, the value will set to
nil
!: Unwrap the Associated Value
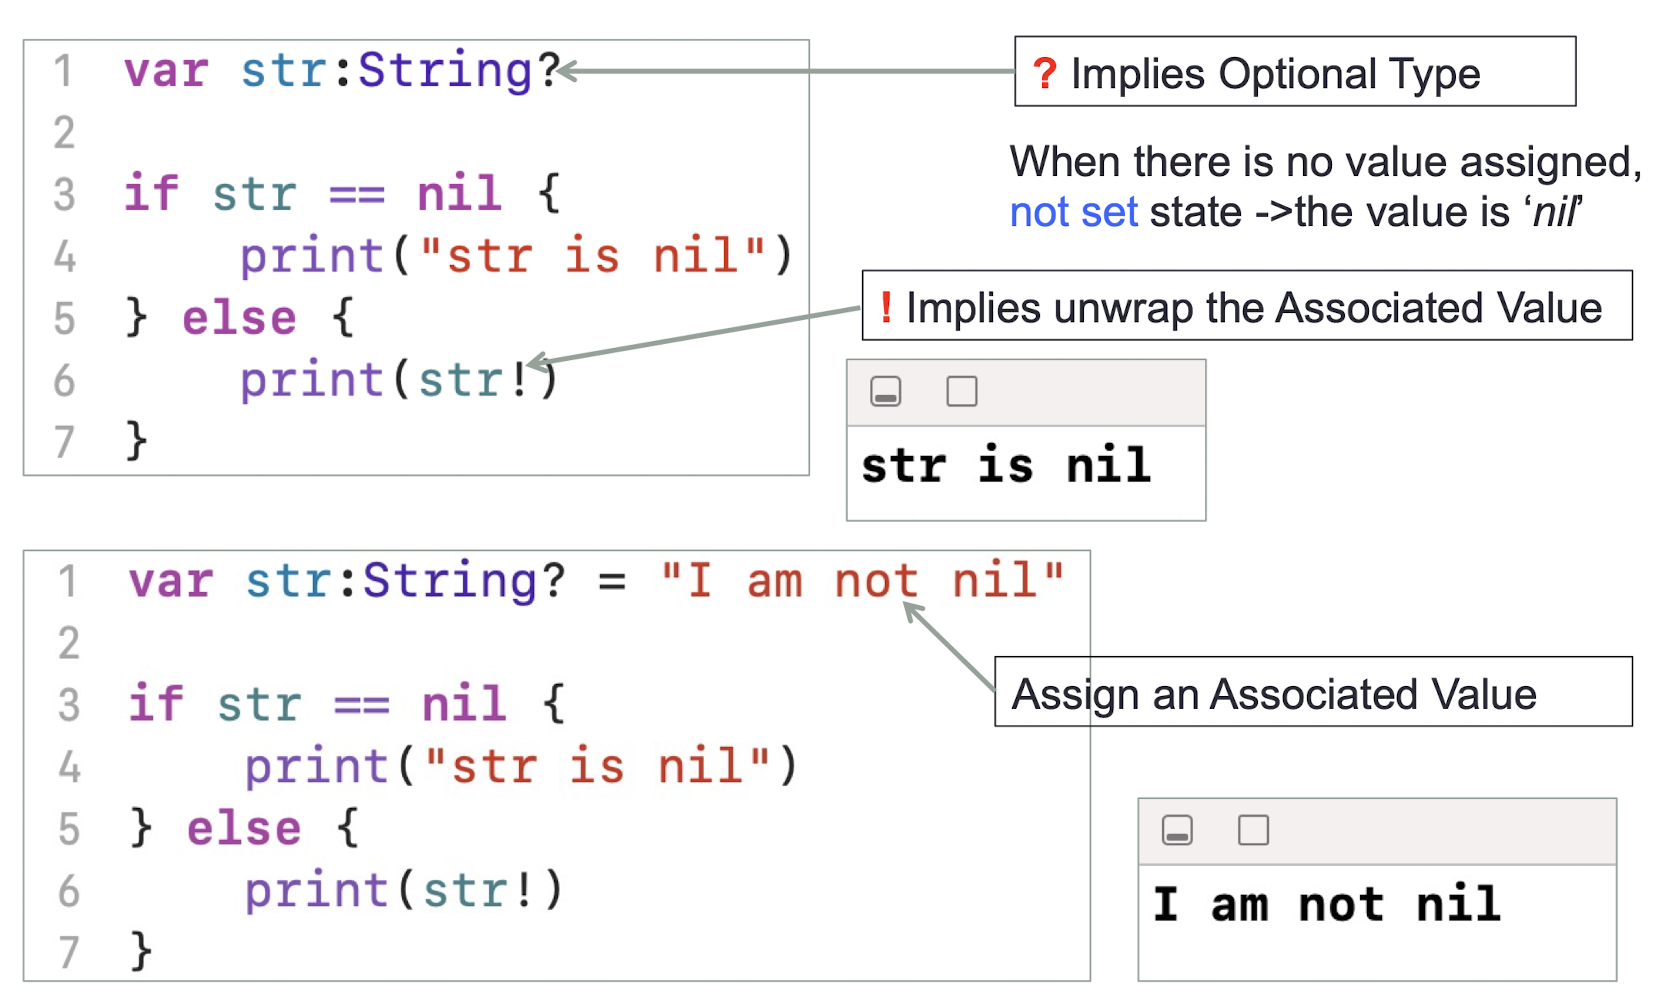

1 | |
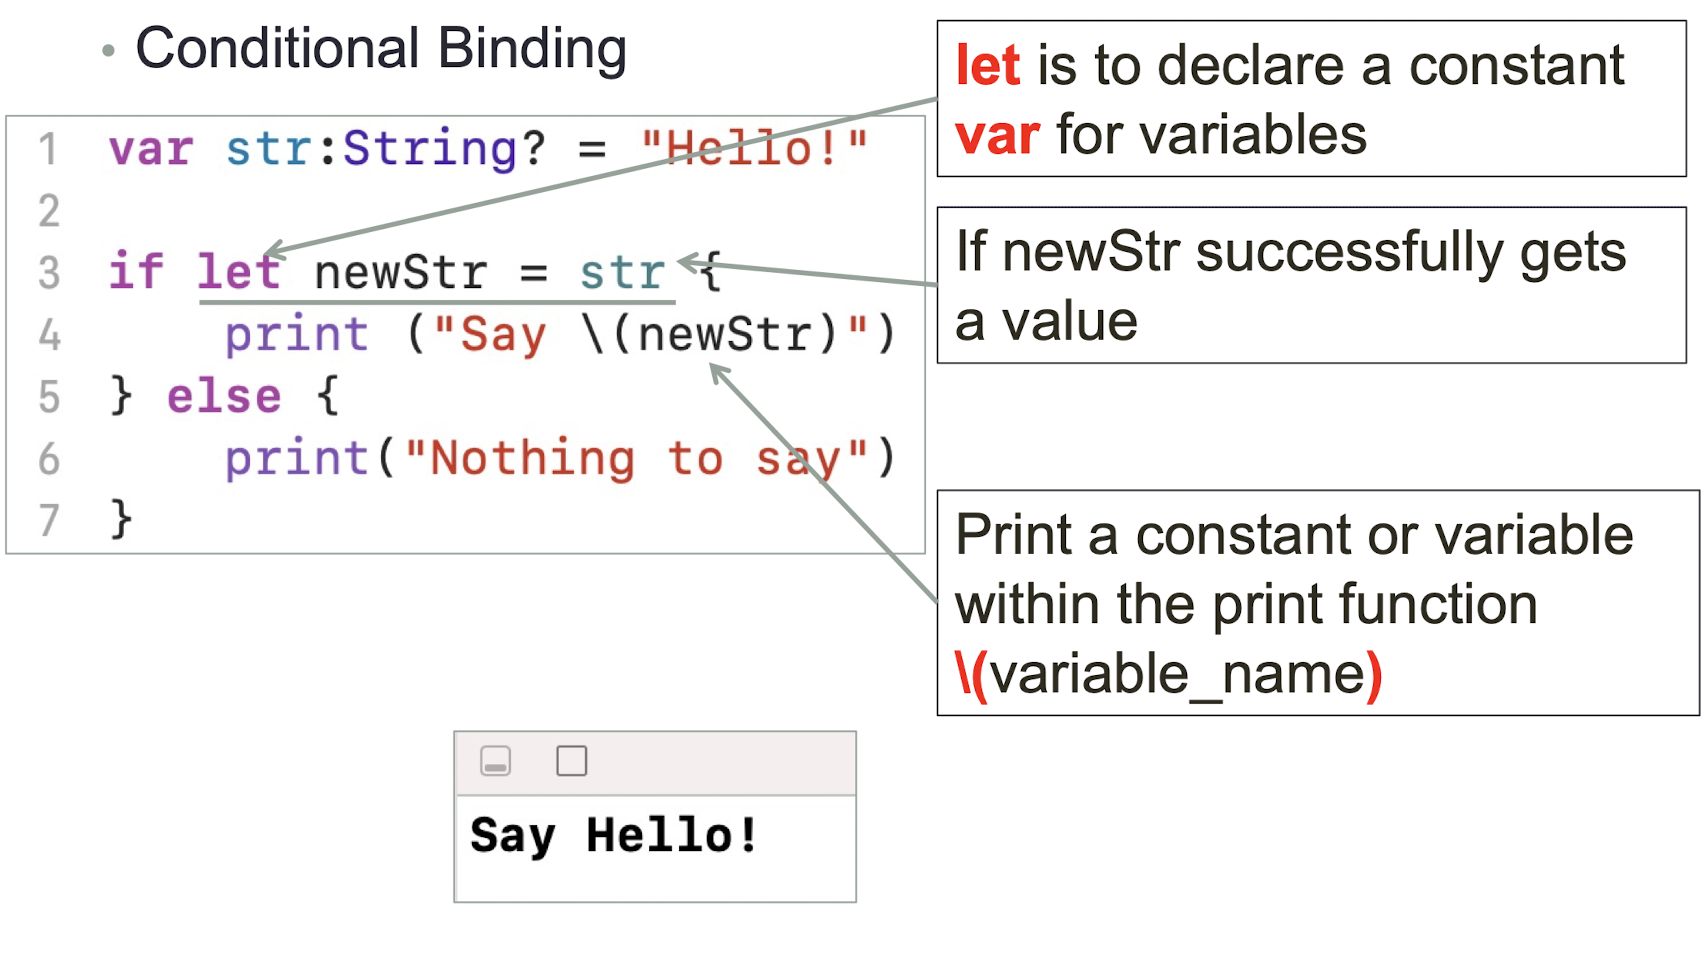
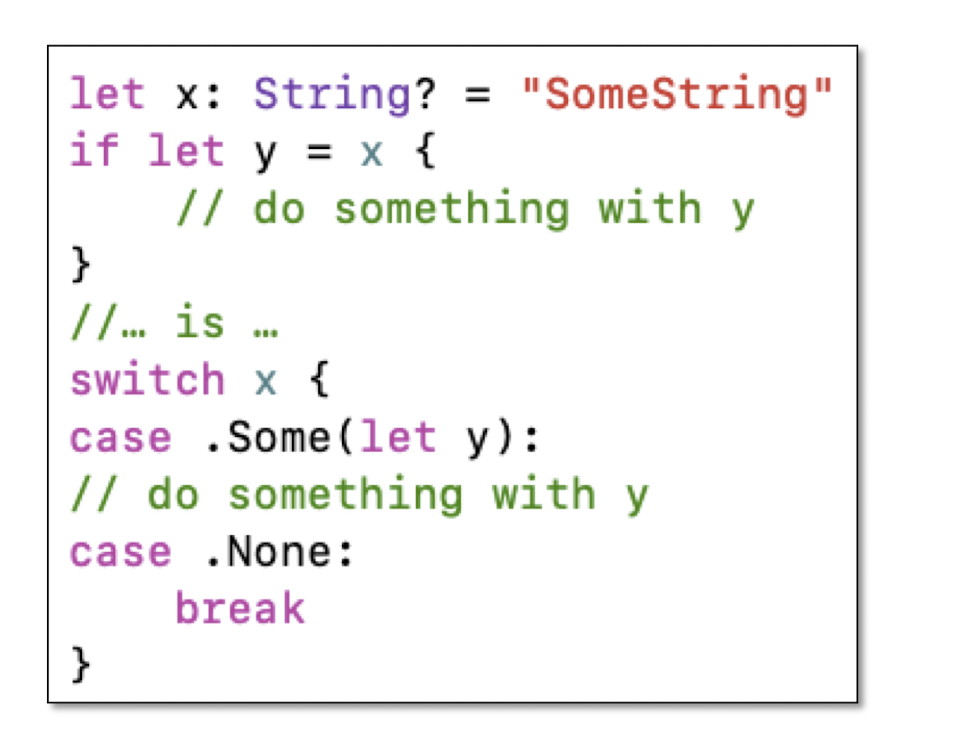
Conditional Binding
- Optional Binding uses if statement to find out whether an optional contains a value or not let is to declare a constant var for variables
- If newStr successfully gets a value
- Print a constant or variable within the print function ( variable_name )
1 | |
- Do the following statements generate errors?
1 | |
- How to fix it?
- How to define an Optional String?
- What are the outputs of the print statements below?
1 | |
1 | |
- The exclamation mark (!) crashes your app if you try to unwrap an optional in the not set state
- let digit = sender.currentTitle! (! means unwrapping this Optional and give me the associated value)
- Every variable needs to be initialized, optional variables are automatically initialized as nil (not set)
- Unwrap an optional only if it is set:
- If let mathSymbol = sender.currentTitle { } //no! needed here
2.11 Array
- An array stores values of the same type in an ordered list
- The same value can appear in an array multiple times at
different positions - Array declaration
1 | |
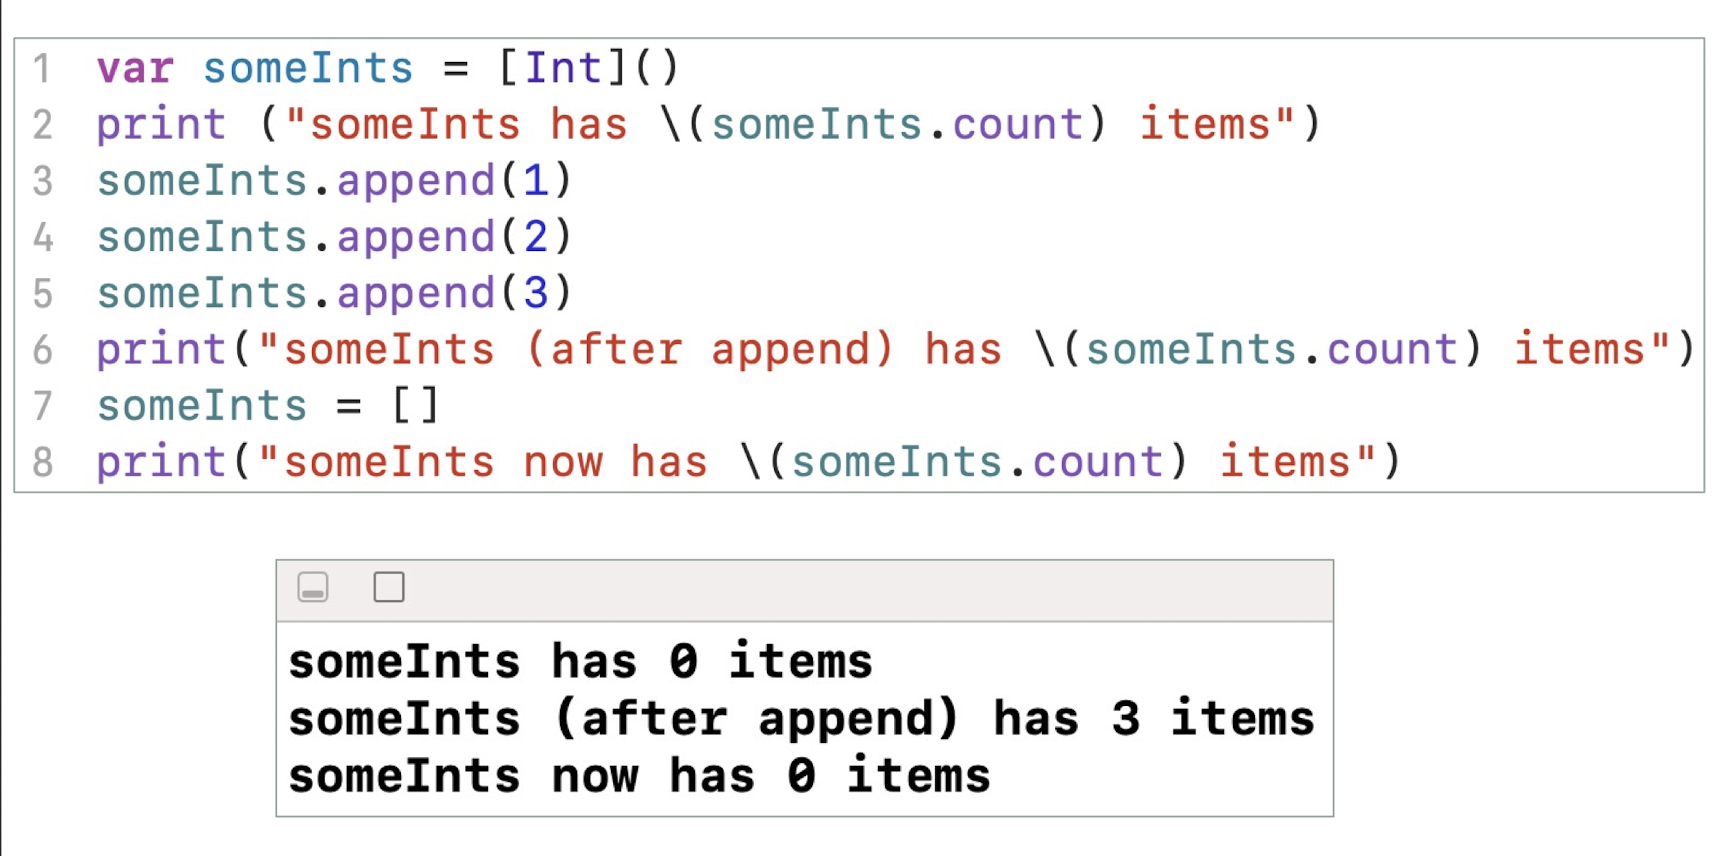
- Creating an empty Array
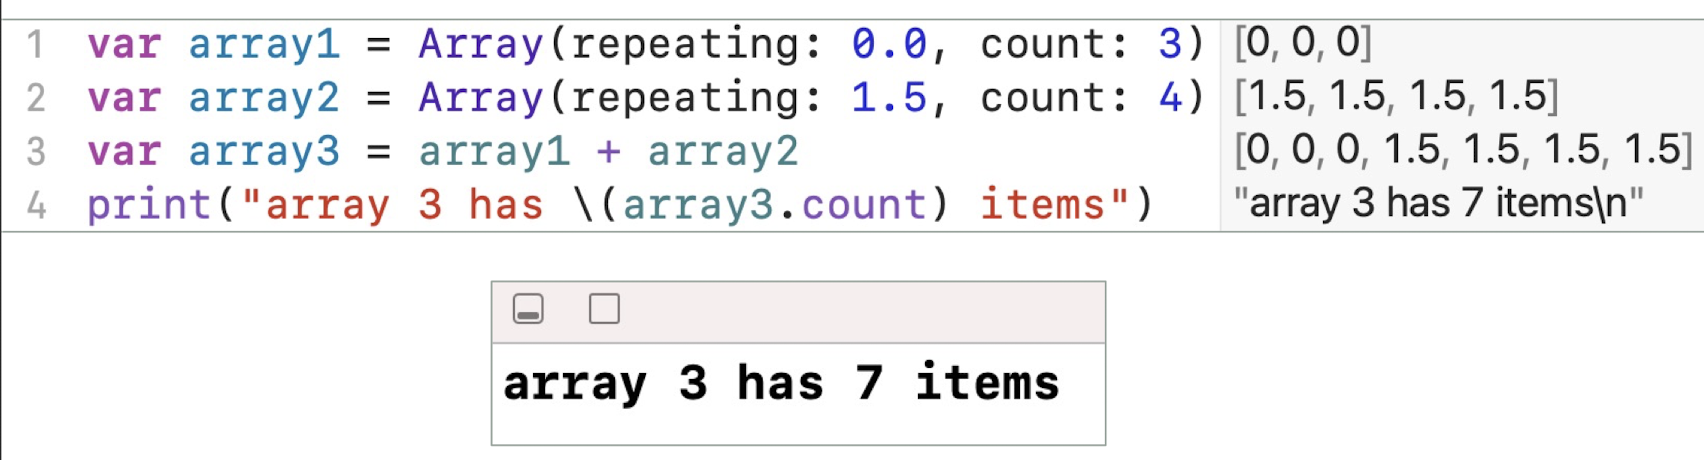
- Creating an Array with a default value
- Creating an Array with an Array Literal
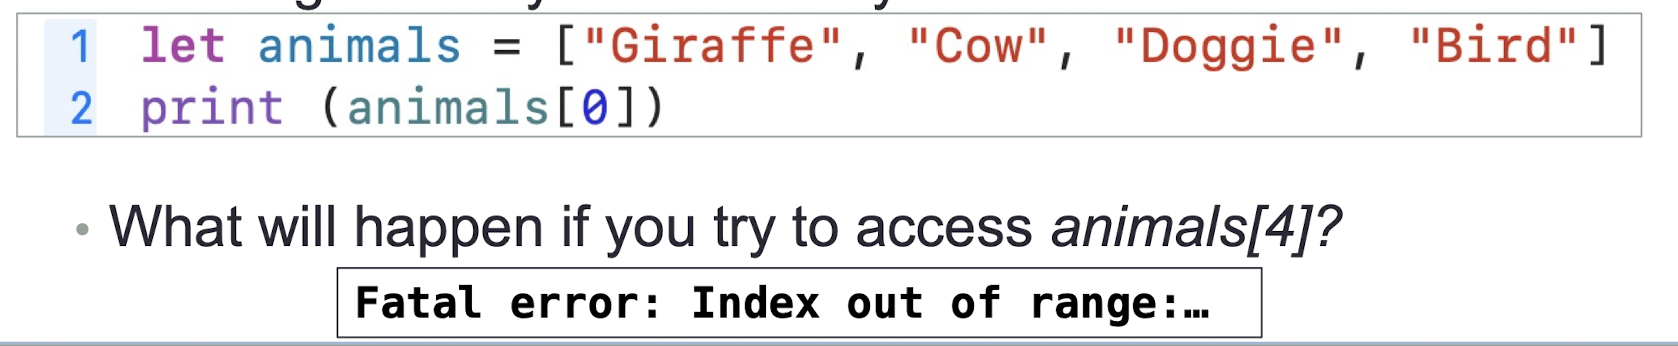
- Accessing and modifying an Array
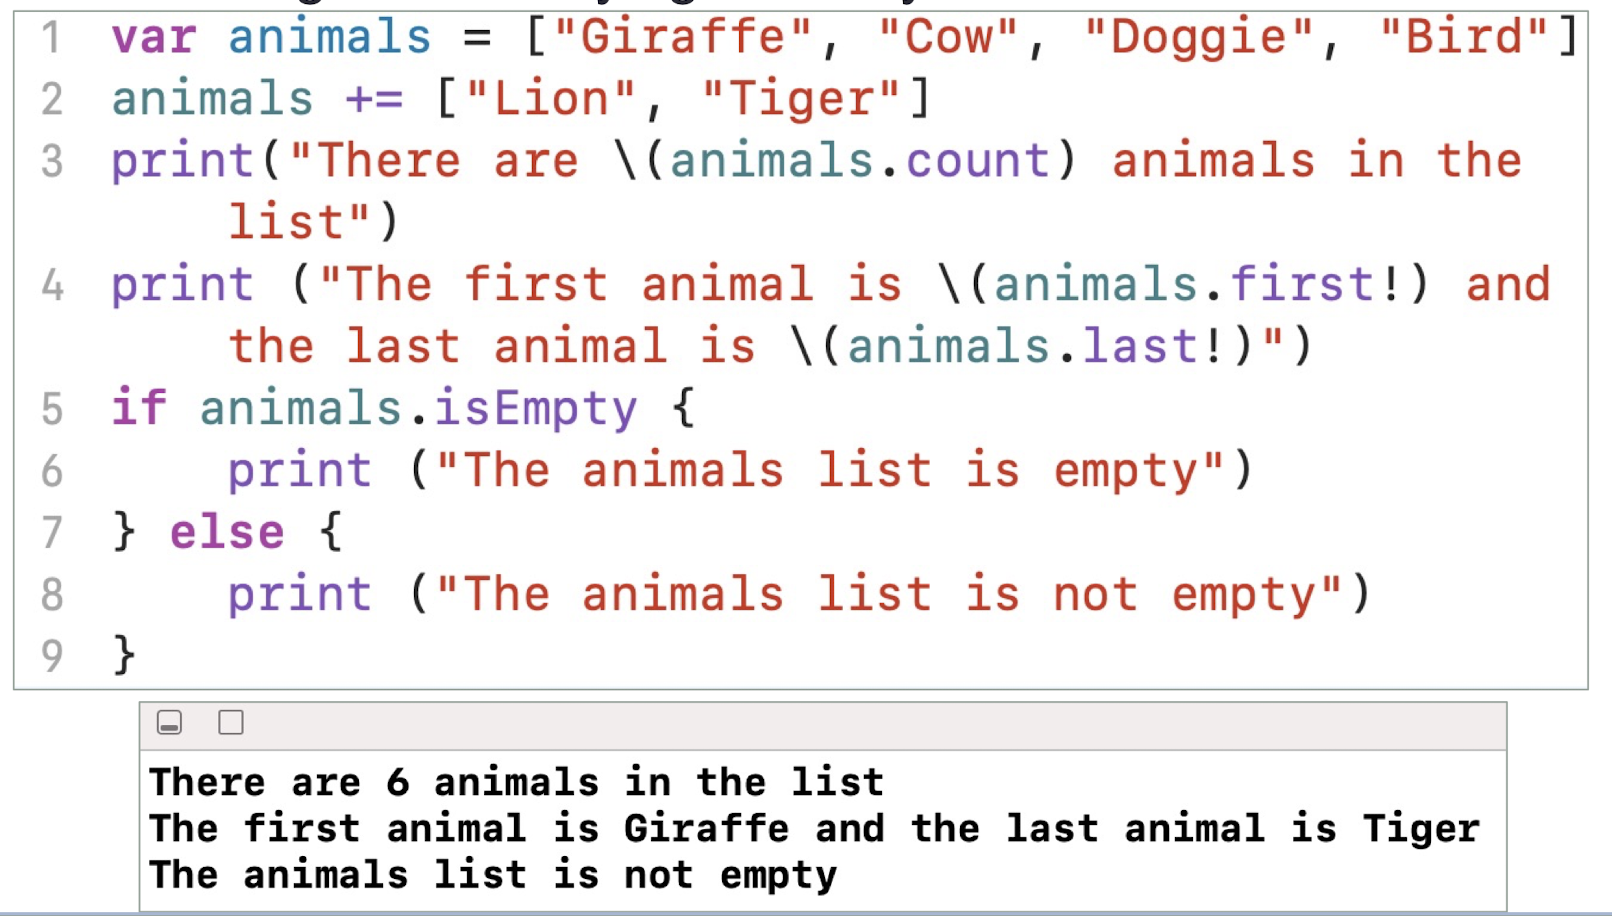
- Accessing and modifying an Array
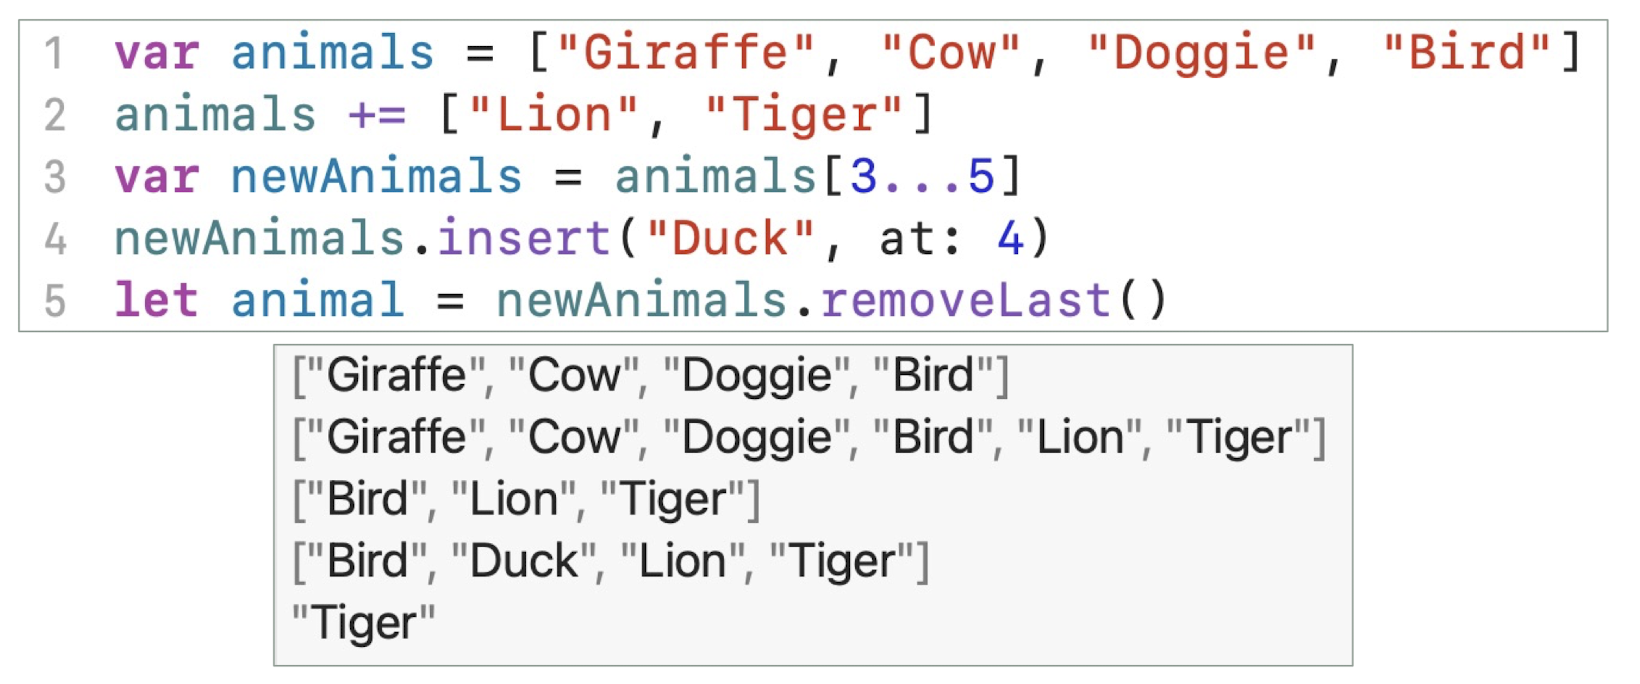
- Use subscript syntax to change a range of values at once, even if the replacement set of values has a different length than the range you are replacing
- Not necessary to start from index 0
- Looping through an array
1 | |
- And many more ways to access and modify an array…
- https://developer.apple.com/documentation/swift/array
2.12 Function
A function is a block of code with a given name It can be executed by calling its name
Function Declaration
- tells the compiler about a function’s name, return type, and parameters.
- Keyword func is used to declare a function
func functionName( parameter(s) ) - > returnParameter(s) {
someCode
}
Function Definition
- It provides the actual body of the function.
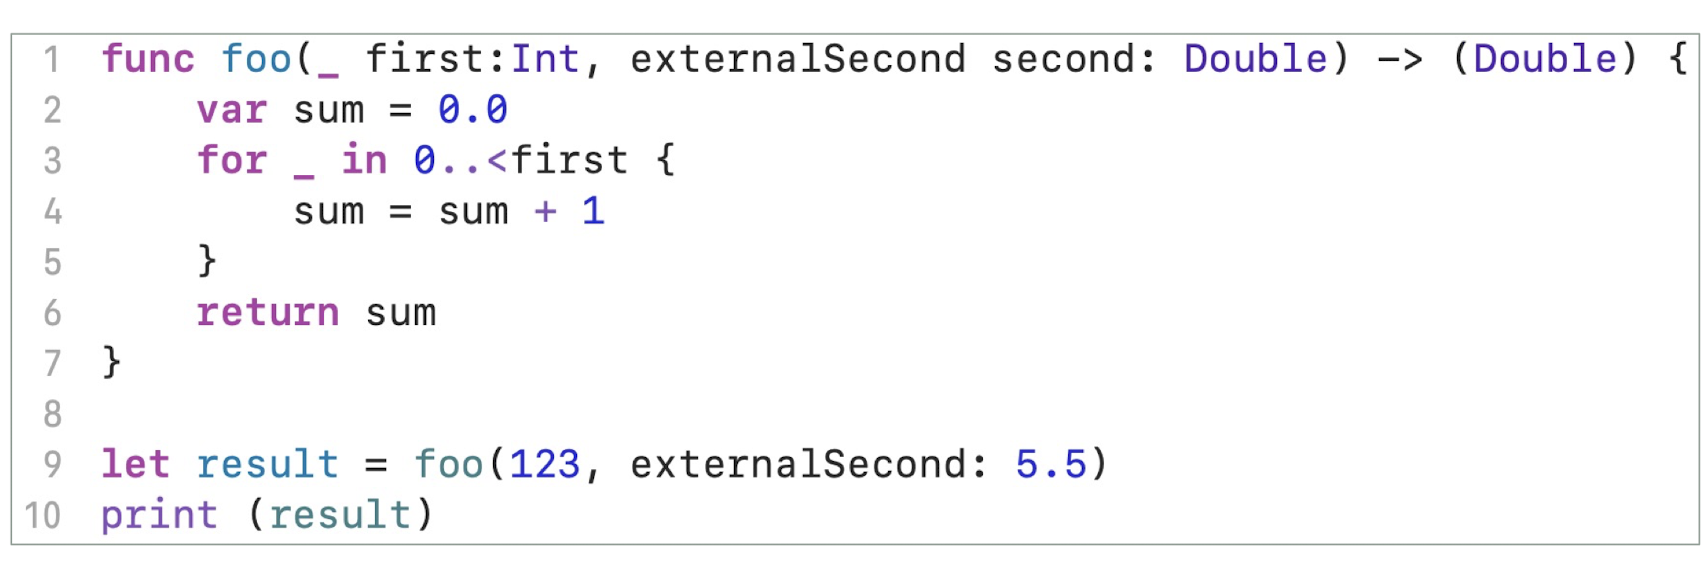
Parameters Names
All parameters to all functions have an internal name and an external name
The internal name is the name of the local variable you use inside the method
The external name is what callers use when they call the method
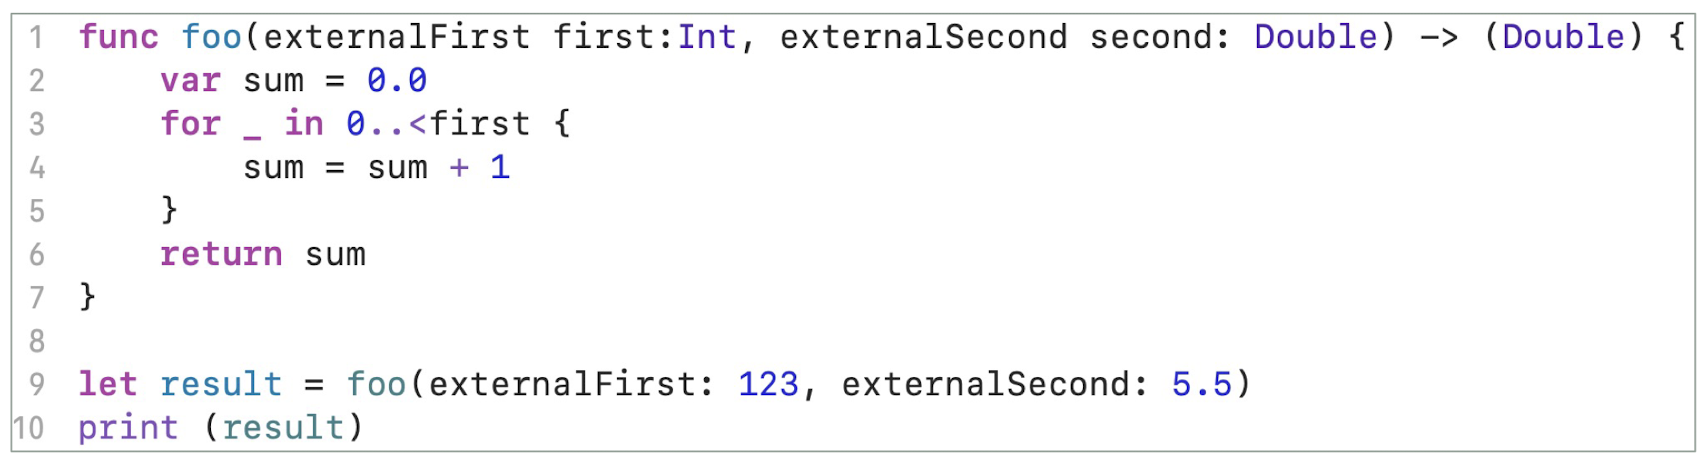
You can put _ if you don’t want callers to use an external name for a given parameter
1 | |
2.13 Exercise 2.2
- Write a function max3 to find and return the largest number among 3 integers
- 3 Int type input parameters
- 1 Int type return value
- Does function call max3(n1: 1.0 , n2: 2.0 , n3: 3.0 ) work?
- If not, why and how to fix it?
https://www.tutorialspoint.com/compile_swift_online.php
2.14 Class
- A class is a group of variables with functions that can manipulate the variables
- Keyword is class
- The name of the class become a type
- init function is the constructor
1 | |
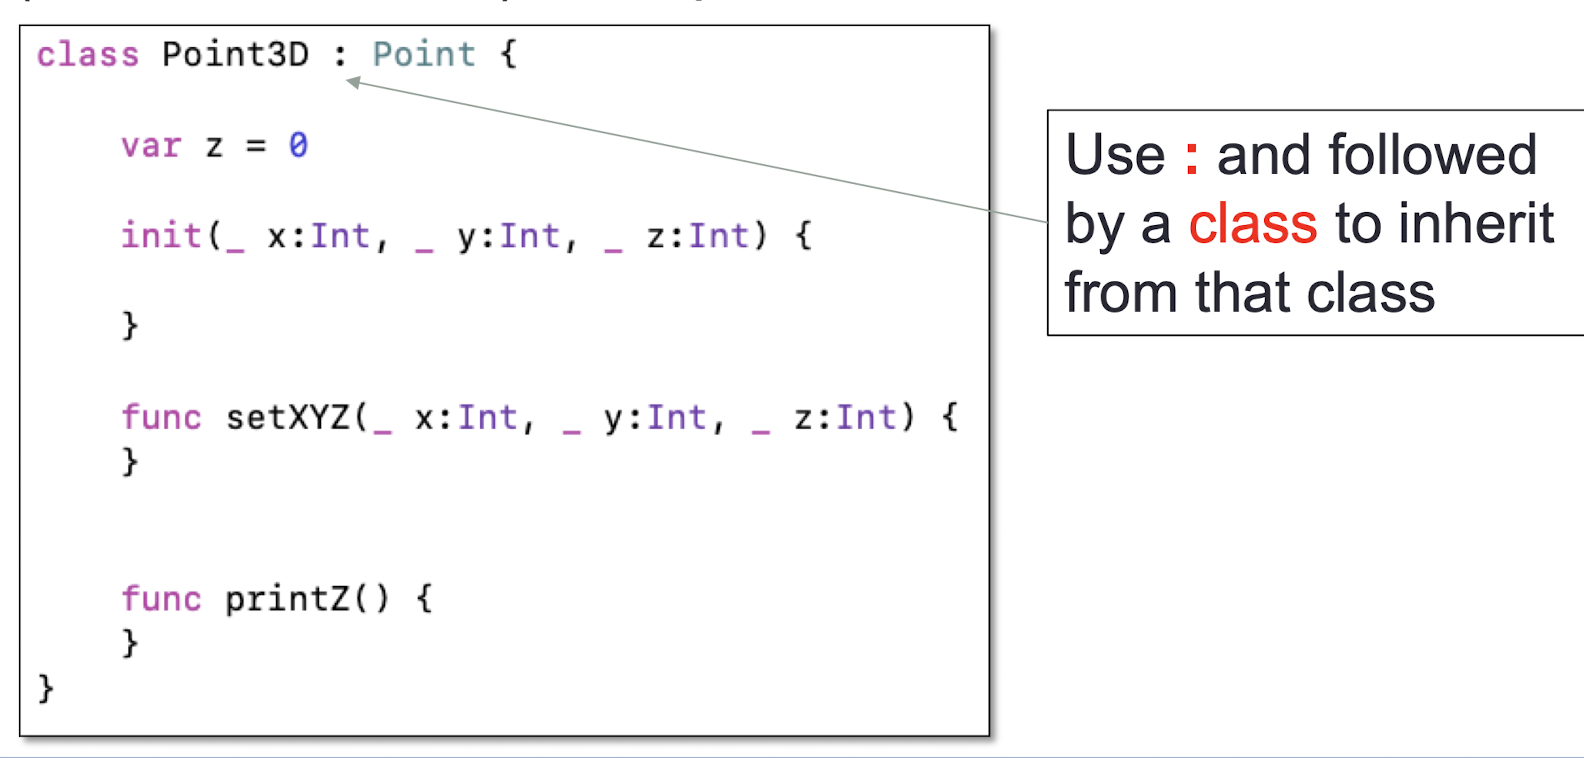
2.14.1 Class Inheritance
- A class may inherit from another class
- The new class (derived class) have the same properties (data and functions) of the parent class
- Override function
- Derived class can have its own version of function inherited from the parent class
- Keyword is
override - Keyword
superis to use the parent class’s function and provide additional functionality within the overriding function
1 | |
2.15 Summary
- In this lecture, you learn:
- The basic syntax of the Swift Language
- The Optional type is an important feature
- Class Inheritance
- Data Structure
3. Swift Programming 2
- Swift Features
- Tuples, Dictionary, Set
- Enum
- Closure
- More Optional
- Property Observers, Computed Properties
- Classes, Structs and Enums
- Understand the iOS structure
- The Model-View-Controller (MVC) Model
3.1 Tuples
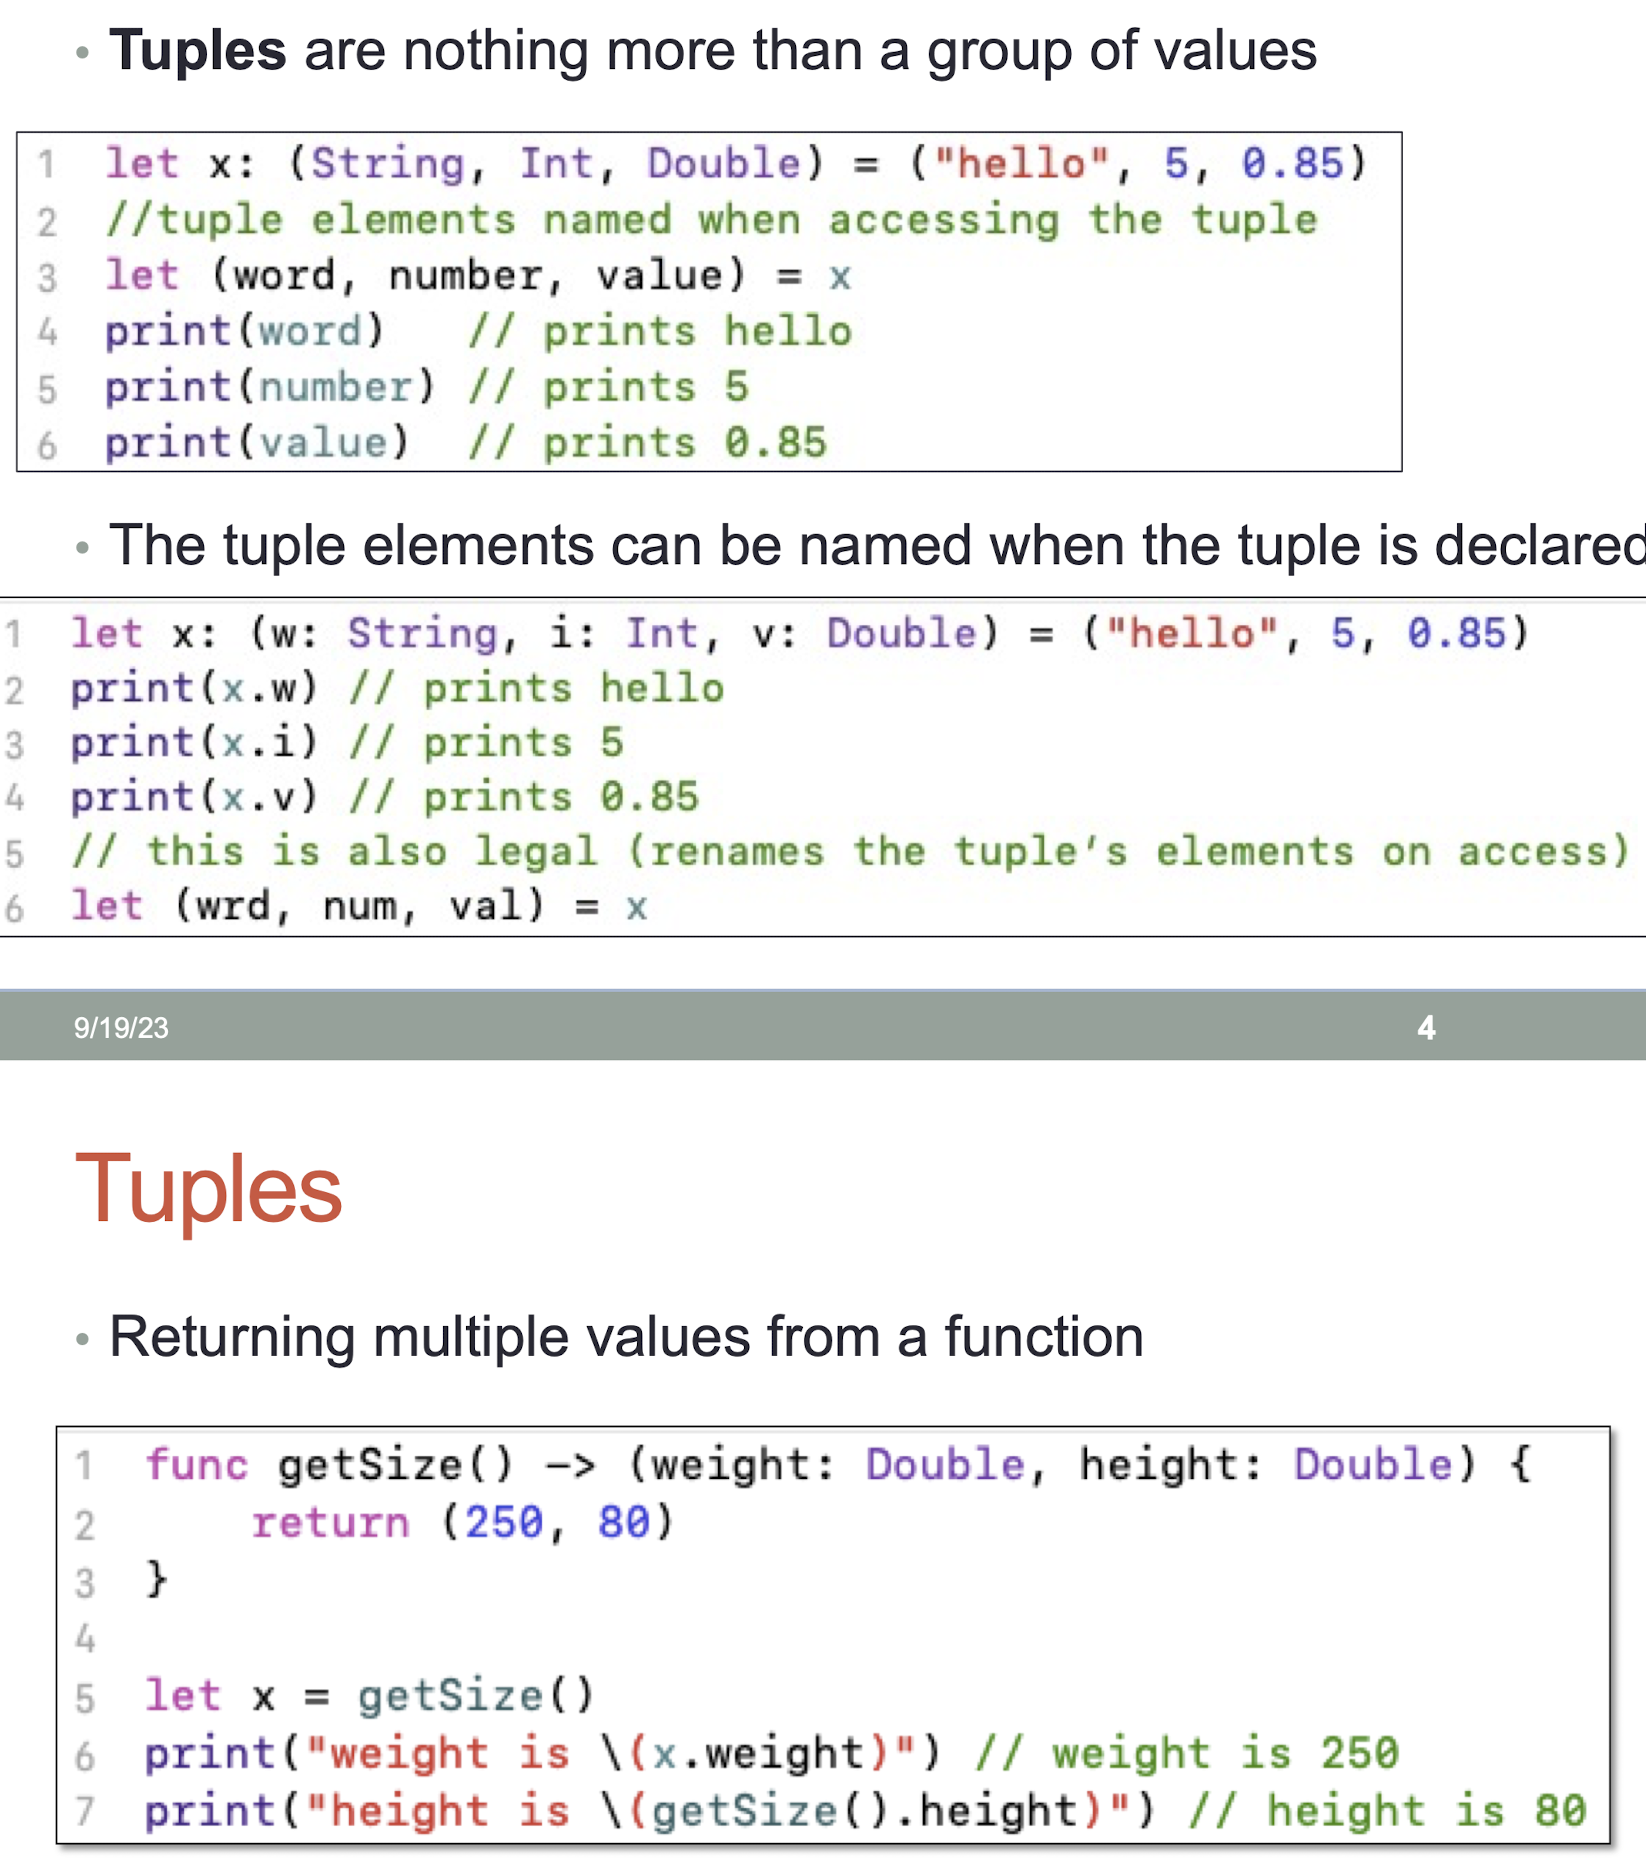
- Tuples are nothing more than a group of values
- The tuple elements can be named when the tuple is declared
- Returning multiple values from a function
1 | |
3.2 Dictionary
- Dictionaries are used to store unordered lists of values of the same type
- Dictionaries use unique identifier known as a key to store a value which later can be referenced and looked up through the same key
- A dictionary key can be either an integer or a string without a restriction, but it should be unique within a dictionary
- Creating a dictionary
1 | |
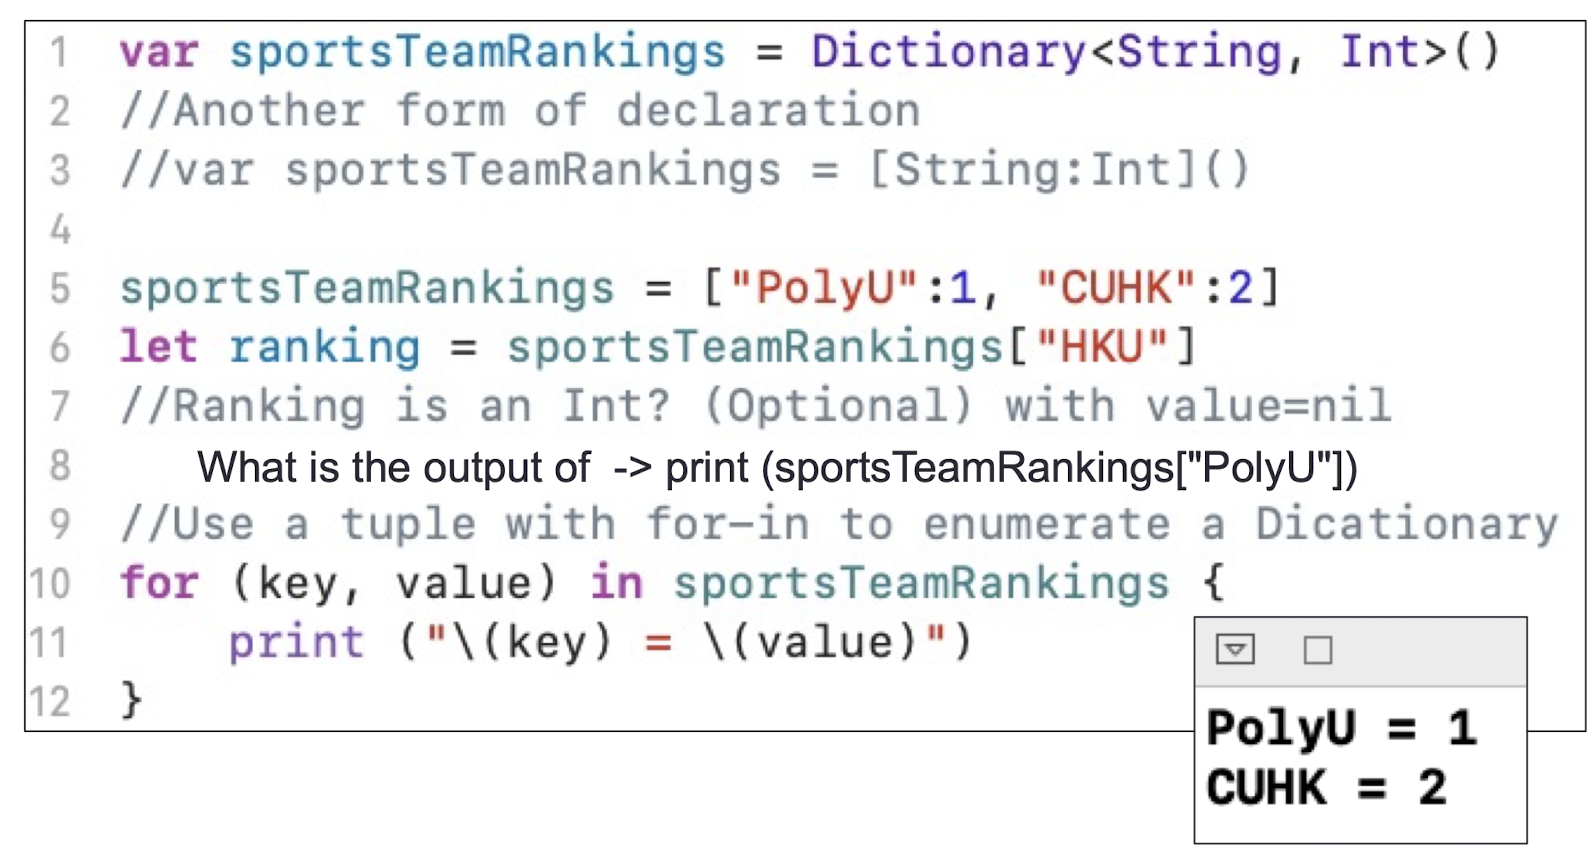
- Accessing and modifying a Dictionary
- The return value is an Optional value
- To remove a pair, assign a value of
nilfor that key - When have a conflict,
- use
uniquingKeysWith: {(current, _) in current}to use the original one, - use
uniquingKeysWith: {(_, new) in new}to use the new one
- use

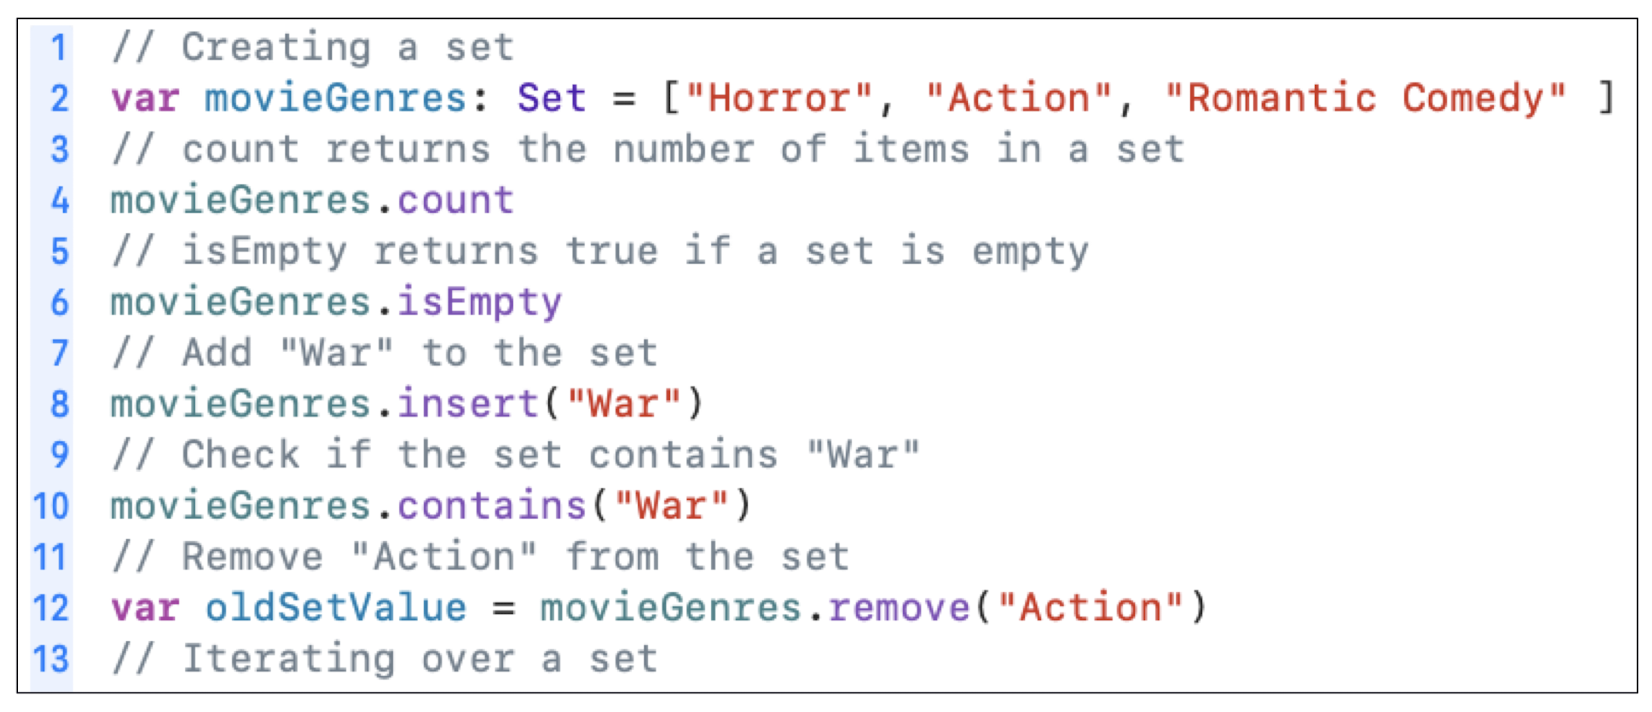
3.3 Set
- A Set is an unordered collection of unique elements
1 | |
- Operations
- Union - create a new set with the elements of a set and another set or sequence
- Intersection - create a new set with only the elements common to a set and another set or sequence
1 | |
- Operations
- Subtracting - create a new set with the elements of a set that are not also in another set or sequence
- SymmetricDifference - create a new set with the elements that are in either a set or another set or sequence, but not in both
1 | |
- Use the “equal to” operator
==to test whether two sets contain the same elements - Use the
isSubset(of:)method to test whether a set contains all the elements of another set or sequence. - Use the
isSuperset(of:)method to test whether all elements of a set are contained in another set or sequence. - Use the
isDisjoint(with:)method to test whether a set has no element in common with another set.
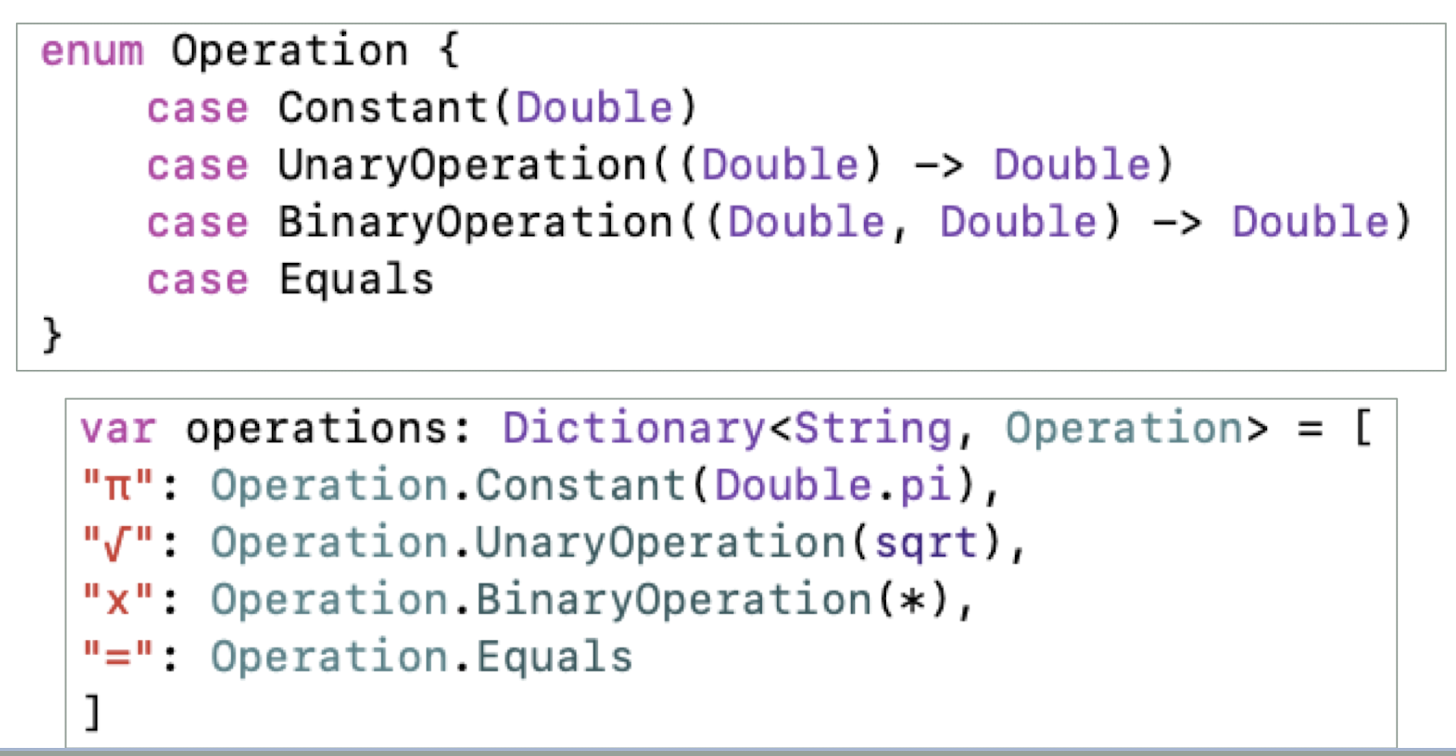
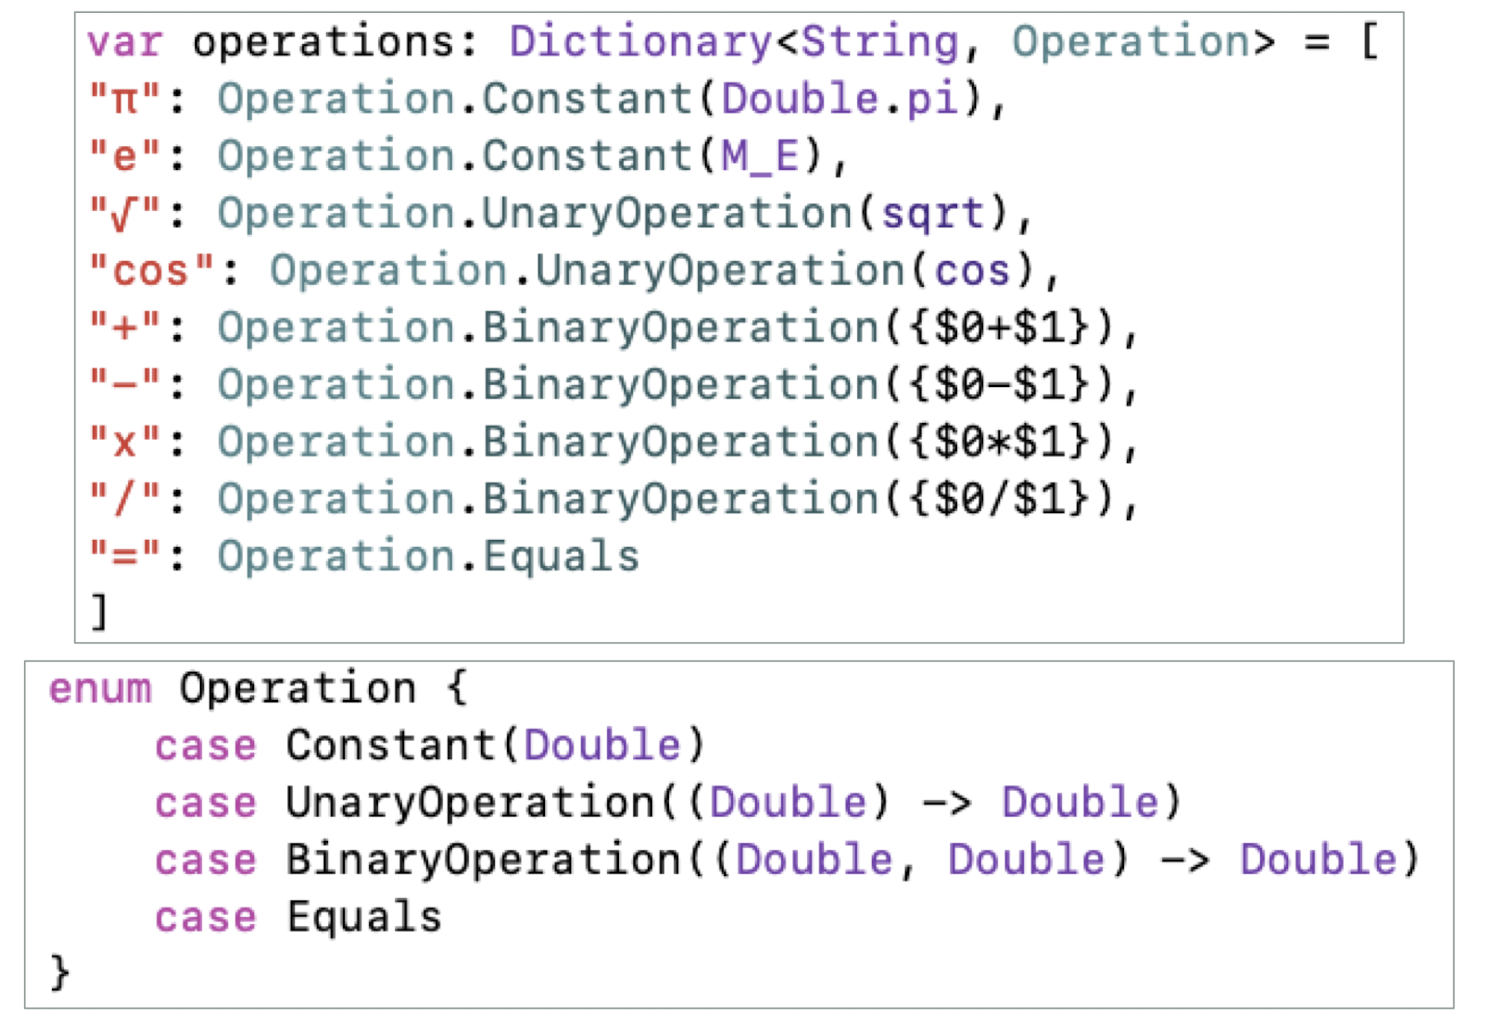
3.4 Enum
- enum in general is a discrete set of values
- enums are like class and can have their own methods, but cannot have inheritance, and enum is “ pass by value ”
1 | |
3.5 Closure
- A closure, like a function, contains a sequence of instructions and can take parameters and return values.
- Closures don’t have names
- The sequence of instructions in a closure is surrounded by curly braces { }
- Use $0 , $1 , $2 , etc. to represent the parameters
3.5.1 Closure with Type Inference
1 | |
2.5.2 Closure with Arrays
filter(includeElement: (T) -> Bool) -> [T]
- This one creates a new array with any “undesirables” filtered out
- The function passed as the argument returns false if an element is undesirable
let bigNumbers = [2,47,118,5,9].filter({ $0 > 20 })bigNumbers = [47, 118]
map(transform: (T) -> U) -> [U]
- Create a new array by transforming each element to something different
- The thing it is transformed to can be of a different type than what is in the Array
let stringified: [String] = [1,2,3].map { String($0)}
reduce(initial: U, combine: (U, T) -> U) -> U
- Reduce an entire array to a single value
let sum: Int = [1,2,3].reduce(0) { $0 + $1 }- // adds up the numbers in the Array
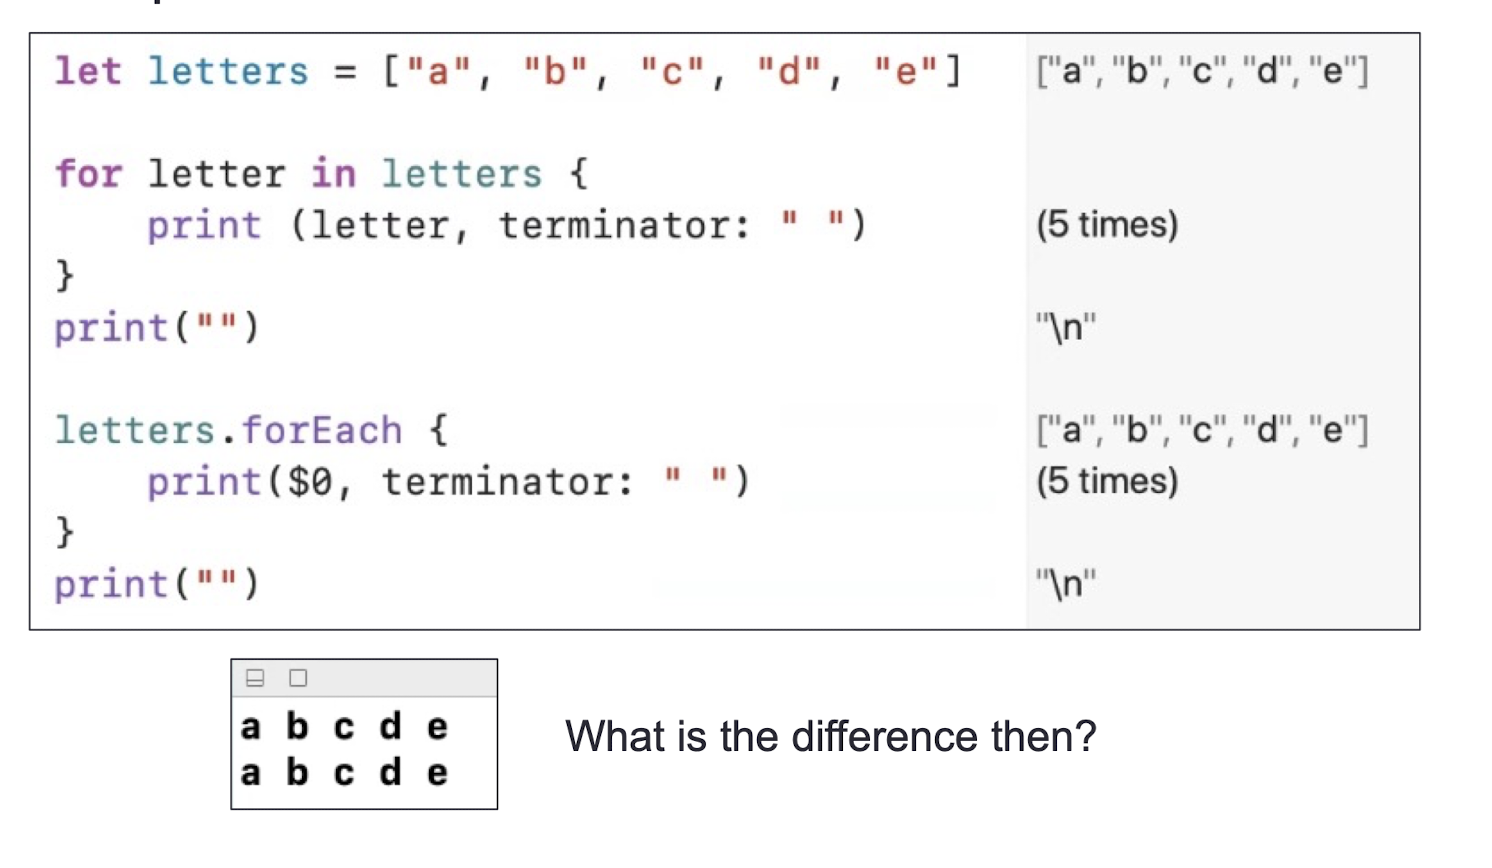
The forEach loop/method in Arrays
Using the forEach method is distinct from a for-in loop in two important ways:
- You cannot use a break or continue statement to exit the current call of the body closure or skip subsequent calls.
- Using the return statement in the body closure will exit only from the current call to body, not from any outer scope, and won’t skip subsequent calls.
- Functional Programming (See the example in the next slide)
1 | |
Example 1:
Example 2:
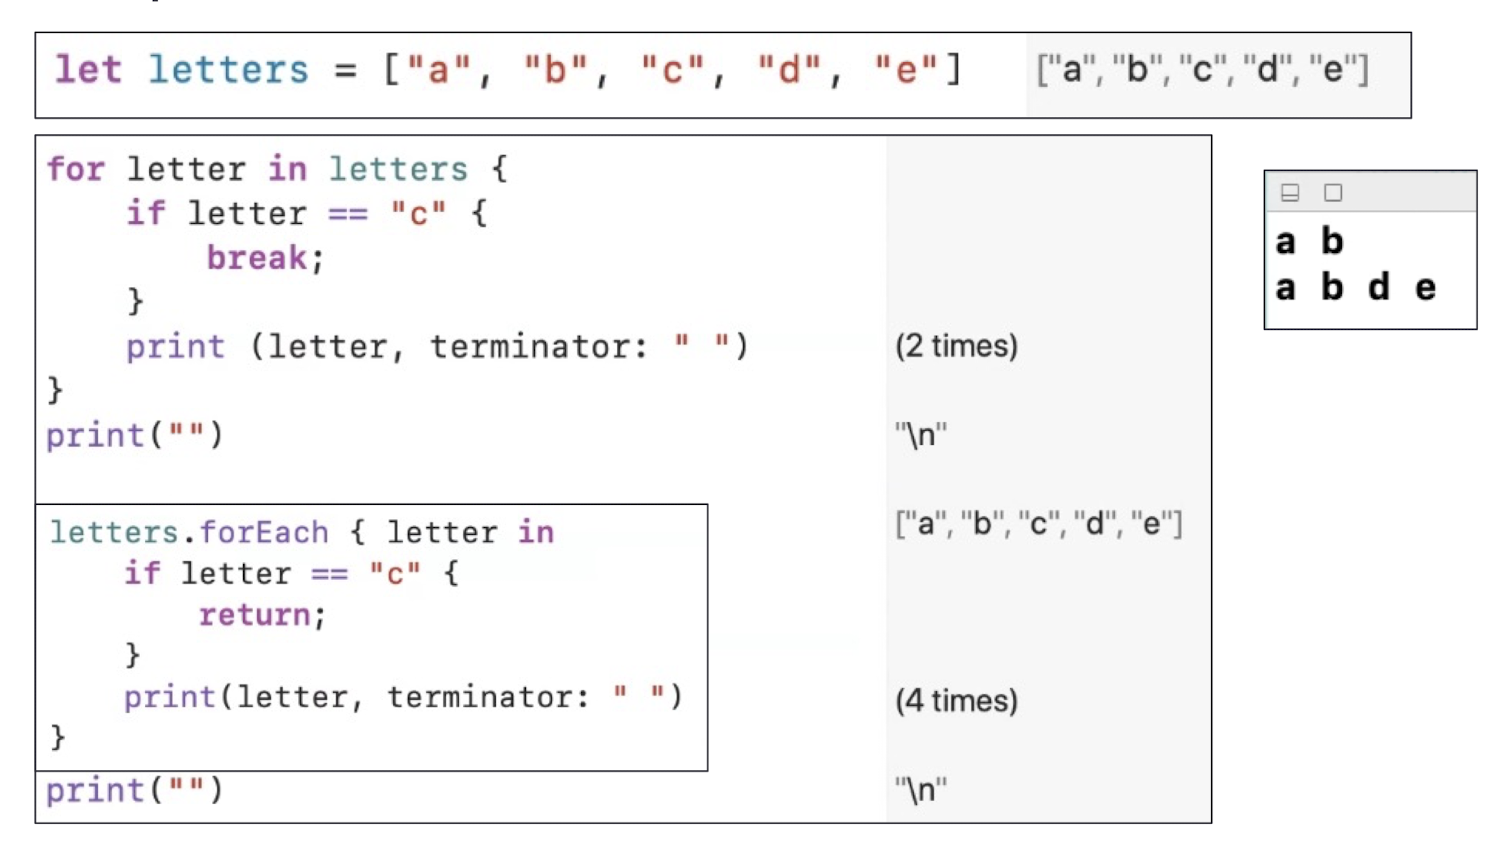
returninforEachis just continue, will not exit the loop
3.6 More Optional
- An Optional is just an enum
1 | |
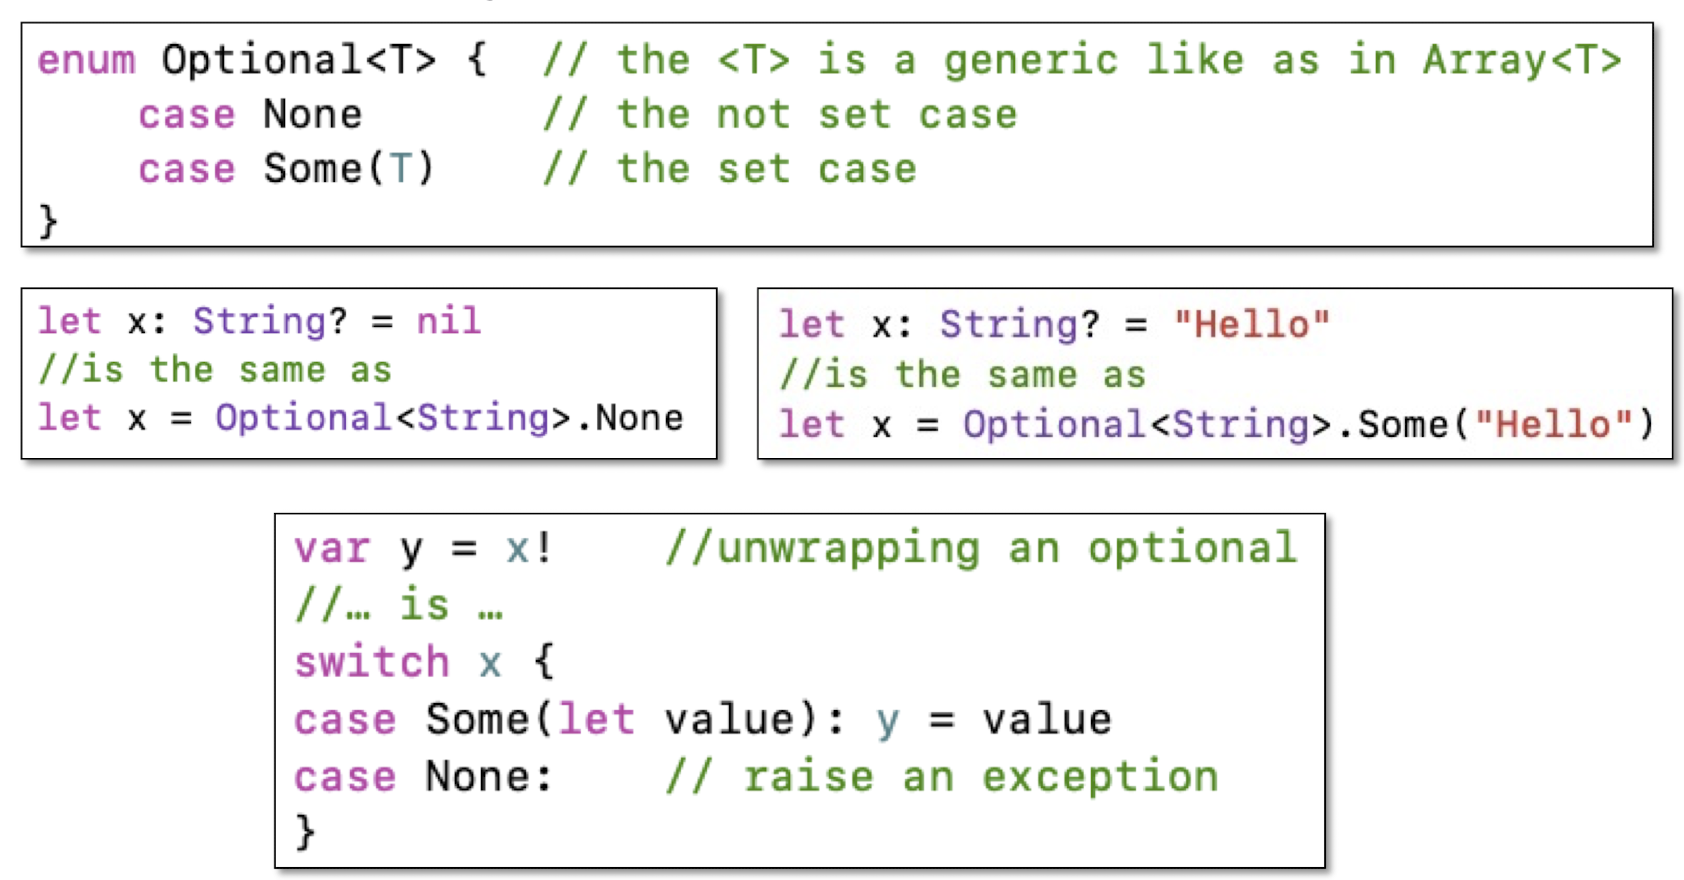
3.7 Optional operator ??
- There is also an Optional “ defaulting ” operator ??
- The aim to provide a default value if the Optional is nil
1 | |
- The above code can be replaced by a single statement
1 | |
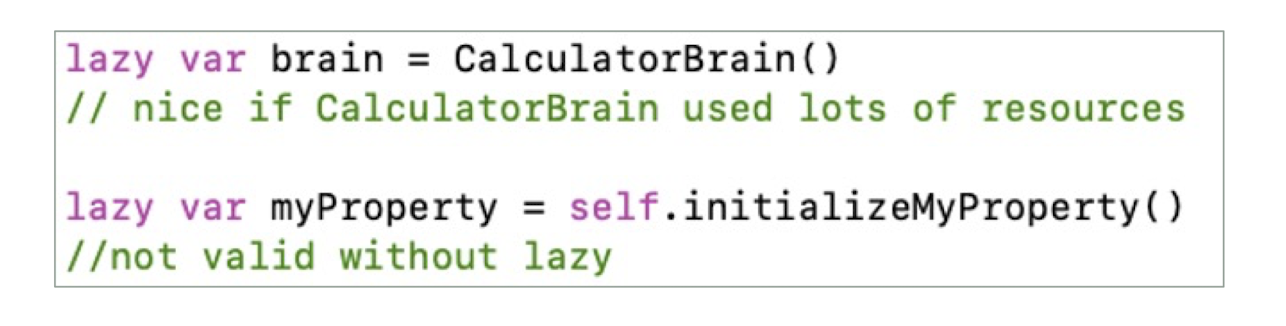
3.8 Lazy Initialization
- Swift requires that “you must initialize all of your properties”
- A lazy property does not get initialized until someone accesses it
- You can allocate an object, execute a closure, or call a method if you want
- Things initialized this way can’t be constants (i.e., var ok, let not ok)
- This can be used to get around some initialization dependency issues
Example:
1 | |
3.9 Property Observers
- Property Observers
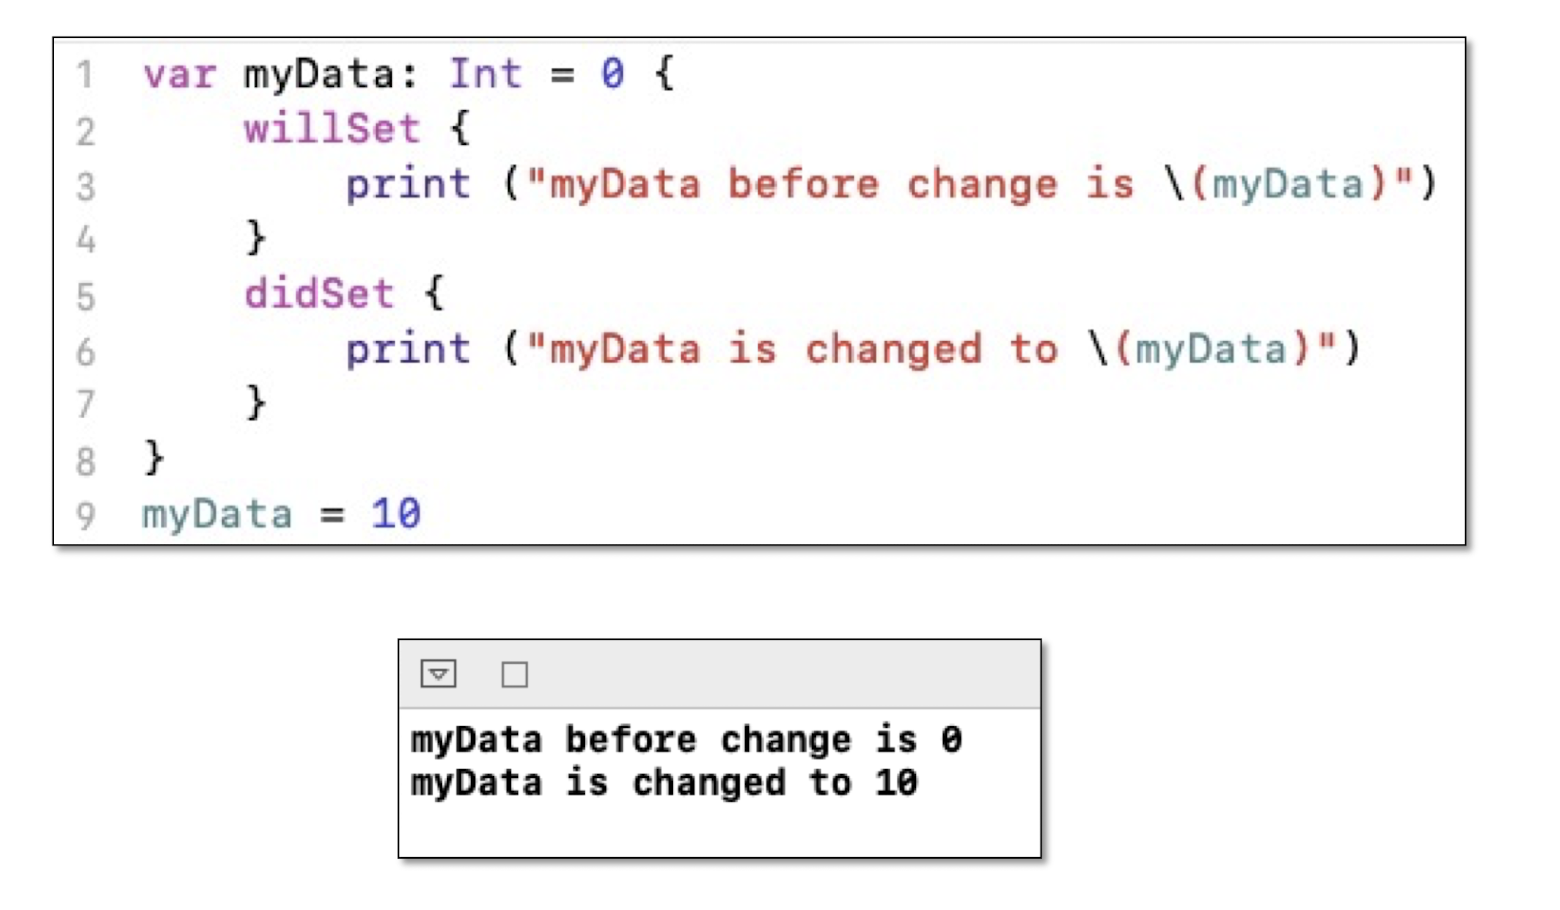
- You can observe changes to any property with
willSetanddidSet- willSet is called just before the property is about to change
- didSet is called just after the property did change
- Will also be invoked if you mutate a struct (or value type)
- (e.g., add something to a dictionary)
- Very common thing to do with didSet/WillSet in a Controller to update the UI
1 | |
3.9.1 Computed Properties of a Variable
- Automatic detection of which method to call
1 | |
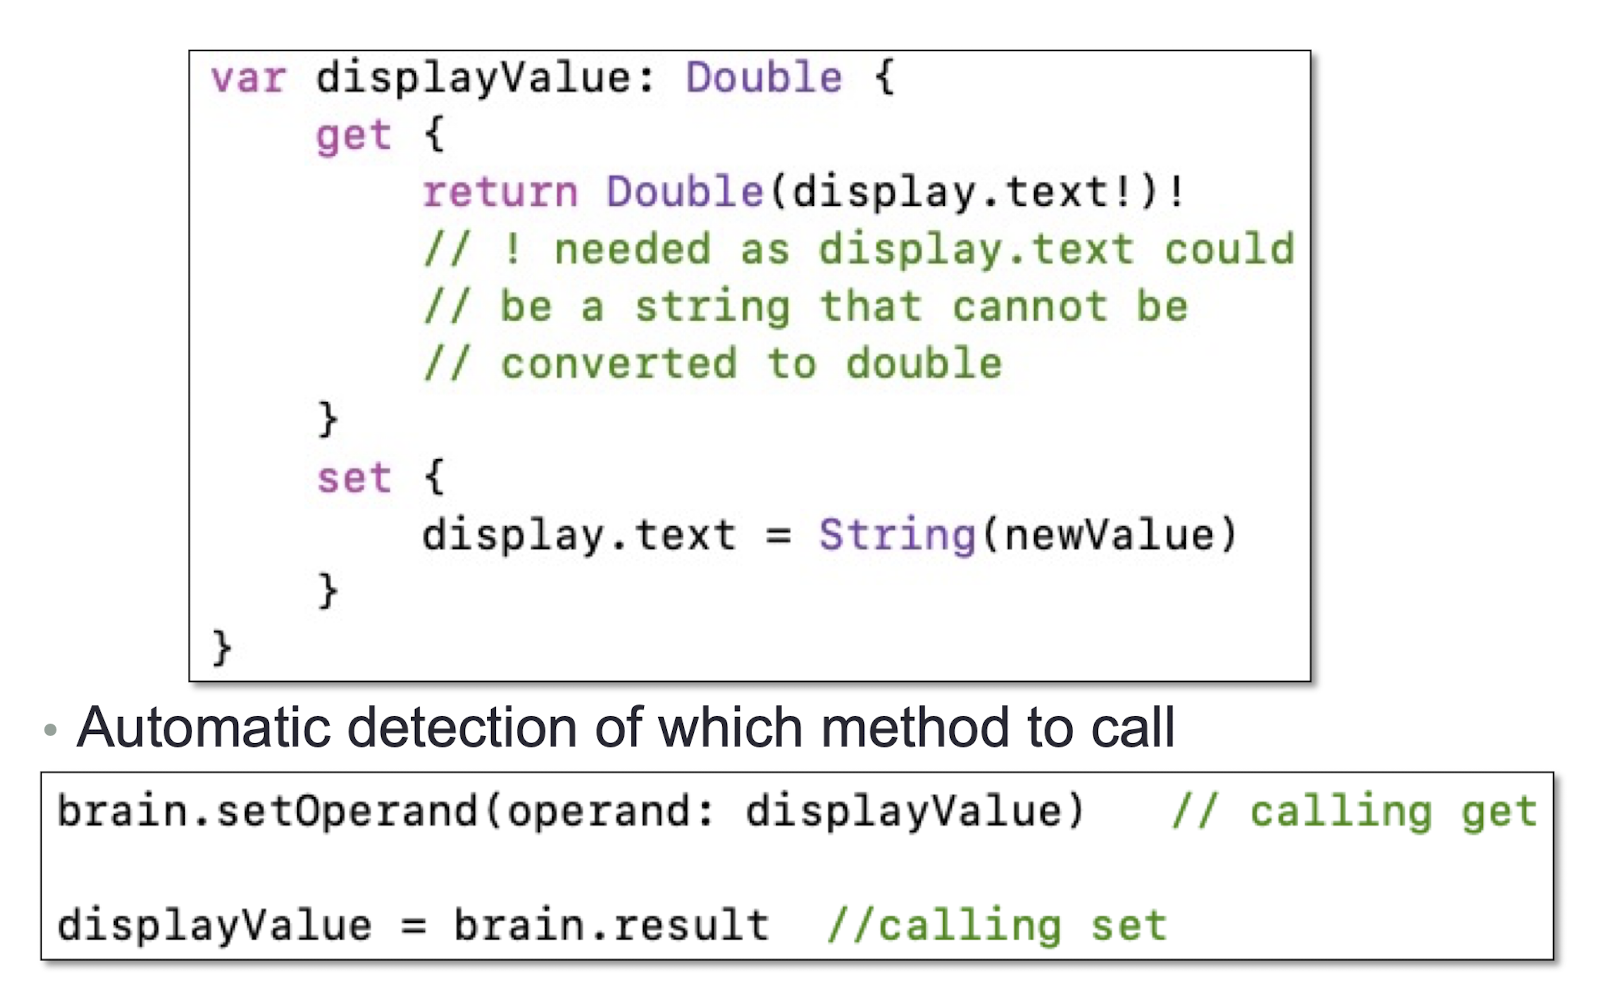
getis called when the property is readsetis called when the property is written to
3.10 Struct
- structs : they are like class and similar to enum
- But pass by value instead of pass by reference (class)
- Pass by value means that when you pass it, it makes a copy of it
- For pass by reference, it is done through pointer
- Keyword to declare a struct is struct
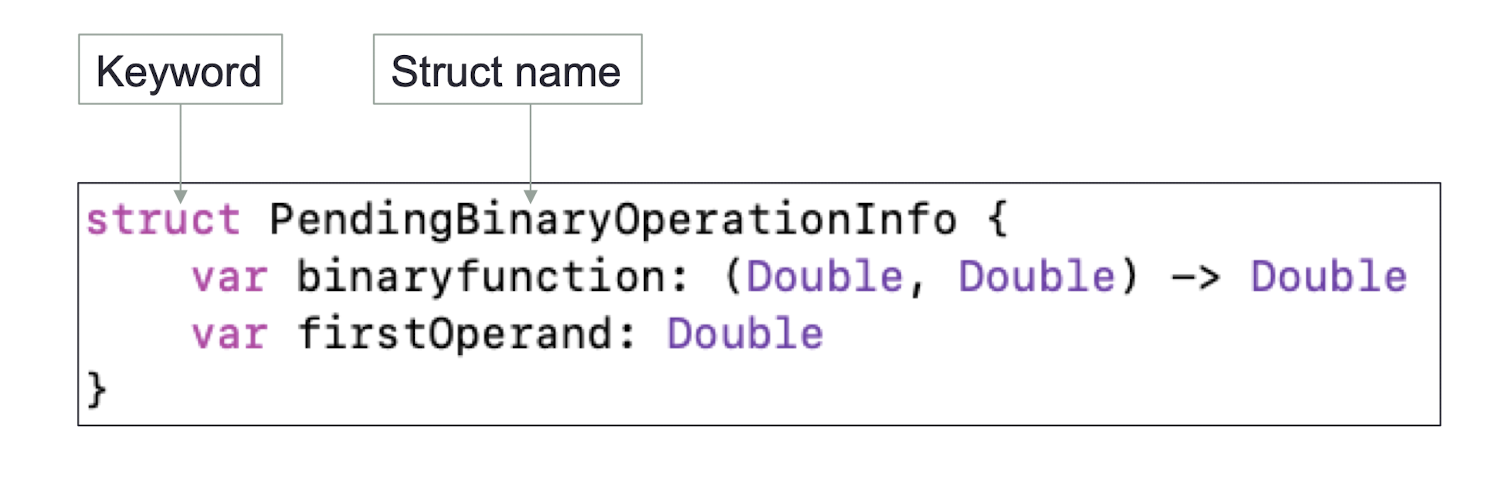
1 | |
3.11 Data Structure in Swift
- Classes, Structs and Enums
These are the 3 fundamental building blocks of data structures in Swift:
Similarities
- Declaration syntax
1 | |
- Similarities
- They can have Properties and Functions.
1 | |
- Similarities
- Initializers (again, Not for enum) …
1 | |
- Differences
- Inheritance (class only)
- Value type (struct, enum) make copy vs Reference type (class) pass the address
3.12 Value vs Reference
Value (struct and enum)
- Copied when passed as an argument to a function
- Copied when assigned to a different variable
- (e.g.,
var x = y// x is a copy of y if it is of value type) - Immutable if assigned to a variable with
let- (e.g.,
let x = array// cannot append to the array)
- (e.g.,
- Remember that function parameters are constants
- You must note any
functhat can mutate a struct / enum with the keyword mutating (e.g.,mutating func…)
Reference (class)
- Stored in the heap and reference counted (automatically)
- Constant pointers to a class (let) still can mutate by calling methods and changing properties (what the pointer pointed to could be changed)
- When a pointer is passed as an argument, it does not make a copy (just passing a pointer to same instance)
Choosing which to use?
Usually you will choose class over struct. struct tends to be more for fundamental types (e.g., String, Double, Int, Array, Dictionary)
Use of enum is situational (any time you have a type of data with discrete values)
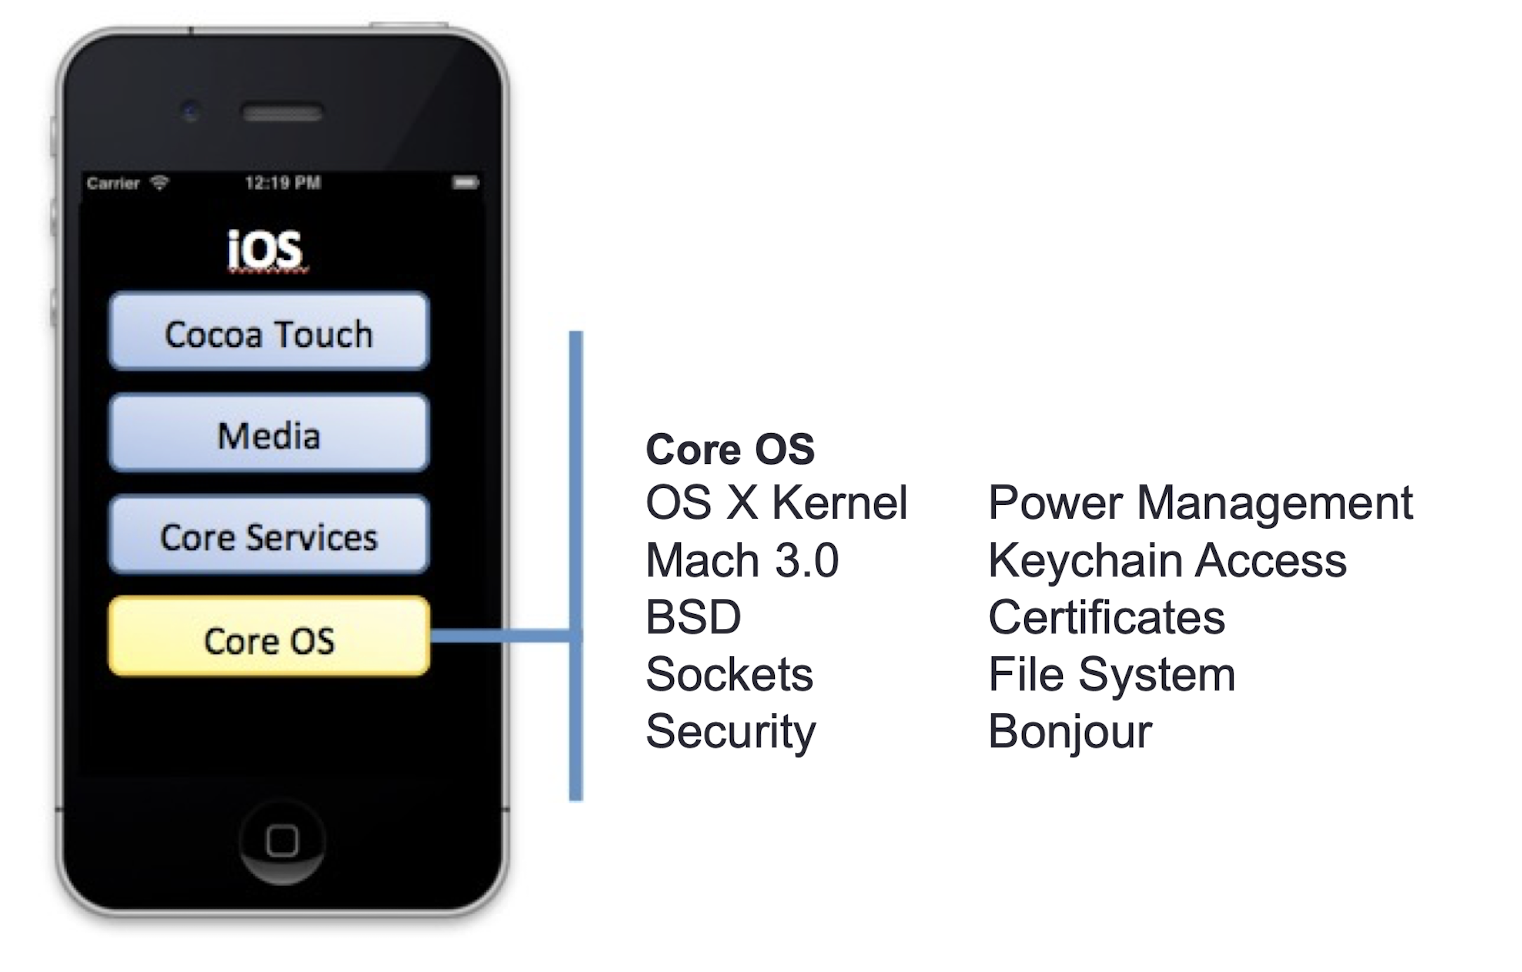
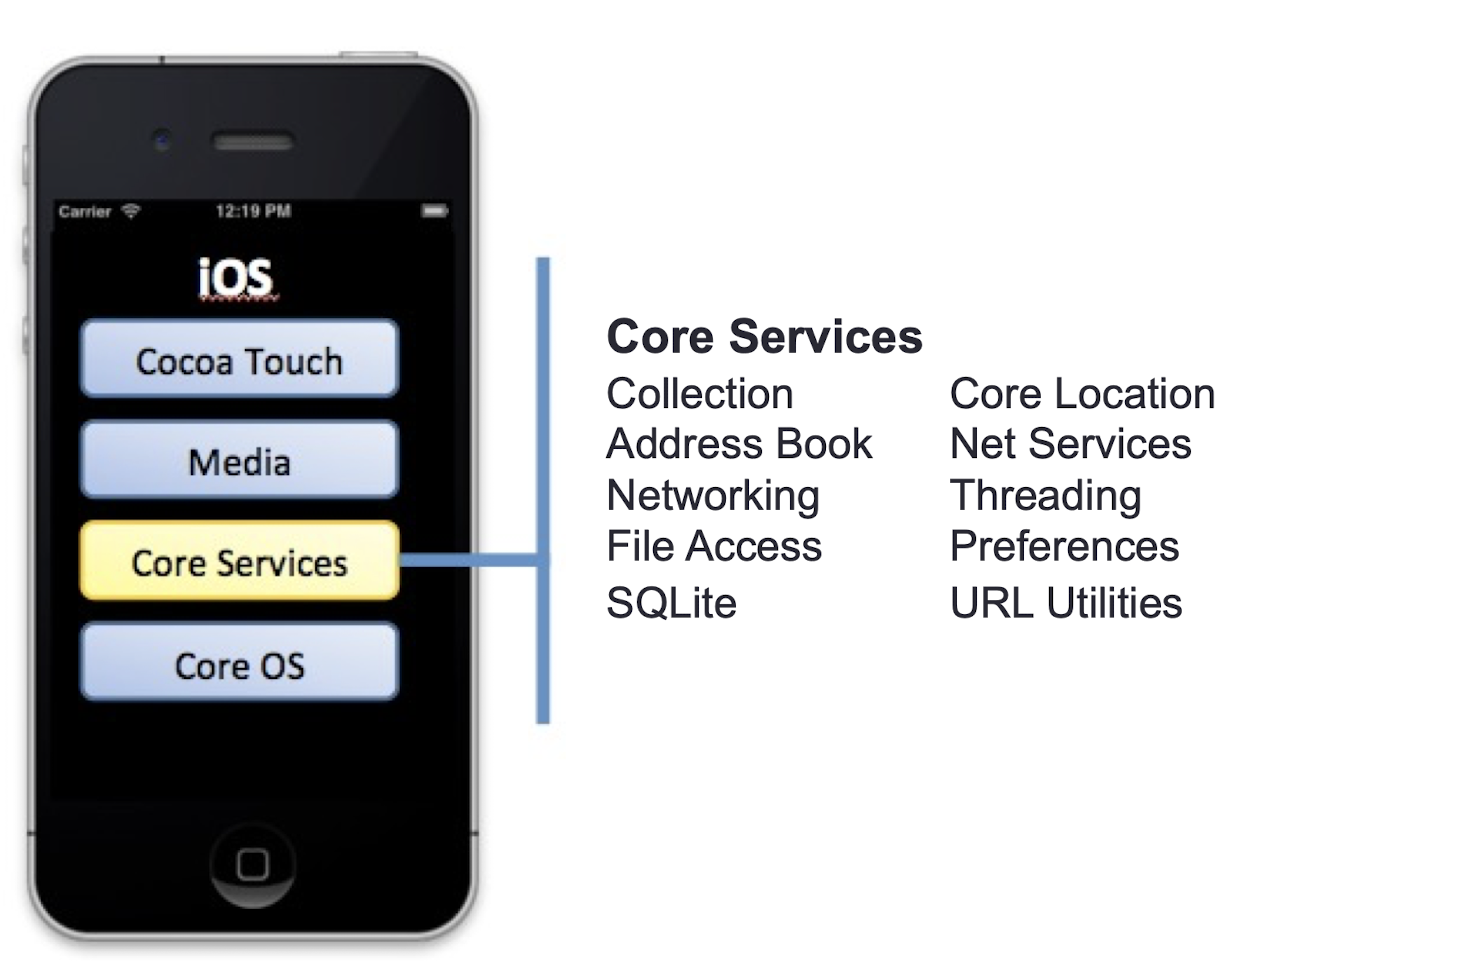
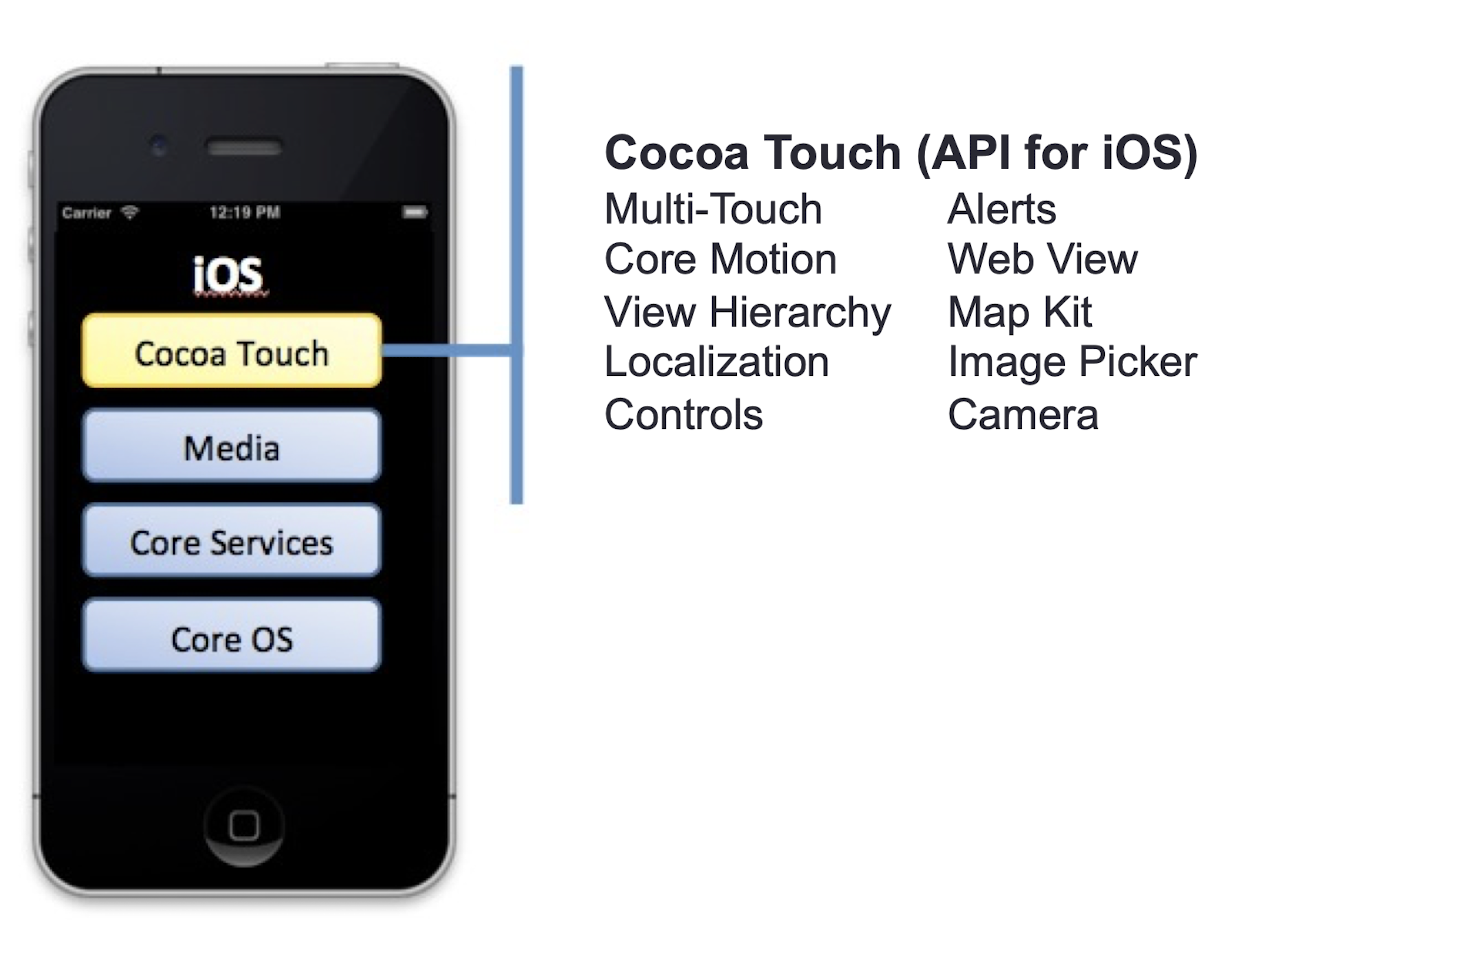
3.13 What is in iOS?

3.14 History
3.15 iOS Development
- Use Apple iOS SDK
- Need Macintosh Computer
- iPhone/iPad Simulator for Mac
- Apple ID
- Objective-C, Swift (can work side-by-side with Objective-C)
3.16 Platform Components
- Tools: Xcode
- Language
let value = formatter.numberFromString(display.text!)?.doubleValue
- Frameworks
- Foundation Kit, UIKit, SwiftUI, Map Kit,
- Core Data, Core Motion, etc.
- Design Strategies
- MVC MVVM
3.17 Starting a UIKit New Project
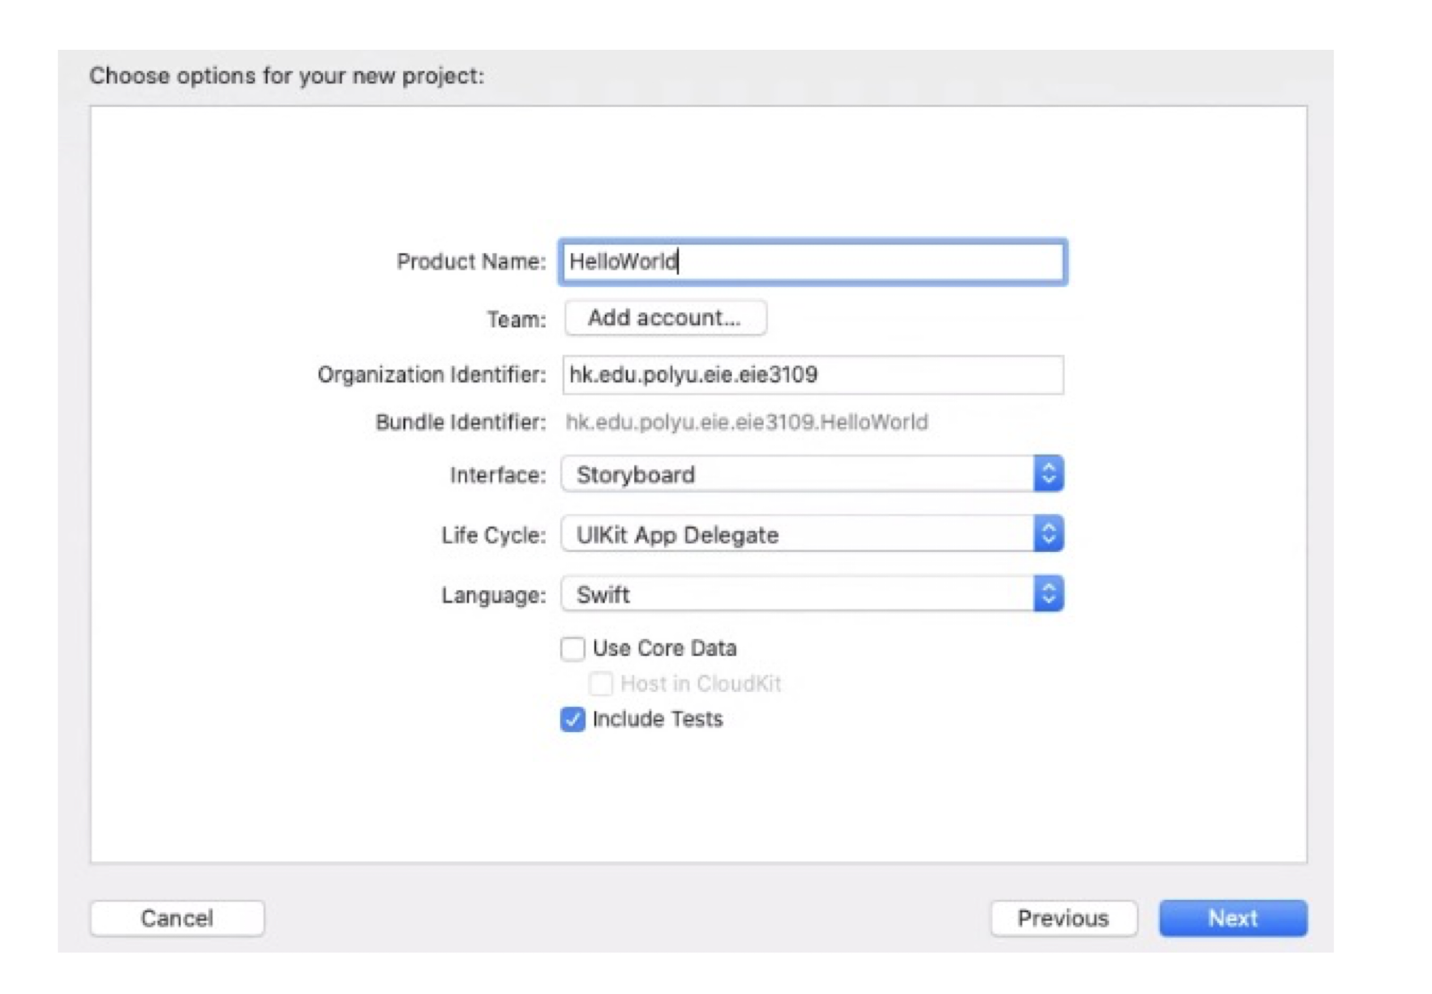
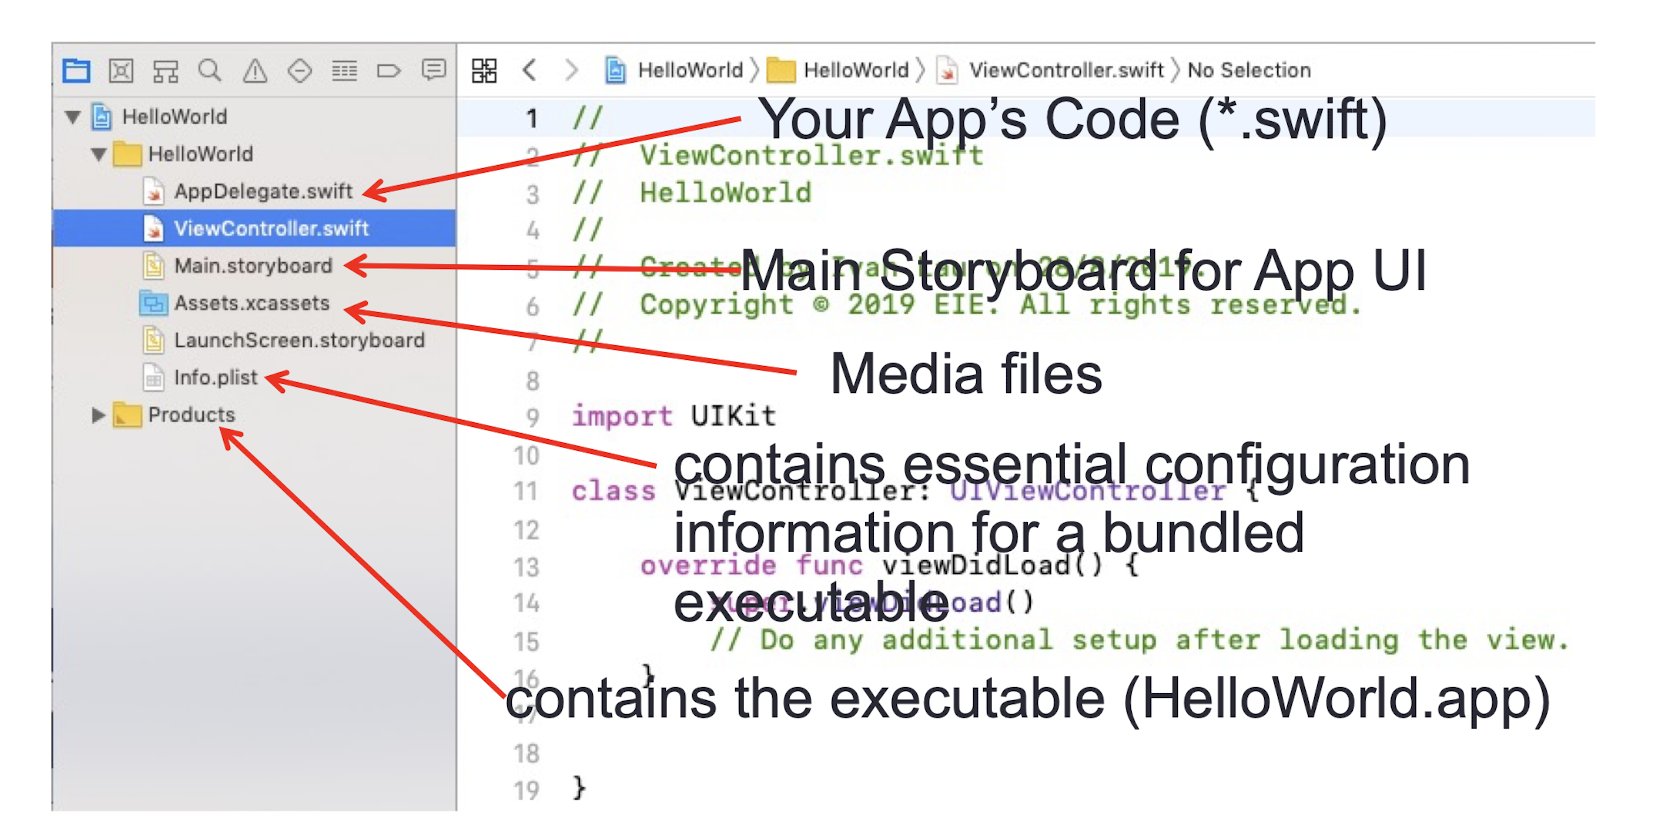
3.18 iOS Project Structure
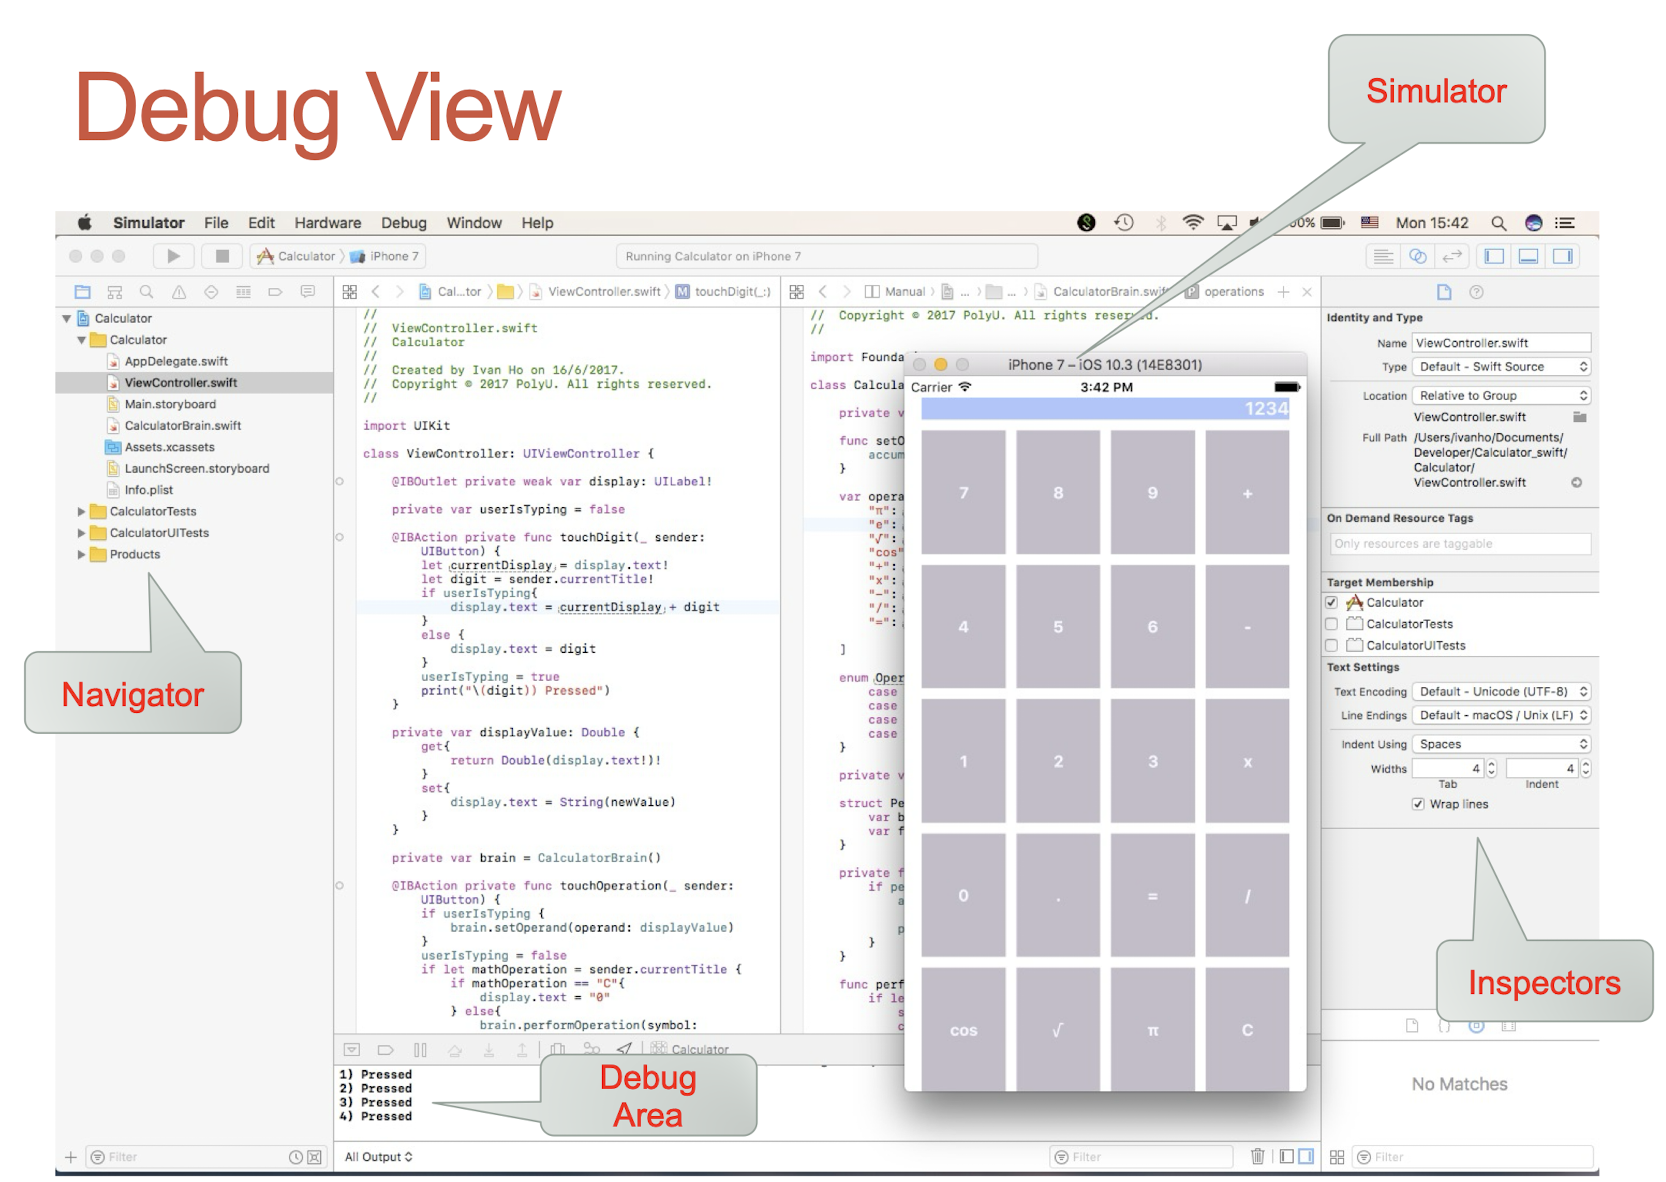
3.19 Debug View
3.20 Guess-A-Number Game
- Click the Button to fire up the Action
- Get the number user inputted in the Label
- Compare user’s number and the secret number
- Then display a message in the Label
- Reset the generated number for a new game if user wins
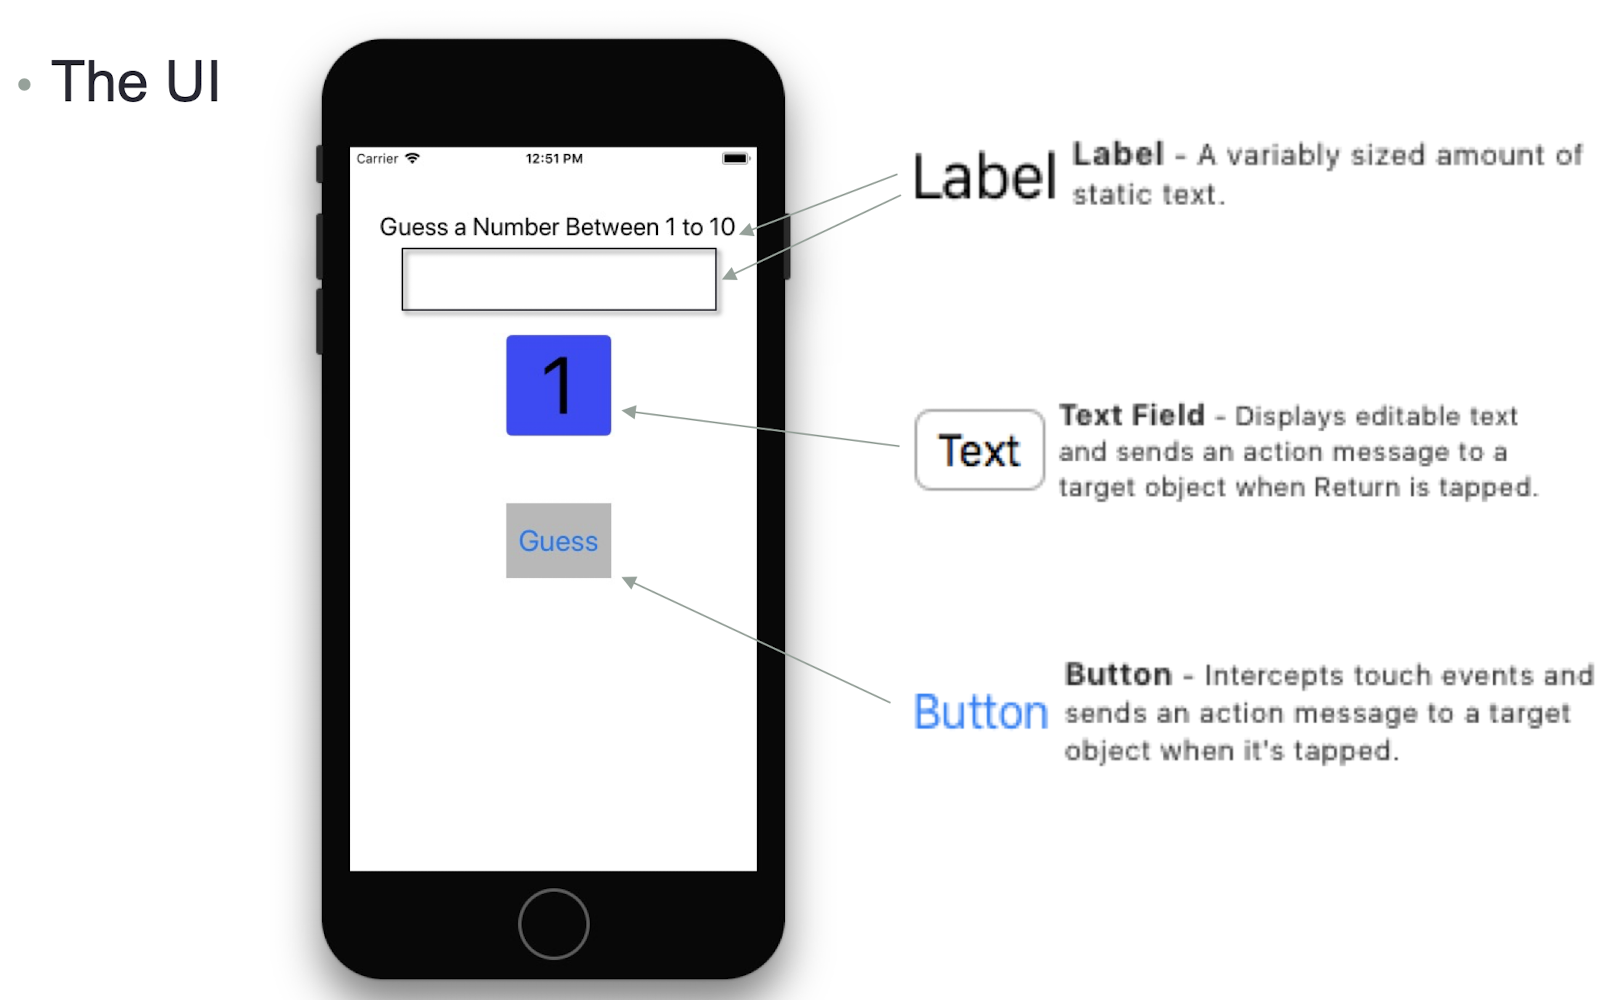
- The UI
3.20.1 Implementation
- Pseudocode – informal description of logic or program flow that is intended for human reading.
- When start:
- Generate a random number from 1 to 10
- When user clicks the button, do:
- Get the number from the text field
- Compare the user input number with the generated number
- If user input is >
- Display “guess a smaller number”
- If user input is <
- Display “guess a bigger number
- If user input = gen. num. Display “Win and guess again” and reset the sec. num for next round
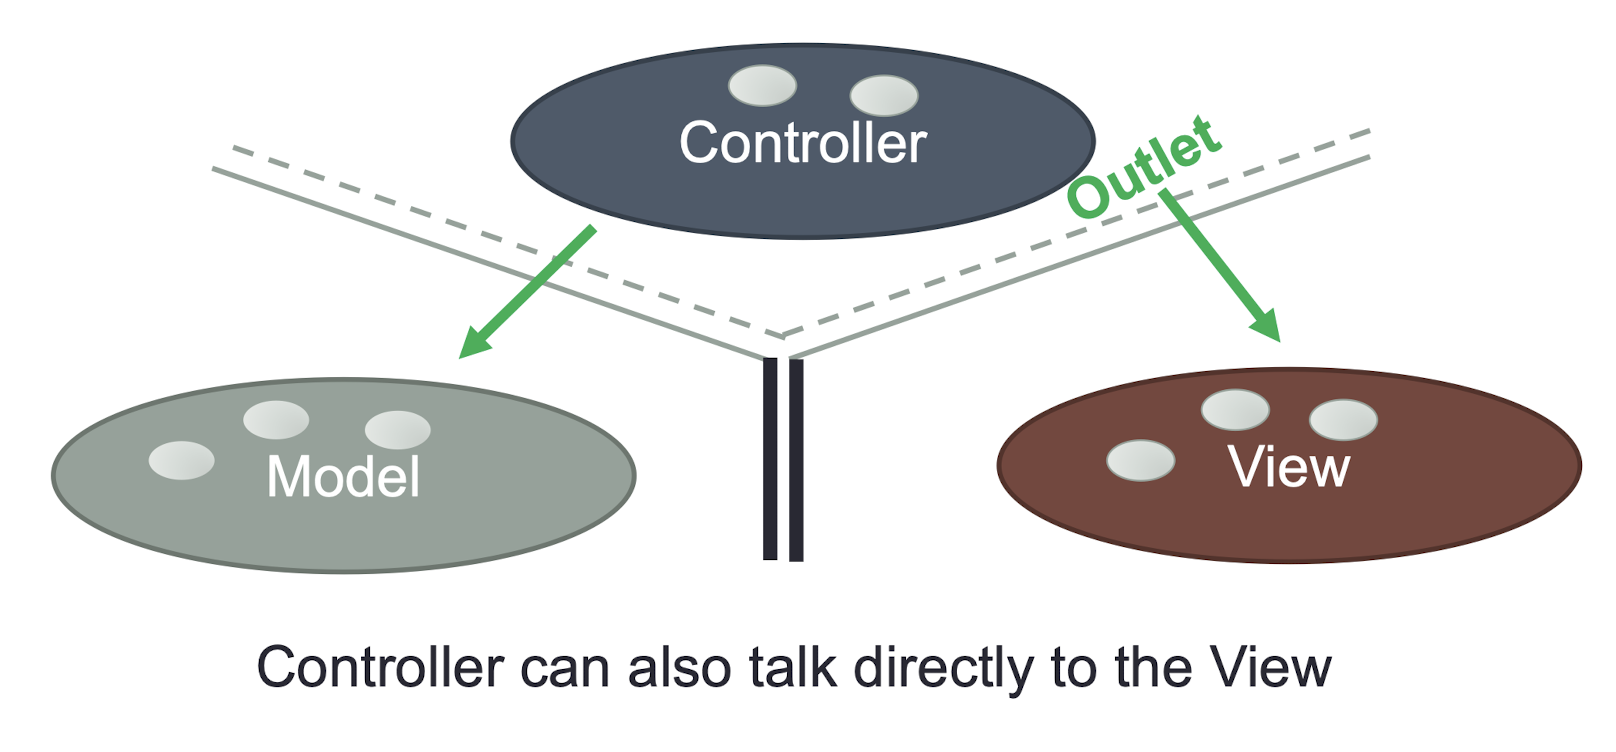
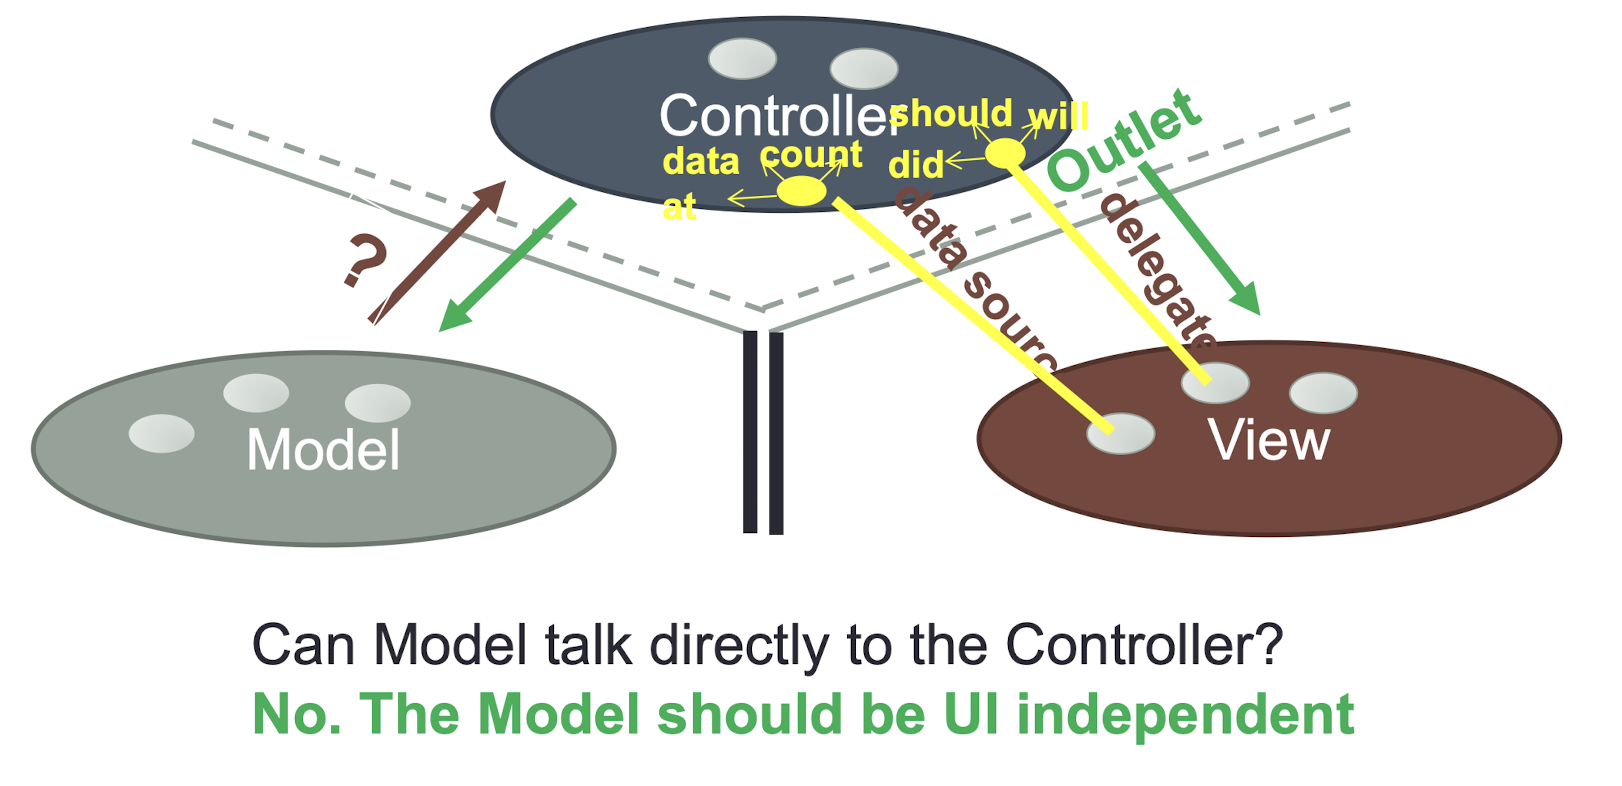
3.21 The MVC Model
- the Model-View-Controller (MVC) design pattern assigns objects in an application one of three roles: model , view , or controller
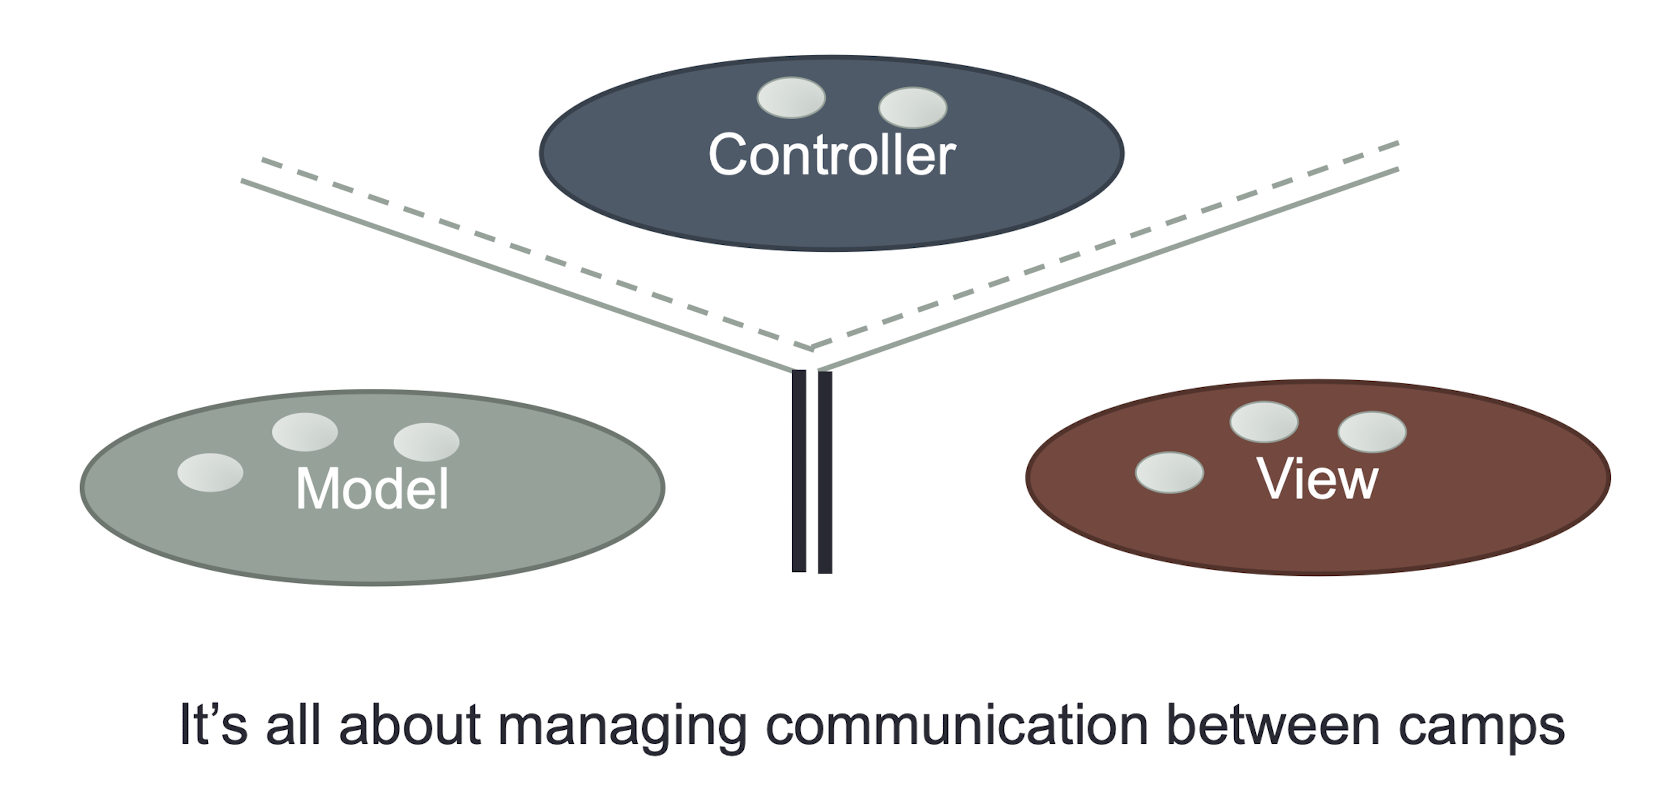
- The pattern (or called camp) defines not only the roles objects play in the application, it defines the way objects communicate with each other
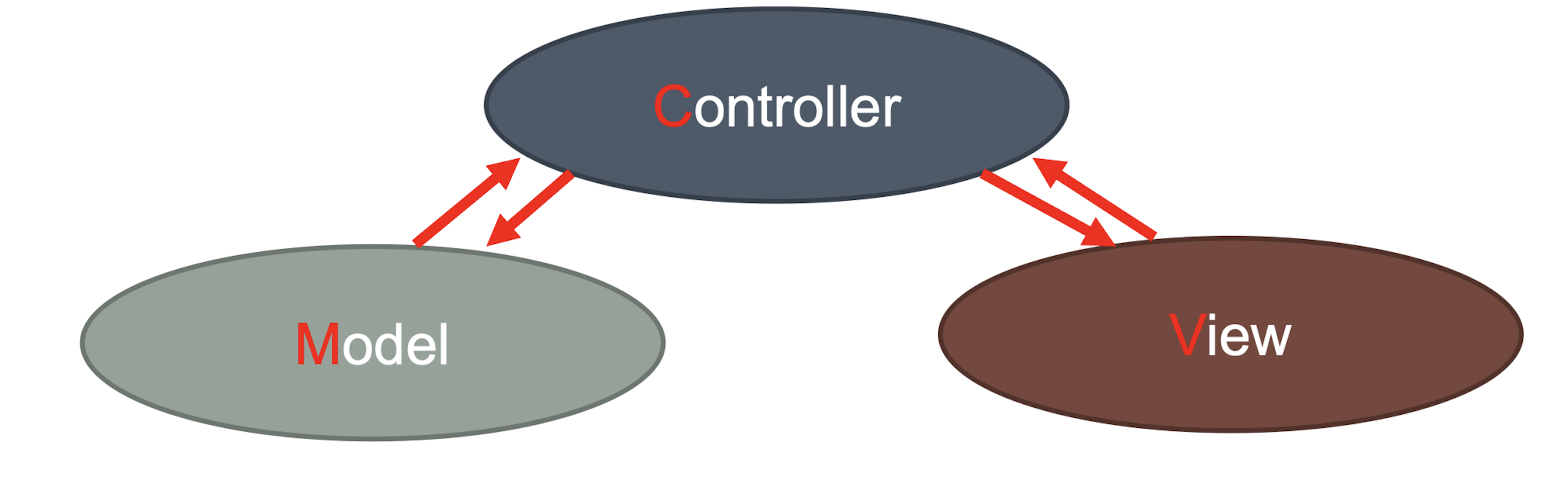
Each of the three types of objects is separated from the others by abstract boundaries and communicates with objects of the other types across those boundaries
The collection of objects of a certain MVC type in an application is sometimes referred to as a layer—for example, model layer
3.21.1 Why MVC?
MVC is central to a good design for a Cocoa application
Many objects in these applications tend to be more reusable, and their interfaces tend to be better defined
Applications with an MVC design are also more easily extensible than other applications
Many Cocoa technologies and architectures are based on MVC and require that your custom objects play one of the MVC roles
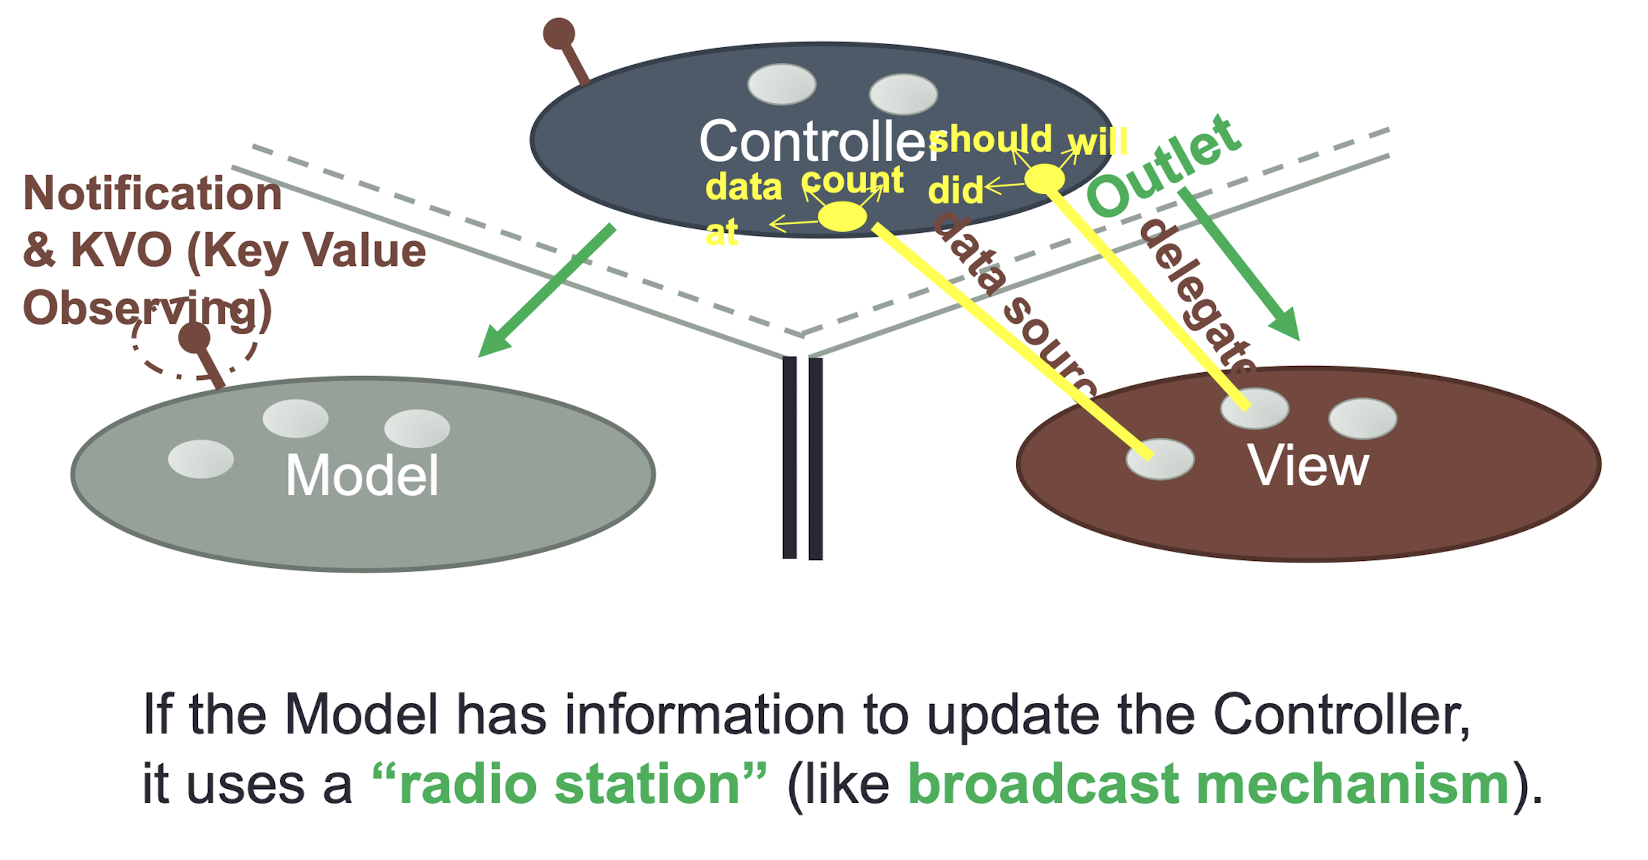
3.21.2 The Model Objects
Model objects encapsulate the data specific to an application
It defines the logic and computation that manipulate and process that data
They can be reused in similar problem domains
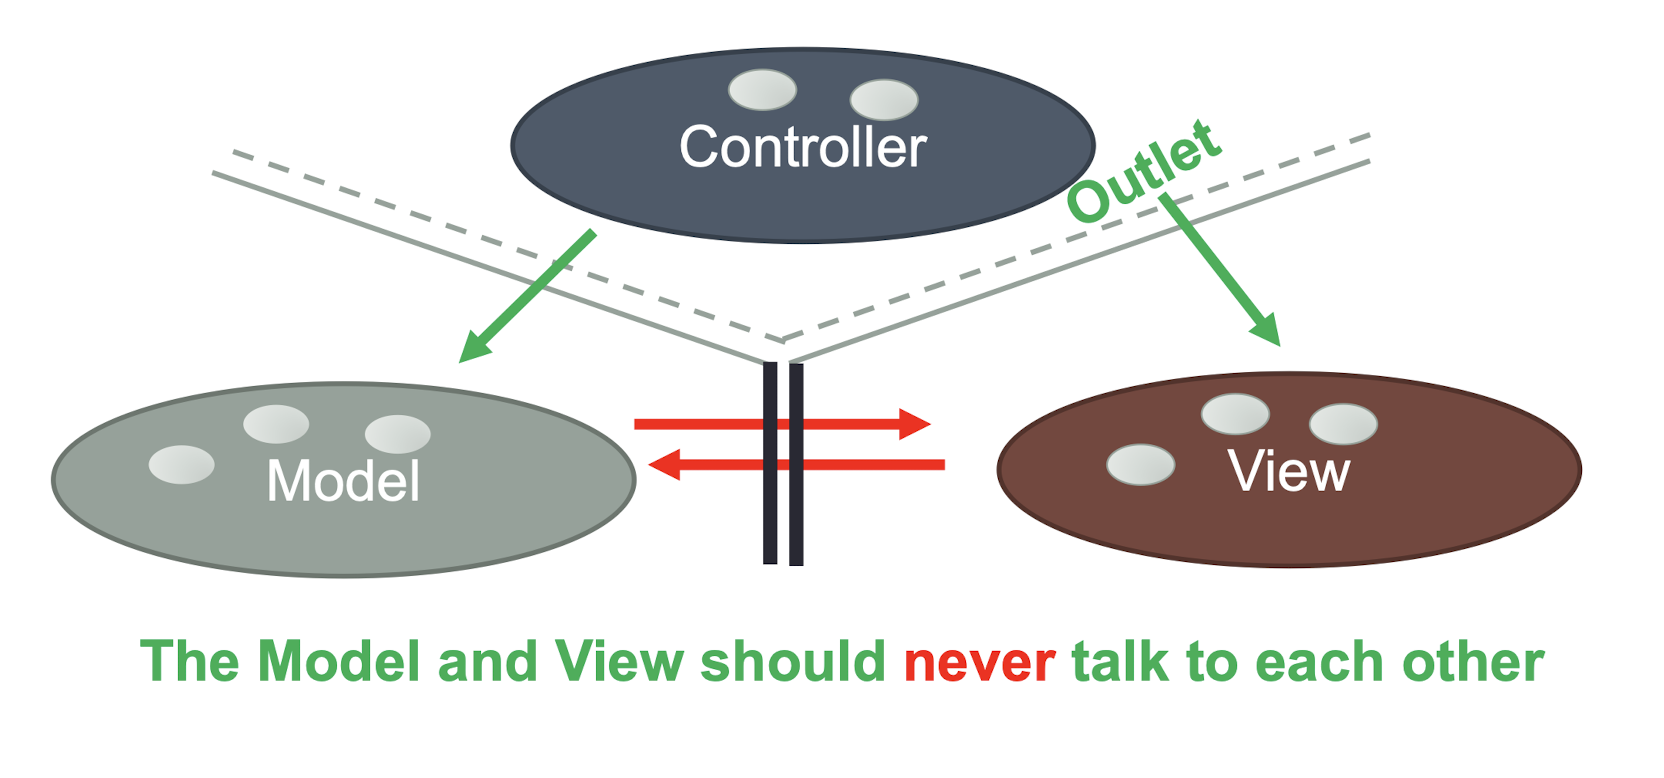
A model object should have no explicit connection to the view objects that present its data and allow users to edit that data
it should not be concerned with user-interface and presentation issues.
3.21.3 The View Objects
A View object is an object in an application that users can see
A view object knows how to draw itself and can respond to user actions
A major purpose of view objects is to display data from the application’s model objects and to enable the editing of that data
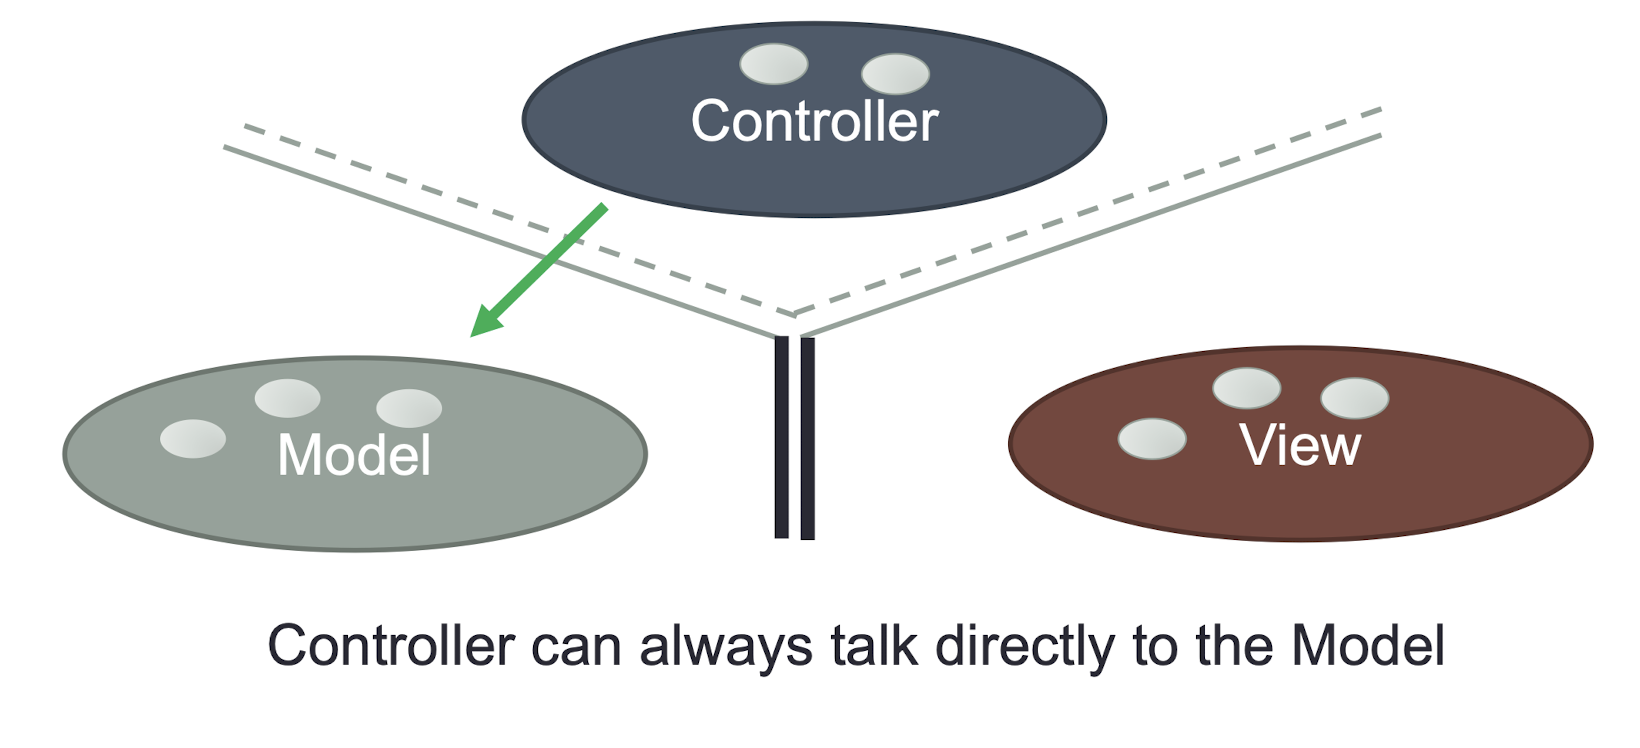
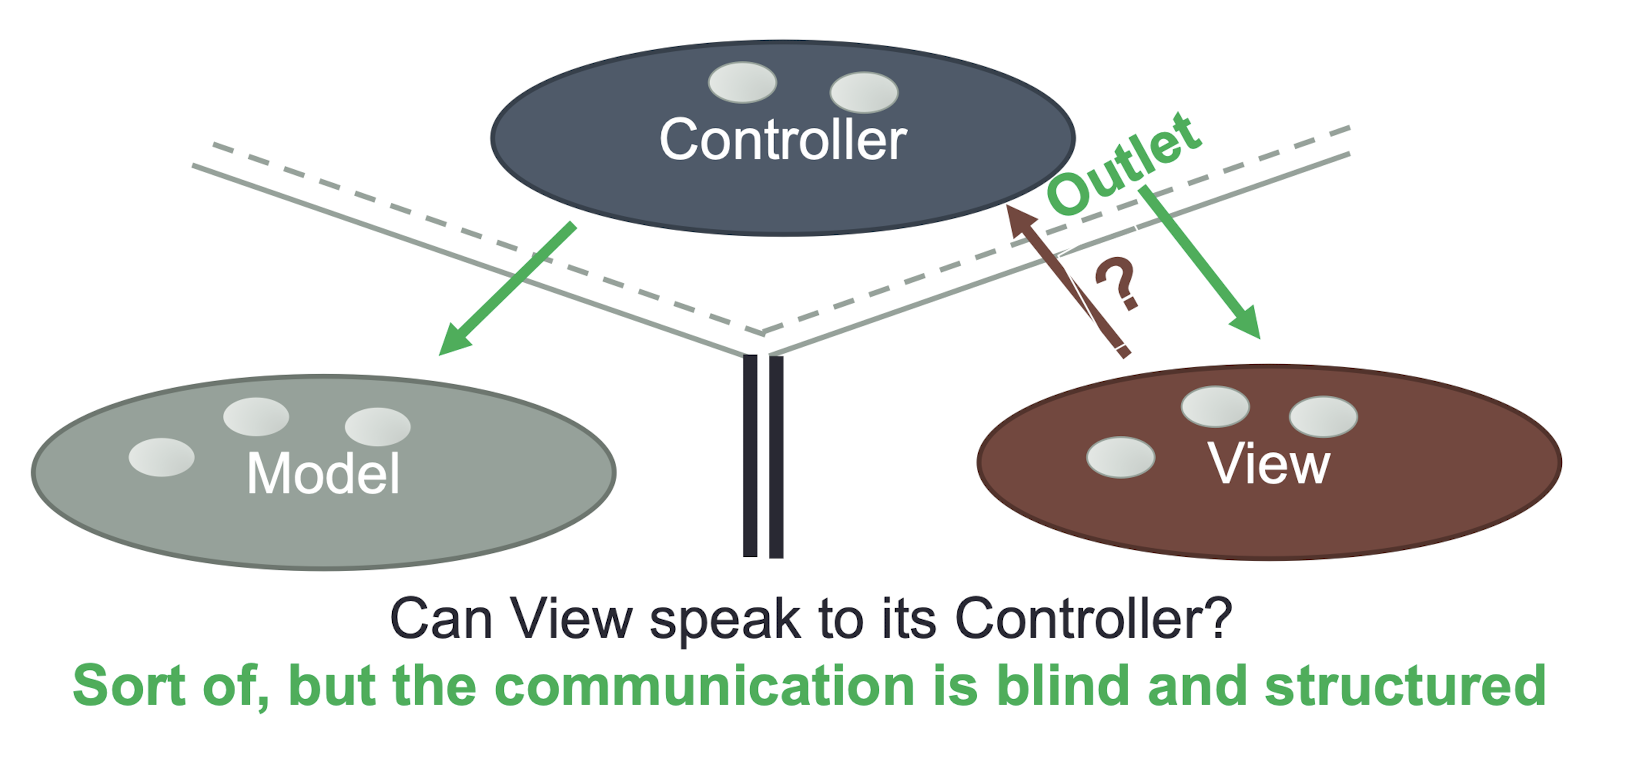
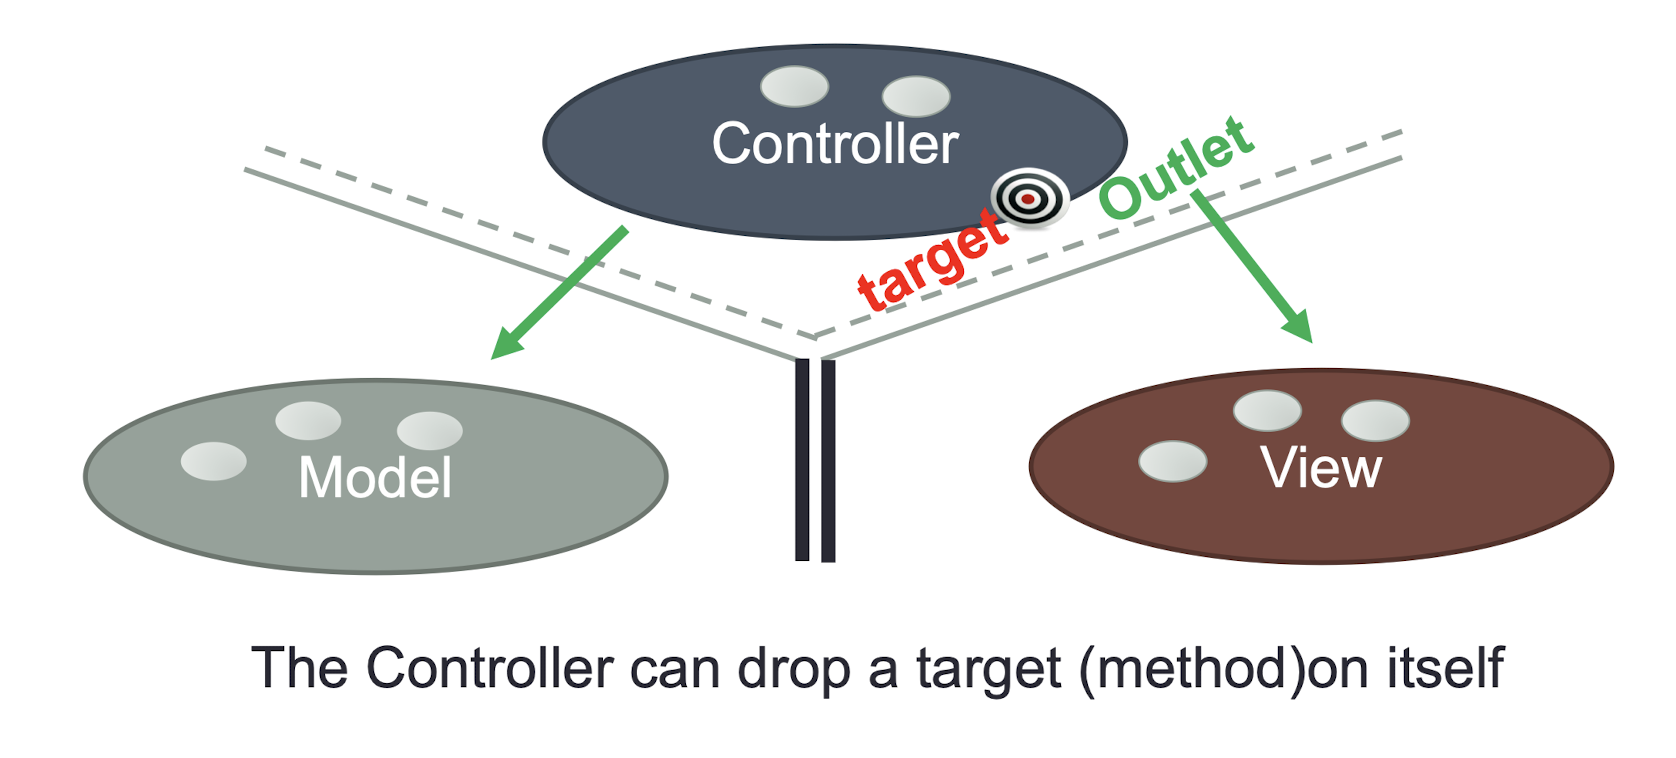
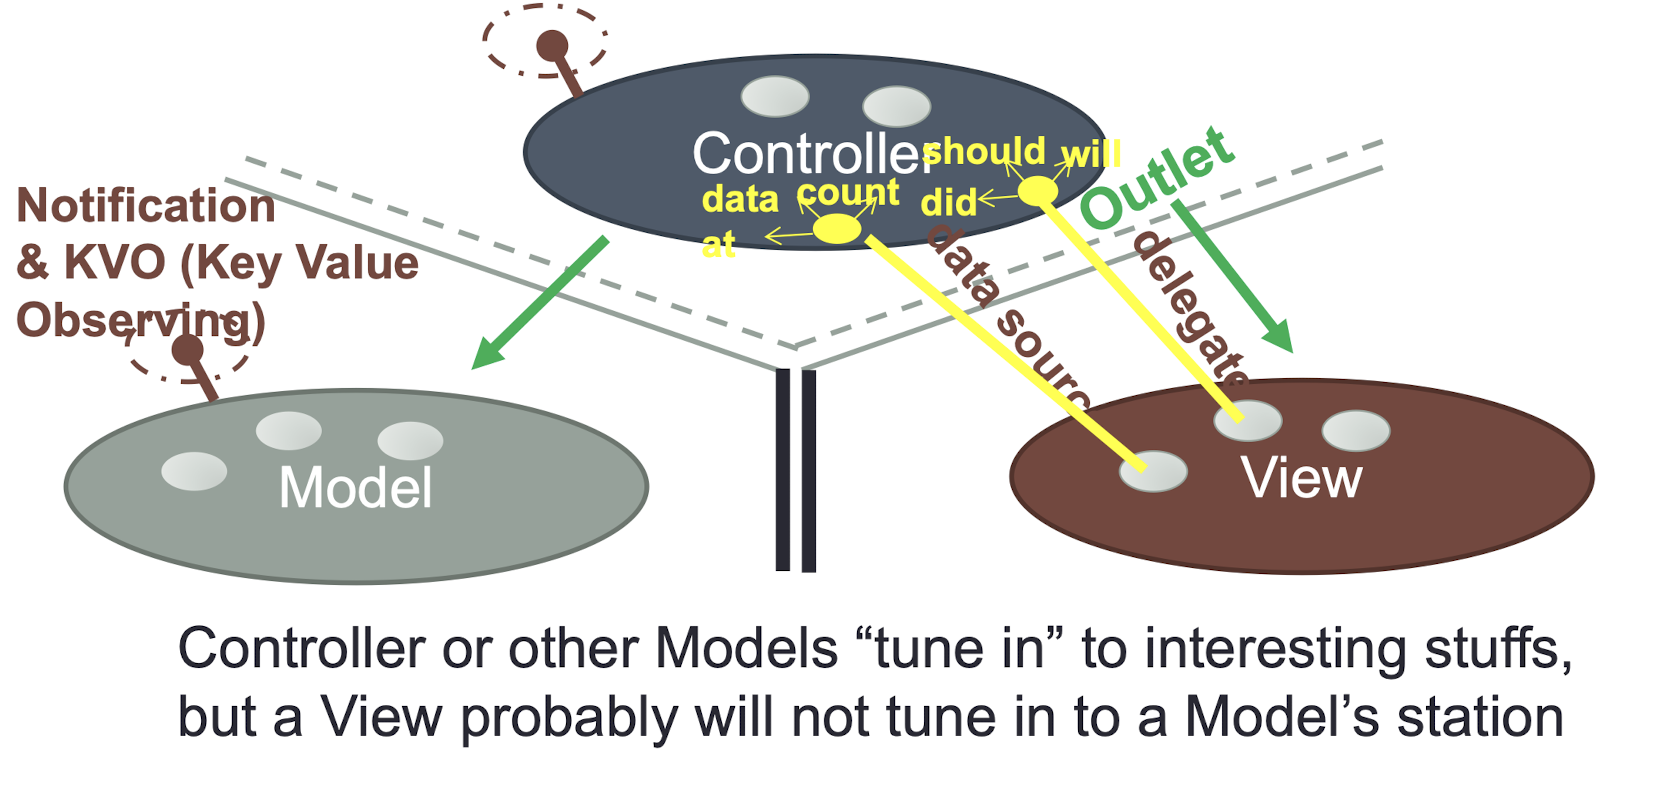
3.21.4 The Controller Objects
- A Controller object acts as an intermediary between one or more of an application’s view objects and one or more of its model objects
- Controller objects are thus a conduit through which view objects learn about changes in model objects and vice versa.
- Controller objects can also perform setup and coordinating tasks for an application and manage the life cycles of other objects
[Example]
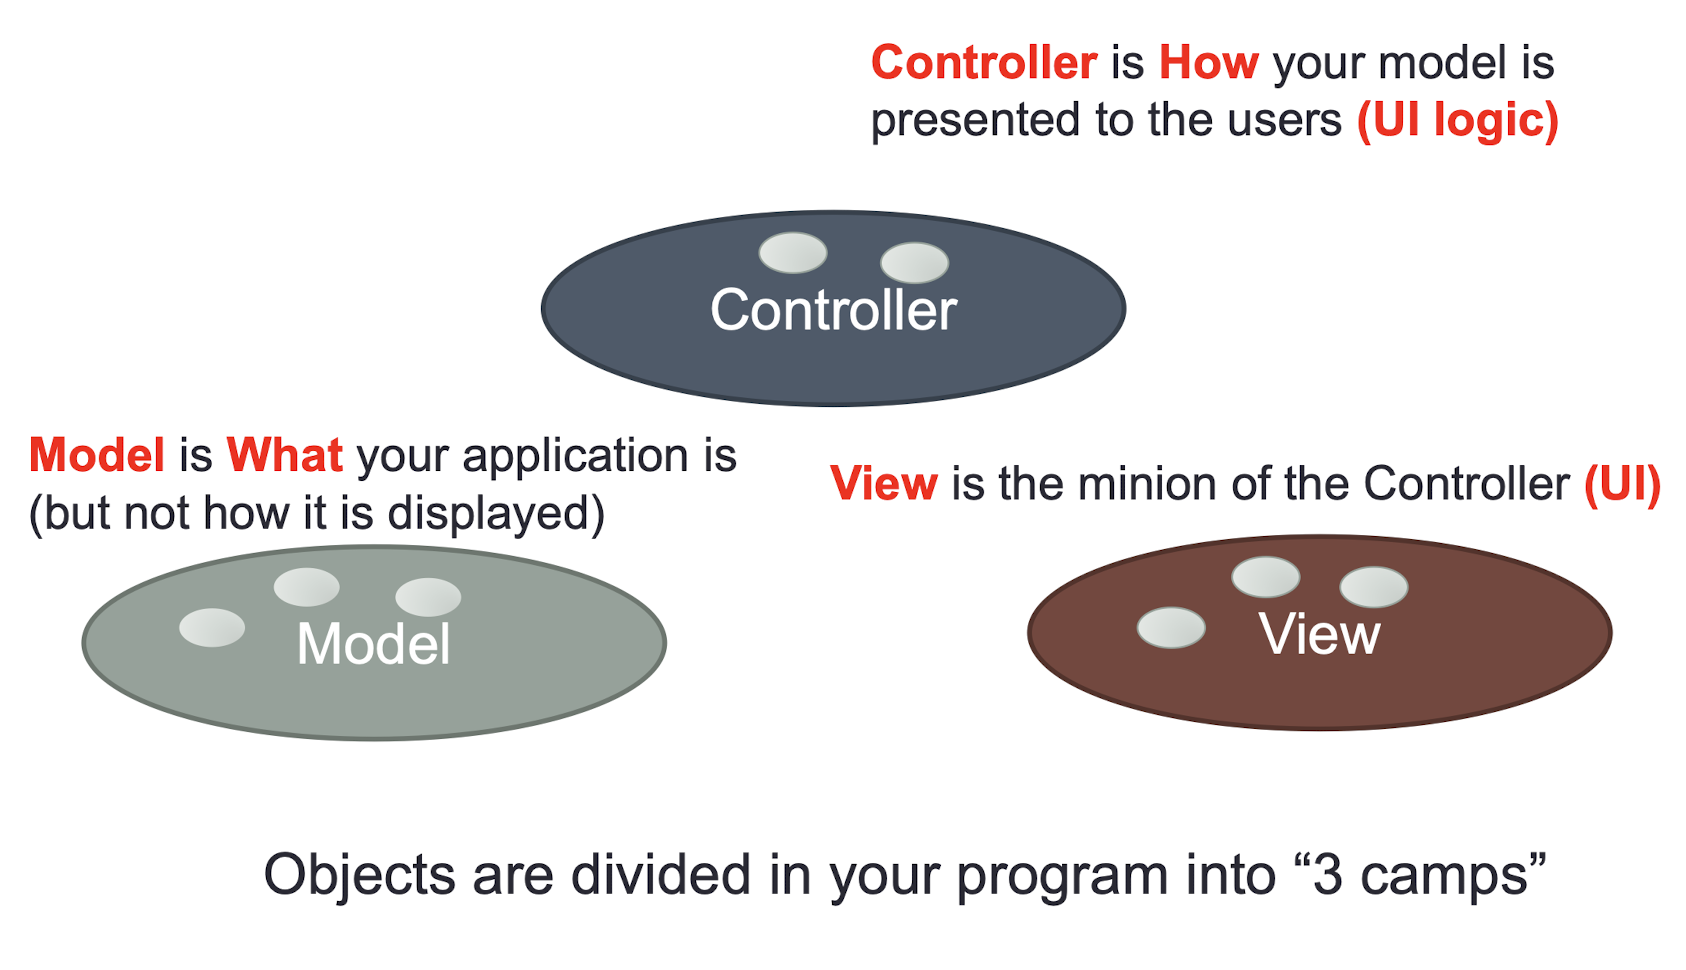
Objects are divided in your program into “3 camps”
- Model is What your application is (but not how it is displayed)
- Controller is How your model is presented to the users (UI logic)
- View is the minion of the Controller (UI)


3.22 Guess-A-Number Game (MVC)
- Separate the “ Model ” part in ViewController to another class named GuessModel in GuessModel.swift
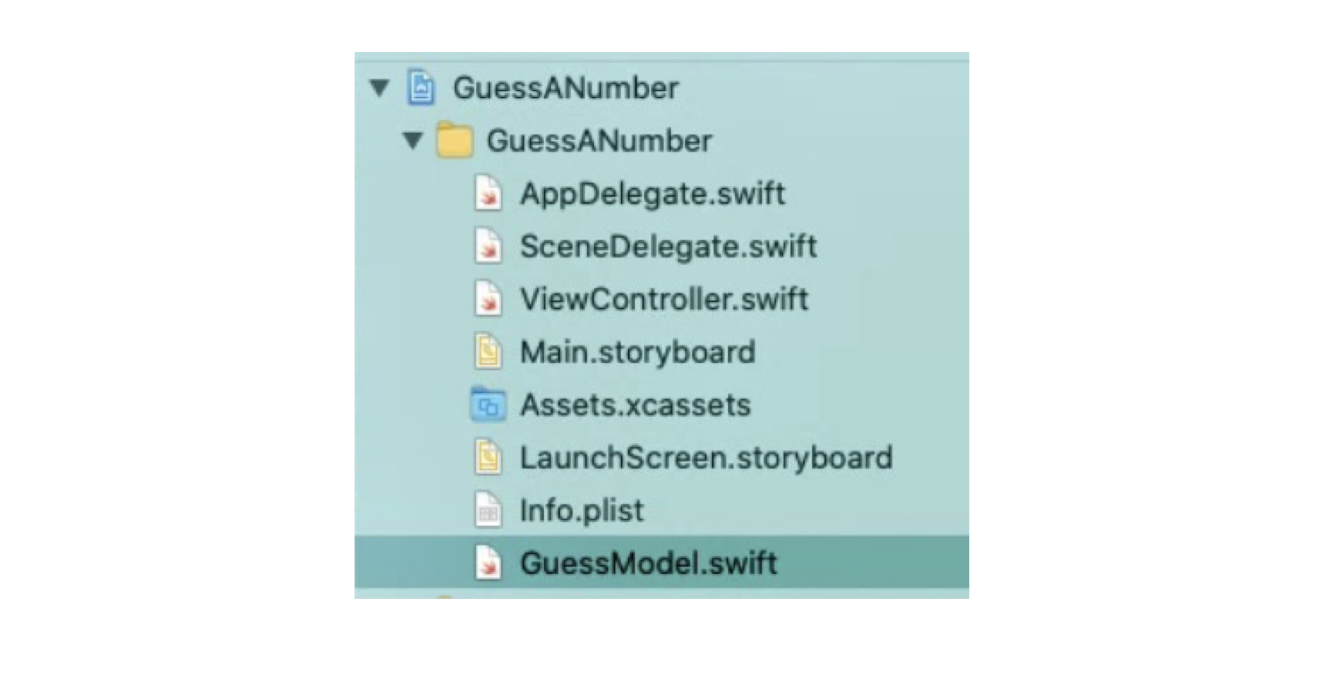
3.23 MVC Implementation
- Given:
- ViewController.swift ( Non-MVC )
1 | |
- Implement
GuessModelclass
1 | |
- Modify ViewController.swift to use the GuessModel class
- Which “files” are the M, V, and C?
Summary
- The iOS Structure
- The Concept of MVC Model
- Example of MVC in application development
- Reference:
- https://developer.apple.com/library/archive/documentation/General/Conceptual/DevPedia-CocoaCore/MVC.html
4. Hardware and Software in Embedded Systems
Objectives
- Hardware Units in Embedded Systems
- Processor, Power Source, Clocking Units, Memories, Interrupt Handler, I/O Communication Units
- Software Embedded into a System
- ROM Image
- Programming Languages
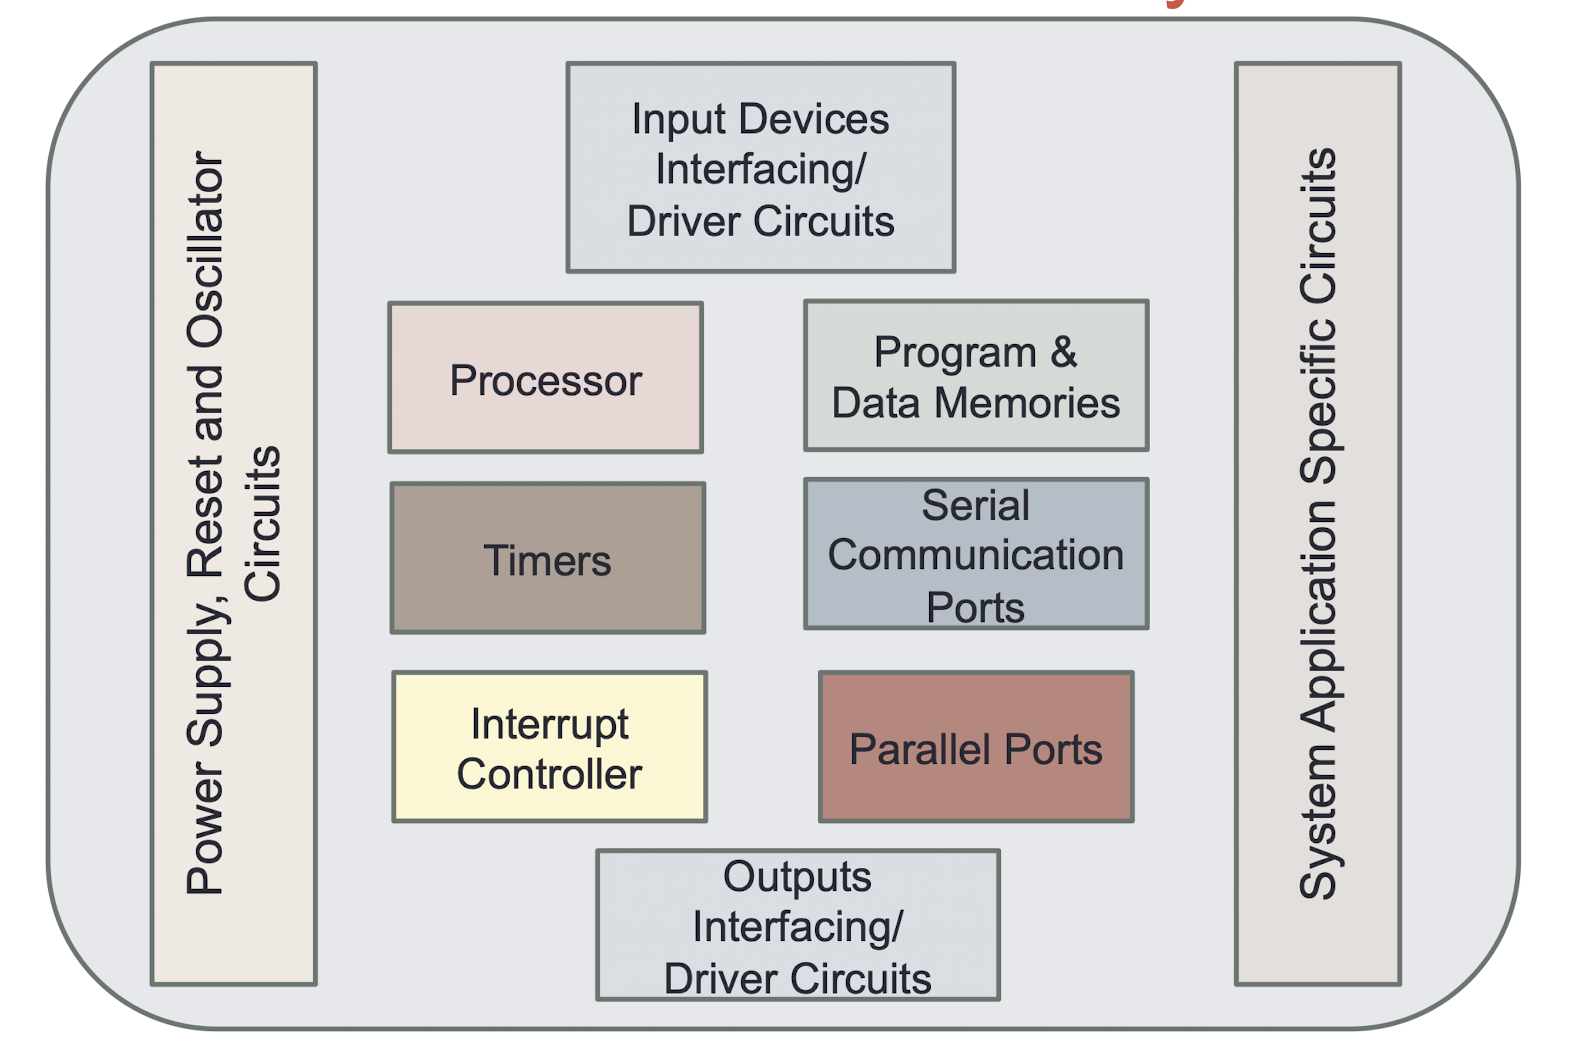
4.1 Hardware Units in Embedded Systems
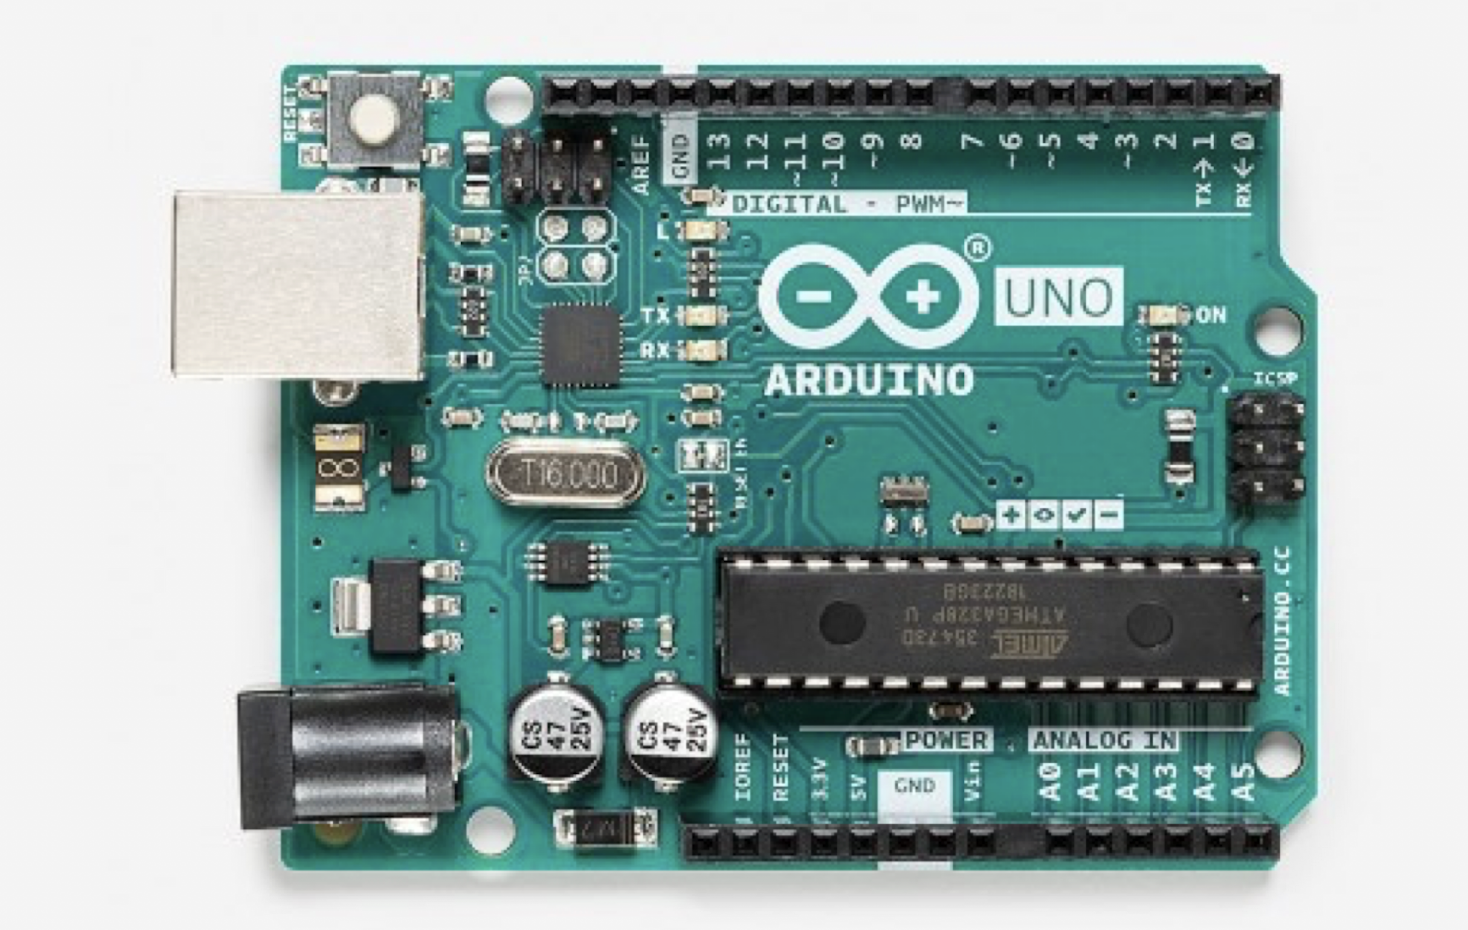
4.2 Arduino Uno
4.3 Processor
- Can it provide the processing power needed to perform the tasks within the system?
- The tasks are either underestimated in terms of their size and/or complexity or that creeping elegance expands the specification to beyond the processor’s capability
- The instructions arrange in a sequence in a program. The program executes in the sequence of their fetch from the memory
A processor has two essential units:
- Program Flow Control Unit (CU) —includes a fetch unit for fetching instructions from the memory
- Execution Unit (EU) — includes circuits for arithmetic and logical unit ( ALU ), and for instructions for a program control task, data transfer instructions, halt, interrupt, or jump to another set of instructions or call to another routine or sleep or reset
An embedded system processor chip or core can be one of the following:
- General Purpose Processor (GPP) - instruction set designed NOT specific to the applications
- Microprocessor
- Microcontroller
- Embedded Processor
- Application Specific Standard Processor (ASSP) as additional processor
- Motor driver
- Multiprocessor system using GPPs and Application Specific Instruction Processor (ASIP)
- Digital Signal Processor (DSP)
- Media Processor
- System-on-chip (SoC) - GPP or ASIP core(s) integrated into an ASIC or VLSI circuit
4.4 System Designer Consideration
- Instruction set: the range of instructions a processor can execute
- Processor ability to solve the complex algorithms used in meeting the deadlines for their processing
- Maximum bits in operand (8, 16, 32, or 64) in a single arithmetic or logical operation
- Internal and External bus-widths in the data-path
- How much data can be transferred at a time
- Clock frequency (in MHz) and processing speed in Million Instructions Per Second (MIPS)
- How fast
4.5 Instruction Set Architecture (ISA)
- ISA is processor specific
- An instruction contains an opcode and optional operand(s)
- Opcode specifies the operation to be performed (add, sub,…)
- Operand specifies the data to be processed
4.5.1 How instructions are stored in memory?
- Consider a 16-bit instruction:
0001 0101 0101 0110 - Among those 16 bits, there are some bits reserved for the opcode (instruction type: add, sub..) and the rest are for operands
- 4-bit of opcode: 16 different operations
- 4-bit of each operand: 16 different data
4.6 Class Question 2.1
- What are the trade offs when increasing the number of bits of opcode if the number of bits of the instruction remains unchanged?
- More bits for opcode -> the number of different operations that the sprocessor can perform increases
- Less bits for operand -> the range of data decreases
- What are the advantages and disadvantages of instructions with variable sizes, e.g. 8 - bit and 16-bit instructions within an ISA?
- More efficient use of memory
- Much more complicated circuit
4.7 Microprocessor
- It is a single VLSI chip that has a CPU and some other units (e.g., caches, floating point processing arithmetic unit, etc.)
- It is used when large embedded software is located in the external memory chips
- A Reduced Instruction Set Computer (RISC) core microprocessor is used when intensive computations are to be performed
- E.g., Motorola 68HCxxx, Intel 80x86, Intel i860, Sun SPARC, IBM PowerPC 601, 604, etc.
- A microprocessor or general-purpose processor chip can be used for the embedded design because:
- Processing by the known instructions available at predefined general-purpose instruction-set results in fast system development
- Once the circuit board and I/O interfaces are designed for a GPP, these can be used for a new system by just changing the embedded software in the ROM/flash
- Ready availability of a compiler facilitates embedded software development in high-level language
- Ready availability of OS and processor-specific Application Program Interfaces (API). Reusability of previous code enables fast development and lower cost
4.8 Microcontroller
- A microcontroller is a single-chip VLSI with limited computational power
- It possesses enhanced input-output capabilities and a number of on-chip functional units (processor, memory, etc.)
- It is used when a small part of the embedded software has to be located in internal memory and when the on-chip functional units like interrupt- handler, port, timer, ADC and PWM are needed
- E.g., Motorola 68HC11xx, HC12xx, HC16xx, Intel 8051 , 80251, etc.
4.9 Embedded Processor
- Fast context switching and thus lower latencies
- Atomic Arithmetic Logic Unit (ALU) operations and thus no shared data problem among multiple registers
- RISC for fast, more precise and intensive calculation by the embedded software
- It is used when fast processing, fast context-switching and atomic ALU operations are needed
- E.g., Intel XScale
4.10 Digital Signal Processor
- For applications in image processing, multimedia, audio, video, HDTV, etc.
- It has a Multiply and Accumulate (MAC) units
- It is used when signal-processing function need to be processed fast.
- E.g., Texas TMS320Cxx, Motorola 5600xx, etc.
4.11 Application Specific System Processors (ASSP)
- It is used as an additional processing unit for running the application-specific tasks in place of processing using embedded software.
- Typically a set-top box (STB) processor or mpeg video-processor or network application processor or mobile application processor
- E.g., i2Chip, W3100A, is a unique hardwired Internet connectivity solution (hardware solution that is five times faster than a software solution using the system’s GPP)
4.12 Multiprocessor Systems using GPPs
- In embedded systems, several processors may be needed to execute an algorithm fast and within a strict deadline
- For example, in real-time video processing
- It is used when a single processor does not meet the needs of the different tasks that have to be performed concurrently
- The operations of all the processors are synchronized to obtain an optimum performance
4.13 Power Source
- System own supply with separate supply rails for IOs, clock, basic processor, memory and analog units.
- Some embedded system interfaces do not have their own power supply and connect to PC power-supply lines. E.g., network interface card.
- Charge pump concept used in a system of little power needs, for examples, in the mouse or contact-less smart card
- DC to DC converter that uses capacitors for energetic charge storage to raise or lower voltage
- https://youtu.be/T47TYuLDtrs
4.14 Power Dissipation Management
- Clever real-time programming by Wait and Stop instructions for saving power
- Clever reduction of the clock rate during specific set of instructions
- Optimizing the codes: trade-off between low power dissipation and fast and efficient program execution
- Clever enabling and disabling of use of caches or cache blocks
4.15 Clock Oscillator Circuit and Clocking Units
- The clock controls the various clocking requirements of the CPU, the system timers and the CPU machine cycles (e.g., for fetching codes and data from memory and then decoding and executing at the processor).
- Real Time Clock (System Clock) and Timers drive hardware and software, and synchronizing all the system units.
4.16 Reset Circuit
- Reset means that the processor starts the processing of instructions from a starting address
- Reset can be activated by:
- An external reset circuit that activates on the power-up, on the switching-on reset of the system or on the detection of a low voltage
- Software instruction, timeout by a programmed timer known as watchdog-timer, or a clock monitor detecting a slowdown below certain threshold frequencies due to fault. i.e. when the system is stuck up in certain set of instructions for a period more than a preset time-interval
4.17 Memories

4.14.1 Memories: ROM or EPROM
- Storing ‘Application’ program from where the processor fetches the instruction codes
- Storing codes for system booting, initializing, Initial input data and Strings
- Storing Codes for RTOS
- Storing Pointers (addresses) of various Interrupt Service Routines
4.14.2 Memories: External or Internal RAM
- Stack: for automatic variables within functions (LIFO)
- Heap: for dynamic memory allocation
1 | |
4.14.3 Memories: EEPROM or Flash, and Caches
- EEPROM or Flash: Storing non-volatile (long-term) results of processing
- EEPROM: Electrically Erasable Programmable Read Only Memory
- Caches: Storing copies of the instructions, data and branch-transfer instructions in advance from external memories and storing temporarily the results in write back caches during fast processing
4.15 Interrupts Handler
- A system may possess a number of devices and the system processor has to control and handle the requirements of each device by running an Interrupt Service Routine (ISR) for each interrupt event.
- Interrupt handles elements for the external port interrupts, IO interrupts, timer and Real-Time Clock interrupts, software interrupts and exceptions
- Interrupts may be simultaneously pending for service
4.16 Linking Embedded System Hardware
- Linking and interfacing buses and units
- Linking and interfacing circuit (also called glue circuit) for the buses by using the appropriate multiplexers, decoders, and de-multiplexers to link various system units
4.17 Buses
- Processor of a system might have to be connected to a number of other devices and systems
- A bus consists of a common set of lines to interconnect the multiple devices, hardware units and systems.
- It enables the communication between two units at any given instance
- The remaining units remain in an unconnected state during communication between these two
- A bus may be a serial bus or a parallel bus transferring one bit or multiple data bits respectively
4.18 IO Communication Units
- I/O Ports and Communication Drivers: Network Ethernet or serial driver to communicate with host embedded system Expansion Facility
- Serial Buses: UART (512 kbaud/s), 1-wire CAN (33 kbps), Industrial I^2 C (100kbps), Serial Port (230 kbps), IEEE 1394 (400 Mbps), High Speed USB 2.0 (480 Mbps), USB 3.0 (5Gbps)
- Parallel Buses: SCSI parallel (40 Mbps), Fast SCSI (8M to 80 Mbps) , Ultra SCSI-3 (8M to 160 Mbps), PCI, PCI-X.
- Keypad or Keyboard I/O Interface
- LCD Display System Interface
- ADC/DAC – Single or Multi channel
- GPIB (IEEE 488) Interface Element
- Pulse Dialing Element, Modem (for fax, internet packet routing)
- Bluetooth, 802.11, IrDA,…
4.19 ROM Image
- Final stage software also called ROM image
- Just as an image is a unique sequence and arrangement of pixels
- Embedded software is also a unique placement and arrangement at each ROM address of bytes for instructions and data.
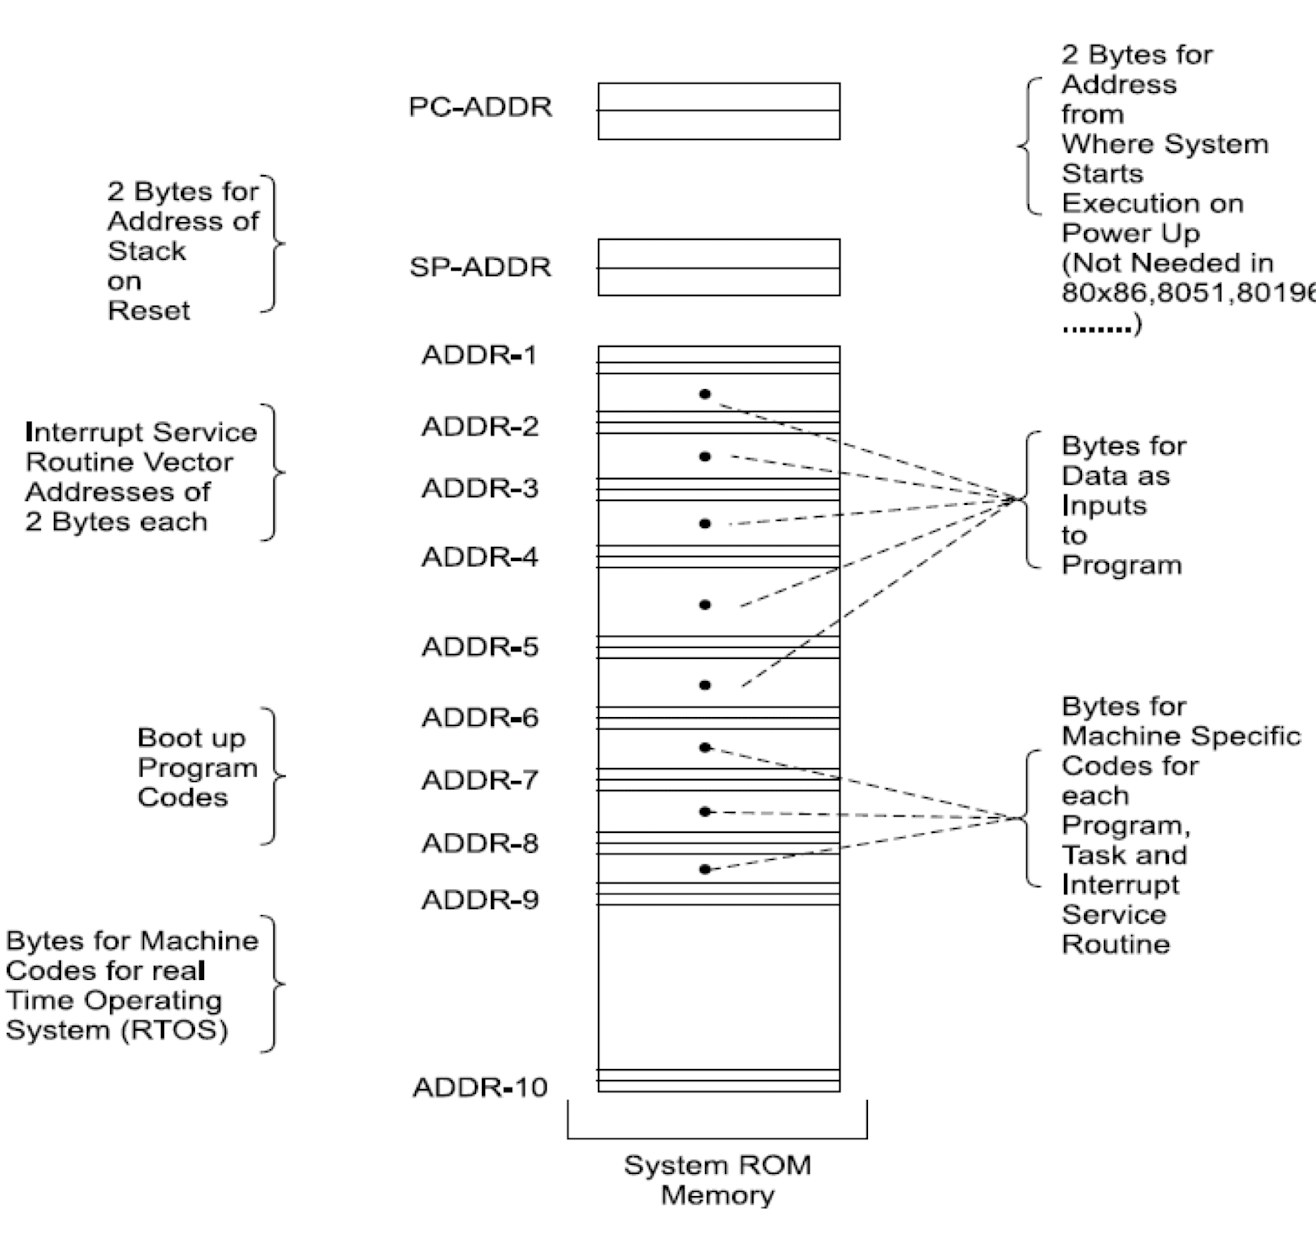
System ROM memory embedding the software, RTOS, data and vector addresses
4.20 Final Machine Implementable Software (ROM Image)
- Bytes at each address defined for creating the ROM image.
- By changing this image, the same hardware platform work differently and can be used for entirely different applications or for new upgrades of the same system.
- Hardware elements between distinct systems can be identical but it is the software that makes a system unique and distinct from the other.
- ROM image may alternatively be compressed software (for example, the zip format) and data (for example, the pictures in jpg or gif format) along with the software required for decompression algorithm
4.21 Other uses of ROM images
- What is a ROM image?
- https://youtu.be/JH-3NijIWb4
4.22 Machine Language Coding
- Programmer defines the addresses and the corresponding bytes or bits at each address.
- The machine code-based coding is used in configuring some specific physical device or subsystem (e.g., instruct a transceiver to transmit at specific Mbps or Gbps using a specific bus protocol and networking protocol)
- Coding in machine implementable codes is time-consuming because the programmer must first understand the processor instruction set and then memorize the instructions and their machine codes.
4.22.1 Machine Language vs. Assembly Language
- Machine Language is the actual bits used to control the processor in the computer
- Usually viewed as a sequence of hexadecimal numbers (typically bytes)
- The processor read these bits (instructions) in from program memory
- Machine language provides a way of entering instructions into a computer (through switches, punched tape, or a binary file).
- Assembly language is more human readable view of machine language
- Instead of using numbers, the instructions and registers are given names (add, sub, R1, A, B…)
- Assembly language is very close to the machine language.
| Assembly | Machine Language Code |
|---|---|
MOV A,[1] |
3e 00 01 ; A=y |
MOV B,[2] |
3f 00 02 ; B=z |
ADD A,B |
8c ; A=A+B; |
MULT A,B |
9f ; A=A*B |
MOV [0],A |
4e 00 00 ; x=A |
4.23 Assembly Language Coding
- Needed for invoking Processor Specific Instructions
- Could be time-consuming as it requires understanding of the processor and instruction set.
- A program or a small specific part coded in the assembly language using an Assembler (software used for developing codes in assembly).
- Full coding in assembly may be done only for a few simple, small-scale systems (e.g., toys, vending machines, data acquisition systems, etc.).
Four steps when using assembly language
- 1. Assembler: translate the assembly software into the machine codes (assembling)
- 2. Linker: linking these codes with the other required assembled codes (e.g., *.exe)
- 3. Loader (part of the OS): relocating the codes according to the available RAM addresses
- 4. Locator: locating the codes as a ROM image and permanently placing them at the available addresses in the ROM (e.g., Intel Hex file format) before finally burned at the ROM
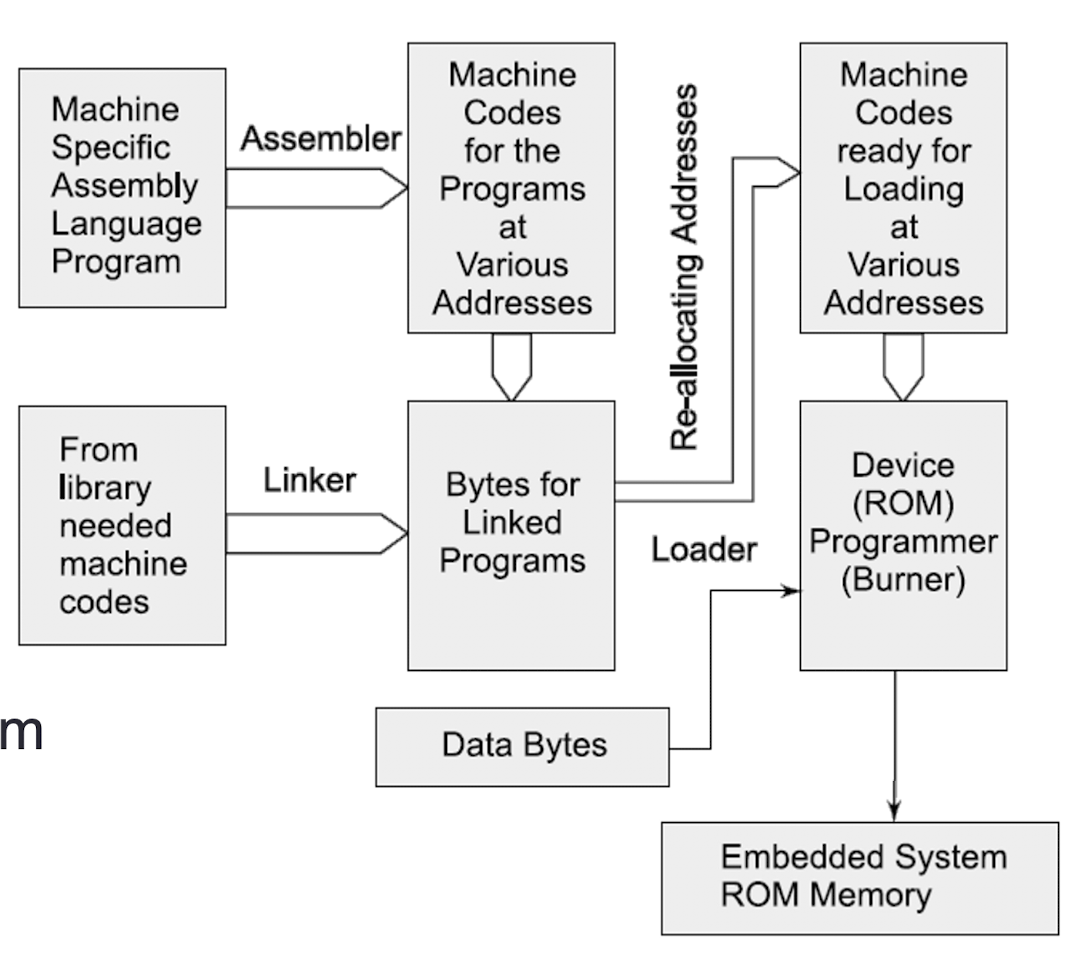
The conversion from Assembly to ROM Image
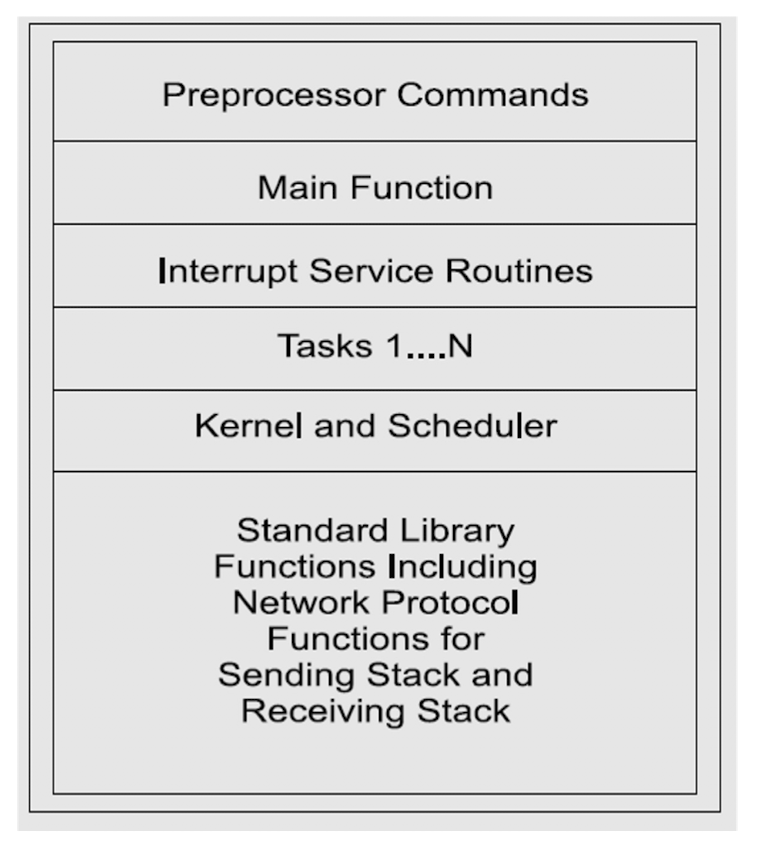
4.24 High Level Language
- Programming Language: C, C++, Java, etc.
Different program layers in a typical embedded “C” software
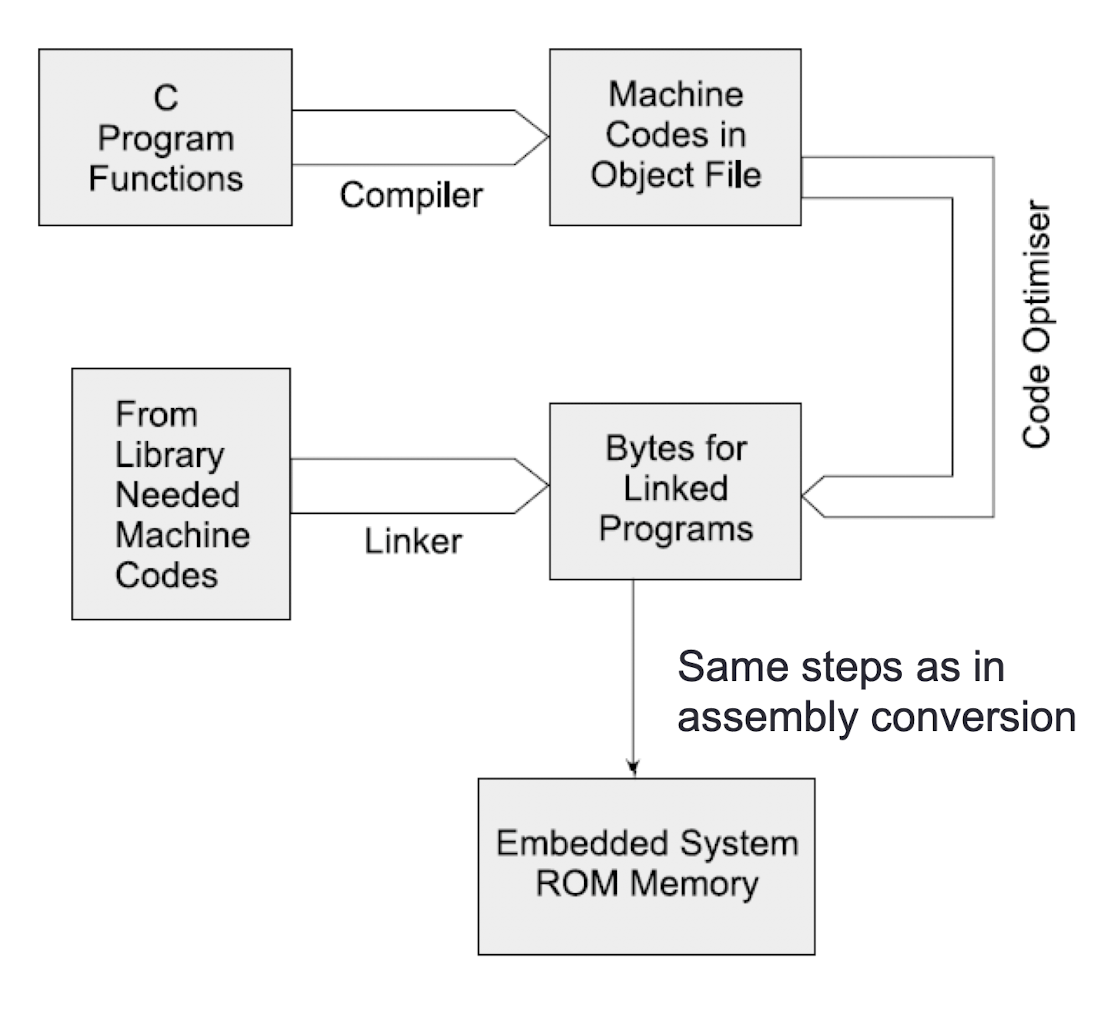
4.25 Compiler
- Generates an object file
- Using linker and locator, the file for ROM image is created for the targeted hardware
- C++ and Java are other languages used for software coding
Converting a C program into ROM image
4.26 Assembly language, Machine Code, and High Level Language
- https://www.youtube.com/watch?v=wA2oMRmbrfo
- How is Java code translated into machine code for processor to run?
- Java code -> Java compiler -> Java byte code -> Java Virtual Machine -> machine code
4.27 Design Example: Mobile Phone
Hardware Units: Embeds an SoC integrating the following units
- Microcontroller or ASIP
- DSP core, CCDSP, video, voice processors
- Flash, memory stick, EEPROMs, SRAMs
- Peripheral circuits, ADC, DAC and interrupt controller
- Direct memory access controller
- LCD controller
- Battery
Mobile phone software development tools
- OS (Android, iOS, Windows, Symbian, Palm, etc.)
- Java 2 Micro Edition (J2ME) along with KVM as Java Virtual Machine
- Java Wireless toolkits with JDK (Java Development Kit)
Software components
- Memory and file systems
- Keypad, LCD, USB, 3G port device drivers
- SMS message creation and communicator
- Mobile imager for uploading pictures and MMS
- Mobile browser for access to the Web
- Downloader for games, ring-tones, wallpapers
- Simple Camera
- Bluetooth synchronization, IrDA and WAP connections support
4.28 Summary
Hardware units
- Processor(s) and
- Basic circuit elements: power source, clock, reset, timers, memory, glue circuit for the elements linking and interfaces
- Keypad, LCD display matrix or touch screen
- IO communication elements: buses (serial and parallel), interfaces for network interface, ADC, DAC, pulse dialer, modem, Bluetooth, 802.11, …
- Interrupt handler
Software Components:
- Embedded software saves as ROM image
- Conversion steps from high level language codes to assembly and then to the ROM image
- Program layers in the embedded software
- High level language used for software development is C, C++, visual C++ or Java
5. Views and Controls
Objective
- The UIView class
- UI Components
- Gesture Recognizers
- Multi-View Application
- The SwiftUI
- MVVM
- Stack
- ObservableObject
5.1 The UIView class
- Views are the fundamental building blocks of your app’s user interface
- the UIView class defines the behaviors that are common to all views
- A view object renders content within its bounds rectangle and handles any interactions with that content
- The UIView class is a concrete class that you can instantiate and use to display a fixed background color
- The view subclasses, such as labels, images, buttons, and other interface elements commonly found in apps, can be used to draw more sophisticated content
5.2 Jobs of View Objects
- View objects are the main way your application interacts with the user. They might be used in the following ways:
- Drawing and animation
- Views draw content in their rectangular area using UIKitor Core Graphics.
- Some view properties can be animated to new values.
- Layout and subview management
- Views may contain zero or more subviews.
- Views can adjust the size and position of their subviews.
- Use Auto Layout to define the rules for resizing and repositioning your views in response to changes in the view hierarchy.
- Event handling
- A view is a subclass ofUIResponderand can respond to touches and other types of events.
- Views can install gesture recognizers to handle common gestures.
- Drawing and animation
5.3 The UIView “Family”
UIKit
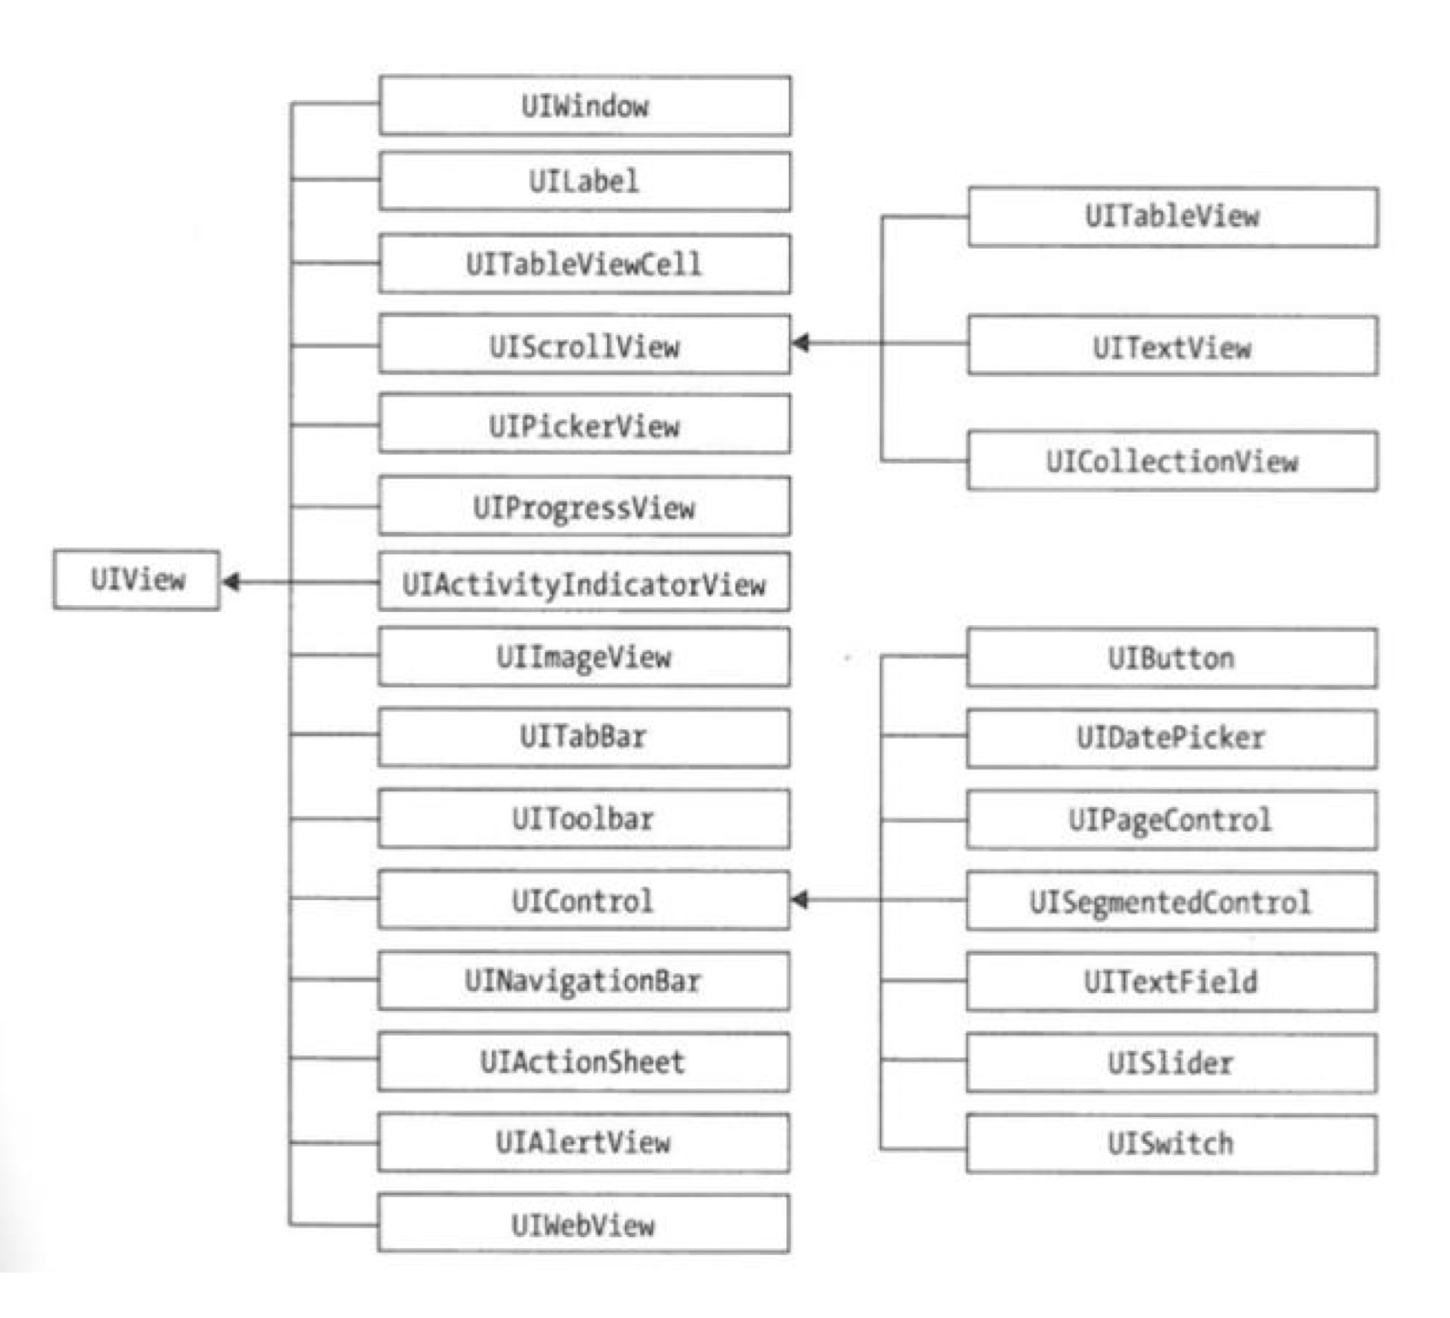
5.4 Interface Structure
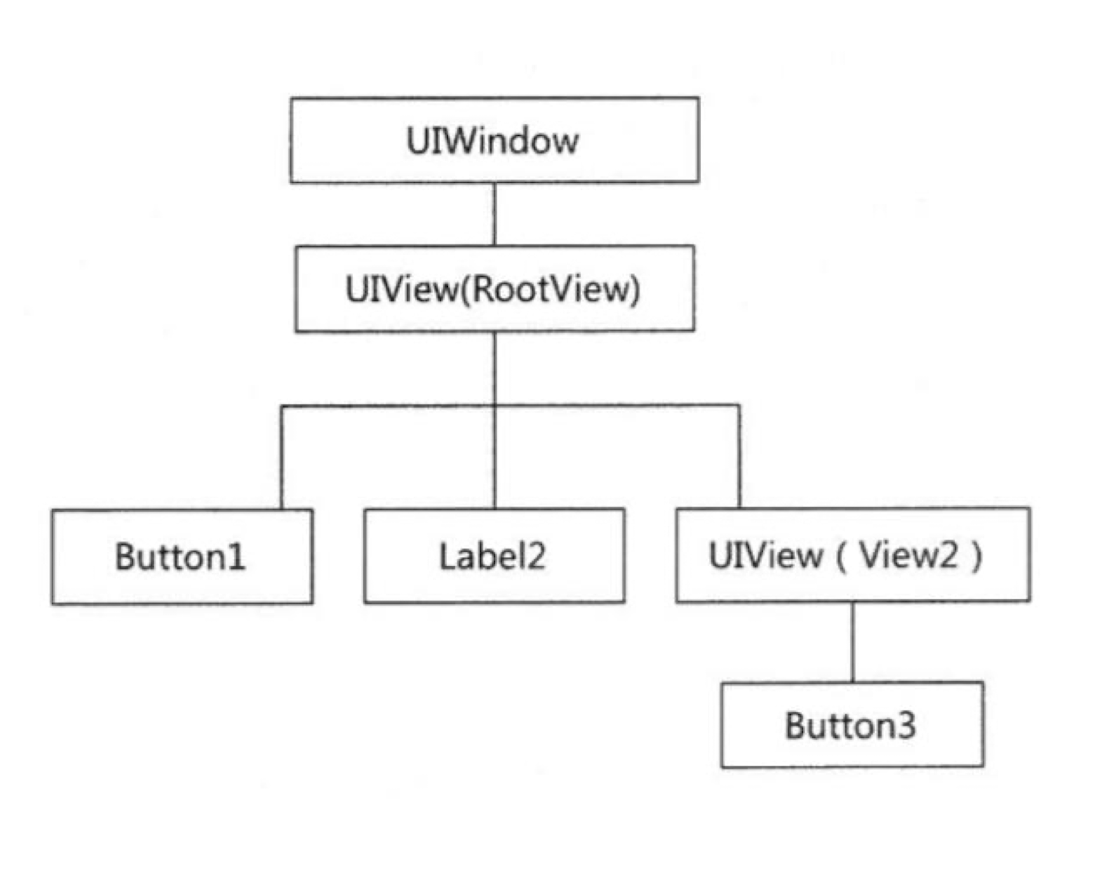
5.5 Superview and Subviews
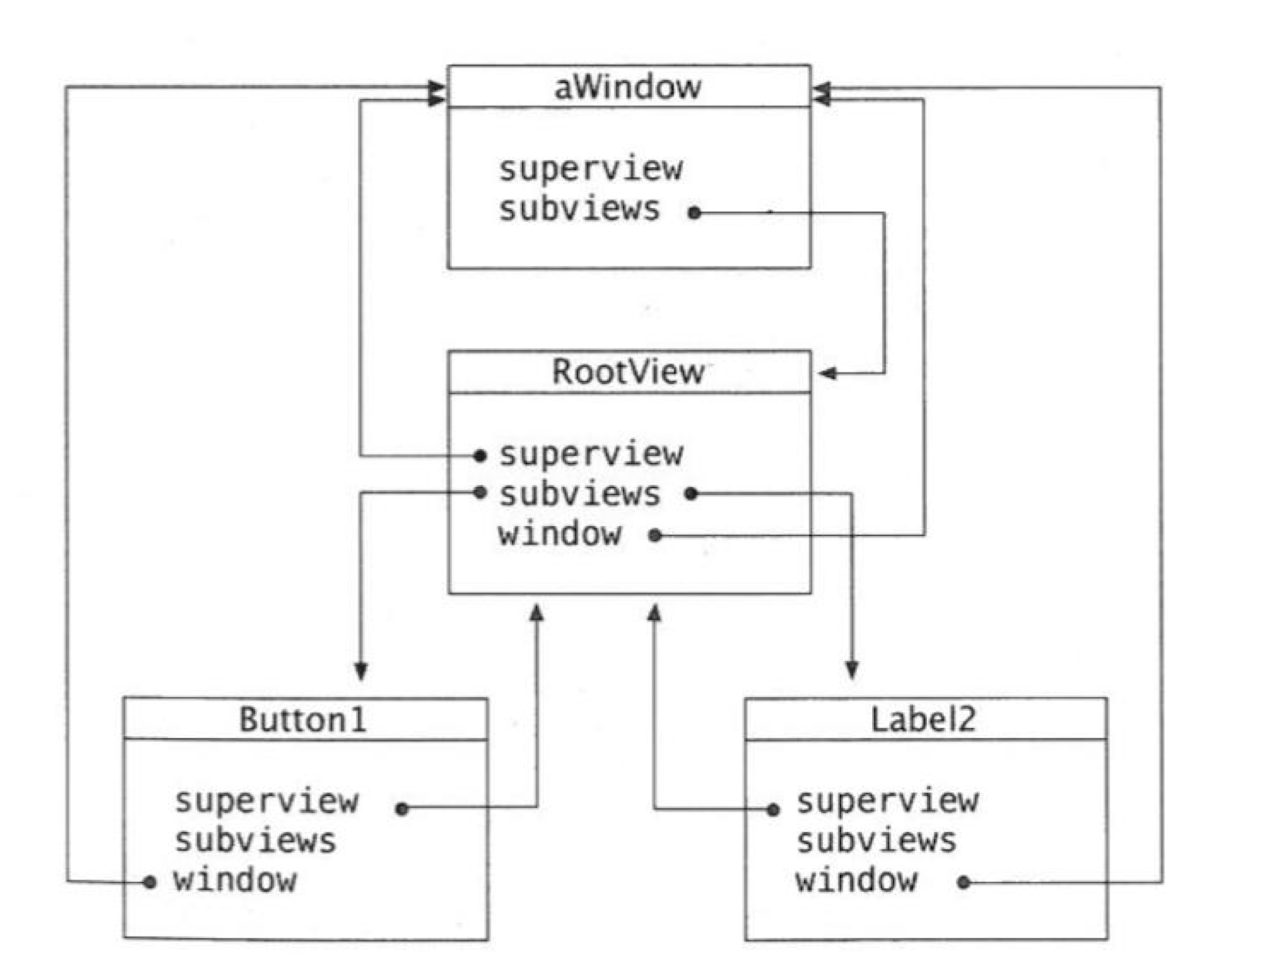
- In each view, there is only one super-view, but many sub-view
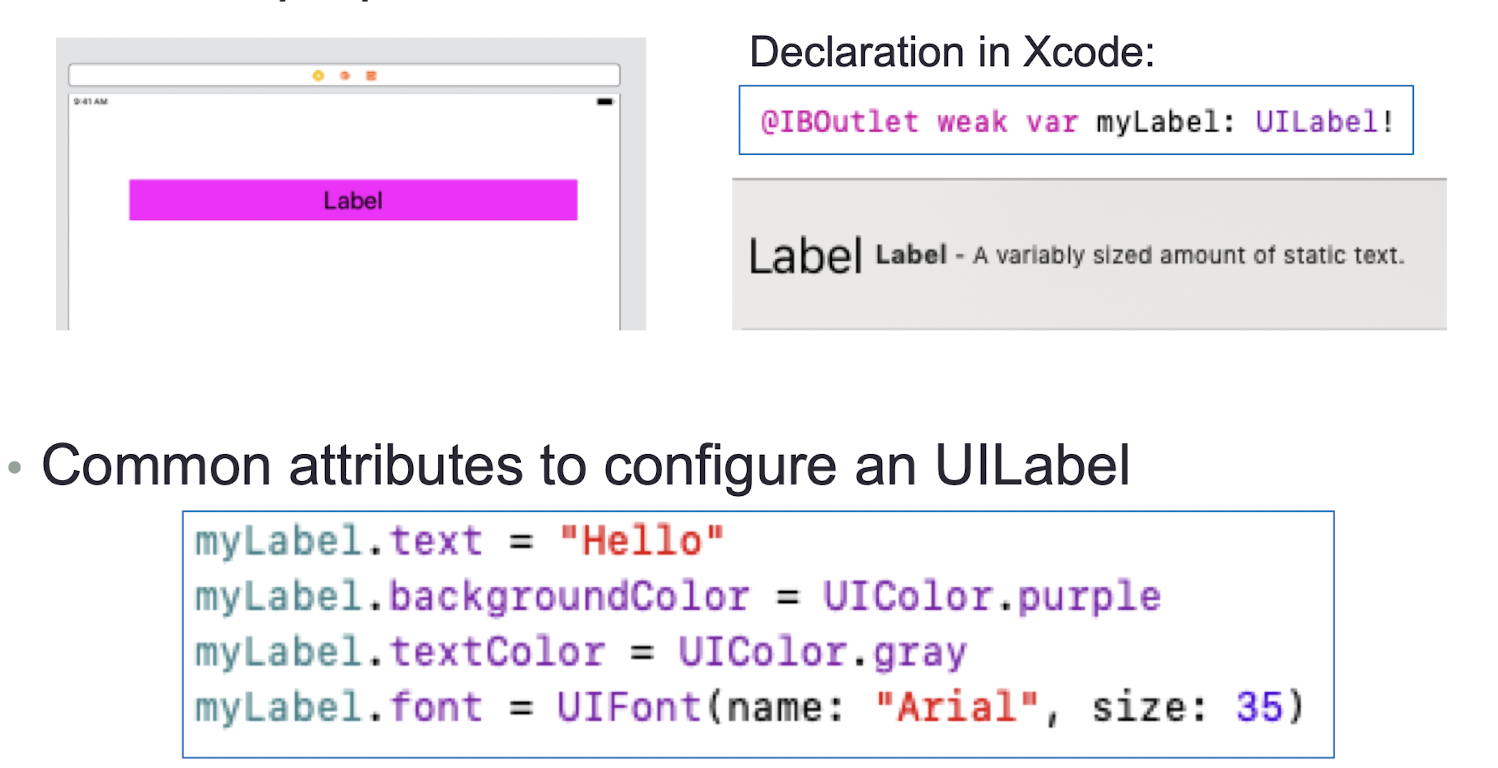
5.6 UILabel
A Text on the screen, can not be edited
- A view that displays one or more lines of read-only text, often used in conjunction with controls to describe their intended purpose
- Common attributes to configure an UILabel
1 | |
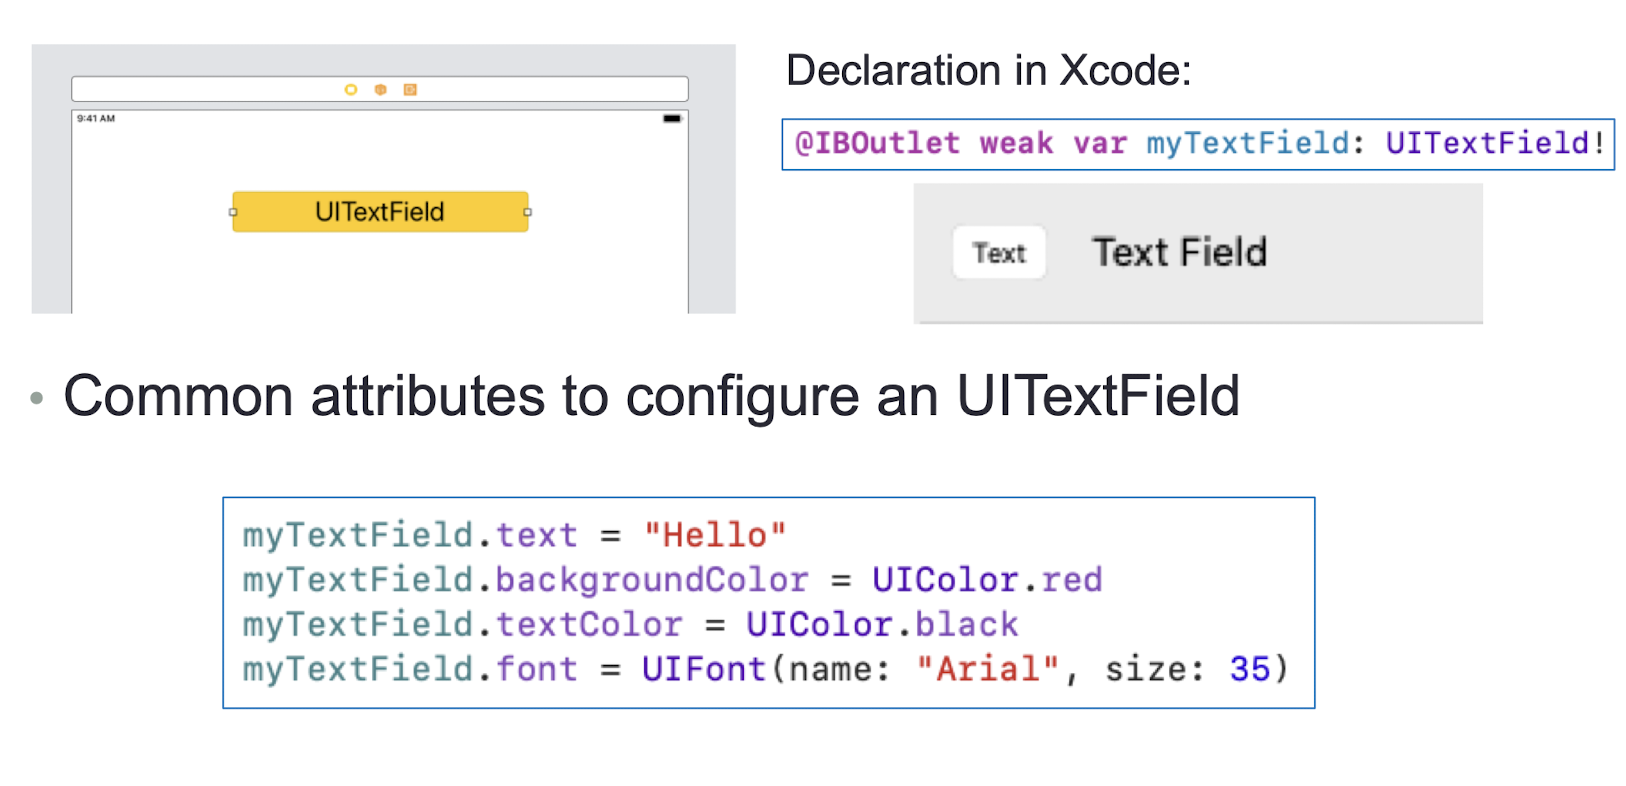
5.7 UITextField
- An object that displays an editable text area in your interface
- Common attributes to configure an UITextField
1 | |
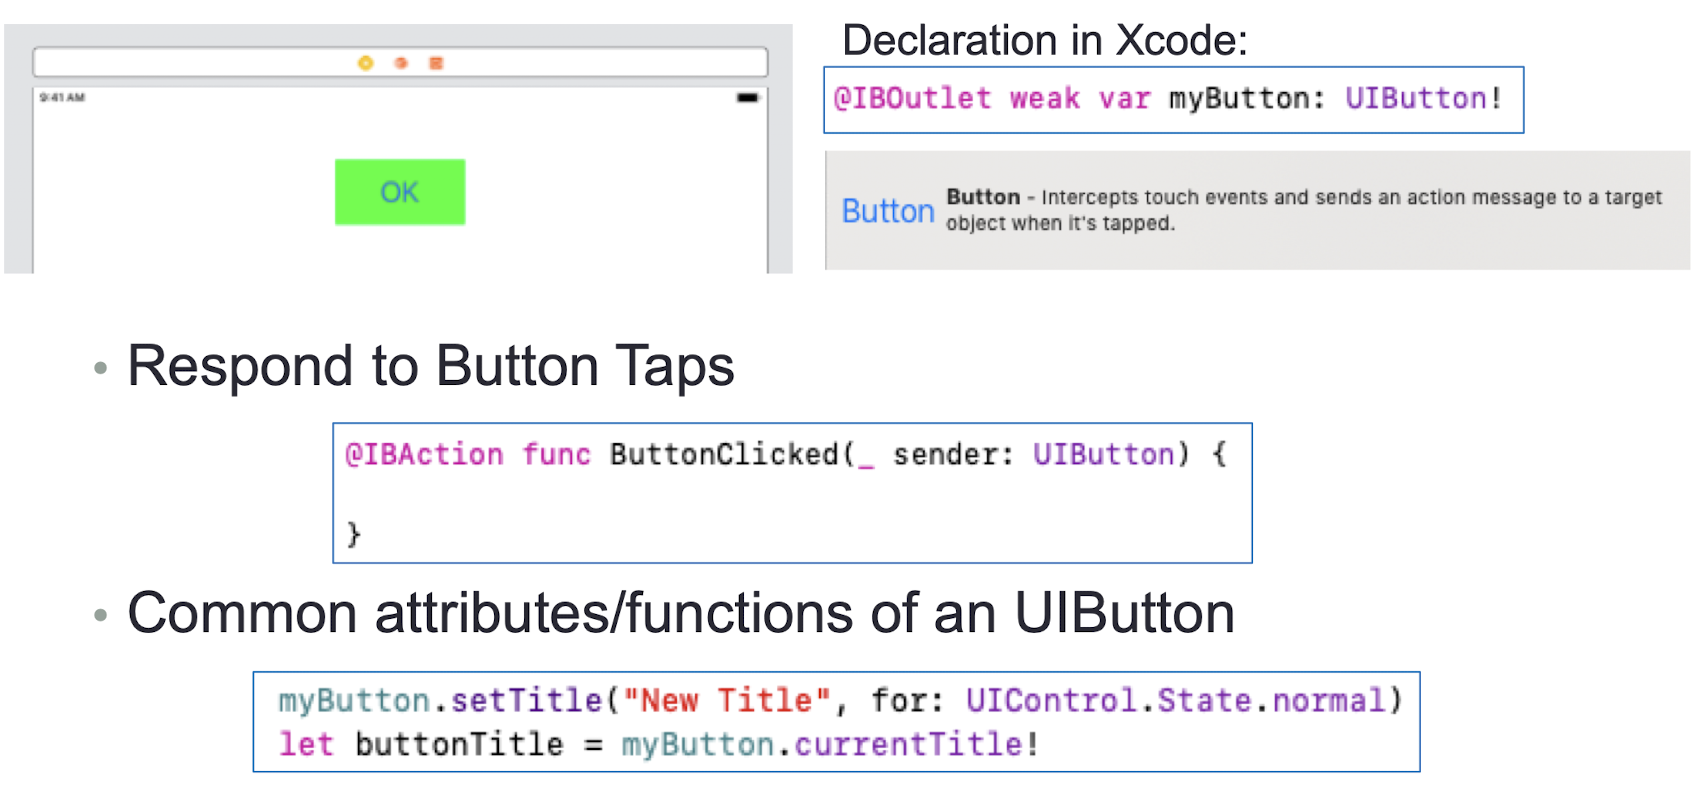
5.8 UIButton
- A control that executes your custom code in response to user interactions
- Respond to Button Taps
- Common attributes/functions of an UIButton
1 | |
5.9 Exercise 5
- What will happen if user enters a non-Int type in the TextField in the Guess-A-Number game?
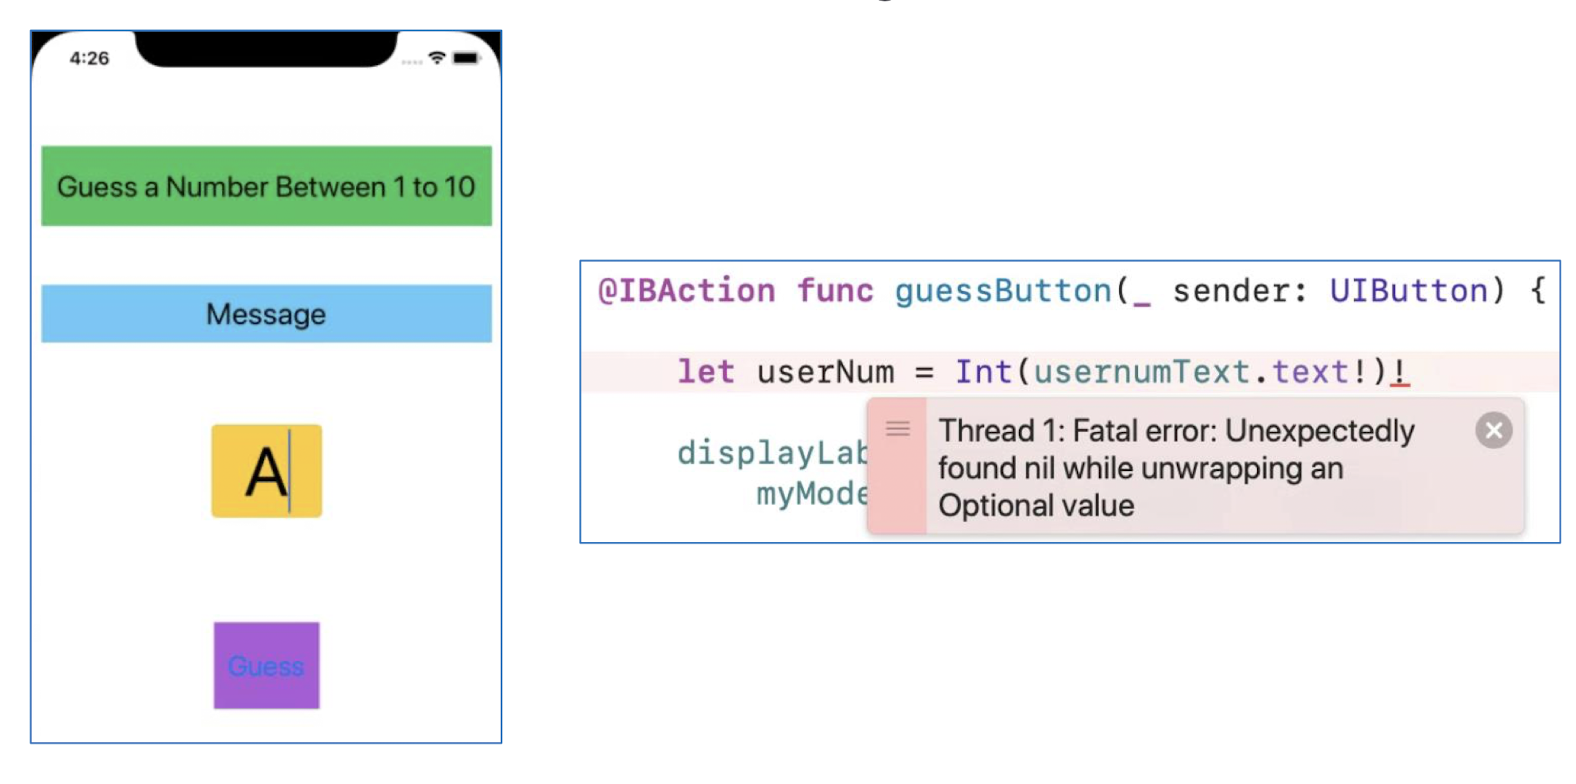
Modify
1 | |
so that the app will not crash even if user enters a non-Int
type in the TextField and check the user input whether it is
between 1 to 10.
- Display a message in displayLabel if user enters a non-Int type value
1 | |
5.10 UISwitch
- A control that offers a binary choice, such as On/Off
- Respond to state change
- Common attributes/functions of an UISwitch
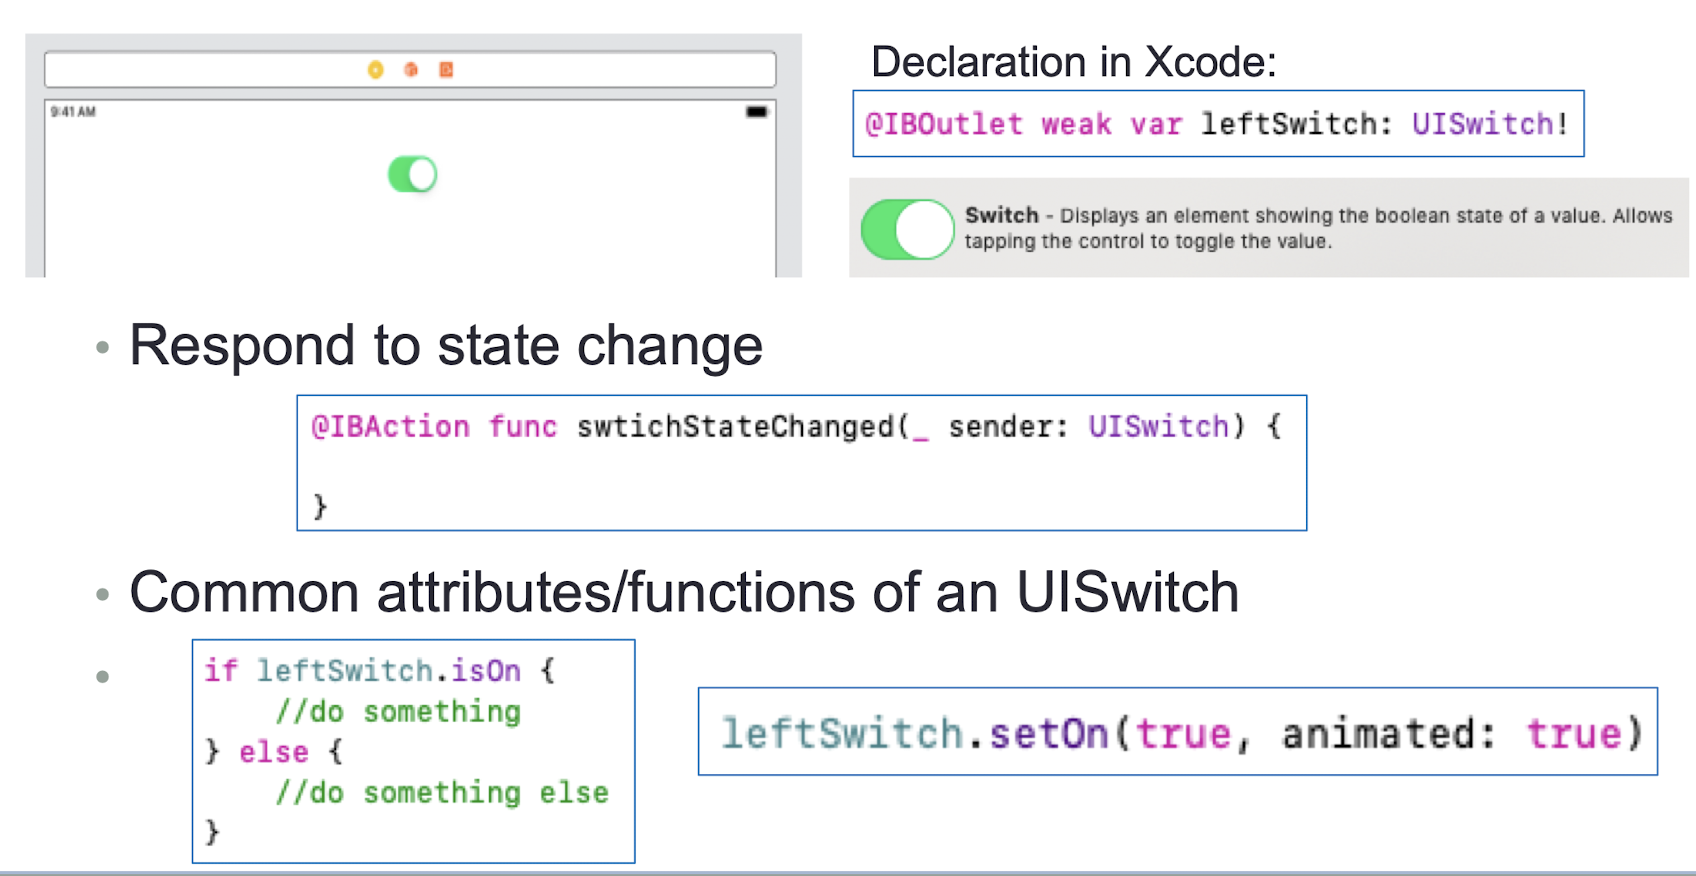
1 | |
5.11 UISlider
- A control used to select a single value from a continuous range of values
- Respond to value change
- Common attribute of an UISlider
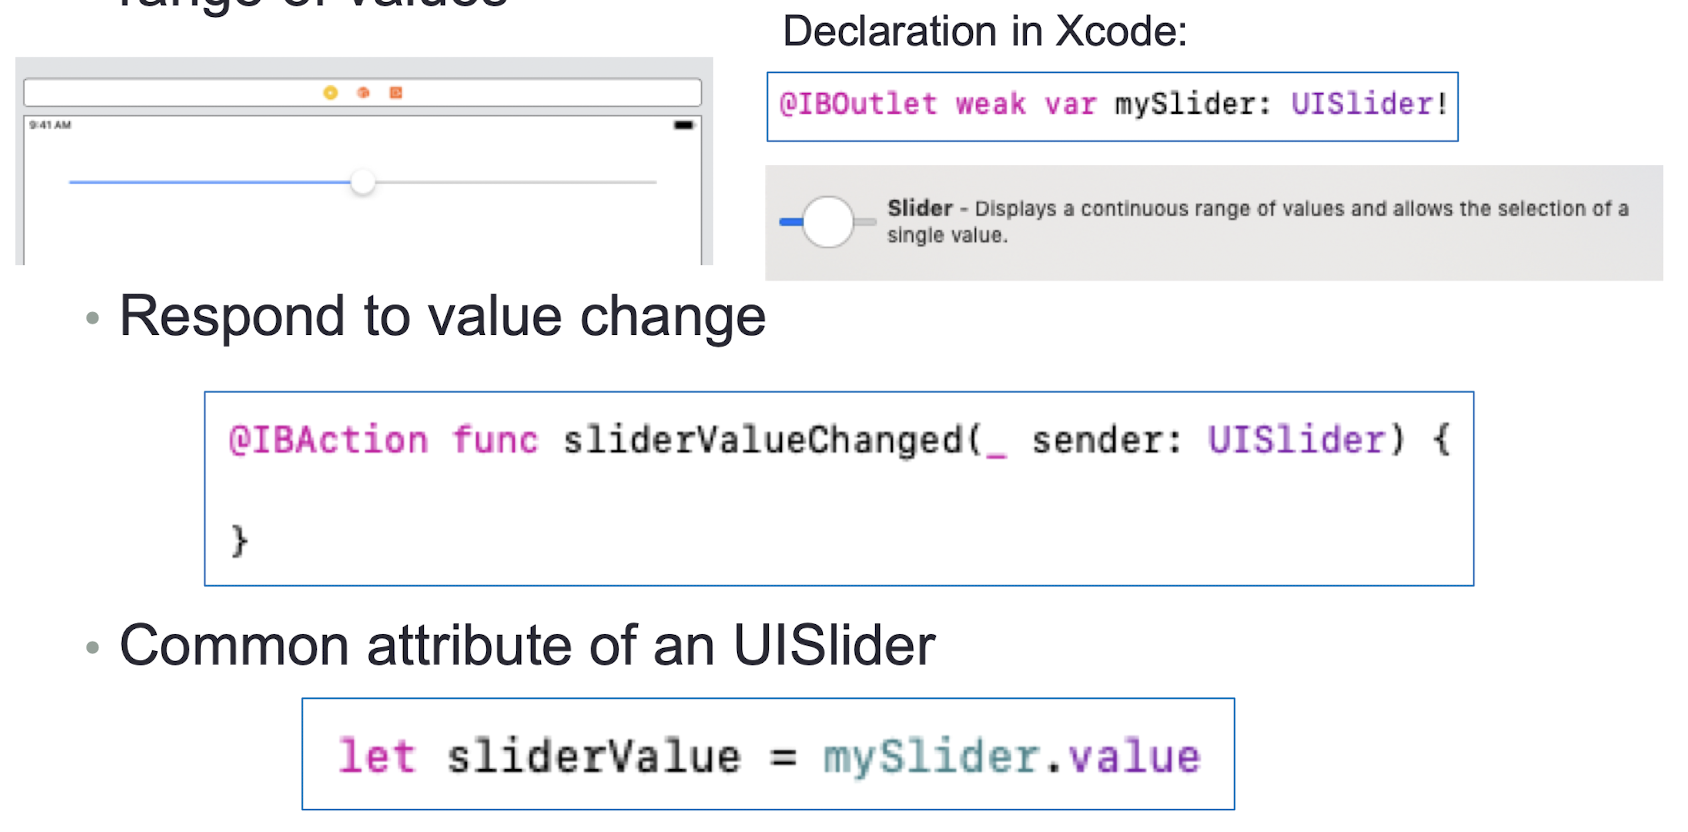
1 | |
5.12 UISegmentedControl
- A horizontal control made of multiple segments, each
segment functioning as a discrete button - Respond to value change
- Common attributes/functions of an UISegmentedControl

1 | |
5.13 WKWebView
- An object that displays interactive web content, such as for an in-app browser
- Load an URL content
- Setting
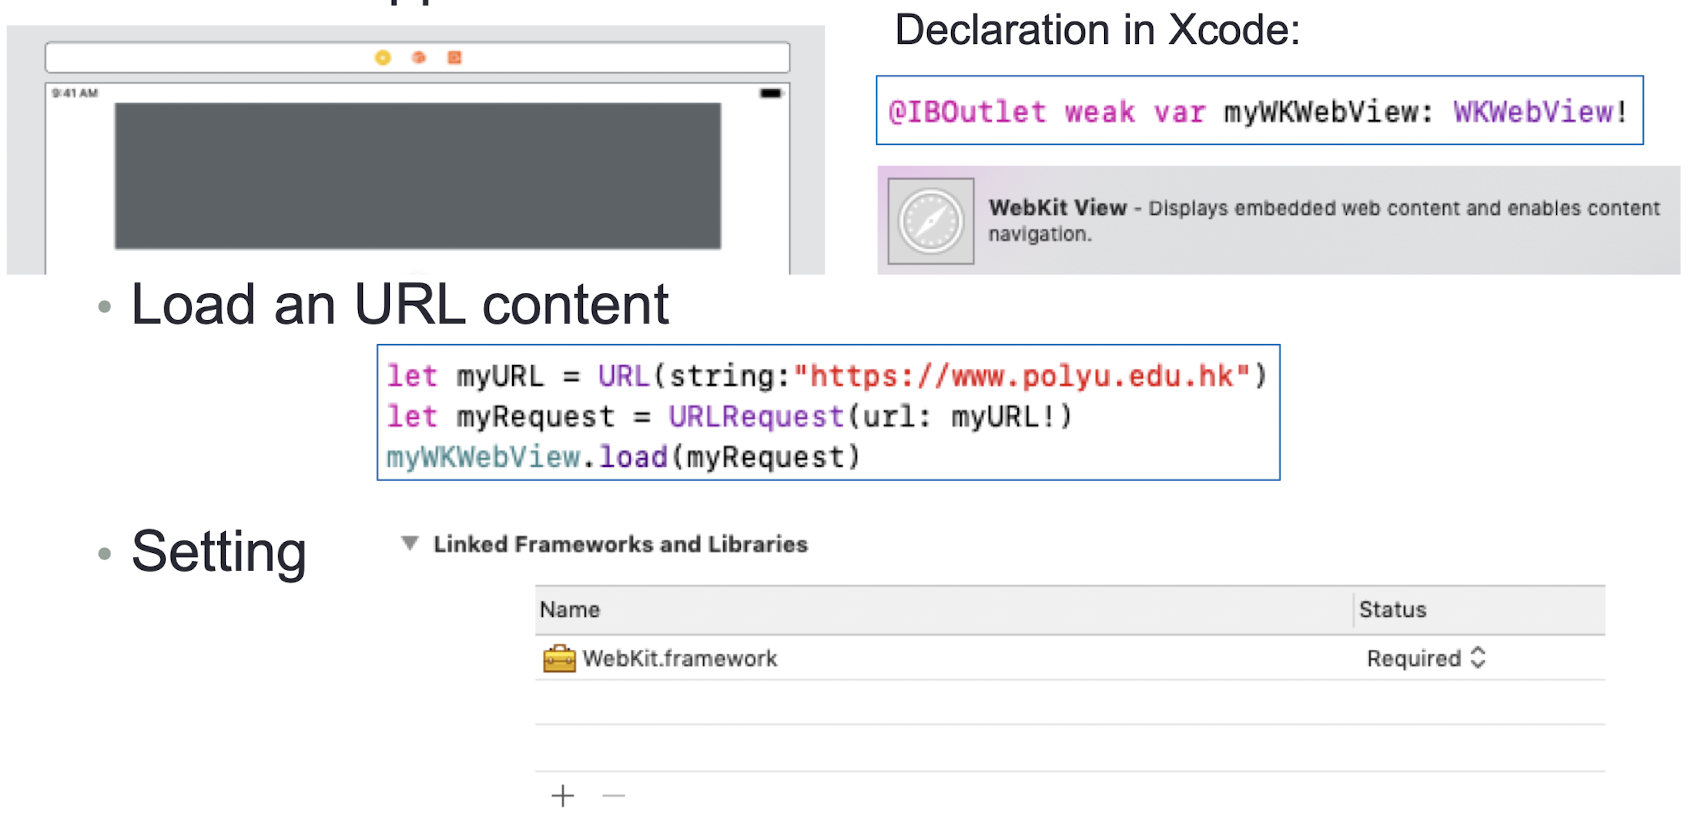
1 | |
5.14 UIActivityIndicatorView
- A view that shows that a task is in progress
- Start and Stop
- Common attribute/function of an UIActivityIndicatorView
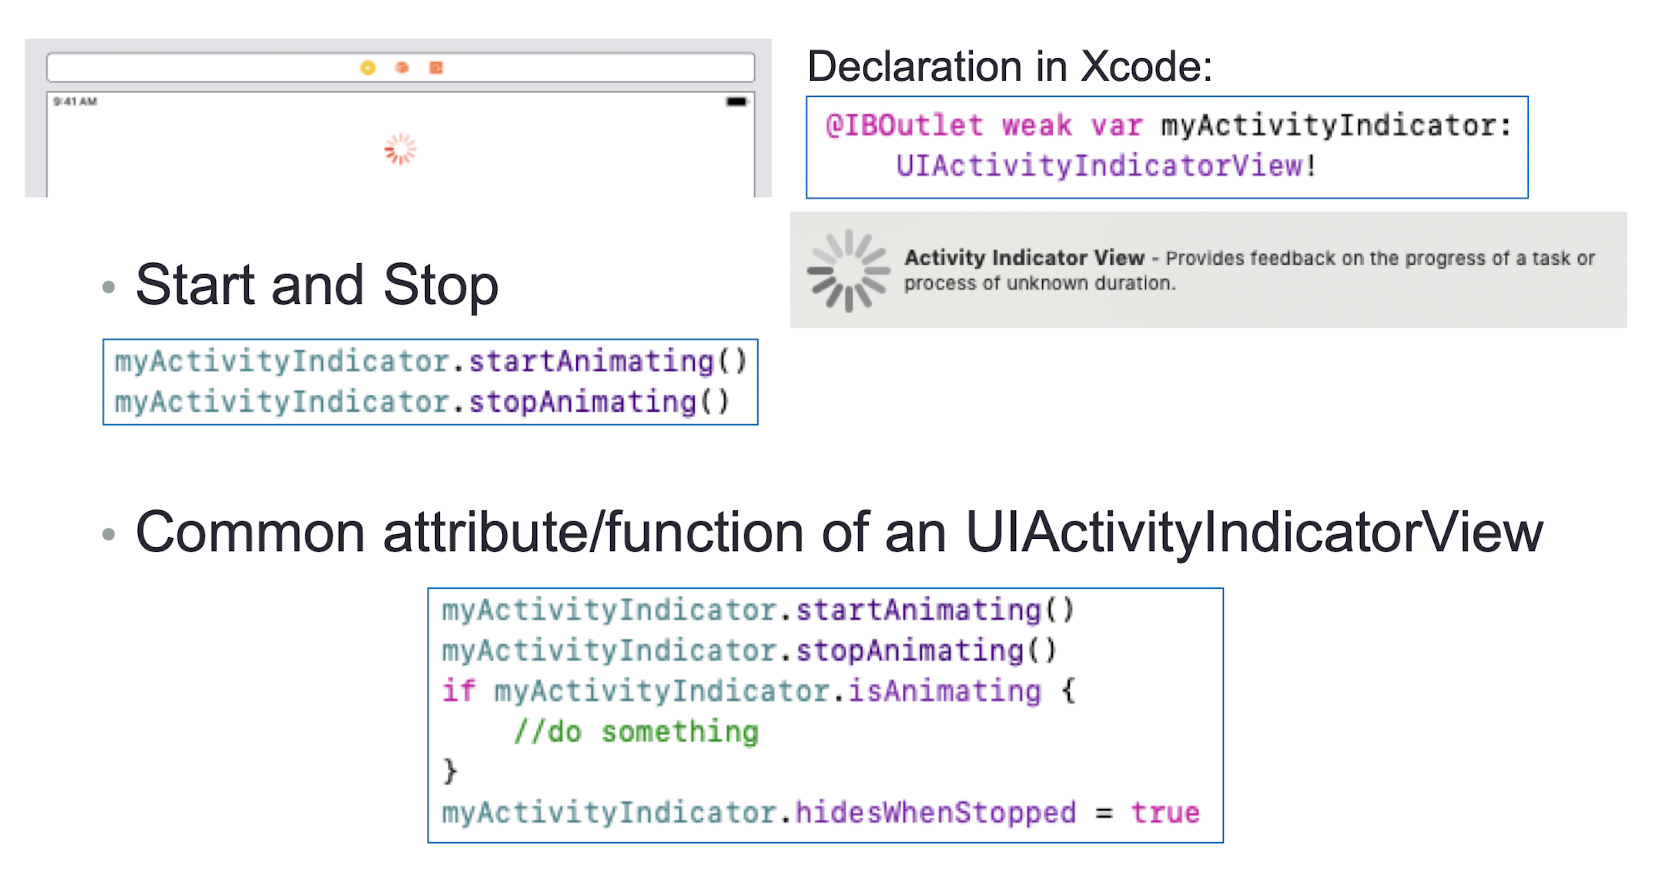
1 | |
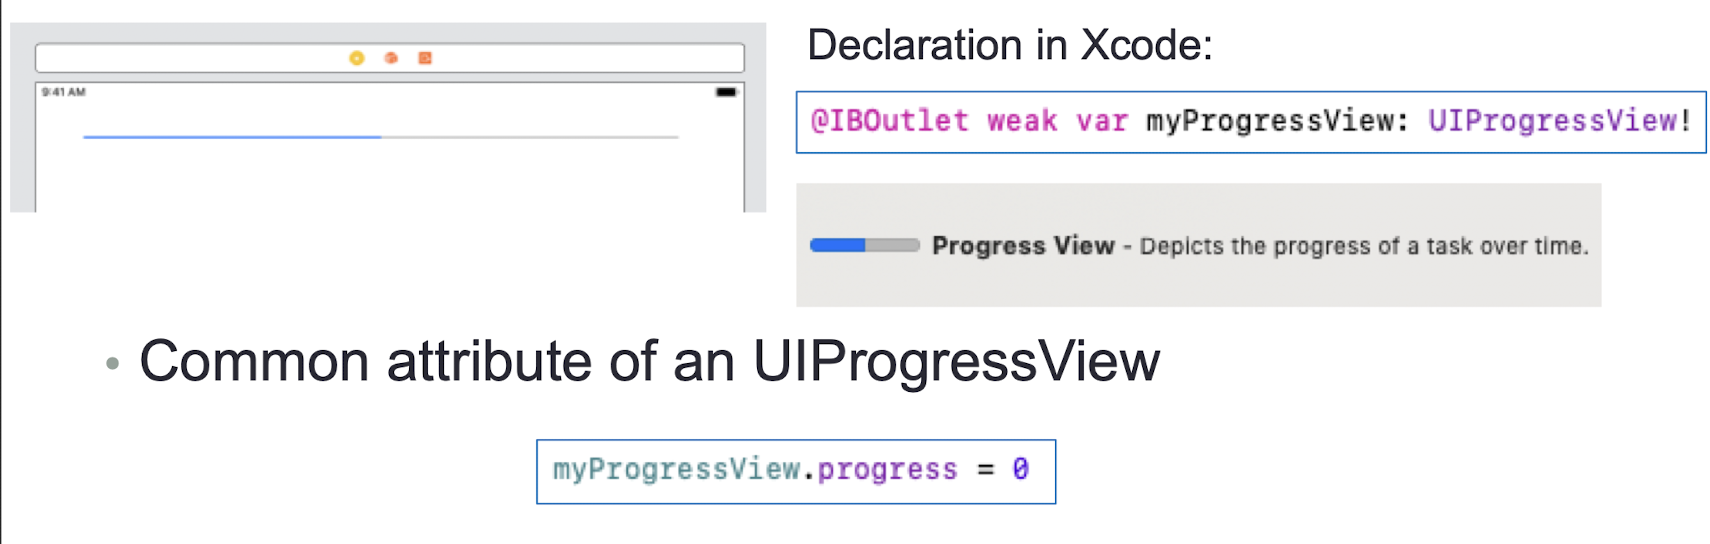
5.15 UIProgressView
- A view that depicts the progress of a task over time
- Common attribute of an UIProgressView
- A Timer class can be used to simulate loading event
1 | |
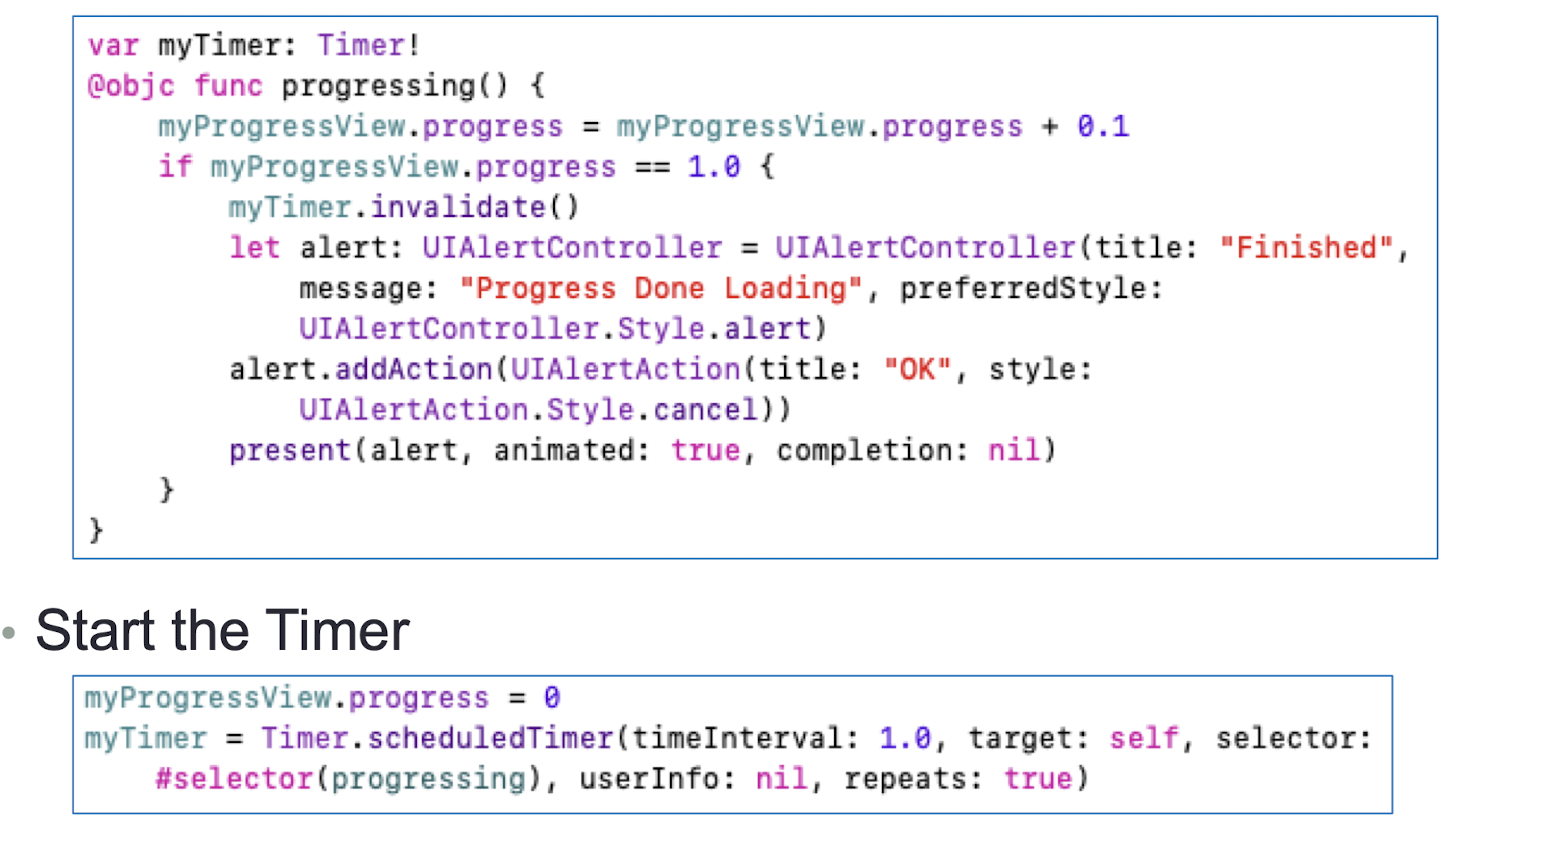
The Timer class
1
2
3
4
5
6
7
8
9
10
11
12
13var myTimer: Timer!
@objc func progressing() {
myProgressView.progress = myProgressView.progress + 0.1
if myProgressView.progress == 1.0 {
myTimer.invalidate()
let alert: UlAlertController = UIAlertController(title: "Finished"
message: "Progress Done Loading", preferredstyle:
VIAlertController.Style.alert)
alert.addAction(UIAlertAction(title: "OK", style:
UlAlertAction.Style.cancel))
present(alert, animated: true, completion: nil)
}
}Start the Timer
1 | |
5.16 UIDatePicker
- A control used for the inputting of date and time values
- Respond to value change
- Format of Date String
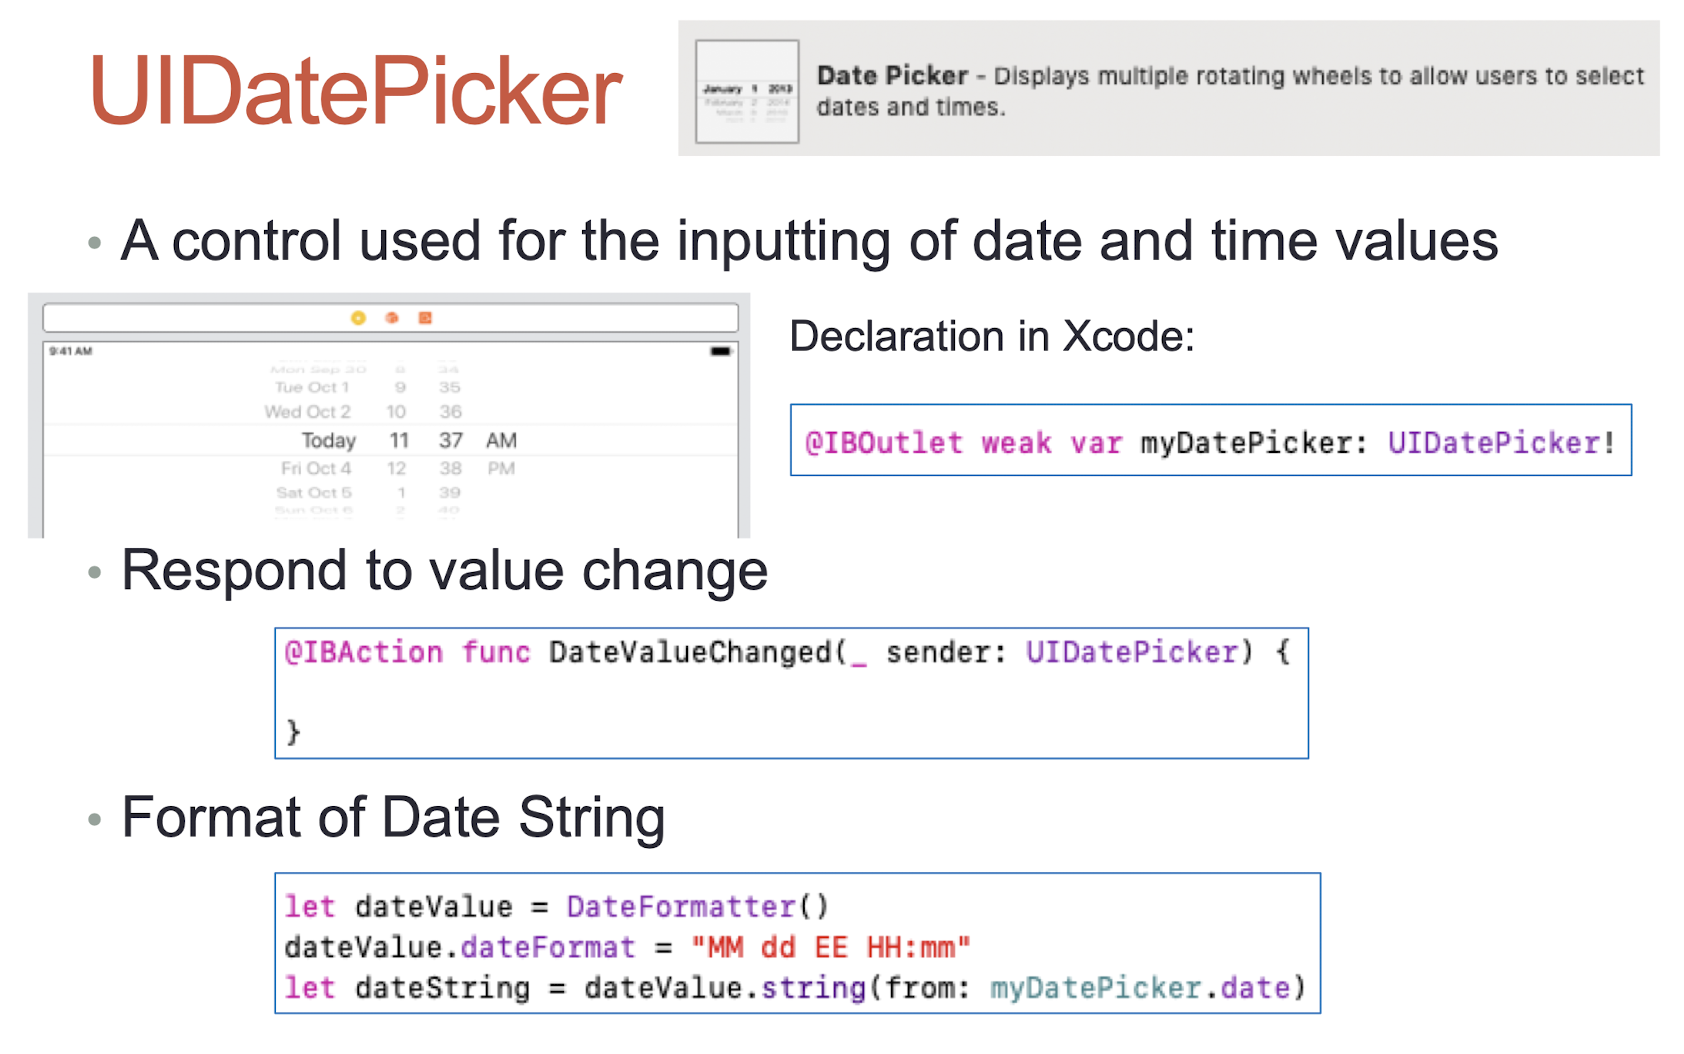
1 | |
5.17 Gesture Recognizers
- Gestures are recognized by instances of UIGestureRecognizer
- The base class is “abstract”
- Use concrete subclass to recognize, ex. UITapGestureRecognizer
There are two steps to use a gesture recognizer
- Add a gesture recognizer to UIView
- Provide an Action method to handle that gesture
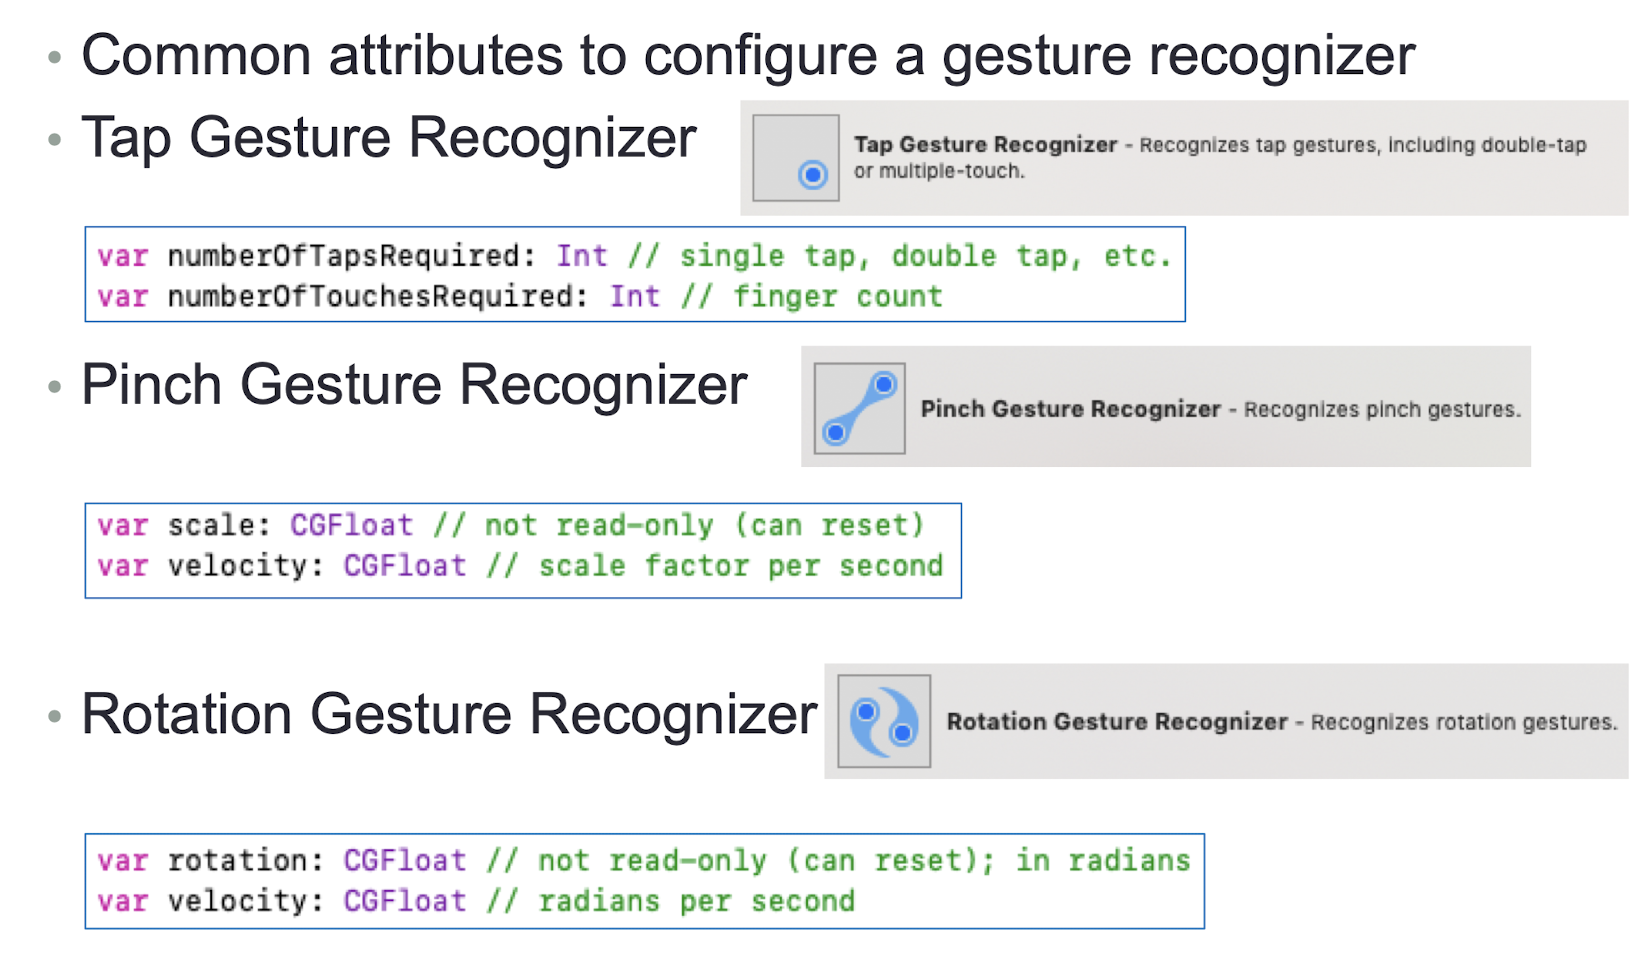
Common attributes to configure a gesture recognizer
- Tap Gesture Recognizer
- Pinch Gesture Recognizer
- Rotation Gesture Recognizer
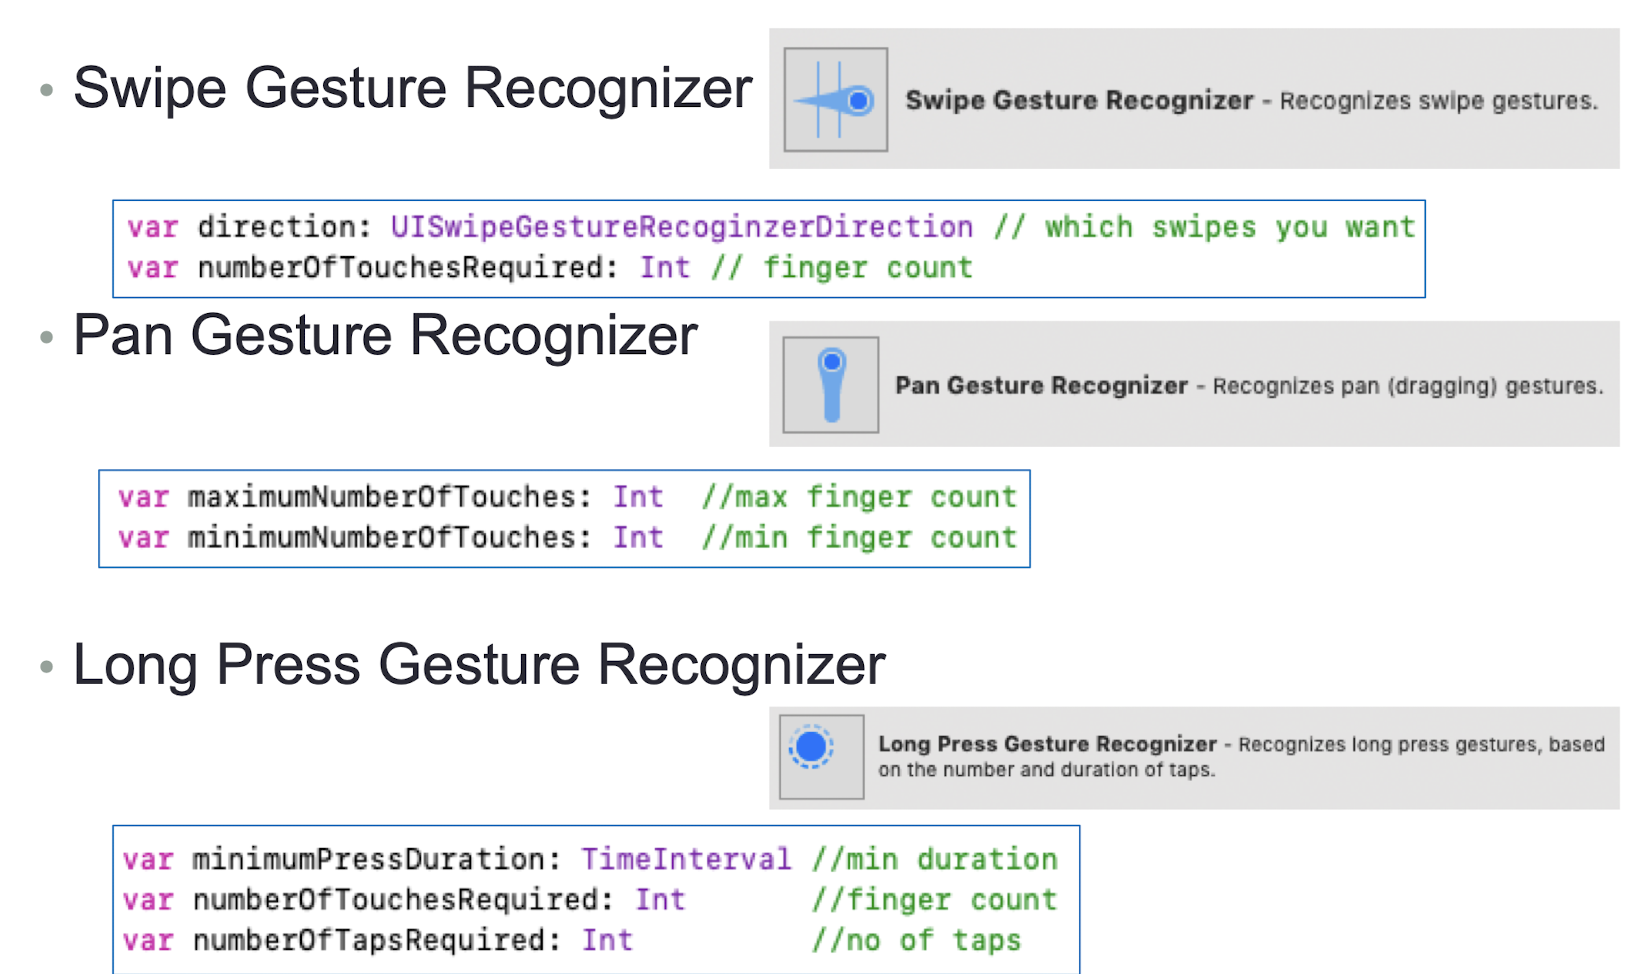
- Swipe Gesture Recognizer
- Pan Gesture Recognizer
- Long Press Gesture Recognizer
5.18 Multi-View Application
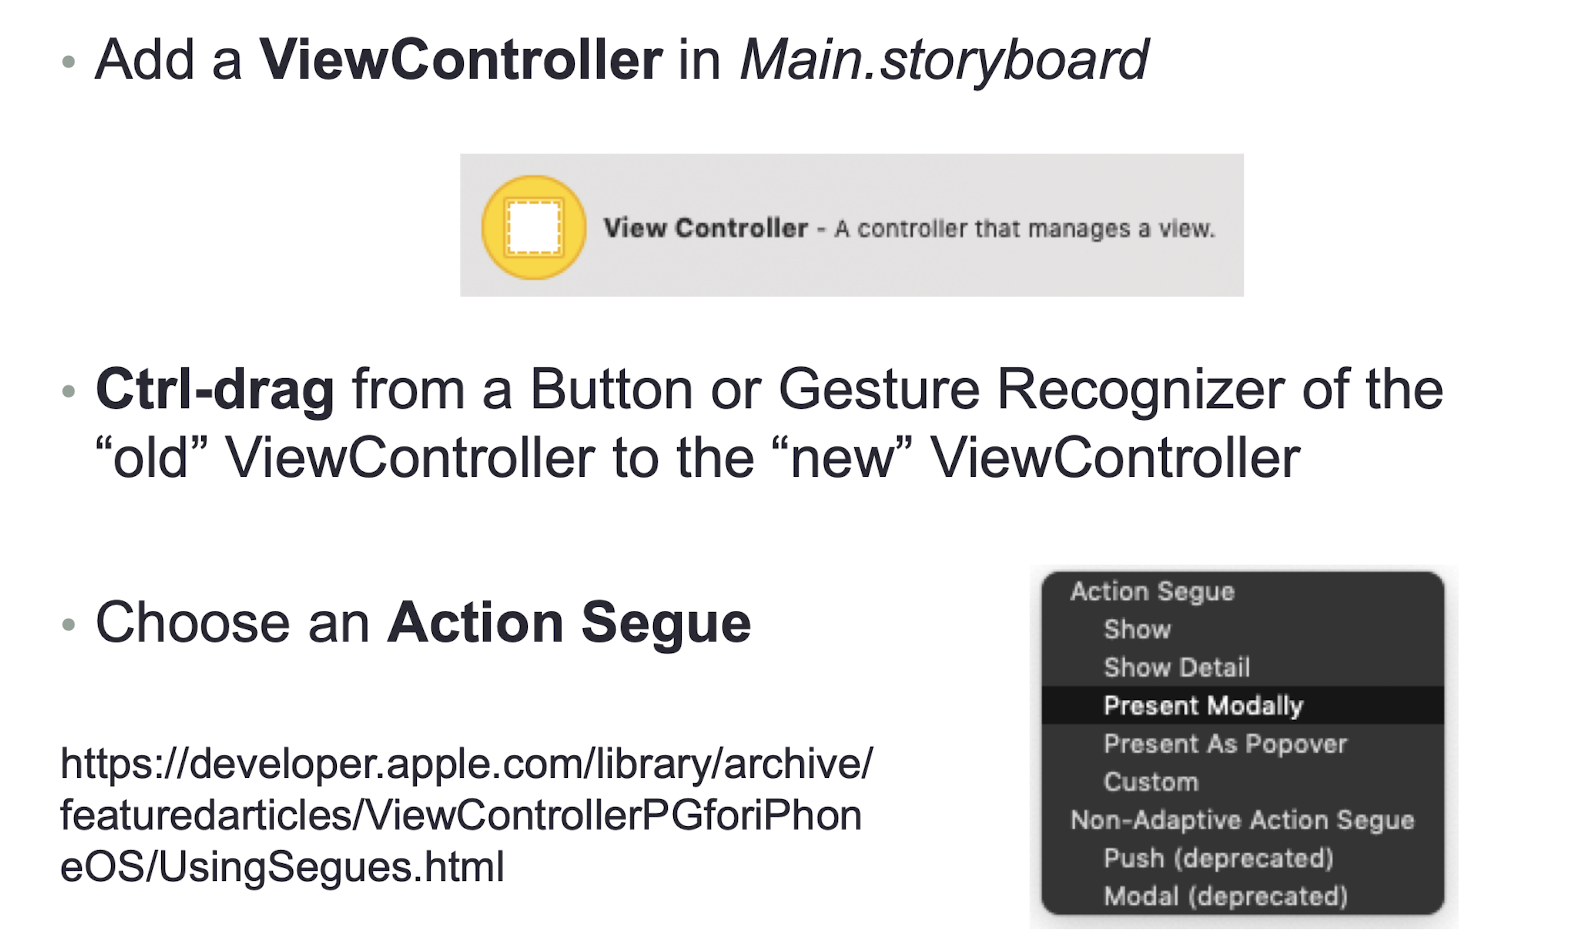
- Add a ViewController in Main.storyboard (UIKit)
- Ctrl-drag from a Button or Gesture Recognizer of the “old” ViewController to the “new” ViewController
- Choose an Action Segue
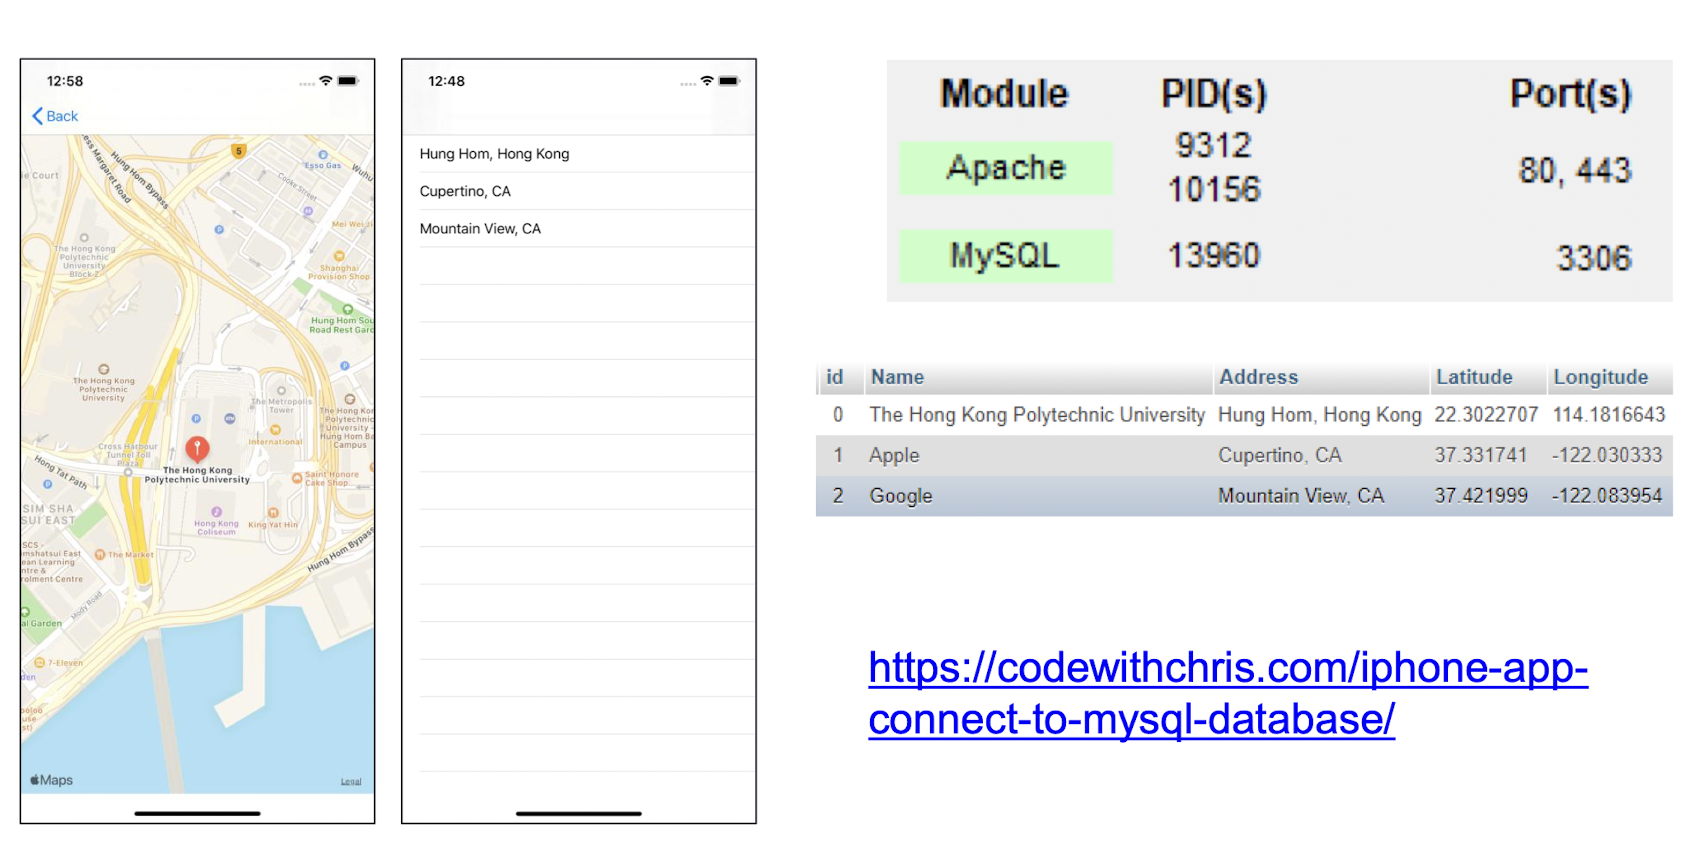
- App<->Web Server (API->Database)
https://codewithchris.com/iphone-app-connect-to-mysql-database/
- PHP server code
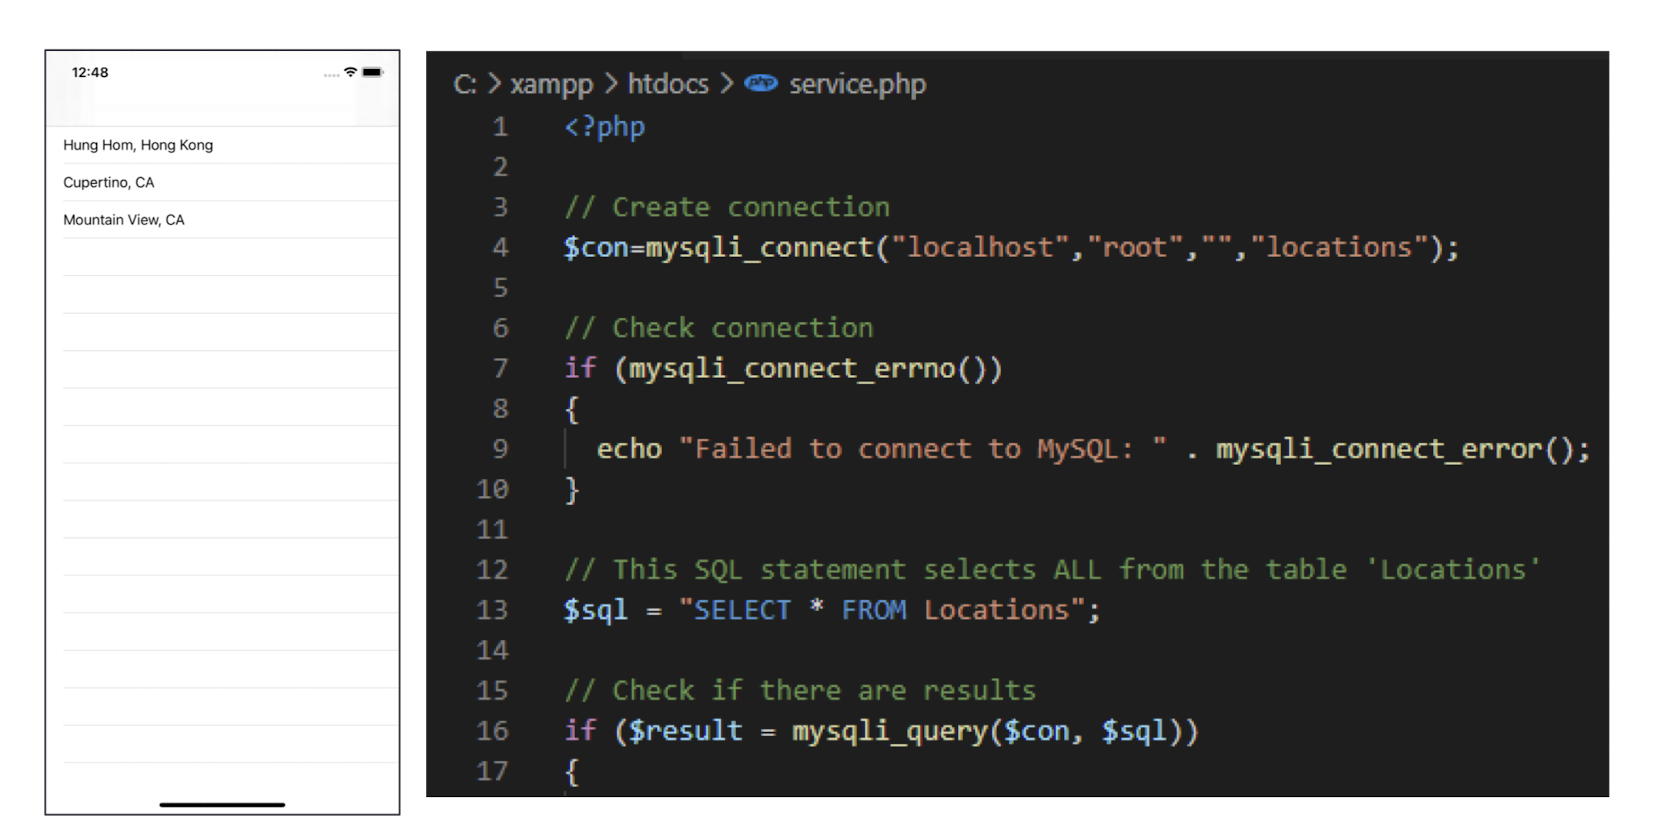
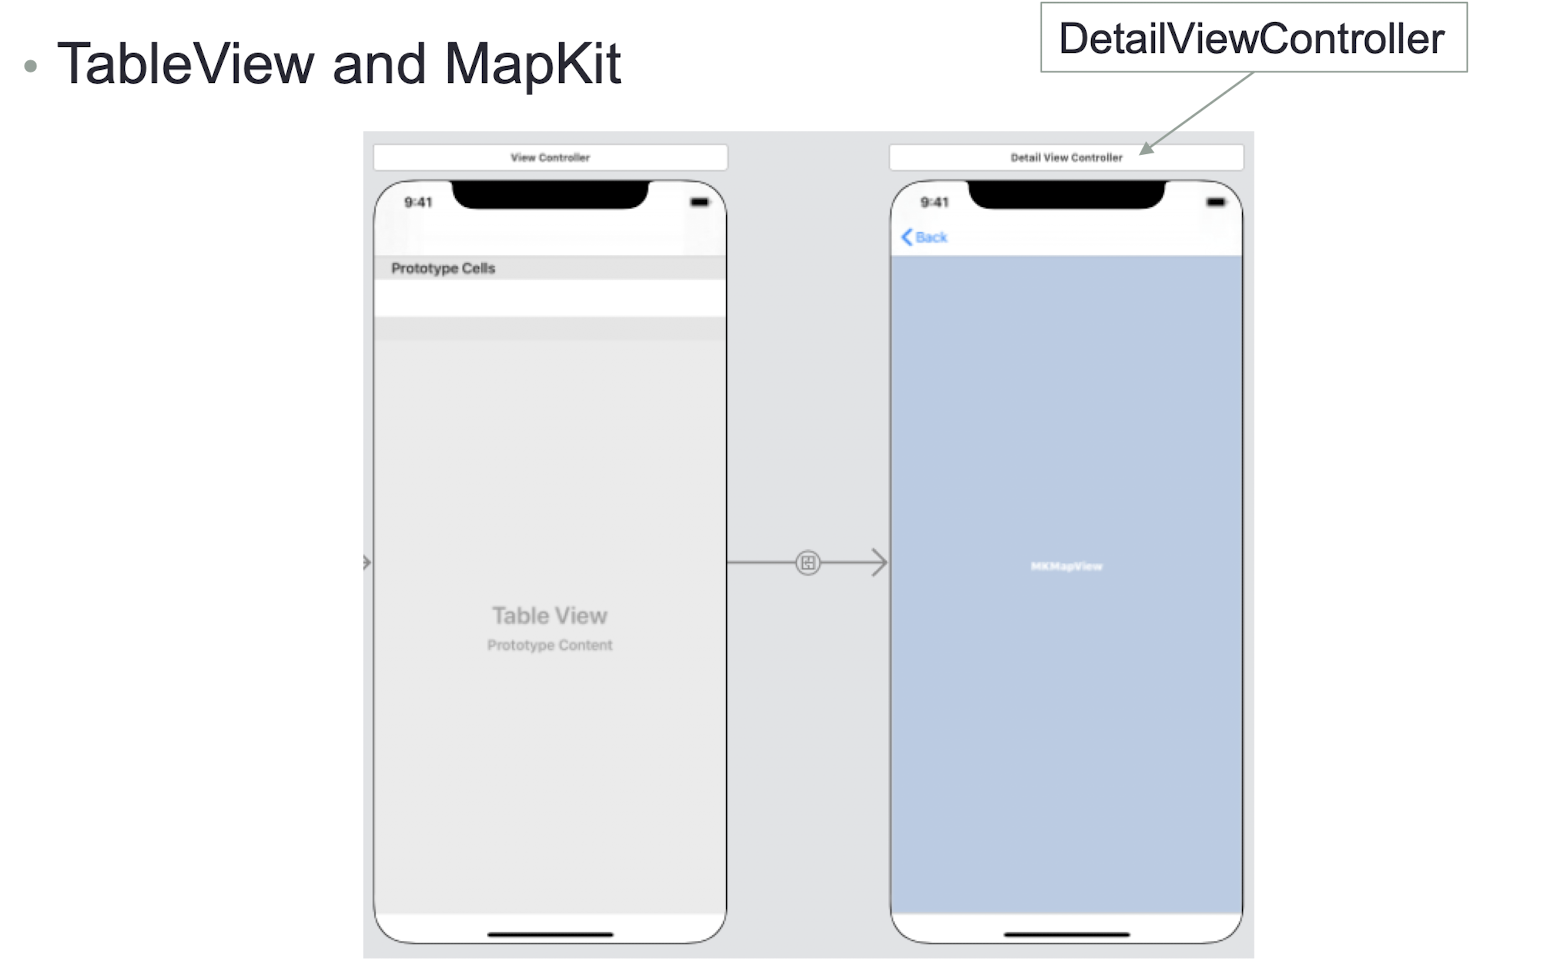
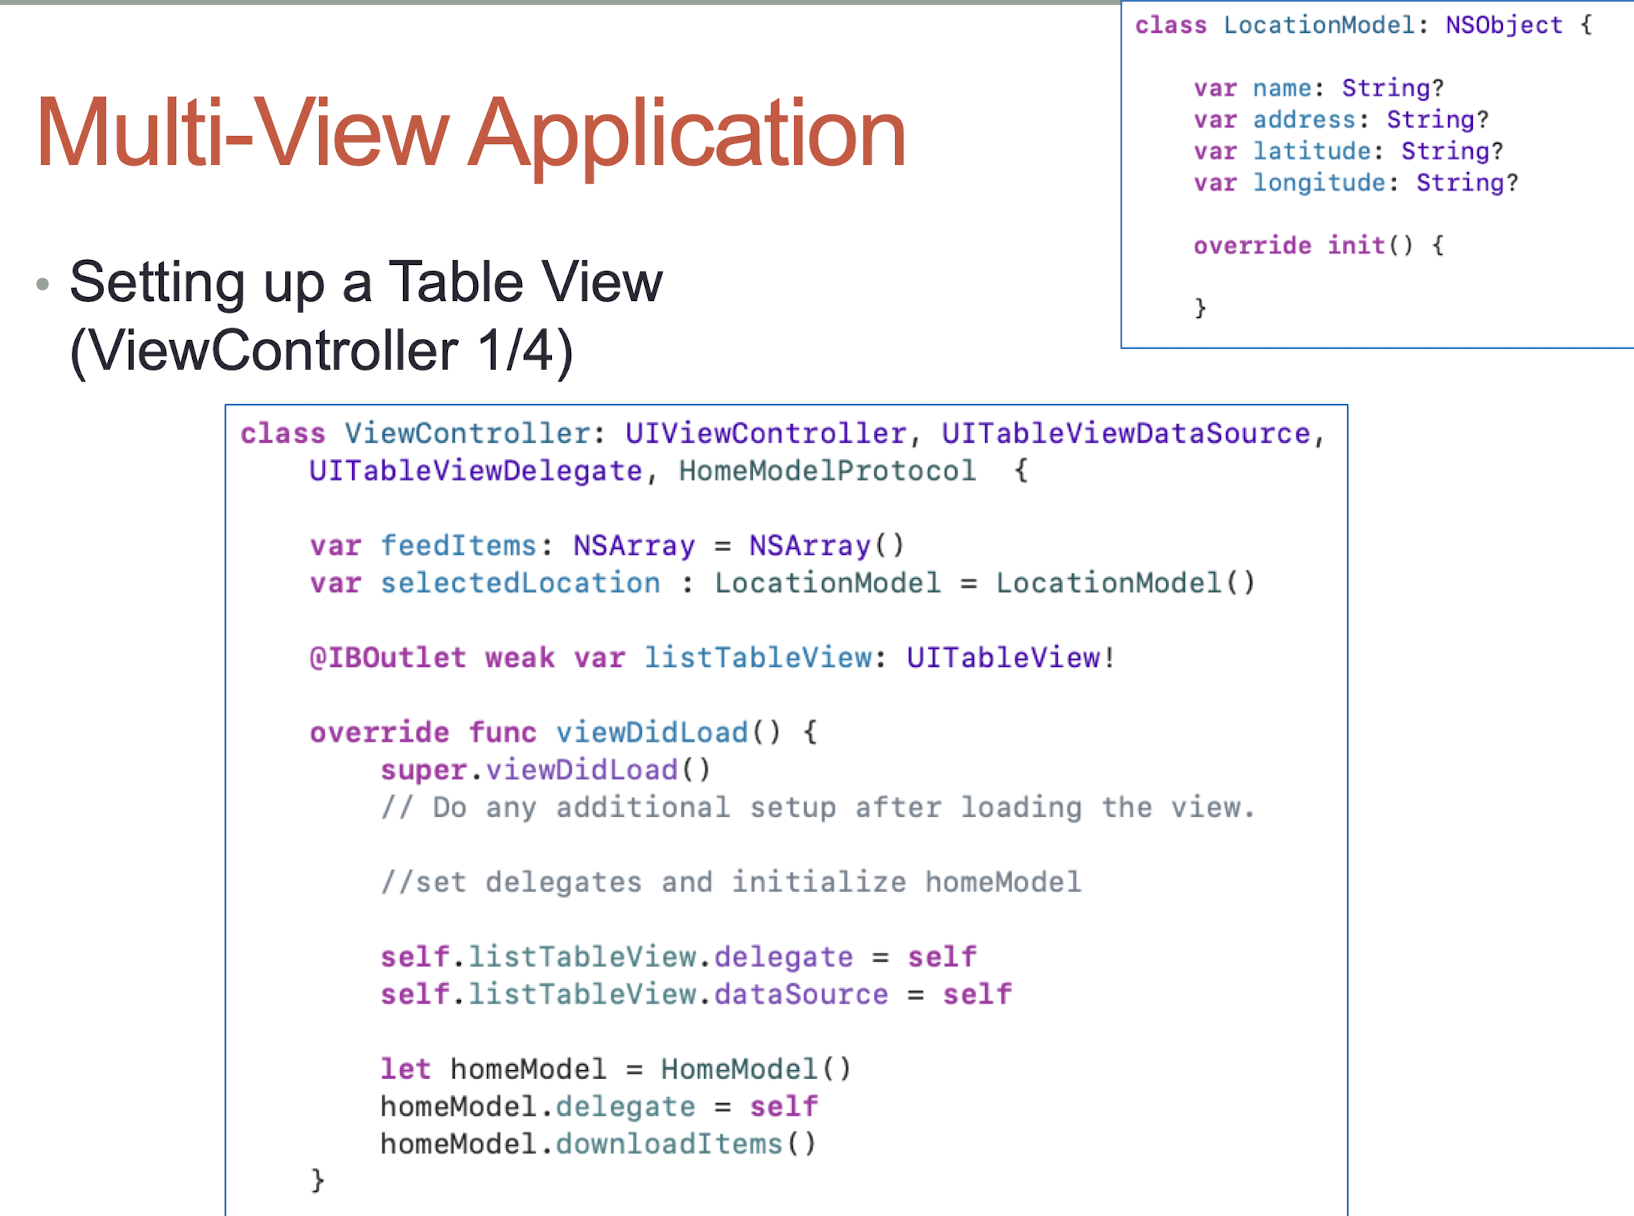
- TableView and MapKit
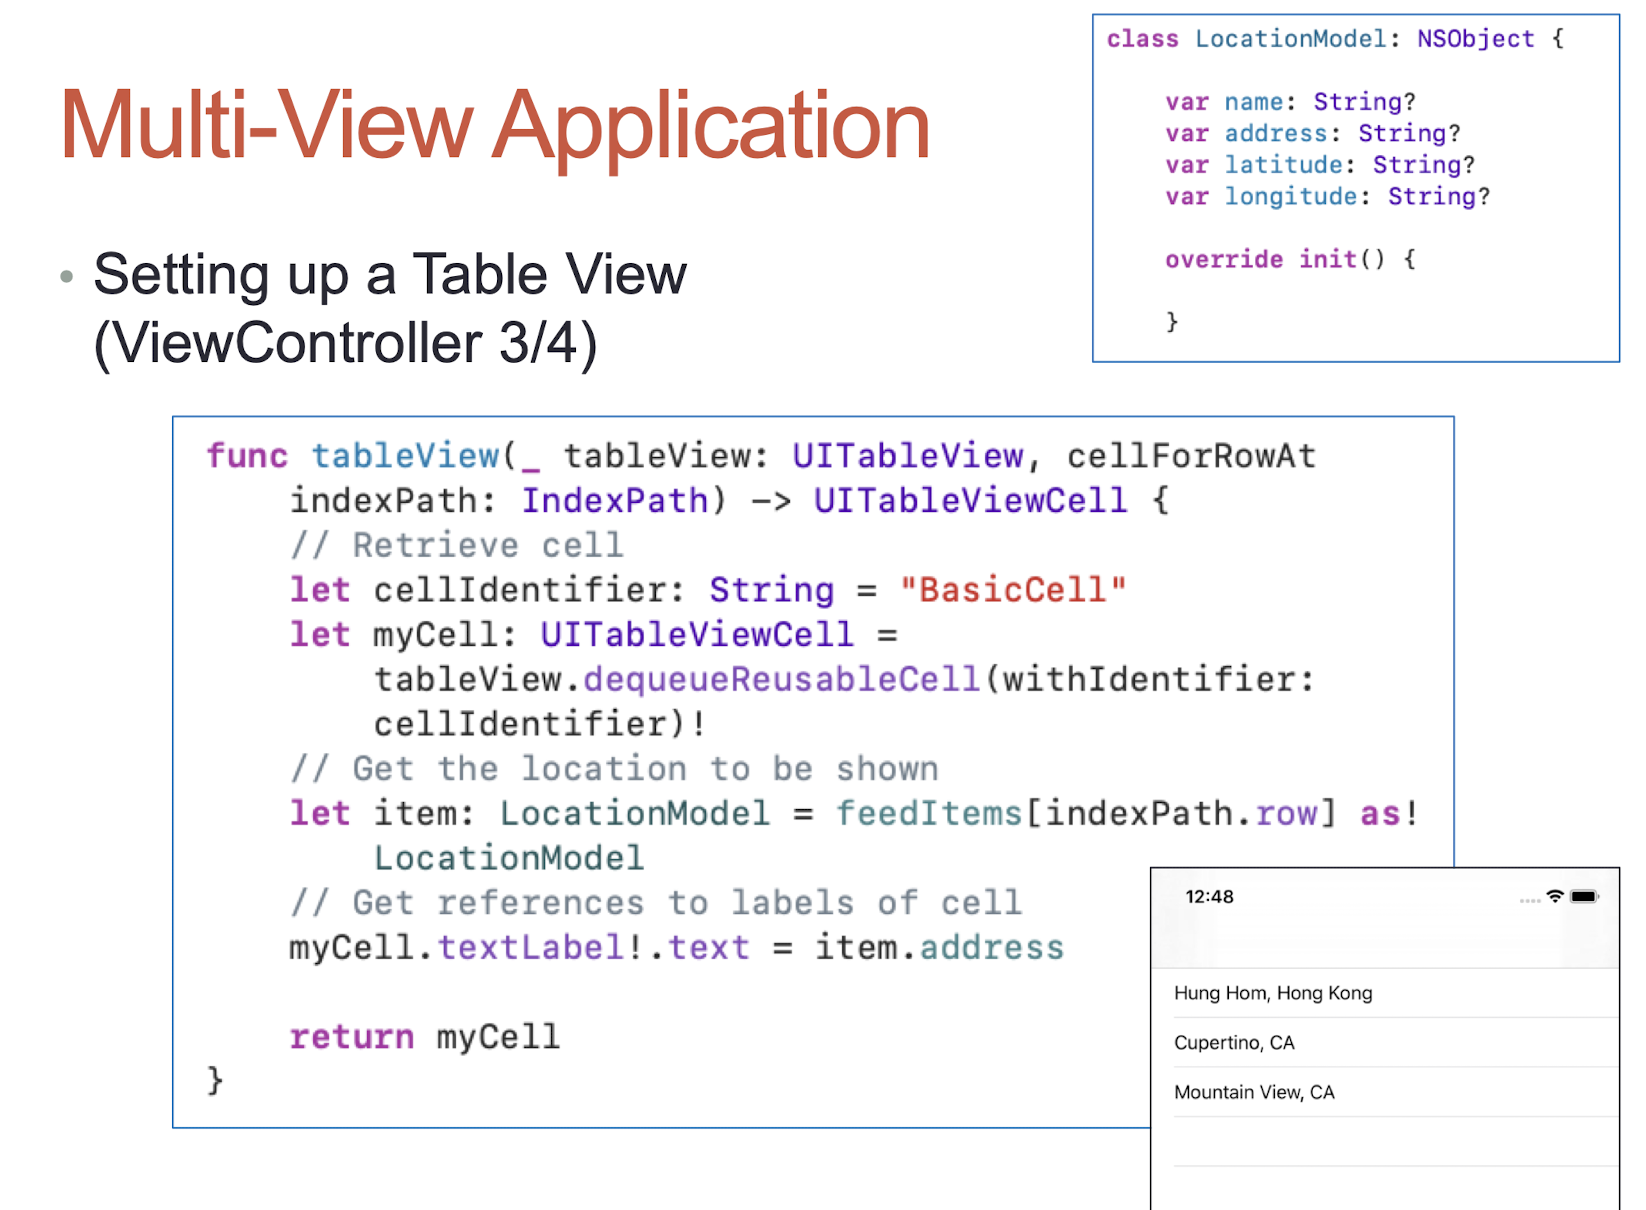
- Setting up a Table View (ViewController 1/4)
1 | |
5.18.1 MVC
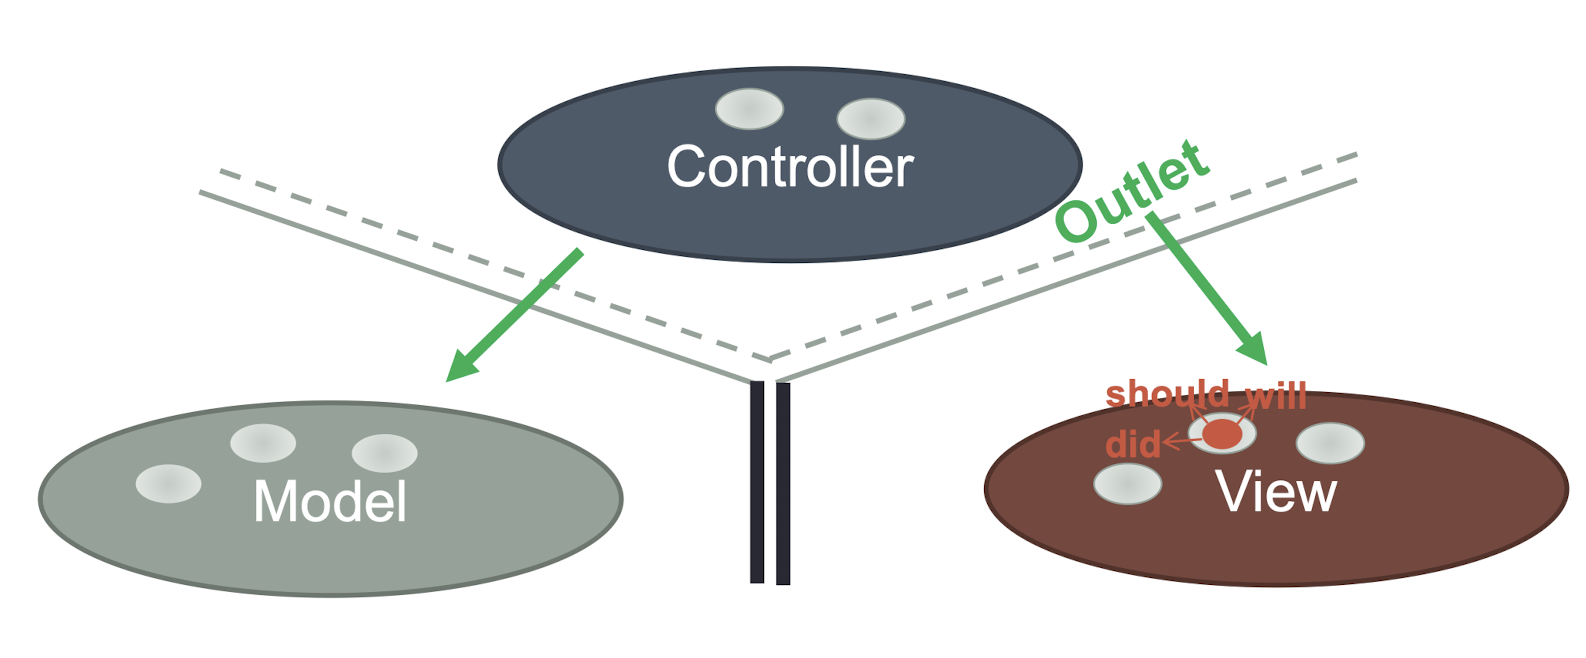
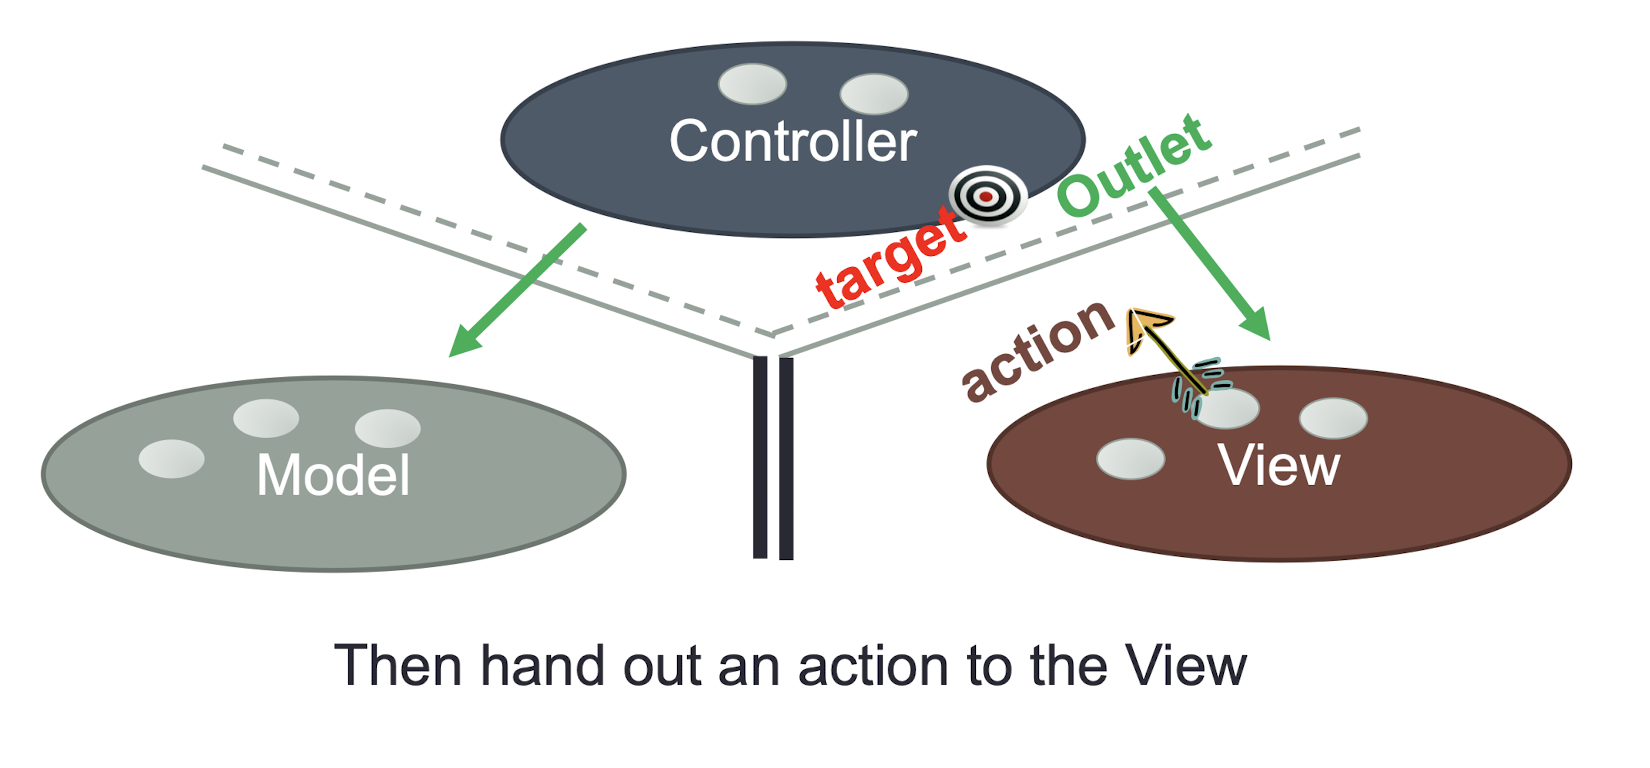
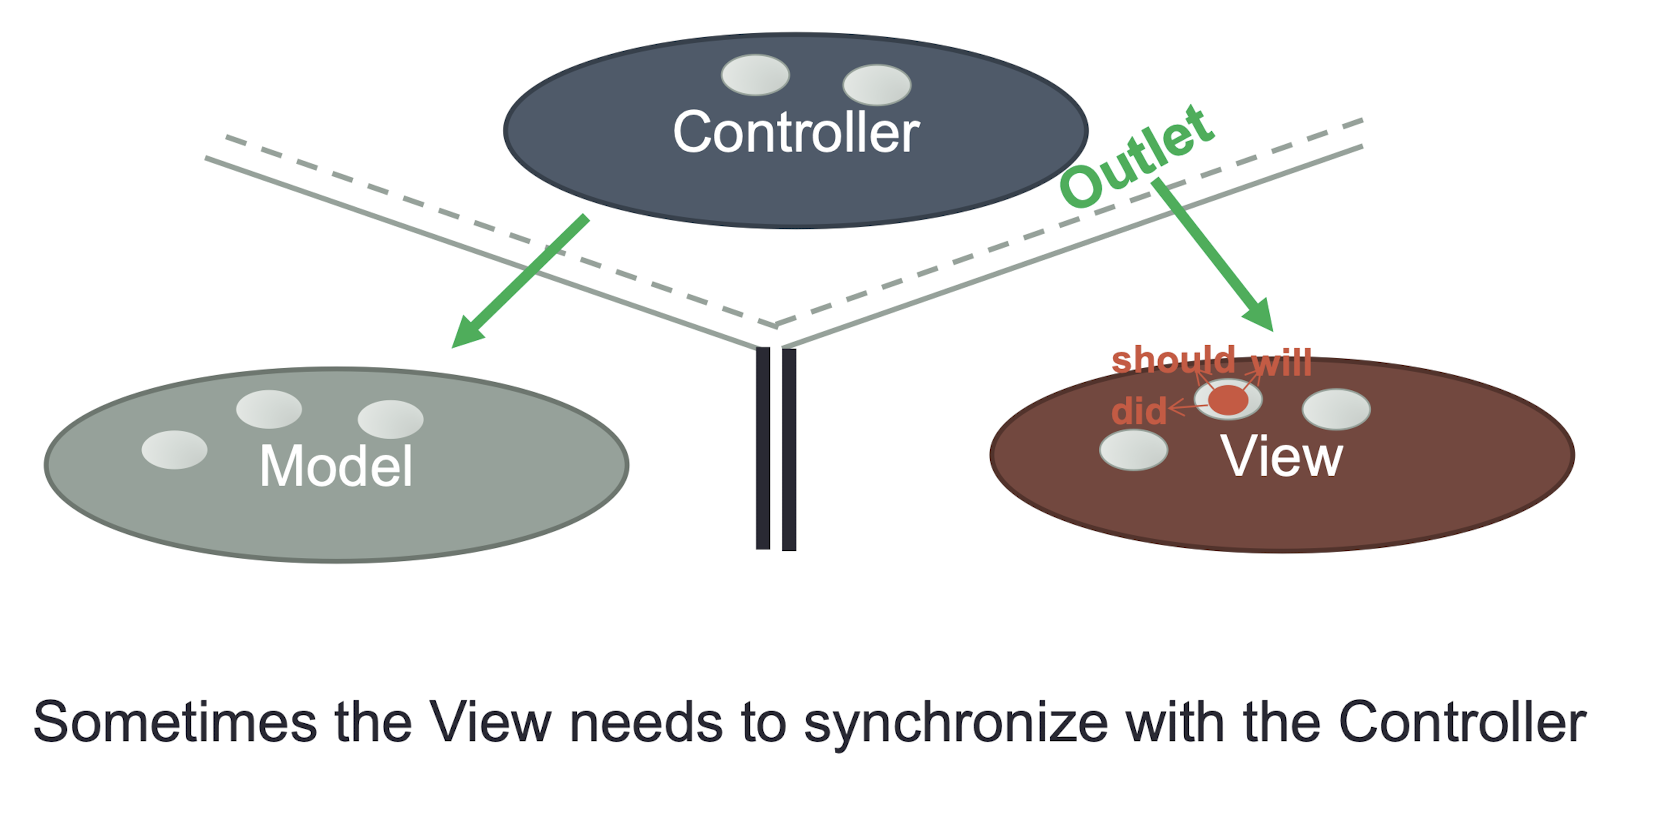
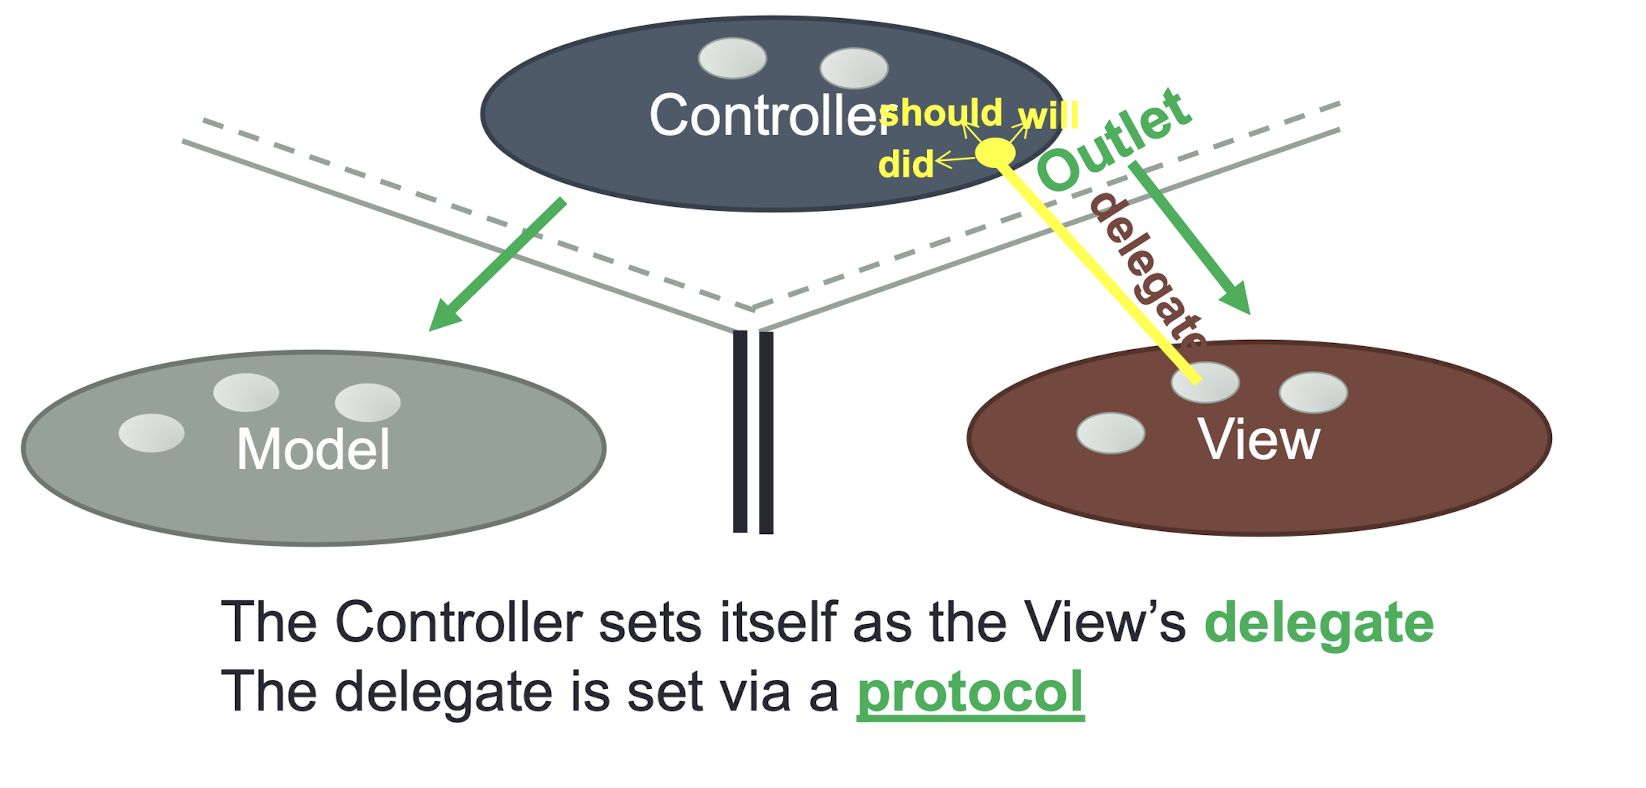
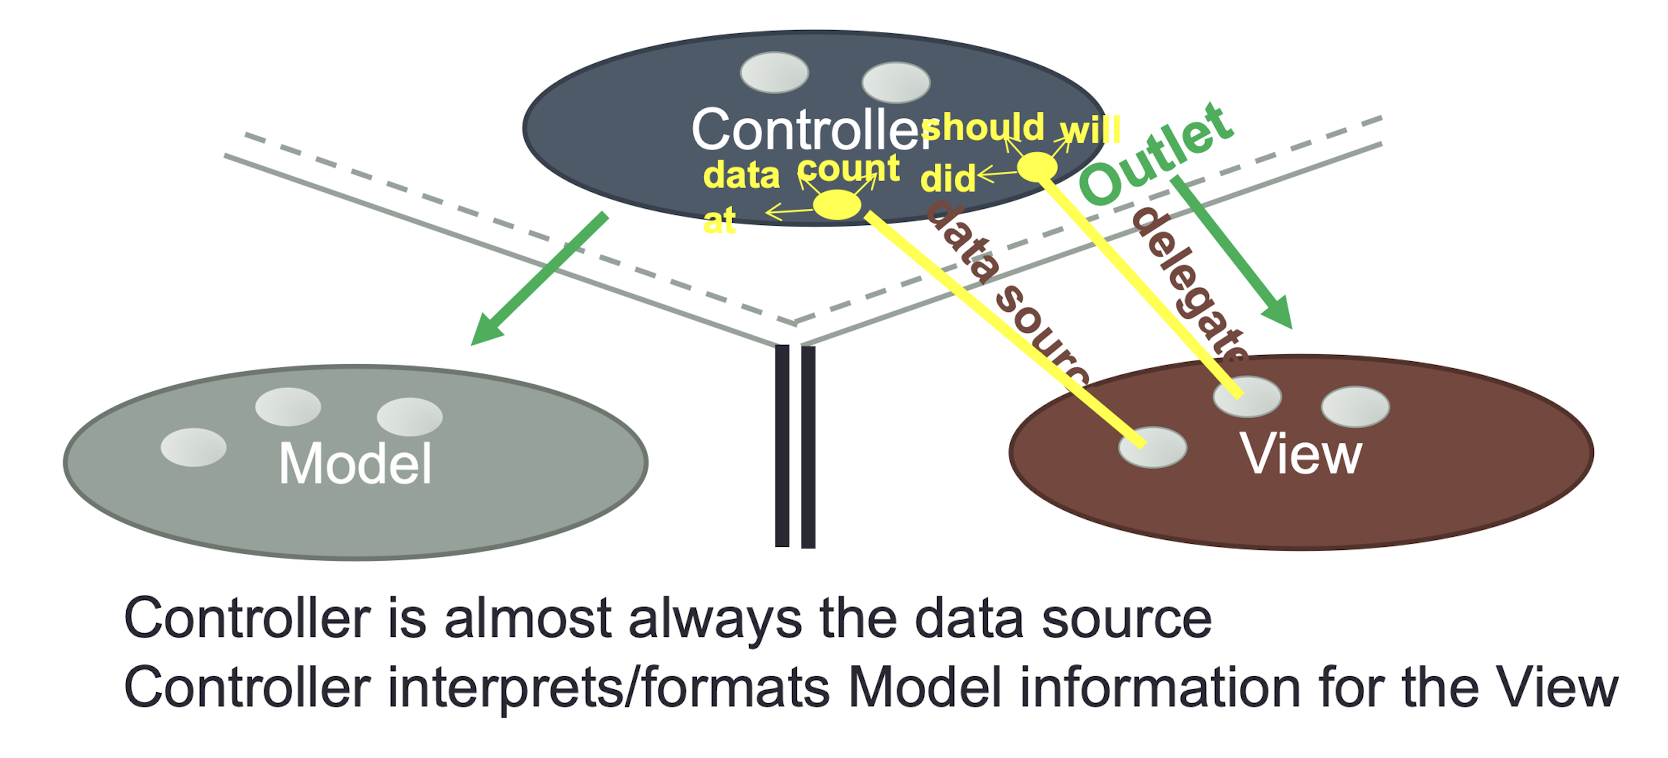
Sometimes the View needs to synchronize with the Controller
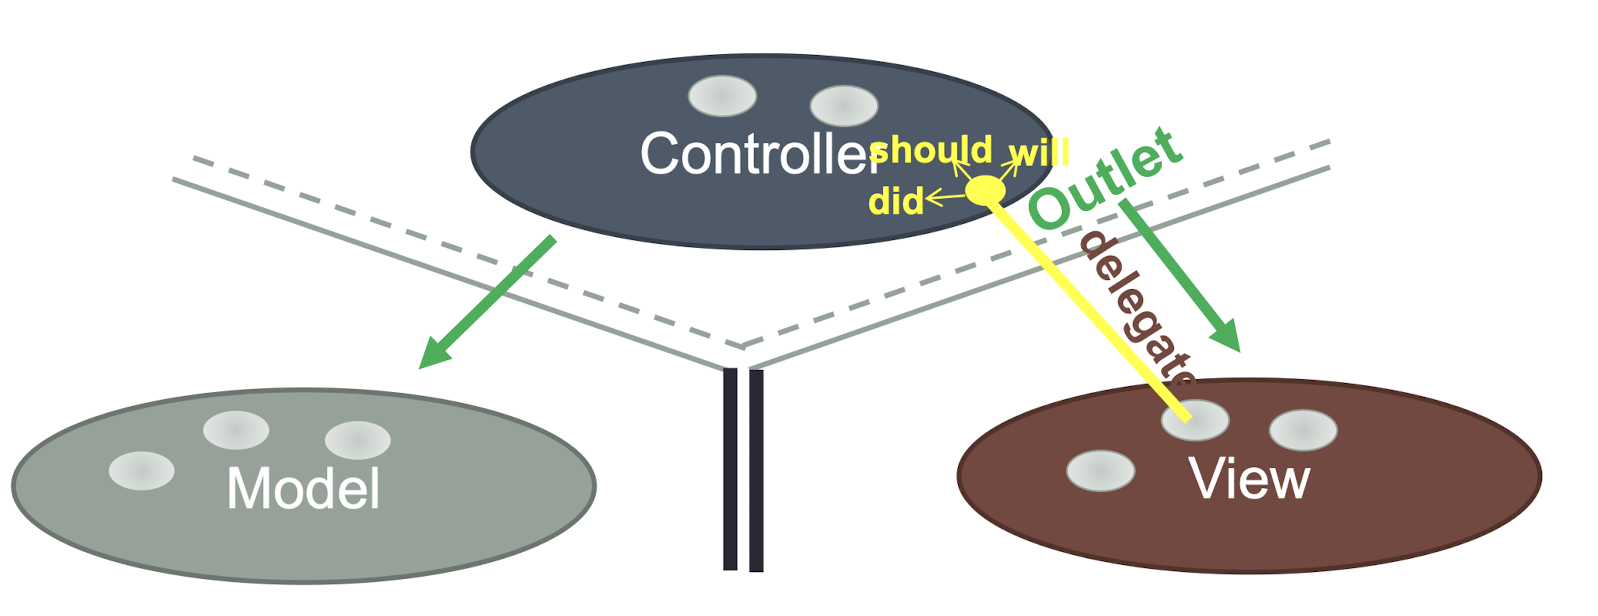
The Controller sets itself as the View’s delegate
The delegate is set via a protocol
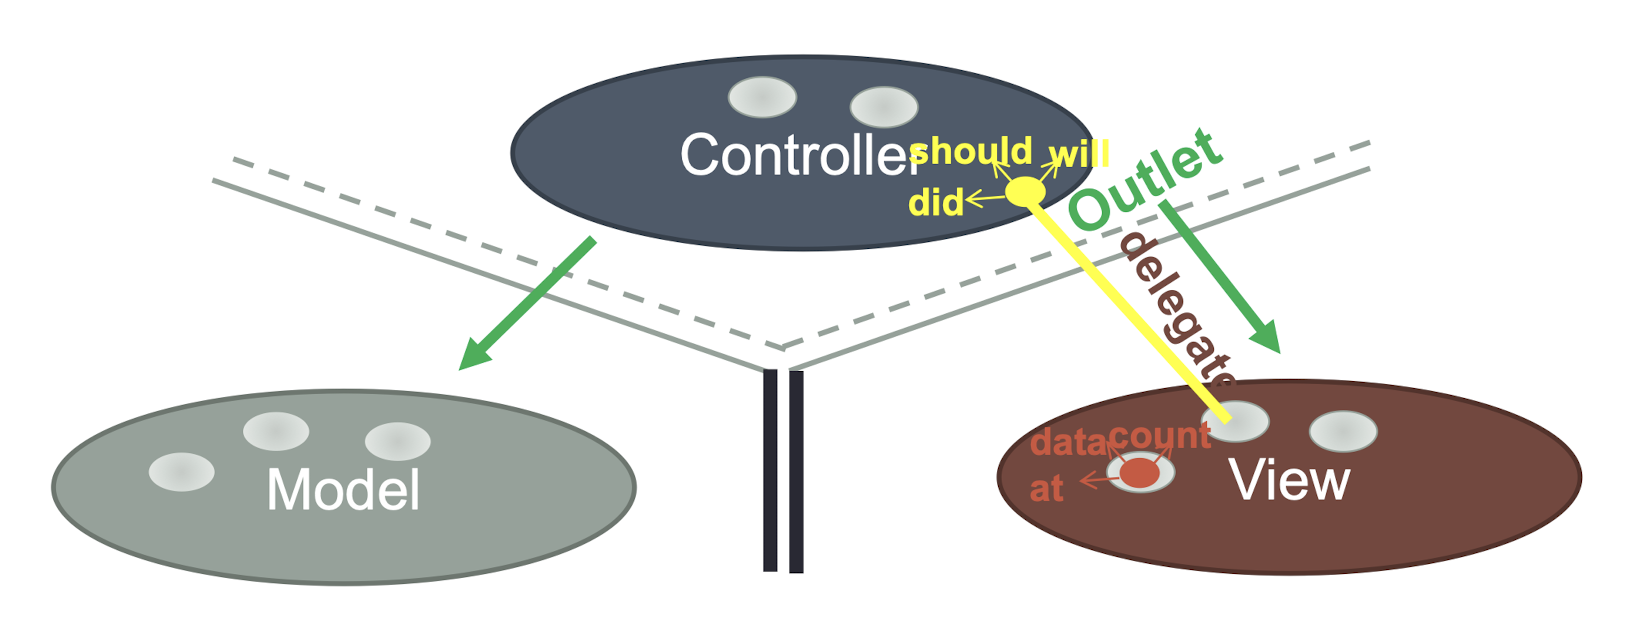
View does not own the data they display
So, again, a protocol is needed to acquire it
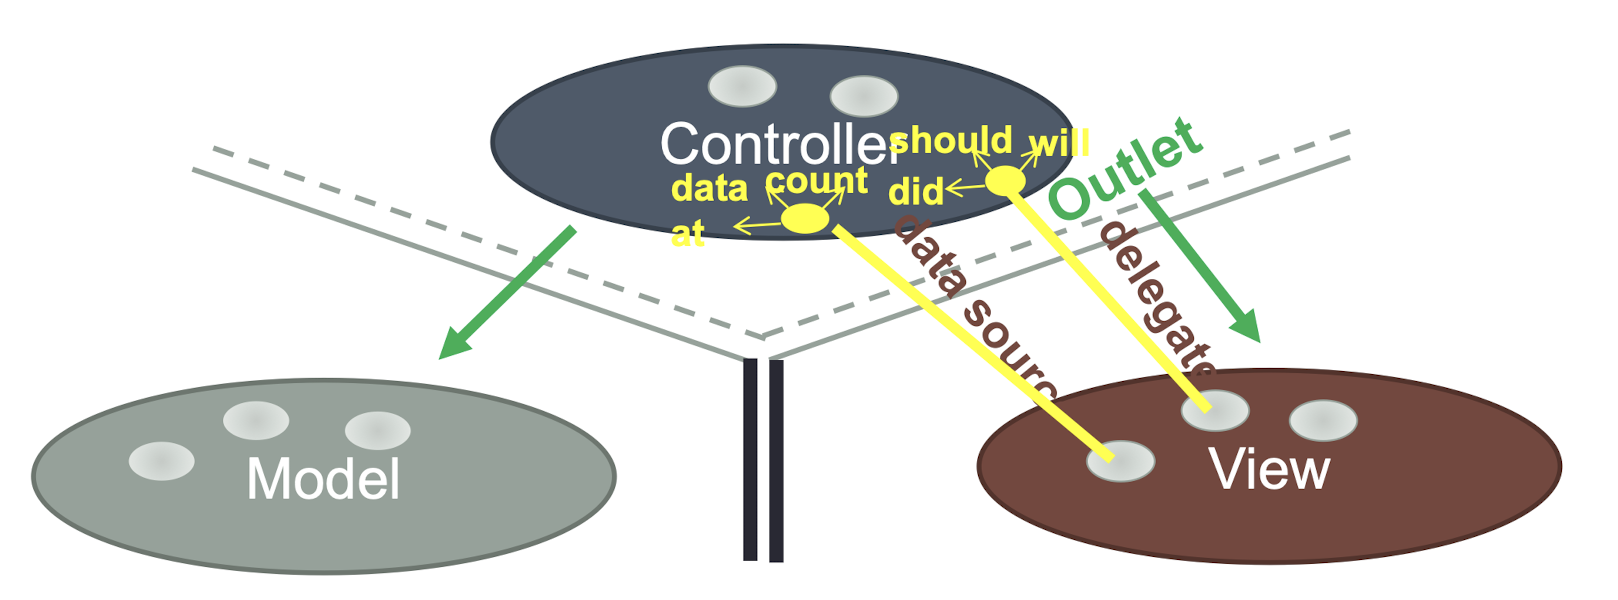
Controller is almost always the data source
Controller interprets/formats Model information for the View
Multi-View Application (Cont’d)
- Setting up a Table View (ViewController 2/4)
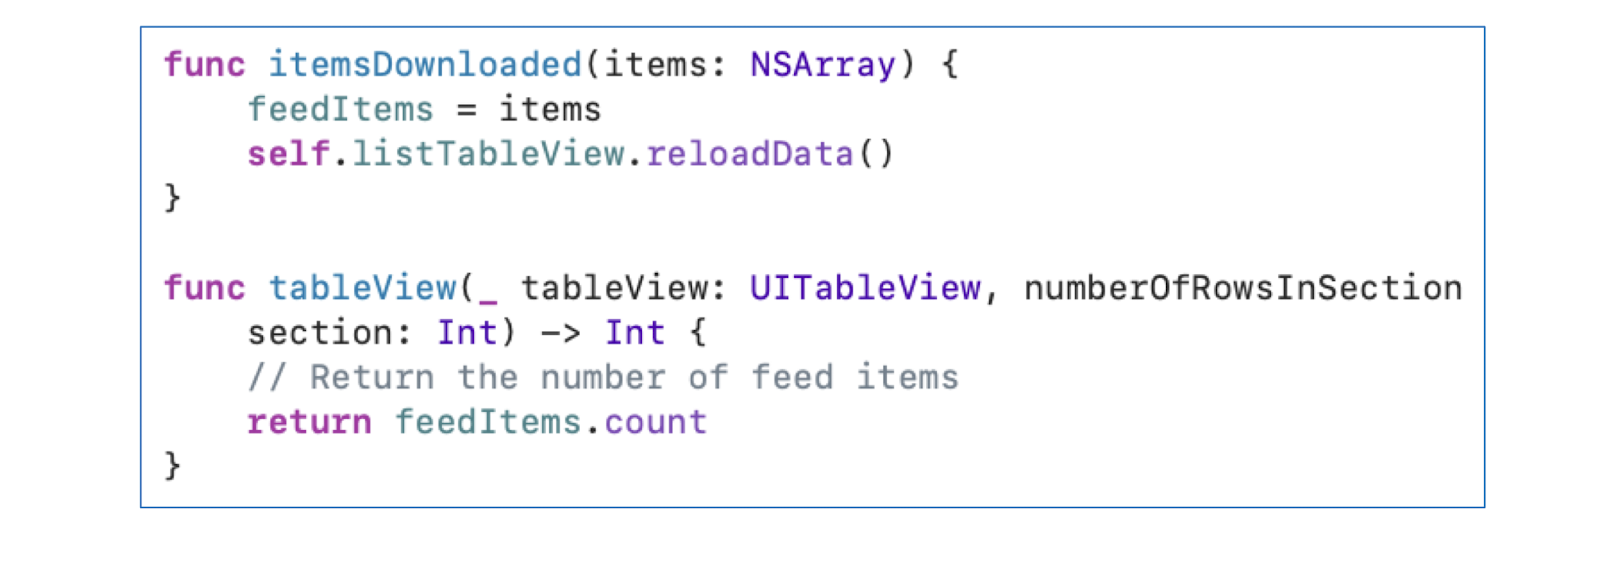
- Setting up a Table View (ViewController 3/4)
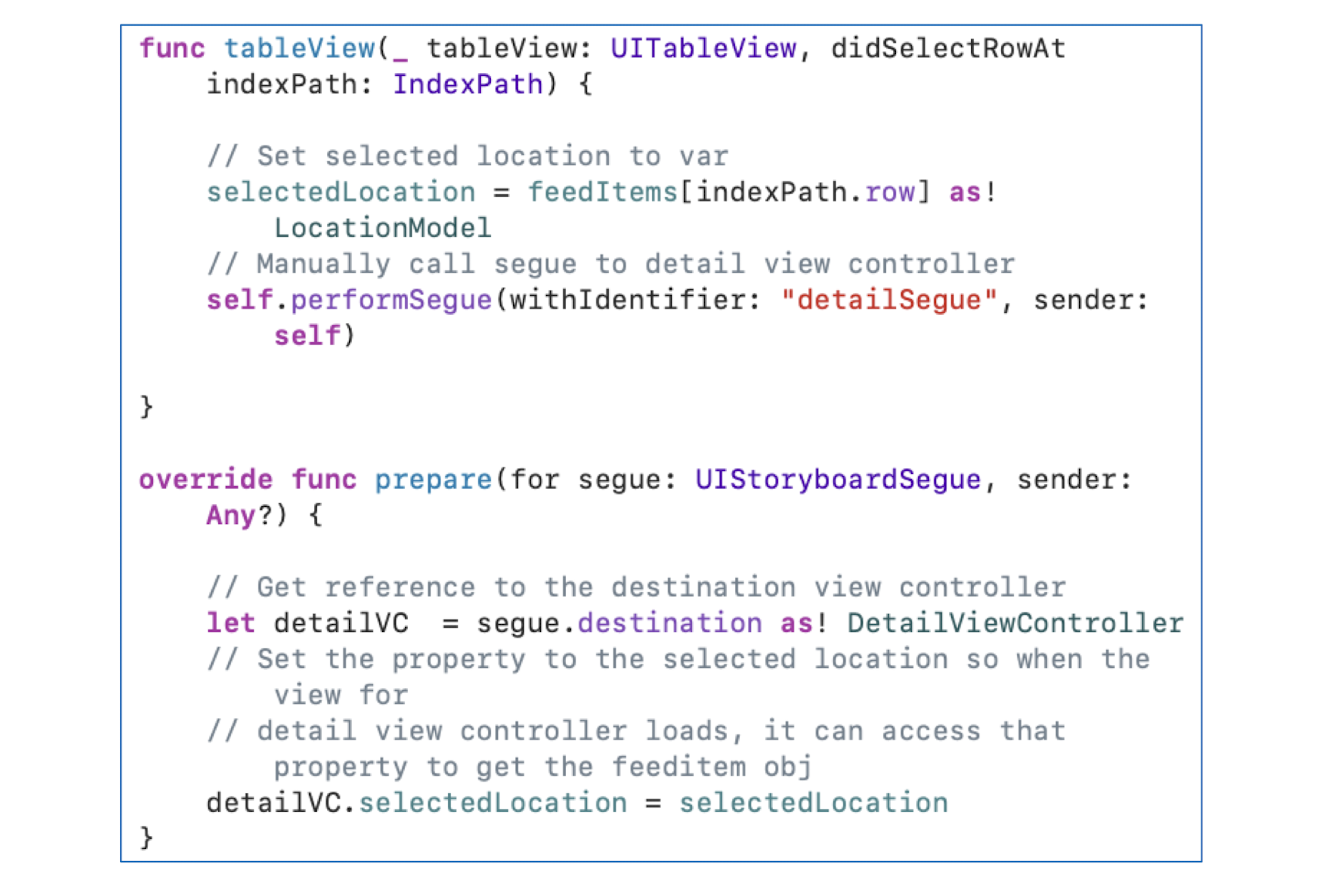
- Row selected (ViewController 4/4)
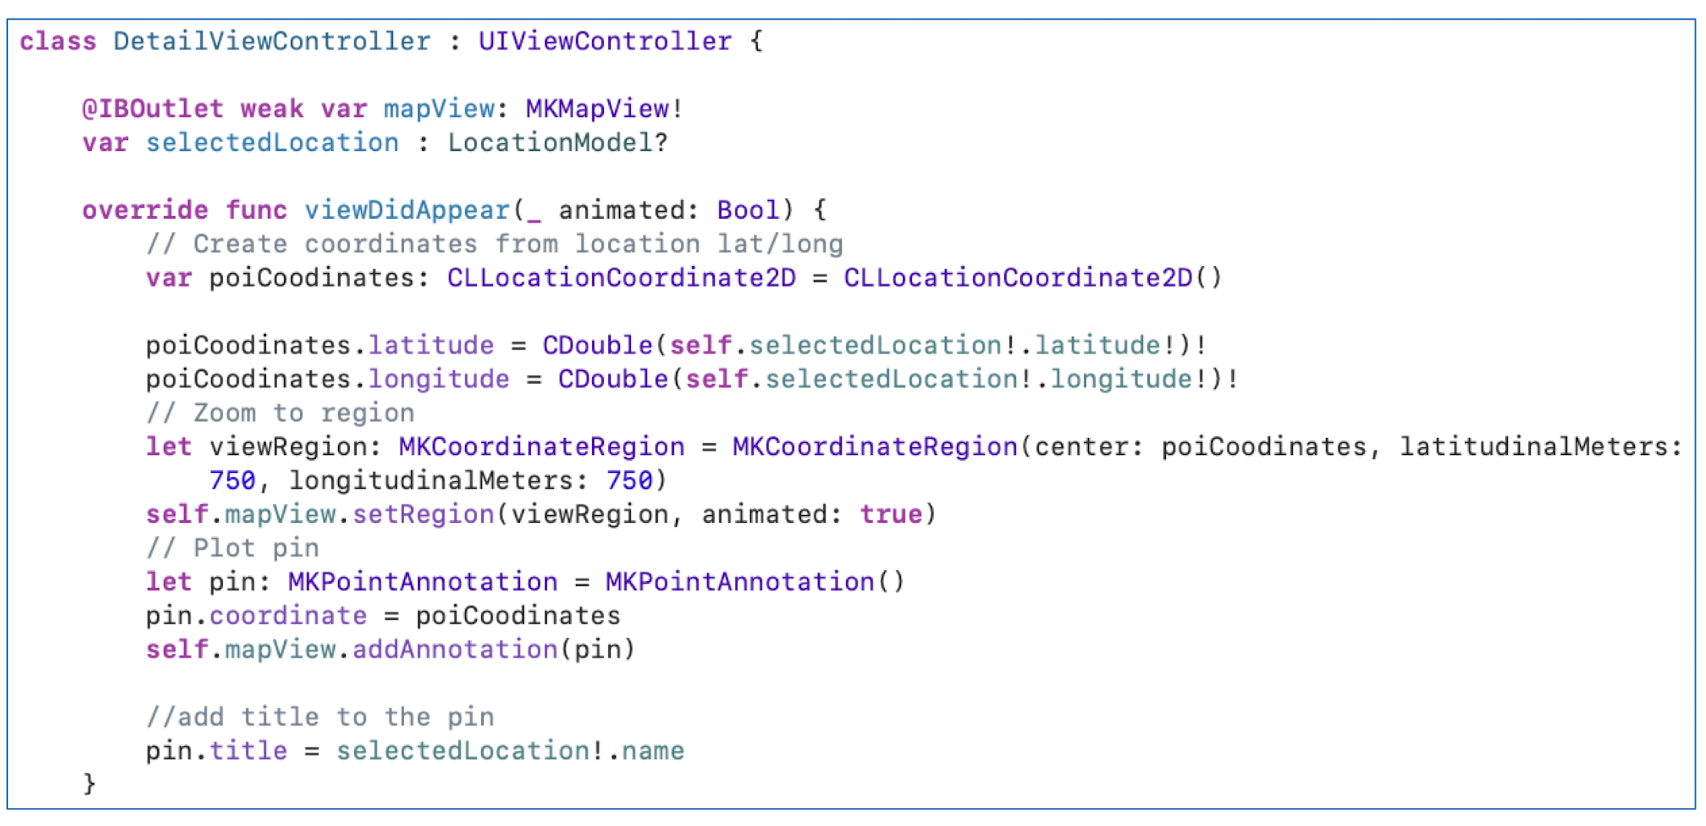
- DetailViewController class
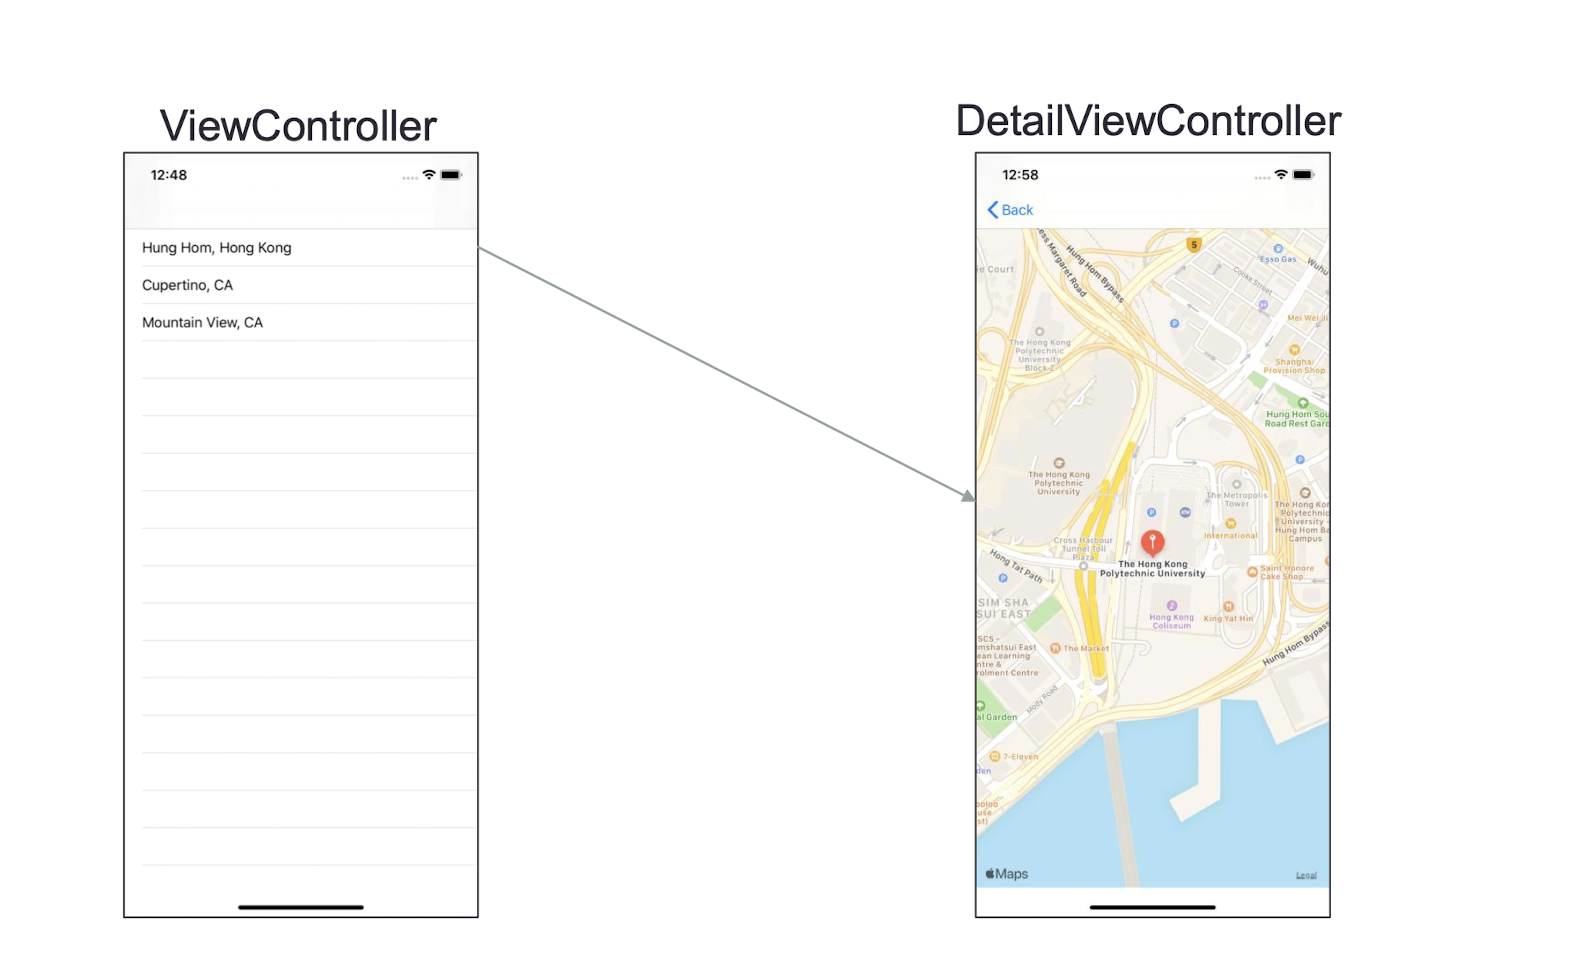
ViewController DetailViewController
5.19 Problems with MVC Model
- MVC = “Massive View Controller”?
- Too much code in Controller
- A Controller (ViewController in iOS, Activity in Android) corresponds to a view
- Many Controllers
- Hard to unit test individual controller
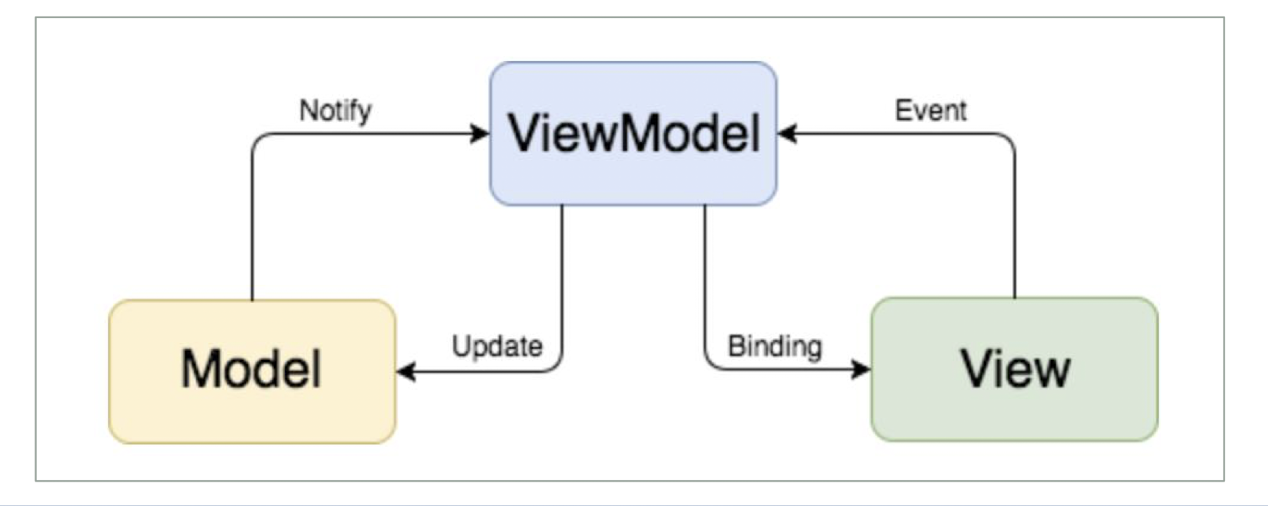
5.20 Model–View–ViewModel (MVVM)
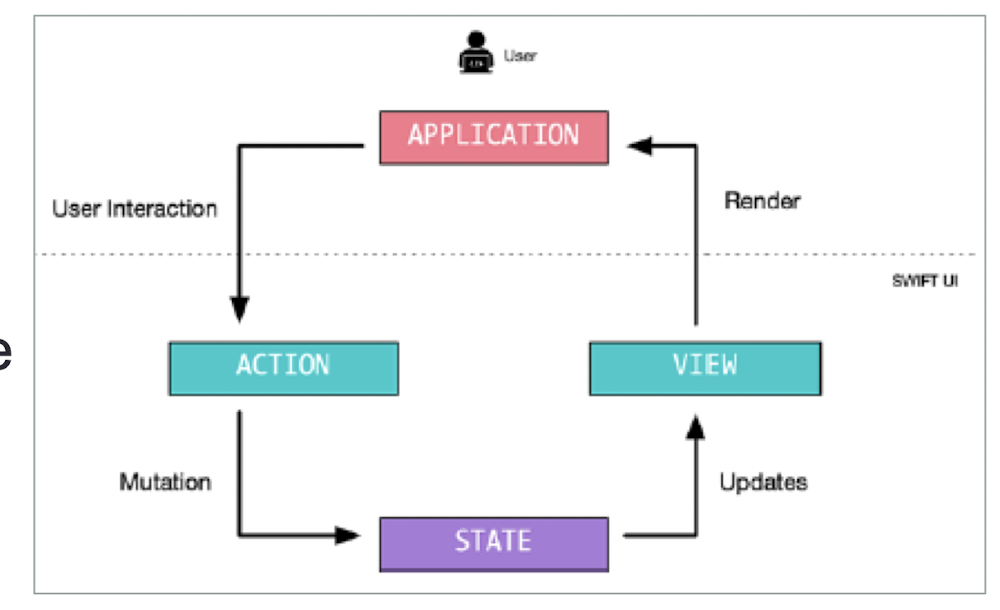
- While Apple stayed with the MVC architecture for a very long time, it is moving to the MVVM pattern with the new SwiftUI
- One of the major goals of using MVVM pattern is the automatic binding
- Whenever the ViewModel changes because of the underlying data change (the result of an API call), the view can automatically update to reflect to those data changes
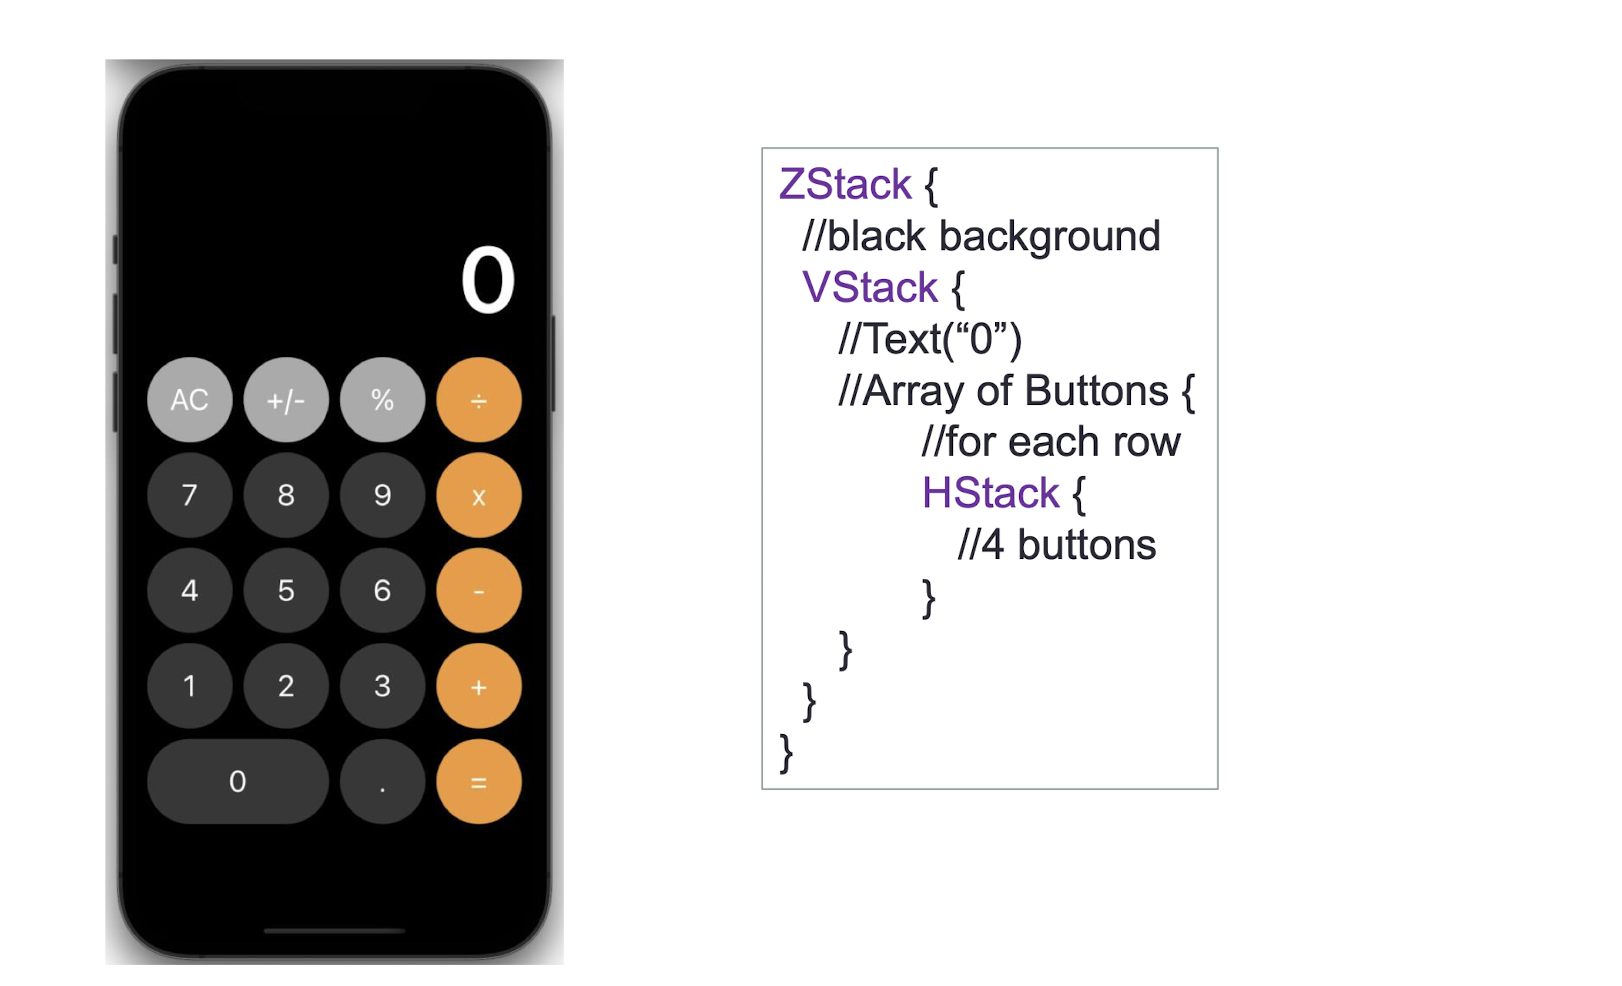
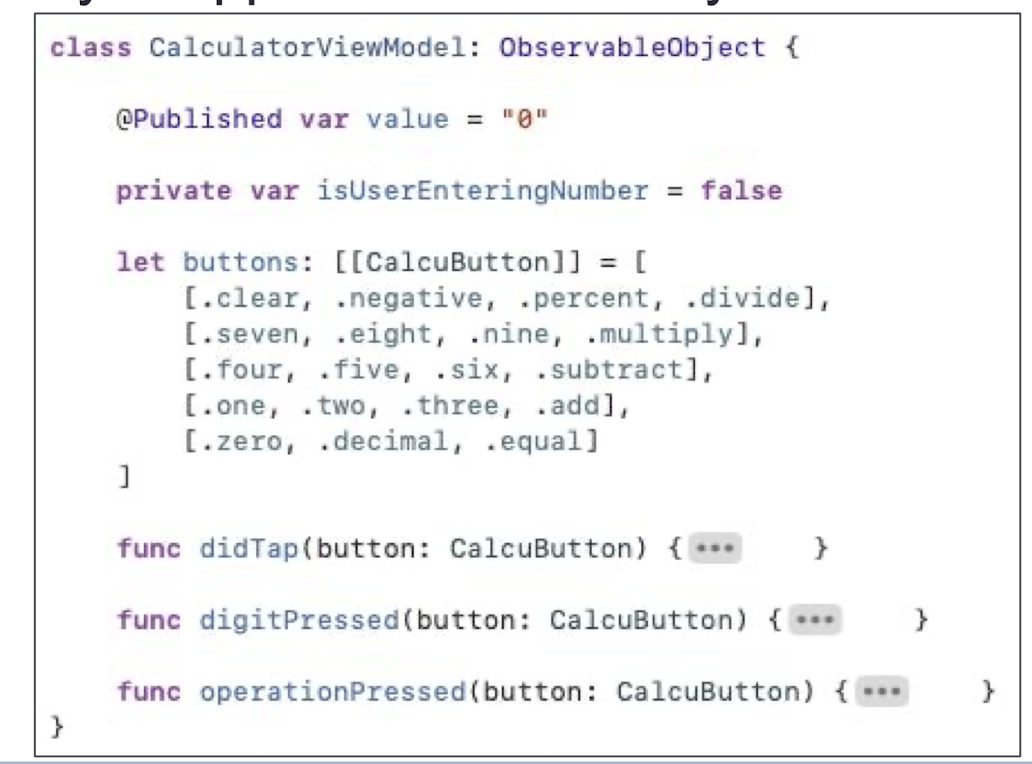
- In the Calculator App, when the
valueis updated, the value on the screen will be updated automatically.
- In the Calculator App, when the
Model – data and logic (same as MVC)
View – what users see (same as MVC)
What is ViewModel?
- Data shown on the View
- For small application, ViewModel is both Model and ViewModel
5.21 UIKit to SwiftUI
UIKit is only for iOS
- In traditional programming languages, one would generally create an UI element; then set its visual frame; set the colors, background and foreground, and other attributes; and then set it up on the visual hierarchy.
- UILabel example:
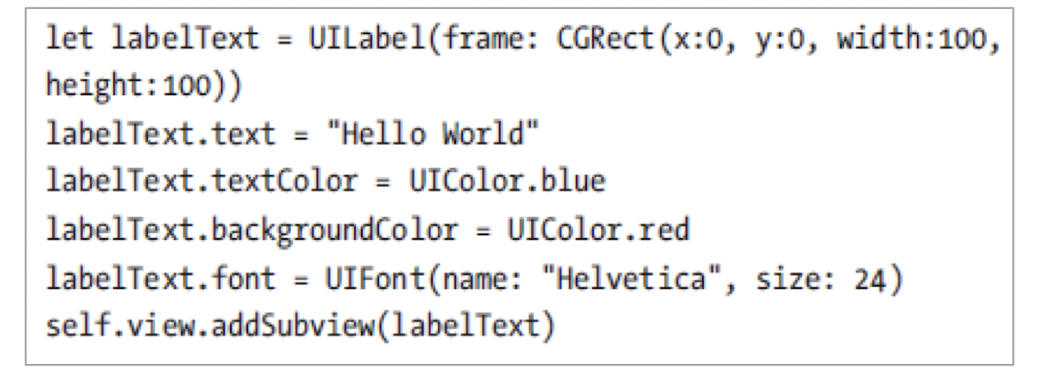
This simply creates a UILabel and then sets its attributes. This code is specific for iOS as it uses the UILabel which is not available on macOS which uses NSLabel or the watchOS which uses WKInterfaceLabel
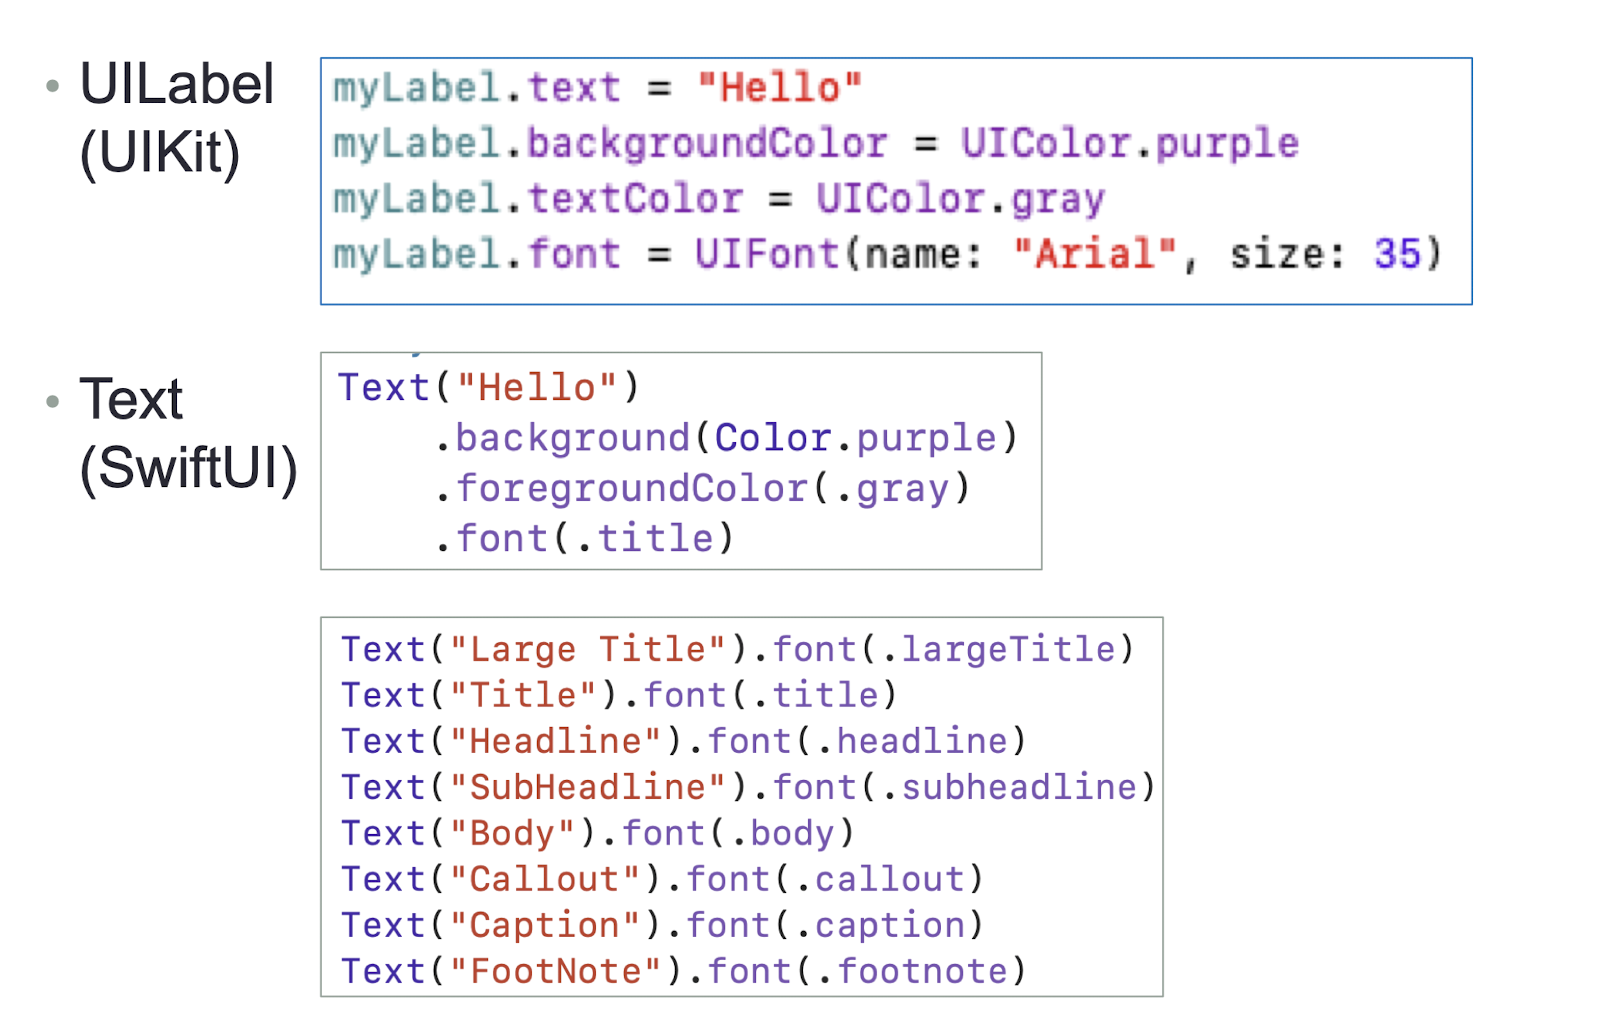
Now with SwiftUI, there is a common element that is available on all of iOS, iPadOS, macOS, and watchOS. The same code looks like:

- SwiftUI makes it much easier to manage, even creating complex views by using containers like VStack or Hstack
- UI updates automatically as soon as the data changes
5.22 SwiftUI Architecture
- The Swift language is open source. However, SwiftUI is not and managed only by Apple
- It is cross-platform on the Apple Ecosystems only and works across all of them, iOS, iPadOS, macOS, tvOS, and watchOS

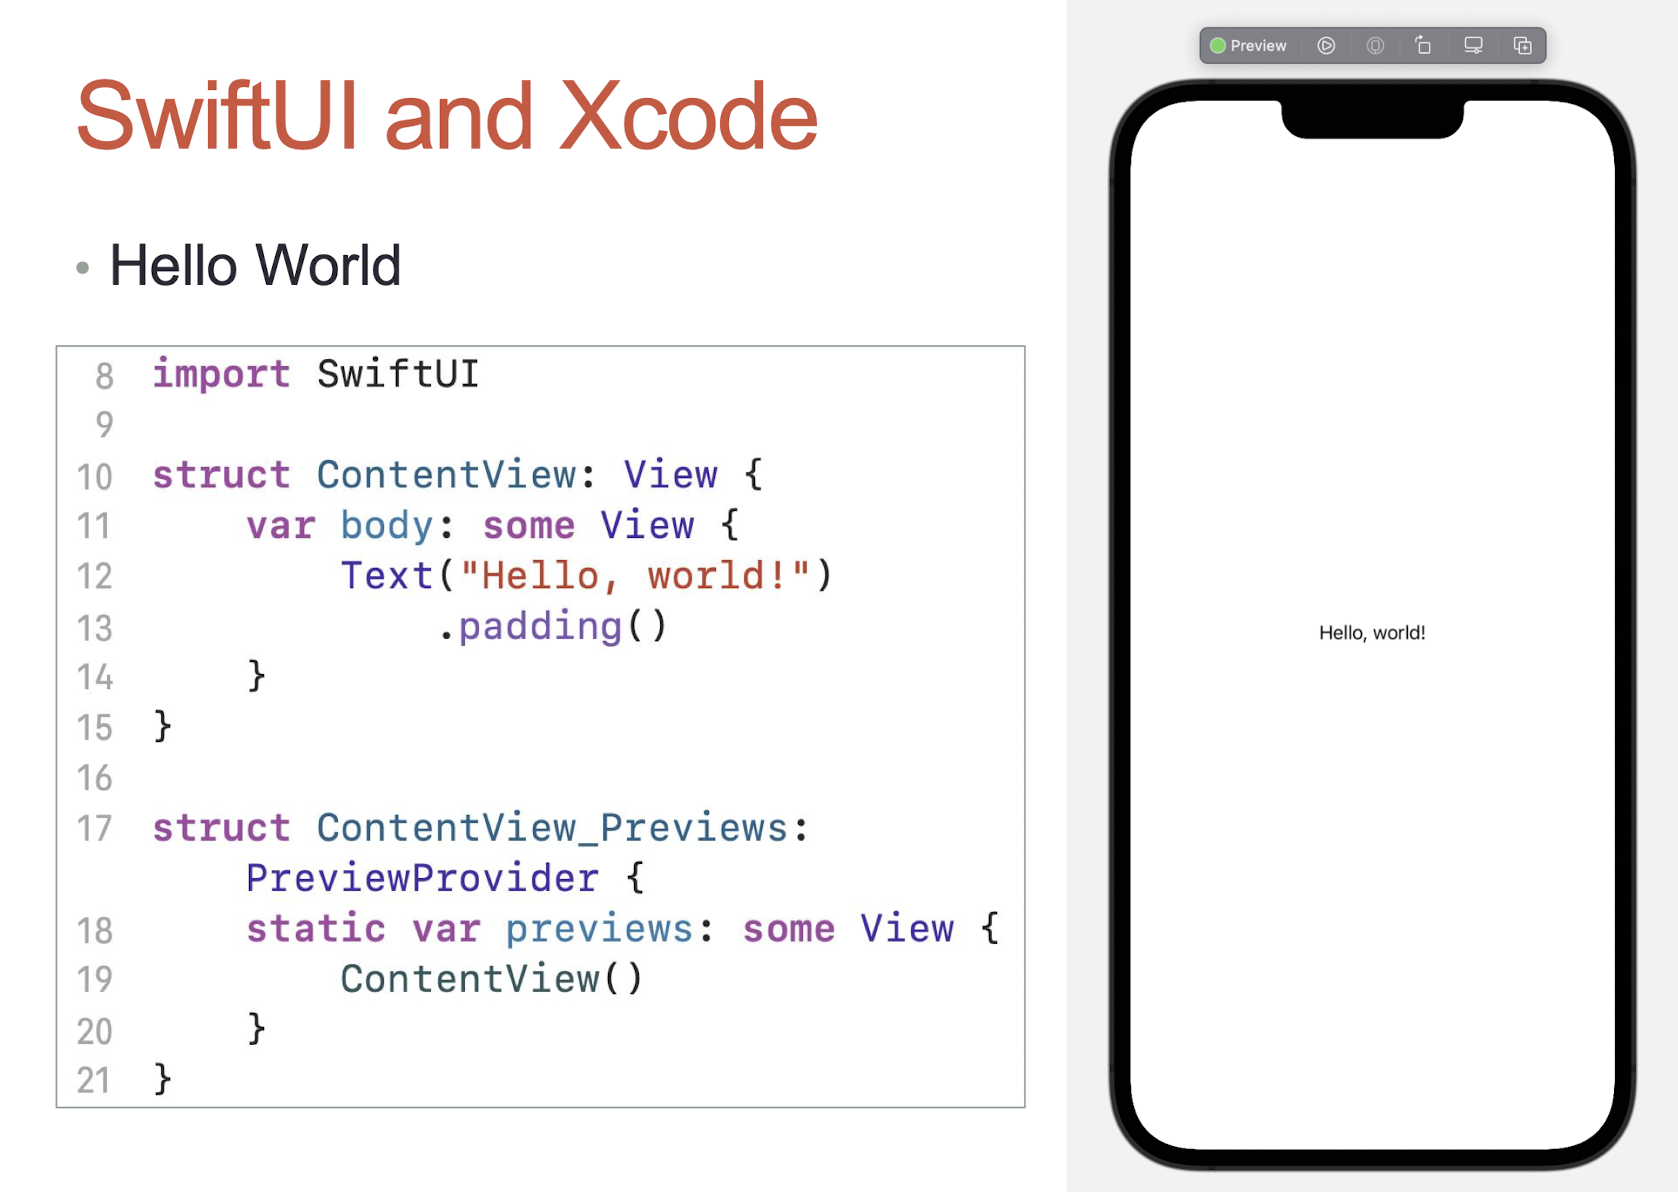
5.23 SwiftUI and Xcode
- The minimum requirements are Xcode 11 or higher running on macOS 10.15 Catalina or higher
- The “newer” OS, iOS 13, iPadOS 13, macOS 15, and watchOS 6
- Xcode offers quick previews and SwiftUI allows us to create views and also provides sample data to preview the view in Xcode without having to run it
- Xcode compiles the code and displays the preview all in the background as soon as some code is written
5.23.1 Text
- UILabel (UIKit)
- Text (SwiftUI)
1 | |
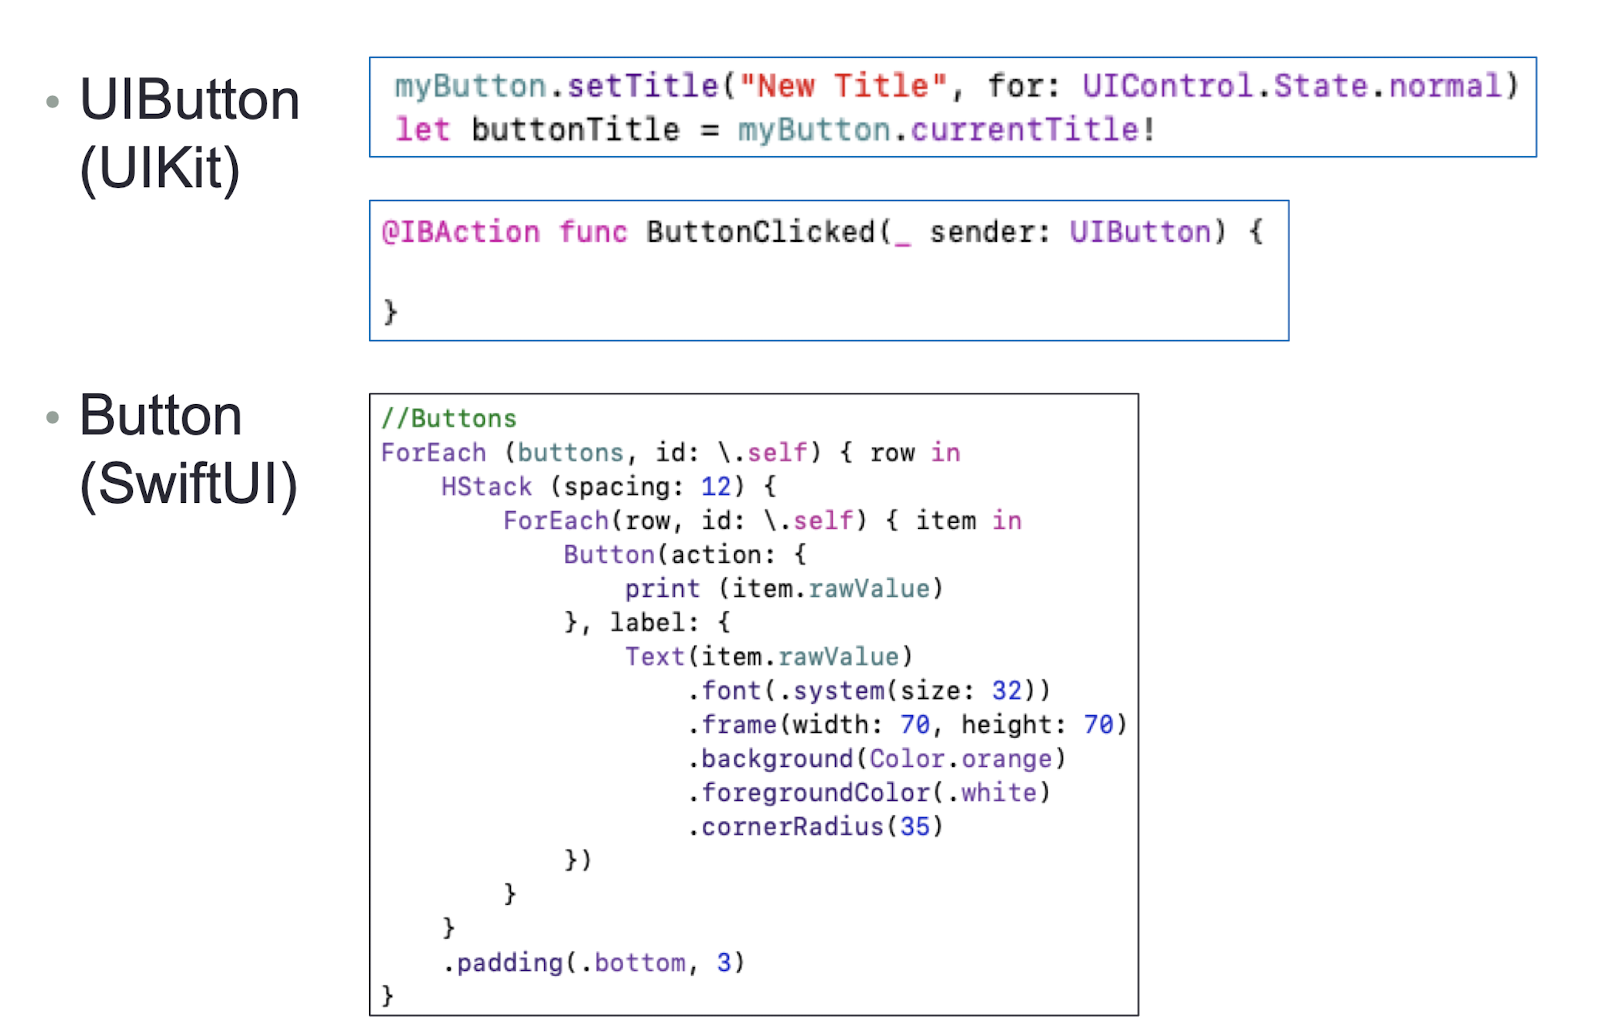
5.23.2 Buttons
- UIButton (UIKit)
- Button (SwiftUI)
1 | |
5.23.3 SwiftUI Stacks
- Horizontal Stack (HStack), Vertical Stack (VStack), and Aligning on both Axis (ZStack)
- The Stacks are also a way to group elements and create a complex layout
- Stacks can be nested inside of other stacks
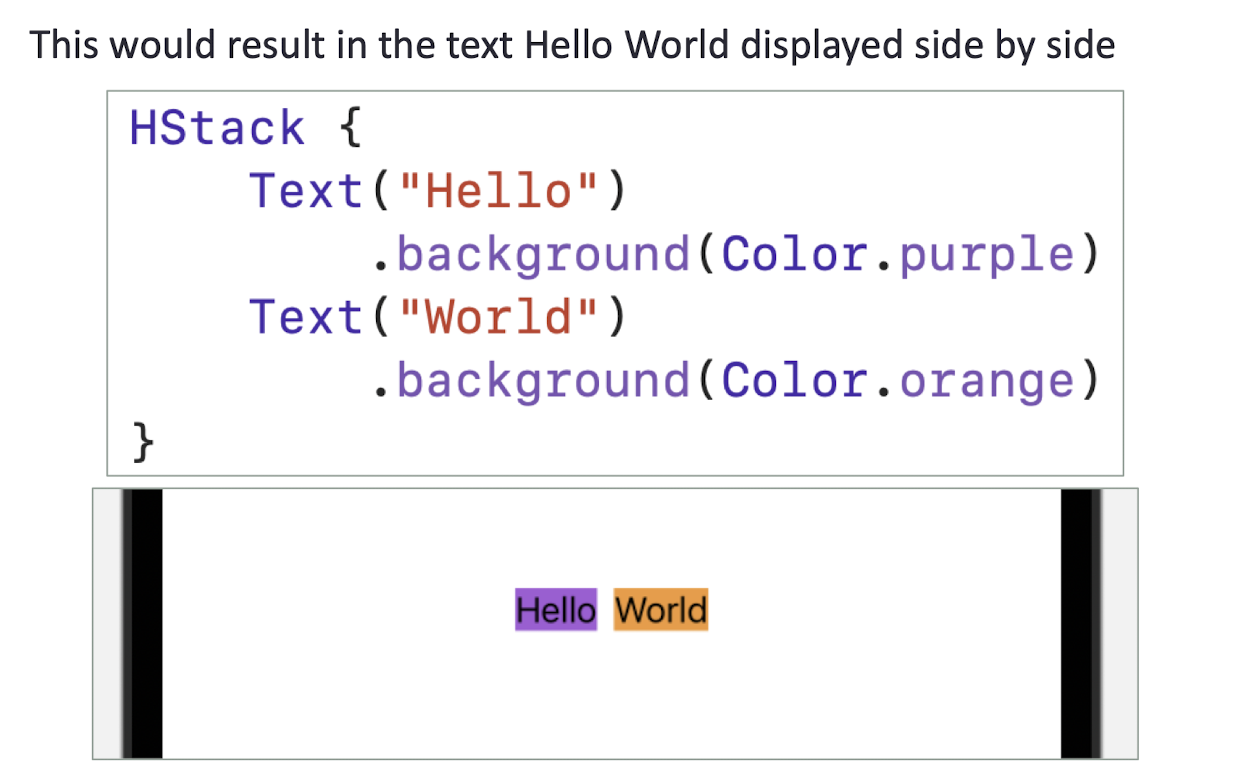
5.23.4 HStack
- HStack aligns the child elements horizontally, side by side on the X axis (from left to right).
This would result in the text Hello World displayed side by side
1 | |
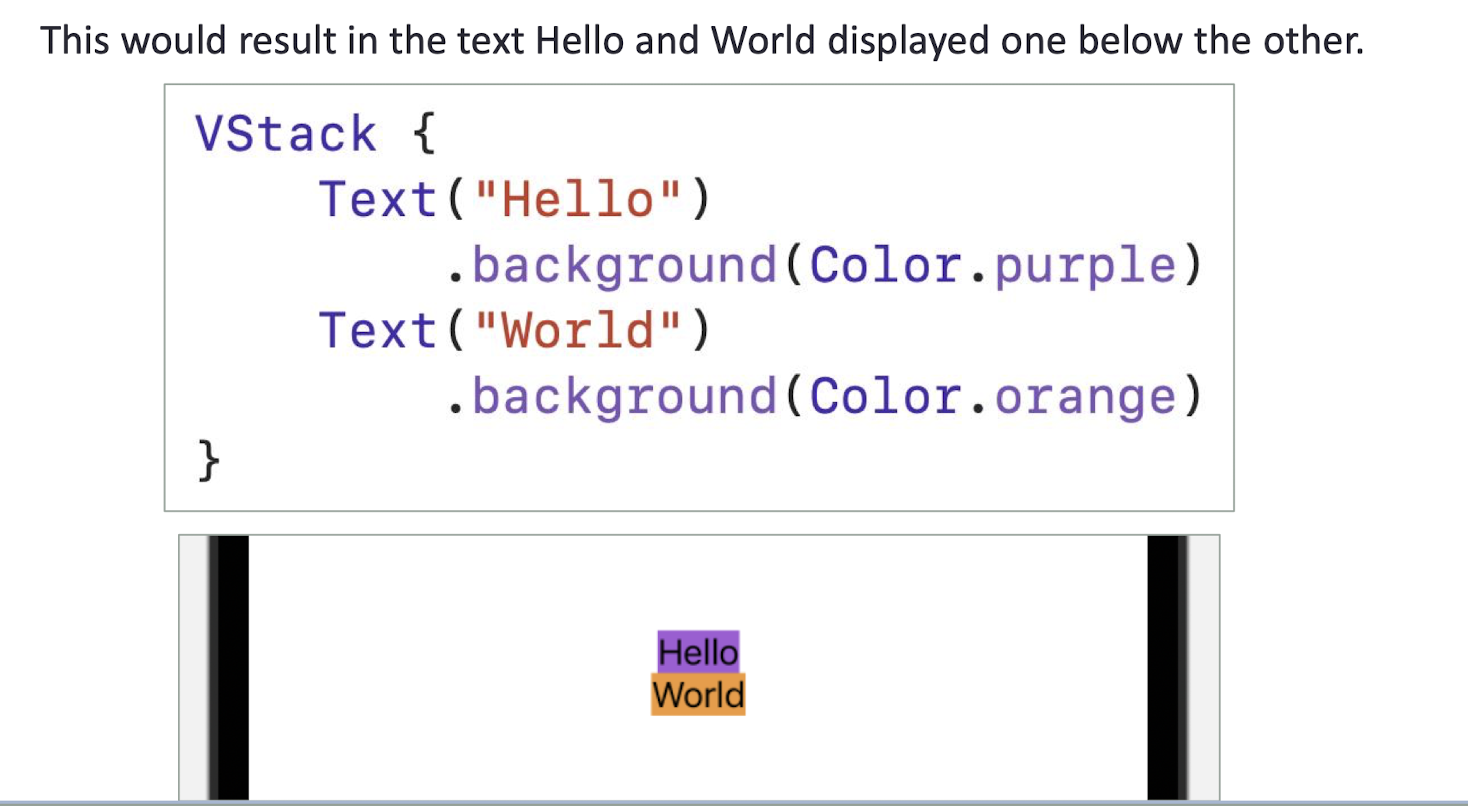
5.23.5 VStack
- VStack aligns the elements vertically, one below the other on the Y axis (from Top to bottom)
This would result in the text Hello and World displayed one below the other.
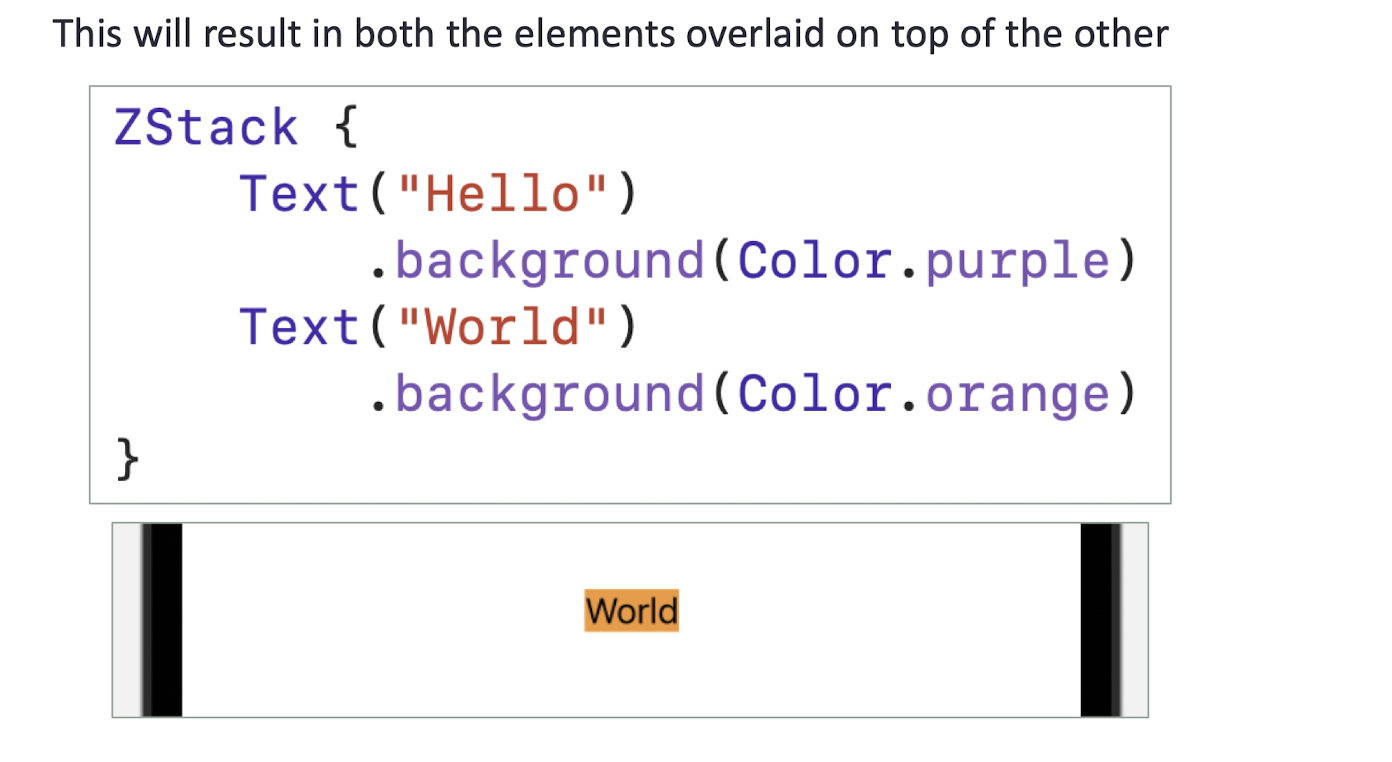
5.23.6 ZStack
- ZStack aligns the elements in respect to each other in the Z-axis(stacked on top of each other)
This will result in both the elements overlaid on top of the other
5.23.7 Combining Stacks
1 | |
5.23.8 Spacer and Divider
- Spacer: Occupies all the available space in between
- Divider: Put a littel space in between
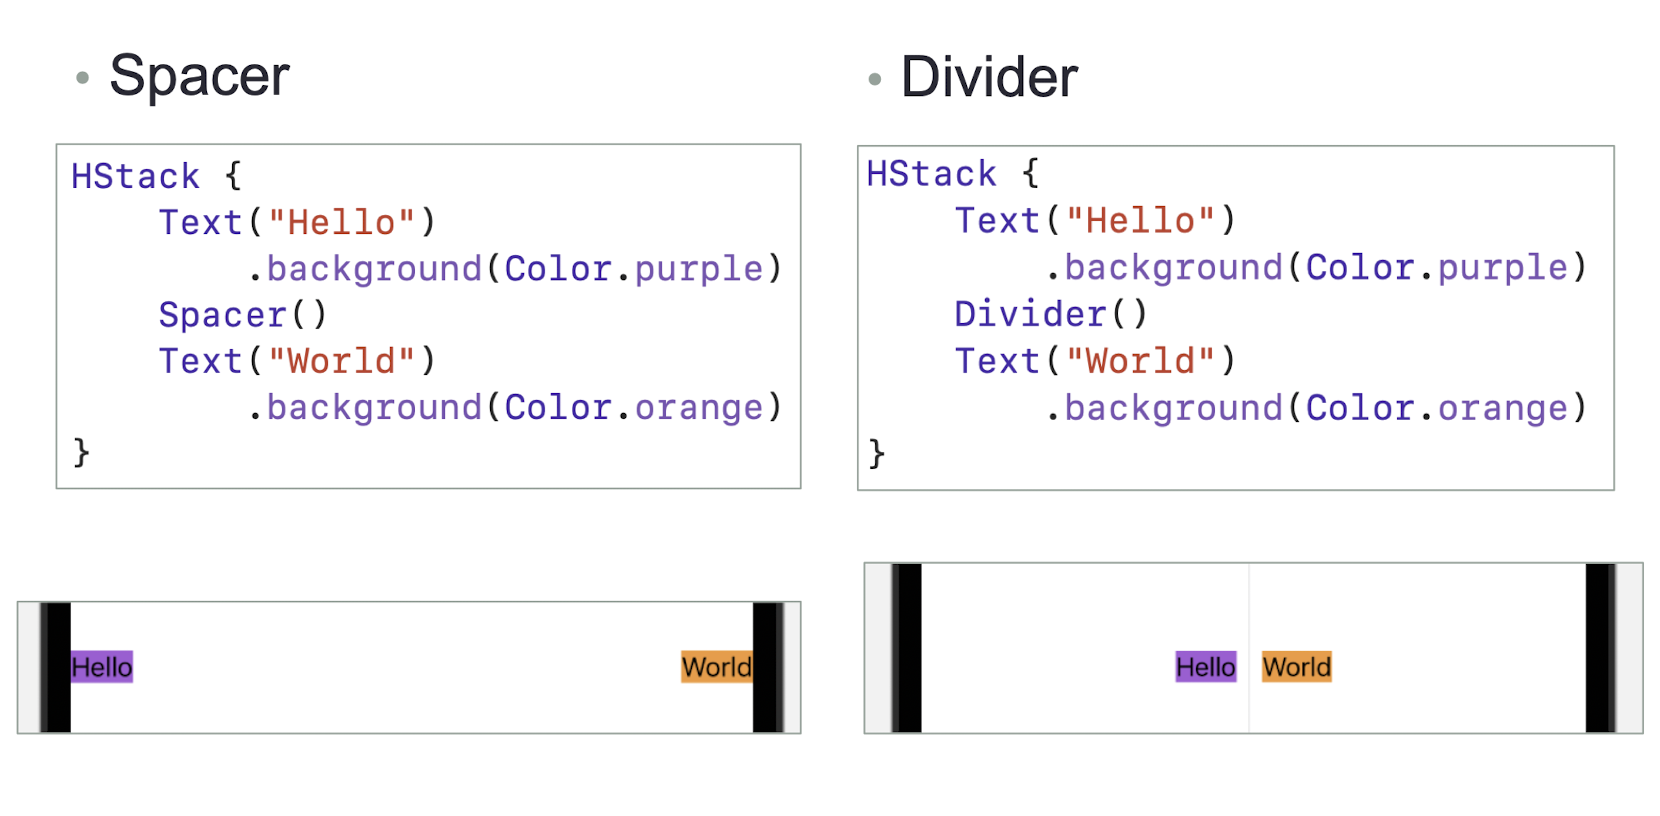
1 | |
5.23.9 @State
- @State: Property Wrapper encapsulates the value to allow modifying it from an immutable struct
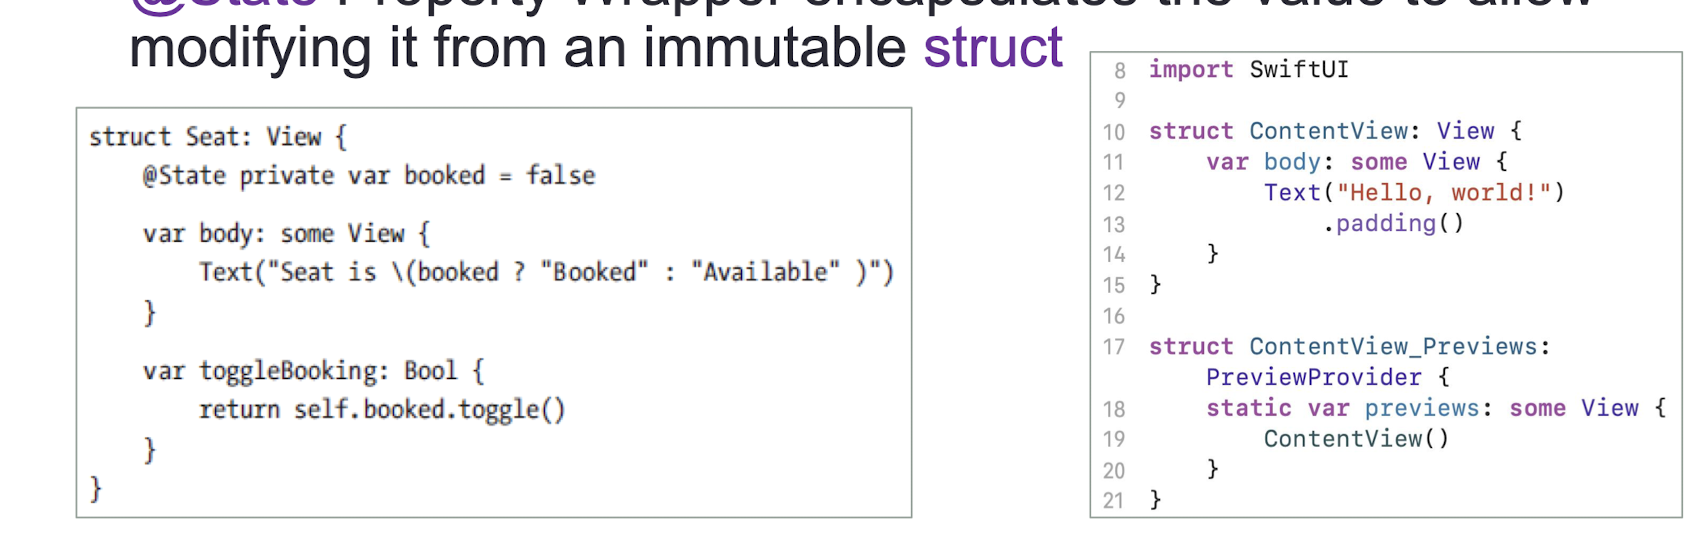
@State variable is a value that can change at some point and that the view is dependent on this value, so whenever the value changes, the view must be updated with the new value.
Modify the body to create an interactive SwiftUI component
1 | |
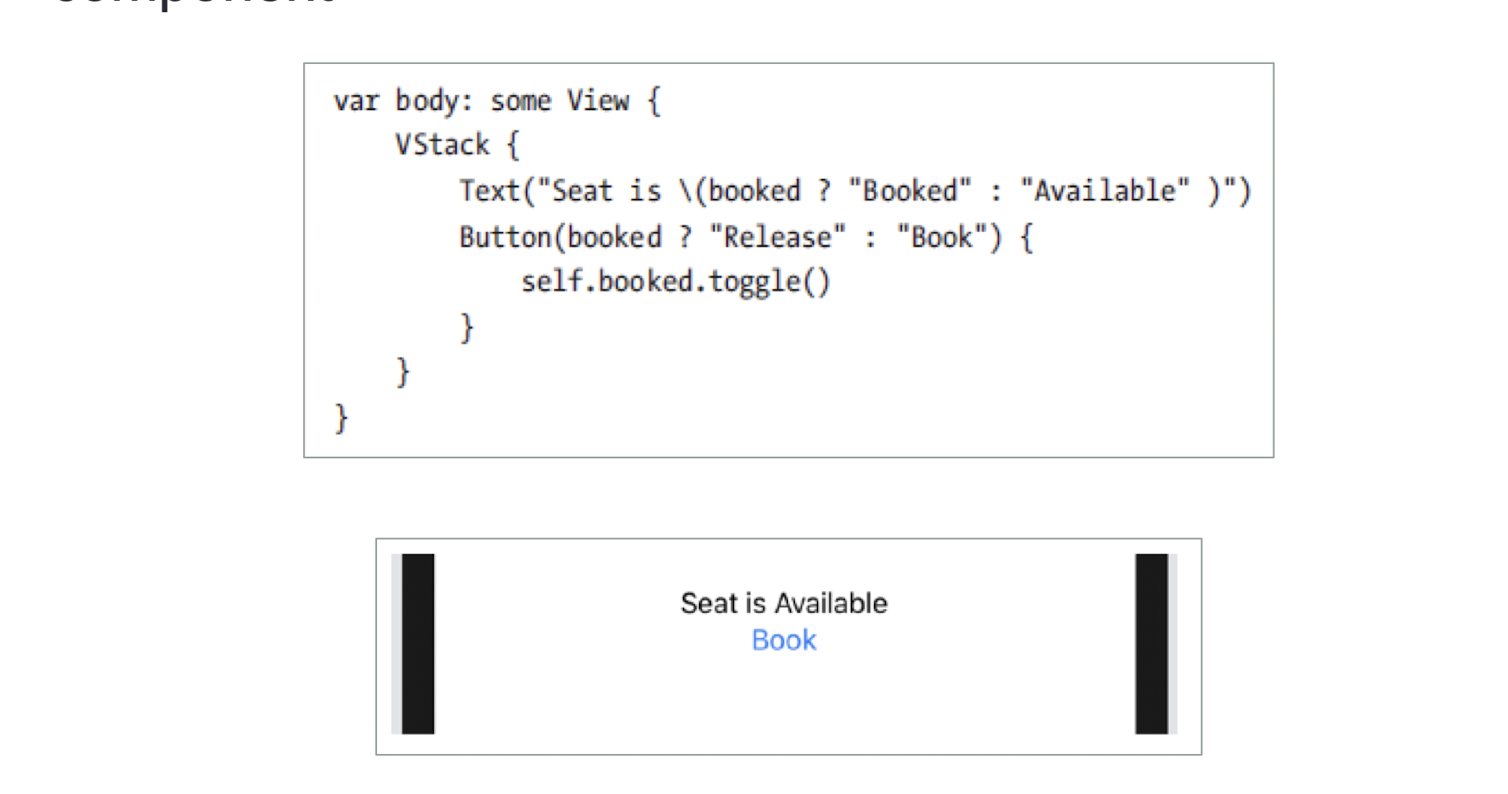
- When a state variable changes, the state knows the view that is managing the state and sends a message to this view to update itself and its children.
- All of the views and subviews are updated, efficiently because the runtime knows which views to update based on which views have changed or are affected with that state change.
- The framework does all of this work for us.
5.23.10 @Binding
- @Binding is a first-class reference to data; it allows the components to read and write a value without owning it
1 | |
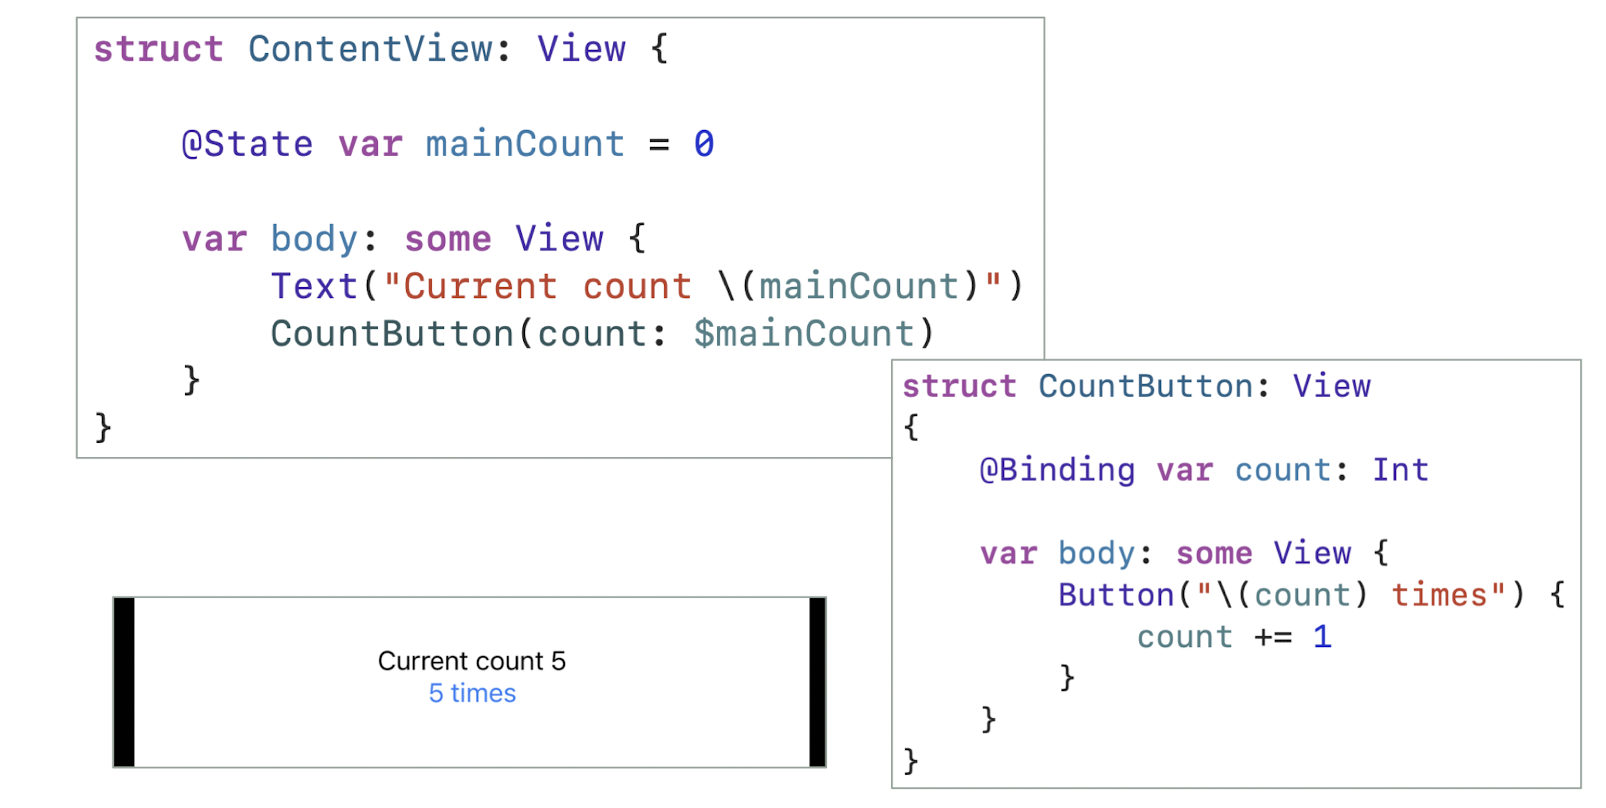
- the
countis bound to the$mainCountin the caller class
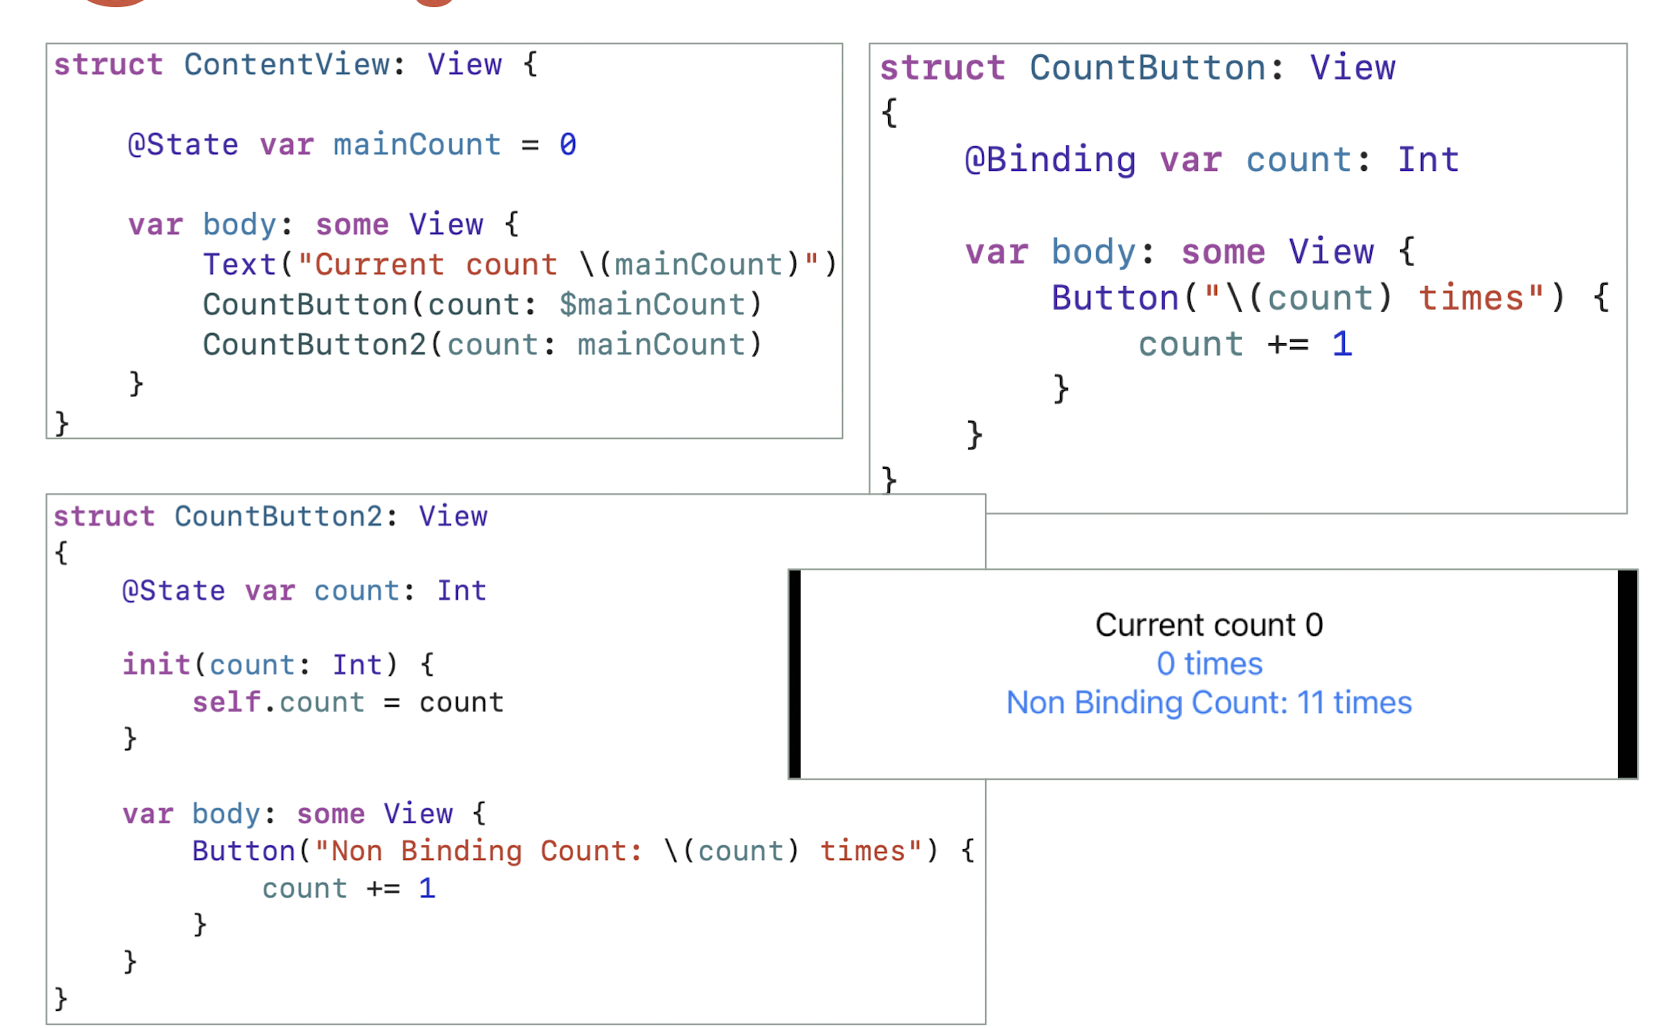
- State only works for the current view (locally), but Binding can be passed to other views (globally)
5.23.11 ObservableObject and @Published
- The
ObservableObjectprotocol is used with some sort of class that can store data - the @Published property wrapper is added to any properties inside an observed object that should cause views to update when they change
5.23.12 Using an ObservableObject in a View
- Use
@ObservedObjectfor complex properties that might belong to several views. Most times you’re using a reference type you should be using@ObservedObjectfor it. - Use
@StateObjectonce for each observable object you use, in whichever part of your code is responsible for creating it. - Use
@EnvironmentObjectfor properties that were created elsewhere in the app, such as shared data.
1 | |
5.23.13 State and ObservableObject
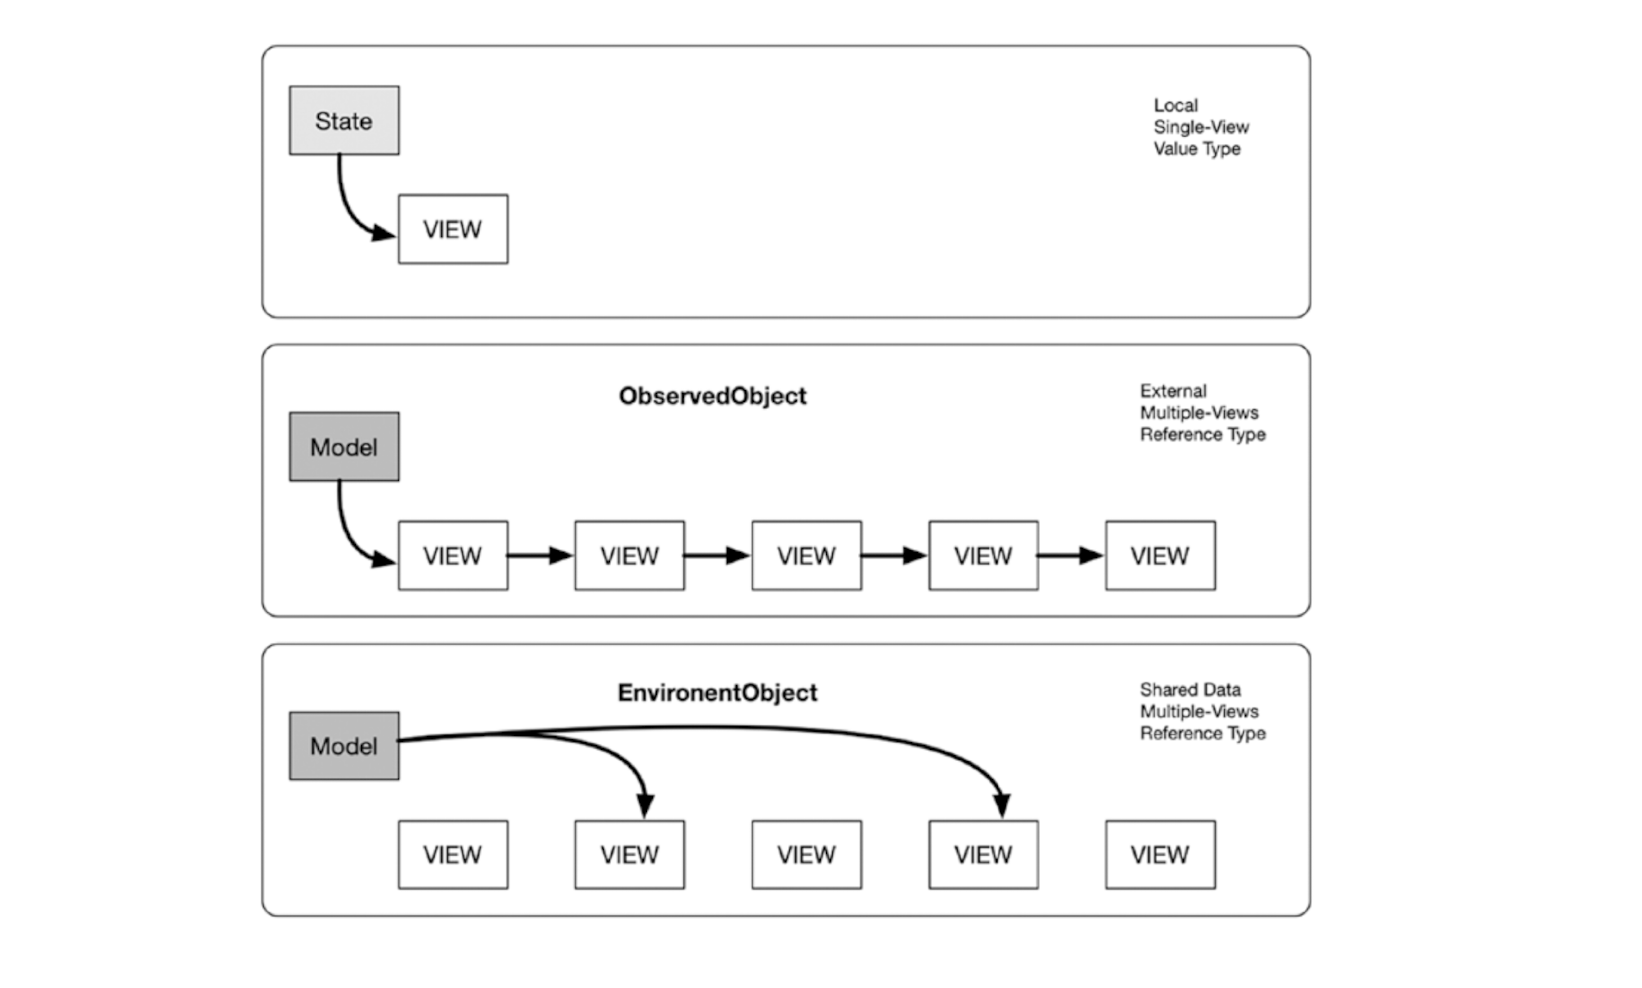
- One view only: just use the @State object
- Manny views, and pass to many views: use the @ObservableObject
- Many view, only one model: use the @EnvironmentObject
Tutorial: Real-Time Operating System (RTOS)
- Process Management
- Inter-Process Communication
5.24 Characteristics of RTOS
- A real-time system requires that results be produced within a specified deadline period
- An embedded system is a computing device that is part of a larger system (i.e. automobile, airliner)
- A safety-critical system is a real-time system with catastrophic results in case of failure
- A hard real-time system guarantees that real-time tasks be completed within their required deadlines
- A soft real-time system provides priority of real- time tasks over non real-time tasks
5.25 Features of Real Time Systems
- Most real-time systems do not provide the features found in a standard desktop system
- Reasons include
- Real-time systems are typically single-purpose
- Real-time systems often do not require interfacing with a user
- Features found in a desktop PC require more substantial hardware than what is typically available in a real-time system
5.26 System-on-a-Chip
- Many real-time systems are designed using system-on-a-chip (SOC) strategy
- SOC allows the CPU, memory, memory-management unit, and attached peripheral ports (I.e. USB) to be contained in a single integrated circuit
5.27 Kernel
- It is the basic structural unit of any operating systems (OS)
- It can be defined as the secured unit of an OS
- The services provided by Kernel handle the following tasks:
- Process management
- Memory management
- Scheduling
- Inter process communication
- I/O, Device/driver management
- Interrupt control
5.28 Process Management
- Create a process when there is a program which is requested to run
- Activate the process to request the required resources (CPU time and memory)
- Run the process
- Block the process when there are some requests from other processes with higher priority
- Resume the process if necessary
- Deactivate the process to release all resources used
- Delete the process after the program has been finished
5.29 Inter-Process Communication and Synchronization of Processes
- A significant problem that multitasking systems must address is sharing data and hardware resources among multiple tasks
- It is usually “unsafe“ for two tasks to access the same specific data or hardware resource simultaneously
- Example of multi-process synchronization:
- Consumer-Producer Problem
5.30 Consumer-Producer Problem
Two processes, the producer and the consumer, who share a common, fixed-size buffer used as a queue
- Producer
- The producer’s job is to generate a piece of data, put it into the buffer and start again
1 | |
- Consumer
- At the same time the consumer is consuming the data (i.e., removing it from the buffer) one piece at a time.
- The problem is to make sure that the producer won’t try to add data into the buffer if it’s full and that the consumer won’t try to remove data from an empty buffer.
1 | |
Race Condition
count++could be implemented as- register1 = count
- register1 = register1 + 1
- count = register1
count--could be implemented as- register2 = count
- register2 = register2 – 1
- count = register2
Consider this execution interleaving with “count = 5” initially:
- S0: producer execute
register1 = count {register1 = 5} - S1: producer execute
register1 = register1 + 1 {register1 = 6} - S2: consumer execute
register2 = count {register2 = 5} - S3: consumer execute
register2 = register2 -1 {register2 = 4} - S4: producer execute
count = register1 {count = 6 } - S5: consumer execute
count = register2 {count = 4}
- S0: producer execute
There are three common approaches to resolve this problem:
- Temporarily masking
- Binary Semaphores
- Message Passing
5.30.1 Temporarily Masking
- Disable interrupt
An interrupt, even if of higher priority than the present critical function, get disabled
Solve the race condition
- S0: producer execute register1 = count
- {register1 = 5}
- S1: producer execute register1 = register1 + 1
- {register1 = 6}
- S2: consumer execute register2 = count
- Blocked. Consumer can be executed only when producer is not being executed
- S3: consumer execute register2 = register2 – 1
- Waiting
- S4: producer execute count = register1 {count = 6}
- Resume S2 and S3
- S5: consumer execute count = register2 {count = 5}
- S0: producer execute register1 = count
Disadvantages:
- It increases the interrupt latency period and a deadline may be missed for an interrupt service
- For some safety devices, interrupt cannot be missed
- Interrupt latency
- The period of time from the arrival of an interrupt at the CPU to the start of the routine that services the interrupt
- Interrupt latency
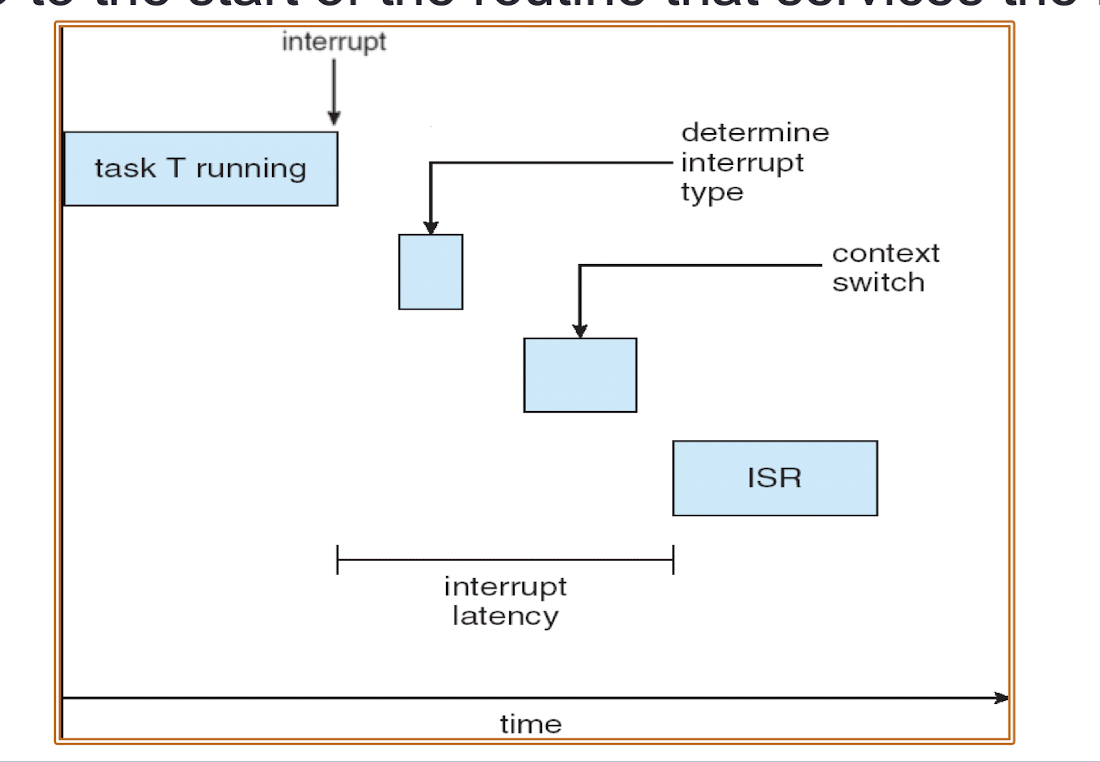
5.30.2 Binary Semaphores
Synchronization tool that does not require busy waiting
- Semaphore S – integer variable
- Two standard operations modify
- S: wait() and signal()
- Originally called P() and V()
- Less complicated
Can only be accessed via two indivisible (atomic) operations
1 | |
- Binary semaphore – integer value can range only between 0 and 1
- Simpler to implement
Can implement a counting semaphore S as a binary semaphore
Provides mutual exclusion
1 | |
Problems: Deadlock
- Two or more processes are waiting indefinitely for an event that can be caused by only one of the waiting processes
- Example:
- Let S and Q be two semaphores initialized to 1
- Two following processes are executed simultaneously
P1:
wait (S);
wait (Q);
signal (S);
signal (Q);
P2:
wait (Q);
wait (S);
signal (Q);
signal (S);
Problems: Deadlock
- Example:
- P1 executes wait(S): P1 enter the critical region of S and S becomes 0
- P2 executes wait(Q): P2 enter the critical region of Q and Q becomes 0
- P1 executes wait(Q): P1 is waiting for the semaphores of Q which will be released by P2
- P2 executes wait(S): P2 is waiting for the semaphores of S which will be released by P1
- Deadlock occurs
5.30.3 Message Passing
- Most RTOSs offer a message passing mechanism for synchronization
- Each message can contain an array or buffer of data
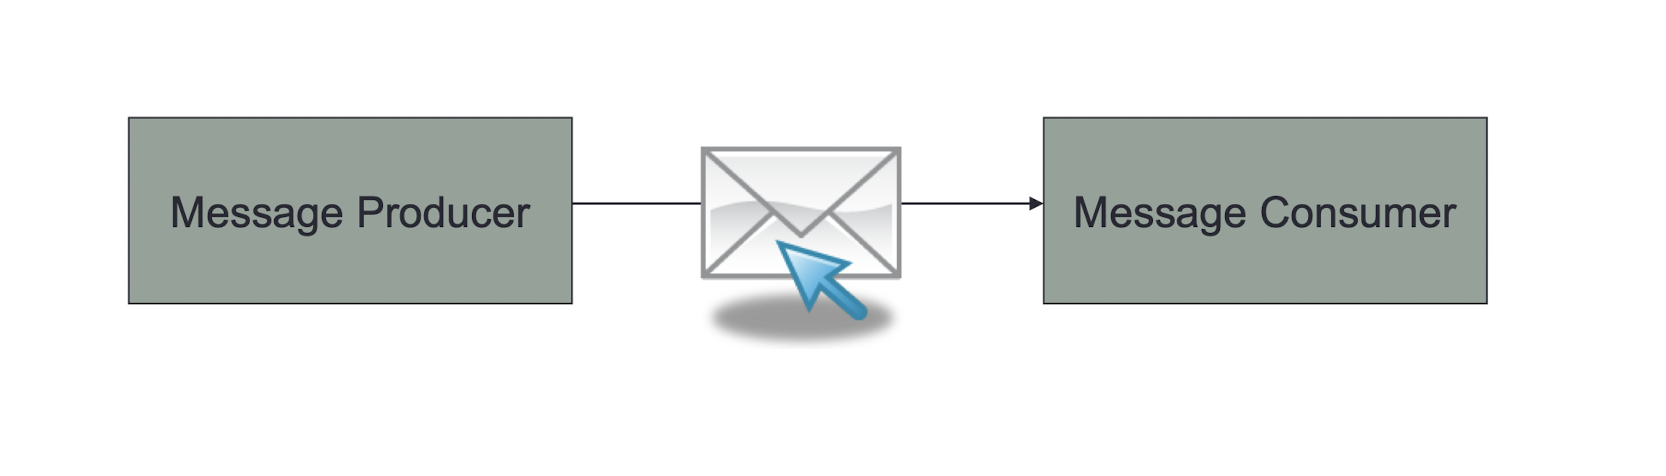
- According to the message passing mechanism
- Consumer will execute only (read the count) if the producer send a message to ask it to do so. Otherwise, consumer will wait
- Alternatively, the producer will continue execute only when it receive a reply from consumer indicating that consumer has finished the consumption
6. Introduction to Android
- What is Android?
- Android Versions and Its Feature Set
- The Android Architecture
- The Various Android Devices on The Market
- The Android Application Store – Google Play
- Integrated Development Environment (IDE)
1 | |
6.1 What is Android?
- An Open Platform for Mobile Development
- A hardware reference design for mobiles
- A Linux operating system kernel
- Open source libraries
- A run time environment
- An application framework and UI framework
- Some pre-installed applications
- Software Development Kit
- Android brings Internet-style innovation and openness to mobile phones
- Android offers a unified approach to application development.
- Developers need only develop for Android in general, and their applications should be able to run on numerous different devices, as long as the devices are powered using Android
6.2 Advantages to Manufacturers
- This development model makes Android very attractive to vendors, especially those companies affected by the phenomenon of Apple’s iPhone
- When the iPhone was launched, many smart-phone manufacturers had to scramble to find new ways of revitalizing their products
- These manufacturers saw Android as a solution, meaning they will continue to design their own hardware and use Android as the operating system that powers it
- Vendors (typically hardware manufacturers) can add their own proprietary extensions to Android and customize Android to differentiate their products from others.
6.3 The Birth of Android
- Initially developed by Android Inc.
- In 2005, acquired by Google
- In Nov 2007, Open Handset Alliance (OHA) was established
- A global alliance initialized by Google for reducing the cost for mobile equipment develop and facilitate technology exchange among members within the alliance
- http://www.openhandsetalliance.com/
- Mobile Operators, Handset Manufacturers, Semiconductor Companies, Software Companies, Commercialization Companies
6.4 Early Android Phones
- 22 Oct 2008: T-Mobile G1 released in US, manufactured by HTC
- Feb 2009: Android SDK v1.1 released
- 17 Feb 2009: T-Mobile G2 released
- 15 Apr 2009: Android SDK v1.5 released
- 24 Jun 2009: HTC Hero released HTC Hero
6.5 Android Versions
https://en.wikipedia.org/wiki/Android_version_history
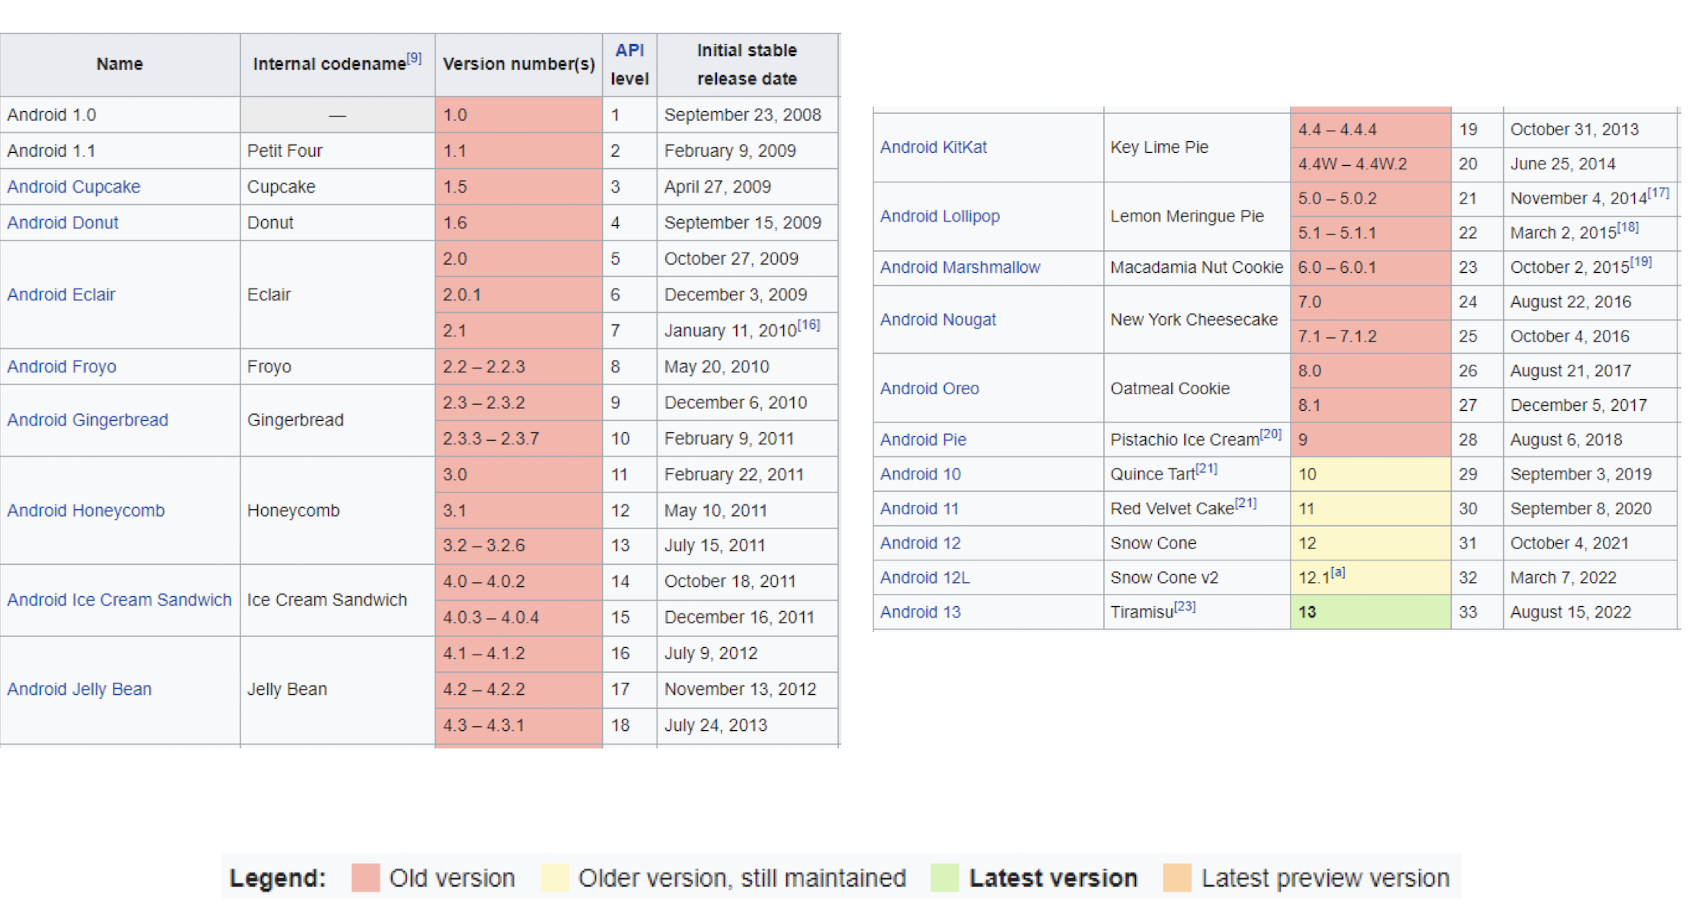
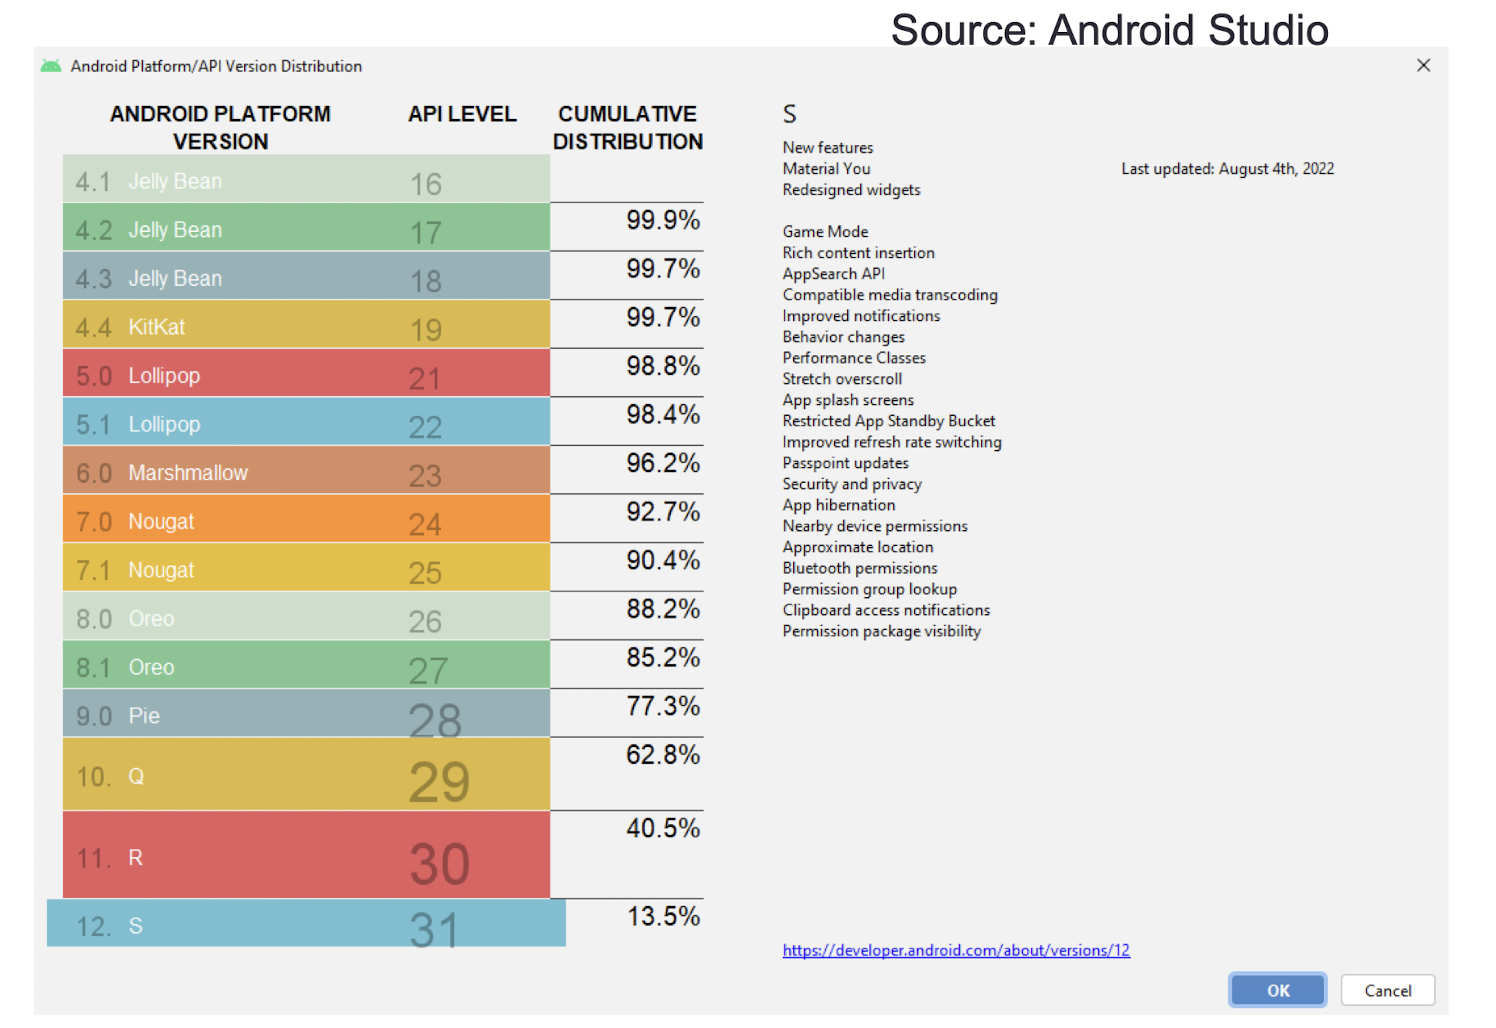
6.6 Android 11
- Release date: 8 September 2020
- Chat bubbles
- Screen recorder
- Notification history
- New permissions controls
- API distinction between standalone 5G NR and non-standalone 5G
- One-time permission
- Permissions auto-reset
- Wireless Android Auto on devices with 5GHz Wi-Fi
- Increased number of updatable core OS components in Google Play from 6 to 12
- Enterprise work profile privacy protections now apply on company-owned devices
Android 11 review
https://youtu.be/8FMK-dX6I8o
https://en.wikipedia.org/wiki/Android_version_history
6.7 Android 12
- Release date: 4 October 2021
- Easier Wi-Fi sharing.
- AVIF image support.
- Material You, an updated design language based on Material Design.
- Android Runtime (ART) module added to the updatable core OS components via Google Play, added functionality to existing modules.
- Gestures can work in immersive mode.
- Performance improvements to system services to improve transitions, power efficiency, and reduce app startup times.
- Android 12L (Release date: March 7, 2022)
- Improvements specific for foldable phones, tablets, desktop-sized screens and Chromebooks, and modifications to the user interface to tailor it to larger screens
Android 11 review
https://youtu.be/6c8i1nK8MF
https://en.wikipedia.org/wiki/Android_version_history
6.8 Android License
- Android’s source code was released under the open source Apache License
- That means anyone who wants to use Android can do so by downloading the full Android source code
- Vendors (typically hardware manufacturers) can add their own proprietary extensions to Android and customize Android to differentiate their products from others
6.9 The Great Debate
- Google vs Huawei
- Android is an open-source operating system, which means that any person or company can use it for whatever they like without cost
- While Huawei is unable to use Google-owned services and products in its phones, that doesn’t mean it can’t use Android itself
- However, many of the integral features of Android that users rely on aren’t included with “pure” Android and are actually owned by Google
- Theoretically, Huawei could use Google-less Android to power its smartphones and tablets indefinitely
https://www.androidauthority.com/huawei-google-android-ban-988382/
6.10 Android Devices
- Android devices come in all shapes and sizes including, but not limited to, the following types of devices
- Smartphones
- Tablets
- E-reader devices
- Internet TVs
- Automobiles
- Smart wears
Android Smartphones
Android Tablets
- Typically between 7” to 10”
- https://www.android.com
Android E-book Readers
- Barnes & Noble’s Nook
- https://www.android.com
Android TV
- TV and TV box
- https://www.android.com
Android Automobile System
- GPS Navigation System
Android Wearable devices
- Wear
- Glasses
6.11 Features of Android
The base Android OS supports:
- Storage
- SQLite, a lightweight relational database, for data storage
- Connectivity
- GSM/EDGE, IDEN, CDMA, EV-DO, UMTS, Bluetooth (includes A2DP and AVRCP), Wi-Fi, LTE, and WiMAX
- Messaging
- SMS and MMS
- Media support
- H.263, H.264 (in 3GP or MP4 container), MPEG-4 SP, AMR, AMR- WB (in 3GP container), AAC, HE-AAC (in MP4 or 3GP container), MP3, MIDI, Ogg Vorbis, WAV, JPEG, PNG, GIF, and BMP
- Hardware support
- Accelerometer sensor, camera, digital compass, proximity sensor, and GPS
- Multi-touch screens
- Multi-tasking applications
- Tethering
- Sharing of Internet connections as a wired/wireless hotspot
6.12 Android Architecture
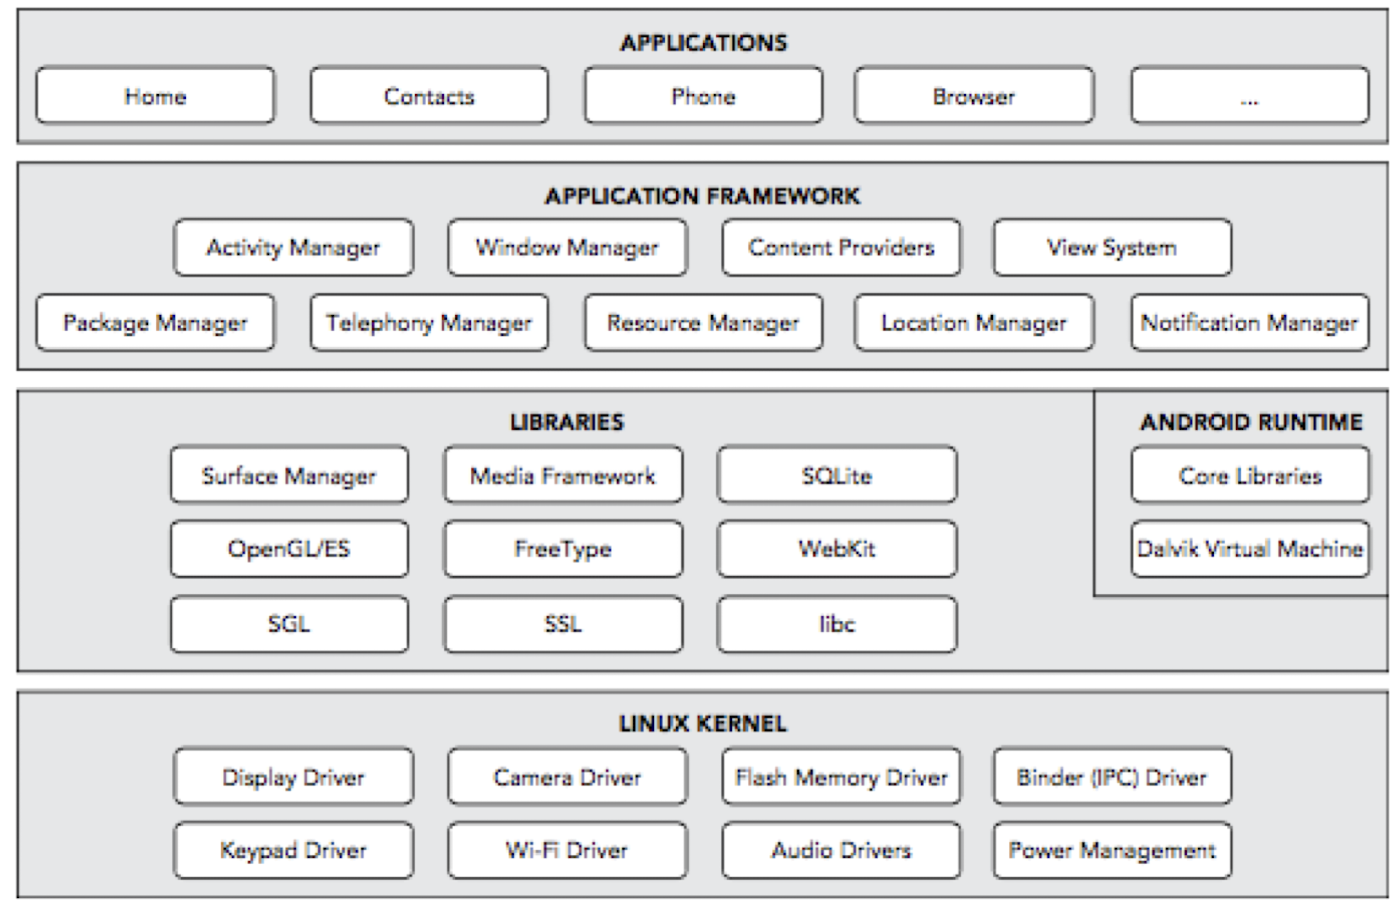
6.13 Linux Kernel
This is the kernel on which Android is based. This layer contains all the low-level device drivers for the various hardware components of an Android device
Works as a HAL (Hardware Abstraction Layer)
- Device drivers
- Memory management
- Process management
- Networking

- Official: Android is built on the Linux kernel, but Android is not Linux
- No native window
- No glibc
- Not all standard Linux utilities included
- Feature Added / Modified:
- Inter Process Communication (IPC) Binder
- Power Manager
- ……
- References:
- Android/Linux kernel fight continues
- Android and the Linux kernel community
6.14 Libraries
- These contain the code that provides the main features of an Android OS. For example, the SQLite library provides database support so that an application can use it for data storage. The WebKit library provides functionalities for web browsing
- C/C++ libraries
- Interface through Java
- Surface manager – Handling UI Windows
- 2D and 3D graphics
- Media codecs, SQLite, Browser engine
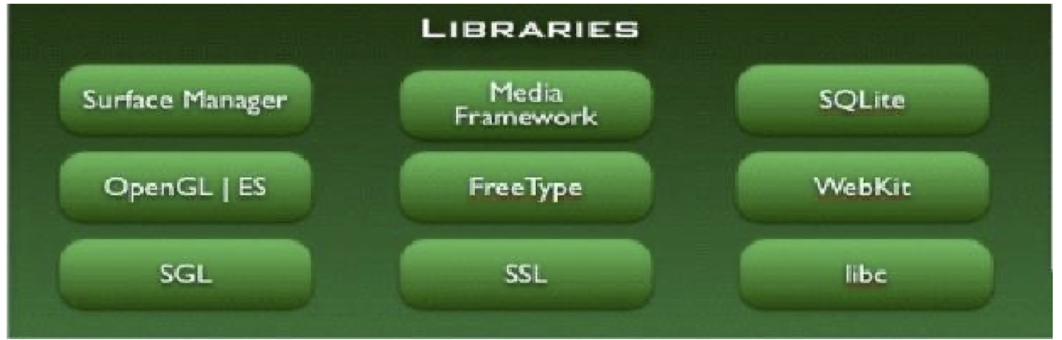
6.15 Android Runtime
- The Android runtime is located in the same layer with the libraries and provides a set of core libraries that enable developers to write Android apps using the Java programming language
- The Android runtime also includes the Dalvik virtual machine, which enables every Android application to run in its own process, with its own instance of the Dalvik virtual machine. (Android applications are compiled into Dalvik executables)
- Dalvik is a specialized virtual machine designed specifically for Android and optimized for battery-powered mobile devices with limited memory and CPU power

- Dalvik VM (not JVM, for versions before 5.0)
- Dex files (Dalvik Executable Files)
- Compact and efficient than class files
- Limited memory and battery power
- Core Libraries
- Java Standard edition
- Collections, I/O etc…
Android Runtime was designed specifically for Android to meet the needs of running in an embedded environment where you have limited battery, limited memory, limited CPU
Android application are compiled to Dalvik bytecode
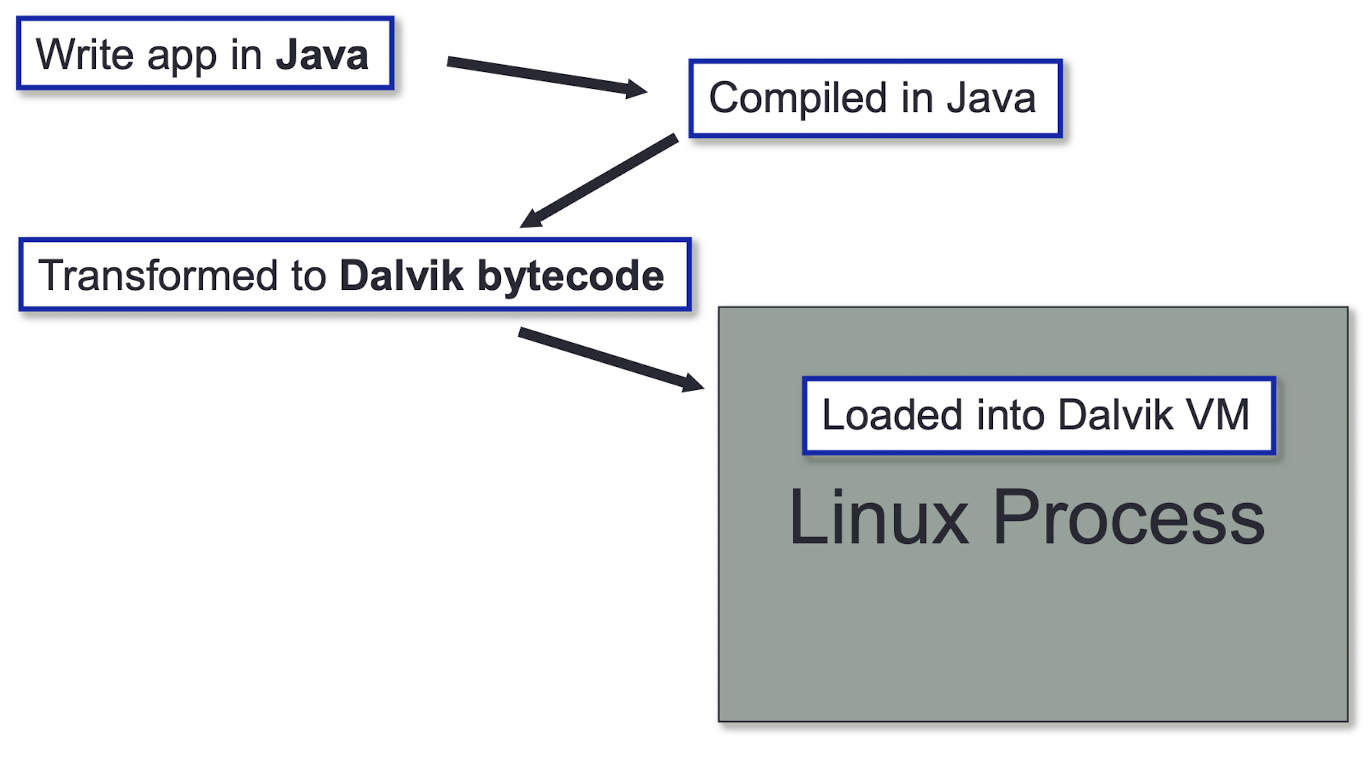
- The Dalvik runtime is optimized for mobile applications
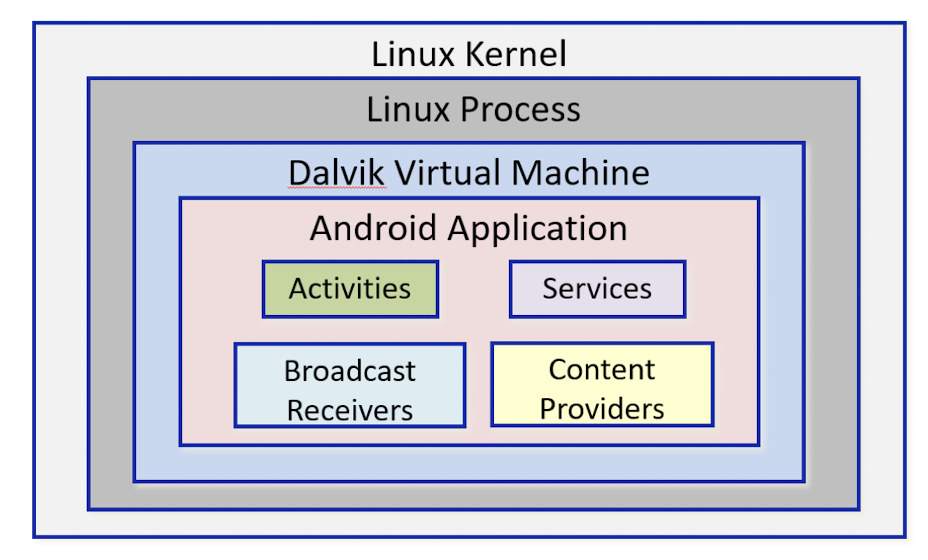
- Run multiple VMs efficiently
- Each app has its own VM
6.15.1 Android Runtime (ART) vs. Dalvik Runtime
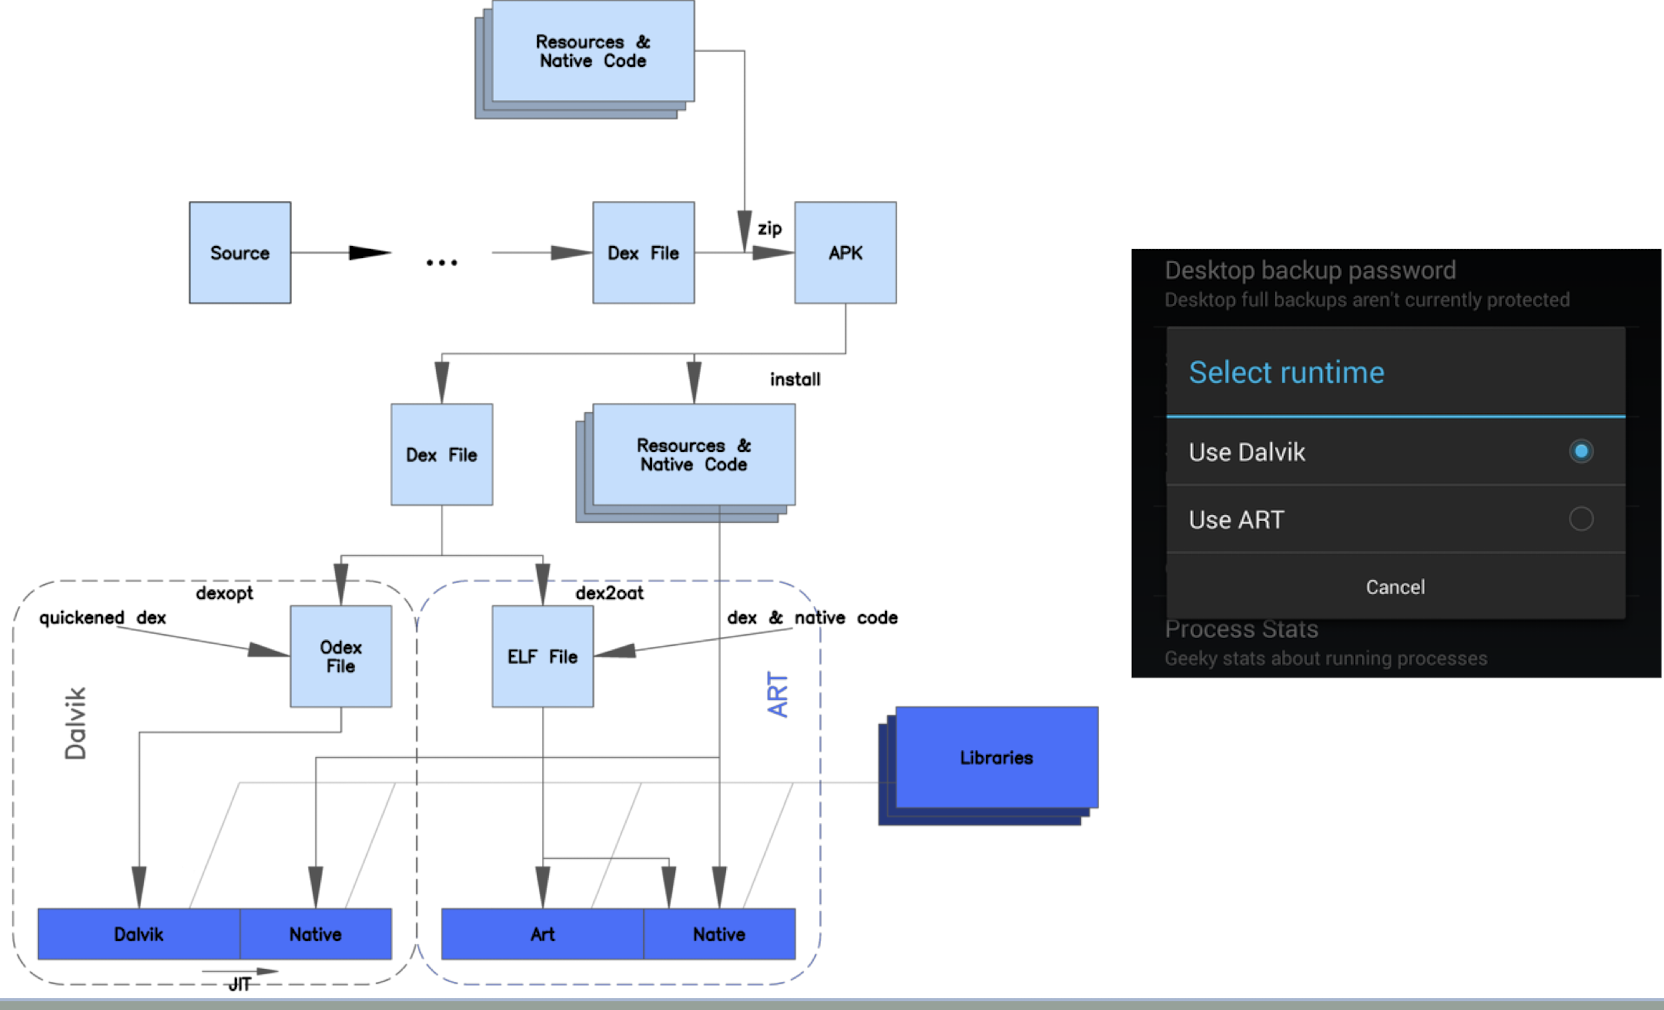
ART introduces the use of ahead-of-time (AOT) compilation by compiling entire applications into native machine code upon their installation.
It improves the overall execution efficiency and reduces power consumption, which results in improved battery autonomy
For backward compatibility, ART uses the same input bytecode as Dalvik, supplied through standard .dex files as part of APK files, while the .odex files are replaced with Executable and Linkable Format (ELF) executables
Once an application is compiled, it is run solely from the compiled ELF executable, which eliminates various application execution overheads associated with Dalvik’s interpretation and trace-based JIT (Just In Time) compilation
As a downside, ART requires additional time for the compilation when an application is installed, and applications take up slightly larger amounts of secondary storage (e.g., flash memory) to store the compiled code
- But faster
6.16 Application Framework
- The application framework exposes the various capabilities of the Android OS to application developers so that they can make use of them in their applications
- API interface
- E.g., Activity manager – manages application life cycle.

6.17 Applications
- At this top layer are the applications that ship with the Android device (such as Phone, Contacts, Browser, and so on), as well as applications that you download and install from the Google Play. Any applications that you write are located at this layer
- Built in and user apps
- Can replace built in apps

6.18 The Android UI Dilemma
- LePhone?
- OMS?
- Meizu?
- ShanZhai?
6.19 How does Google Make Money?
- Does Google charge mobile phone manufacturers to use Android OS on their devices?
- Google avoided additional costs for paying to be a default search engine of any other OS
- Google paid Apple $1 billion in 2014 to keep Google search bar on iPhone
- Google Play?
- In 2018, Google Play generated gross revenue of 24.8 billion USD as compared to the 19.5 billion USD in the previous year.
https://www.feedough.com/how-does-google-make-money-from-android/
- Google is an advertising company
- Major revenue comes from advertising
- AdWords and Search Advertising
- The bulk of Google’s $110.8 billion revenue in 2017 came from its proprietary advertising service, Google AdWords
- When you use Google to search for anything from financial information to local weather, you’re given a list of search results generated by Google’s algorithm
- The algorithm attempts to provide the most relevant results for your query, and, along with these results, you may find related suggested pages from an AdWords advertiser
https://www.investopedia.com/articles/investing/020515/business-google.asp
- AdWords and Search Advertising
- AdWords advertisements integration touches almost all of Google’s web properties
- Any recommended websites you see when logged into Gmail, YouTube, Google Maps, and other Google sites are generated through the AdWords platform
- To gain the top spot in Google advertisements, advertisers have to outbid each other. Higher bids move up the list while low bids may not even be displayed
- Advertisers pay Google each time a visitor clicks on an advertisement
- A click may be worth anywhere from a few cents to over $50 for highly competitive search terms, including insurance, loans and other financial services
6.20 Platform Comparison
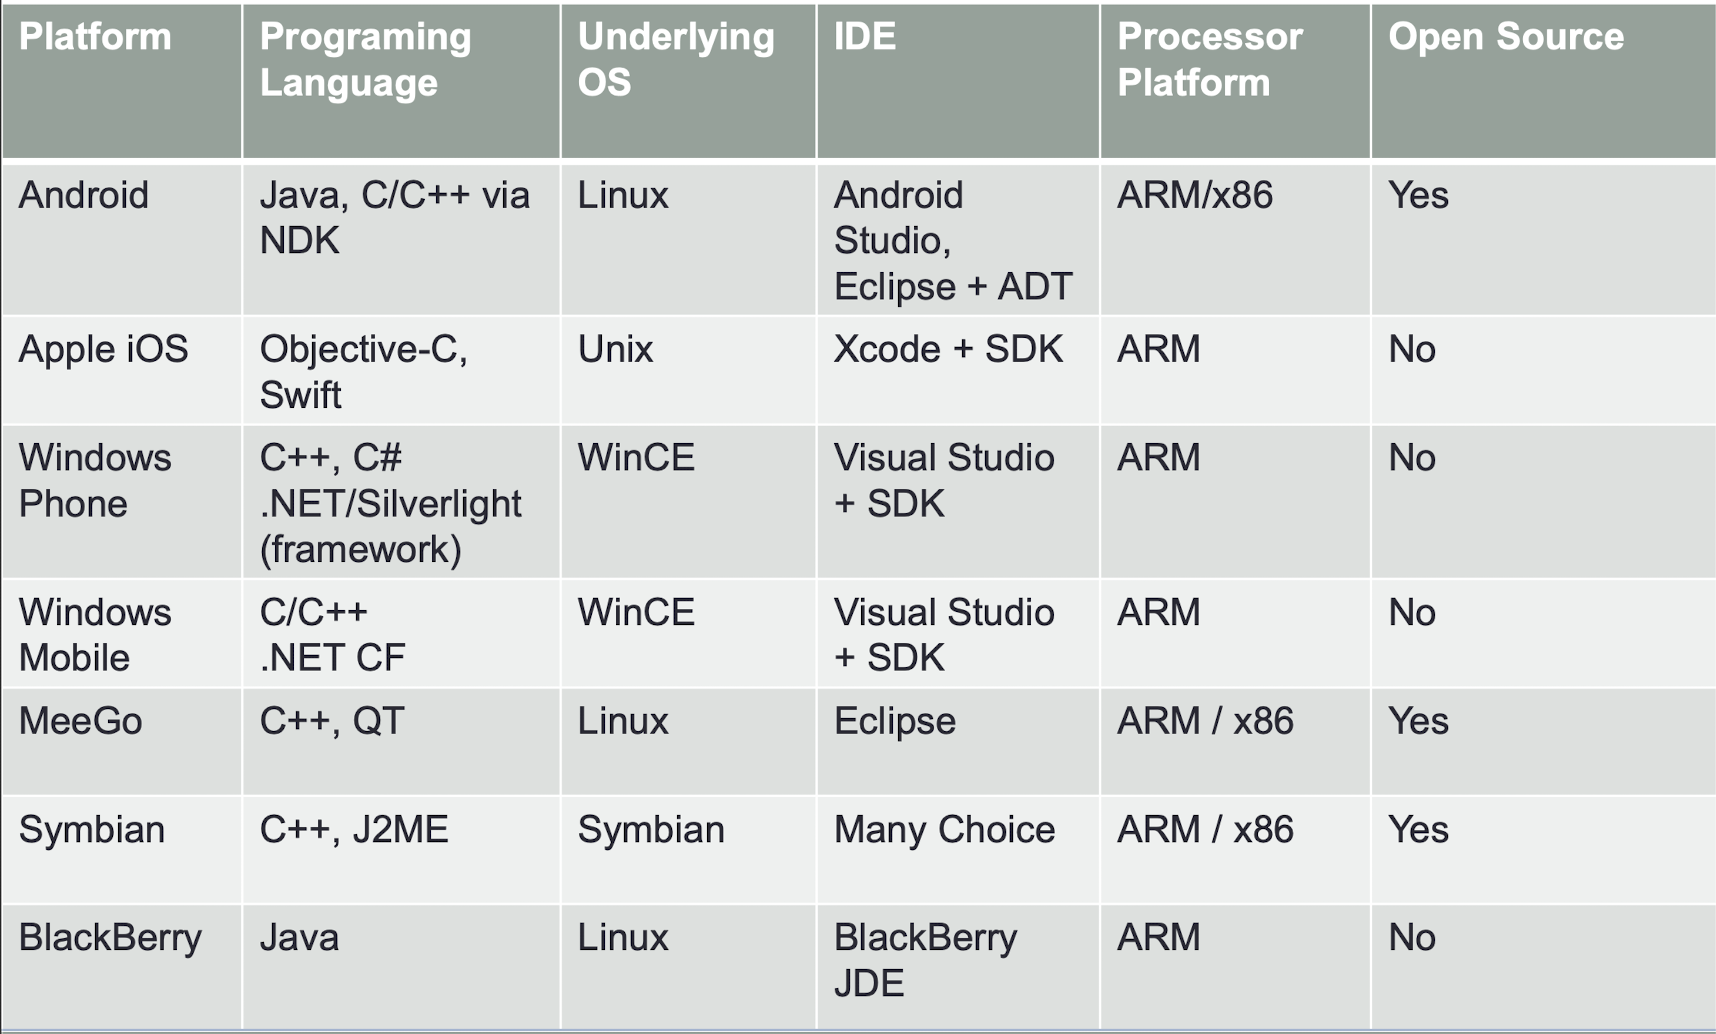
6.21 Smartphone OS Market Share
6.21.1 Smartphone OS Market Share (2007-2011)
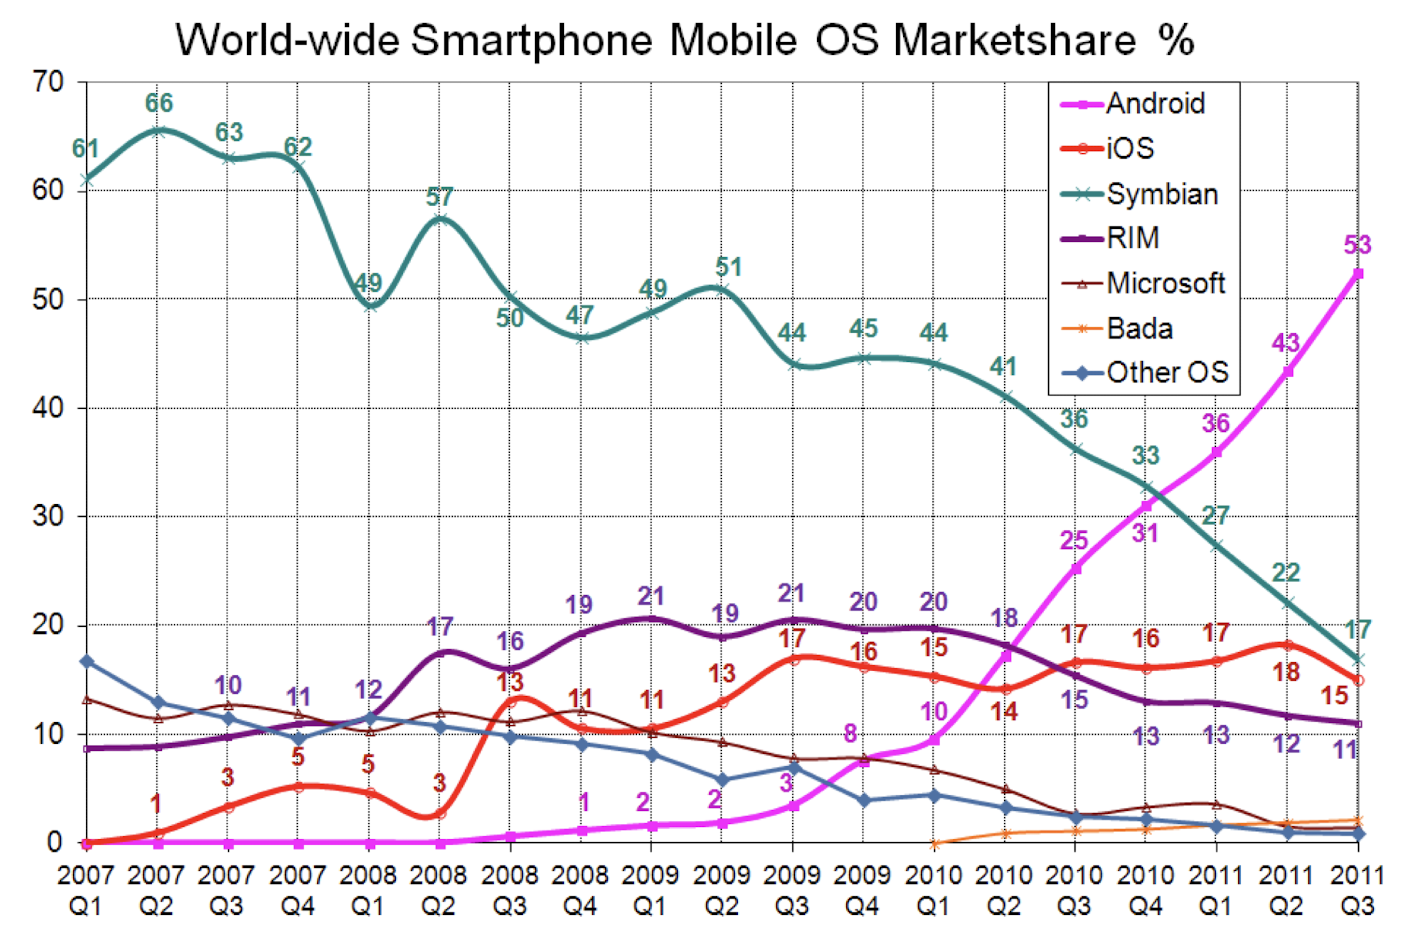
6.21.2 Smartphone OS Market Share (2012-2016)
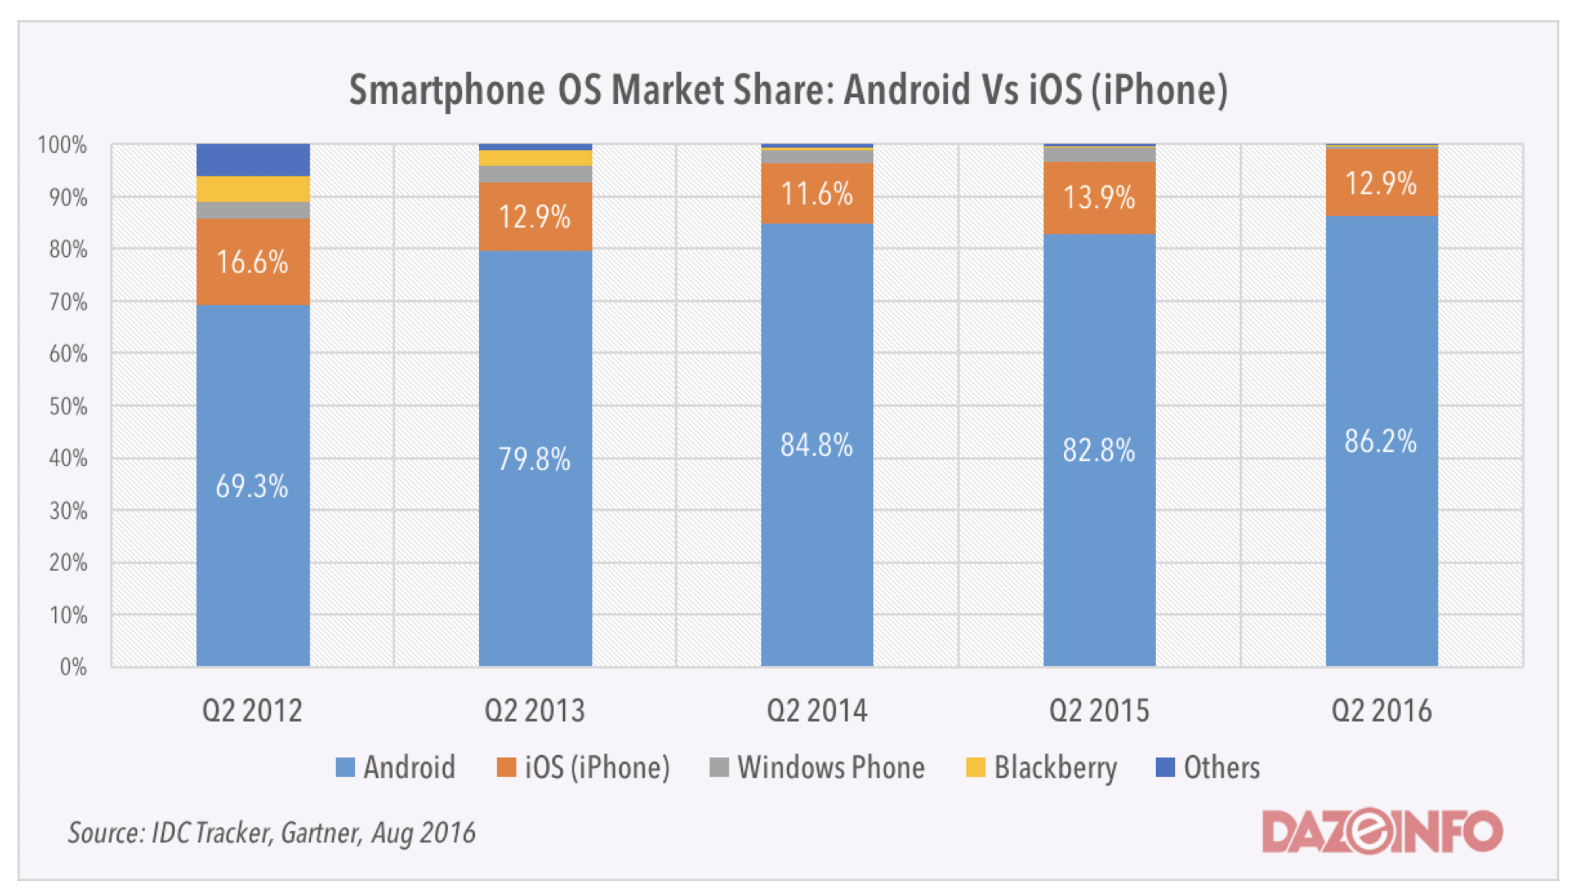
6.21.3 Smartphone OS Market Share (prediction from 2014 to 2018)
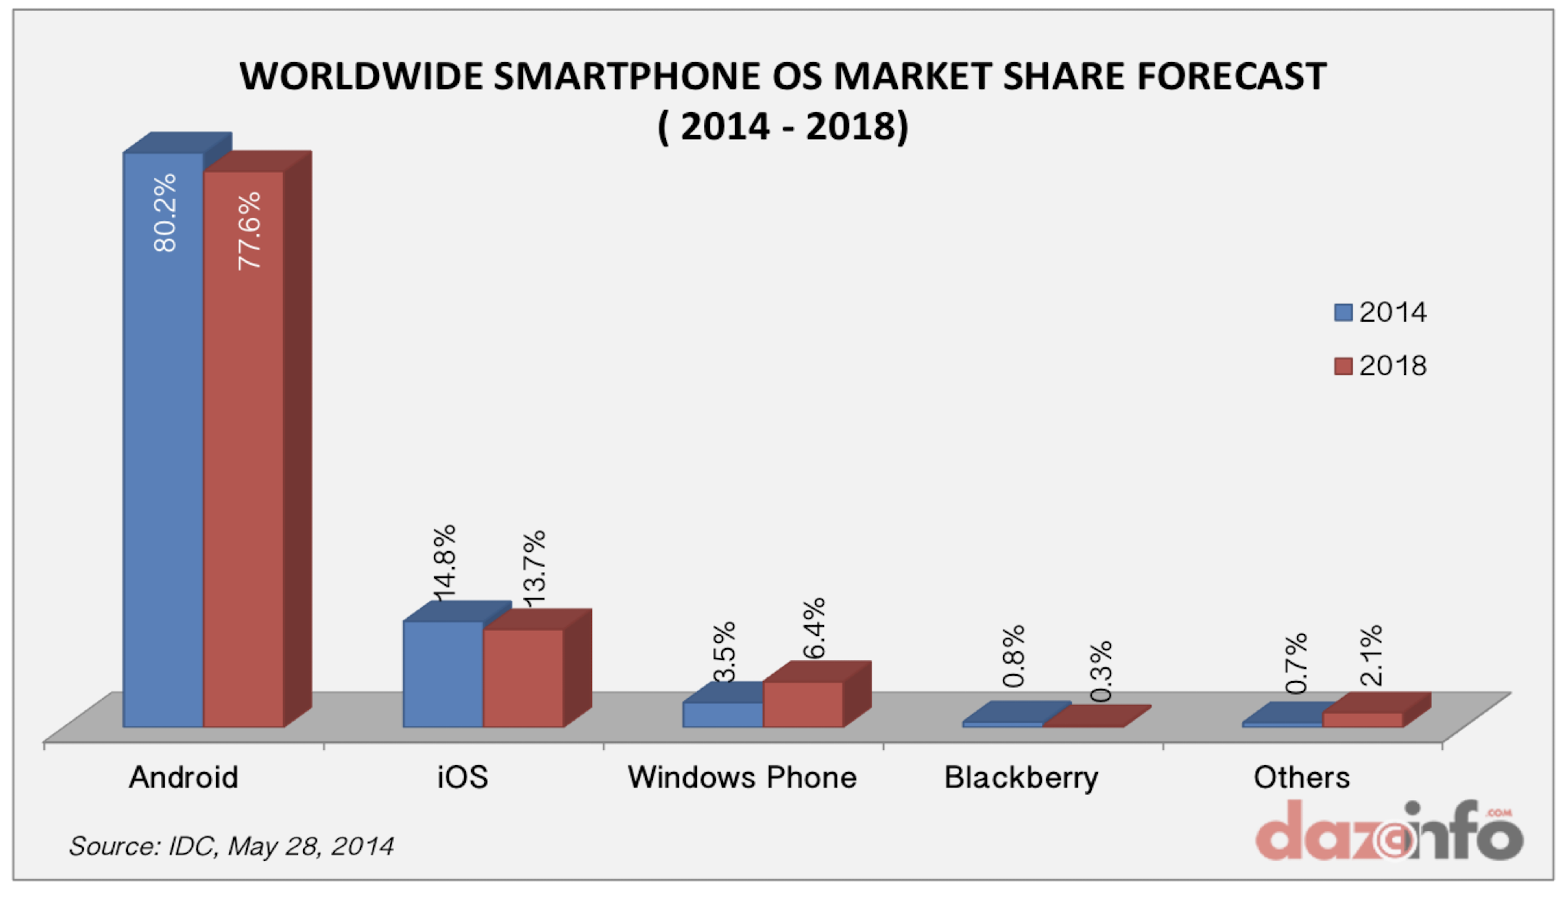
6.21.4 Smartphone OS Market Share (prediction from 2016 to 2022)
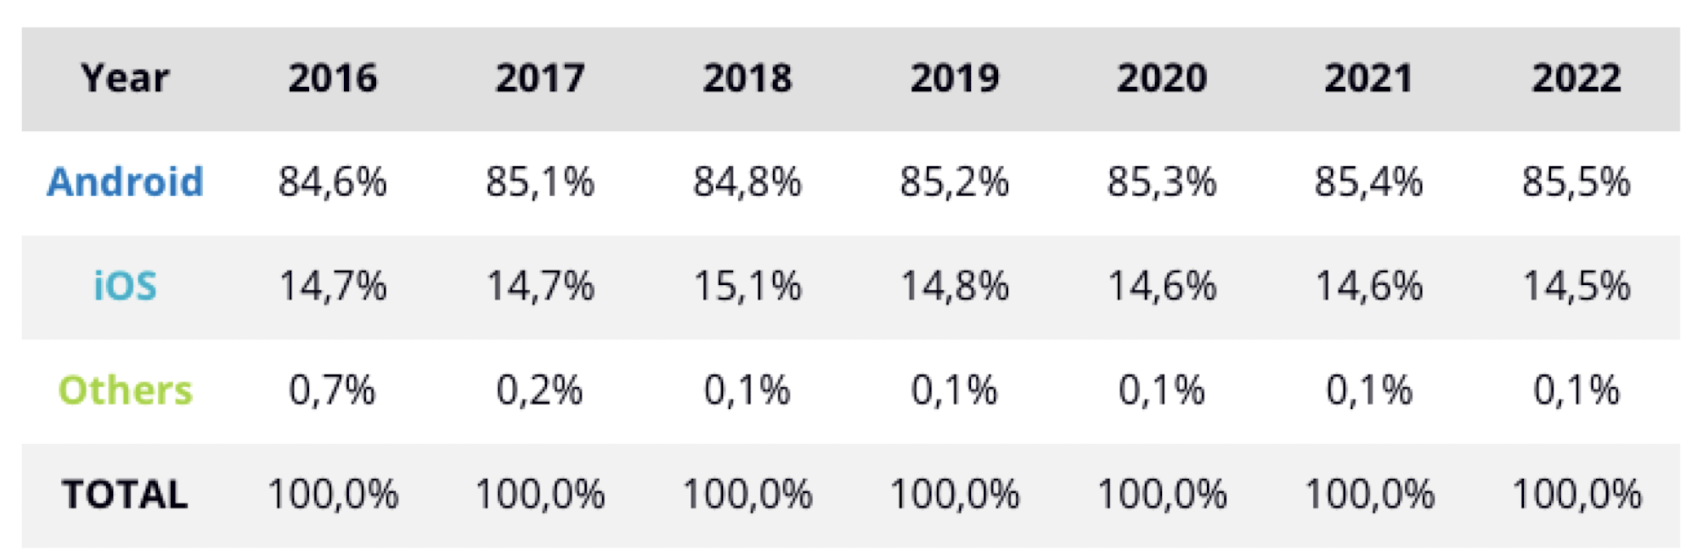
6.21.5 Smartphone OS Market Share (prediction from 2016 to 2022)
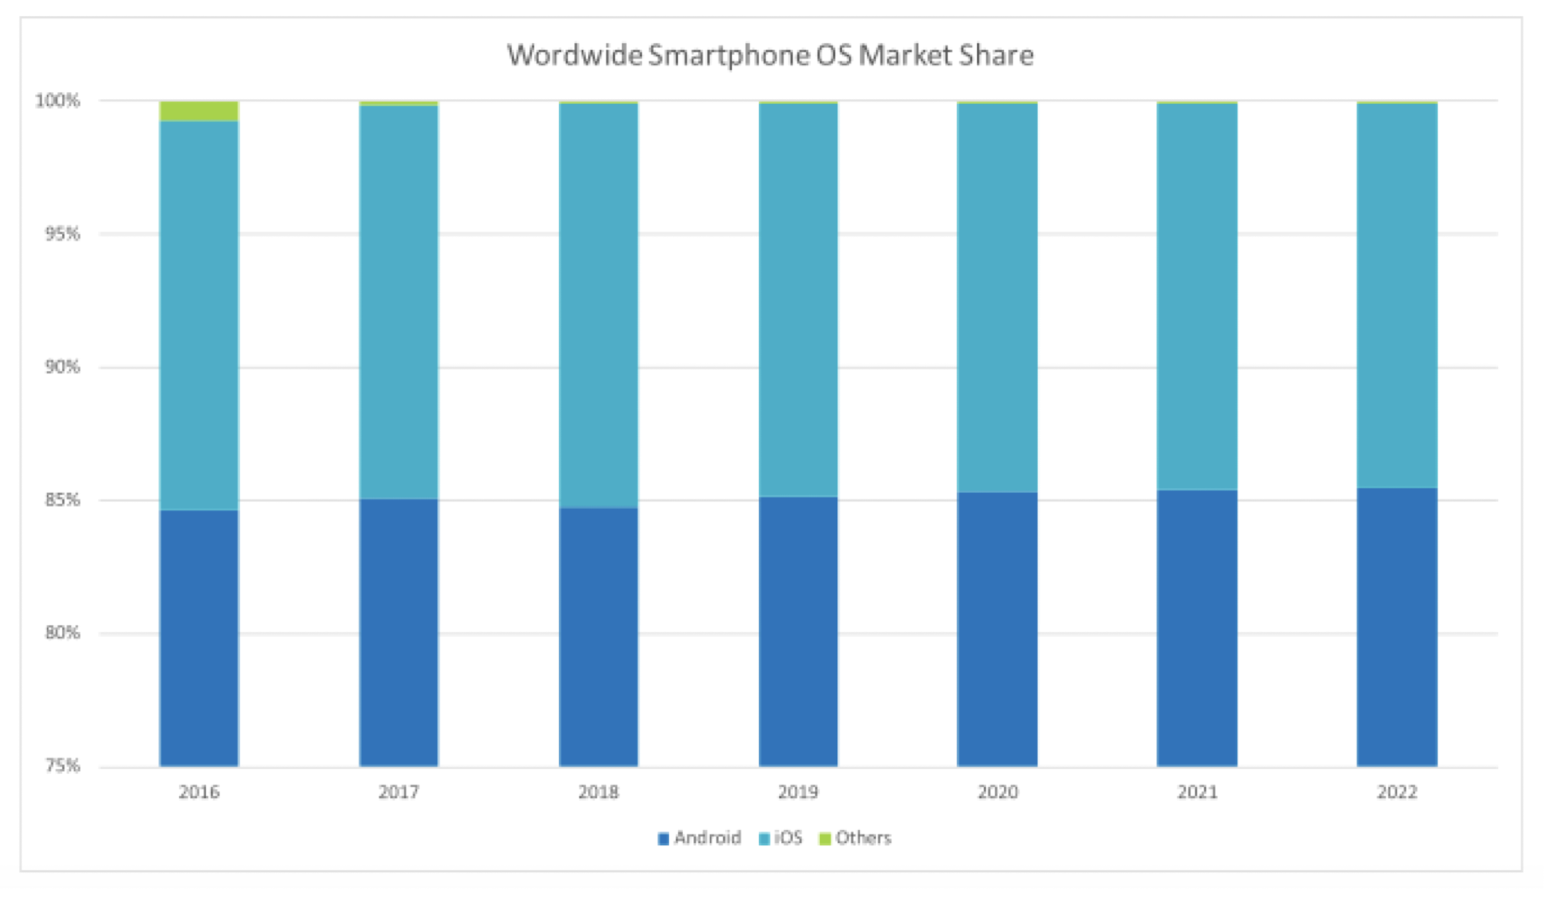
6.21.6 Smartphone OS Market Share (2009-2022)
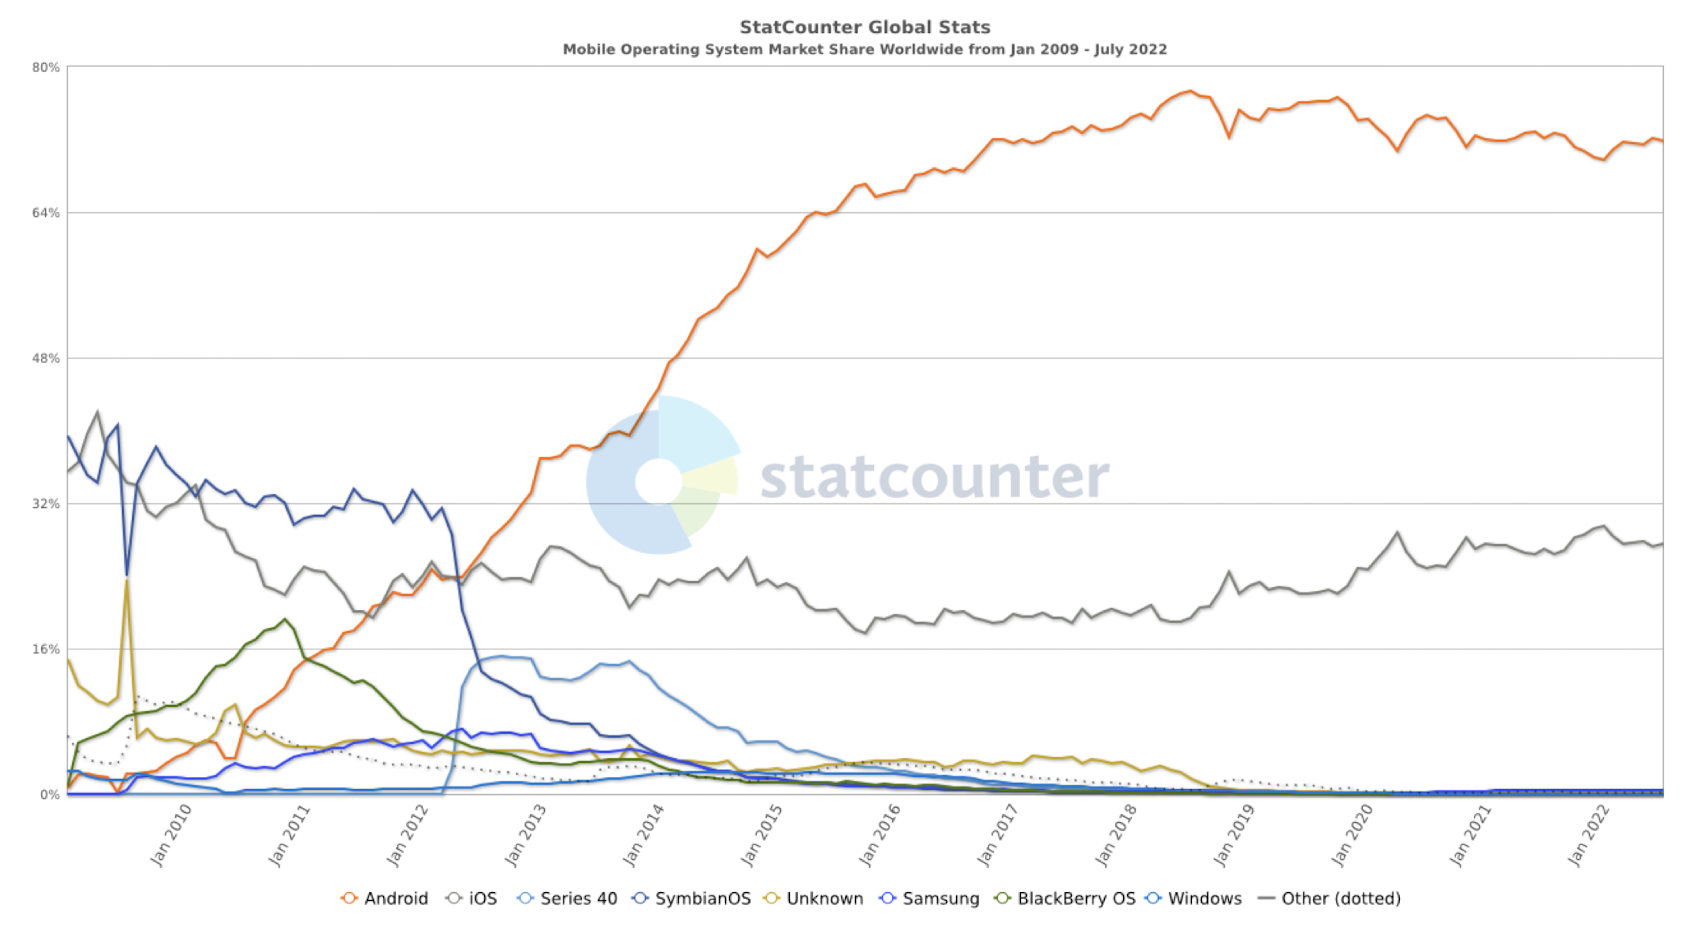
https://gs.statcounter.com/os-market-share
6.21.7 Net Revenue per Download (2014 – Q1 2018)
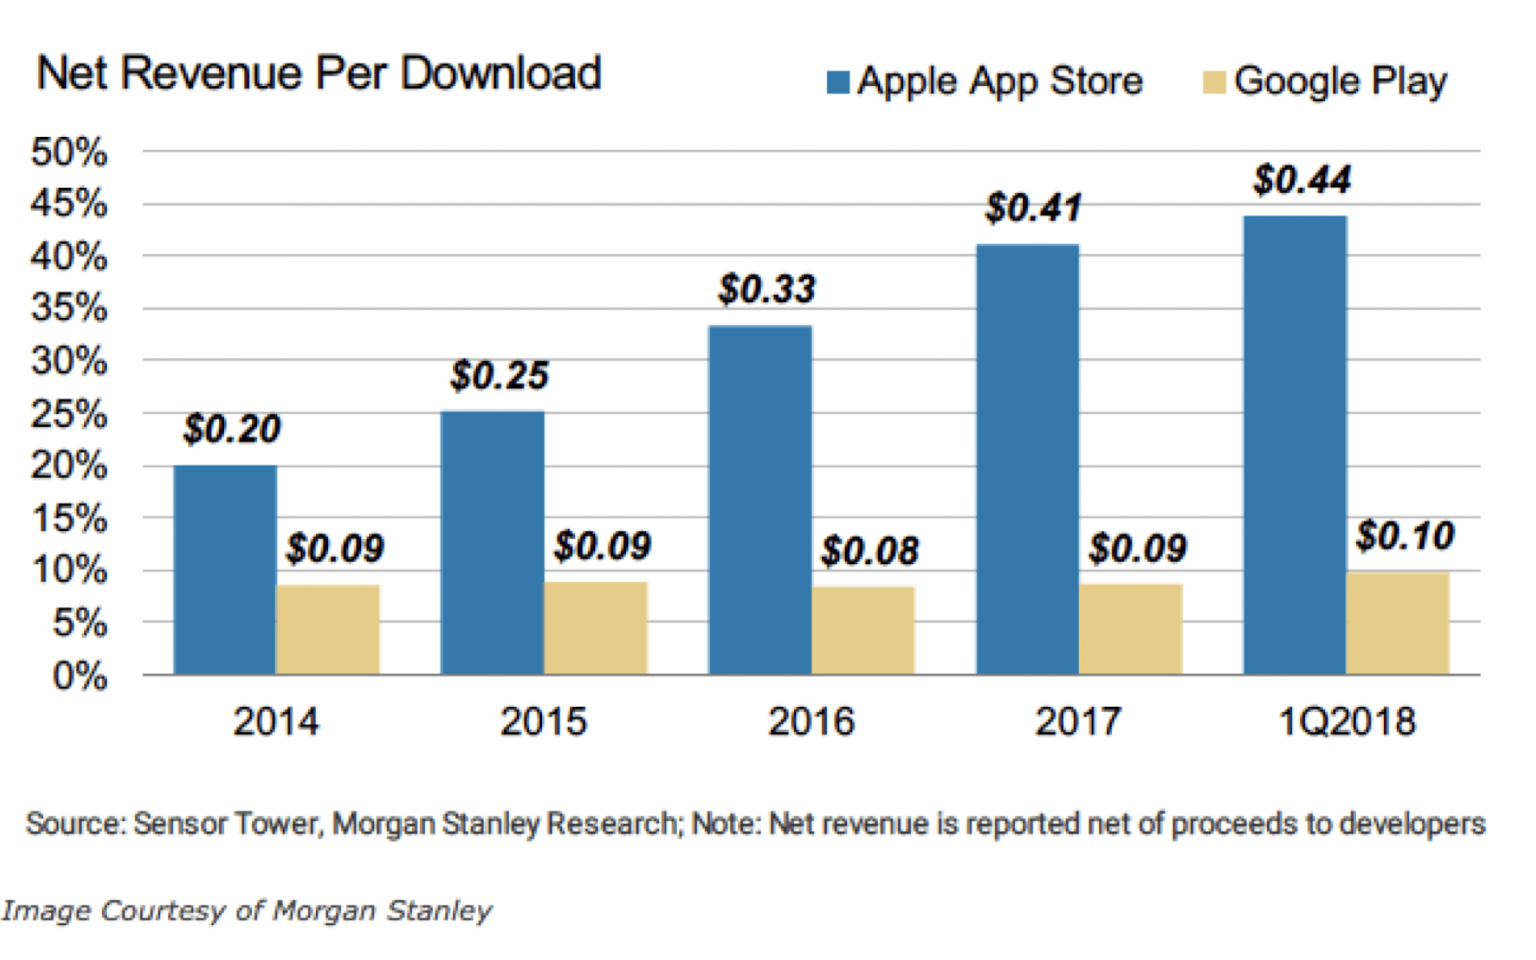
6.21.8 Net Revenue per Download (2014 – Q1 2018)
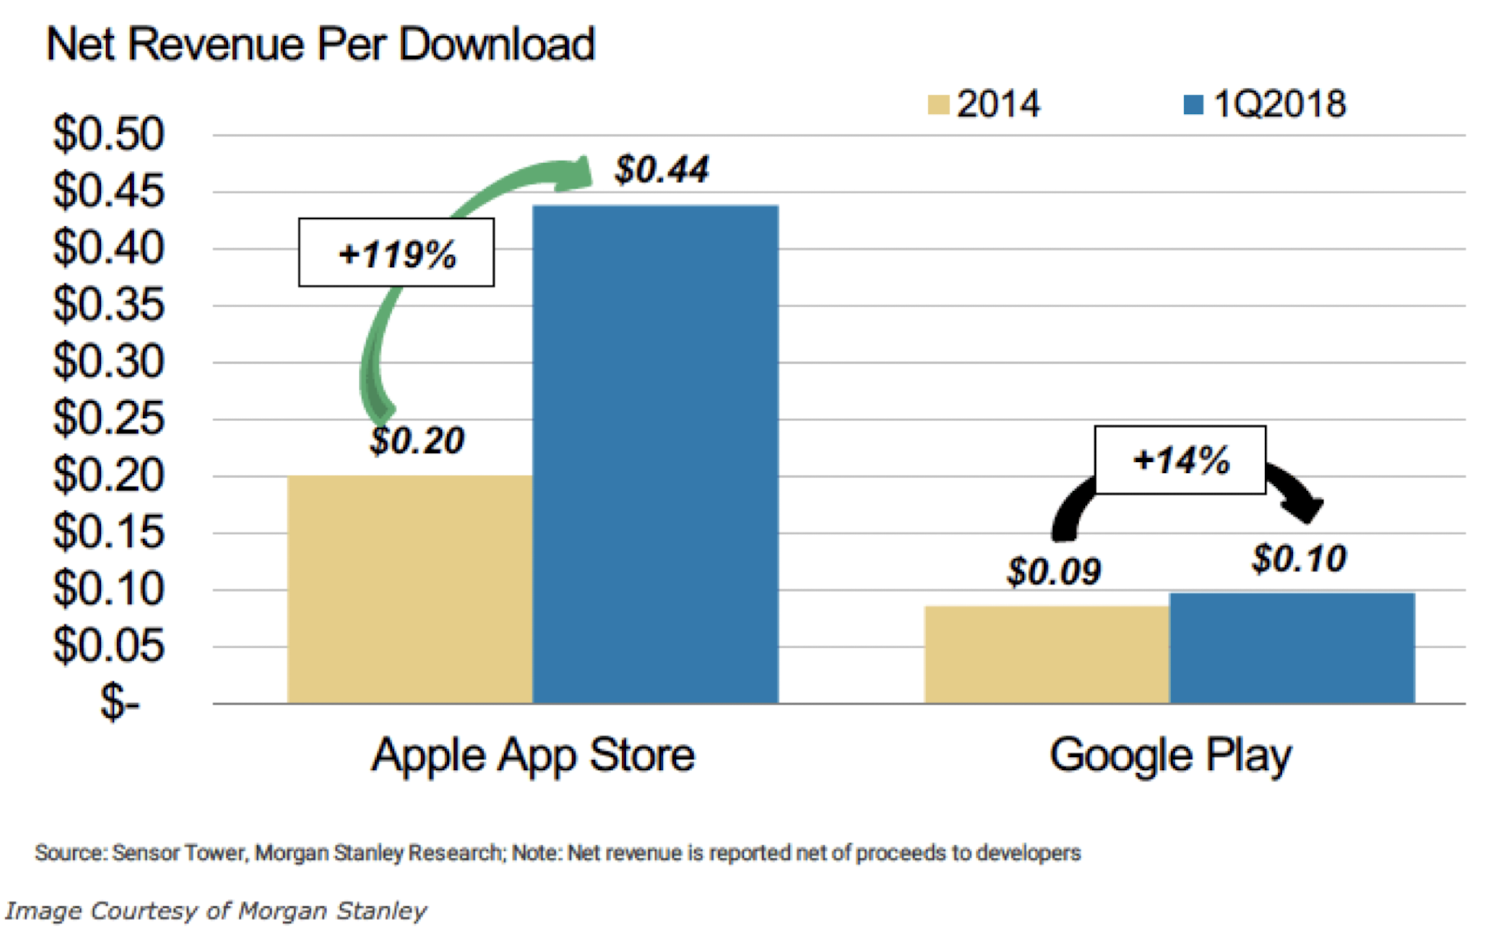
6.21.9 Worldwide App Downloads and Gross Consumer Spend (Q1 2018)
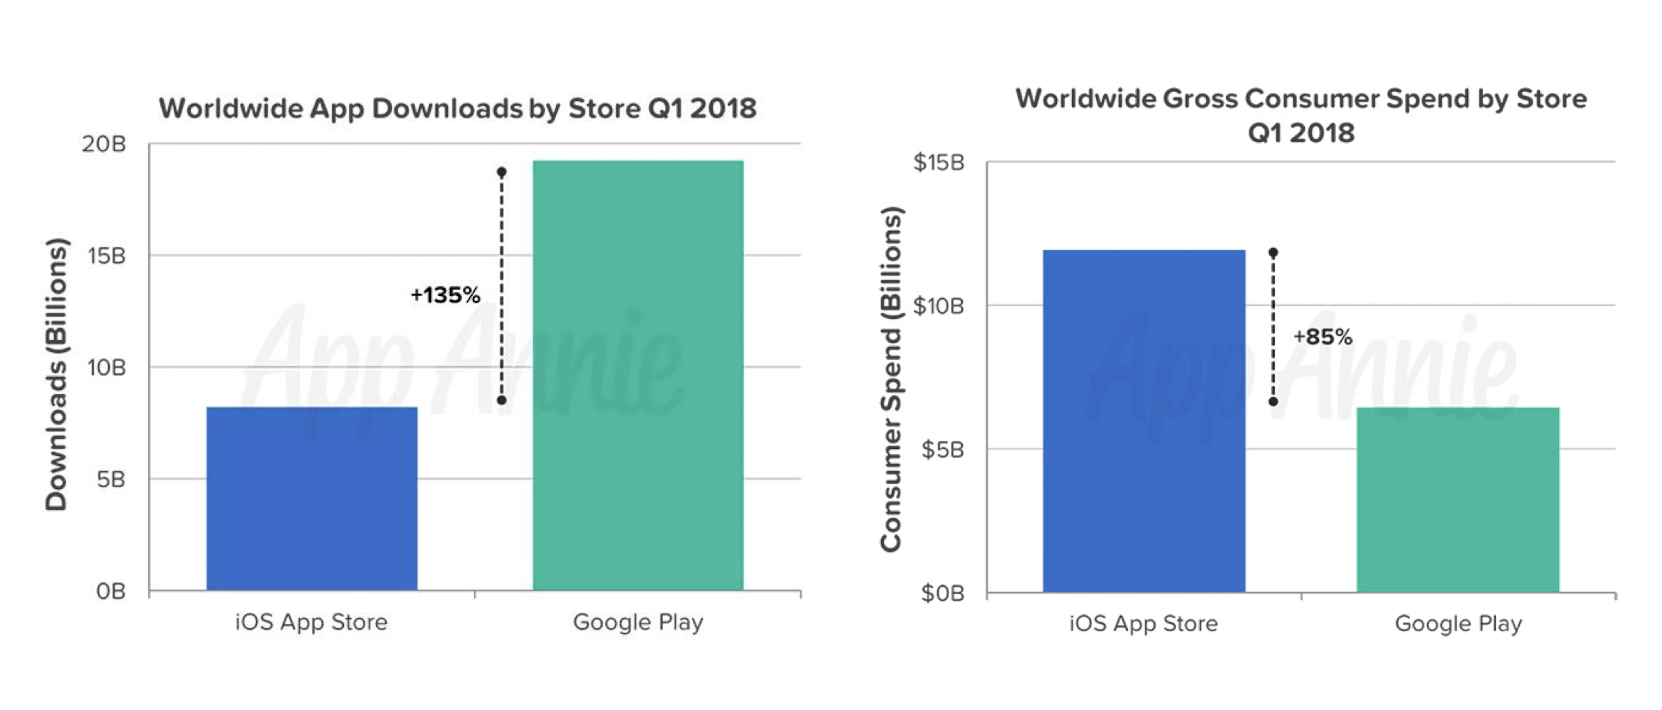
6.21.10 Top Countries by Downlaods and Revenue (2017)
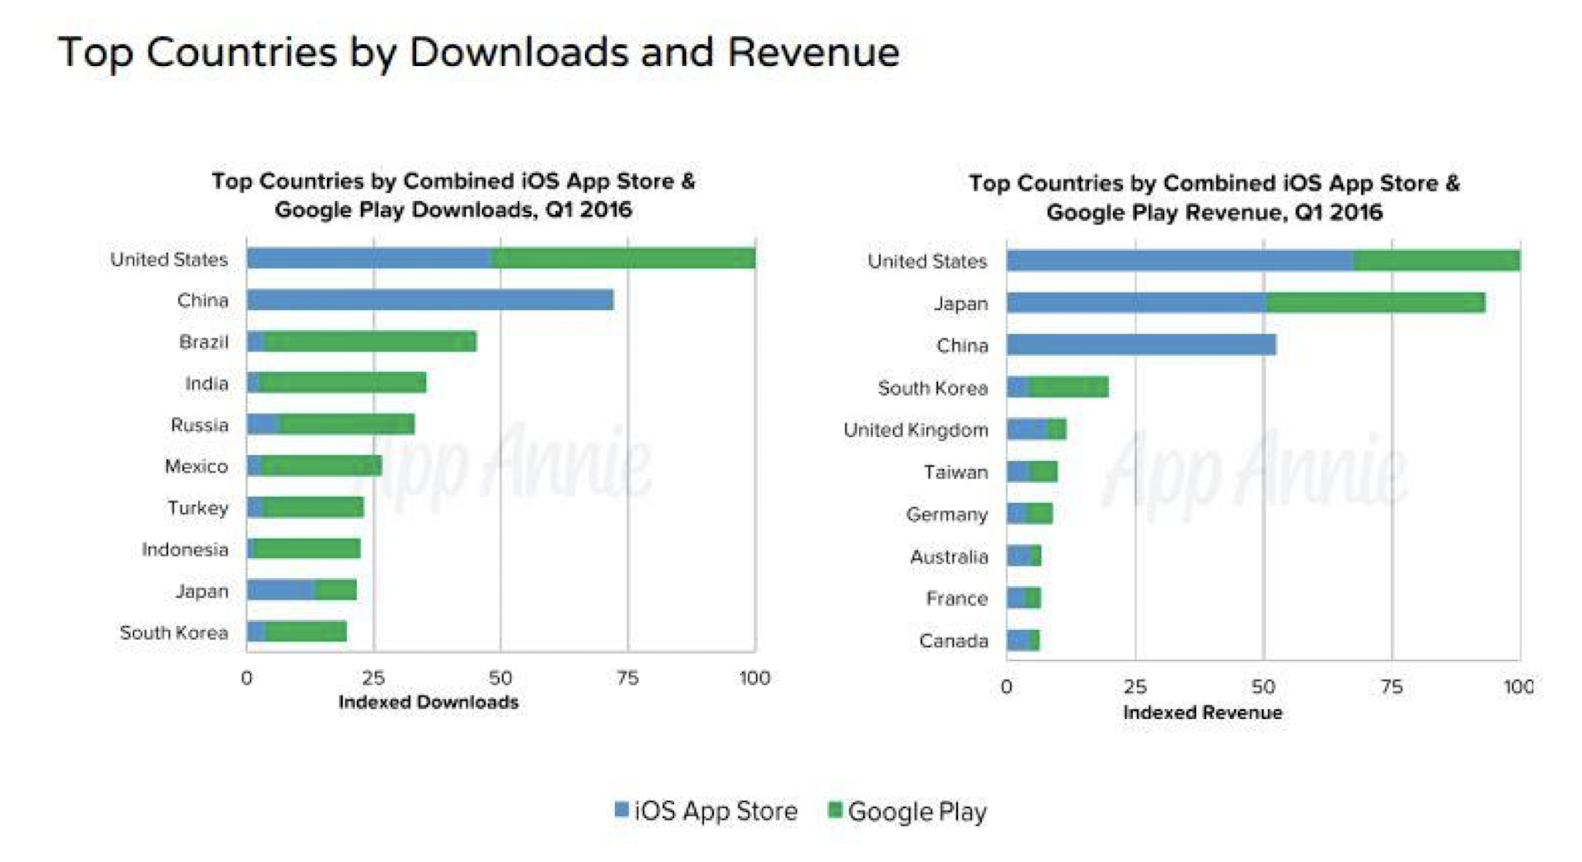
6.22 Numbers between Apple and Android
- The numbers do not reflect how good or bad either platform is
- While the numbers may seem like Android devices are not doing well when it comes to generating revenues, Apple’s pool of devices is much smaller
- Apple’s software ecosystem is consistent, and most of its devices have the latest version of iOS, making all of the latest apps compatible with iPhones and iPads
- Most Android devices outside of flagships do not receive consistent updates and are ‘outdated,’ making it hard for new or updated apps to run efficiently on them
- The closed source nature of Apple’s ecosystem makes it much more favorable for Apple’s app business while Google does not even come close to Apple’s numbers
https://www.mobilescout.com/tech/news/n106111/apple-app-store-makes-4-times-revenue-play-store.html
6.23 Android IDE
Integrated Development Environment (IDE):
- software application that provides comprehensive facilities to computer programmers for software development
- source code editor
- a compiler
- build automation tools
- debugger
- e.g., IDE for Android: Android Studio, Eclipse IDE for iOS: Xcode
6.24 Android Development Tools
- Mainstream:
- Android Studio + Android SDK
- Eclipse + Android SDK + ADT plug-in
- App Inventor (WYSIWYG Environment)
- Non-mainstream:
- ANT or makefile
- Command Line + Notepad
6.25 Android Studio
AndroidManifest.xml contains all the important information for the Android application (e.g., Application name, icon, package name, modules, SDK version, etc.) “java” directory contains all the *.java source files that can be edited and created by the user MainActivity.javawas automatically created according to the “Create Activity” option “
res” directory contains
- “drawable” for storing graphic files
- “layout” for storing UI related layout through activity_main.xml
- “values” for storing color, style, theme, and string related file (constants) through xml files
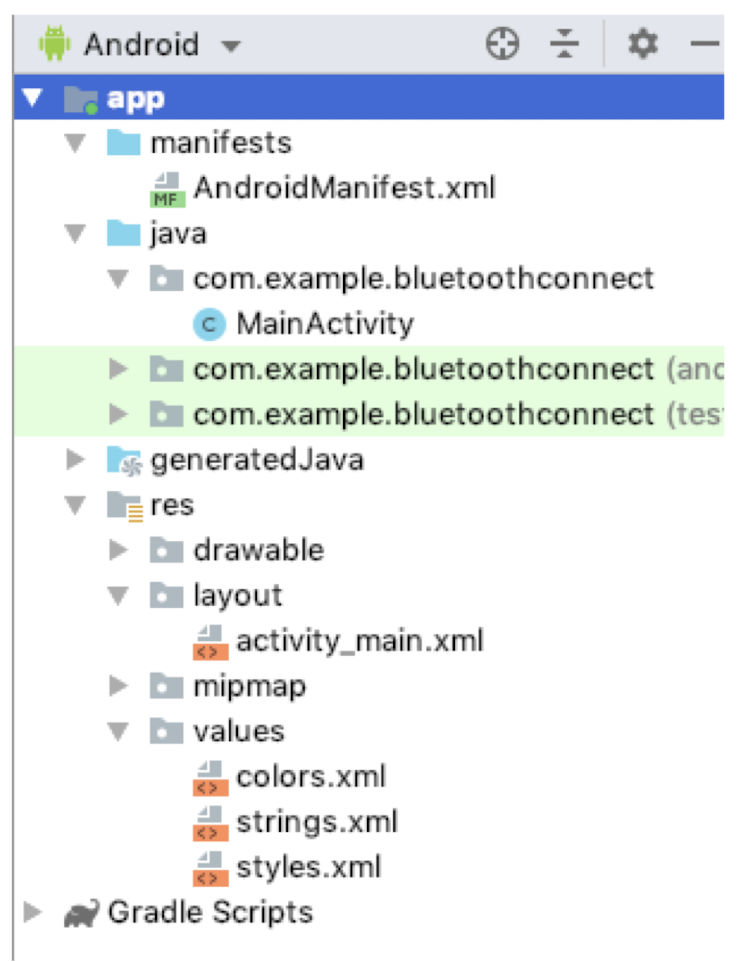
6.26 Reference
- Beginning Android Programming with Android Studio, J. F. DiMarzio, Wrox, 2017
- https://www.android.com/android-10/
6.27 Tutorial: Program Modeling Concepts in Embedded Systems - History of Mobile Systems
- Program Modeling Concepts in Embedded Systems
- Sequential Program Modeling
- Data Flow Modeling
- State Machine Modeling
6.27.1 Sequential Program Modeling
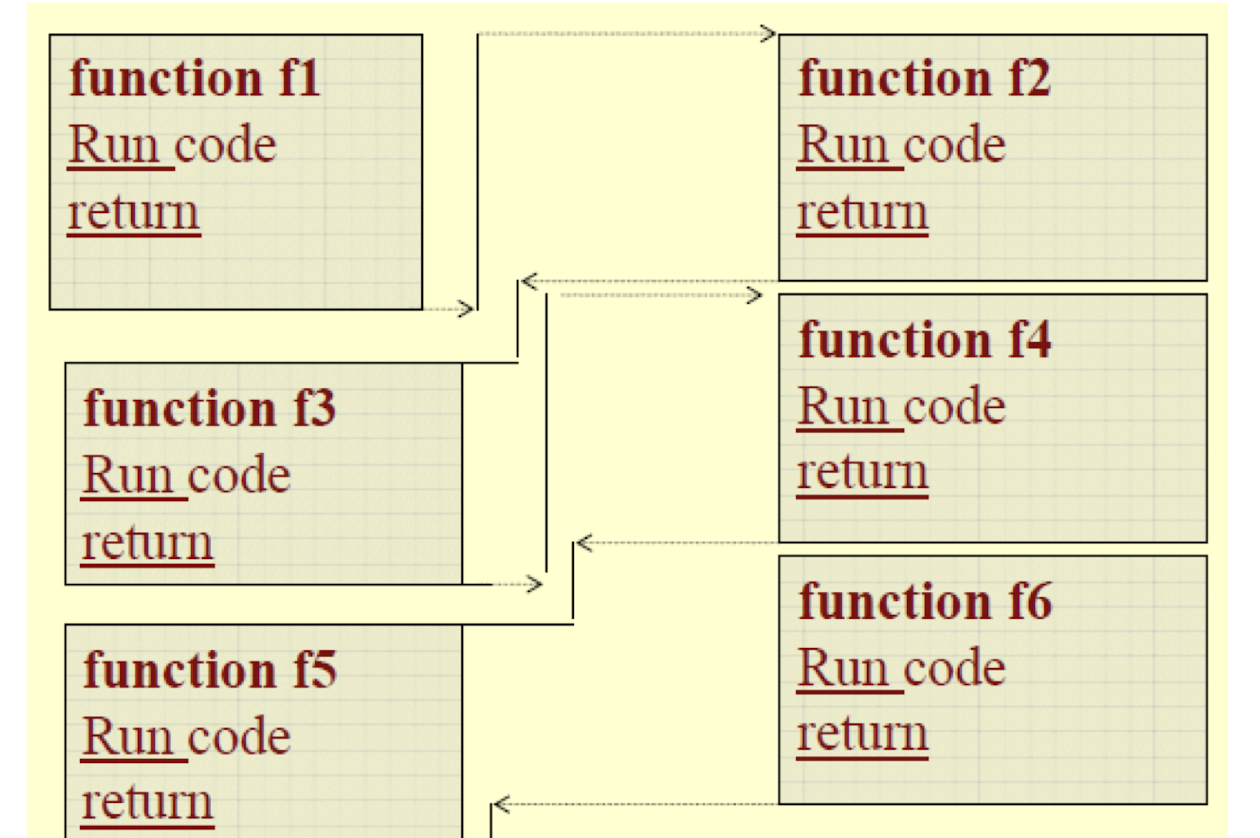
ACVM Example
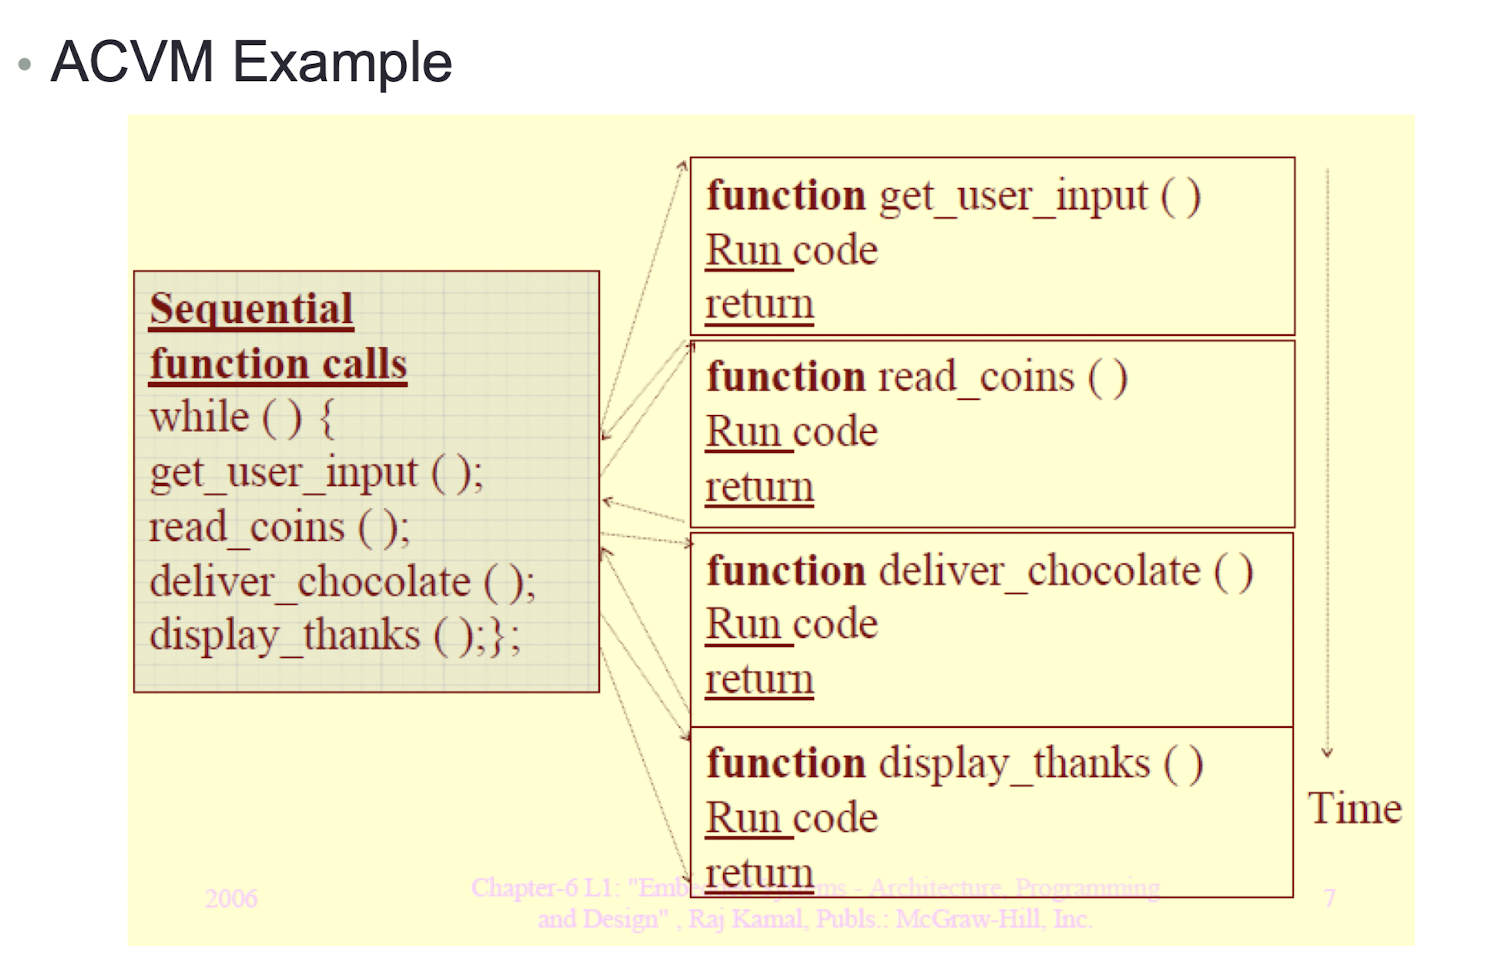
6.27.2 Data Flow Modeling
- A program is modeled as handling the input data streams and creating output data streams
- Program flow and execution steps are determined specifically only by the data
- Data flow graphs (DFGs) and control data flow graphs (CDFGs)
- Example: A program for finding an average of grades in various subjects will have the data inputs of grades and data output of the average
6.27.3 Data Flow Graph (DFG)
- DFG model of the steps for finding the 6th Finite Impulse Response (FIR) Sequence
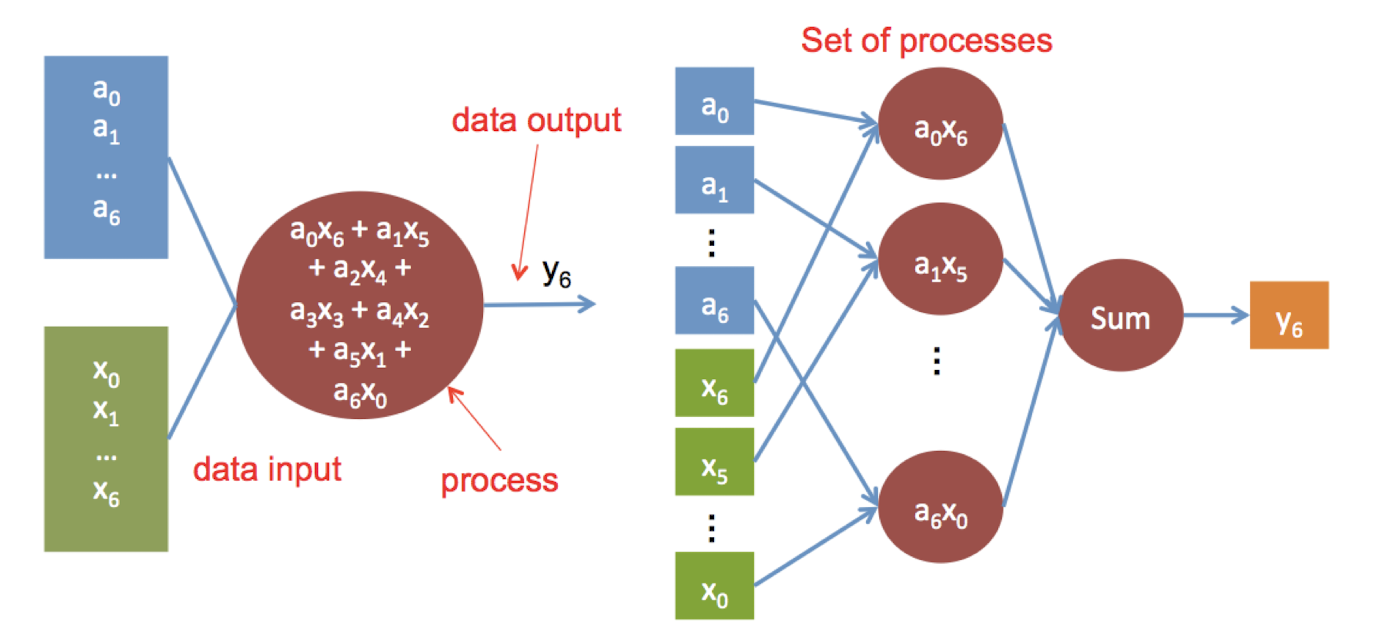
6.27.4 DFG Modeling
- In DFG Model, There are sets of data-in point and single data-out point, with process(es) represented by circle(s). Using the data input from incoming arrow(s) and generating data output along outgoing arrow(s)
- DFG models help in a simple code design
- A DFG gives that unit of a system, which has no control conditions and thus a single path for the program flow
- Programming complexity is minimized by modeling the program in terms of as many DFGs as possible
6.27.5 State Machine Modeling
- A programming model that there are different states, and the model considers a program as a machine, which is producing the states.
- A state table can then be designed for representation of every state in its rows. The following six columns are made for each row.
- Present State name or identification
- Action(s) at the state until some event(s)
- The events (tokens) that cause the execution of state transition function
- Output(s) from the state output function (s)
- Next State
- Expected Time Interval for finishing the transitions to a new state after the event
6.27.6 State Table to State Diagram
- We now consider a simple LED control example
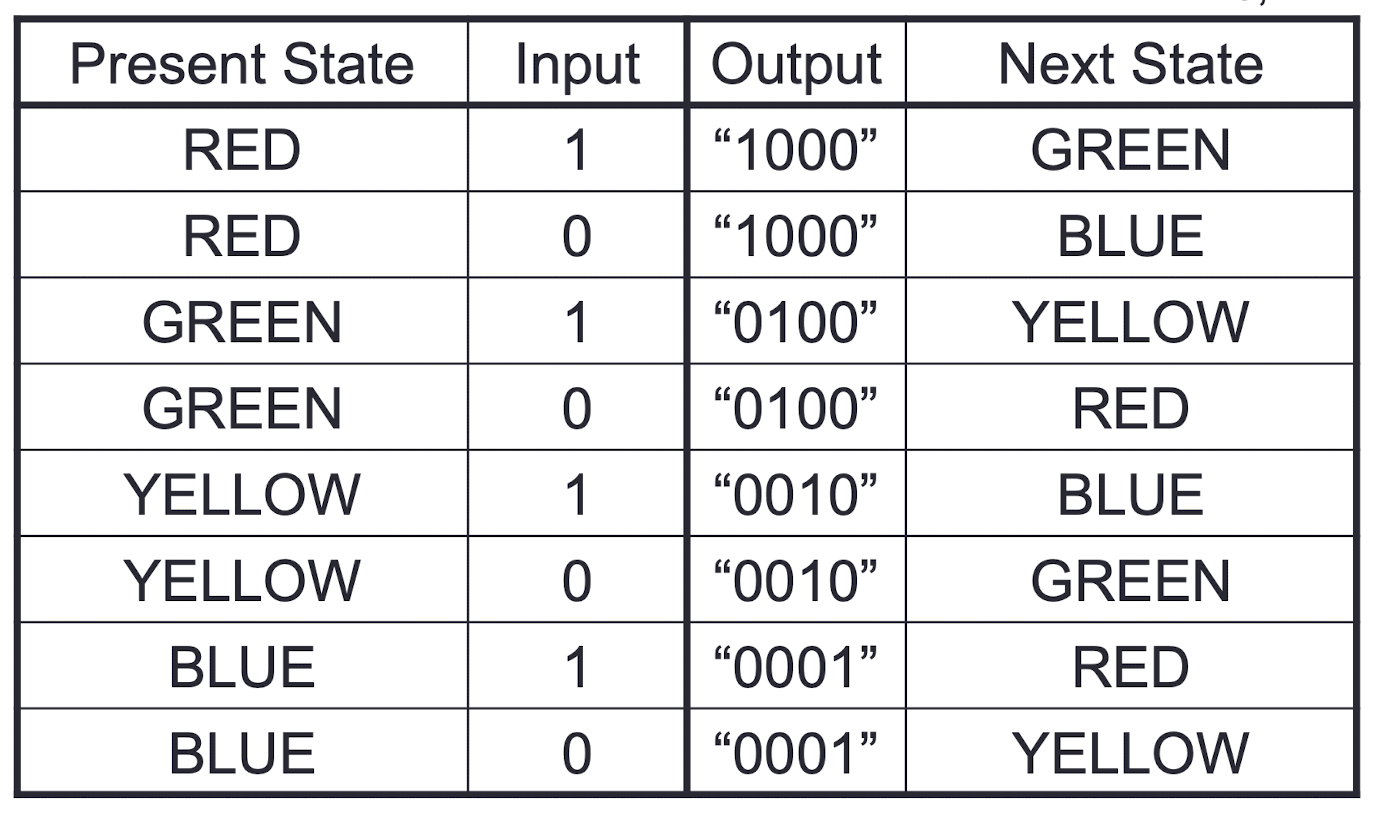
Switch(input)
= 1, R->G->Y->B->R
= 0, B->Y->G->R->B
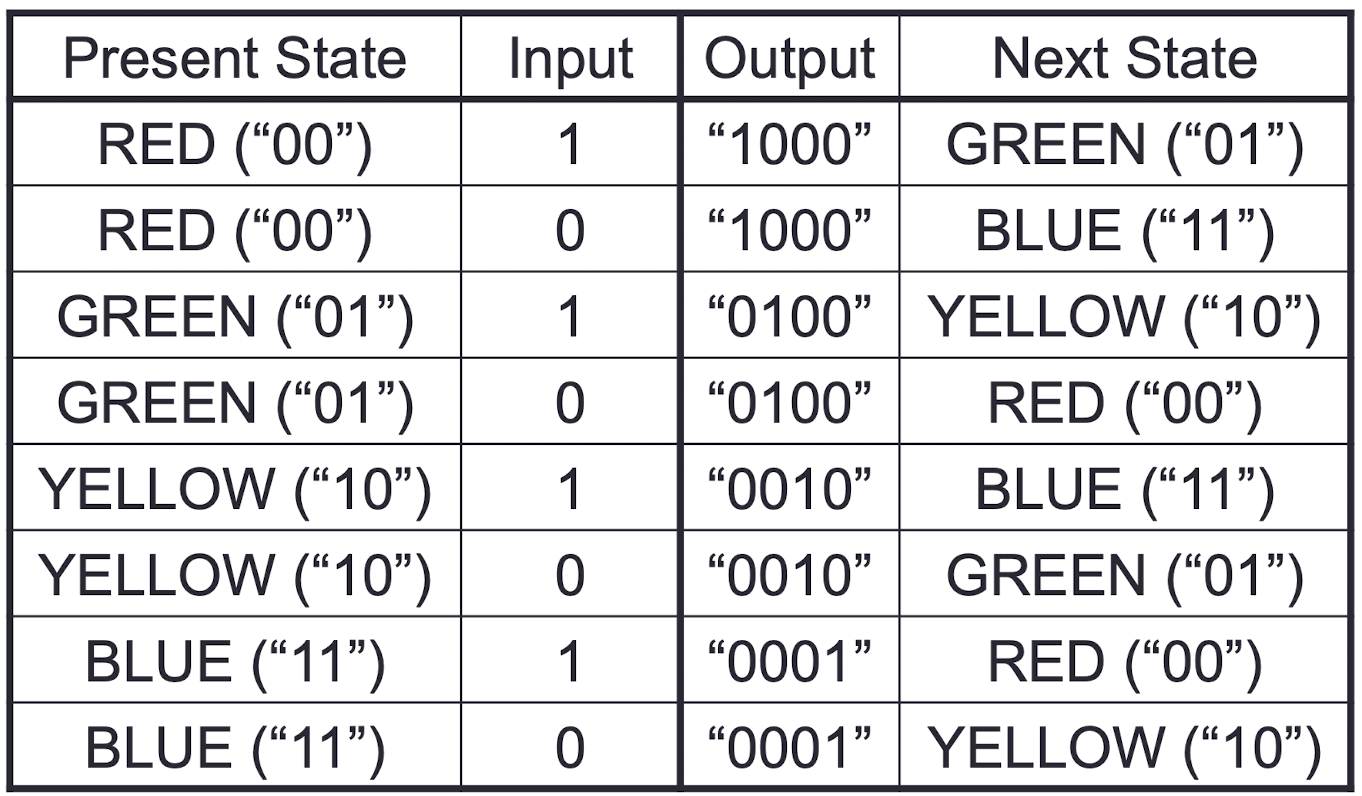
Switch(input)
=1, R->G->Y->B->R
=0, B->Y->G->R->B
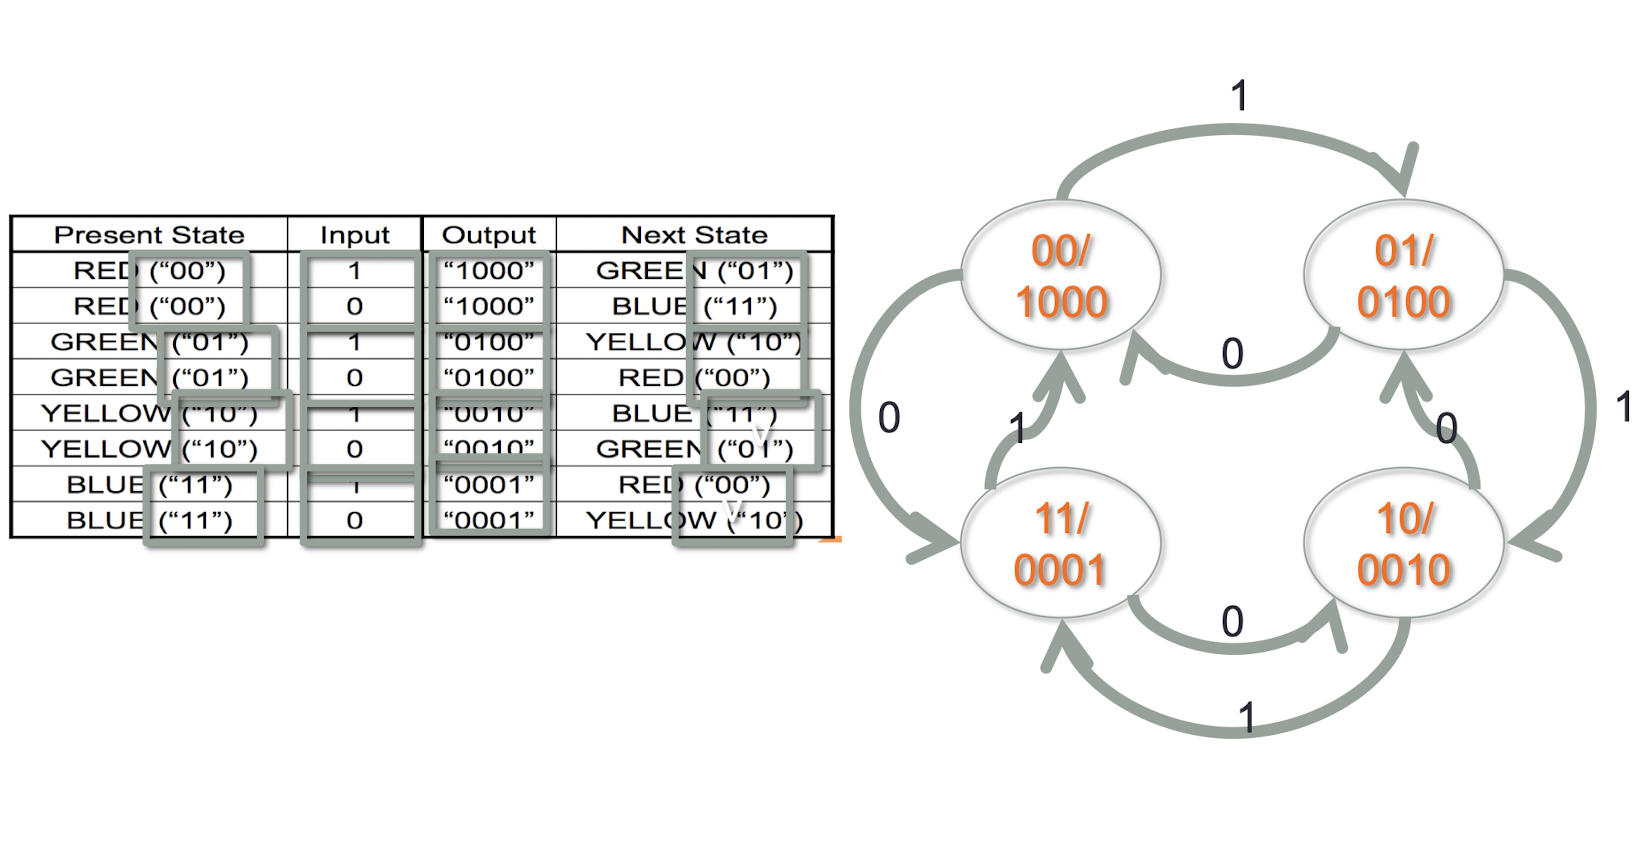
Tutorial 6.1
- Draw the state diagram for below state table
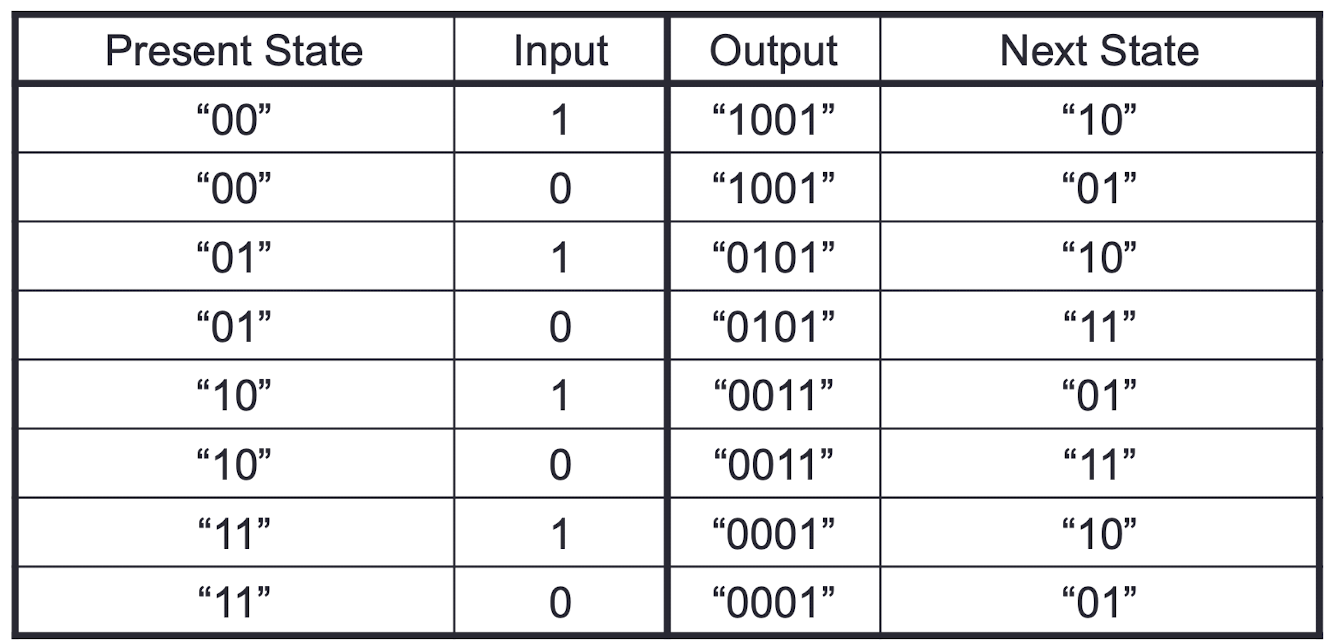
6.28 Tutorial: Program Modeling Concepts in Embedded Systems - History of Mobile Systems
6.28.1 History of Mobile Systems before Year 2000
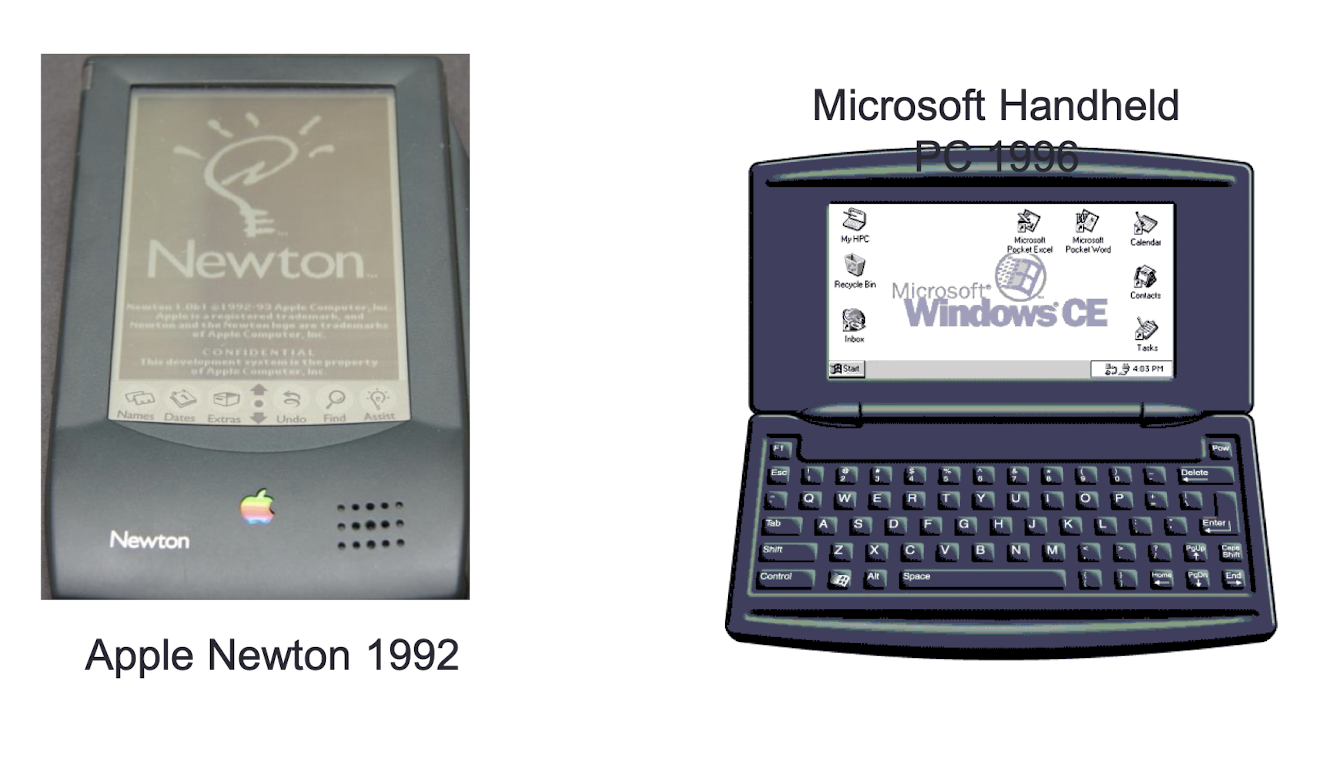
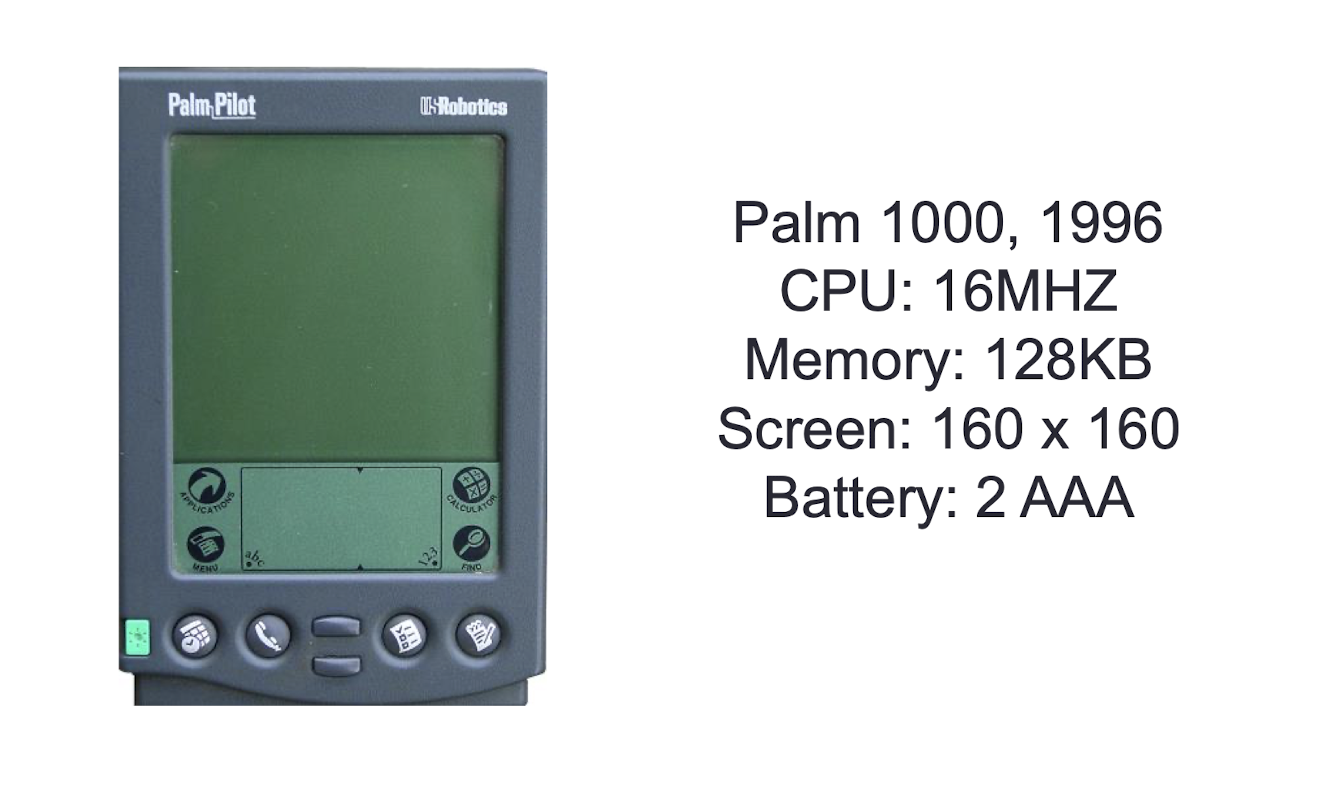
- CPU: Slow
- Screen: Black-and-White, Low resolution
- OS: No Mature Operating System
- Independent Software Vendor (ISV): Close Platform, No third party App
- Internet: No Internet Access
- Synchronization: Standalone
- Storage: RAM with continuous power supply
- Convergence: No
6.28.2 History of Mobile Systems 2000 - 2005
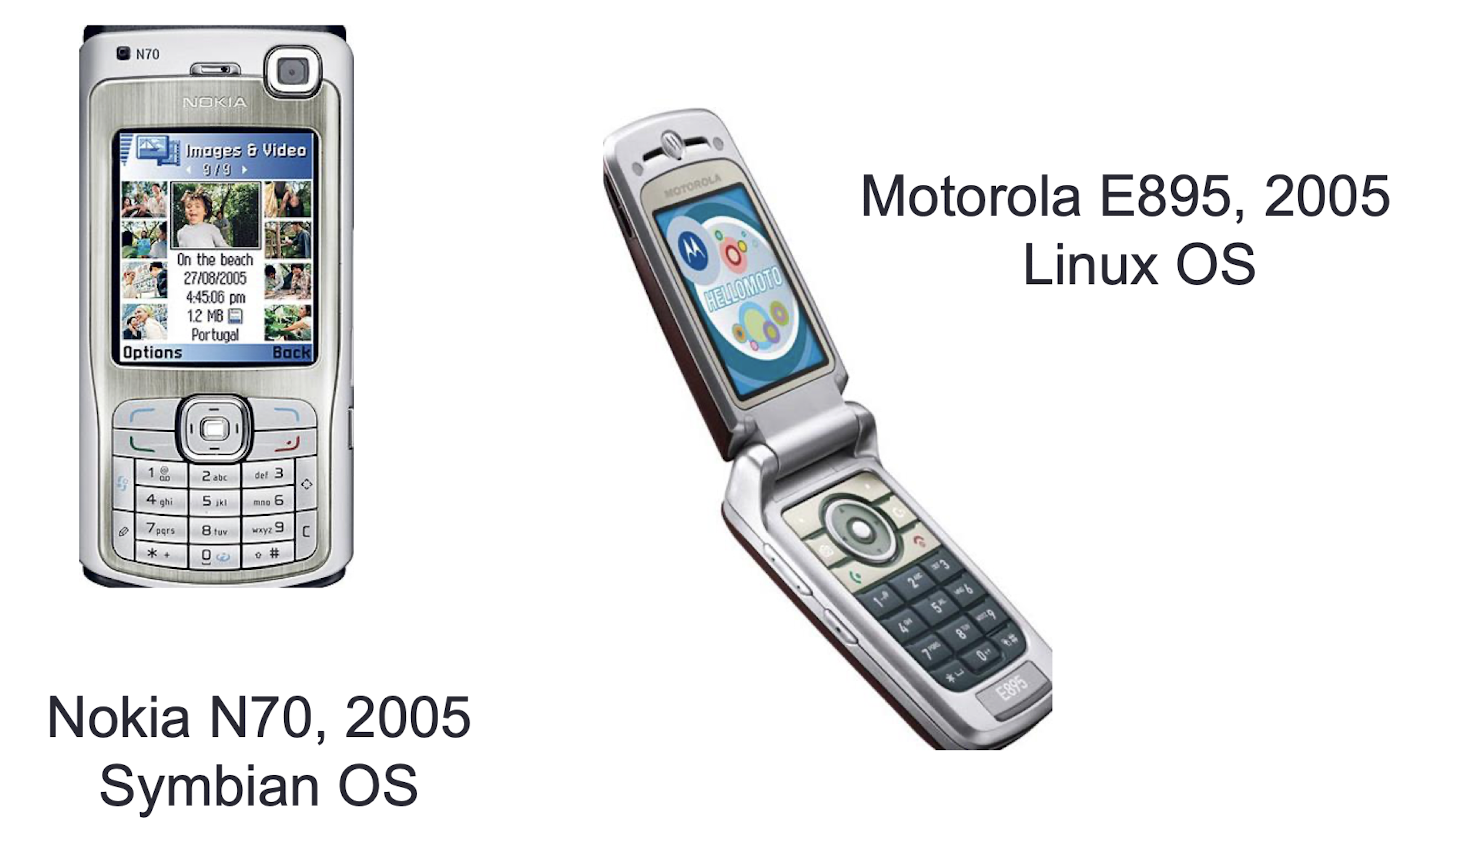
This Period’s Typical Feature
- CPU: ARM hold the market
- Screen: Color, Touch
- OS: Operating System Growing
- ISV: Open Platform, 3rd party app installable
- Internet: Wifi, 2G-GSM/CDMA, 2.5G-GPRS, 2.75G-EDGE
- Synchronization: PC based (ActiveSync…)
- Storage: Flash, Storage Card
- Convergence: Camera, PDA, Internet Appliance, eBook, MP3 Player
6.28.3 Now

6.28.4 A New World of Mobile Devices
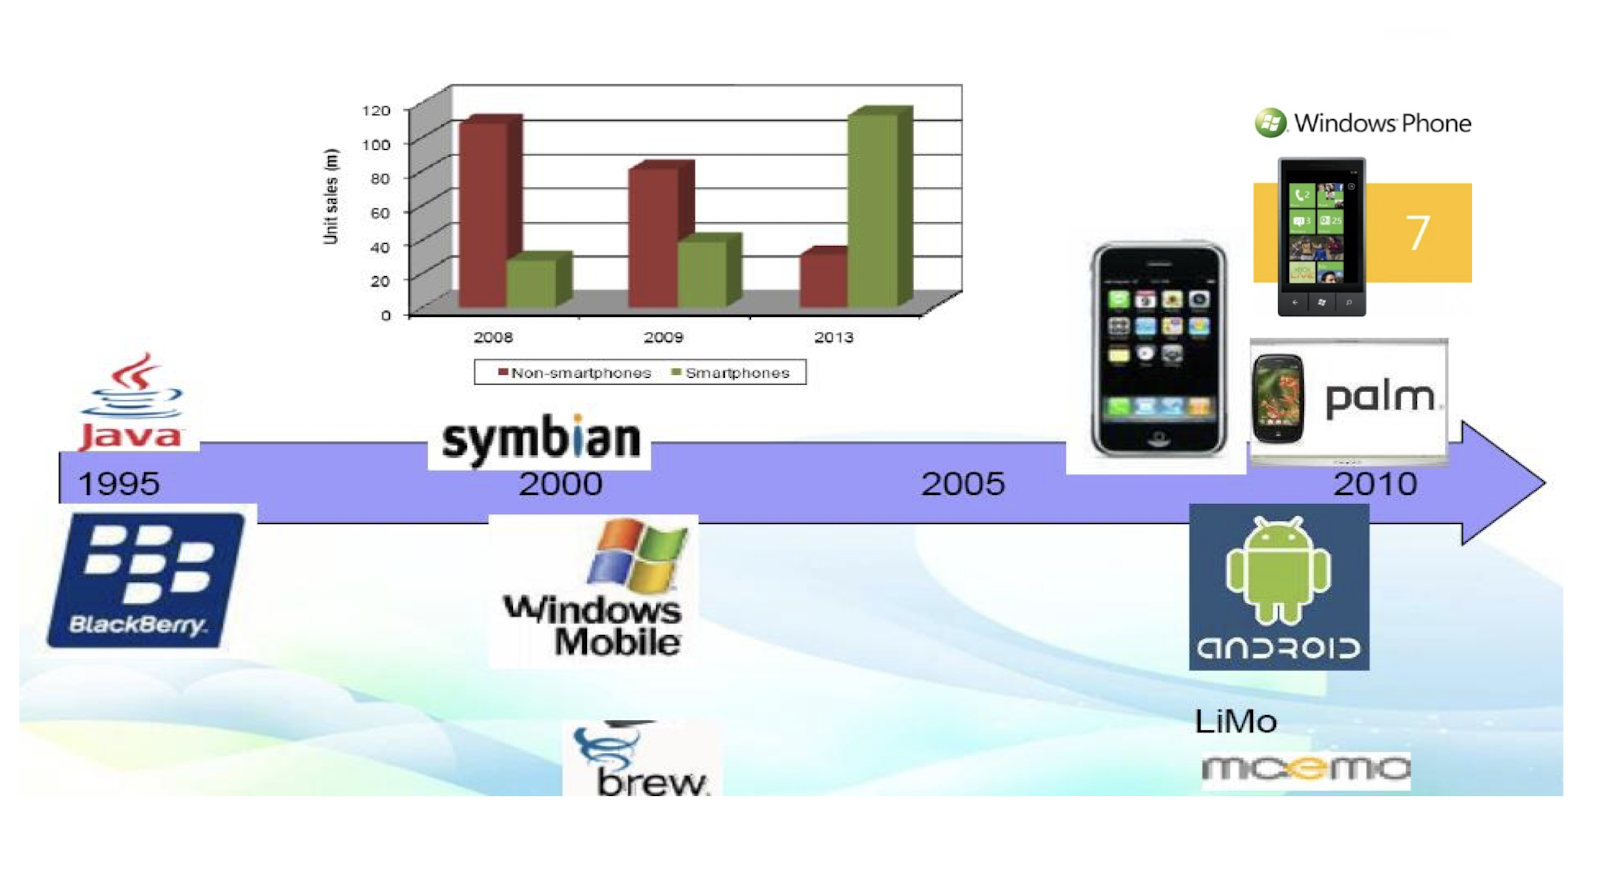
7. Android - Activities and Intents
Objectives
- The Life Cycle of an Activity
- The Concepts of Intents
- Intent and Activity
- Intent and Service
- Intent and Broadcast Receiver
- Tutorial:
- Real-Time Operating System
- Scheduling
7.1 4 Basic Android Components
- Activity
- Dictate the UI and handle the user interaction to the device’s screen
- Service
- Handle background processing associated with an app
- Content Provider
- Handle data and database management issues
- Broadcast Receiver
- Handle communication between Android OS and apps
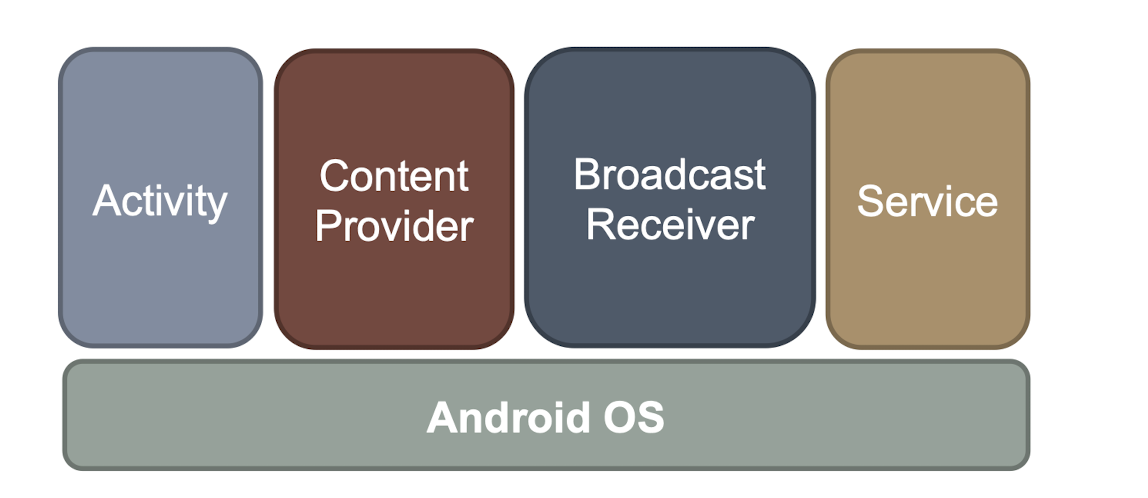
- All components must be fully controlled, understood by the Kernel
- Configuration files register the component to Kernel
- Intents connect components together ( Inter-process communication )
- Three of the core components of an application (activities, services, and broadcast receivers) are activated through messages, called intents.
7.2 What is an Activity?
- The main purpose of an activity is to handle visual user interface and to interact with user
- Activity == web page
- Typically an app has one or more activities
- Each activity has its UI (XML) and program code (Java)
- An existing activity can be replaced by new one with the same contract (intent)
- All activities can be invoked by other applications (intent filter)
7.3 Activity Overview
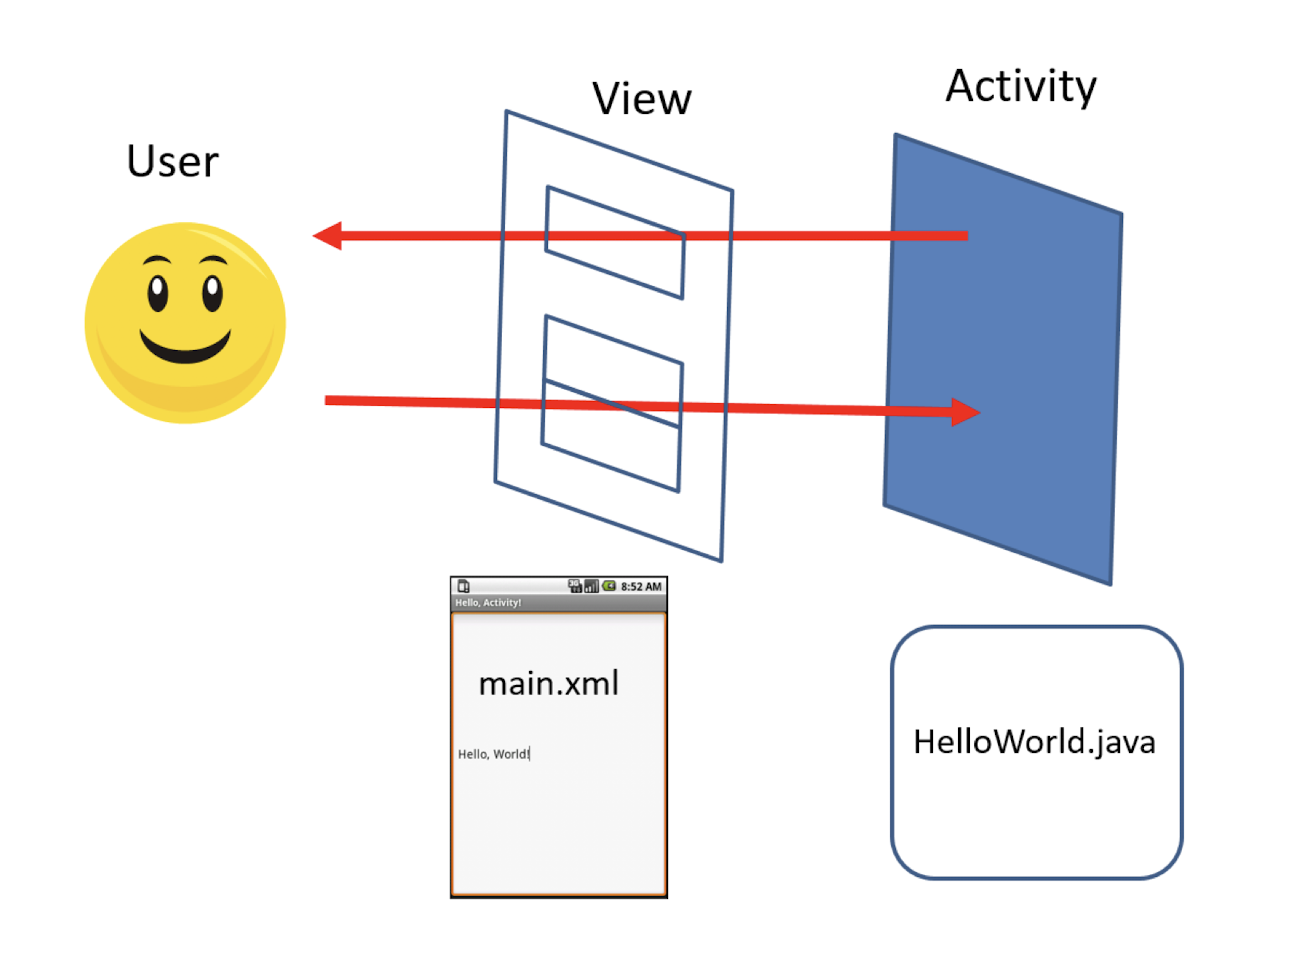
7.4 Activity Life Cycle
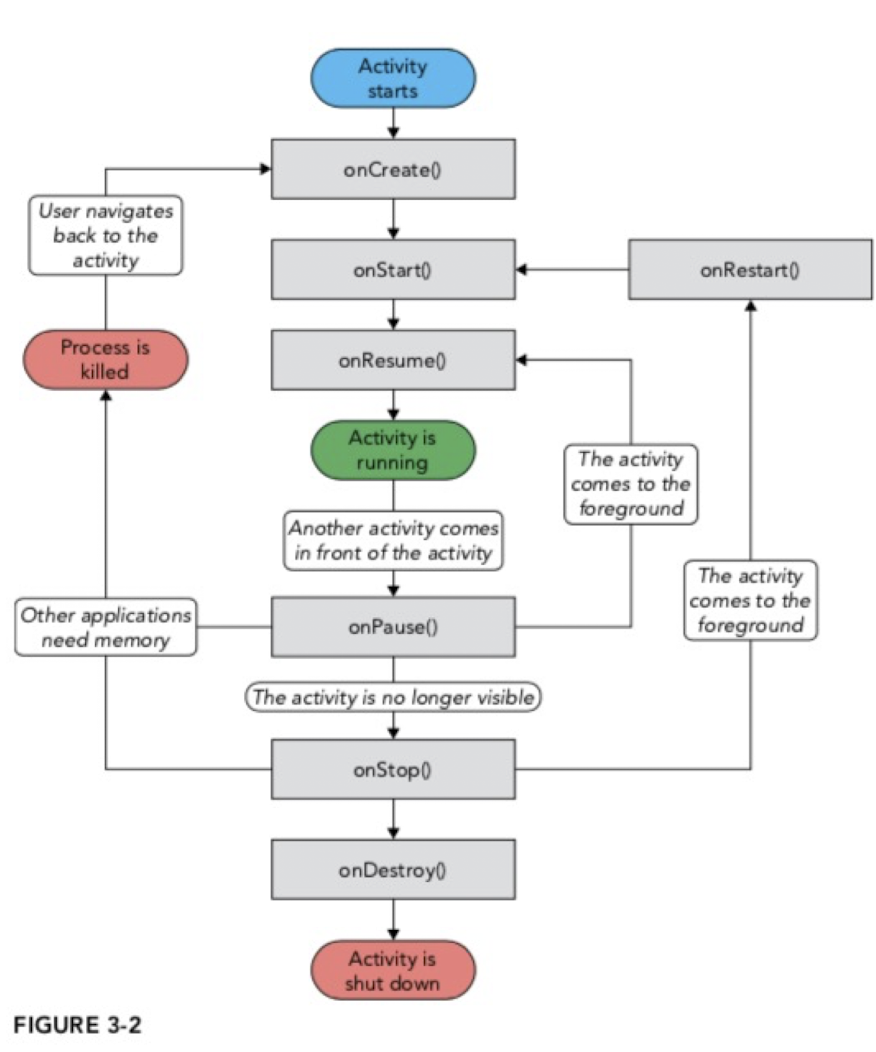
- The Activity base class defines a series of events that govern the life cycle of an activity
- From the moment an activity appears on the screen to the moment it is hidden, it goes through a number of stages
- These stages are known as an activity’s life cycle
- The Activity class defines the following events:
onCreate()- Called when the activity is first created
- Initialise the variables, UI components, etc.
onStart()- Called when the activity becomes visible to the user
onResume()- Called when the activity starts interacting with the user
onPause()- Called when the current activity is being paused and the previous activity is being resumed
- The Activity class defines the following events:
onStop()- Called when the activity is no longer visible to the user
- Hidden in the background
onDestroy()- Called before the activity is destroyed by the system (either manually or by the system to conserve memory)
- Saving data, releasing resources, etc.
onRestart()- Called when the activity has been stopped and is restarting again
7.5 Activity Life Cycle
- Every Android activity, in fact every component, has its own life cycle, from onCreate to onDestroy
- Throughout the life cycle, the component can switch between statuses of visible , invisible, active , inactive
- By default, the activity created for you contains the
onCreate()event. Within this event handler is the code that helps to display the UI elements of your screen
1 | |
- Running : the Activity is running, and it is being processed at the Foreground , the user can interact with the Activity
- Pause : the Activity is no longer at the Foreground (but part of the UI could still be visible to the user) and cannot interact with the user. It can be re-activated by onResume function
- Stop : the Activity stands by in the background and cannot be seen any more on the screen. It can be re-activated by the onRestart function
7.6 Create an Activity
- To create an activity, you create a Java class that extends the Activity base class
1 | |
- Your activity class loads its user interface (UI) component using the XML file defined in your res/layout folder
- Every activity you have in your application must be declared in your AndroidManifest.xml file
7.7 Understanding the Life Cycle of an Activity
Example 1:
- Implement
onRestart()onResume()onPause()onStop()onDestroy()
- similar to
onStart()
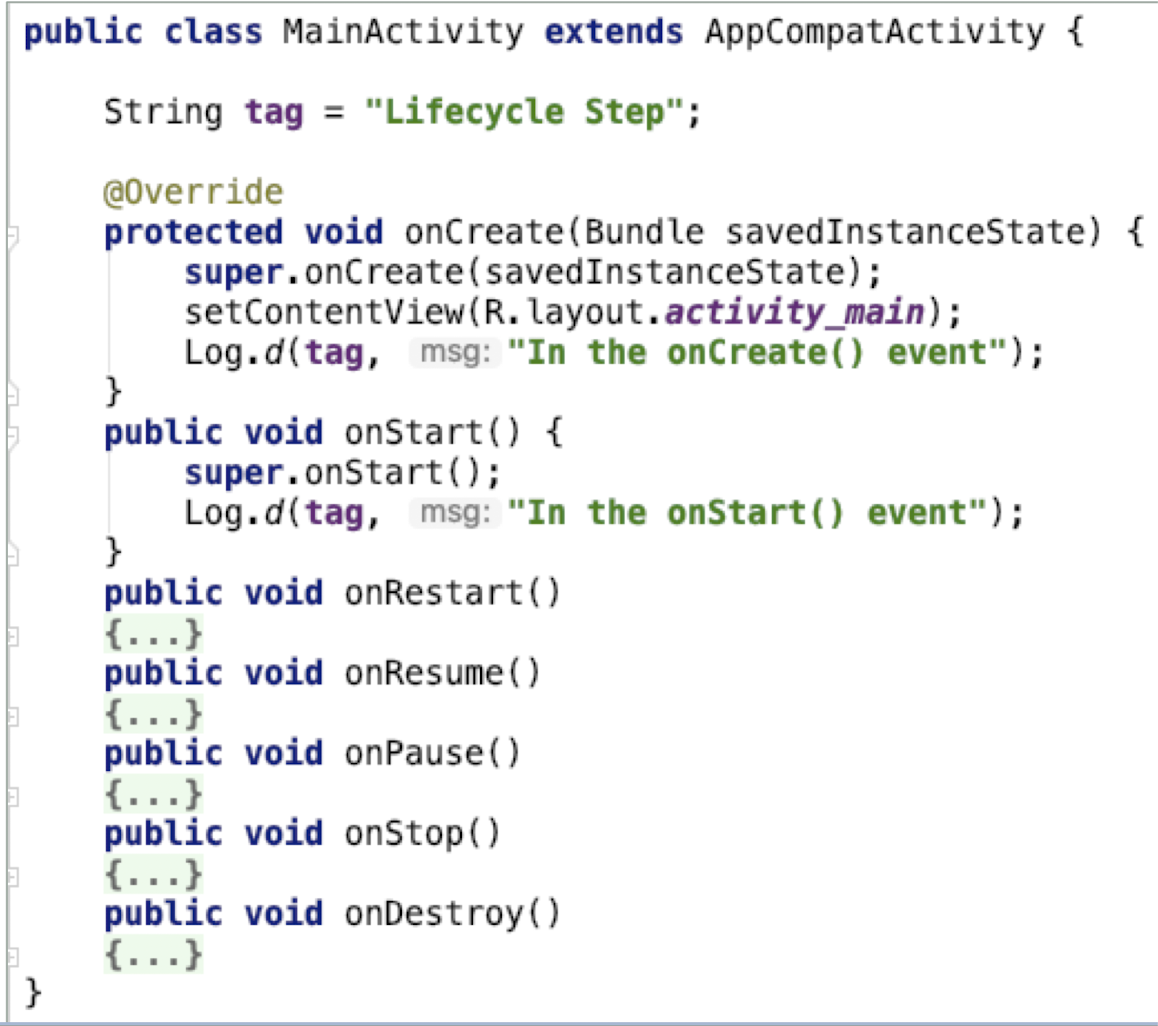
7.9 Different Type of Logs
- Log.e - Error log shows issues that have caused errors
- Log.w - Warning (possible issues) that are not yet errors
- Log.i - Info log messages for regular usage
- Log.d - Debug log messages that are useful during development only
- Log.v - Verbose (all) log messages (the default)
- And also….
7.10 Understanding the Life Cycle of an Activity
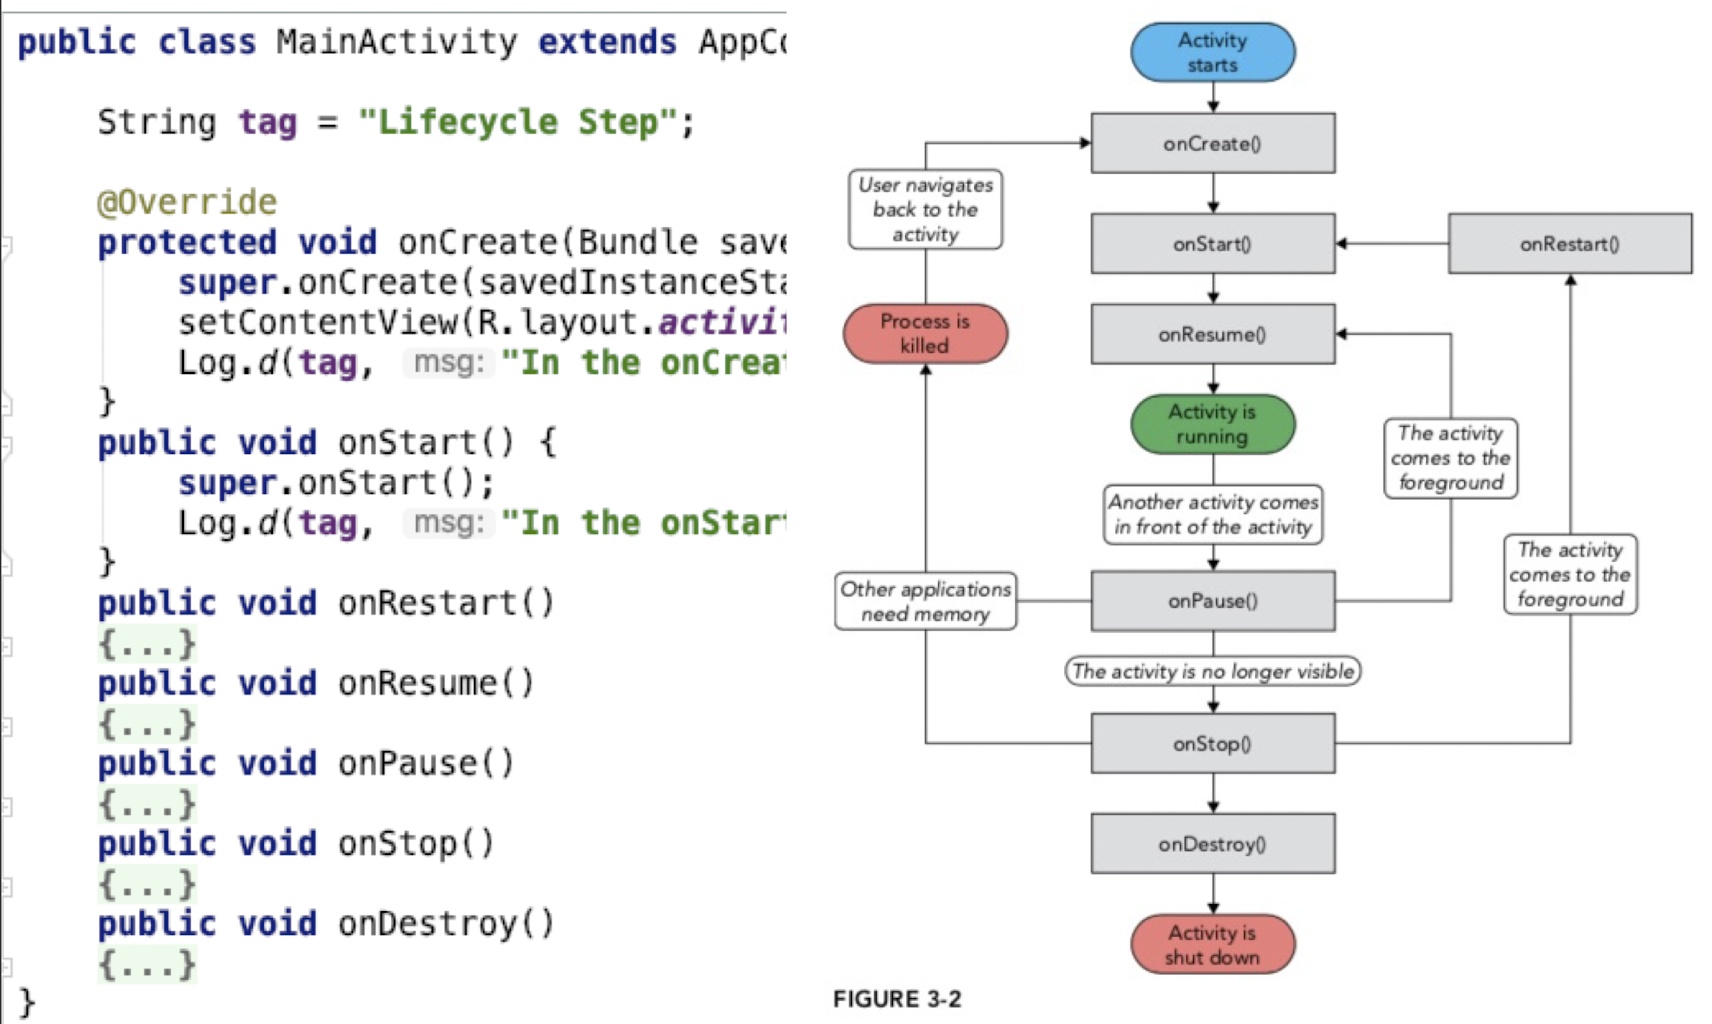
1 | |
- Which methods will be called when the activity is first loaded to the screen and can interact with users?
- onCreate(), onStart(), onResume()
- Which methods will be called when the Back button is clicked?
- onPause(), onStop(), onDestroy()
- Basical shutdown
- Which methods will be called when the activity is selected from the Overview?
- onRestart(), Strat(), onResume()
- Which methods will be called when the Home button is clicked and then another app is loaded (ex. Phone)?
- onPause(), onStop()
- Which methods will be called when the Phone app exits (Back) and then select the activity from Overview?
- For the Phone app: onPause(), onStop(), onDestroy()
- For your activity: onRestart(), onStart(), onResume()
From the previous example:
- An activity is destroyed when the Back button is clicked
- whatever state the activity is currently in will be lost
- additional code is required in the activity to preserve its state when the activity is destroyed
onPause()is called when an activity is sent to the background and when a user kills an activity by the Back buttononStart()andonResume()methods are called when the activity is restored from the background or newly createdonCreate()method is called when an activity is created for the first time
Usage:
- Use the
onCreate()method to create and instantiate the objects that you will be using in your application - Use the
onResume()method to start any services or code that needs to run while your activity is in the foreground - Use the
onPause()method to stop any services or code that does not need to run when your activity is not in the foreground - Use the
onDestroy()method to free up resources before your activity is destroyed
7.11 3 Nested Lifetimes
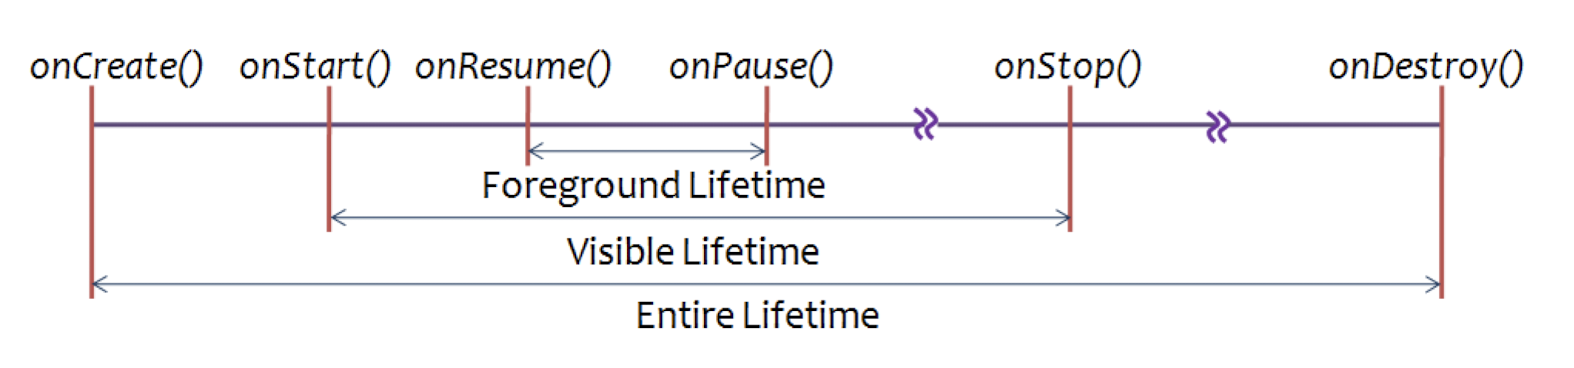
- Visible Lifetime (can see, but may not be intercated with)
- During this time, the user can see the activity on-screen, though it may not be in the foreground and interacting with the user.
- onStart() and onStop() can be called multiple times, as the activity alternates between being visible and hidden to the user.
- Foreground (Active) Lifetime (can see and interact with)
- During this time, the activity is in front of all other activities on screen and is interacting with the user.
7.12 What is an Intent?
- An intent is basically the “glue” that enables activities from different applications to work together seamlessly, ensuring that tasks can be performed as though they all belong to one single application
- When your application has more than one activity, you often need to navigate from one to another
- Navigation between activities is through an intent.
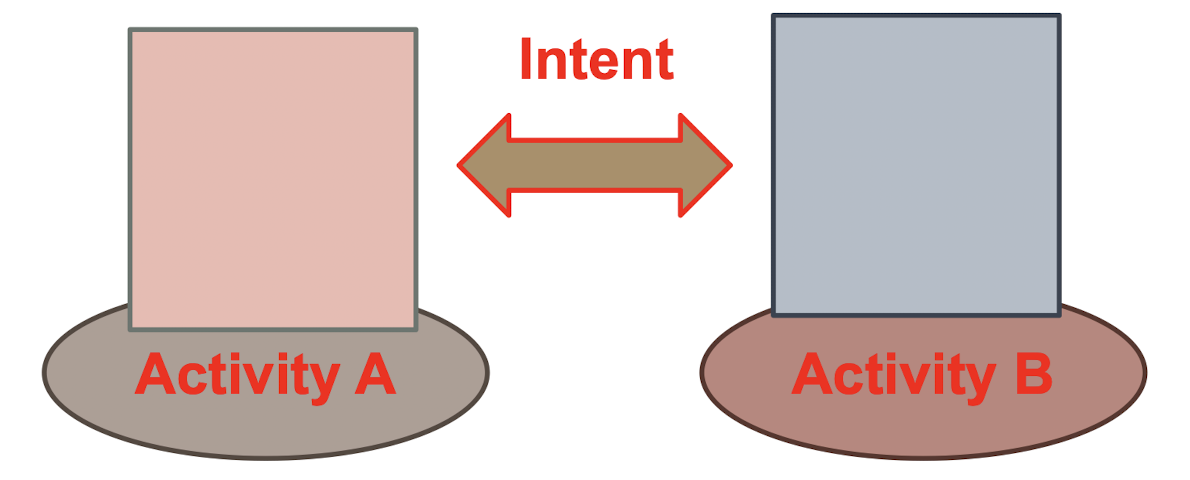
7.13 Intent Overview
- A facility for run-time binding between components ( Activity , Service , Broadcast Receiver)
- A message delivered between components (Inter-Process Communication)
- No matter they are in the same or different applications
- Loose coupling : components make use of little or no knowledge of other definitions of other separate components
- Implemented by
android.content.Intent
7.14 Intents and other Components
- Use
startActivityto activate an Activity component - Use
startServiceorbindServiceto activate a Service component - Use
broadcastIntent(sendBroadcast) to activate aBroadcastReceivercomponent or register broadcast receiver inAndroidManifest.xml(old one, not in use now)
7.15 Explicit and Implicit Intent
Explicit : Call by Name
- Specify the name of the intent, the result is unique and predictable
- Early Binding
- High performance
Implicit : Call by Behavior
- Tell Intent what to do
- Determined by the system that matches your requirement
- Late Binding
IntentDemo
- Two Activity in the IntentDemo app
- MainActivity
- Main2Activity
- MainActivity is started by default
Switch bewteen two Activities (we know the name of the Activity)
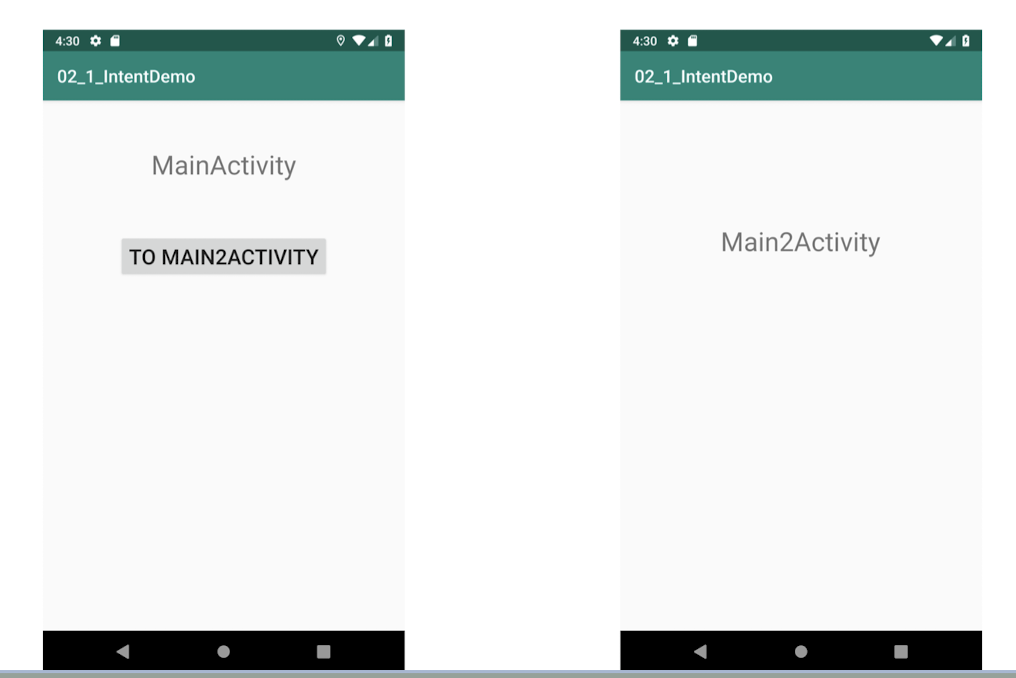
- In MainActivity.java , define how intent activates Main2Activity
- It is an explicit intent , which indicates explicitly the Activity to start
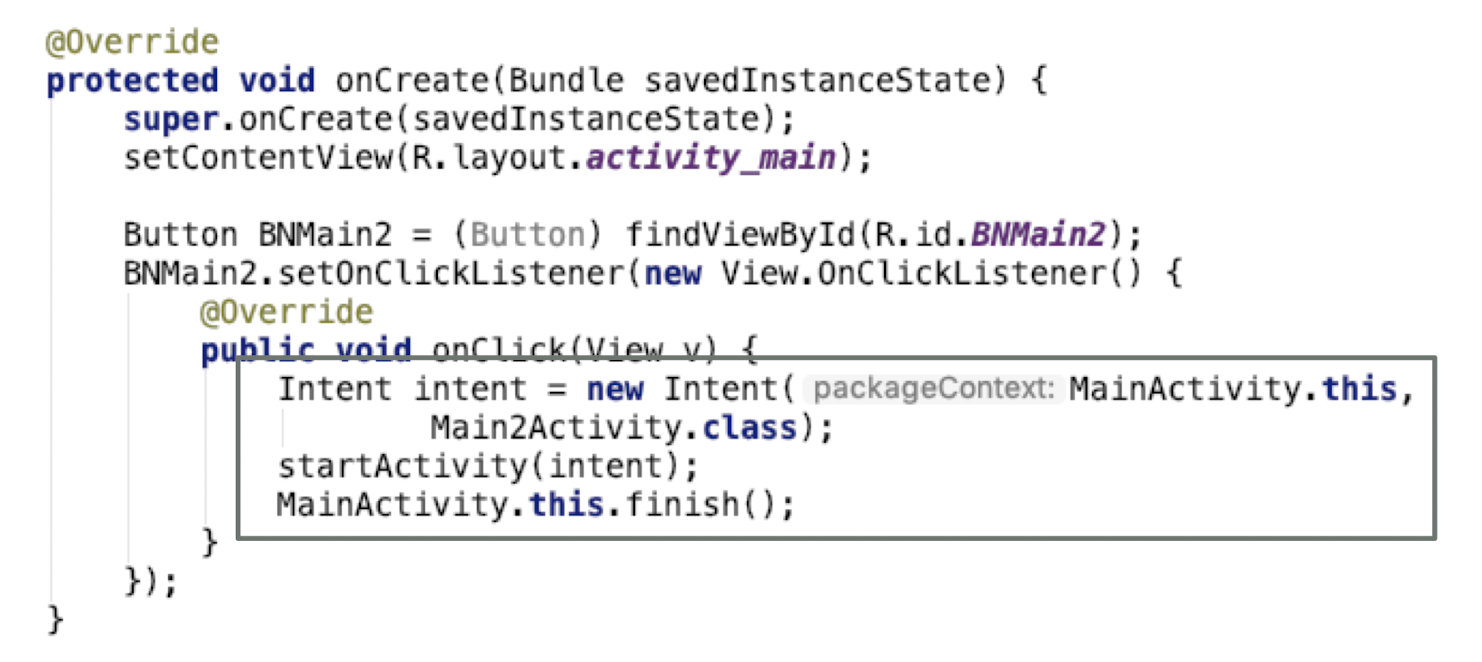
1 | |
AndroidManifest.xml
1 | |
7.16 Activity Communication
- Intent can be used to communicate among multiple Activities (or components)
- Each button link to each activities:
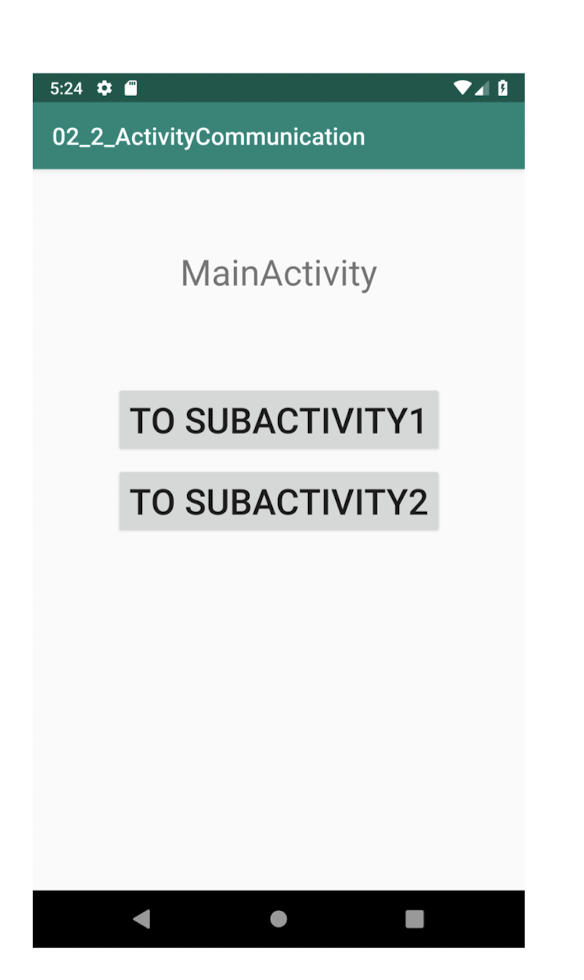
7.17 Activity Communication
- When “To SubActivity1” or “To SubActivity2” is clicked, the app starts “SubActivity1” or “SubActivity2” respectively
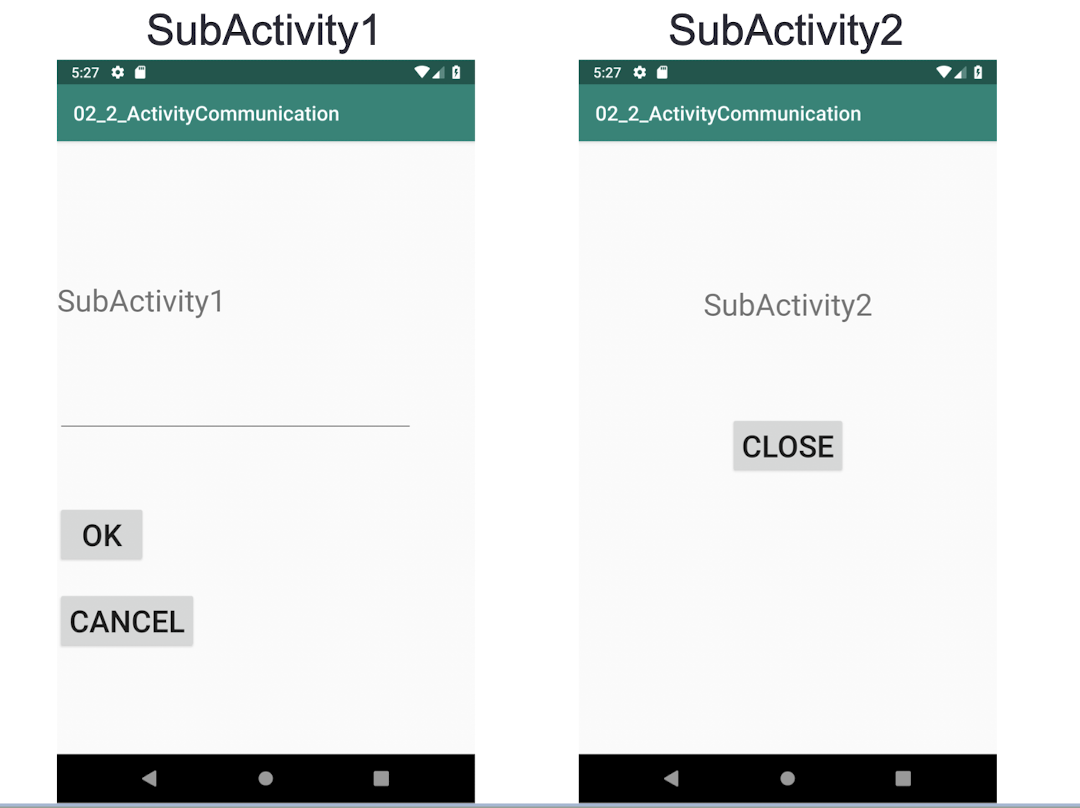
- In
SubActivity1, when a message is inputted and “ OK ” is clicked, the message is passed to display at the Parent Activity (MainActivity) - If “ Cancel ” is clicked, no message will be passed to the Parent Activity
SubActivity2is only used to demonstrate an Activity with multiple children (SubActivities) for now
MainActivity.java
1 | |
- Declare the request code for the two SubActivities
MainActivity.java
- Inside onCreate method:
1 | |
- Instead of using startActivity, use
startActivityForResult- Note: startActivityForResult is deprecated in API30
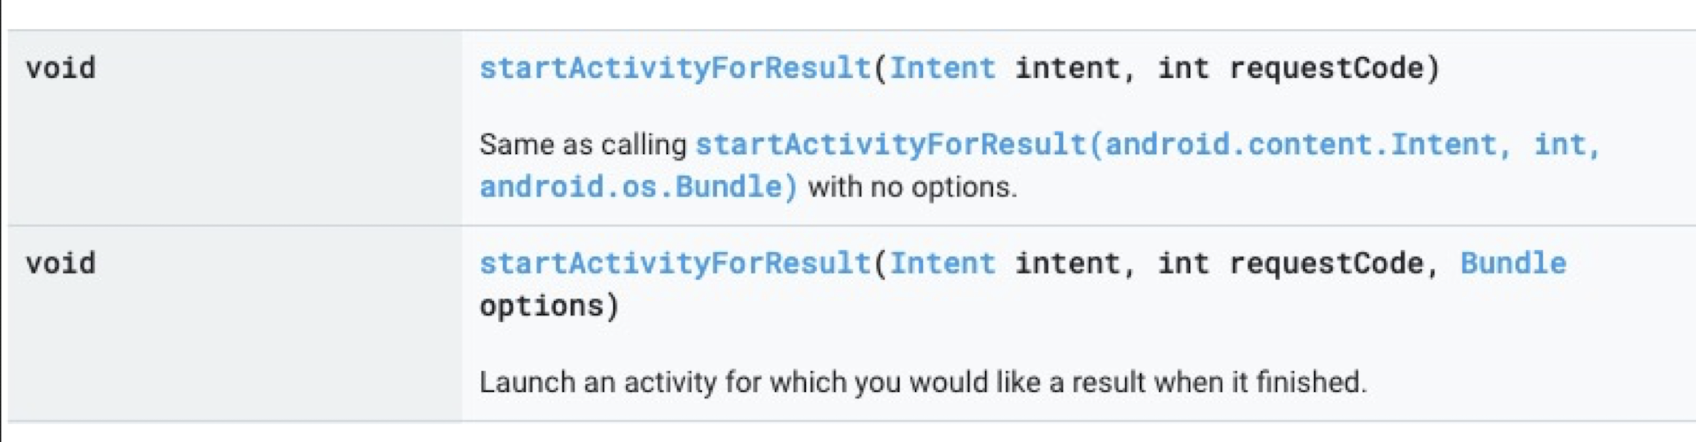
- Launch an activity for which you would like a result when it finished (return result)
- When this activity exits, your onActivityResult() method will be called with the given requestCode
- Using a negative requestCode is the same as calling startActivity(Intent)
Button ToSubActivity2 is set up similarly
1 | |
In MainActivity.java
- Add the override method to get the result
- Contrl+o to select
- Every get the return from the
startActivityForResult, theonActivityResultwill be called
1 | |
OnActivityResult

- URI (Uniform Resource Identifier)
- This class provides constructors for creating URI instances from their components or by parsing their string forms , methods for accessing the various components of an instance, and methods for normalizing, resolving, and relativizing URI instances. Instances of this class are immutable.
SubActivity1.java
- Inside onCreate method:
1 | |
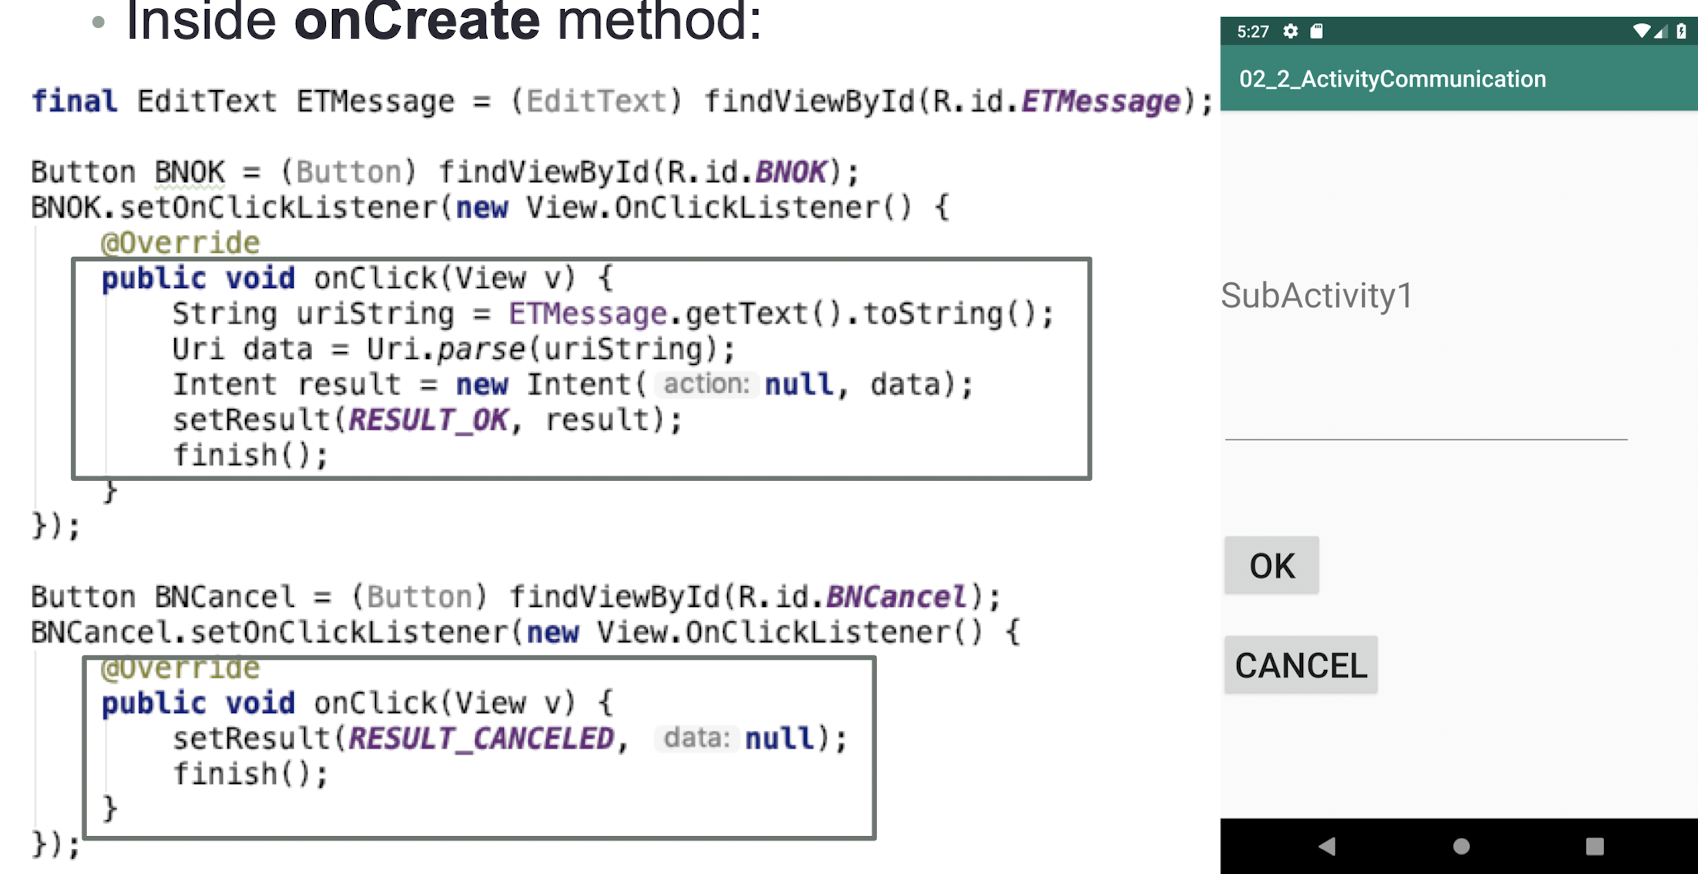
7.18 Activity Communication 2
- Besides returning data from an activity, it is also common to pass data to an activity
- For example, you might want to set some default text in the EditText view before the activity is displayed
- In this case, you can use the Intent object to pass the data to the target activity
- Two ways to pass data using an Intent Object
Method 1: Use the putExtra() method of an Intent object to add a name/value pair
- Value can be String, char, Int, Float,….
1 | |
- To obtain the data sent using the Intent object, you first obtain the Intent object using the
getIntent()method - Then, call its
getStringExtra()method to get the string value set using theputExtra()method
1 | |
Method 2: Use the Bundle Object
- Can put different types of data into a Bundle object
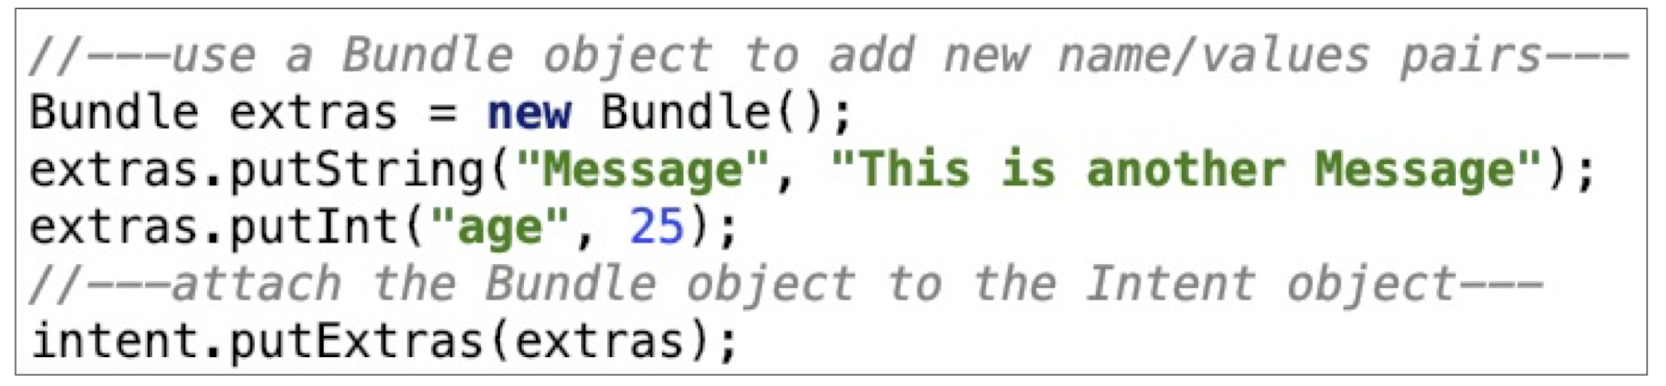
- To obtain the data

Class Question 7.1
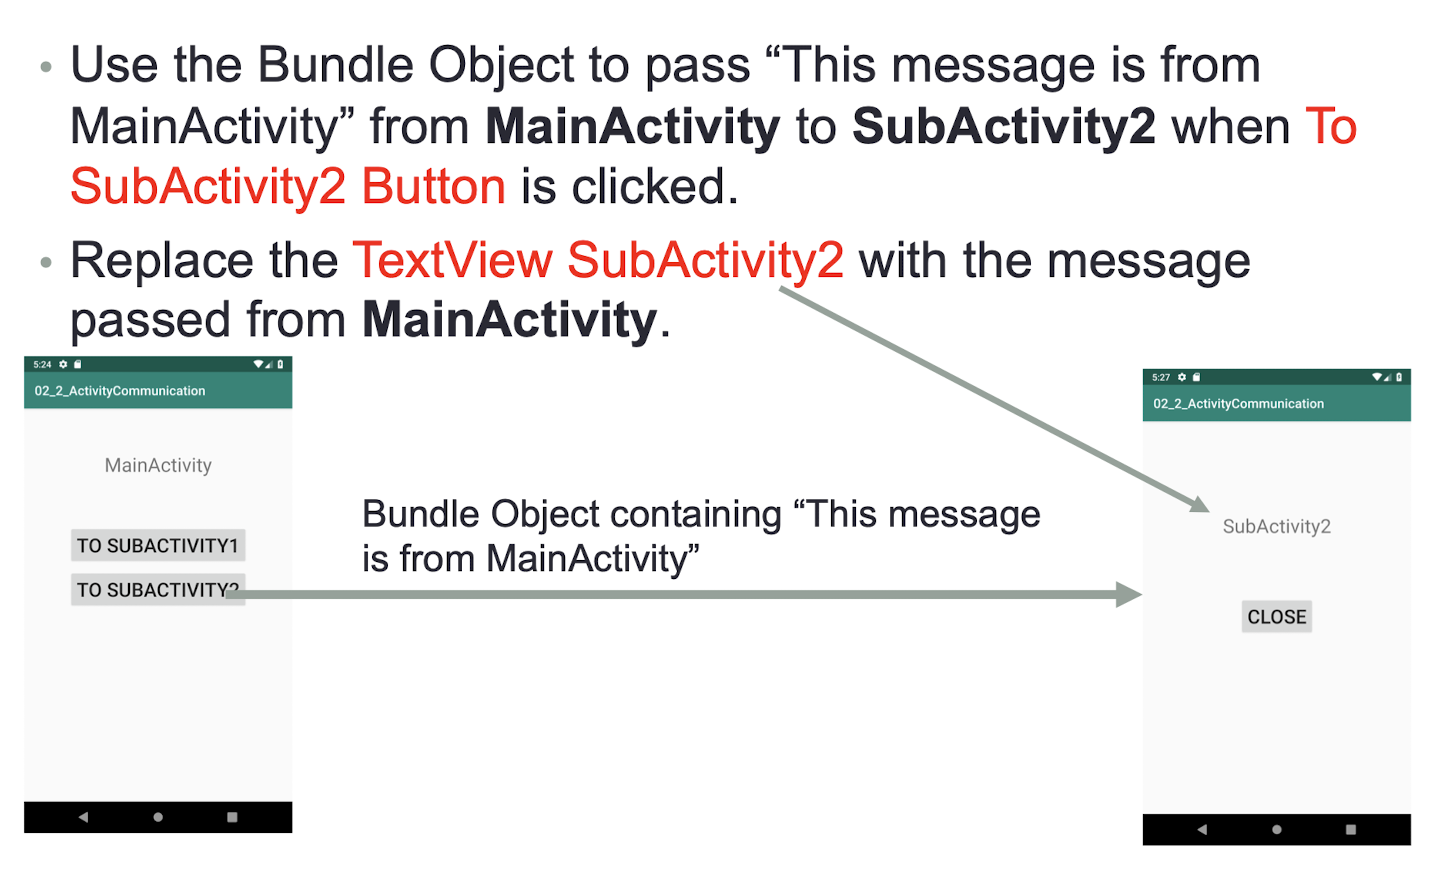
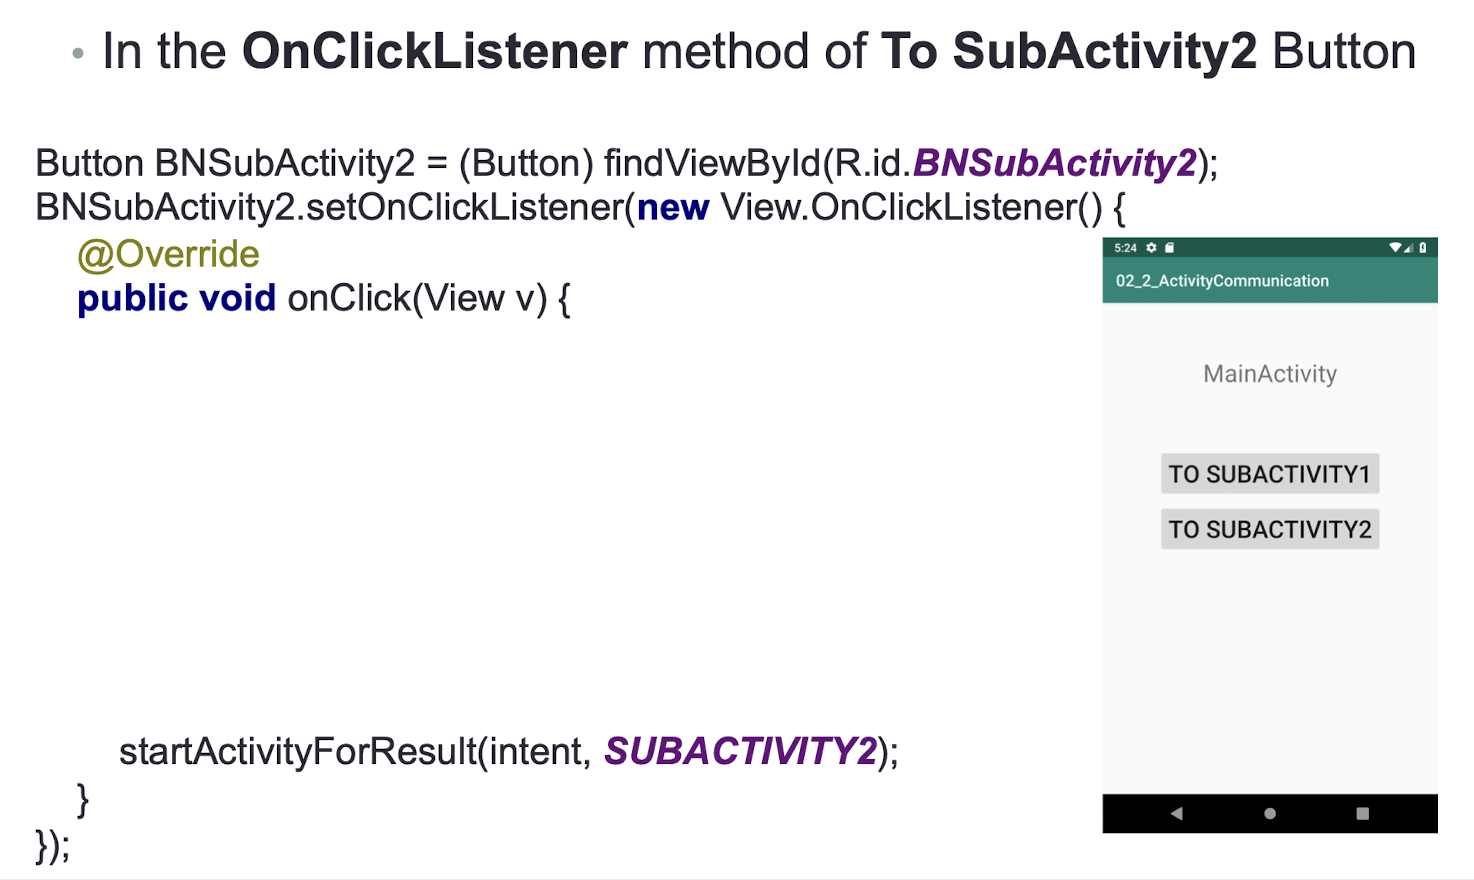
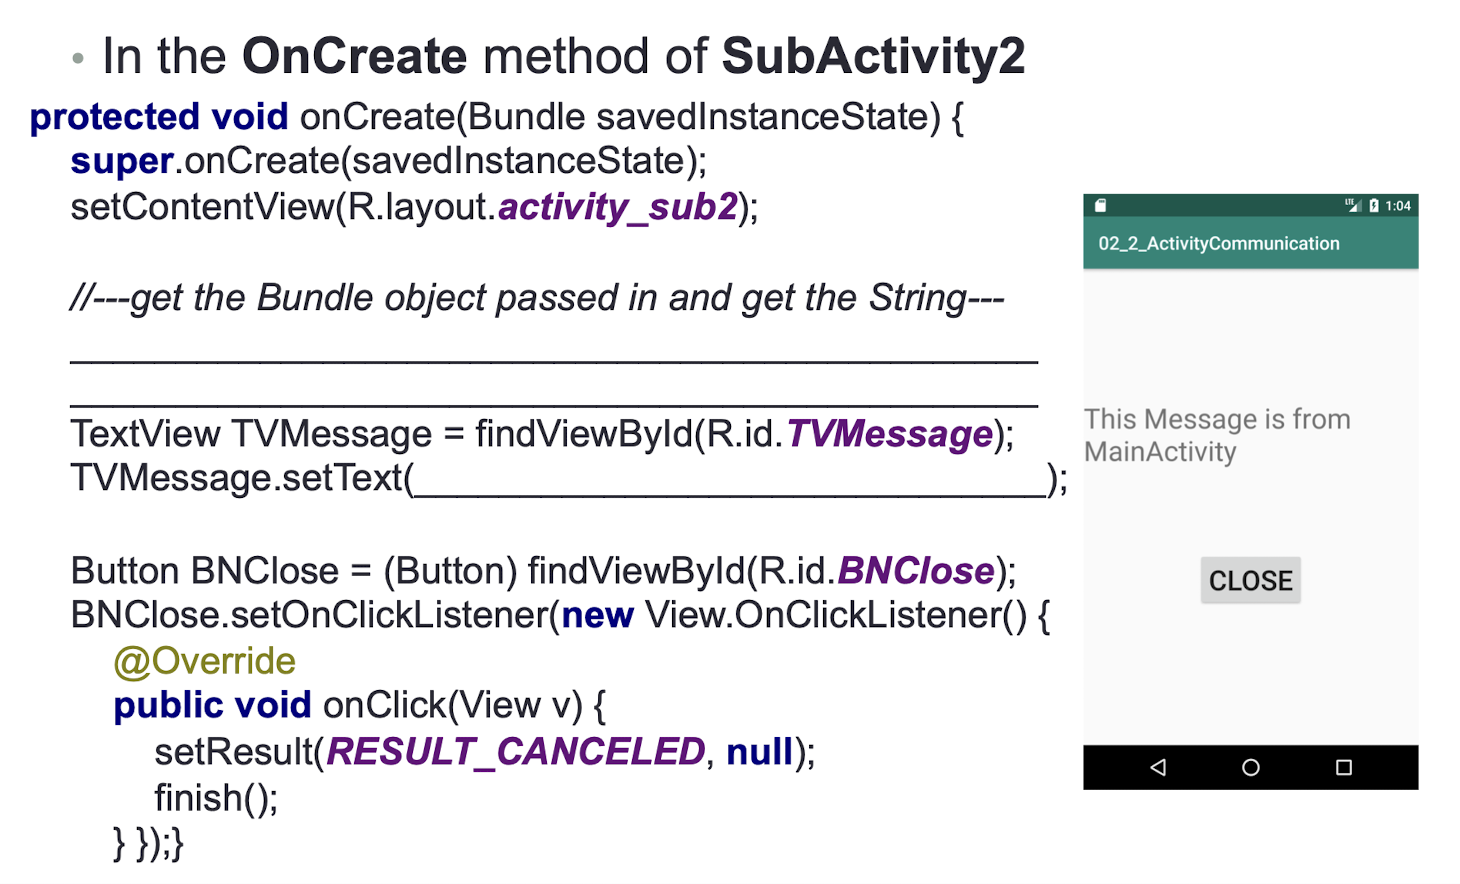
1 | |
1 | |
7.19 Intent Filter
Structured description of Intent values to be matched in
AndroidManifest.xmlAn Intent Filter can be matched against action, category and data (both URI and data type)
Include a “ priority ” value to order multiple matching filters
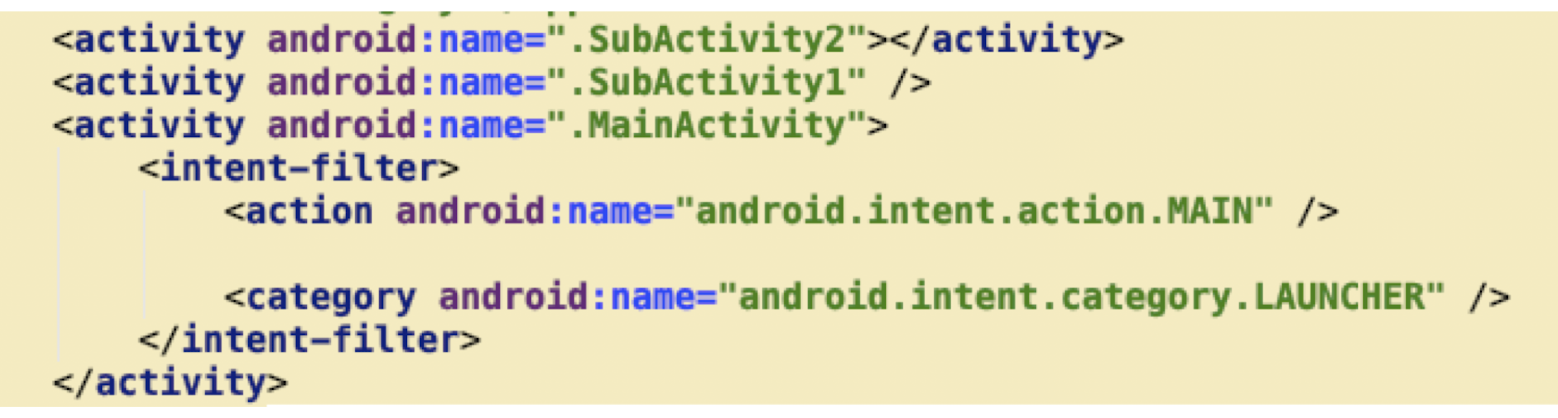
7.20 Intent Attributes
Intent Structure : Action + Data + Other Attributes (e.g., Category, Type, Component, Extras, etc.)
- Action
- Verb, describe what you want to do
- ACTION_VIEW, ACTION_EDIT, ACTION_DIAL, etc.
- Set by using setAction
Data
- String type, in URI format
- content://contacts/people/1 (the person whose identifier is 1); tel:10086 (telephone number)
- Set by using Intent.setData
Component
- Explicit name of the intent. By specifying this attribute, all of the other Intent attributes become optional.
- Used in explicit intent resolution
- Set by using setClass / setClassName / setComponent
- Explicit name of the intent. By specifying this attribute, all of the other Intent attributes become optional.
Type
- Specifies an explicit type of the intent data.
- Usually inferred by data, like: text/plain, image/gif
- Set by using Intent.setType
Category
- Gives additional information about the action to execute
- CATEGORY_LAUNCHER, CATEGORY_DEFAULT
- addCategory / hasCategory / removeCategory
- Extra
- Bundle of any additional data to provide extended information to the component
- E.g., if we have an action to send an e-mail message, we could also include extra pieces of data here to supply a subject, body, etc.
- putExtra / removeExtra
7.21 Some Intent Examples
- Search Google
1 | |
- Browse web page
1 | |
- Display map
1 | |
- Send SMS
1 | |
7.22 Intent Resolution
The system collects all intent filters in all apps to form an intent filter list
The matching of an intent with an intent filter in the list is called Intent Resolution
Only three aspects of an Intent object are consulted when the object is tested against an intent filter: action , data (both URI and data type), category
For an intent filter to match an Intent:
- The action and category must match
- The data (both the data type and data scheme + authority + path if specified) must match.
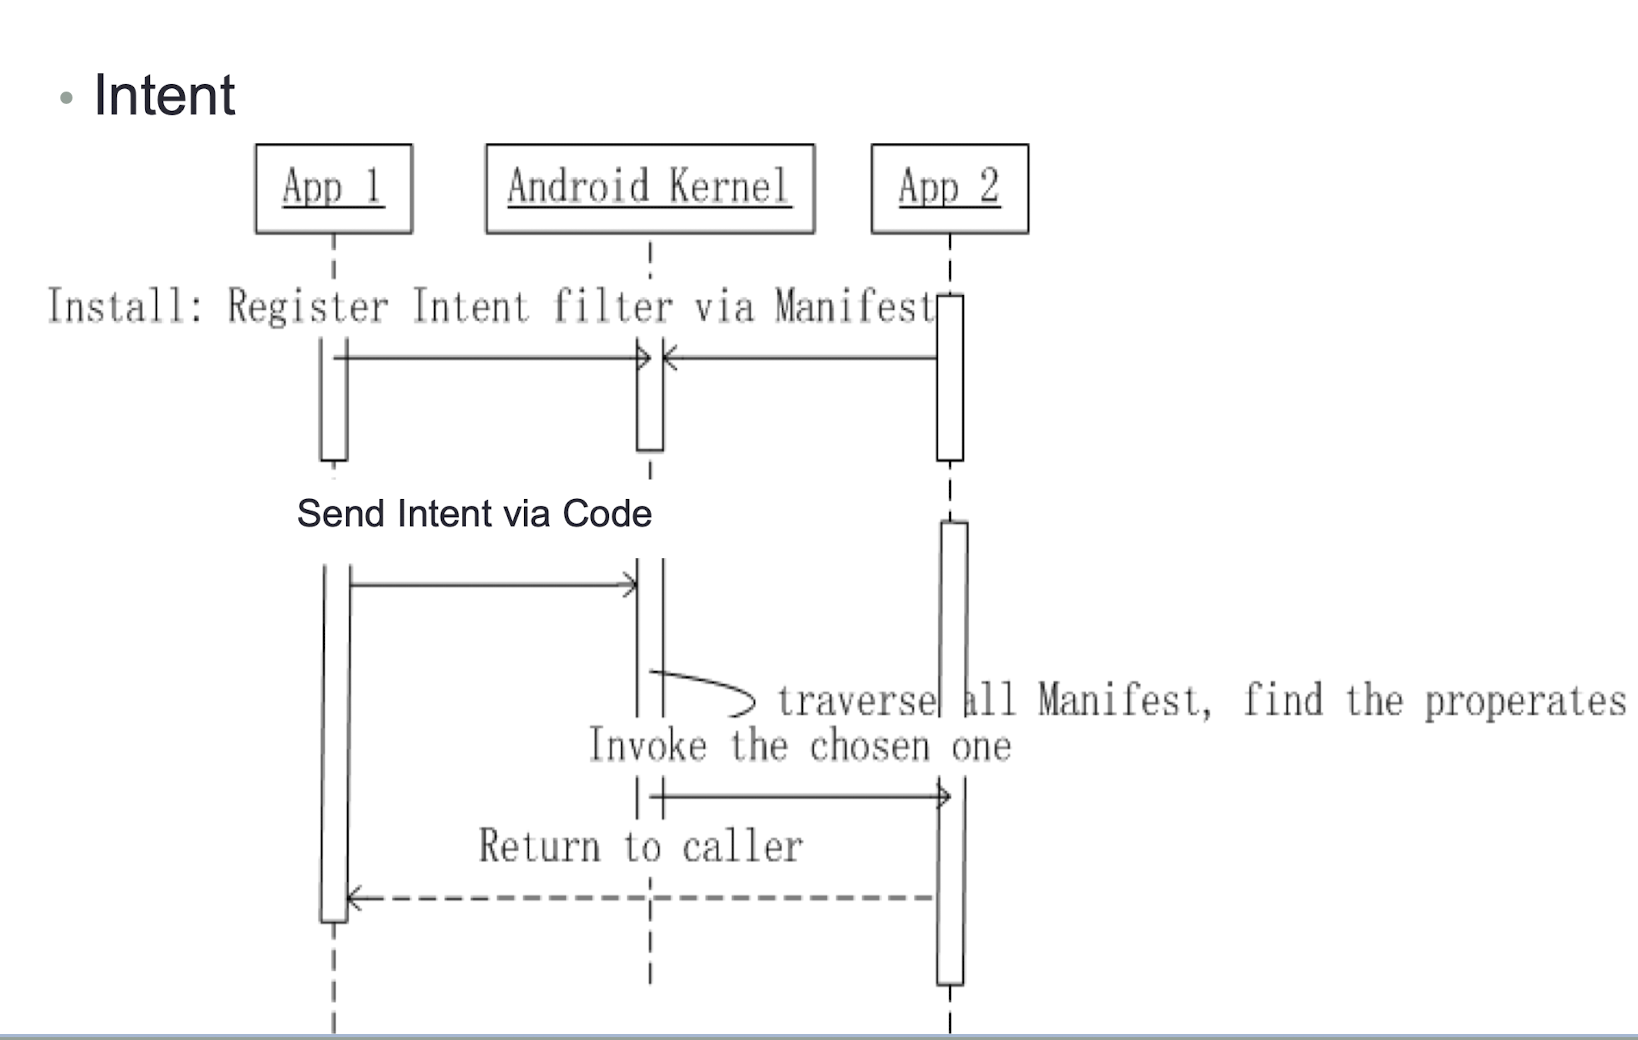
7.23 Intent Resolution Demo (1 app)
- 2 activities are created in 1 app
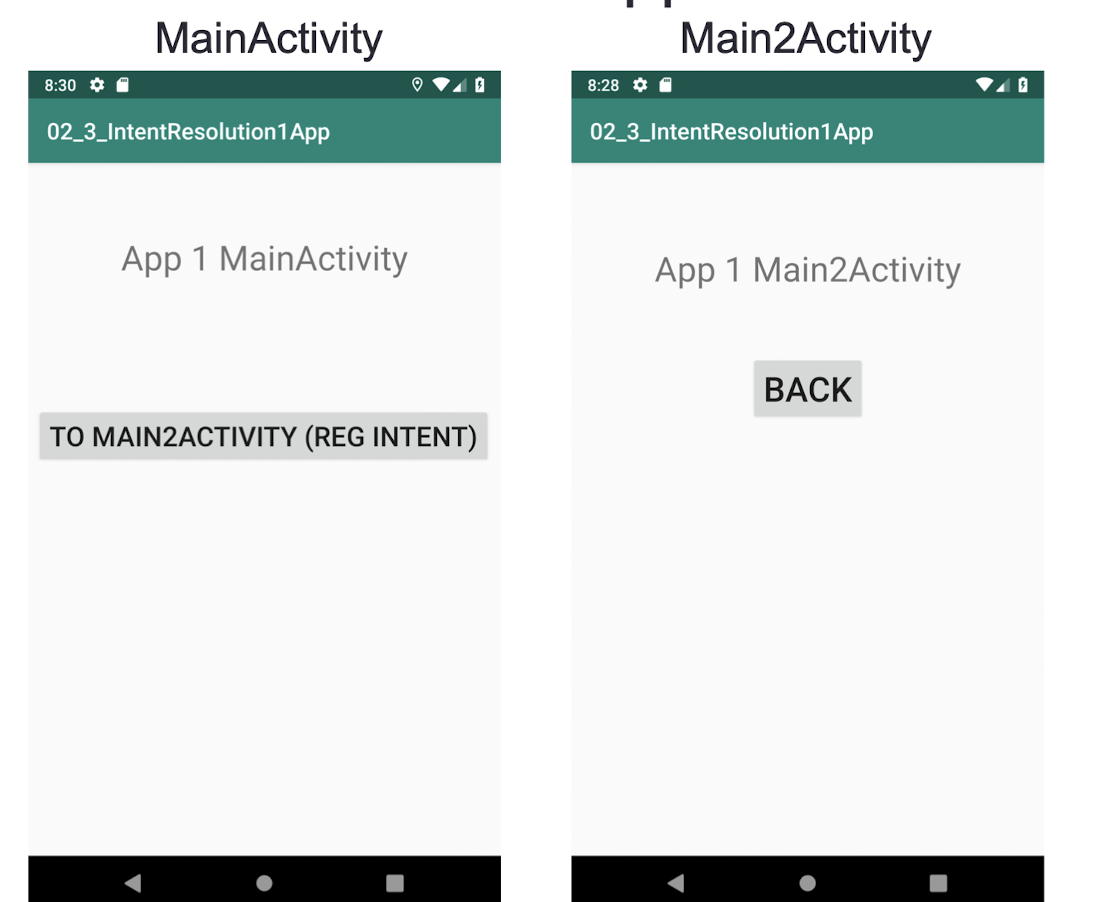
- AndroidManifest.xml
- Register Main 2 Activity with intent filter
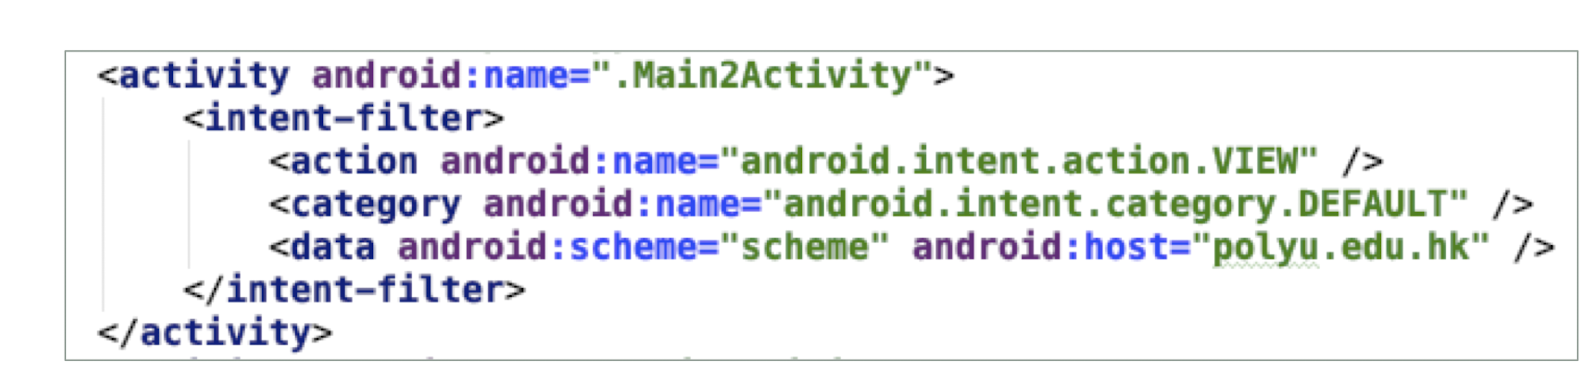
Note: To receive implicit intents, you must include the CATEGORY_DEFAULT category in the intent filter.
- MainActivity.java
- Inside onCreate method:
1 | |
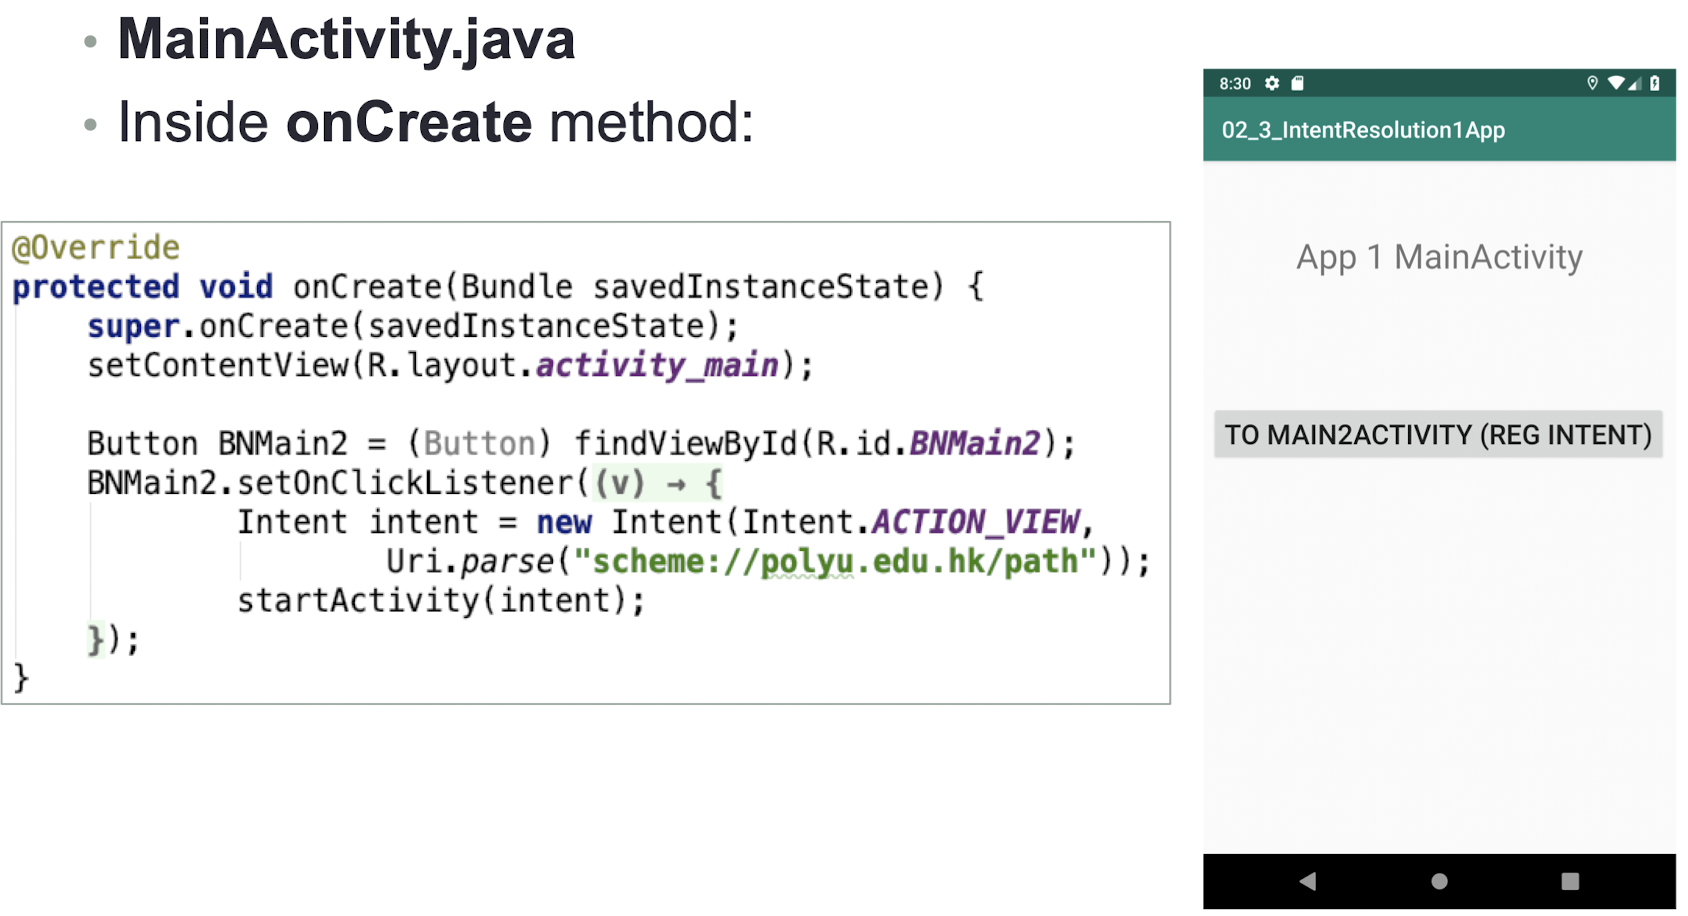
- Main2Activity.java
- Inside onCreate method:
1 | |
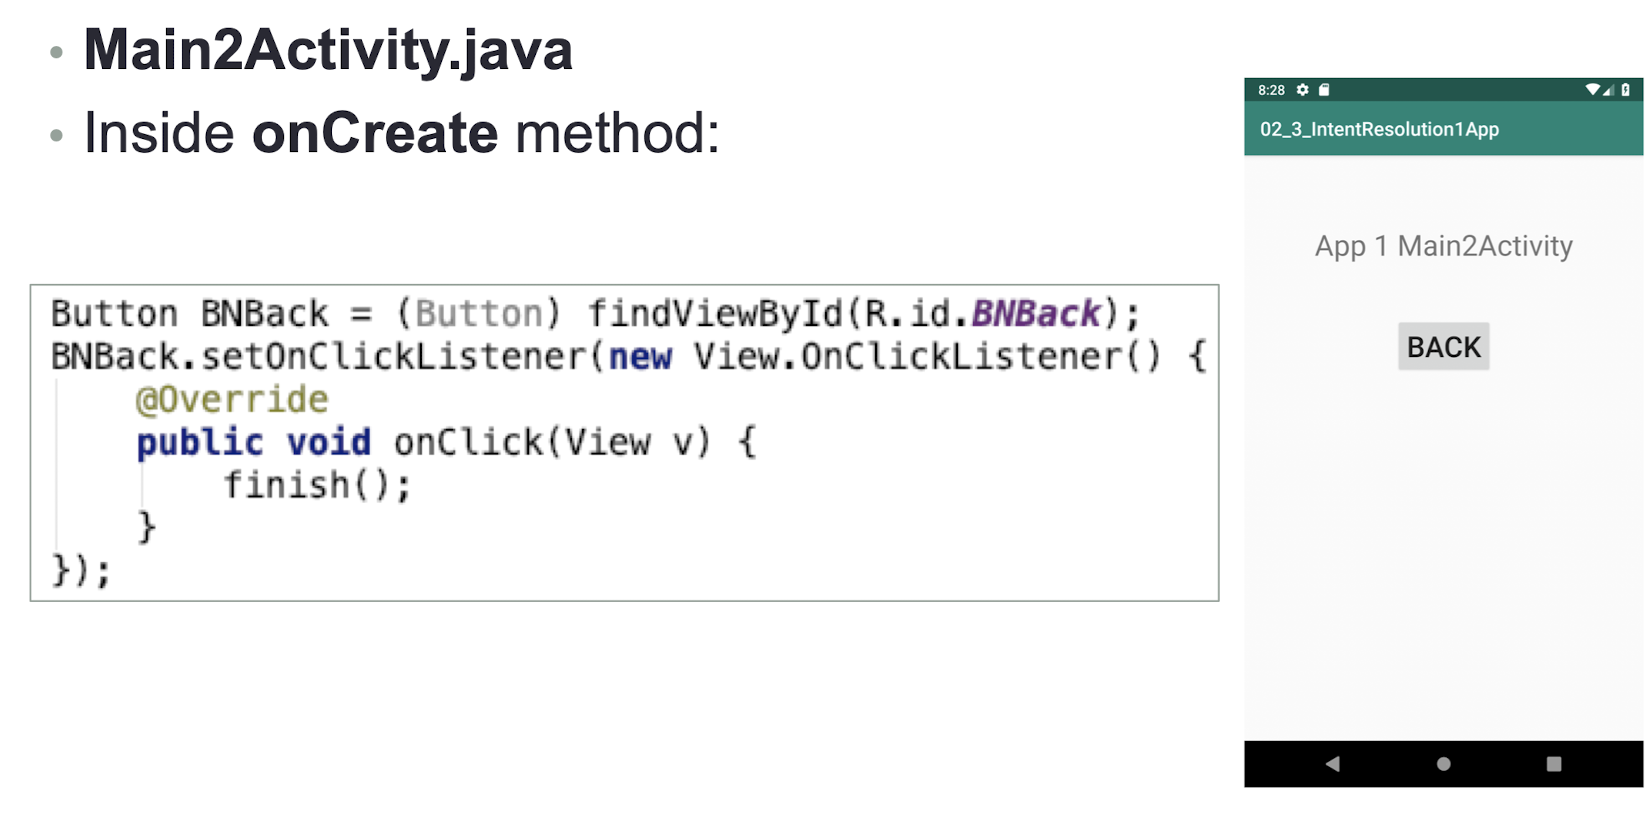
- MainActivity.java
- How to change the Intent statement so that explicit intent is used?
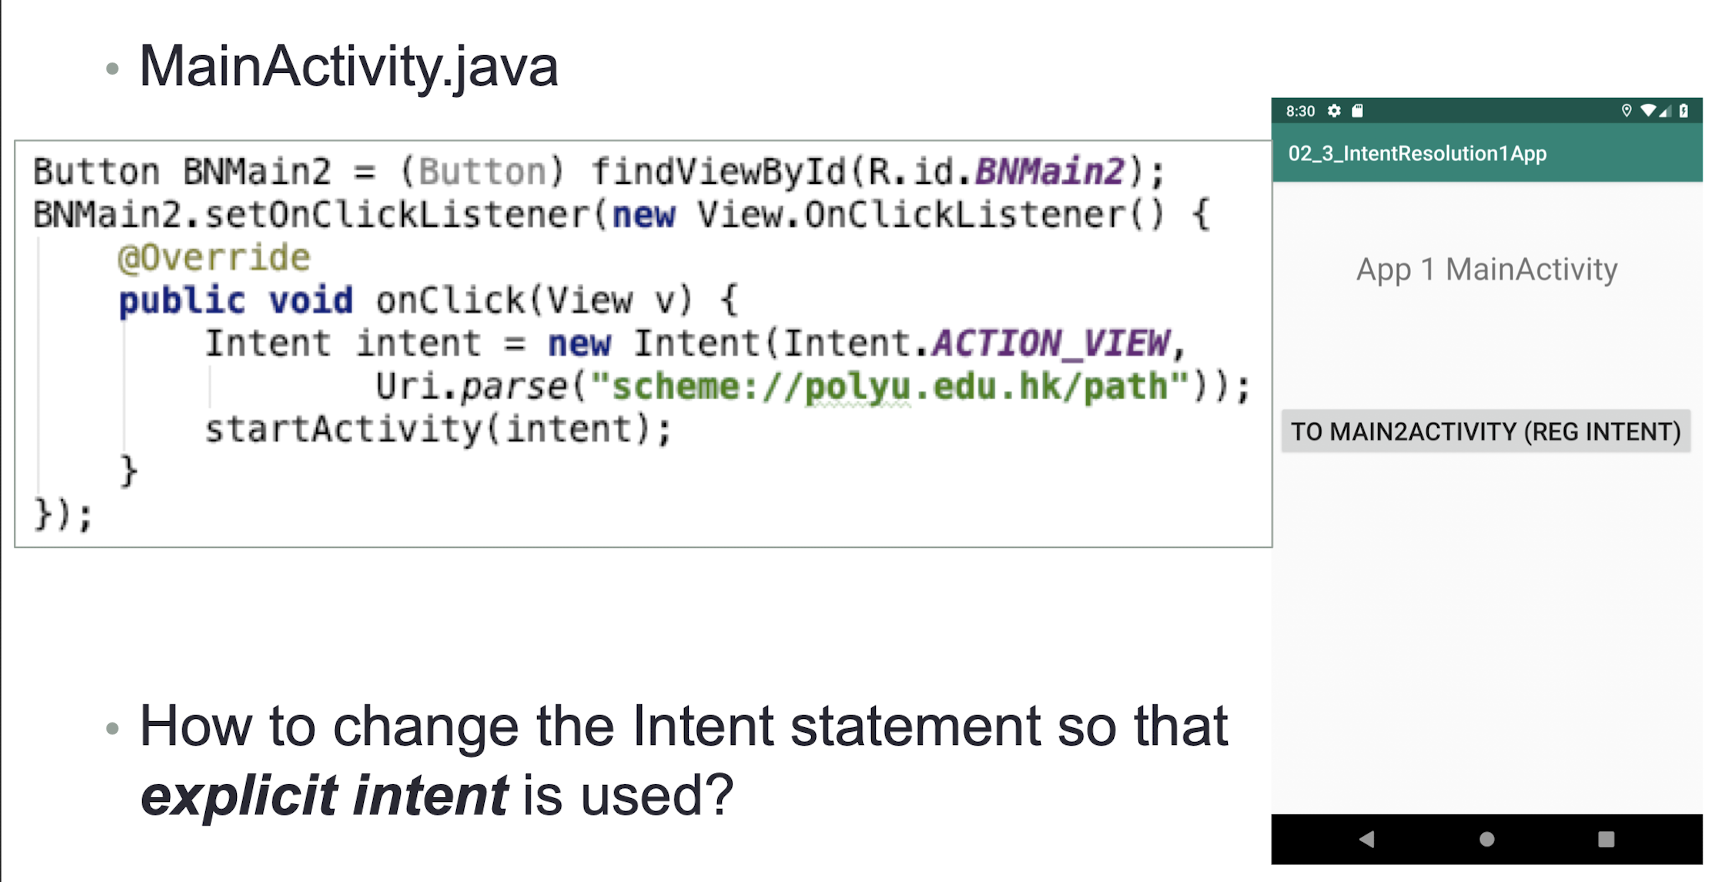
- It works exactly the same as using explicit intent but behind the scene is very different

7.24 Intent Resolution Demo (2 apps)
- A new app is created
- Only 1 activity in this app
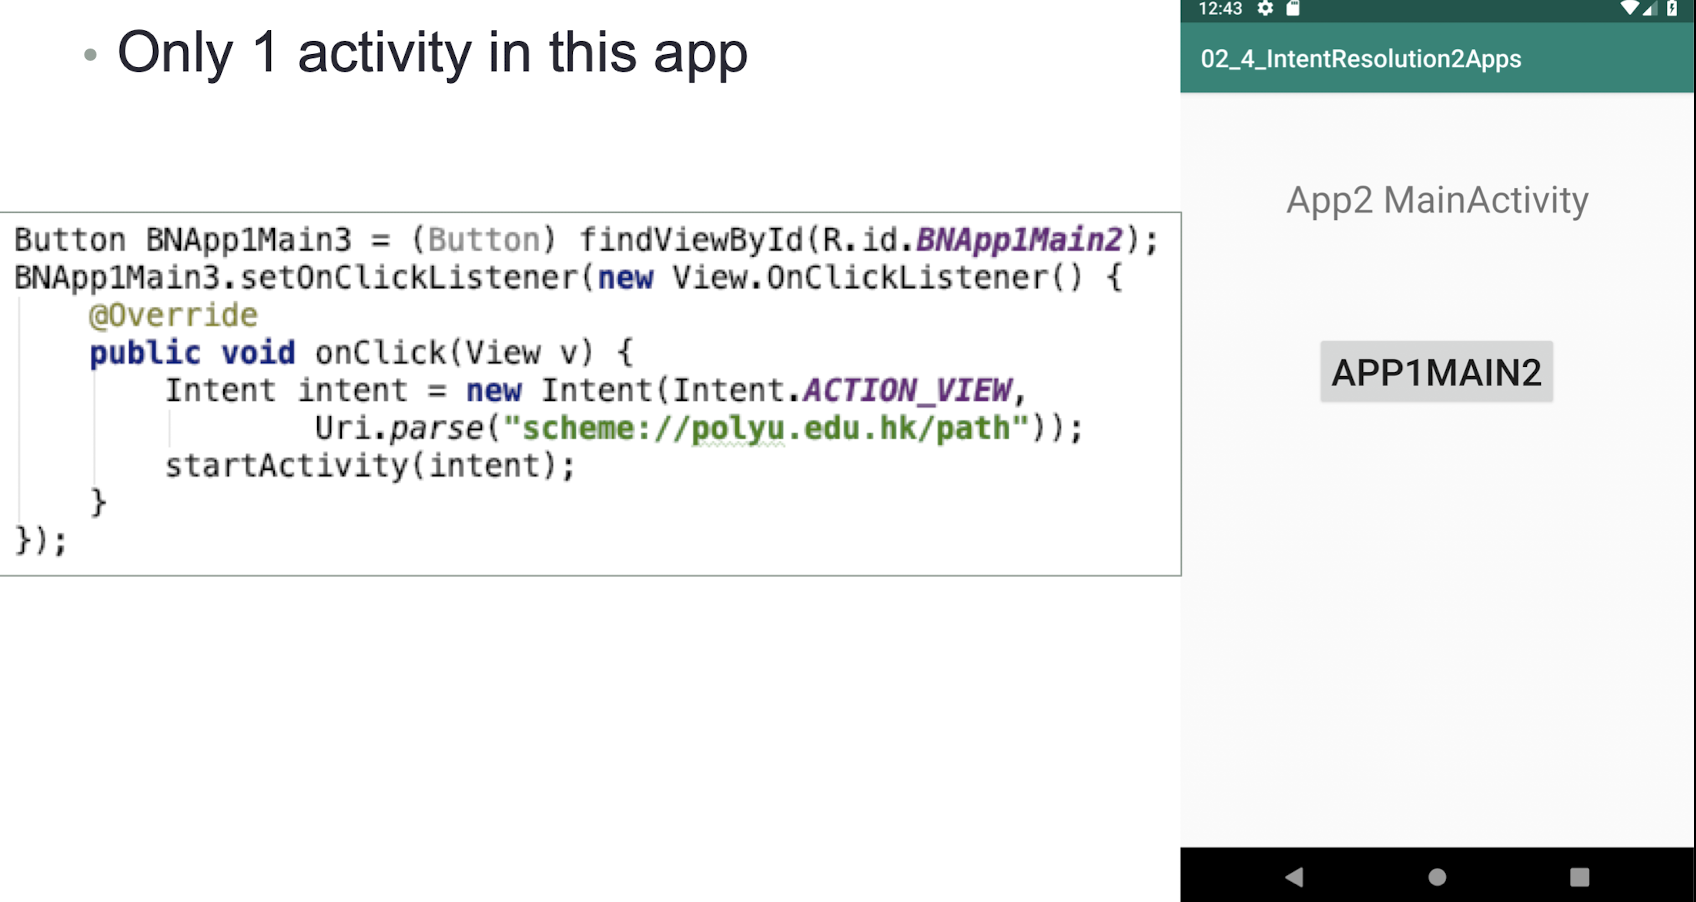
7.25 Service
- One of the 4 components of Android System
- Service == Web Service or AJAX (Asynchronous JavaScript and XML)
- Activities without UI
- For long-running background tasks (e.g., large datadownload services, media players)
Example: Media Player
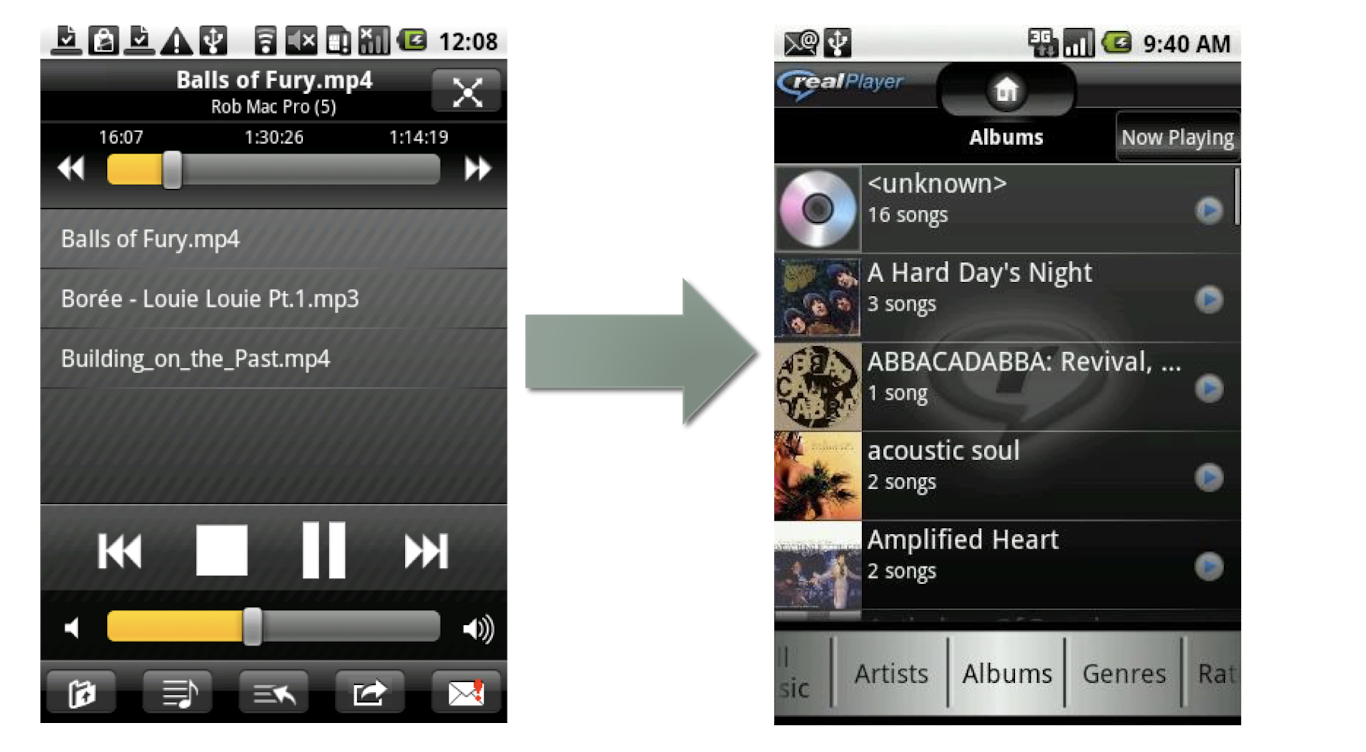
We need playback in background Solution : Service
- Download with Activity
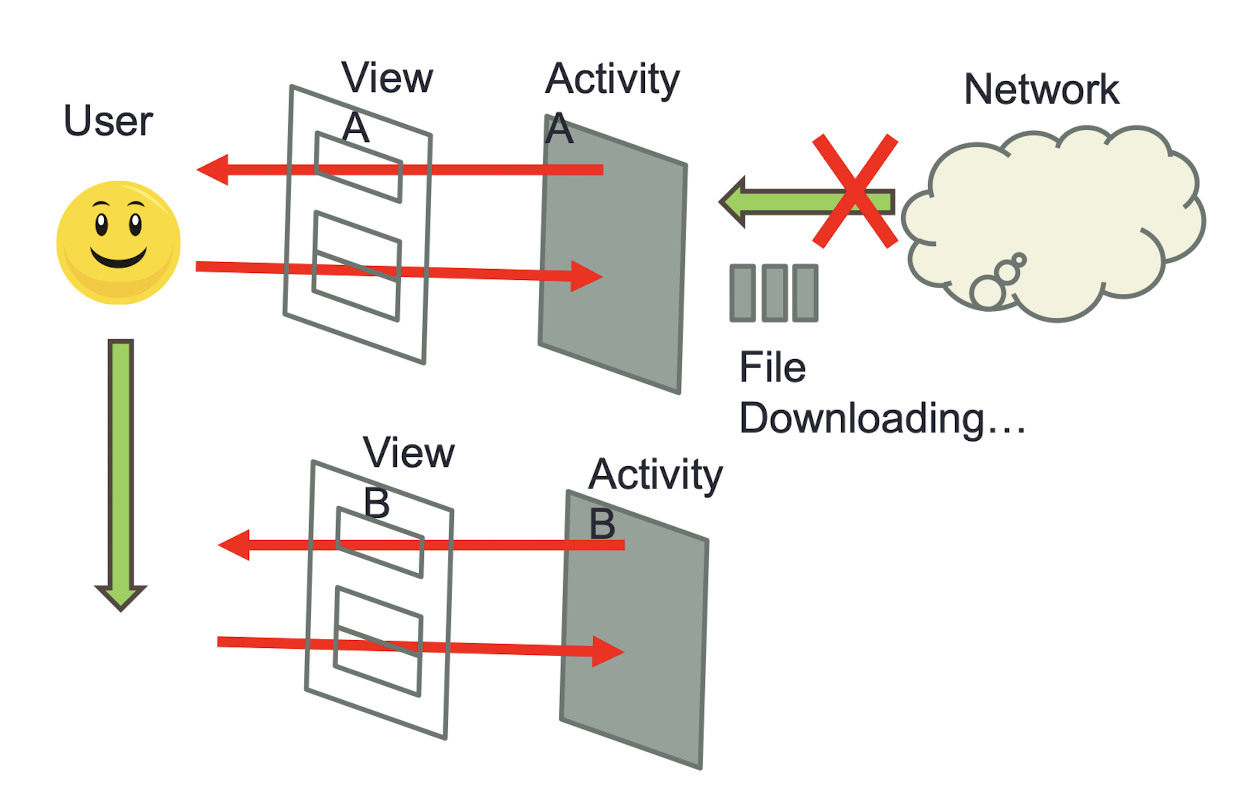
- Download with Service
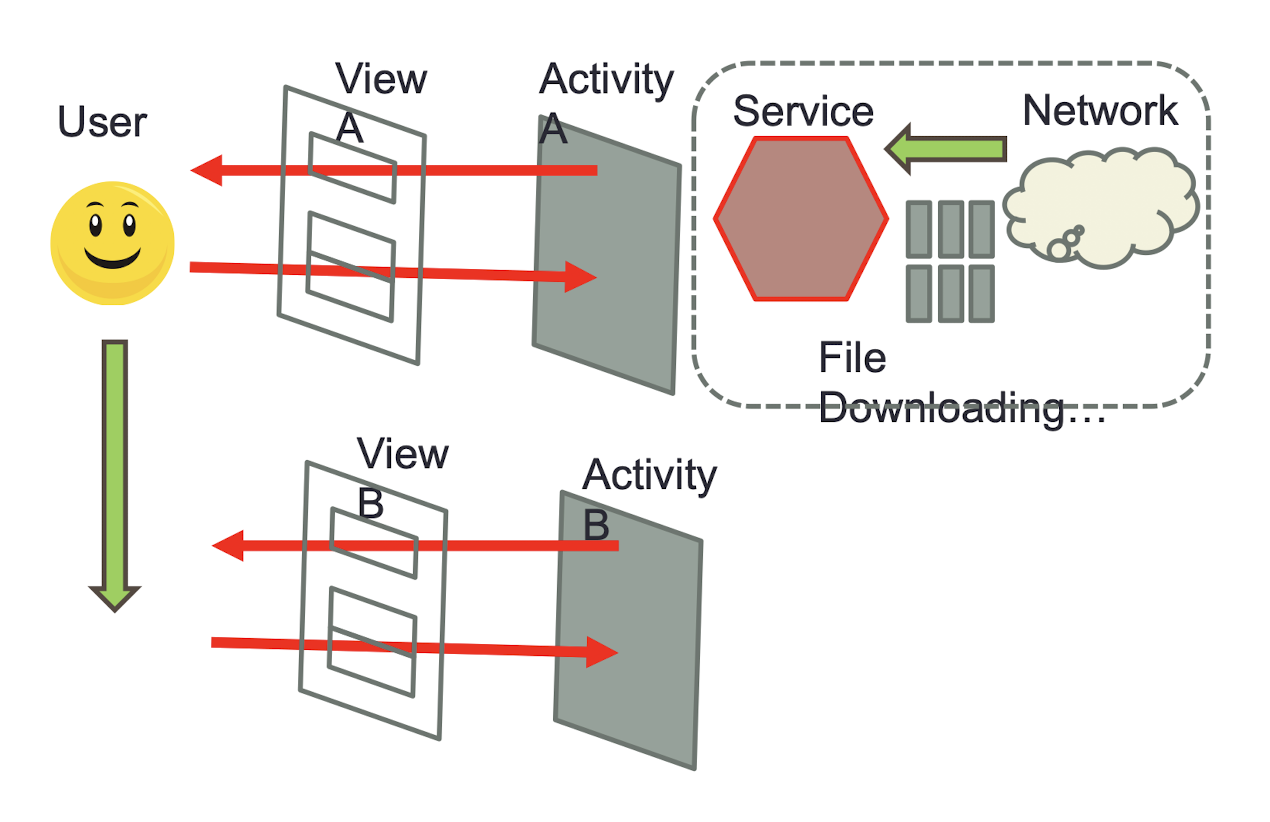
7.26 Intent and Service
- Service Implementation:
- Inherit your own class from
android.app.Service - Override methods in the super class
onCreate()// one time initializationonDestroy()onStart(Intent, int)// startServiceonBind(Intent)// bindServiceonUnbind(Intent)
- Add Service declaration under
<application>in manifest XML
Two methods to start a Service:
startServicestartService(new Intent(this_activity, some_service.class));- Service won’t stop without calling
Context.stopService
bindService- Bind service to an activity
- Lifecycle same as activity
- User can call Unbind to stop it manually
7.28 Service using startService/stopService
- Implementation
1 | |
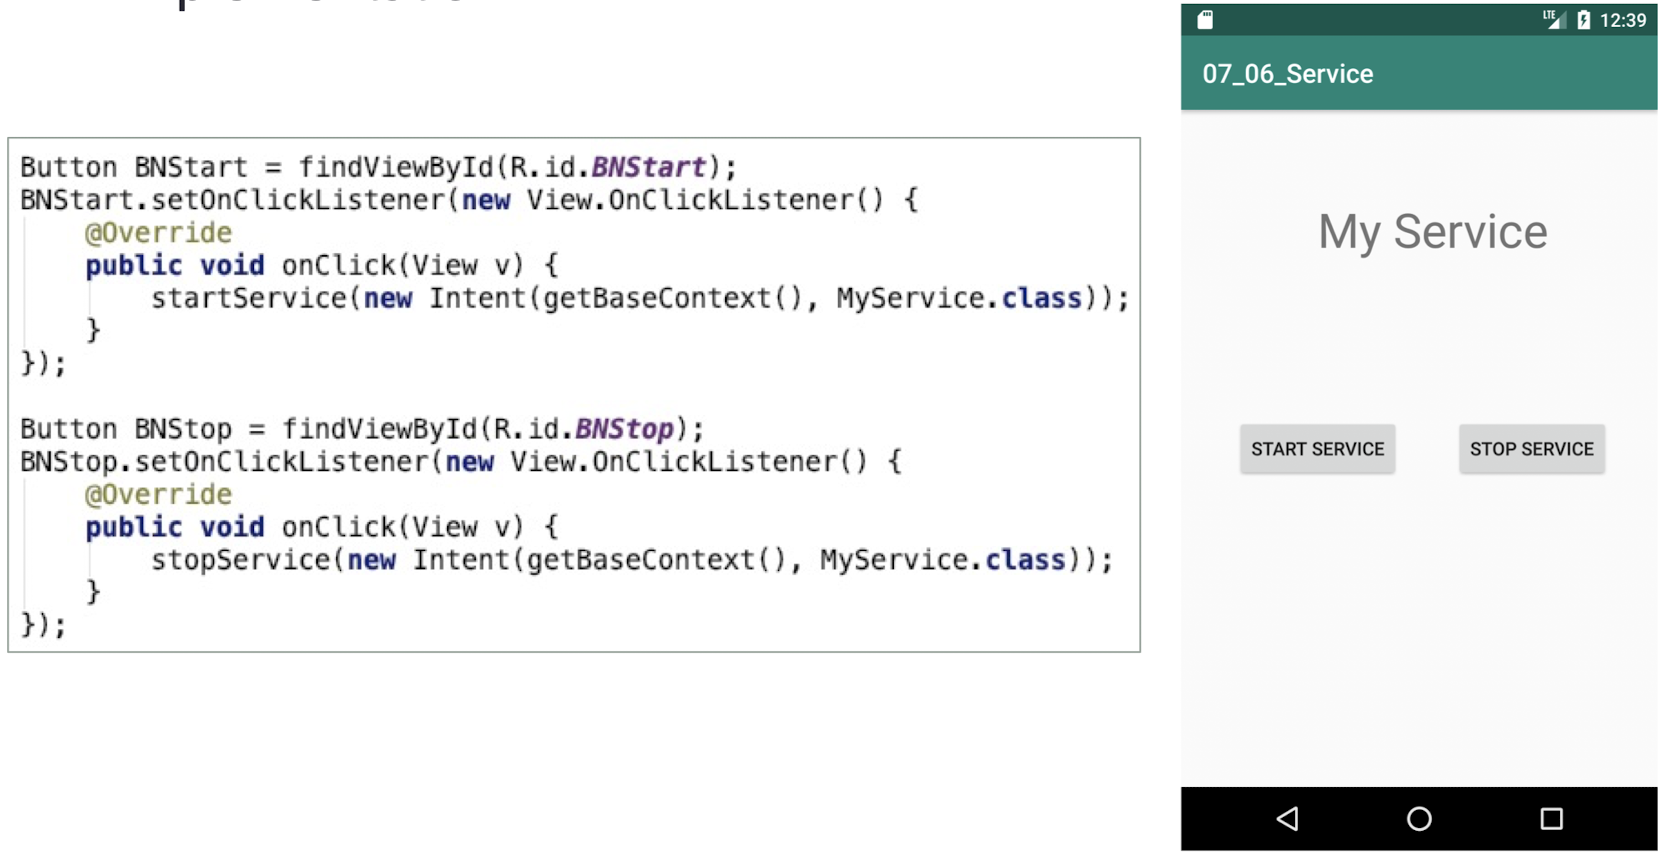
The MyService class
1 | |

7.29 Service Declaration
- In AndroidManifest.xml within
1 | |
android:enabled: Whether or not the service can be instantiated by the systemandroid:exported- Whether or not components of other applications can invoke the service or interact with it
7.30 Service using bindService/ServiceConnection
The ServiceConnection will receive the service object when it is created and be told if it dies and restarts
The service will be considered required by the system only for as long as the calling context exists
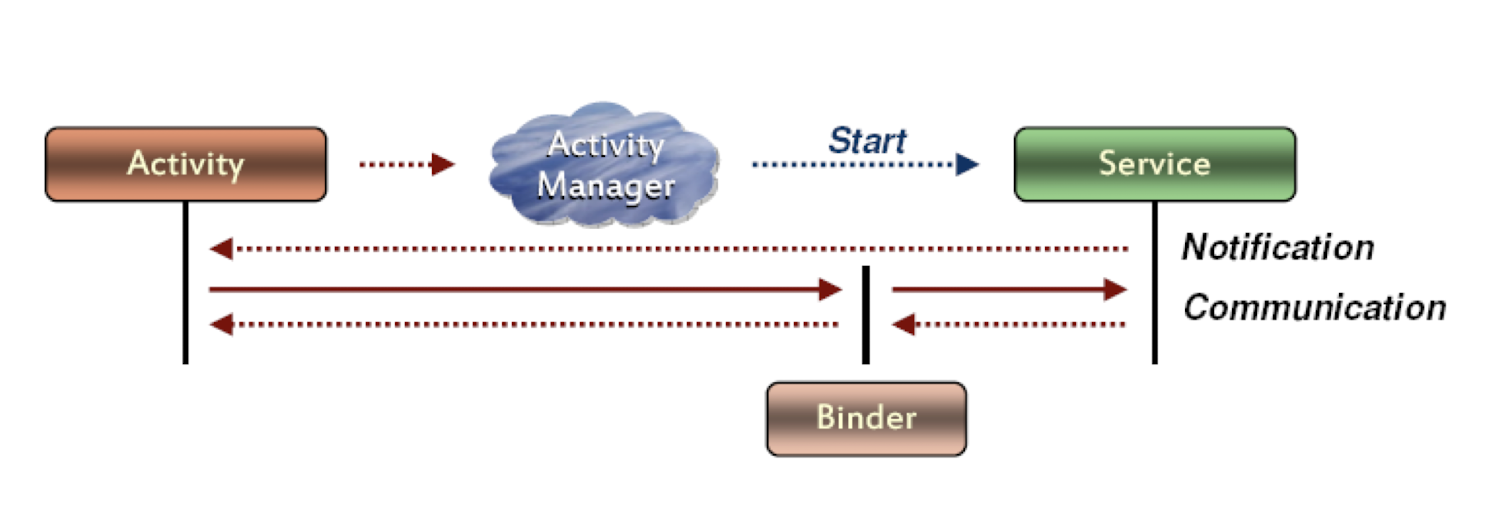
1 | |
7.31 System Services
Core Services (low level)
- Activity Manager
- Package Manager
- Window Manager
- Resource Manager
- Content Providers
- View System
Hardware Services
- Telephony Service
- Location Service
- Bluetooth Service
- WiFi Service
- USB Service
- Sensor Service
7.32 Class Question 7.2
- An Android app is developed to play a music file (song.mp3) stored under the res/raw folder.
- The figure shows the layout of the app and the IDs of the buttons. The play button will start the song when it is pressed and the stop button will stop the song and release the resource when it is pressed.
- Implement the Service class
- And MainActivity using Service
Given MainActivity without using Service
1 | |
7.33 Error Message
The app crashes when it starts running. The error message is recorded:
java.lang.RuntimeException: Unable to start activity ComponentInfo{...mediaplayer.MainActivity}: java.lang.NullPointerException: Attempt to invoke virtual method 'void android.view.View.setOnClickListener(android.view.View$OnClickListe ner)' on a null object reference
What is the cause of the crash when the app starts? Give a solution to fix this run-time error
- BNPlay and BNStop since you didn’t initialize them in the onCreate method. You should initialize them using findViewById before setting their click listeners.
1 | |
Implement the Service class
1 | |
1 | |
Implement the 2 onClick methods in MainActivity using the Service class
1 | |
1 | |
BNPlay.setOnClickListener:
When the BNPlay button is clicked, this code is executed:1
2Intent playIntent = new Intent(MainActivity.this, MyMediaPlayer.class);
startService(playIntent);
This starts the MyMediaPlayer service. Here’s what happens in the service:
If the service is not already running:
onCreate()will be called:- The
MediaPlayerobject is created and set up to play the song from the raw resources.
- The
- Then,
onStartCommand()will be called:- The
MediaPlayerstarts playing the song.
- The
If the service is already running (e.g., if you press the play button while the song is already playing):
onCreate()will not be called again because the service has already been created.- However,
onStartCommand()will be called again:- Given our current implementation, the song will continue playing because we’ve implemented a check using
mediaPlayer.isPlaying()to avoid restarting the playback if the song is already playing.
- Given our current implementation, the song will continue playing because we’ve implemented a check using
BNStop.setOnClickListener:
When the BNStop button is clicked, this code is executed:1
2Intent stopIntent = new Intent(MainActivity.this, MyMediaPlayer.class);
stopService(stopIntent);
This stops the MyMediaPlayer service. Here’s what happens in the service:
onDestroy()will be called:- The
MediaPlayerstops playing. - The
MediaPlayerresources are released, and the object is set to null. - Any other cleanup related to the service is performed here.
- The
So, to summarize:
Clicking the Play button will:
- Start the service if it’s not already started, triggering
onCreate()and thenonStartCommand(). - If the service is already running, it will only trigger
onStartCommand()again.
- Start the service if it’s not already started, triggering
Clicking the Stop button will:
- Stop the service, triggering
onDestroy()and cleaning up the resources.
- Stop the service, triggering
7.34 Broadcast Receiver
- Let you know when system events occur
- SMS is arriving
- Battery is low
- WiFi is connected
- System is shutting down
- No User Interface
- Inform the user via Activity or Notification (e.g., background flashlight, vibration, sound, notification icon on the status bar, etc.)
7.35 Kinds of Broadcast
- Normal Broadcast
- Context.sendBroadcast
- All receivers will receive the broadcast at the same time
- Ordered Broadcast
- Context.sendOrderedBroadcast
- Can be aborted by previous receiver using
broadcastReceiver.abortBroadcast() - Priority can be set in Intent
7.36 Broadcast Registration
- Two ways to register Broadcast
AndroidManifest.xml- Application/Receiver node
- Life cycle ends when OnReceive return.
- Not supported in Android 8.0 or newer
Coding
registerReceiver(BroadcastReceiver, IntentFilter)unregisterReceiver(BroadcastReceiver)
7.37 Broadcasting Airplane Mode Changed
- Create a sub-class of BroadcastReceiver
1 | |
- In MainActivity
1 | |
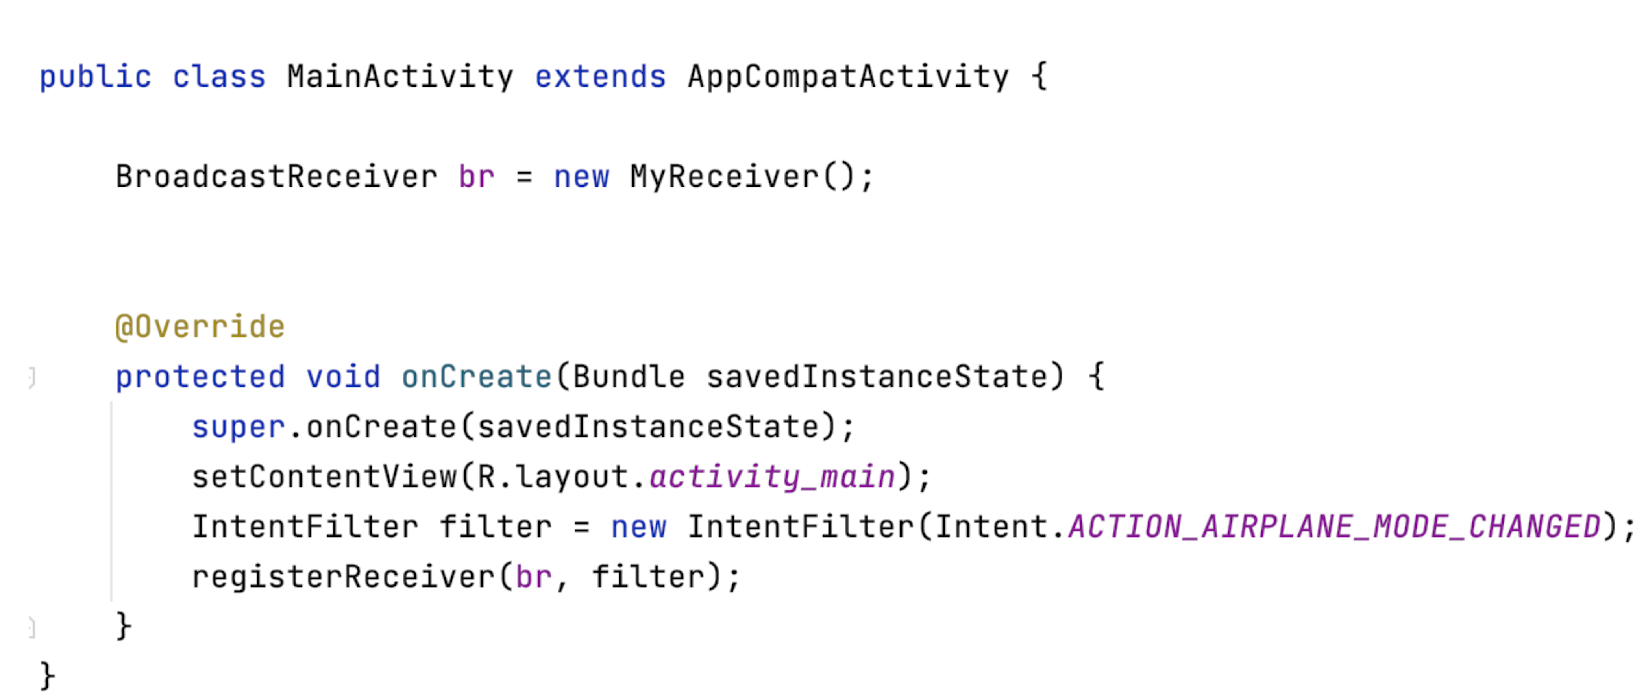
7.38 System Broadcast Action
- Messages broadcasted by the system:
- ACTION_TIME_TICK
- ACTION_TIME_CHANGED
- ACTION_TIMEZONE_CHANGED
- ACTION_BOOT_COMPLETED
- ACTION_PACKAGE_ADDED
- ACTION_PACKAGE_CHANGED
- ACTION_PACKAGE_REMOVED
- ACTION_PACKAGE_RESTARTED
- ACTION_PACKAGE_DATA_CLEARED
- ACTION_UID_REMOVED
- ACTION_BATTERY_CHANGED
- ACTION_POWER_CONNECTED
- ACTION_POWER_DISCONNECTED
- ACTION_SHUTDOWN
7.39 Real-Time Operating System: Scheduling
7.39.1 Scheduling
- In a typical RTOS, a task has three states:
- Running
- Ready
- Blocked
- Most tasks are blocked, most of the time
- Only one task per CPU is running
- In simpler systems, the ready list is usually short, two or three tasks at most
Preemptive, priority-based scheduling
- More important process - > higher priority
- Support preemption: A process currently running on the CPU will be preempted if a higher-priority process becomes available to run
- Preemptive kernels
- Allow preemption of a task running in kernel mode
- Minimizing Latency
- Event latency should be minimized
7.39.2 Process Characteristics in RTOS
- Periodic processes require the CPU at specified intervals (periods)
- p is the duration of the period
- d is the deadline by when the process must be serviced
- t is the processing time
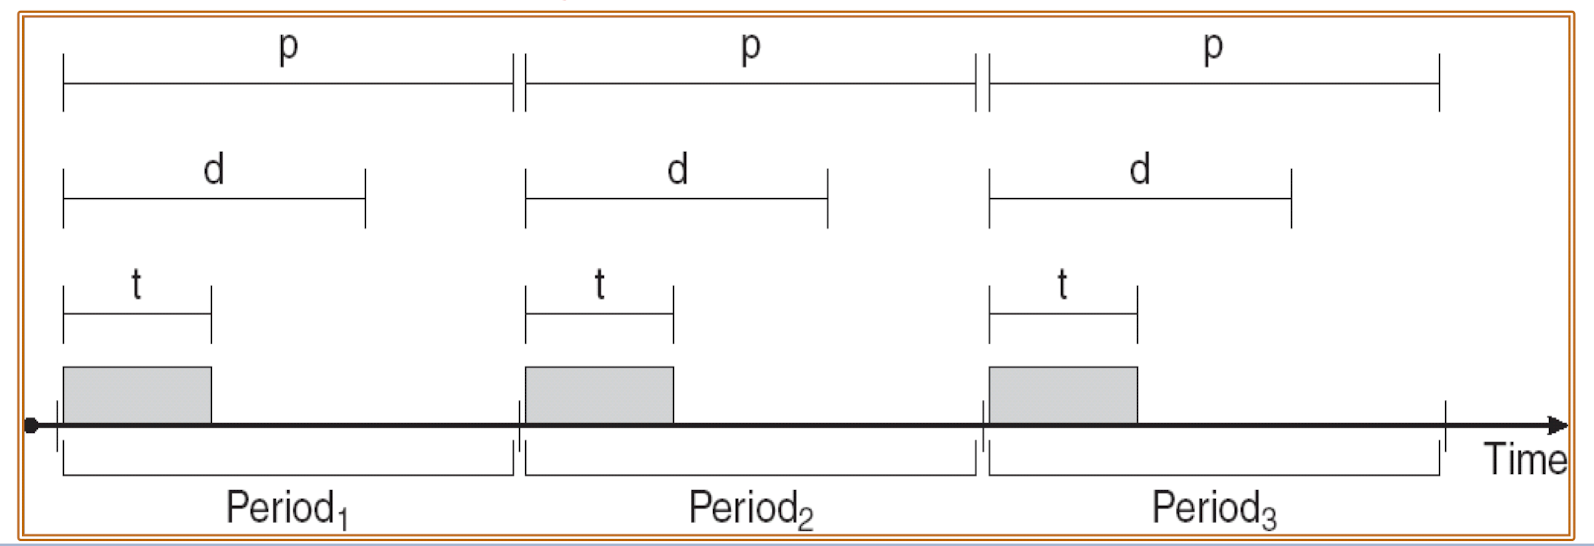
7.39.3 Scheduling of Tasks
- When _P_2 has a higher priority than P1
- PR (Non-Preemptive Scheduling)
- _P_1: t = 20, d = p = 50
- _P_2: t = 36, d = p = 100
- $P_1$ misses the deadline (when t=50, P1 is still running)
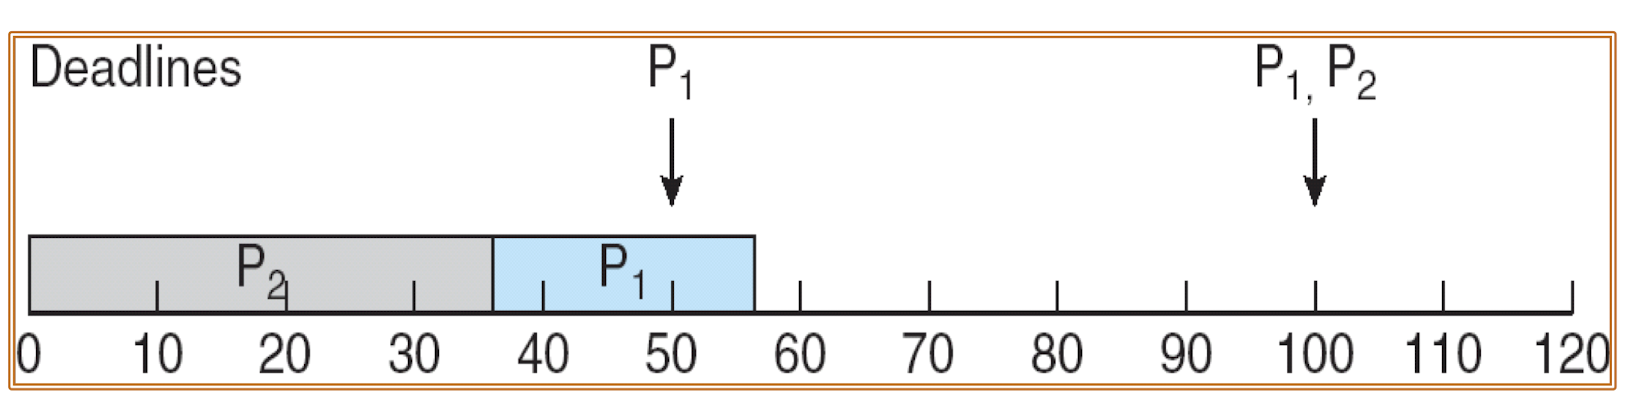
- Hard real time systems
- Must always meet all deadlines
- System fails if deadline window is missed
- Soft real time systems
- Must try to meet all deadlines
- System does not fail if a few deadlines are missed
- Firm real time systems
- Result has no use outside deadline window
- Tasks that fail are discarded
7.39.3 Rate Monotonic Scheduling
- A priority is assigned based on the inverse of its period
- Shortest Remaining Time First (SRT), Preemptive
- Shorter periods = higher priority
- Longer periods = lower priority
- P 1 is assigned a higher priority than P2
- P 1: t = 20, d = p = 50
- P 2: t = 36, d = p = 100
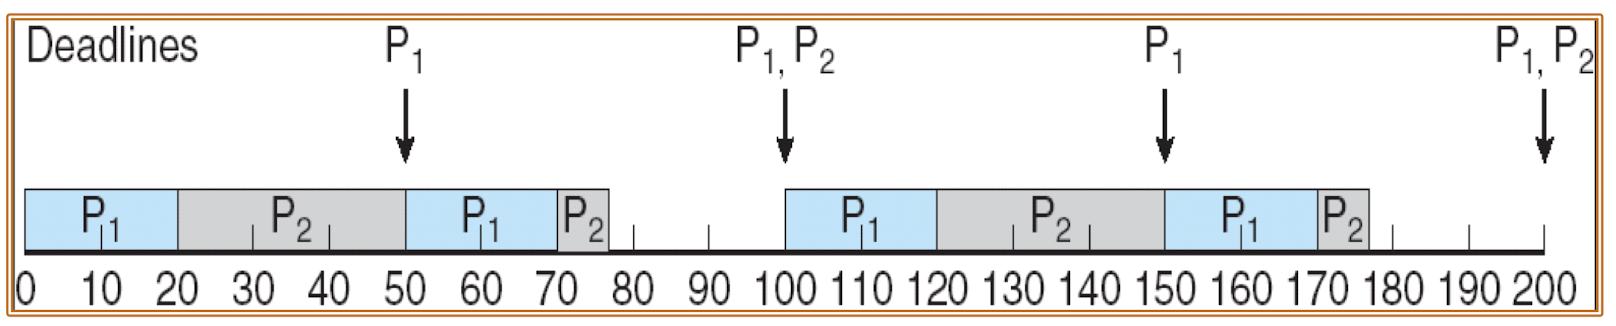
- If d of _P_2 and t of P1 changes
- P 1: t = 25, d = p = 50
- P 2: t = 36, d = p = 80
- P 2 misses the deadline
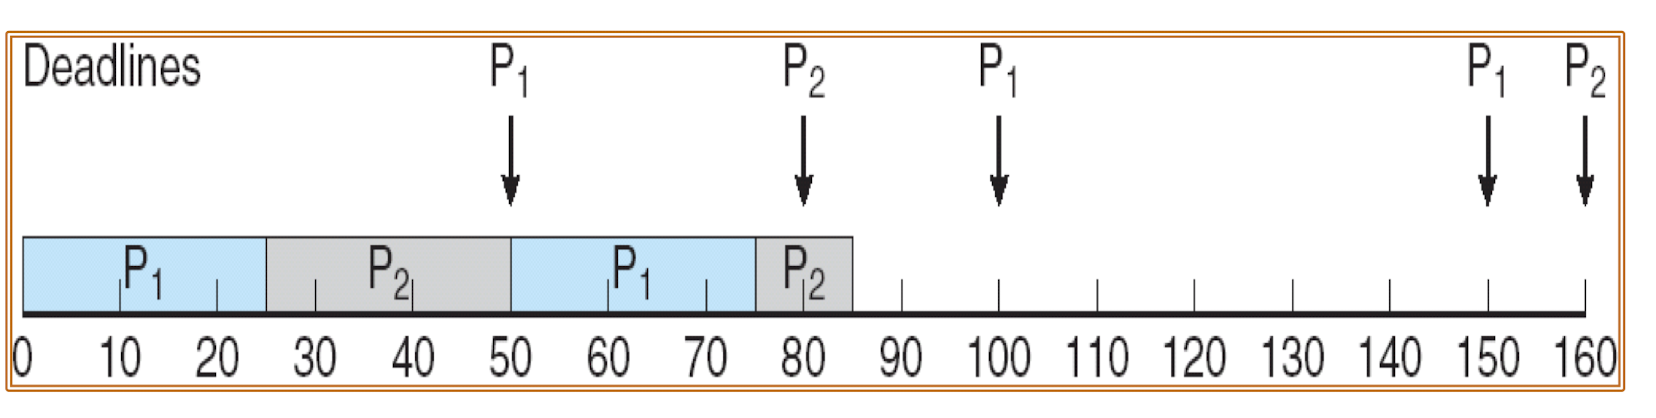
7.39.4 Earliest Deadline First Scheduling
- Priorities are assigned according to deadlines:
- The earlier the deadline, the higher the priorit, preemptive
- The later the deadline, the lower the priority
- P1: t = 25, d = p = 50
- P2: t = 36, d = p = 80
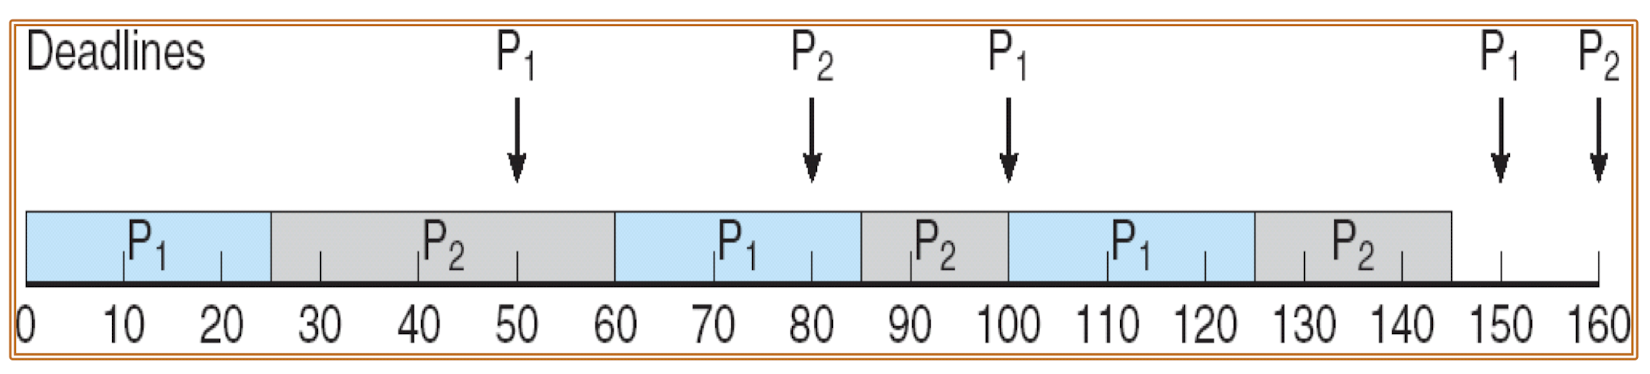
7.39.5 Proportional Share Scheduling
- T shares are allocated among all processes in the system
- An application receives N shares where N < T
- This ensures each application will receive N / T of the total processor time
- Round Robin Scheduling
7.39.6 Scheduling with Latency
If latency is considered, changing the execution processes too frequently will waste too much running time
In this case, it is better to complete one process first and hence execute the others
According to Earliest Deadline First Scheduling (with latency), complete the following schedule diagram of processes P1 and P2 ( P2 has a higher priority for tie breaker):
- Latency = 10
- P 1 : t = 20, d = p = 50
- _P_2 : t = 30, d = p = 100
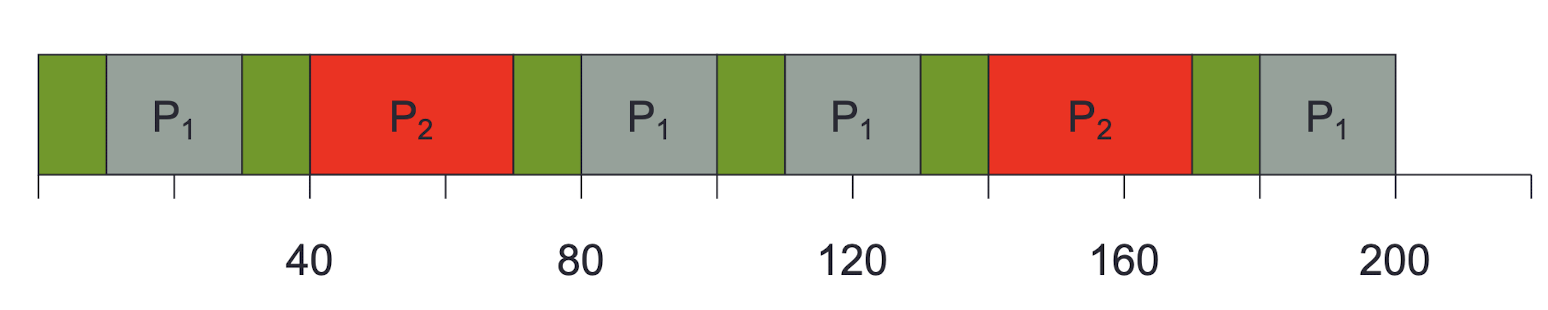
Tutorial 7.1
According to Rate Monotonic Scheduling, complete the following schedule diagram of processes P1 and P2:
P 1 : t = 20, d = p = 50
- P 2 : t = 40, d = p = 70
Tutorial 7.2
According to Earliest Deadline First Scheduling, complete the following schedule diagram of processes P1 and P2:
P 1 : t = 20, d = p = 50
- P 2 : t = 40, d = p = 70
8. Views and ViewGroups
Outlines
- Views and ViewGroups Overview
- Layouts and Display Orientation
- User Interface with Views
8.1 Components of a Screen
- The basic unit of an Android application is an activity, which displays the UI of your application
- The activity may contain widgets such as buttons, labels, textboxes, and so on
- Typically, you define your UI using an XML file (for example, the activity_main.xml file located in the res/layout folder of your project)
- During compilation, each element in the XML file is compiled into its equivalent Android GUI (Graphical User Interface) class, with attributes represented by methods
- The Android system then creates the activity’s UI when the activity is loaded.
8.2 Views and ViewGroups
- An activity contains Views and ViewGroups
- A View is a widget that has an appearance on screen
- Examples of Views are buttons, labels, and text boxes
- A View derives from the base class android.view.View
- One or more views can be grouped into a ViewGroup
- A
ViewGroup(which is itself a special type of View) provides the layout in which you can order the appearance and sequence of views- Examples of
ViewGroupsincludeRadioGroupandScrollView
- Examples of
- A ViewGroup derives from the base class
android.view.ViewGroup
8.3 User Interface with Views
Basic views
- Commonly used views, such as the TextView, EditText, and Button views
List views
- Views that display a long list of items, such as the ListView and the SpinnerView views
8.4 User Interface with Views - Basic Views and ViewGroups
- Basic views of Android applications:
- TextView
- EditText
- Button
- ImageButton
- CheckBox
- ToggleButton
- RadioButton
- RadioGroup
- These basic views enable you to display text information, as well as perform some basic selection
8.4.1 TextView
- TextView is to display text to the user
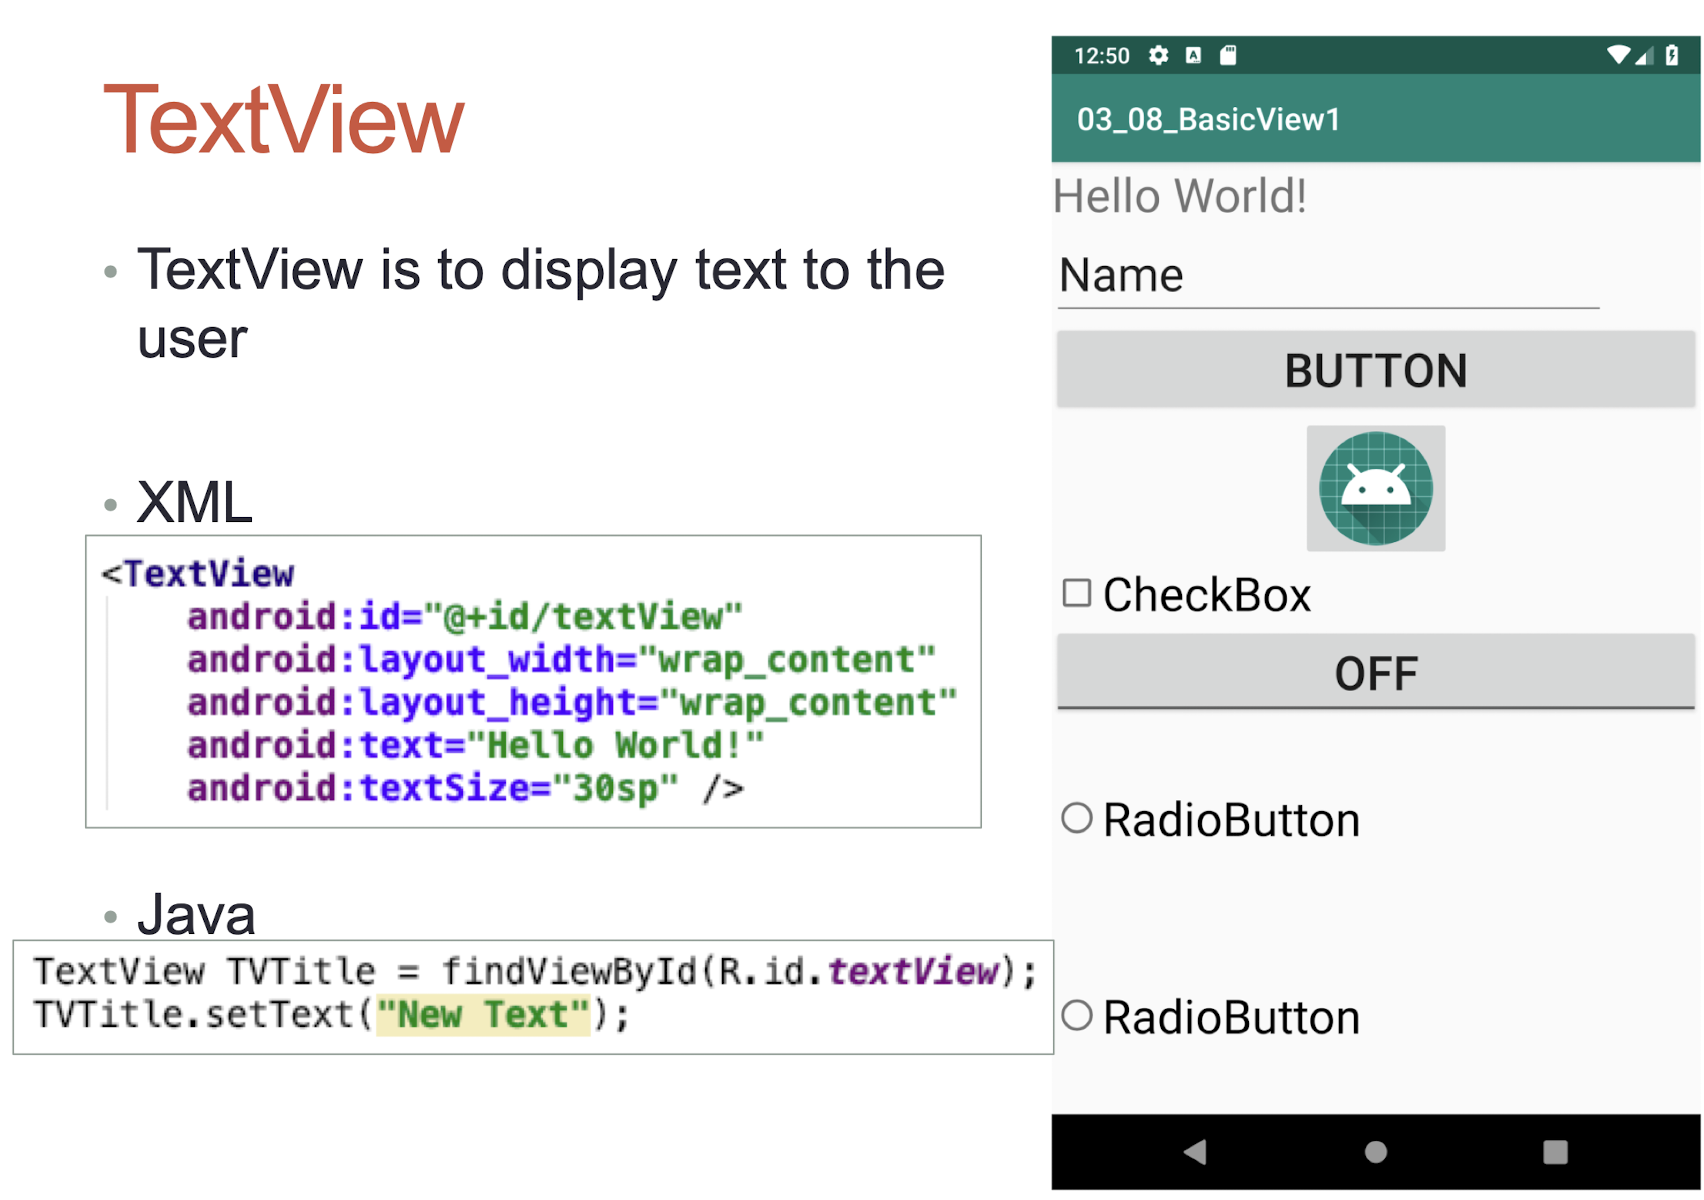
wrap_content- The view should be only as big as needed to fit its content
1 | |
8.4.2 EditText
- EditText allows user to edit the text displayed
1 | |
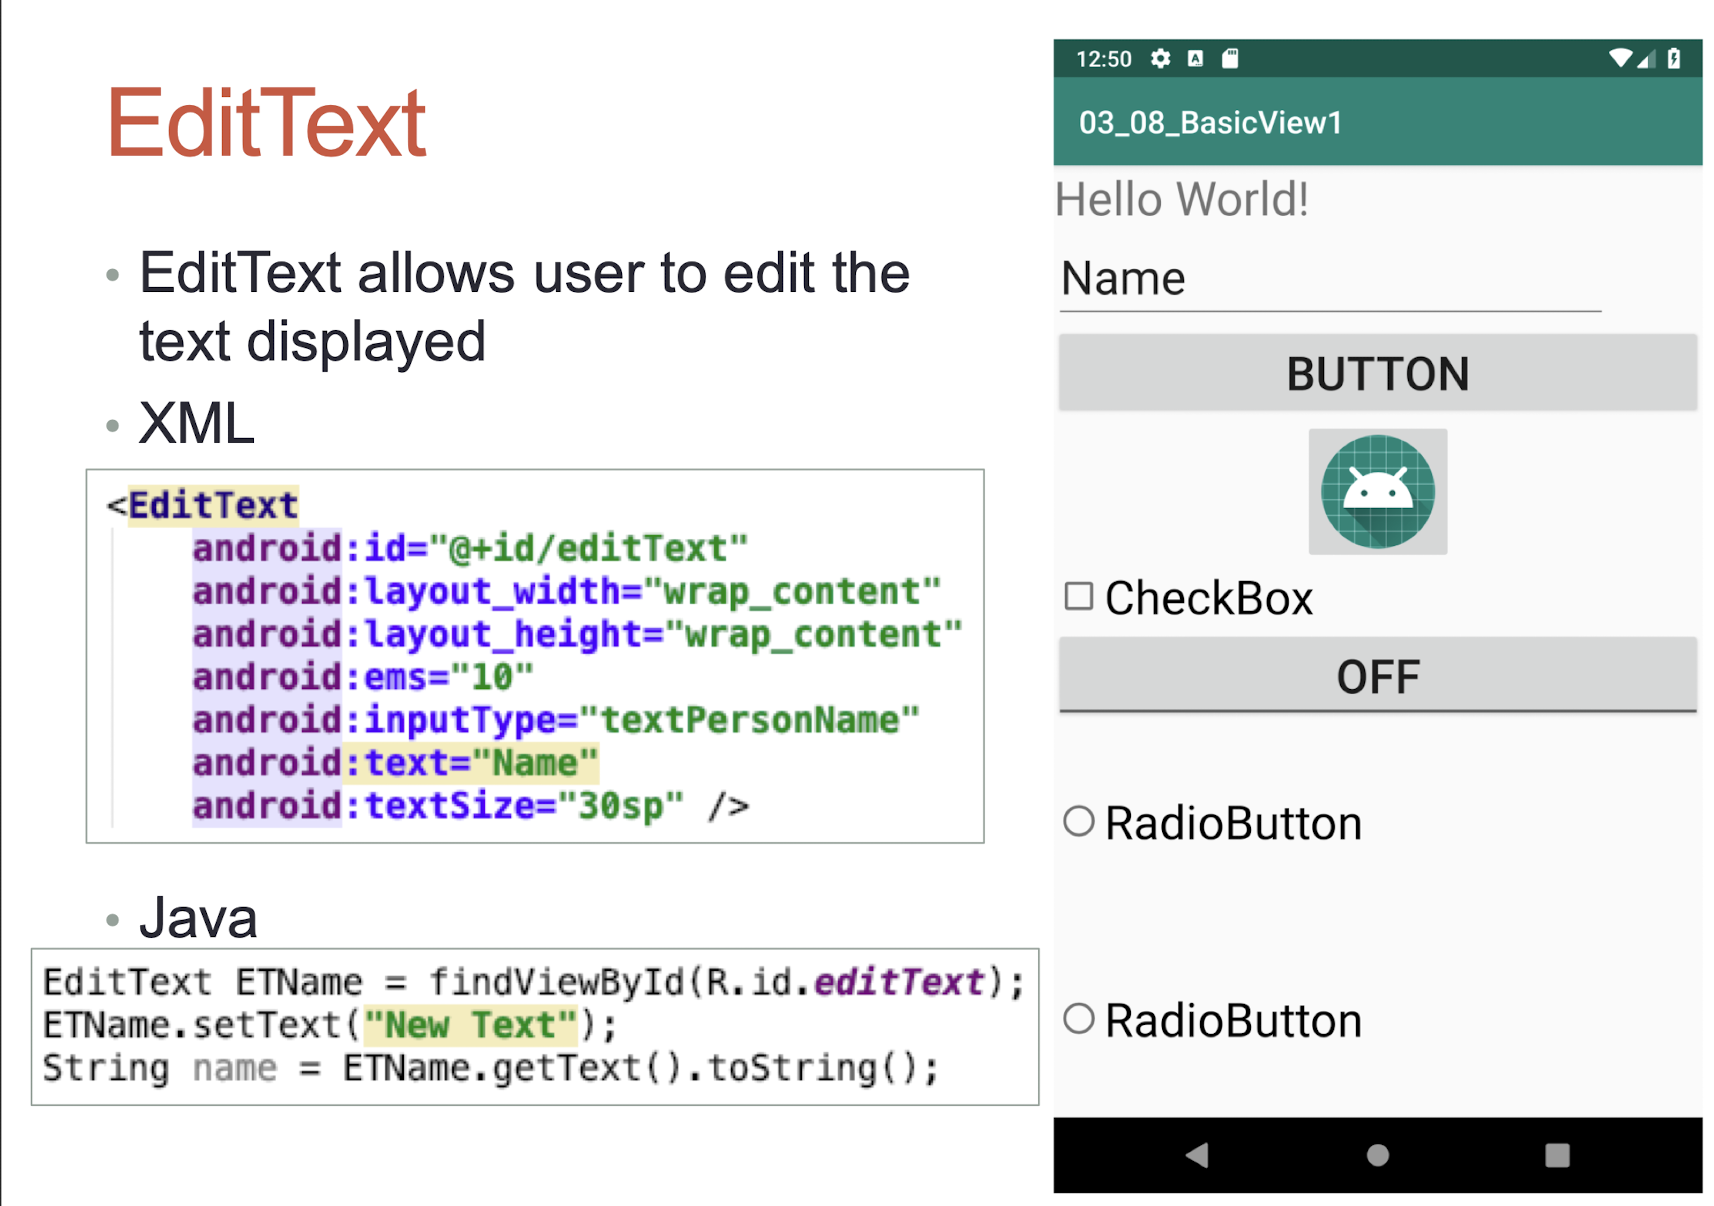
8.4.3 EditText
- Many types of EditText
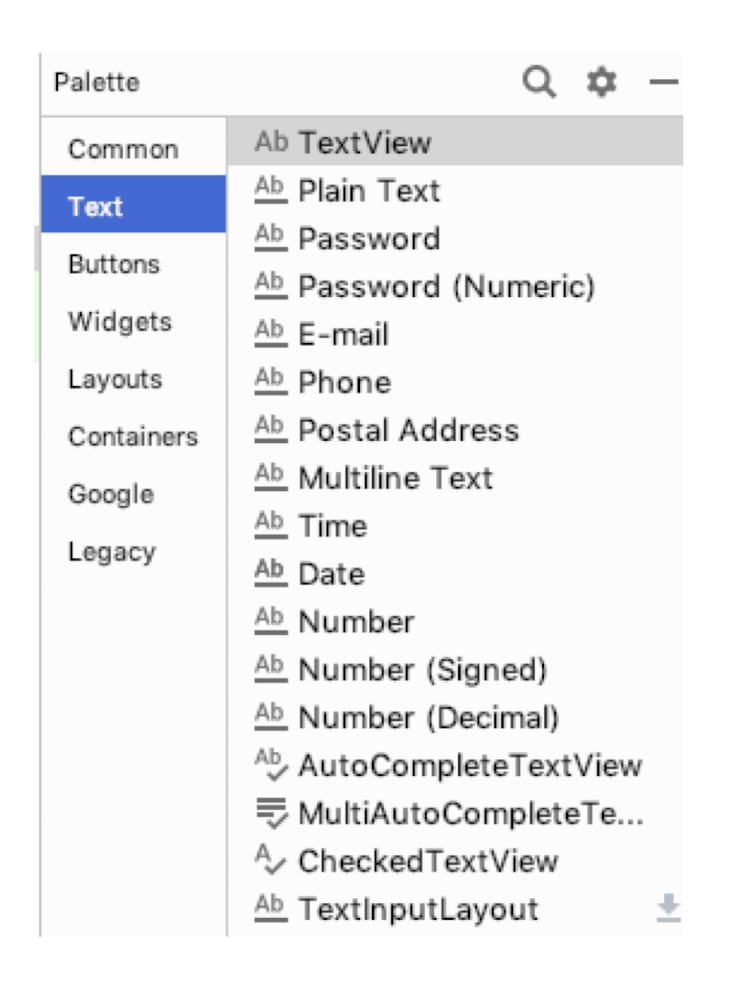
8.4.4 Button
- Button represents a push-button
1 | |
match_parent
- The view should be as big as its parent (minus padding)
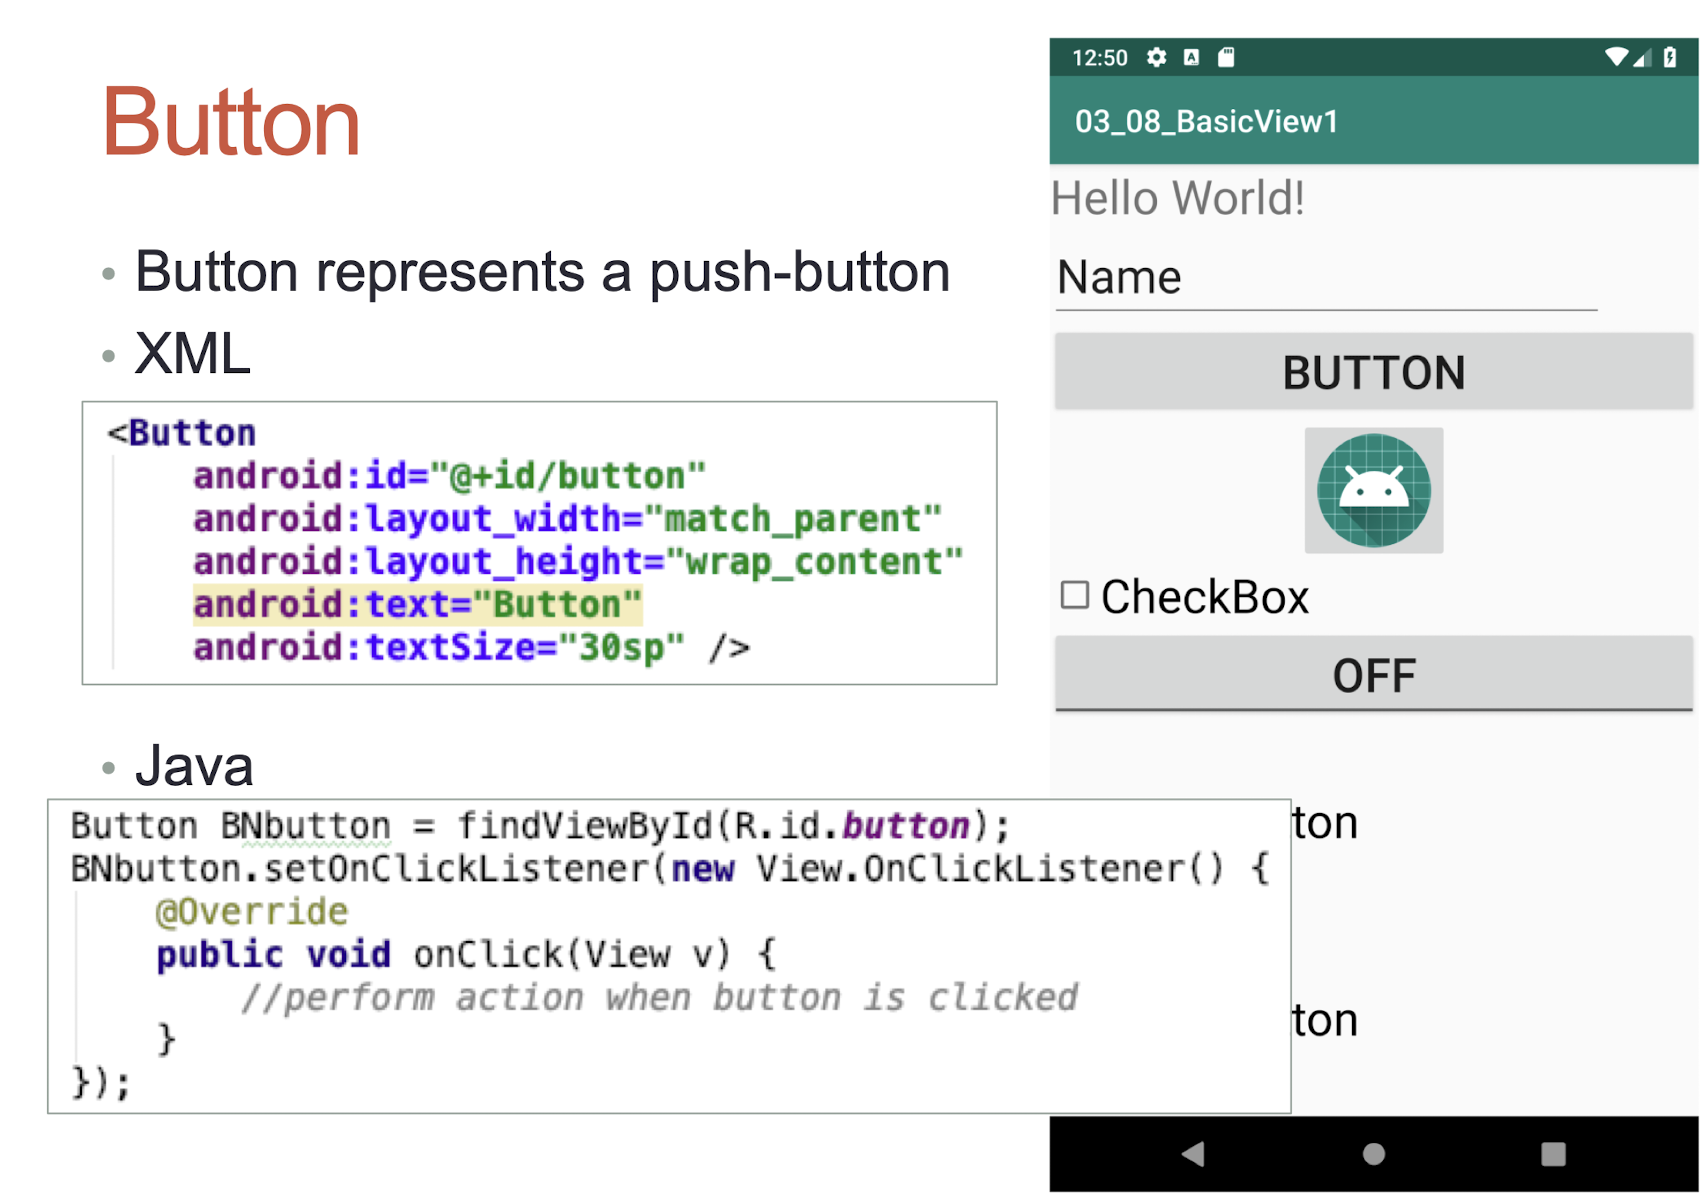
8.4.5 ImageButton
- ImageButton is a Button that displays an image
1 | |
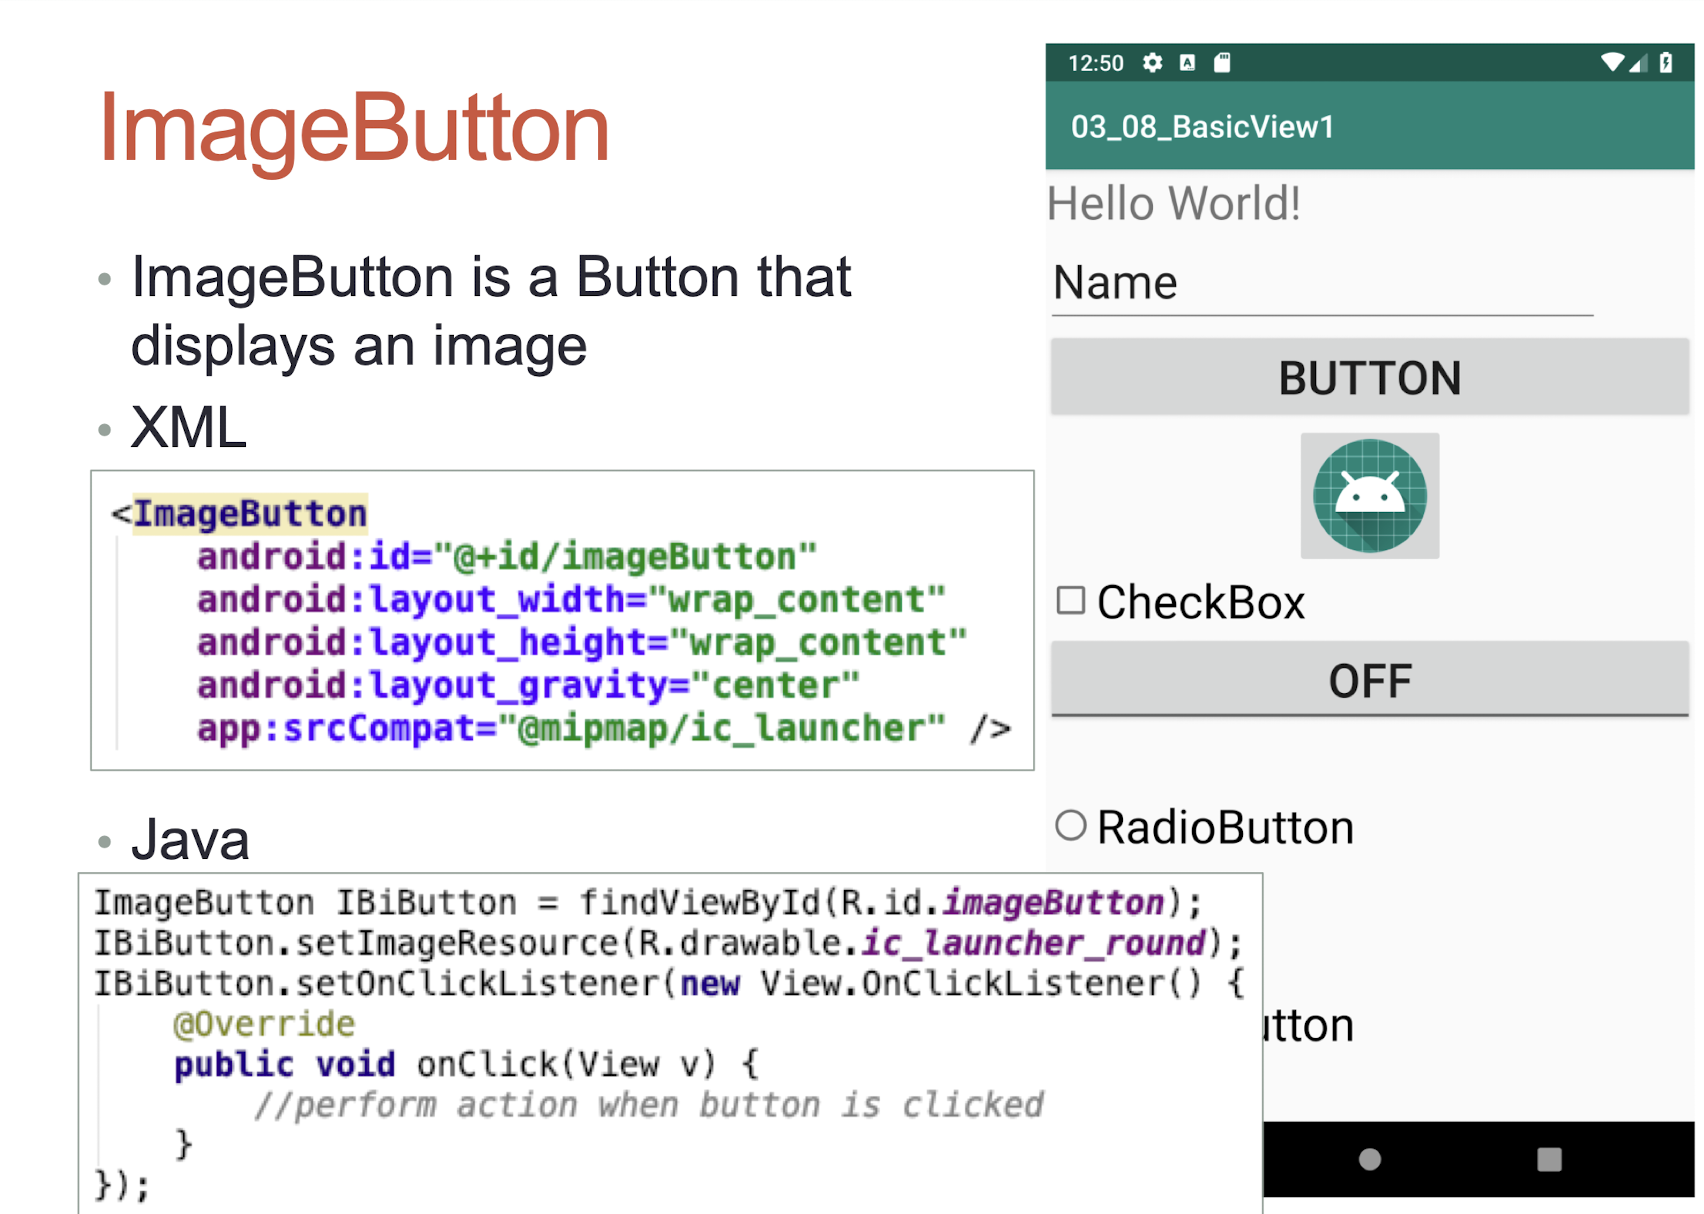
layout_gravity
center: Place the object in the center of its container in both the vertical and horizontal axis, not changing its size.
8.4.6 CheckBox
- CheckBox is a special type of Button that has 2 states:
- checked or unchecked
1 | |
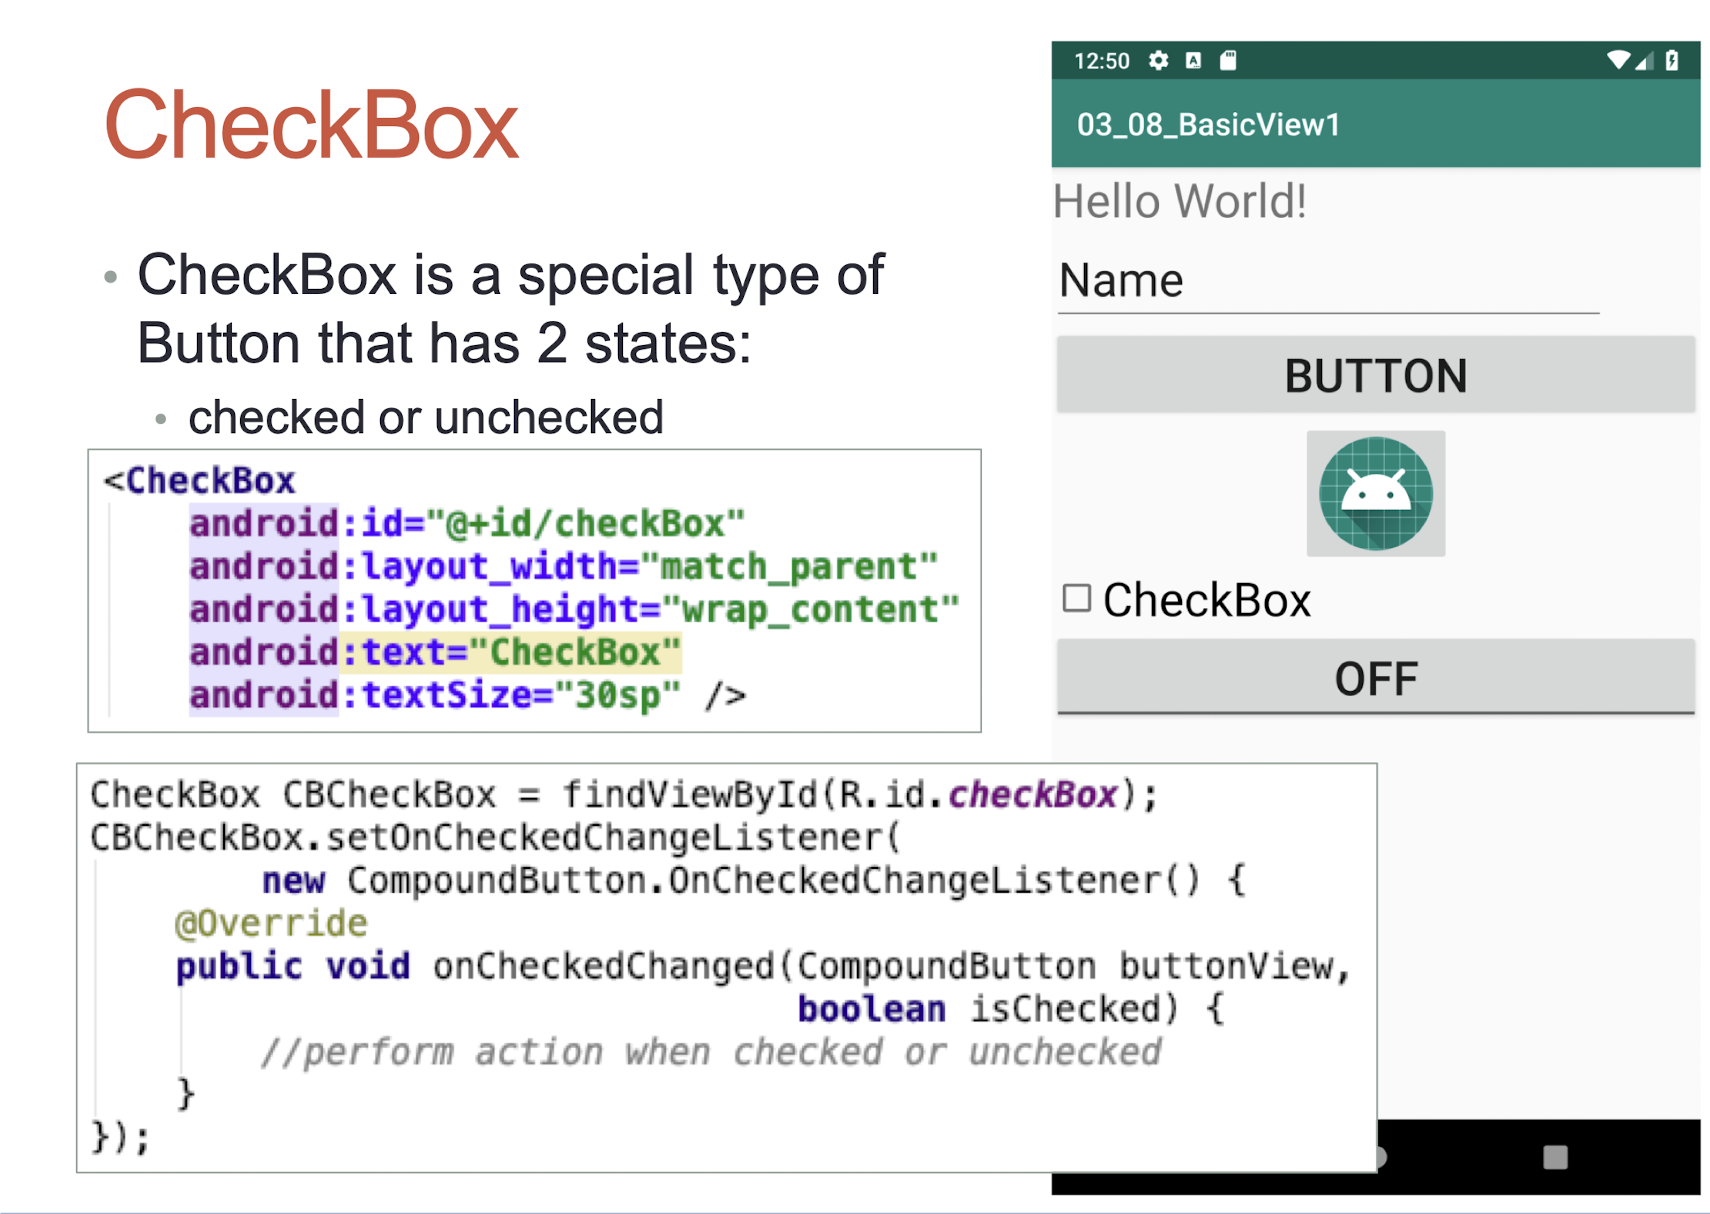
8.4.7 ToggleButton
- ToggleButton displays on/off states
1 | |
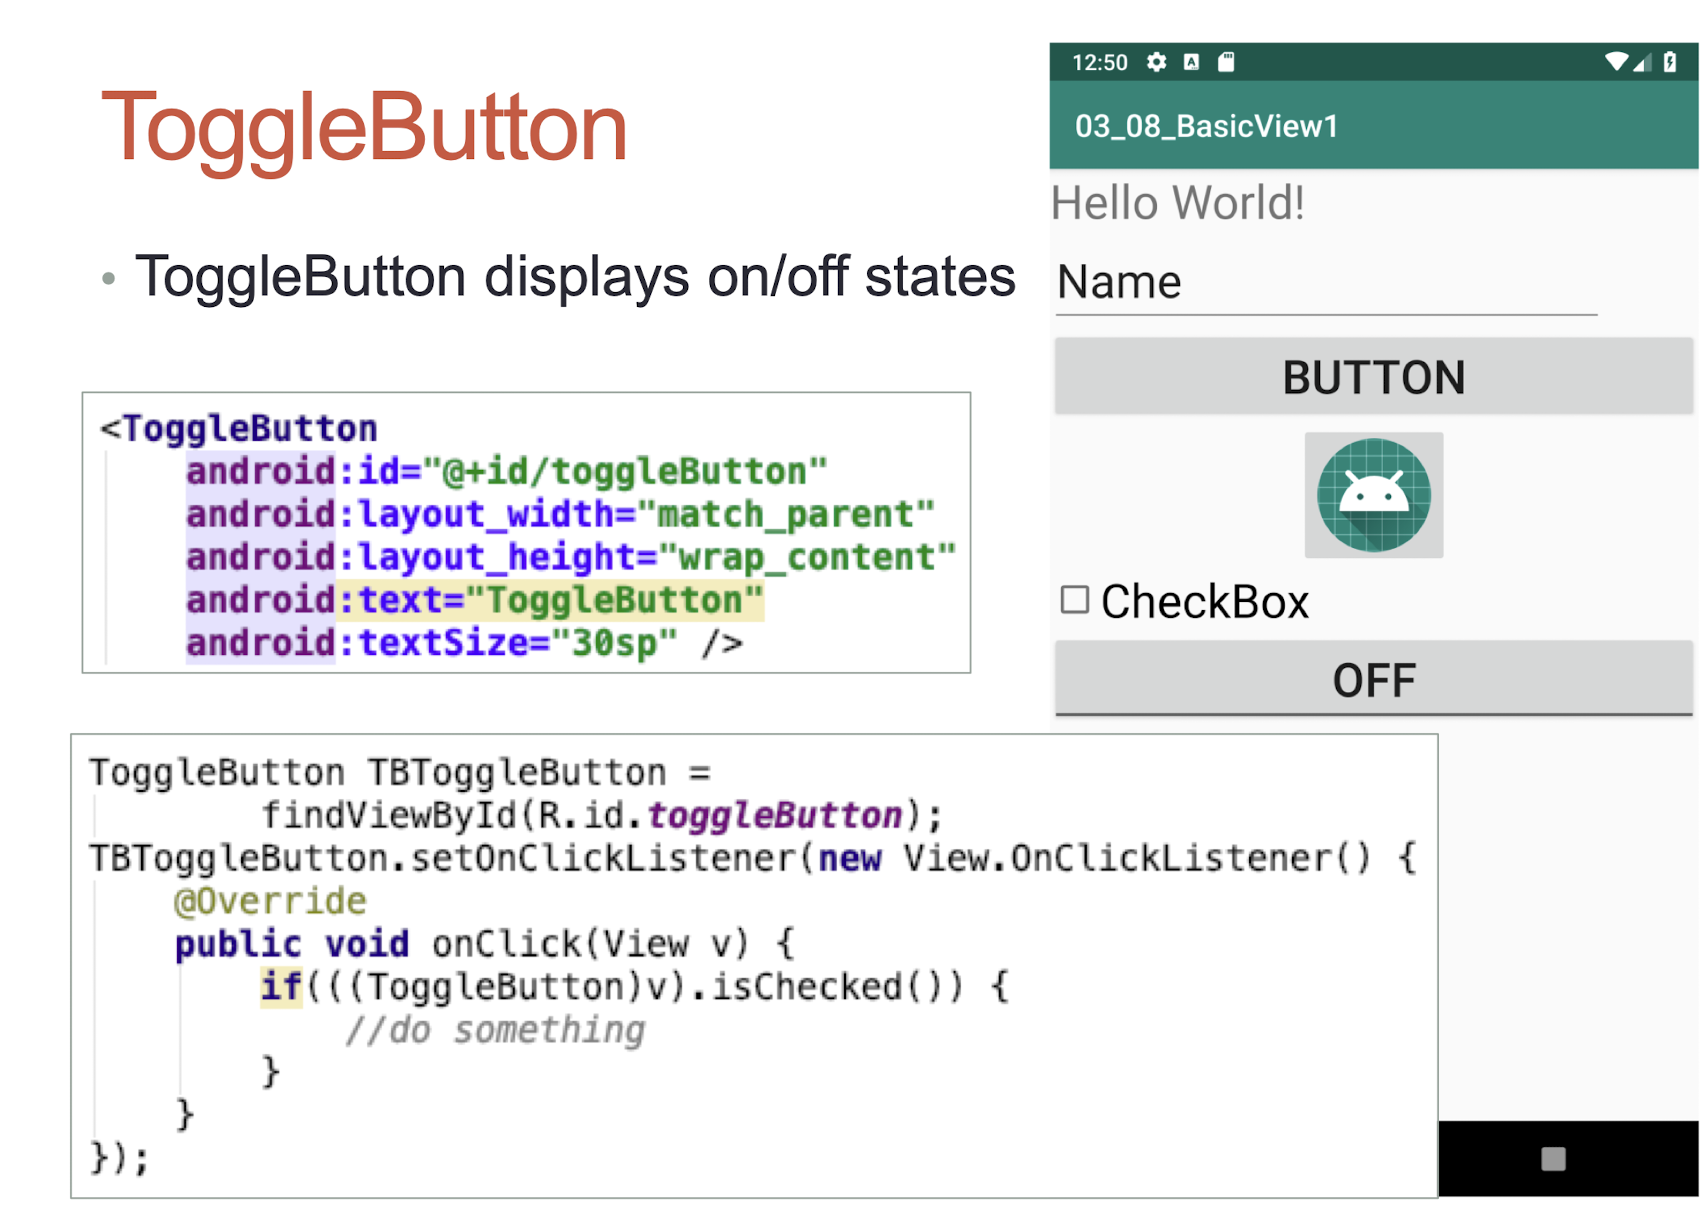
8.4.8 RadioButton & RadioGroup
- RadioButton has 2 states:
- Checked or unchecked
- RadioGroup is used to group on or more RadioButtons, thereby allowing only one RadioButton to be checked within the RaidoGroup
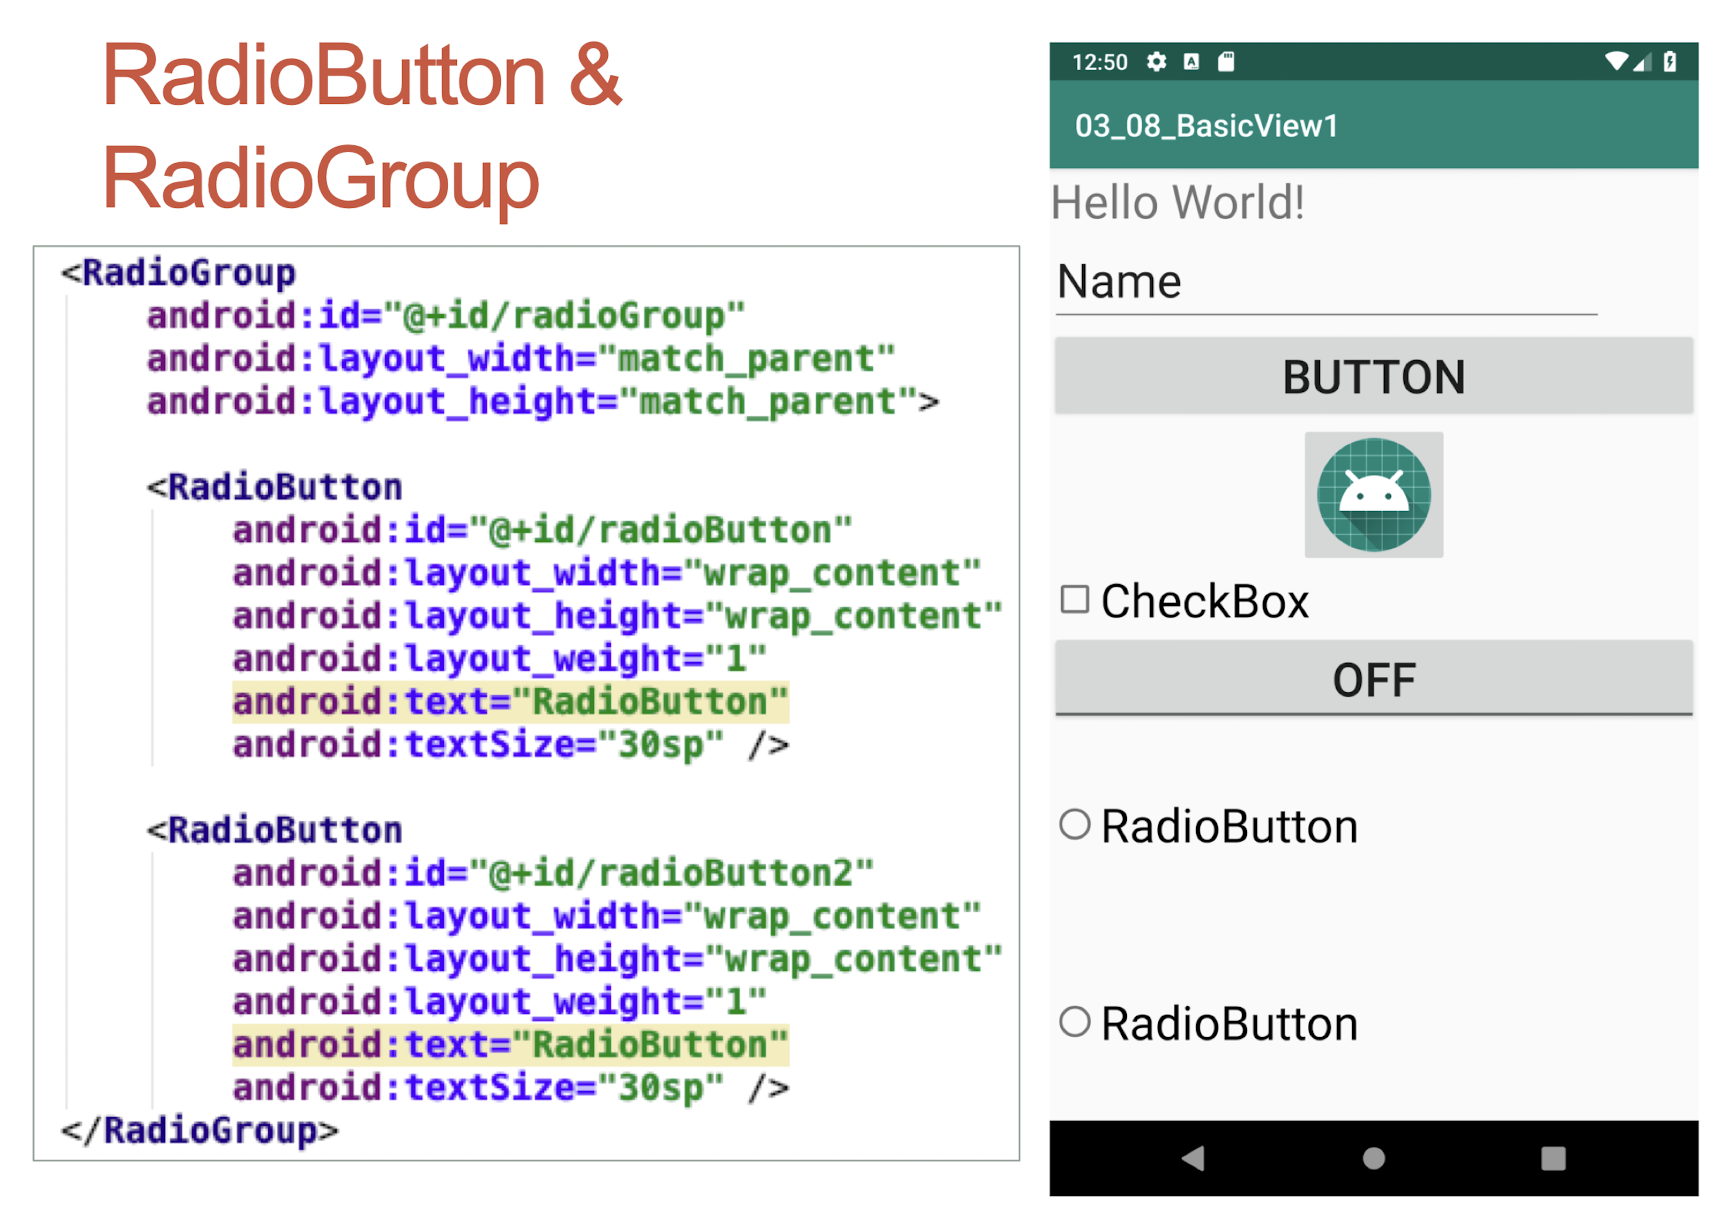
layout_weight:
- The weight is used to distribute the remaining empty space or take away space when the parent is too full
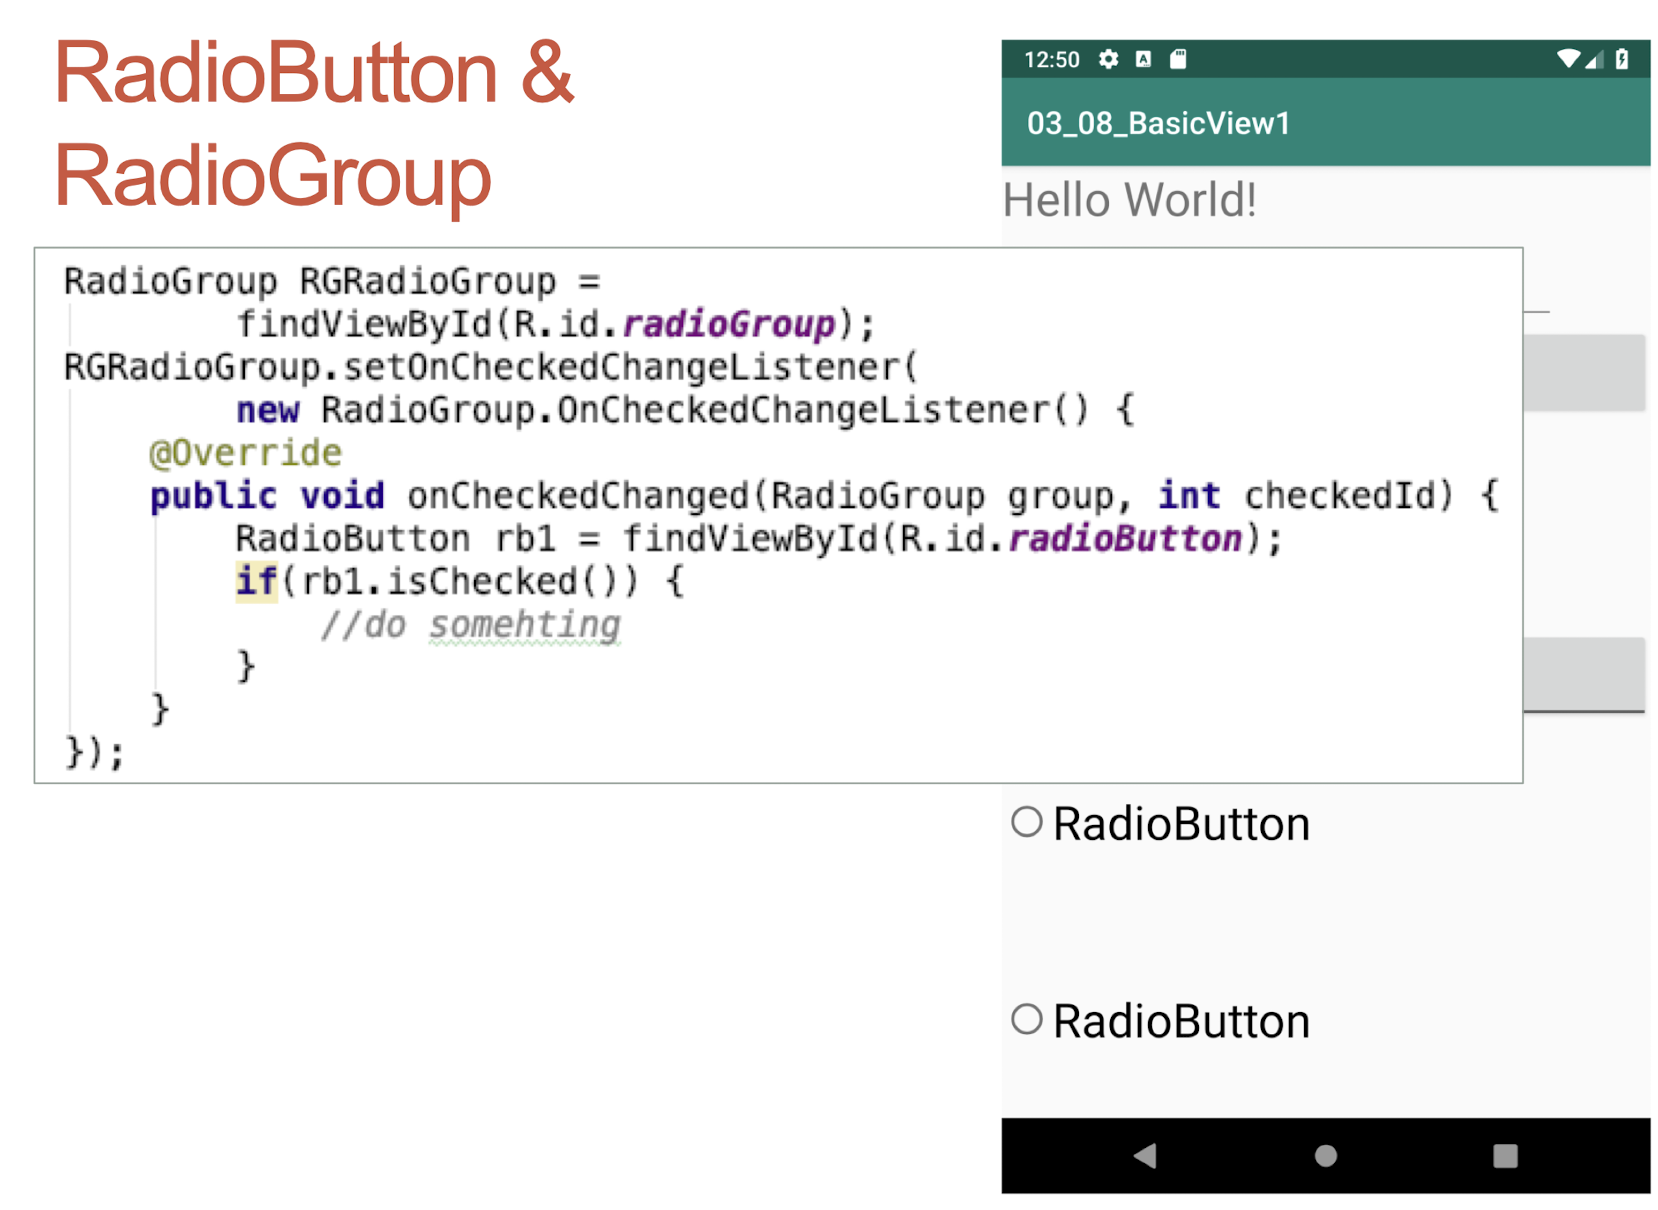
1 | |
8.5 Layout
- Another type of ViewGroup is a Layout.
- A Layout is another container that derives from android.view.ViewGroup and is used as a container for other views
- The purpose of a ViewGroup is to group views logically, such as a group of buttons with a similar purpose
- A Layout is used to group and arrange views visually on the screen
Common layouts available in Android:
- FrameLayout
- LinearLayout
- TableLayout
- RelativeLayout
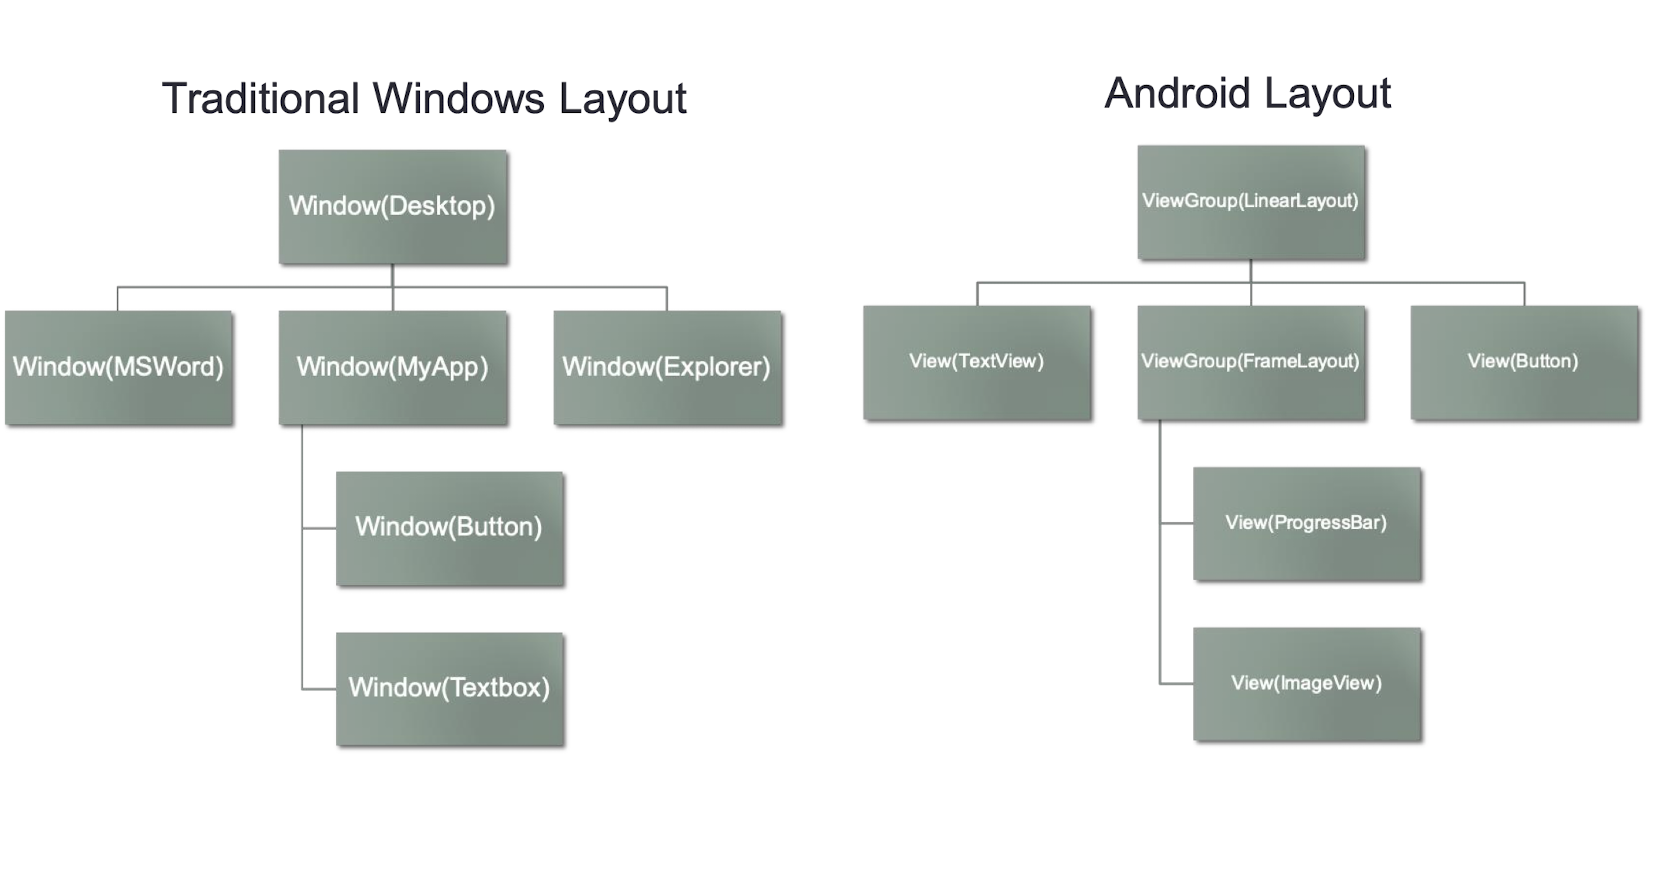
8.5.1 FrameLayout
- The FrameLayout is the most basic of the Android layouts
- FrameLayouts are built to hold one view or multiple views
- Work as place holder
- All widgets are pinned to top left corner by default
- There are myriad screen sizes and resolutions, you have little control over the specifications of the devices that install your application
- Therefore, when your application is resized and reformatted to fit any number of different devices, you want to make sure it still looks as close to your initial design as possible
- The FrameLayout is used to help you control the stacking of single views as the screen is resized
Design panel
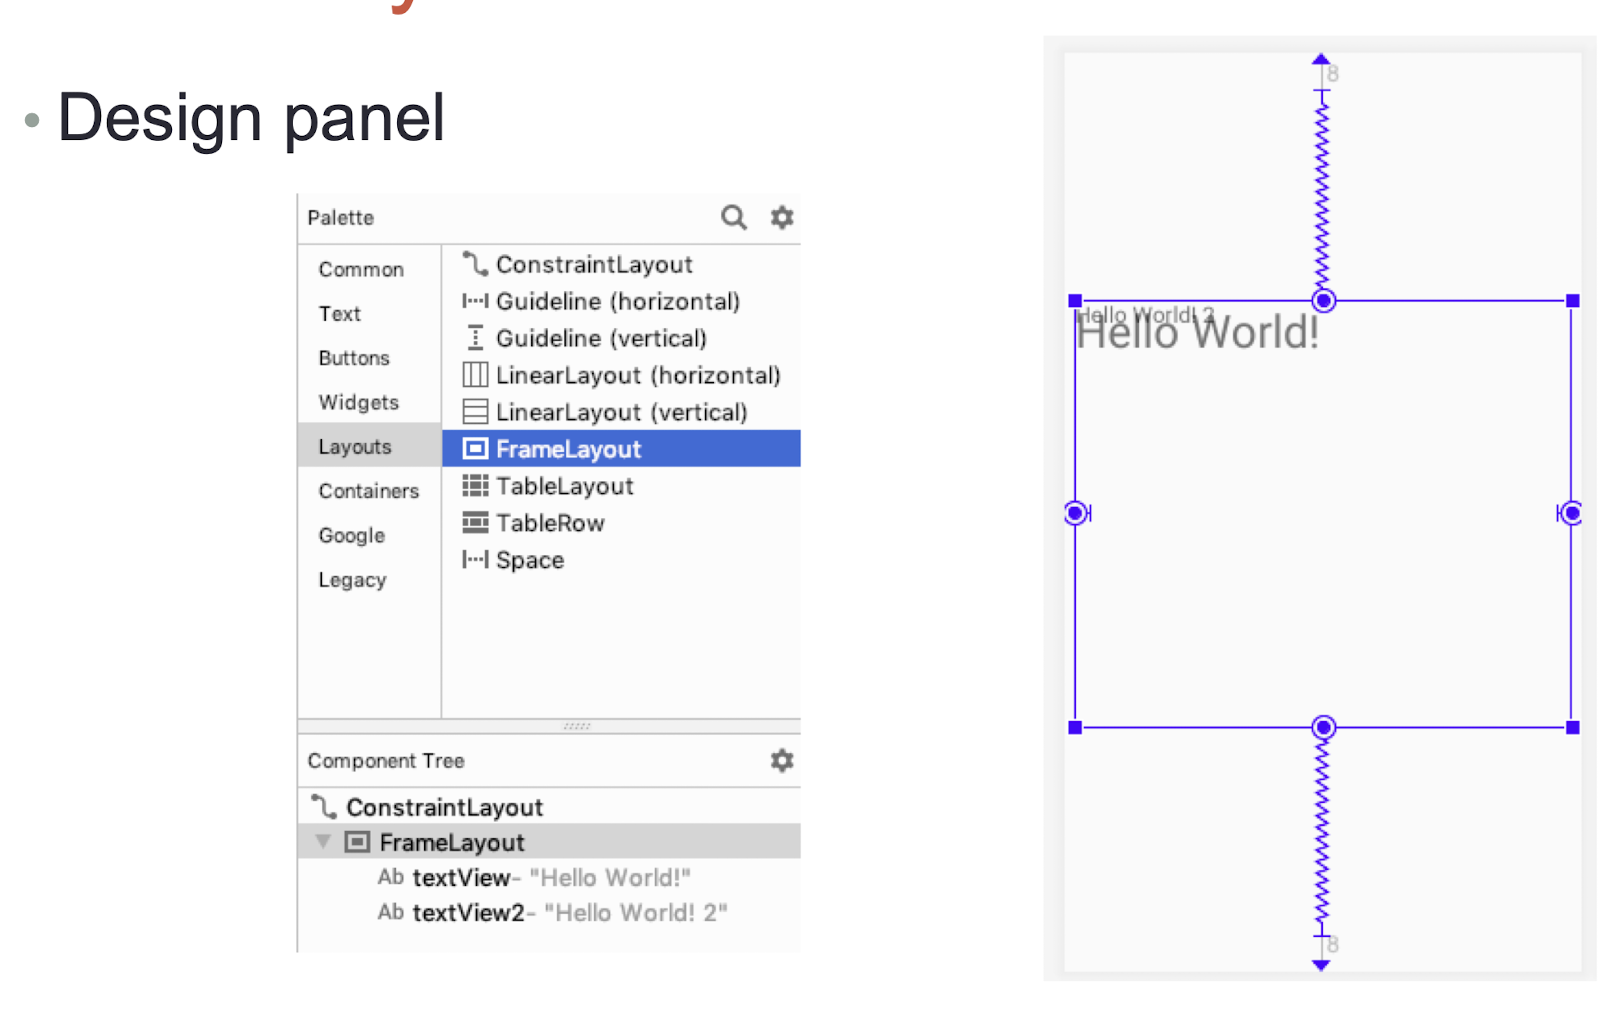
8.5.2 LinearLayout
- The LinearLayout arranges views in a single column or a single row
- Child views can be arranged either horizontally or vertically
- Two different layouts
- one for horizontal rows of views – LinearLayout (Horizontal)
- one for vertical columns of views – LinearLayout (Vertical)
Consider the following xml code:
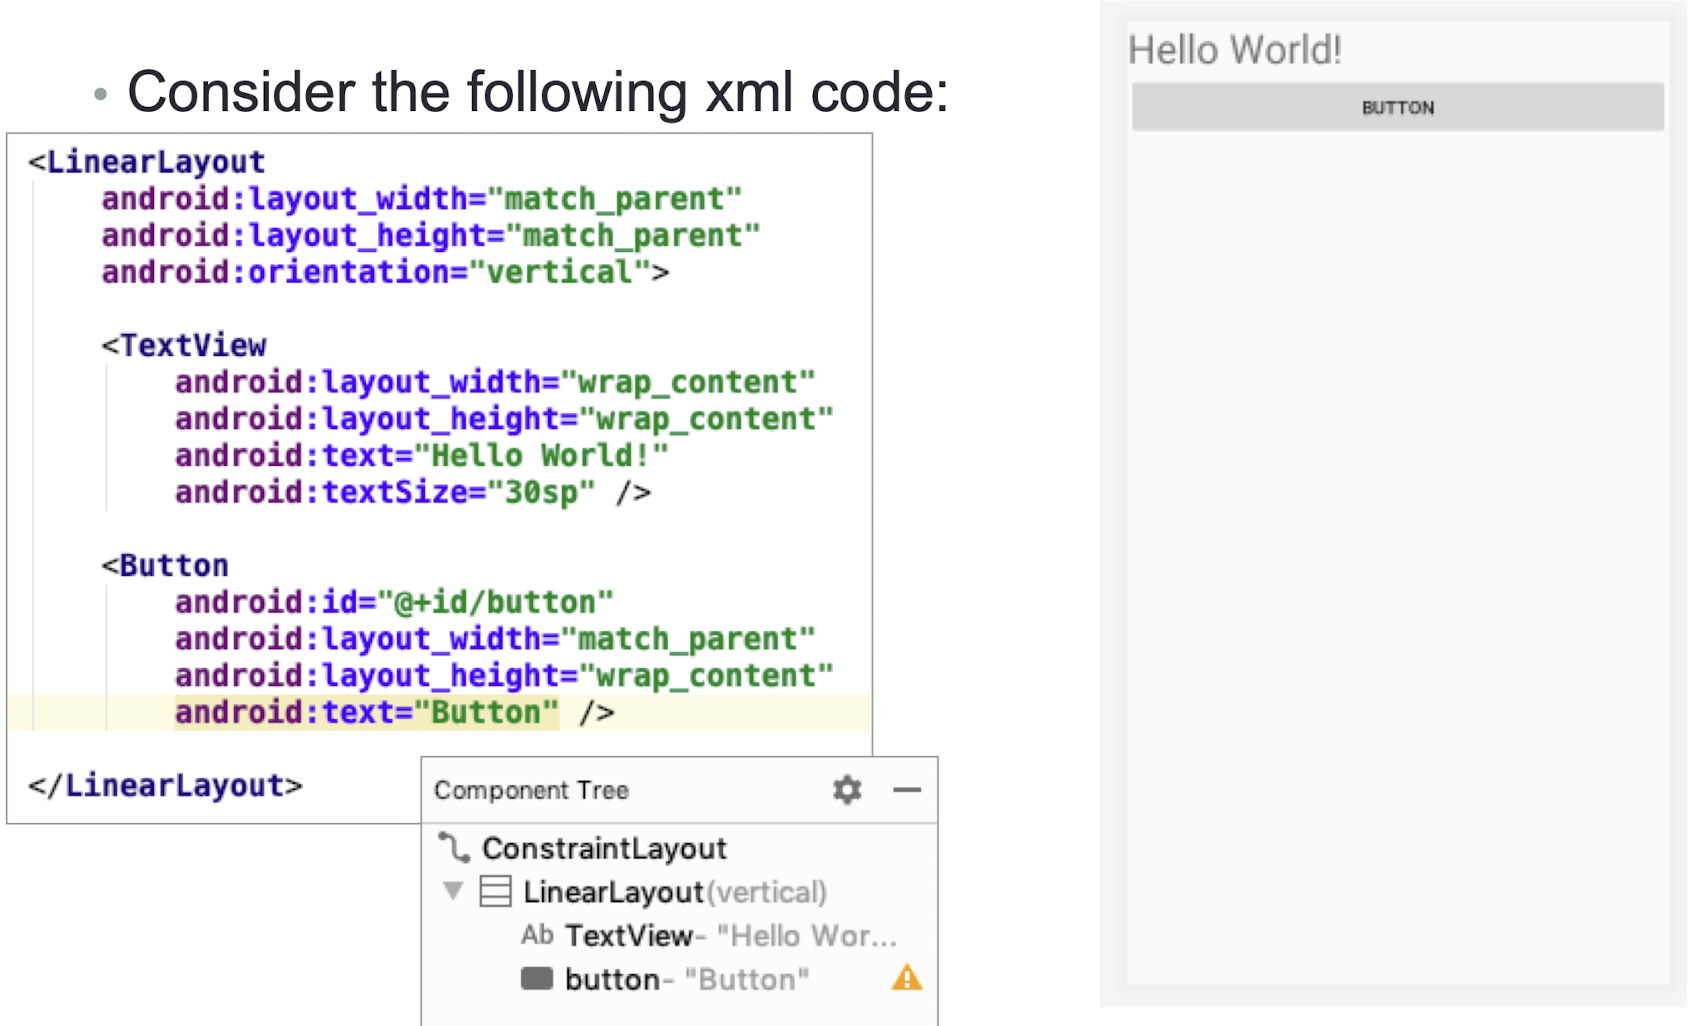
Common Attributes
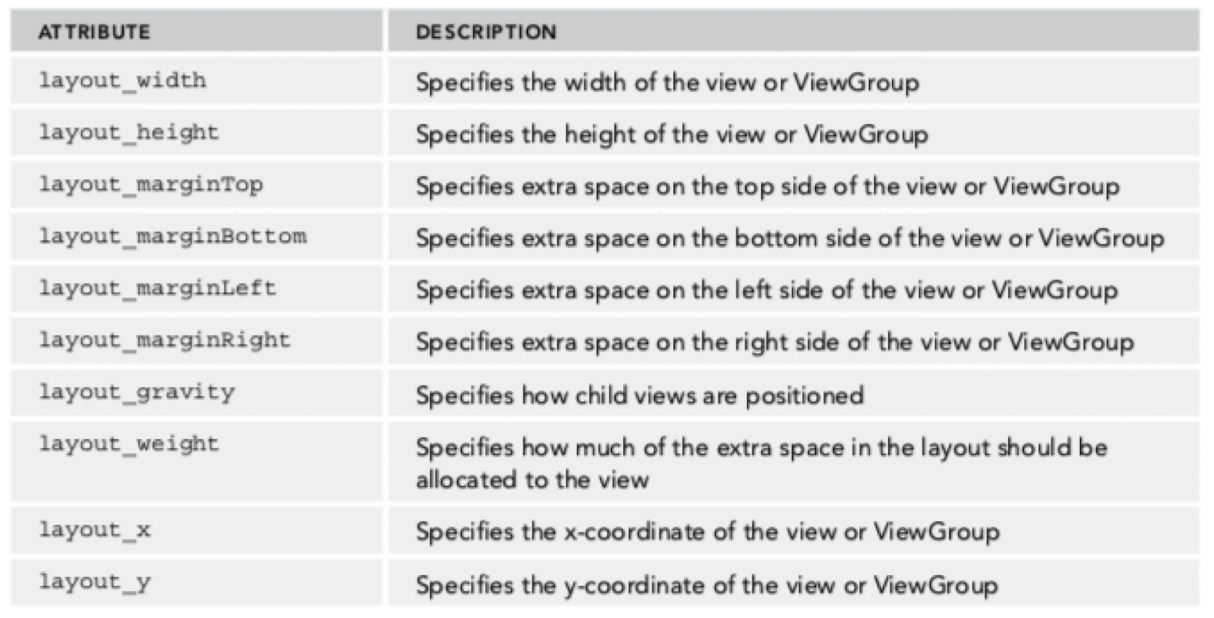
- Some of these attributes are applicable only when a view is in a specific ViewGroup
LinearLayout Exercise
- Create the layout on the right using LinearLayouts
- 4 columns of TextViews with colors and text: Red, Green, Blue, Orange
- 4 rows of TextViews with text:
- Row 1, Row 2, Row 3, Row 4
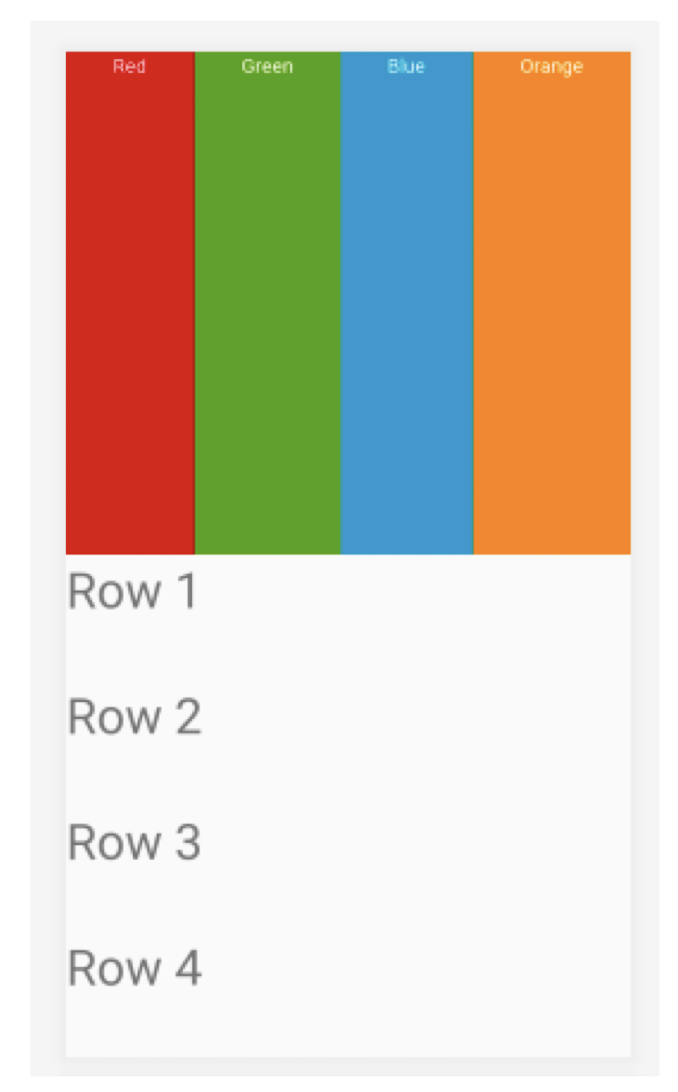
8.5.3 Units of Measurement
- dp - density-independent pixel, for button
- 1 dp is equivalent to one pixel on a 160 dpi (dots per inch) screen
- The 160 dpi screen is the baseline density assumed by Android
- sp - scale-independent pixel, for font size
- This is similar to dp and is recommended for specifying font sizes. it is also scaled by the user’s font size preference
- pt - point
- A point is defined to be 1/72 of an inch, based on the physical screen size, assuming a 72dpi density screen
- px - pixel
- Corresponds to actual pixels on the screen. Using this unit is not recommended, as your UI might not render correctly on devices with a different screen resolution
dpi (dots per inch)
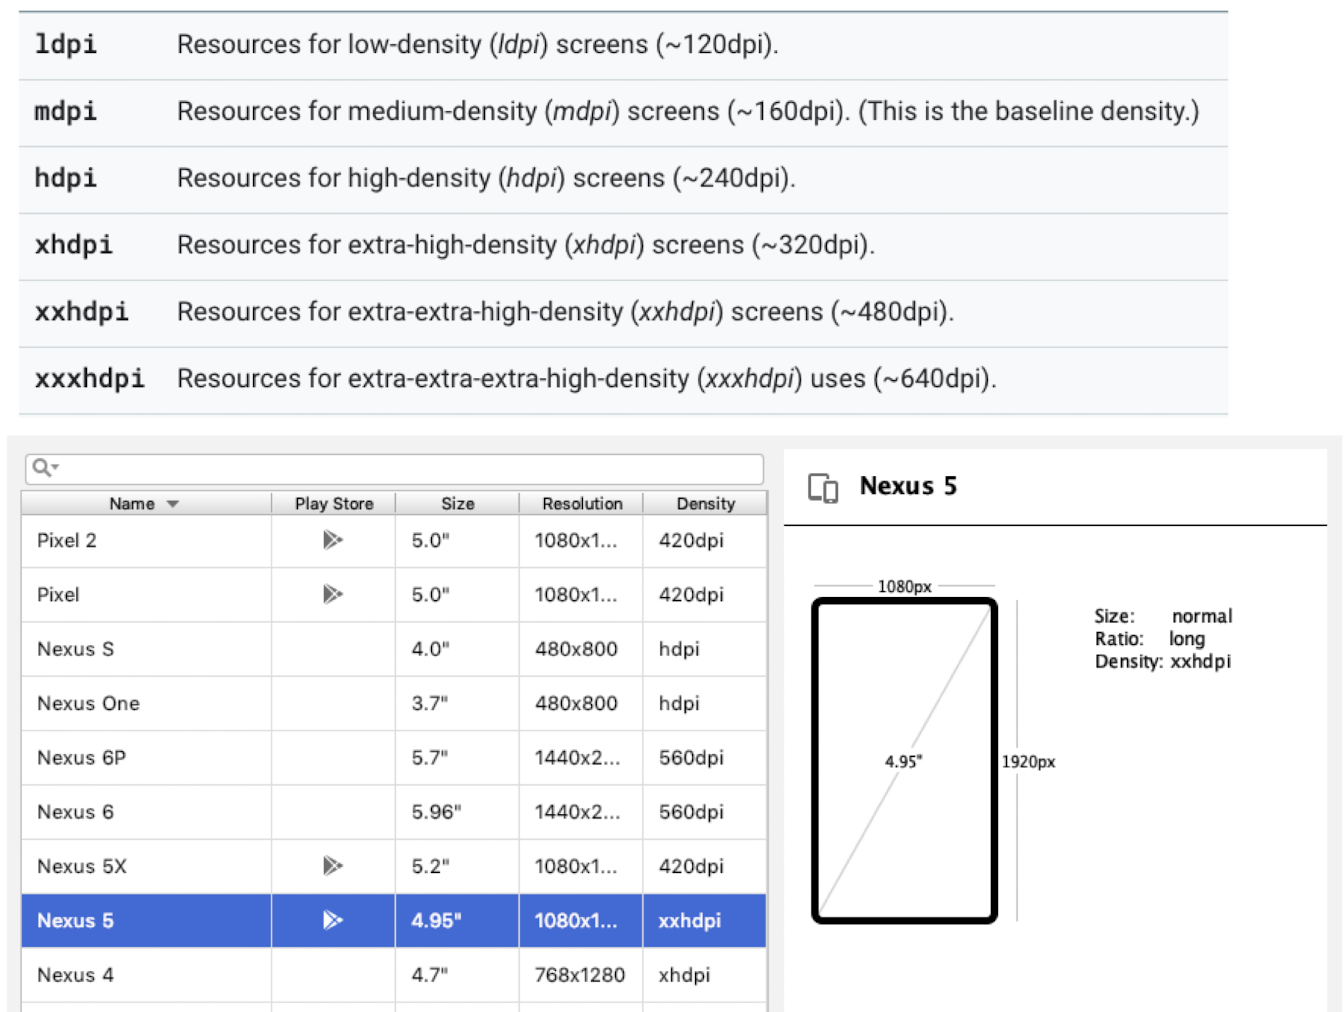
Density-independent pixel (dp)
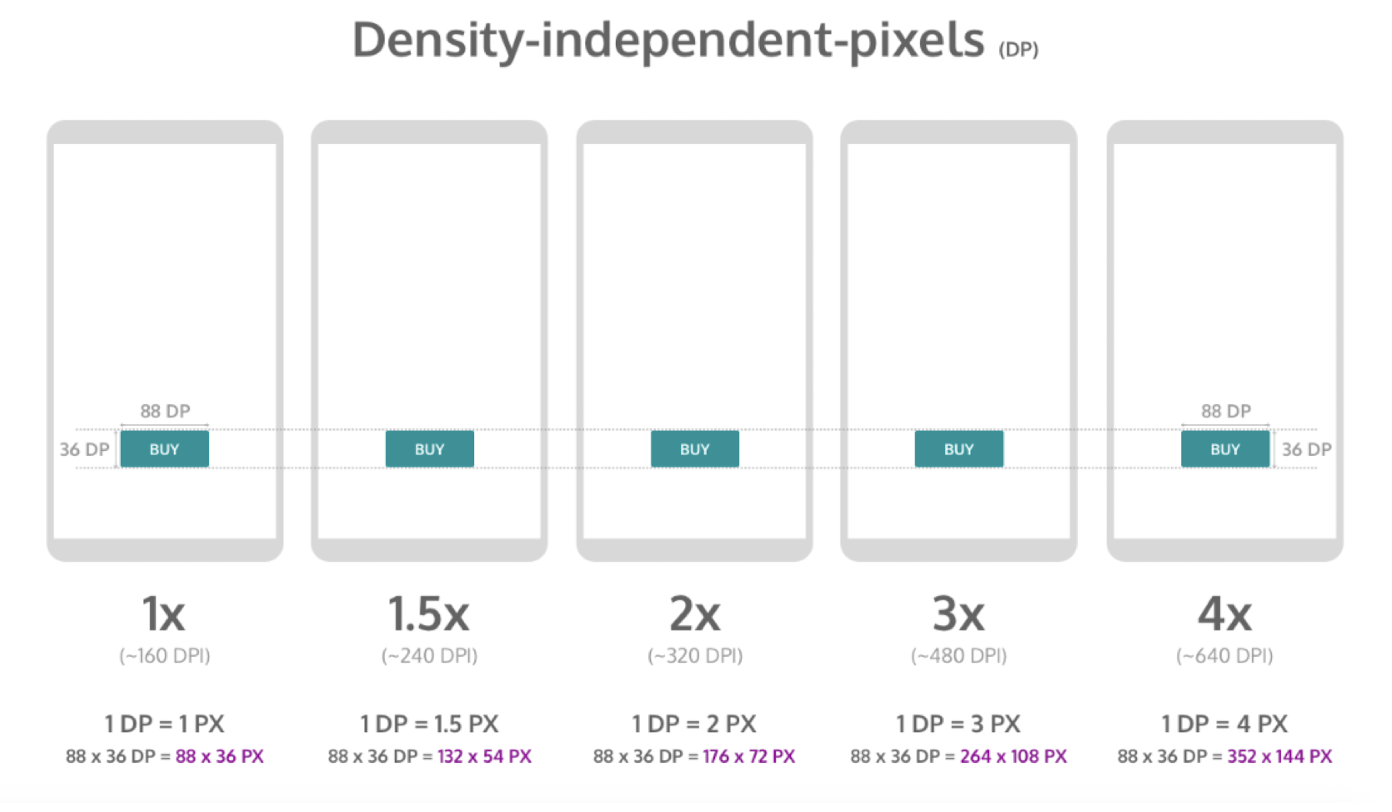
- px = dp * screen dpi /160
https://blog.prototypr.io/designing-for-multiple-screen-densities-on-android-5fba8afe7ead
8.5.4 Class Question 8.1
Assuming the screen dpi is 480, what are the widths of the 2 buttons in pixels?
What are:
1 | |
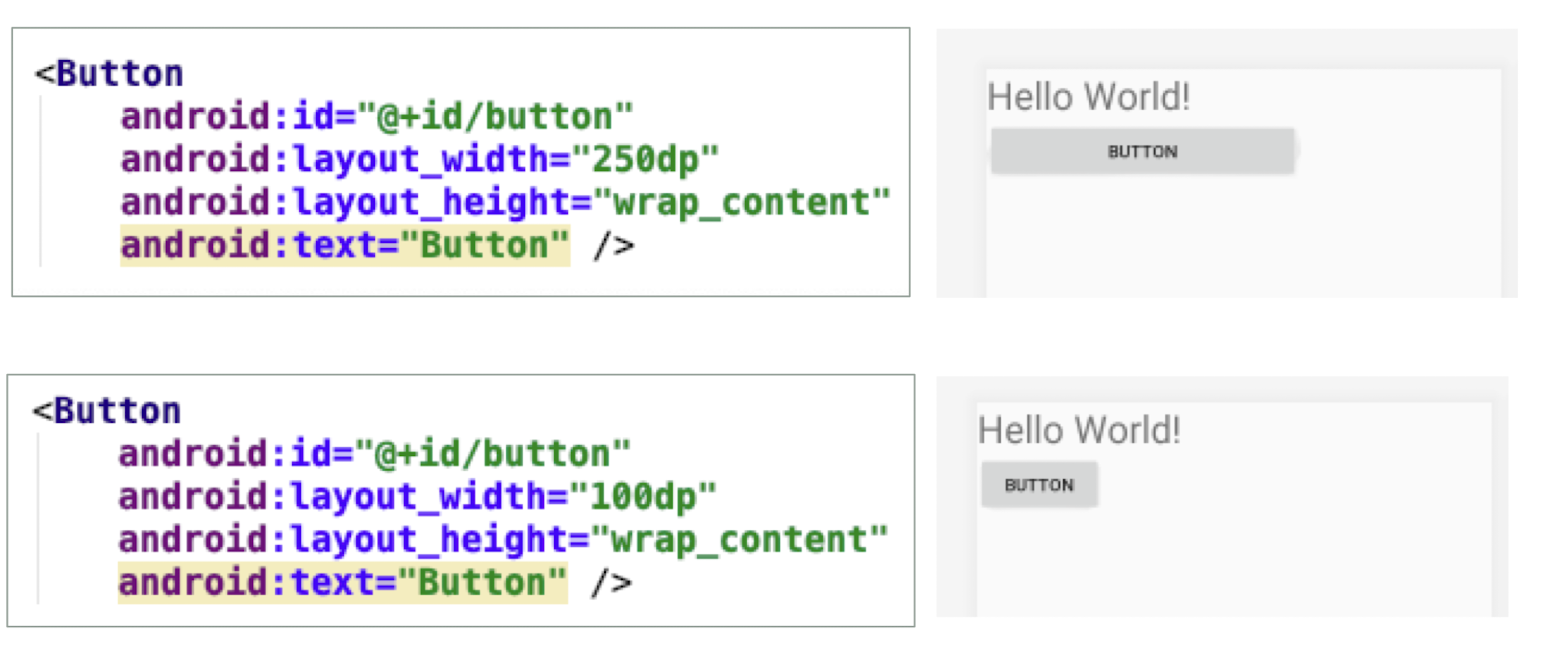
8.5.5 TableLayout
- The TableLayout Layout groups views into rows and columns
<TableRow>element is used to designate a row in the table- Each row can contain one or more views
- Each view placed within a row forms a cell
- The width of each column is determined by the largest width of each cell in that column
Consider the following XML code
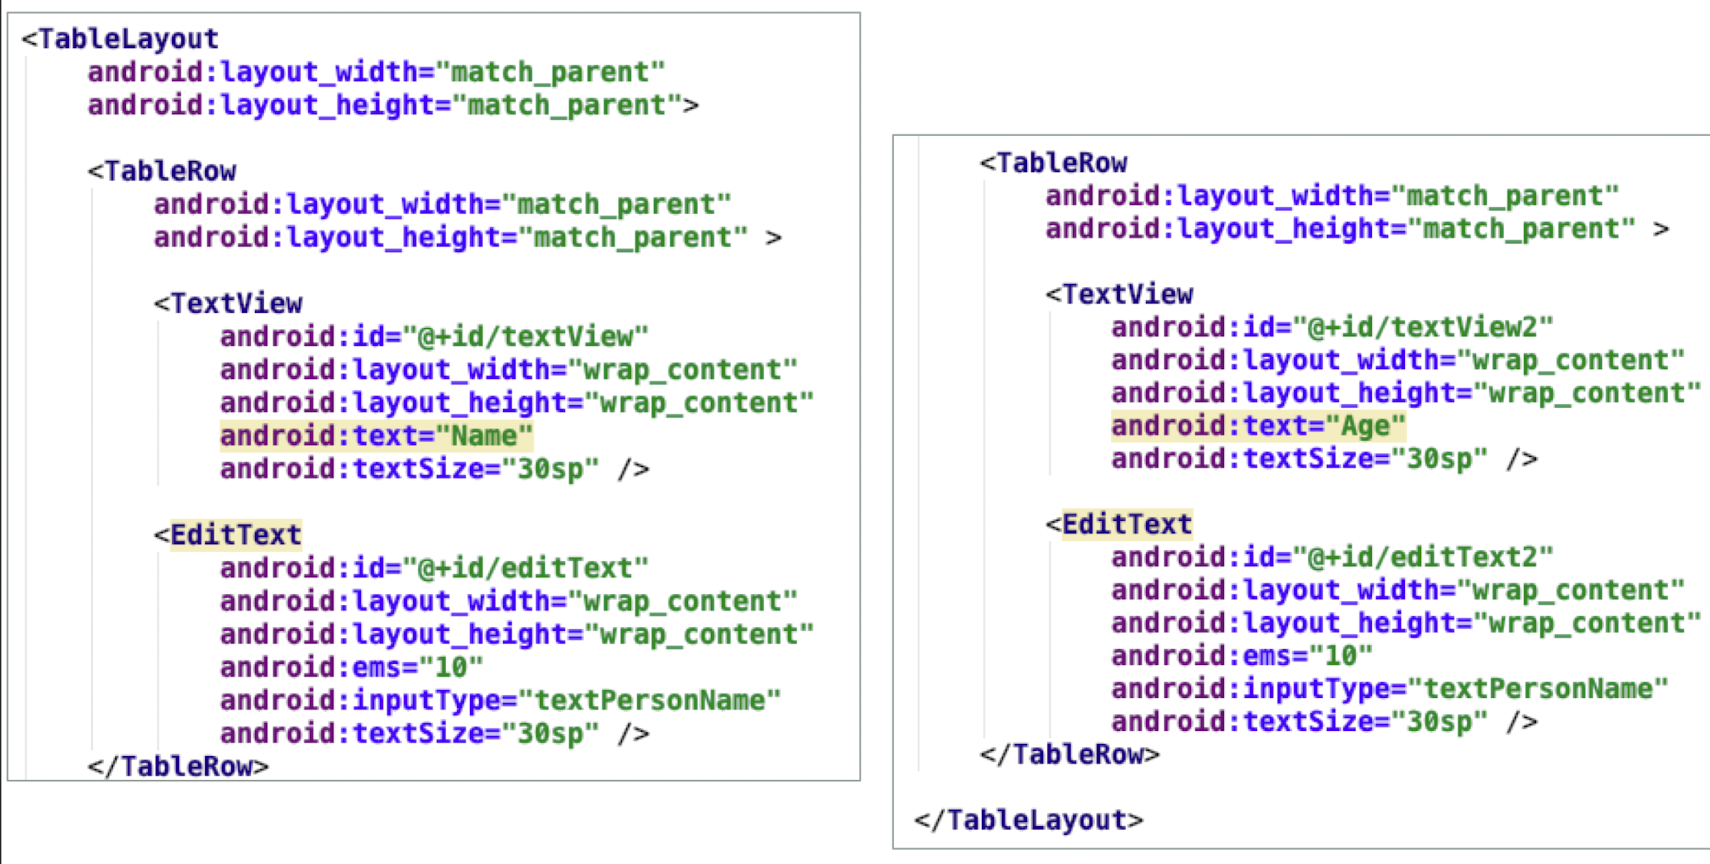
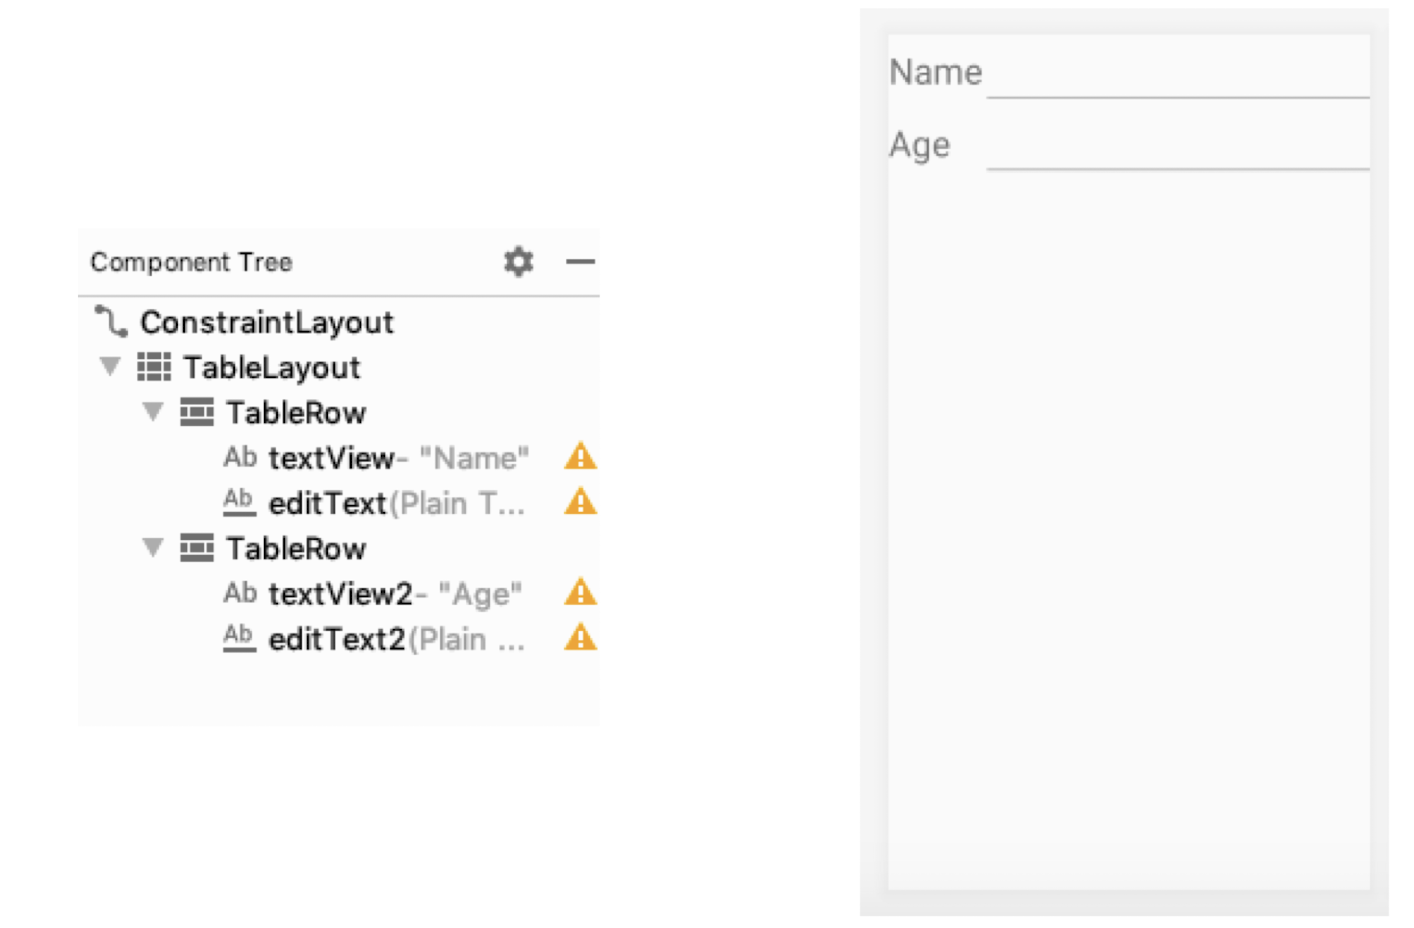
8.5.6 RelativeLayout
- The RelativeLayout layout enables programmer to specify how child views are positioned relative to each other
- Notice that each view embedded within the RelativeLayout has attributes that enable it to align with another view. These attributes are as follows:
- layout_alignParentTop
- layout_alignParentStart
- layout_alignStart
- layout_alignEnd
- layout_below
- layout_centerHorizontal
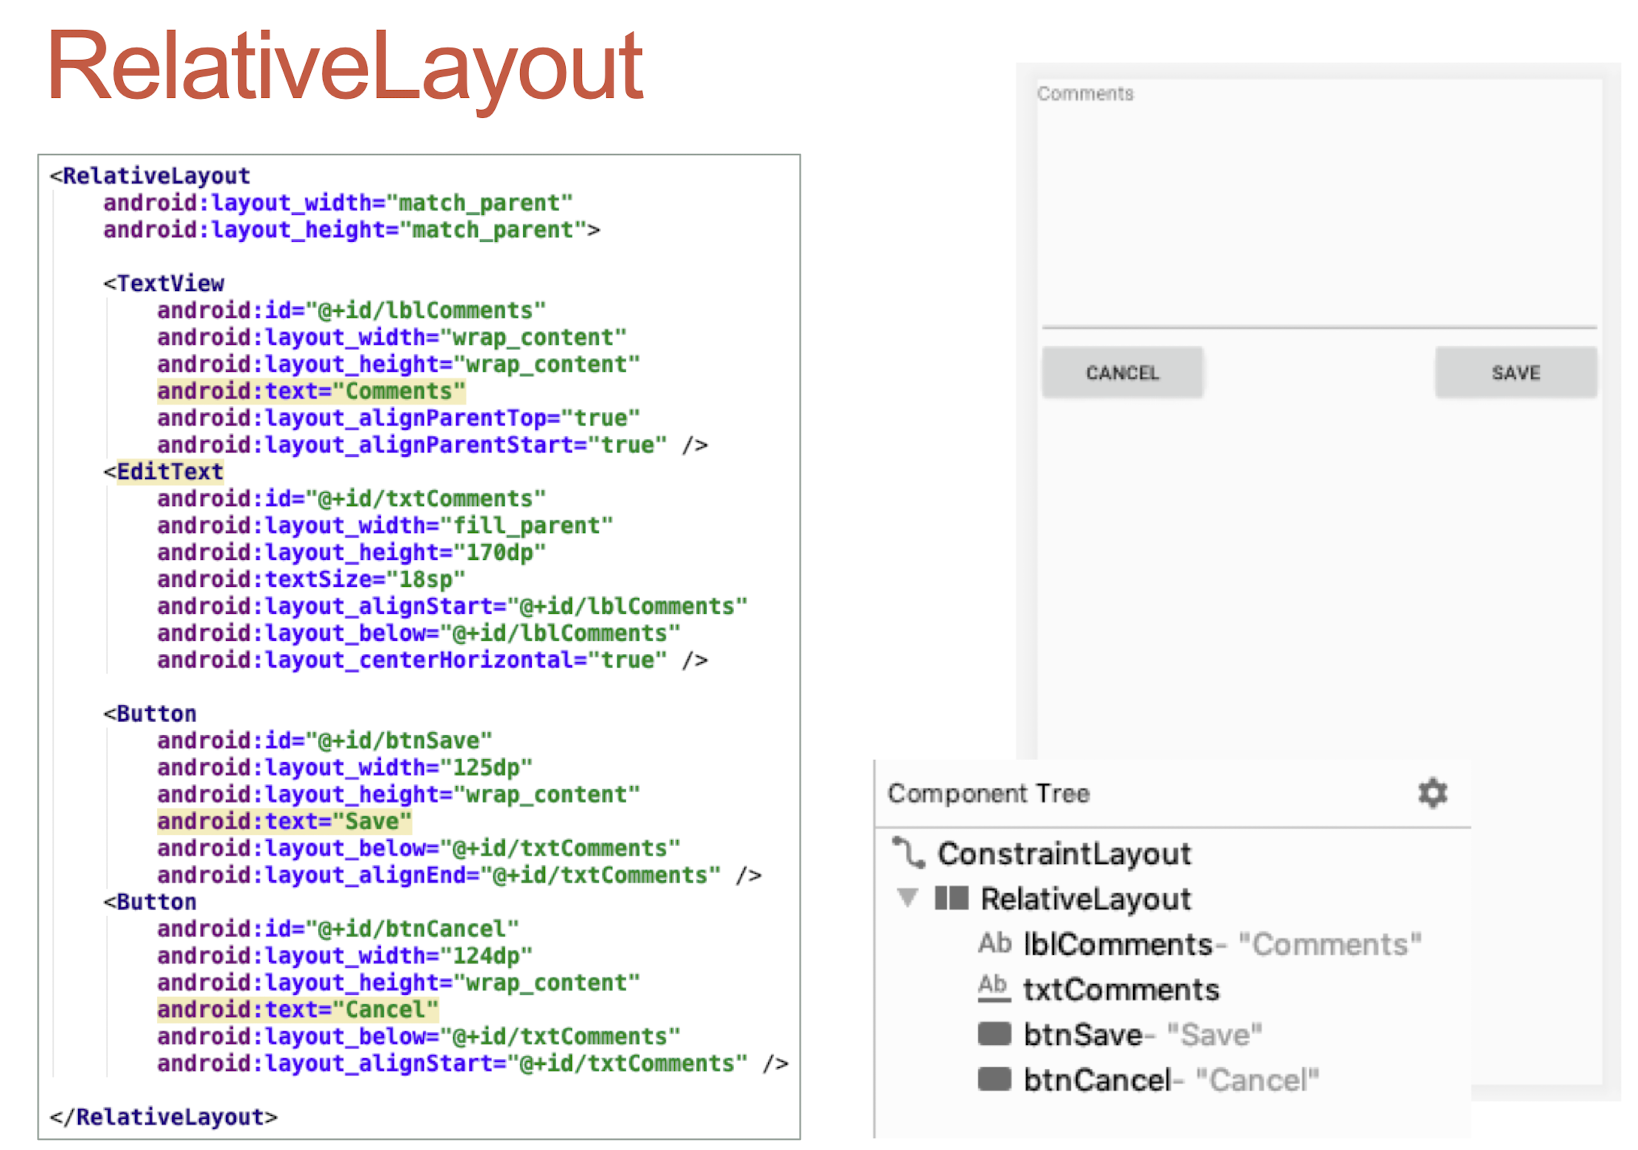
8.5.7 ScrollView
- A ScrollView is a special type of FrameLayout in that it enables users to scroll through a list of views that occupy more space than the physical display.
- The ScrollView can contain only one child view or ViewGroup, which normally is a LinearLayout.
- Normally, the screen height is enough to show all components
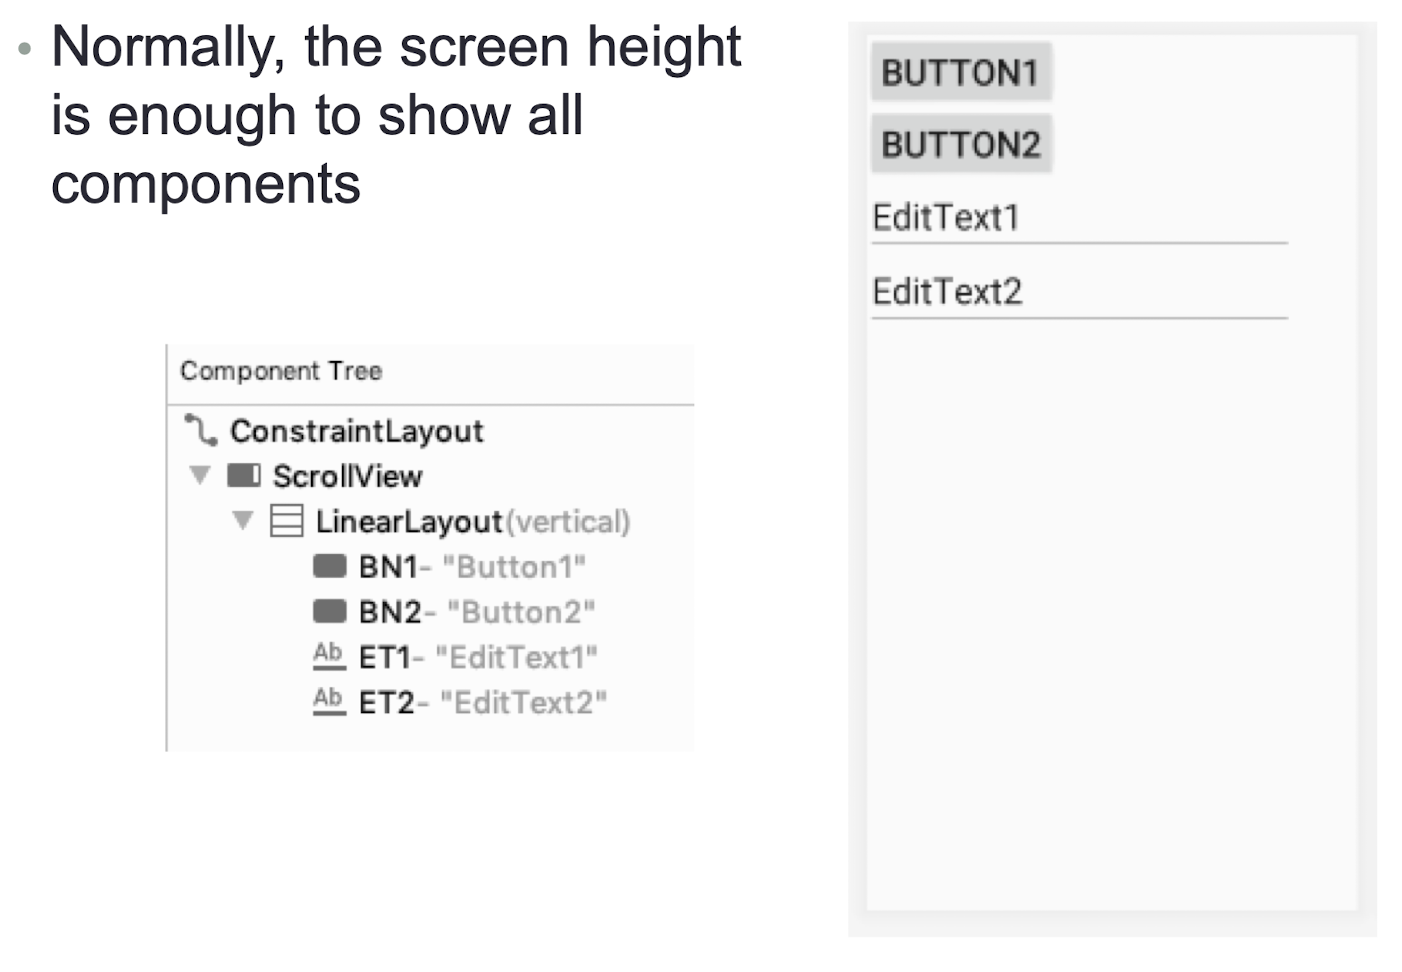
- Add more Buttons and EditTexts
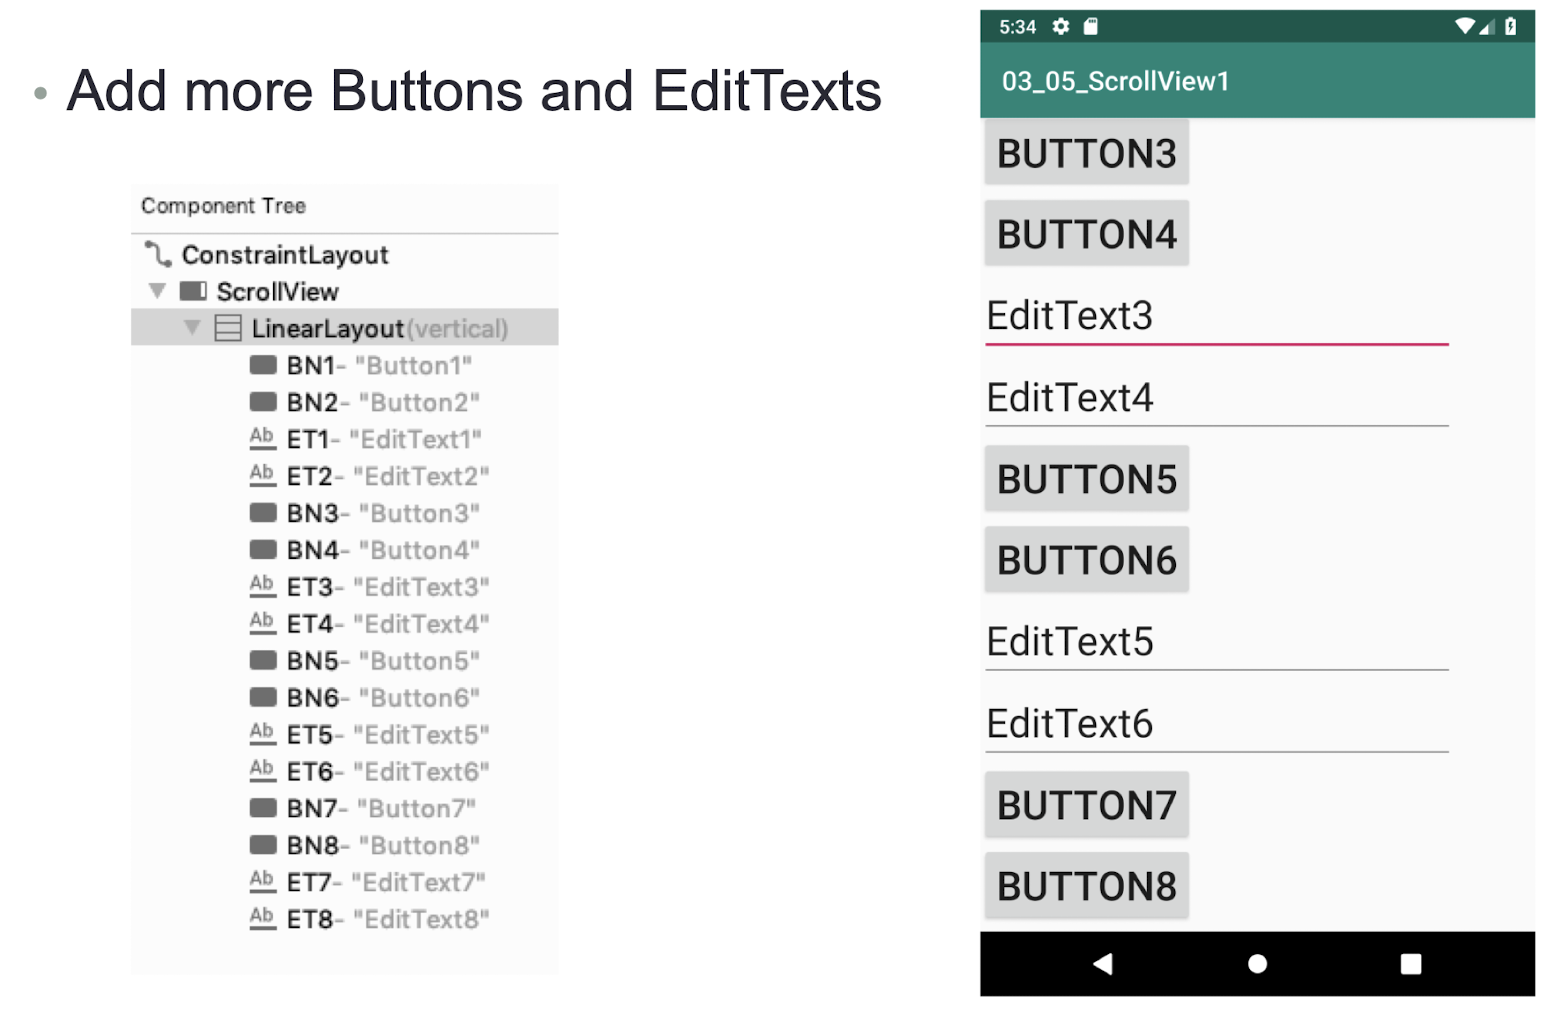
8.6 Display Orientation
- One of the key features of modern smartphones is their ability to switch screen orientation
- Android supports two screen orientations: portrait and landscape
- By default, when you change the display orientation of your Android device, the current activity automatically redraws its content in the new orientation
- This is because the
onCreate()method of the activity is fired whenever there is a change in display orientation. - When the views are redrawn, they may be drawn in their original locations (depending on the layout selected)
Two techniques to handle changes in screen orientation:
- Anchoring
- The easiest way is to “anchor” your views to the four edges of the screen
- When the screen orientation changes, the views can anchor neatly to the edges
- Resizing and repositioning
- Whereas anchoring and centralizing are simple techniques to ensure that views can handle changes in screen orientation, the ultimate technique is resizing each and every view according to the current screen orientation
8.6.1 Anchoring Views
Anchoring can be easily achieved by using RelativeLayout
Consider the following main.xml file, which contains five Button views embedded within the
<RelativeLayout>element:
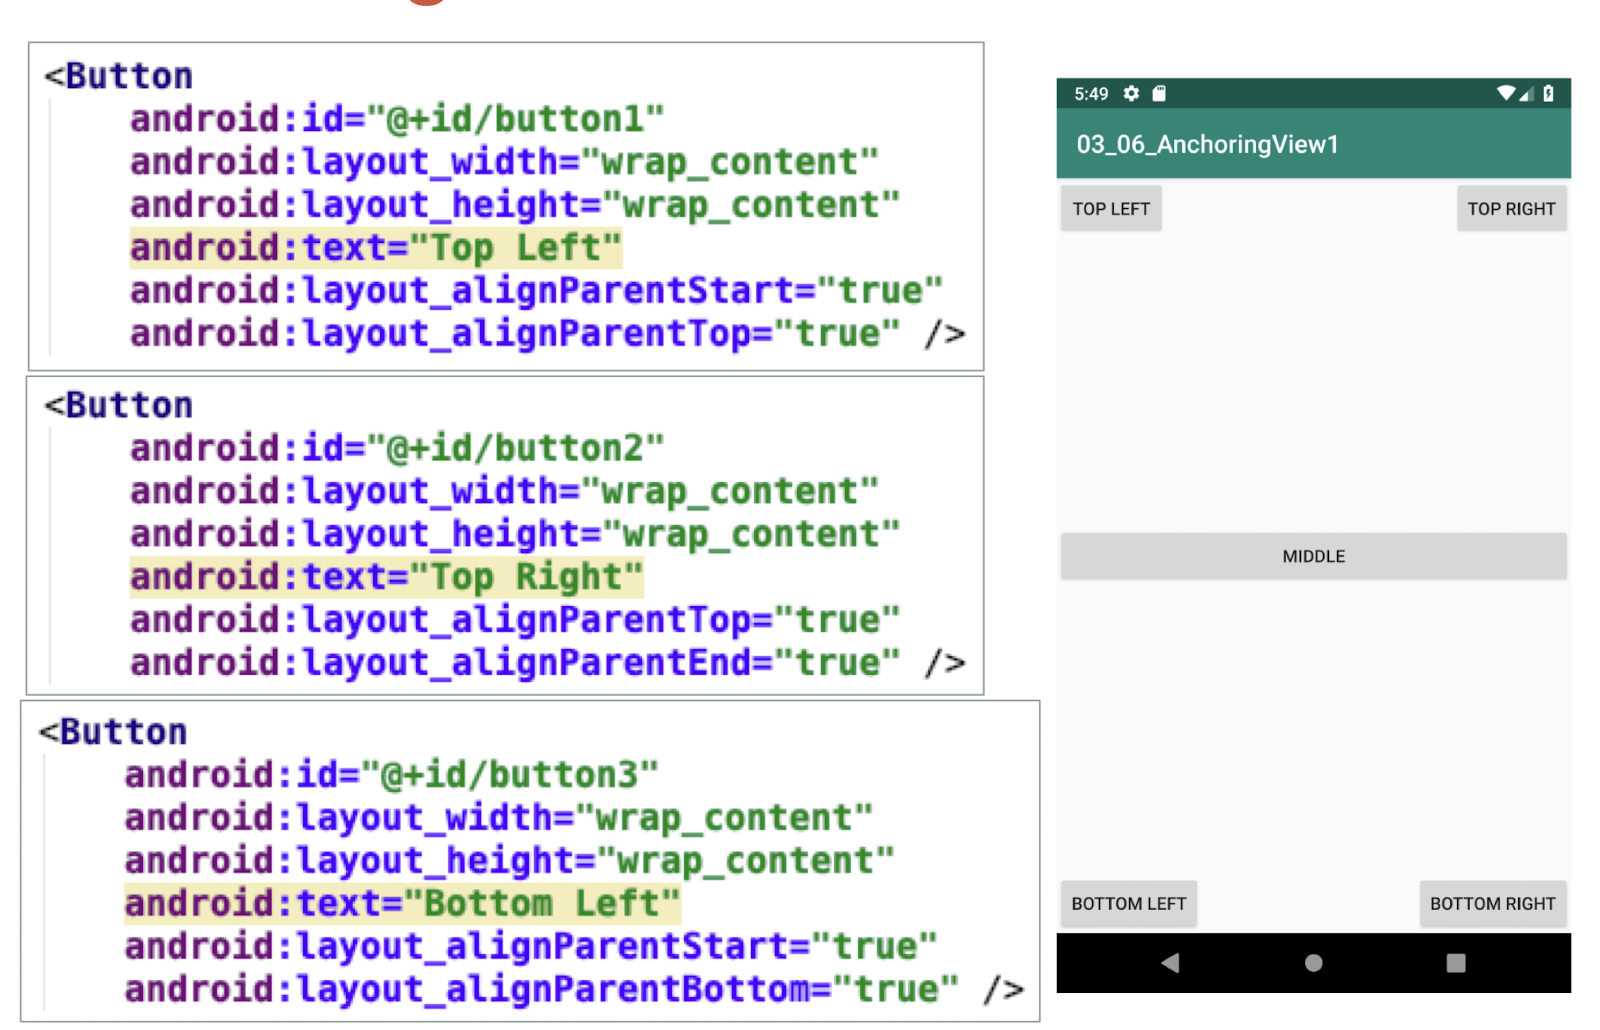
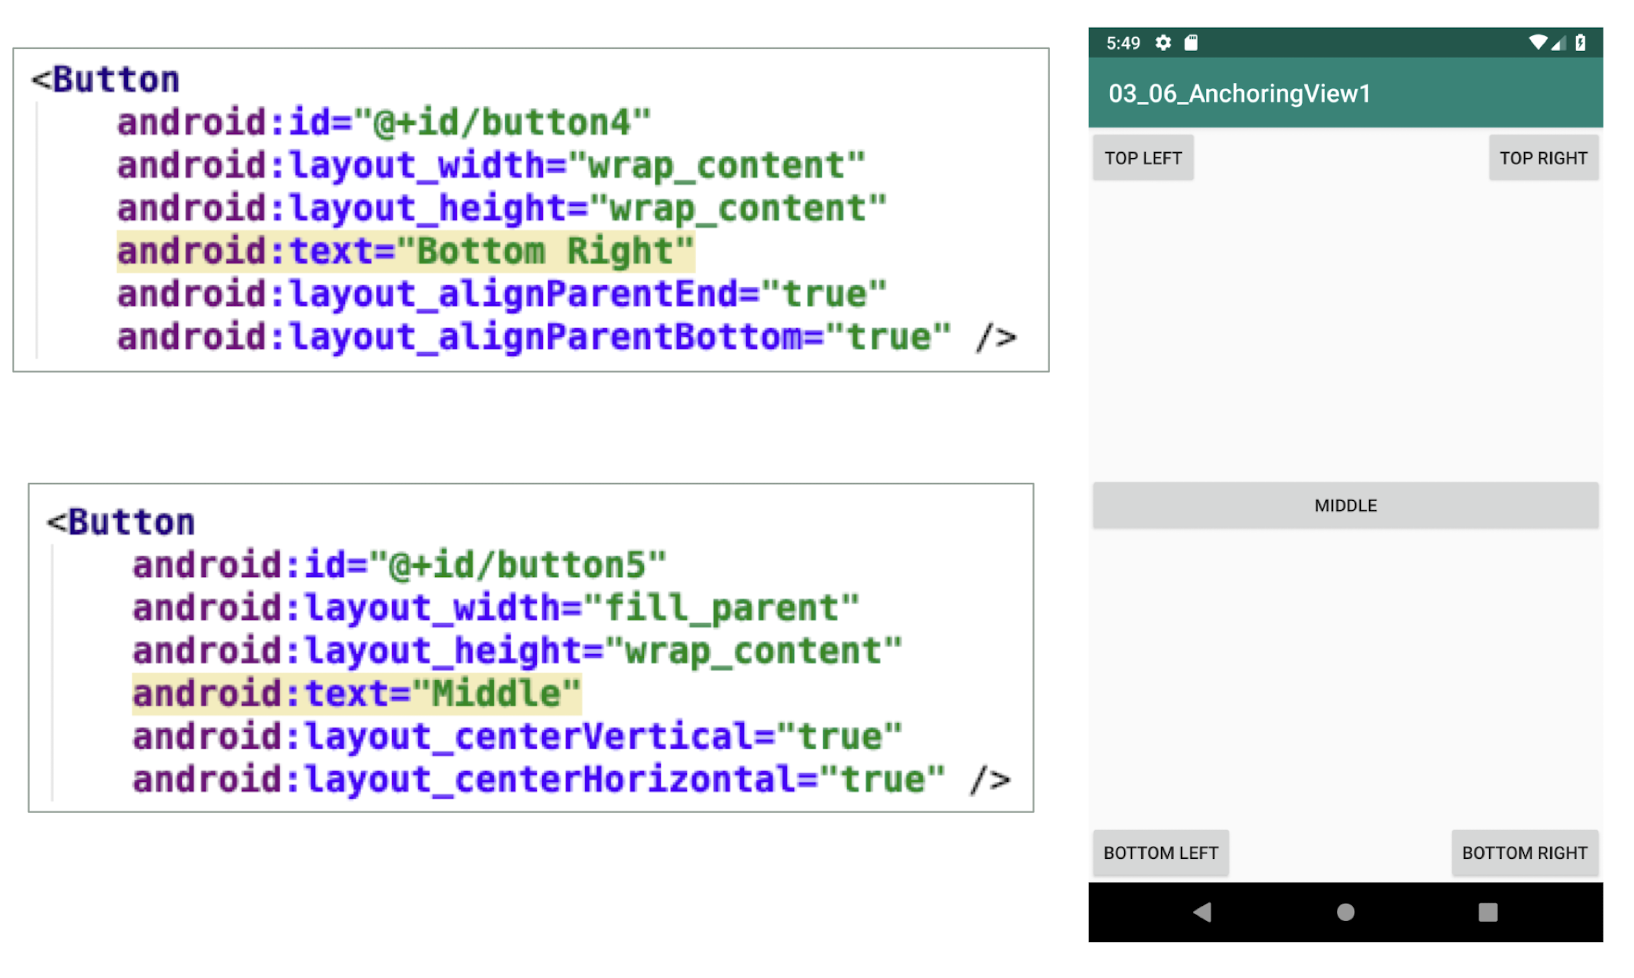
- When the screen orientation changes to landscape mode, the four buttons are aligned to the four edges of the screen, and the center button is centered in the middle of the screen with its width fully stretched
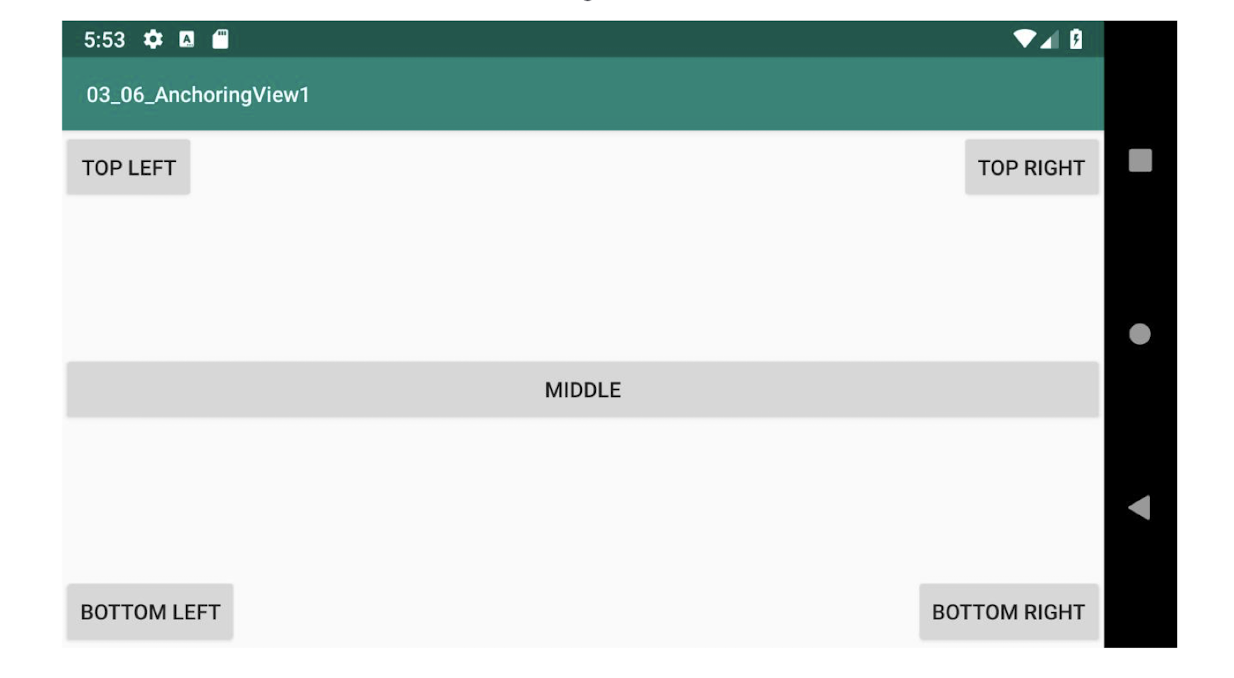
layout_alignParentStart- Aligns the view to the left of the parent view
layout_alignParentEnd- Aligns the view to the right of the parent view
layout_alignParentTop- Aligns the view to the top of the parent view
layout_alignParentBottom- Aligns the view to the bottom of the parent view
layout_centerVertical- Centers the view vertically within its parent view
layout_centerHorizontal- Centers the view horizontally within its parent view
8.6.2 Managing Changes to Screen Orientation
- Which methods will be called when the screen changes from portrait to landscape?
- onPause()
- onStop()
- onDestroy()
- onCreate()
- onStart()
- onResume()
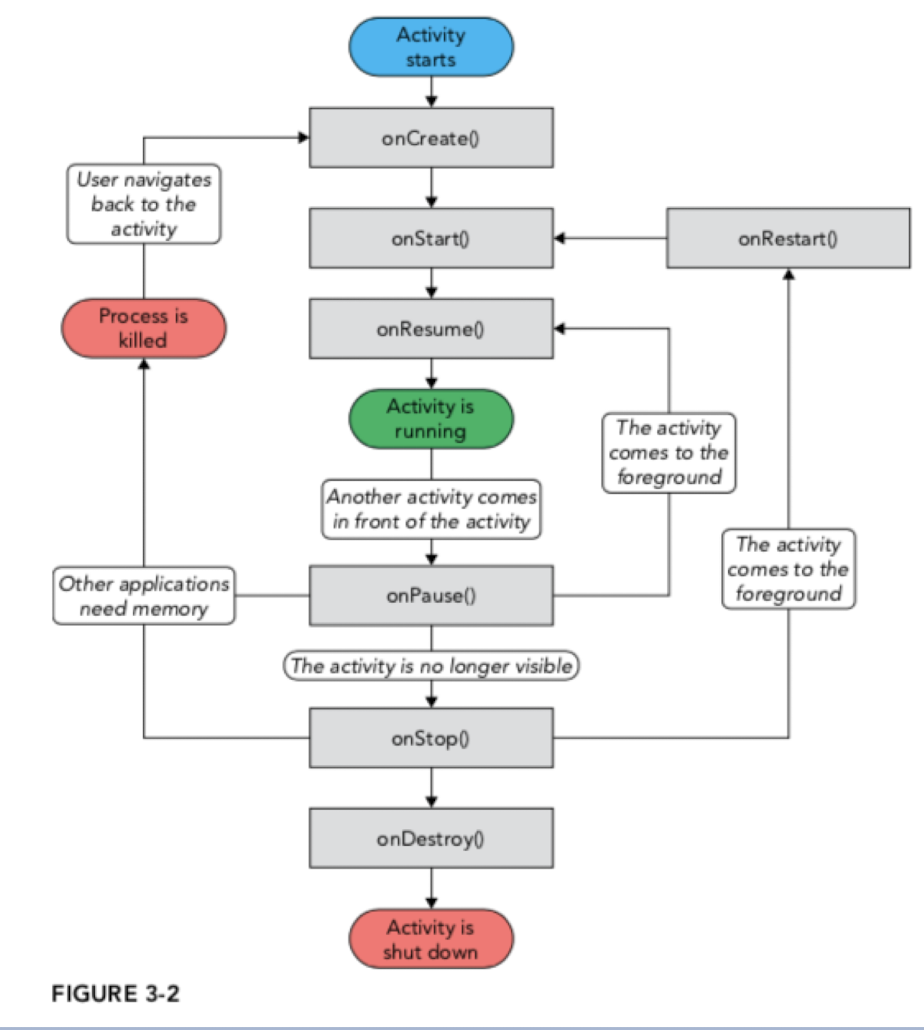
8.6.3 Persisting State Information
- Changing screen orientation destroys an activity and re-creates it
- When an activity is re-created, its current state might be lost
- When an activity is killed, it fires one or both of the following methods:
onPause()- This method is always fired whenever an activity is killed or pushed into the background
onSaveInstanceState()- This method is also fired whenever an activity is about to be killed or put into the background (just like the
onPause()method) - The
onSaveInstanceState()method is not fired when an activity is being unloaded from the stack (such as when the user pressed the back button) because there is no need to restore its state later,- when use the back button, it will not be called
- This method is also fired whenever an activity is about to be killed or put into the background (just like the
Persisting State Information
- To preserve the state of an activity, you could always implement the
onPause()method and then use your own ways to preserve the state of your activity, such as using a database, internal or external file storage, and so on - If you simply want to preserve the state of an activity so that it can be restored later when the activity is re-created (such as when the device changes orientation), a much simpler way is to implement the
onSaveInstanceState()method, as it provides a Bundle object as an argument so that you can use it to save your activity’s state
To save and restore, implement these 2 methods in your Activity
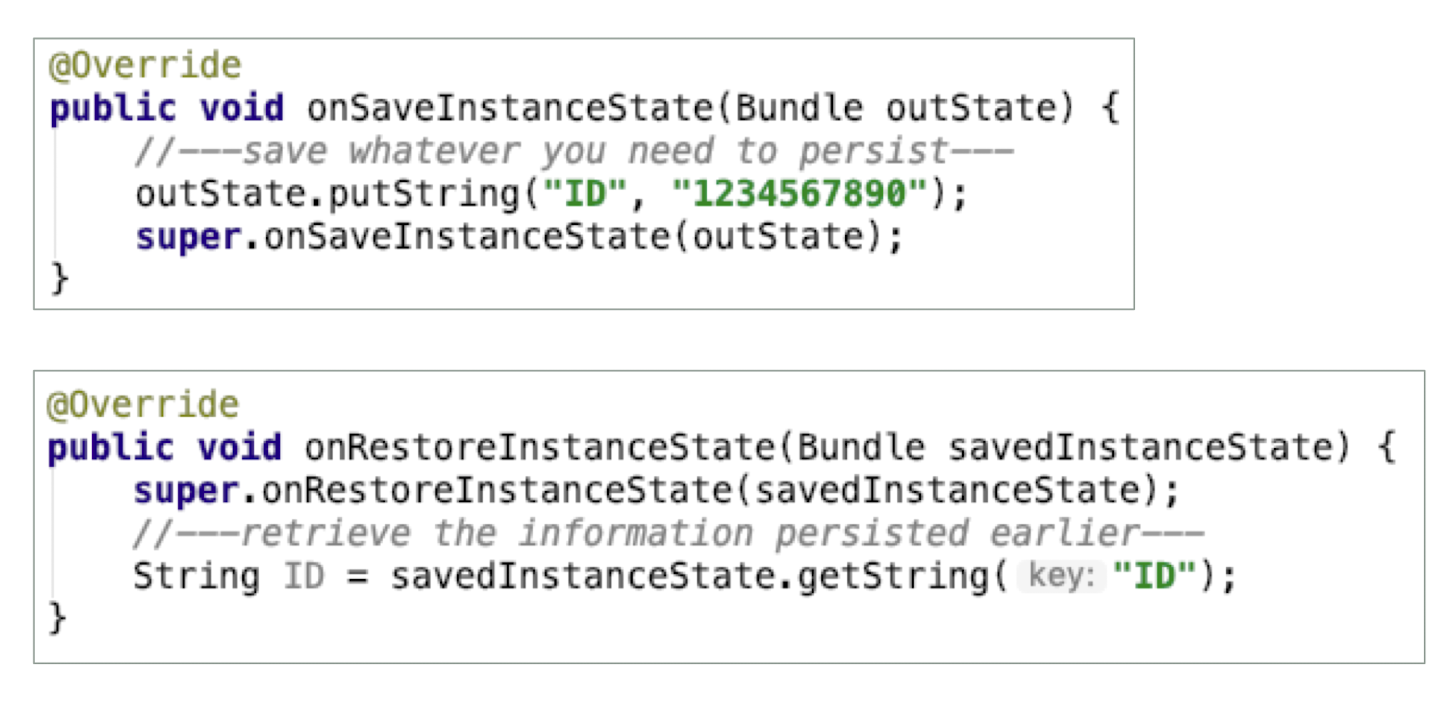
8.6.4 Detecting Orientation Changes
- Sometimes you need to know the device’s current orientation during runtime
- use the
getResources()method
- use the
- The following code shows how to programmatically detect the current orientation of the activity:

8.6.5 Controlling the Orientation
- To ensure that the application is displayed in only a certain orientation
- For example, many games are displayed only in landscape mode
- Programmatically force a change in orientation using the
setRequestedOrientation()method
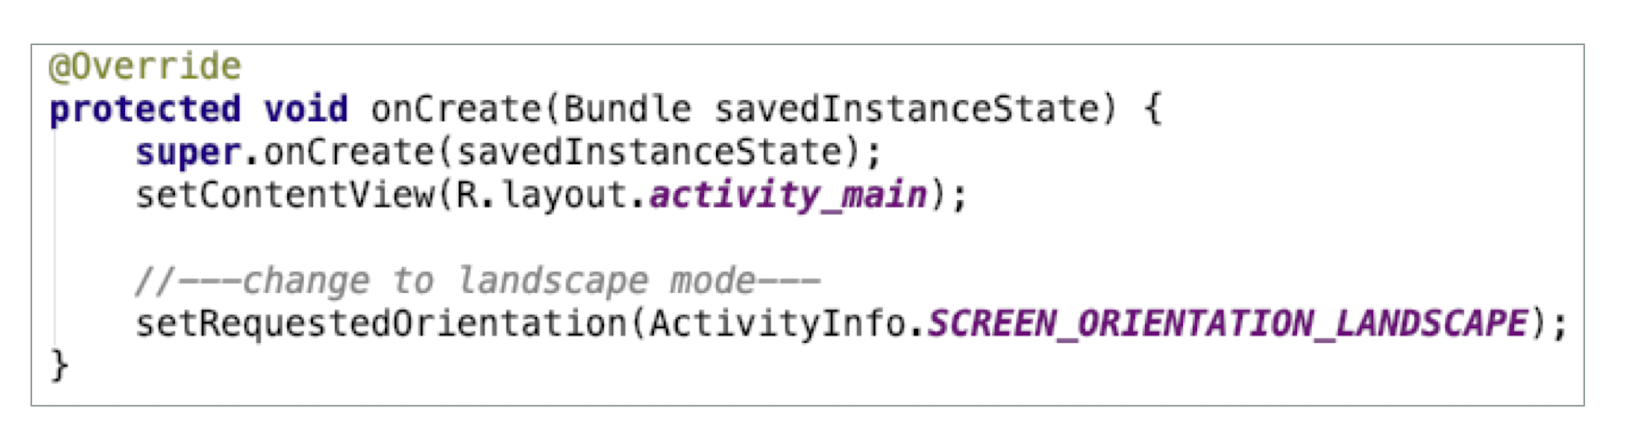
8.6.6 Controlling the Orientation
- Besides using the
setRequestOrientation()method, you can also use the android:screenOrientation attribute on the<activity>element in AndroidManifest.xml
1 | |
8.7 User Interface with Views: List views
ListViews are views that enable you to display a long list of items in a vertically scrolling list
A ListView with 4 items is shown one the right
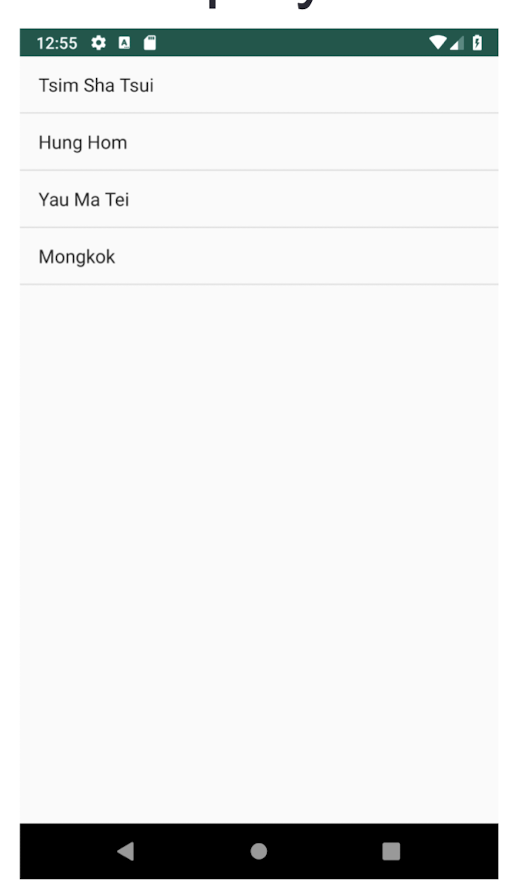
MainActivity.java
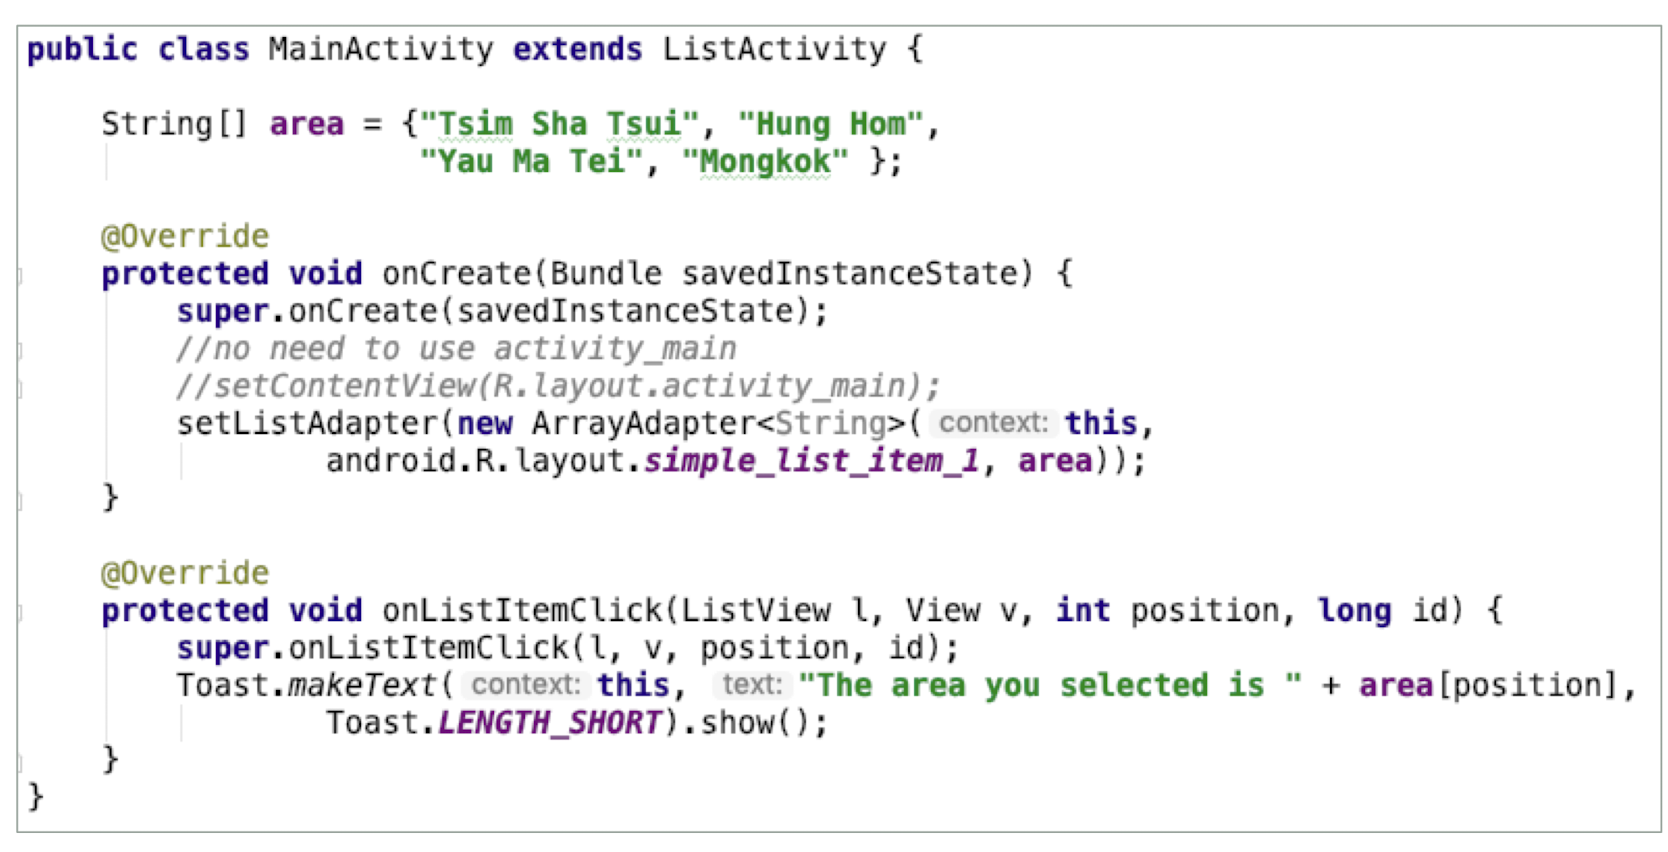
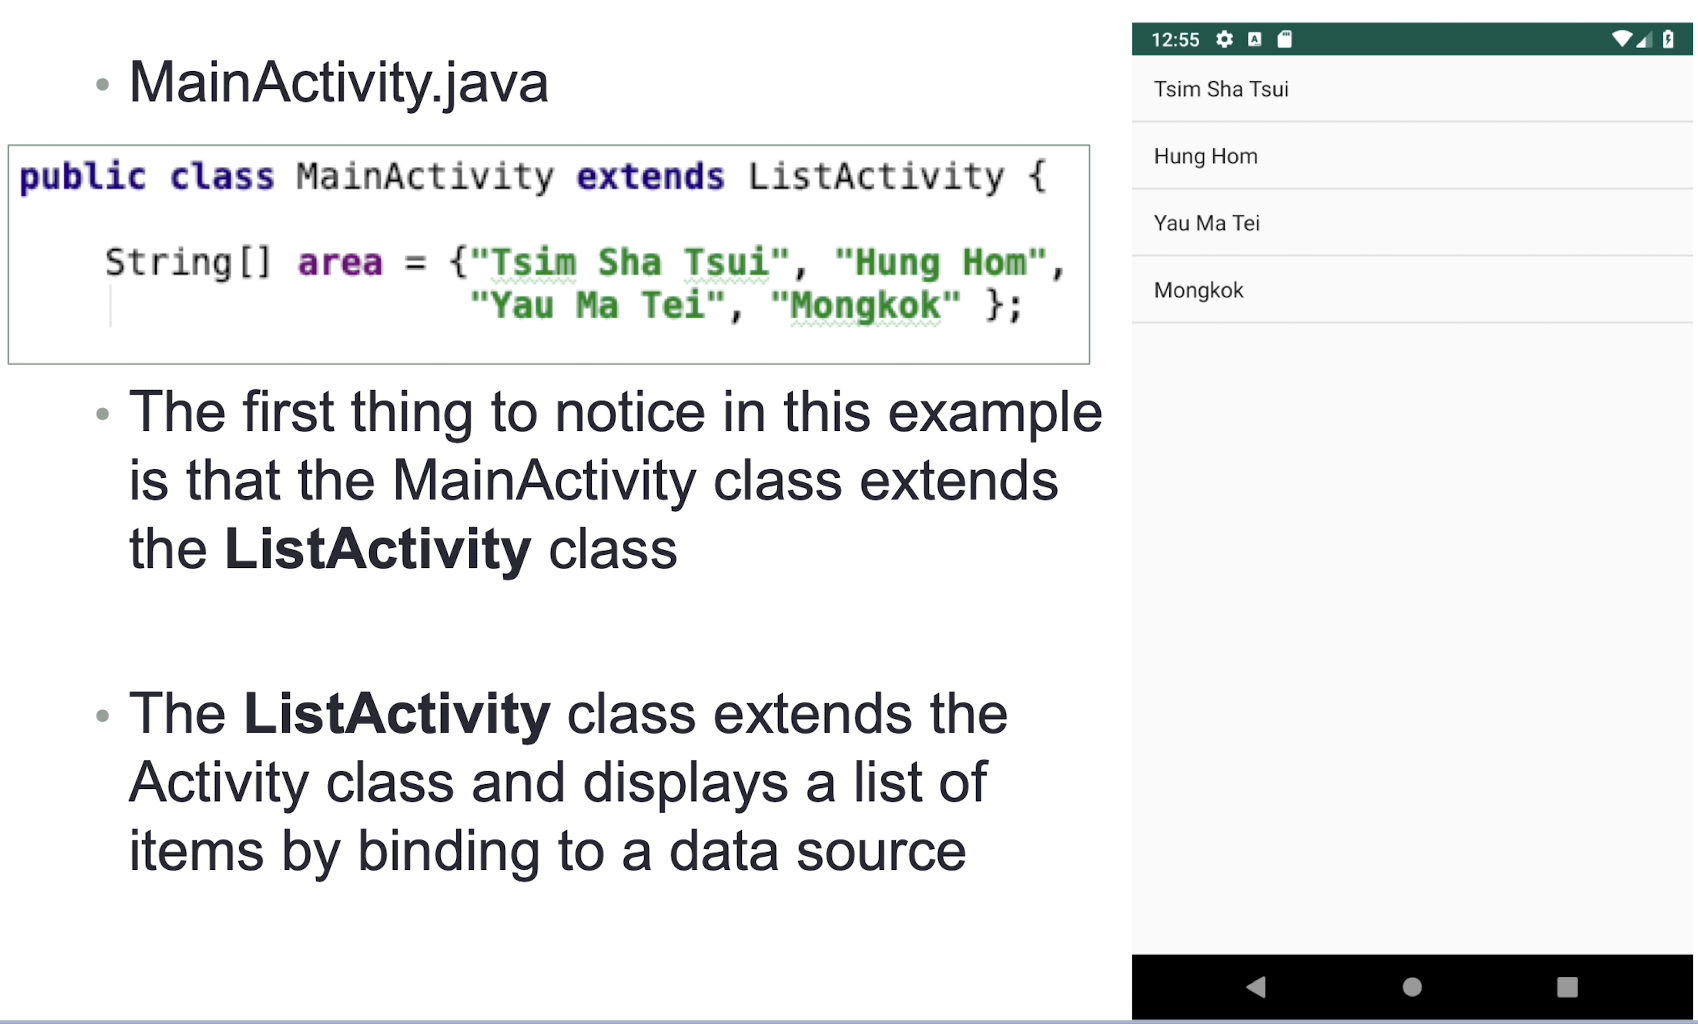
- The first thing to notice in this example is that the MainActivity class extends the
ListActivityclass - The ListActivity class extends the Activity class and displays a list of items by binding to a data source
MainActivity.java
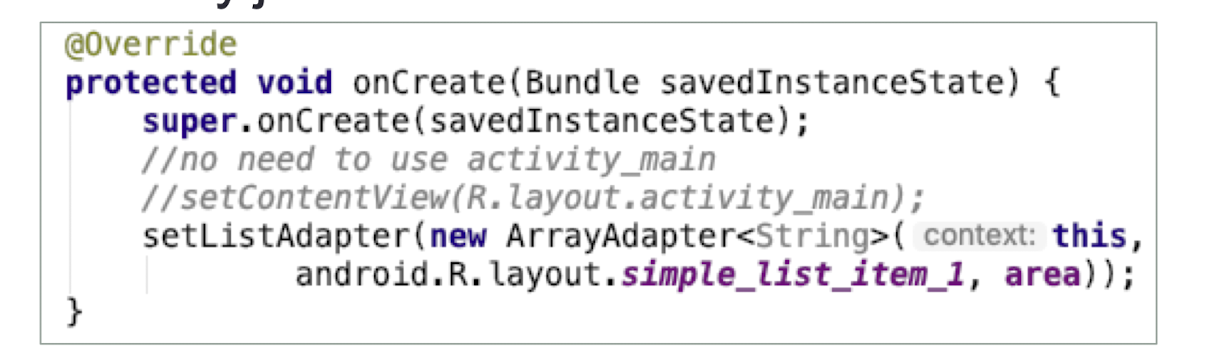
- There is no need to modify the
activity_main.xmlfile to include the ListView because the ListActivity class itself contains a ListView setListAdapter()method to programmatically fill the entire screen of the activity with a ListView- The ArrayAdapter object manages the array of strings that are displayed by the ListView
MainActivity.java

- The
onListItemClick()method is fired whenever an item in the ListView has been clicked - Display the area selected using the Toast class
8.7.1 Displaying Pictures
- There are many ways to display pictures
- ImageView
- GridView
8.7.2 ImageView
- The ImageView is a view that shows images on the device screen
- You may add an image to your project under the res/mipmap folder
- Or use the default ic_launcher images
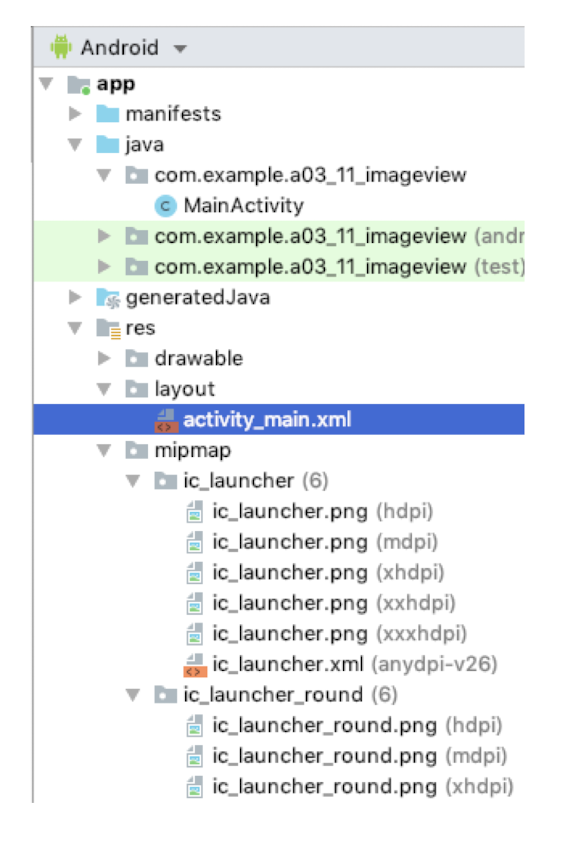
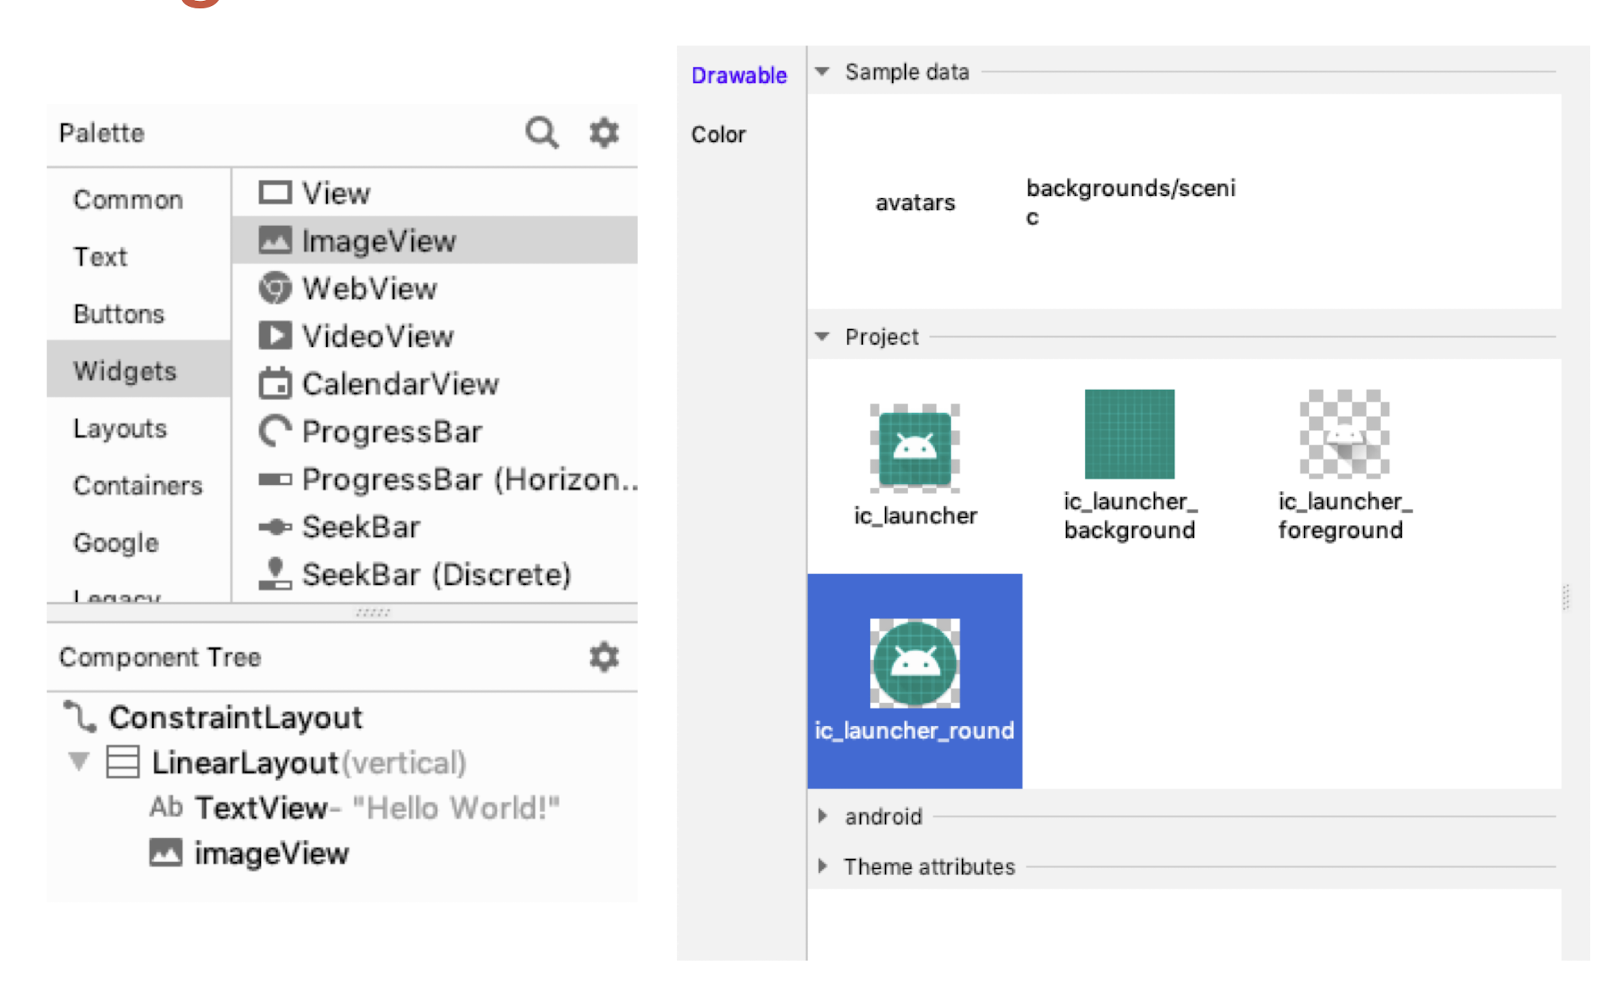
- XML
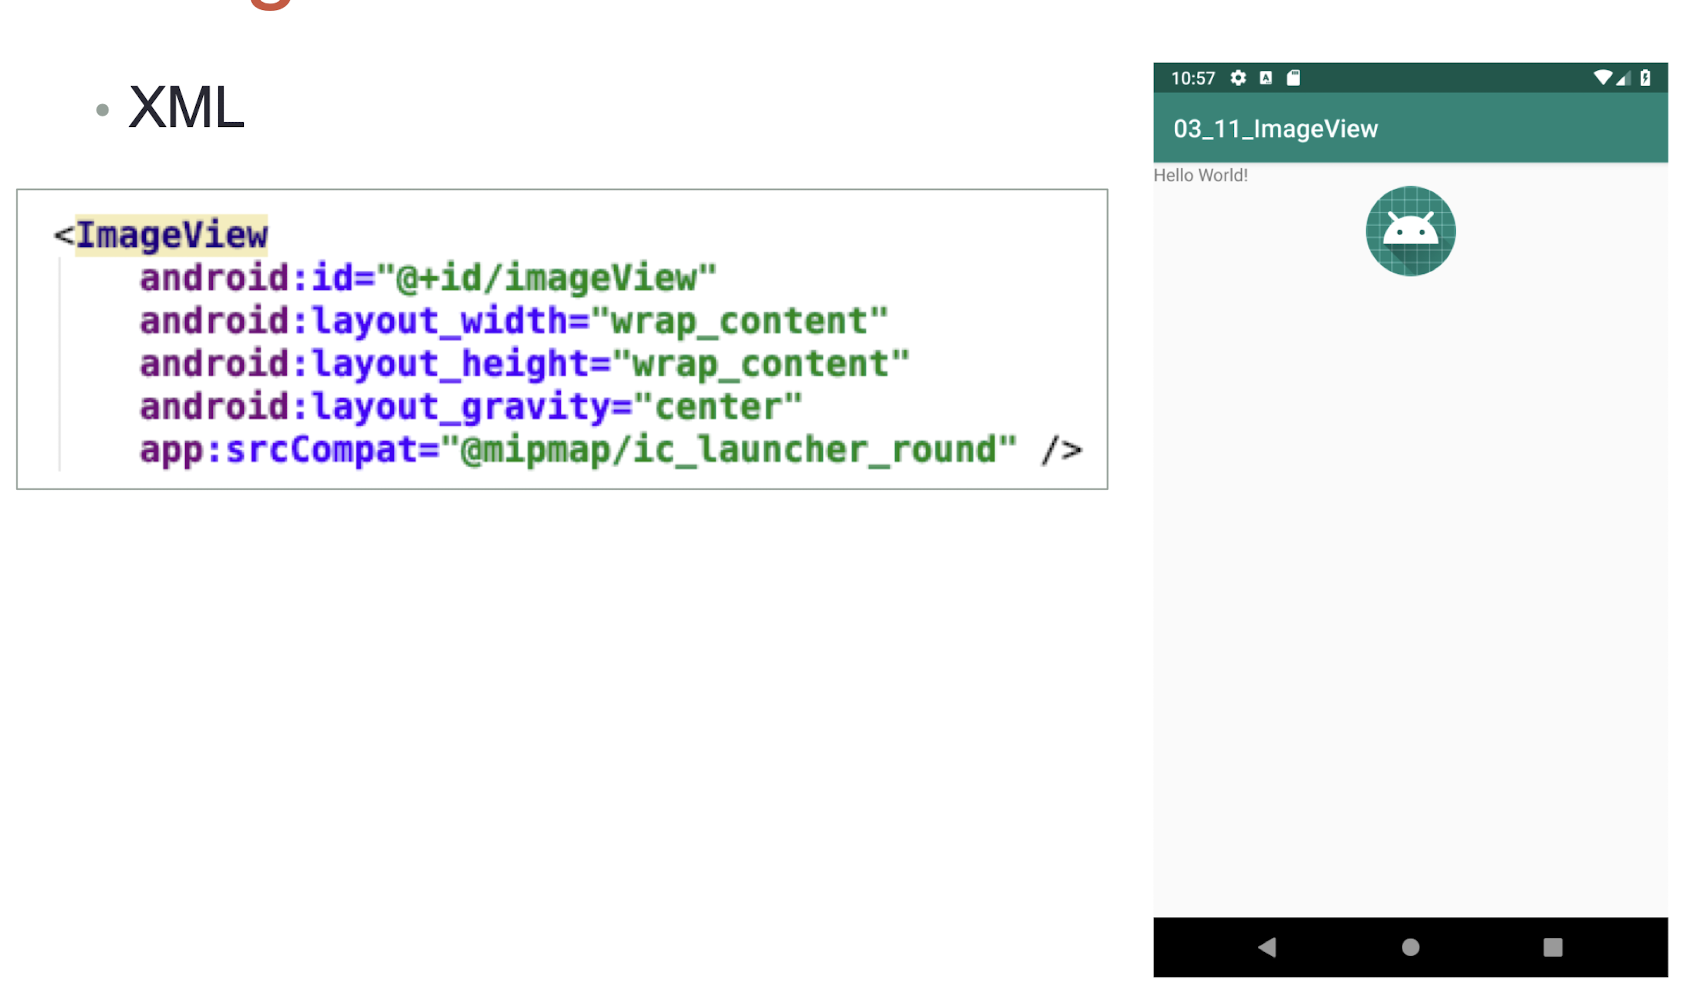
8.8 Supplementary Notes on Views
- Action Bar
- Picker views
- Views that enable users to select from a list, such as the TimePicker and DatePicker views
- GridView
8.8.1 Action Bar
- In place of the traditional title bar located at the top of the device’s screen, the Action Bar displays the application icon and the activity title
- Optionally, on the right side of the Action Bar are action items
- Open a new Android project with Basic Activity
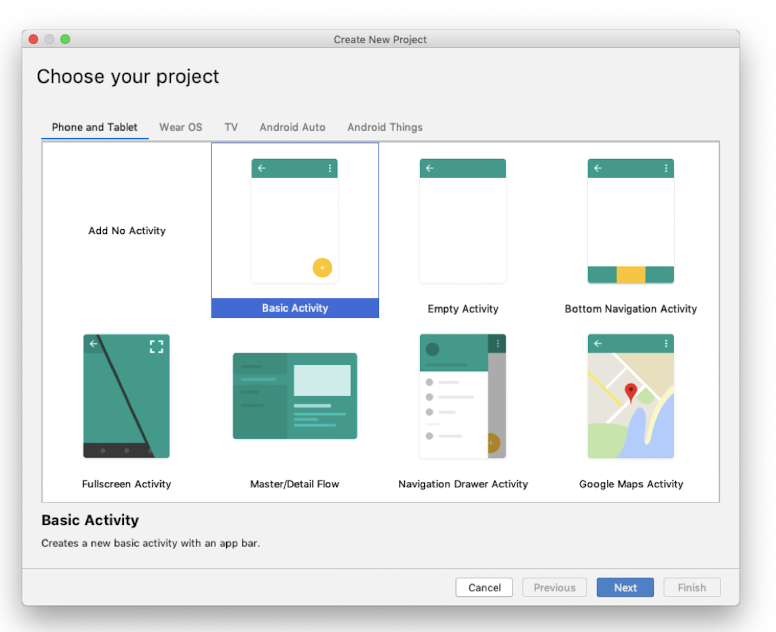
- The Action Bar is already set up in Basic Activity
- The Action Bar is located at the top of the screen
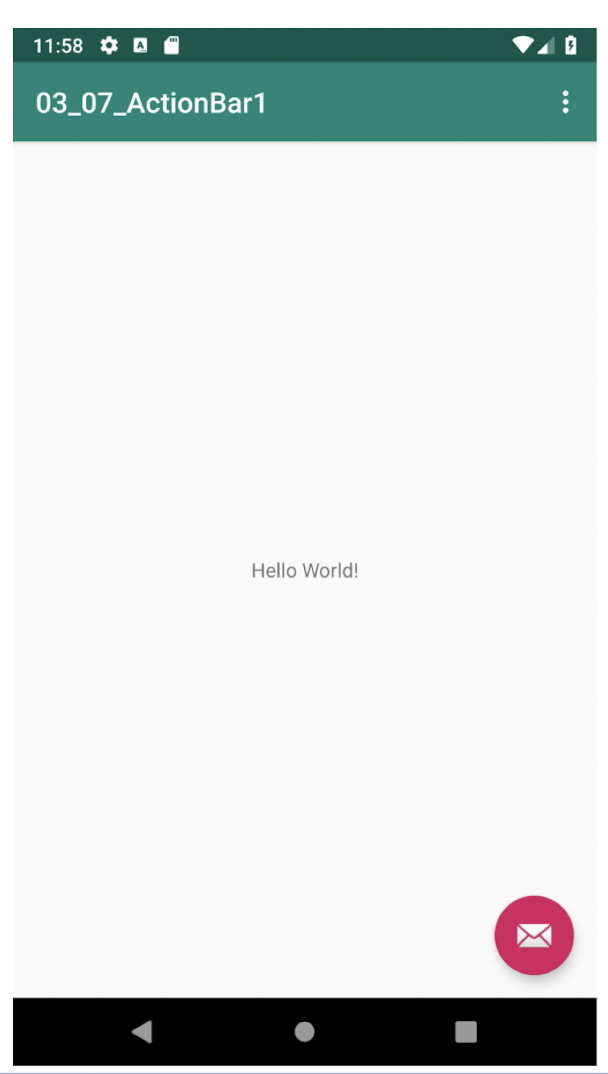
- To hide the Action Bar, comment out this line in MainActivity.java:
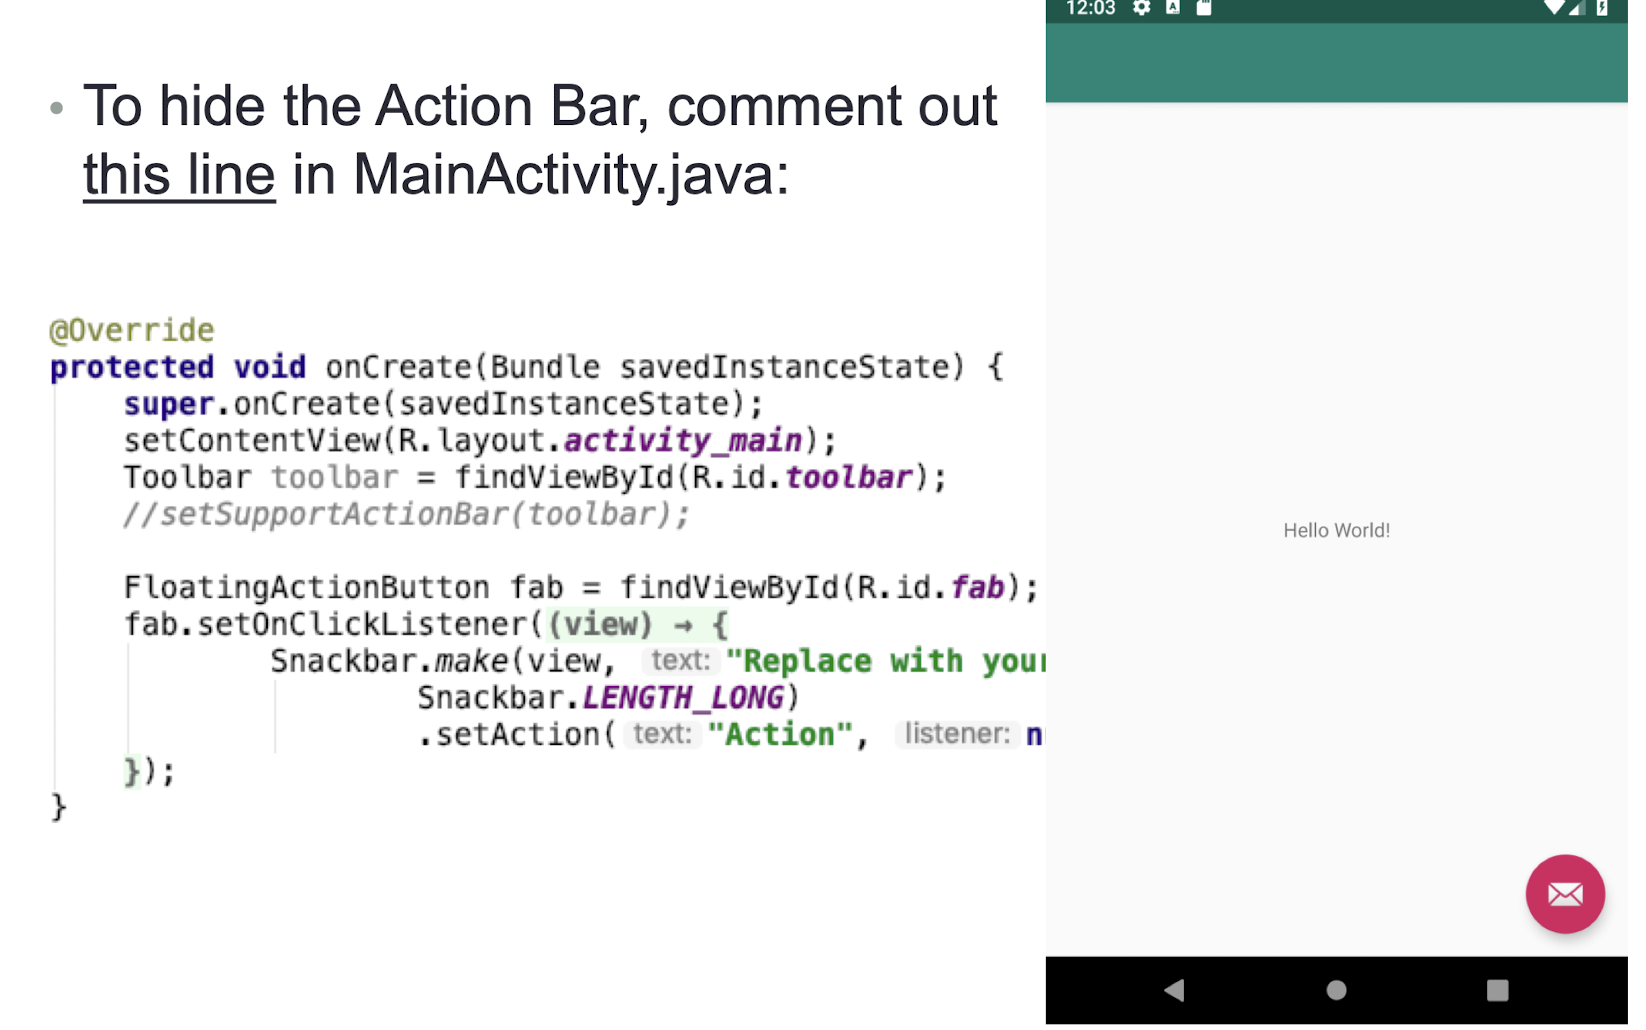
- Besides displaying the application icon and the activity title on the left of the Action Bar, you can also display additional items on the Action Bar
- These additional items are called action items
- Action items are shortcuts to some of the commonly performed operations in your application
- For example, you might be building an RSS reader application, in which case some of the action items might be Refresh Feed, Delete Feed, and Add New Feed
Create menu items
- The Action Bar populates its action items by calling the
onCreateOptionsMenu()method of an activity:
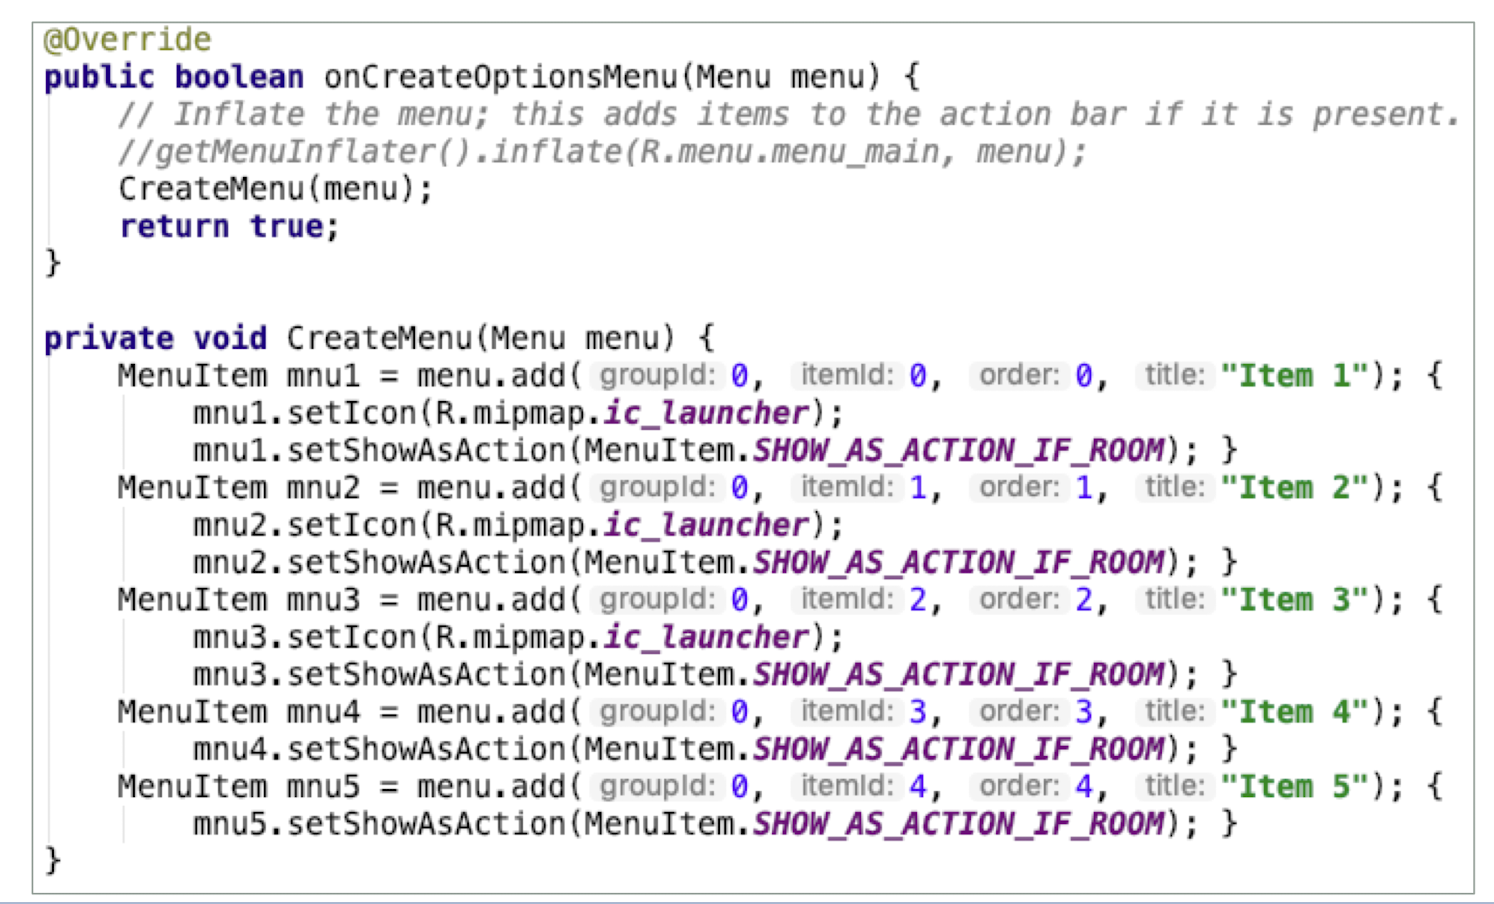
- When a menu item is selected by the user, the
onOptionsItemSelected()method is called
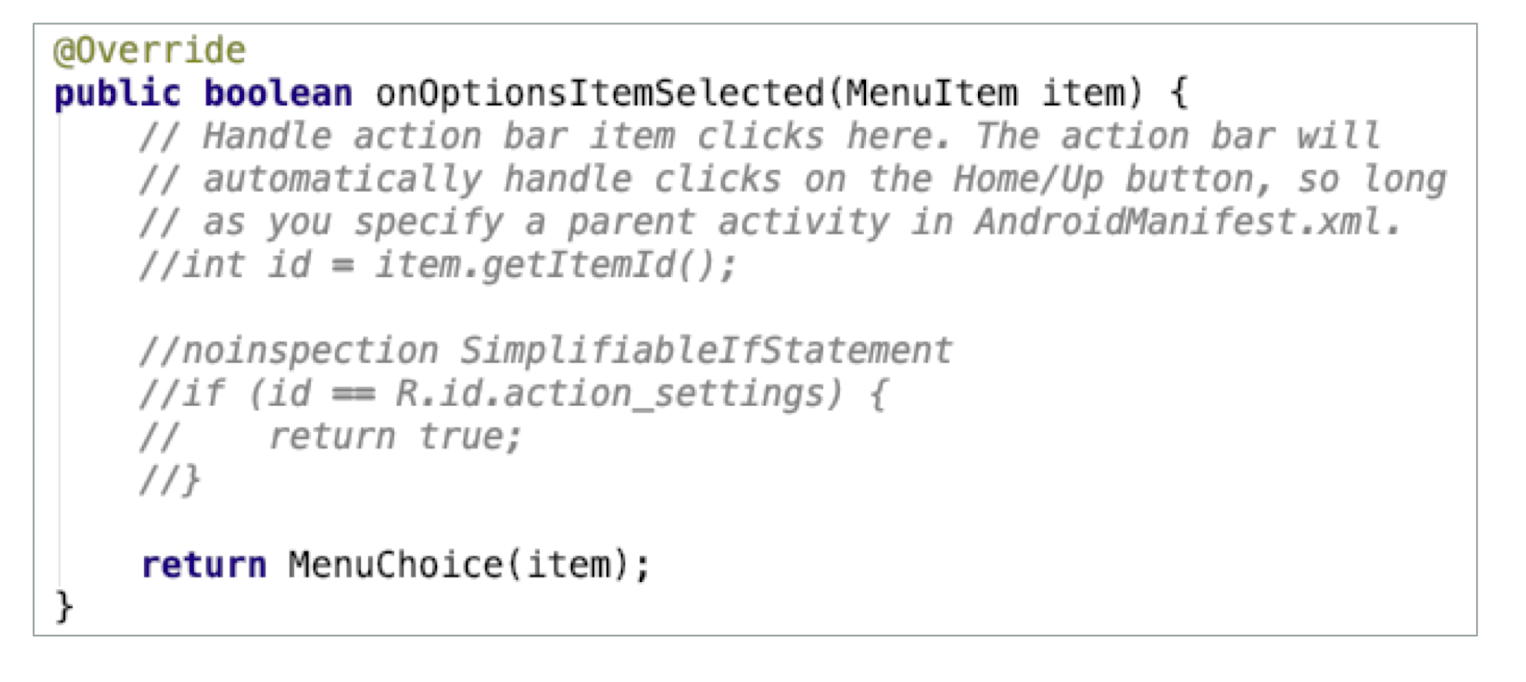
- Self-defined
MenuChoice()method to check which menu item was clicked and then display a message:
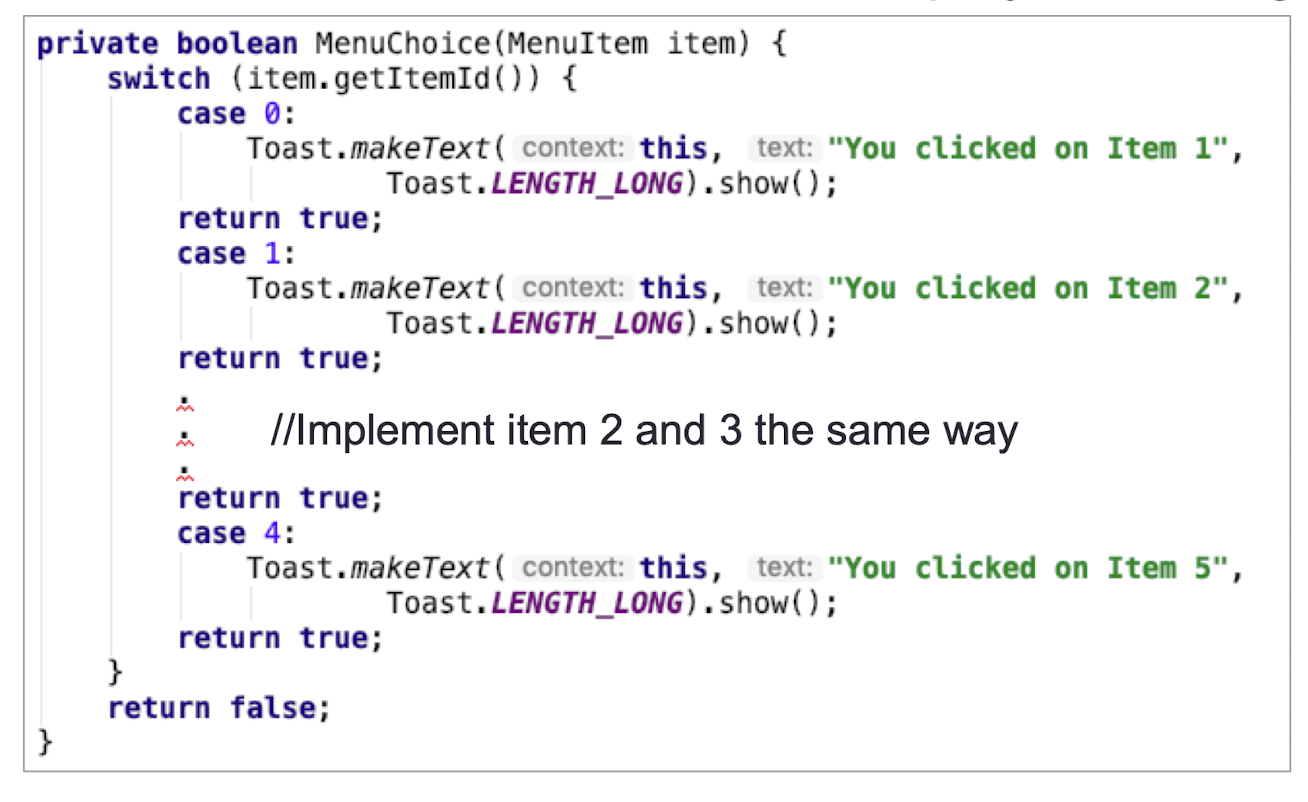

8.8.2 Picker Views
- Selecting a date and time is one of the common tasks needed to perform in a mobile application
- Android supports this functionality through the TimePicker and DatePicker views
8.8.3 TimePicker
- The TimePicker view enables users to select a time of the day, in either 24-hour mode or AM/PM mode
- Choose an SDK that is level 23 or greater
- XML
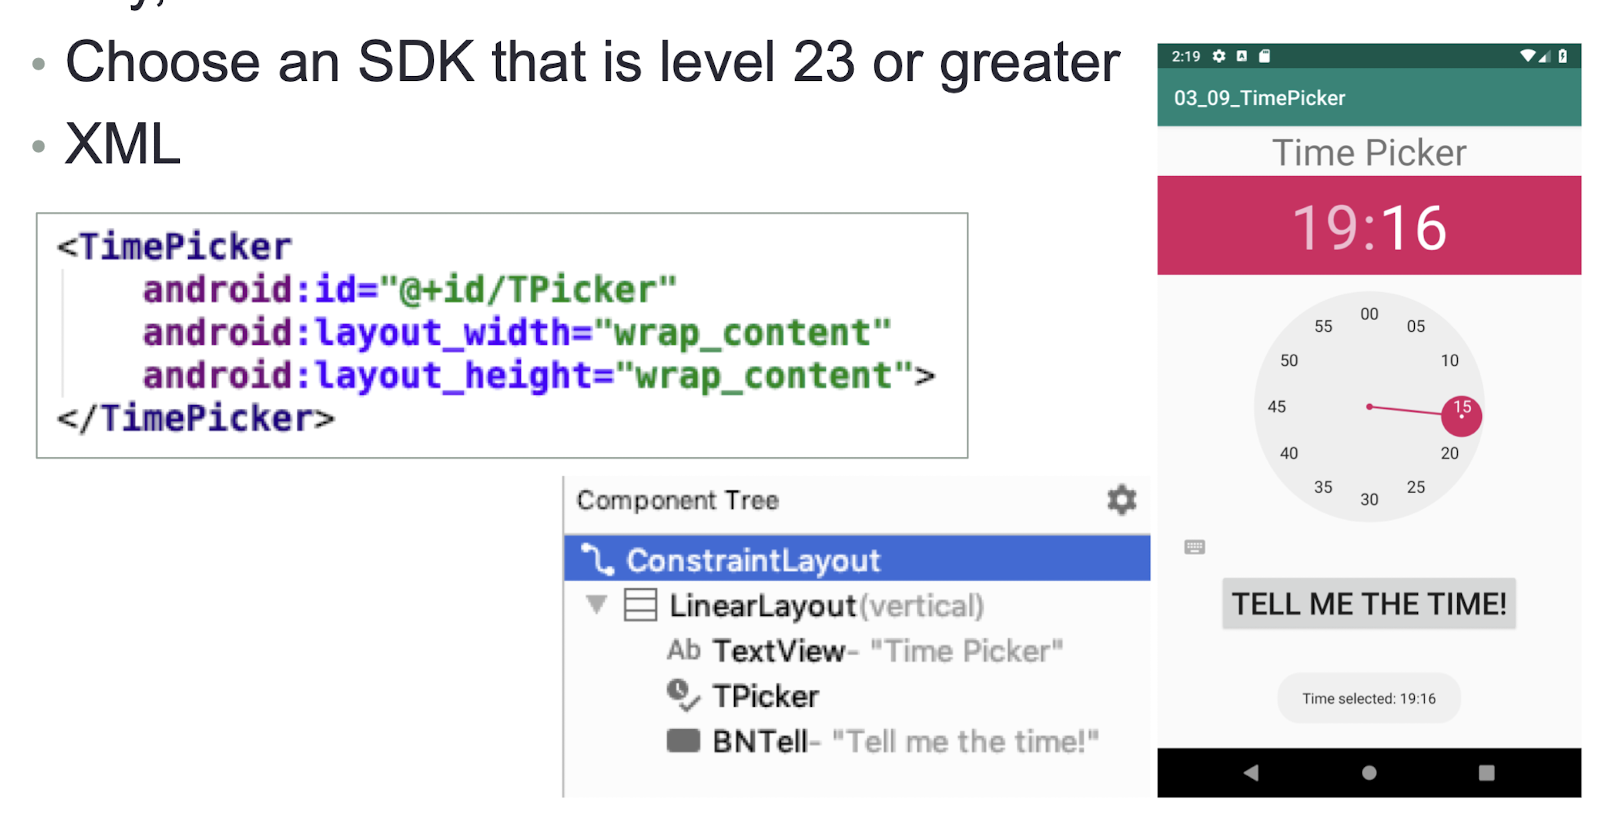
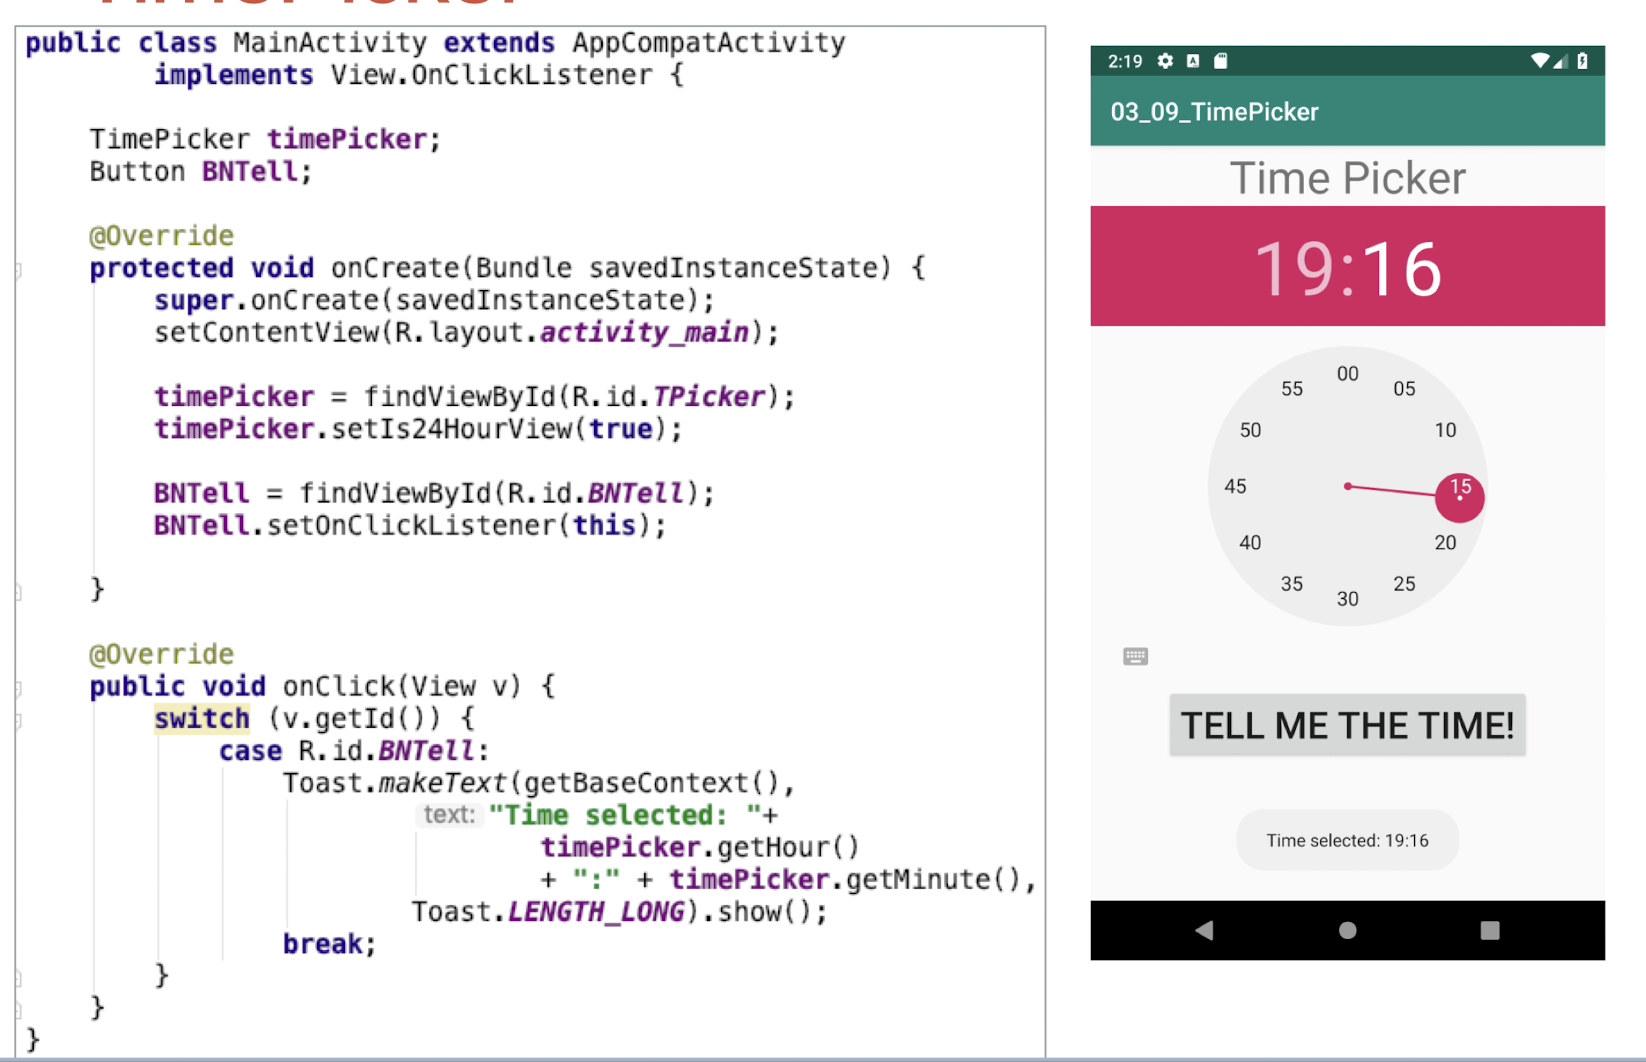
- The click listener can be put outside. by using the switch statement to check which button is clicked.
DatePicker Exercise
- Another view that is similar to the TimePicker is the DatePicker
- Using the DatePicker, you can enable users to select a particular date on the activity
- Create an app that user can choose the date and time
- User clicks on the SET Button. Then a Toast message will display the date and time user selected.
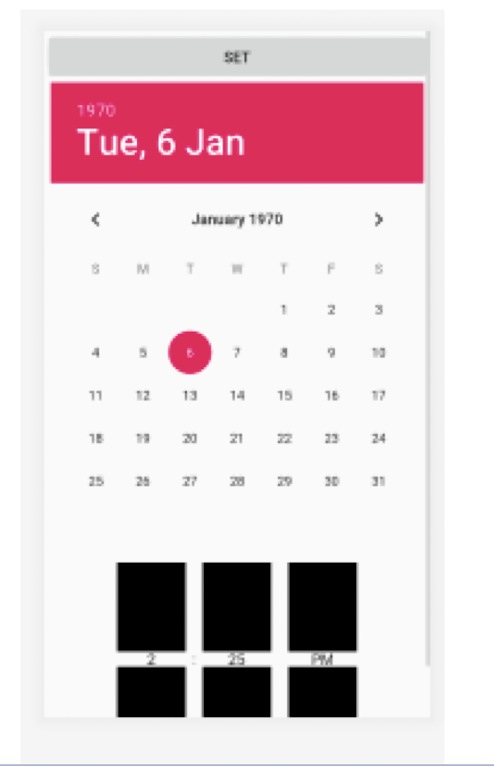
- The XML code is given
- Noted that TimePicker is using a spinner
- Which UI view you can use if the height of the screen is not enough to show all components?
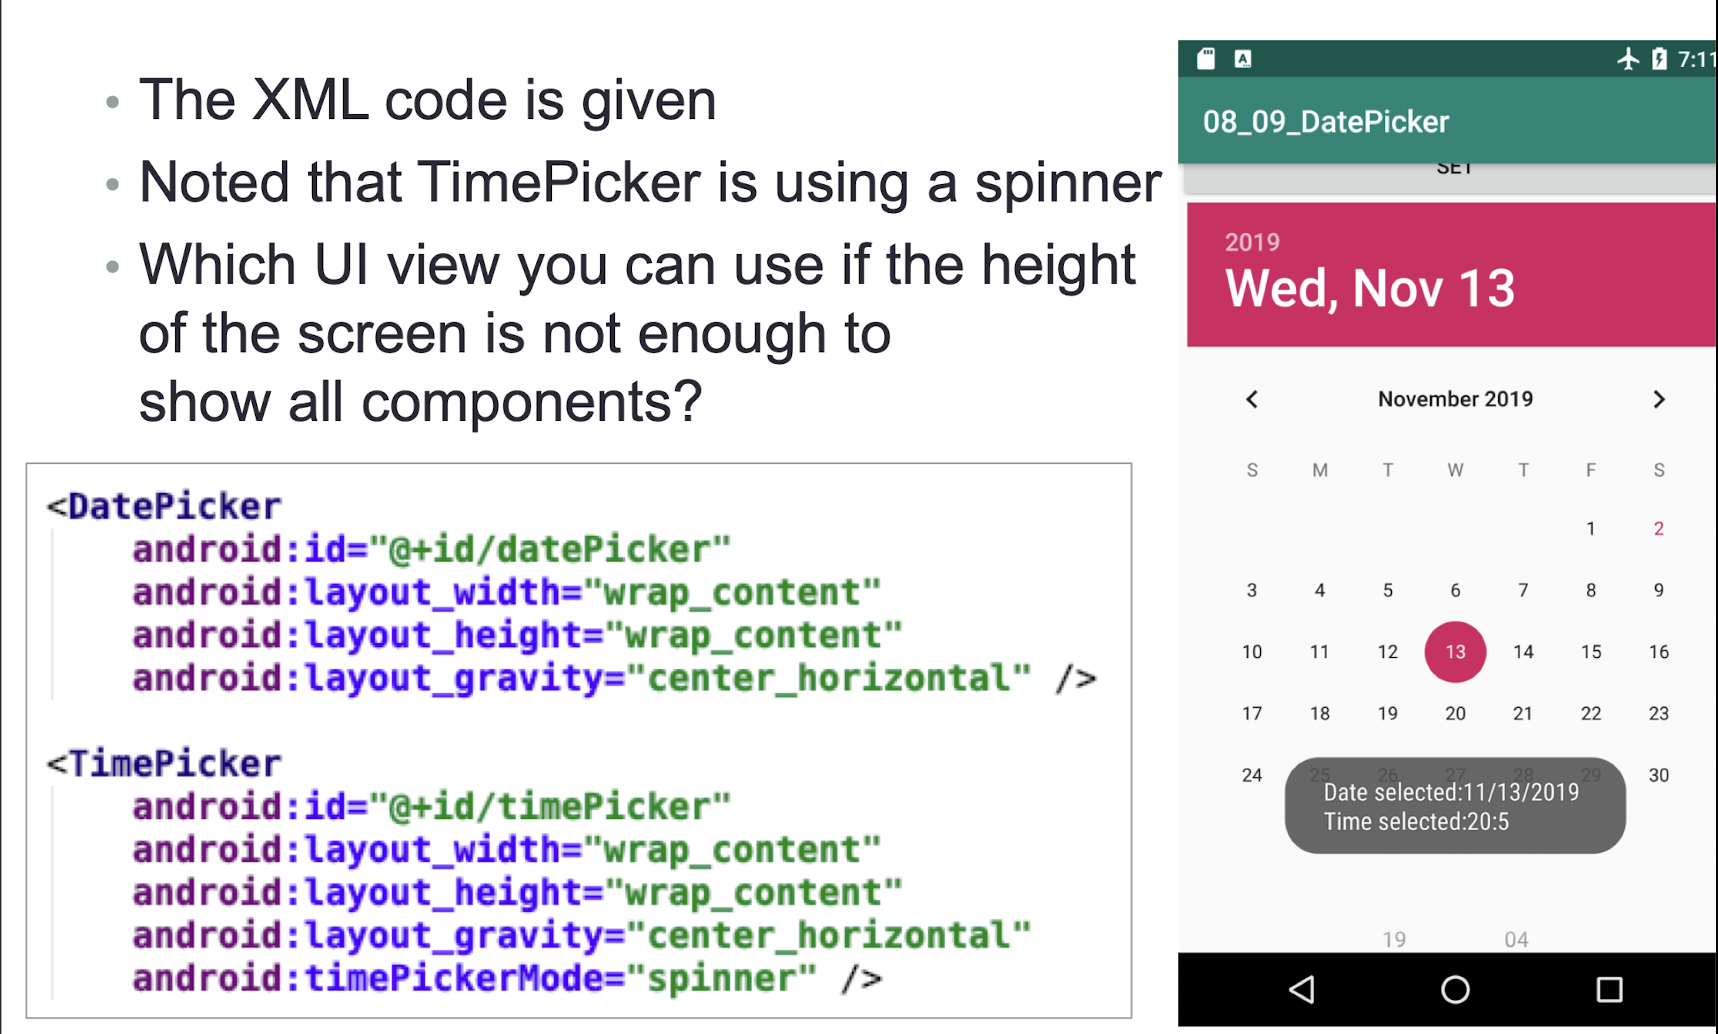
8.8.4 GridView
- The GridView shows items in a two-dimensional scrolling grid
- You can use the GridView together with an ImageView to display a series of images

- MainActivity.java
- Implement the ImageAdapter class and then bind it to th GridView
- When an image is selected, display a Toast message indicating the selected image
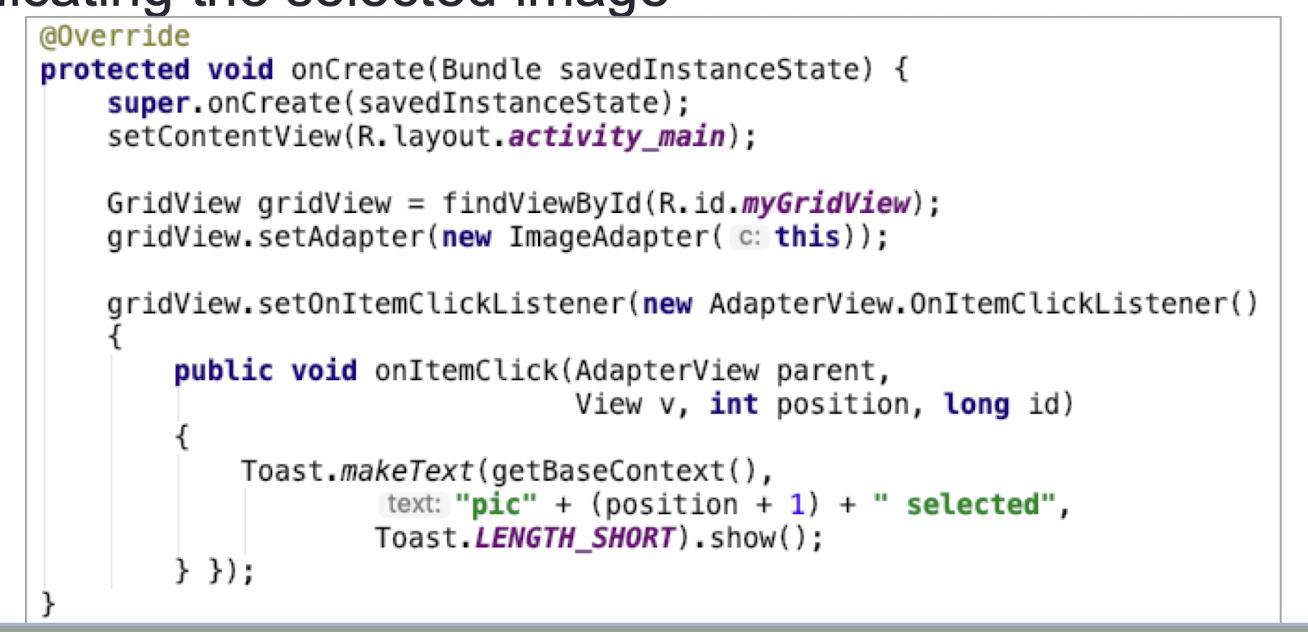
- ImageAdapter class
- Within the
getView()method, you can specify the size of the images - You can also specify how images are spaced in the GridView by setting the padding for each image
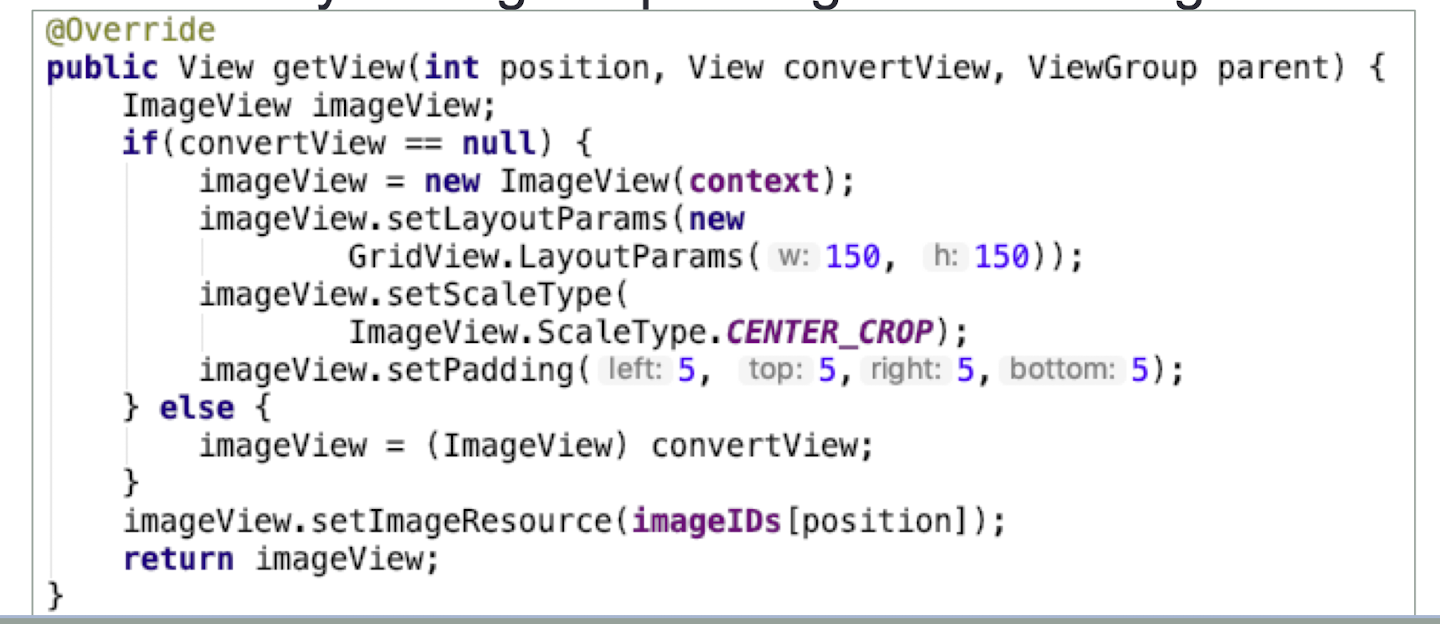
- Using 4 columns to show imageIDs
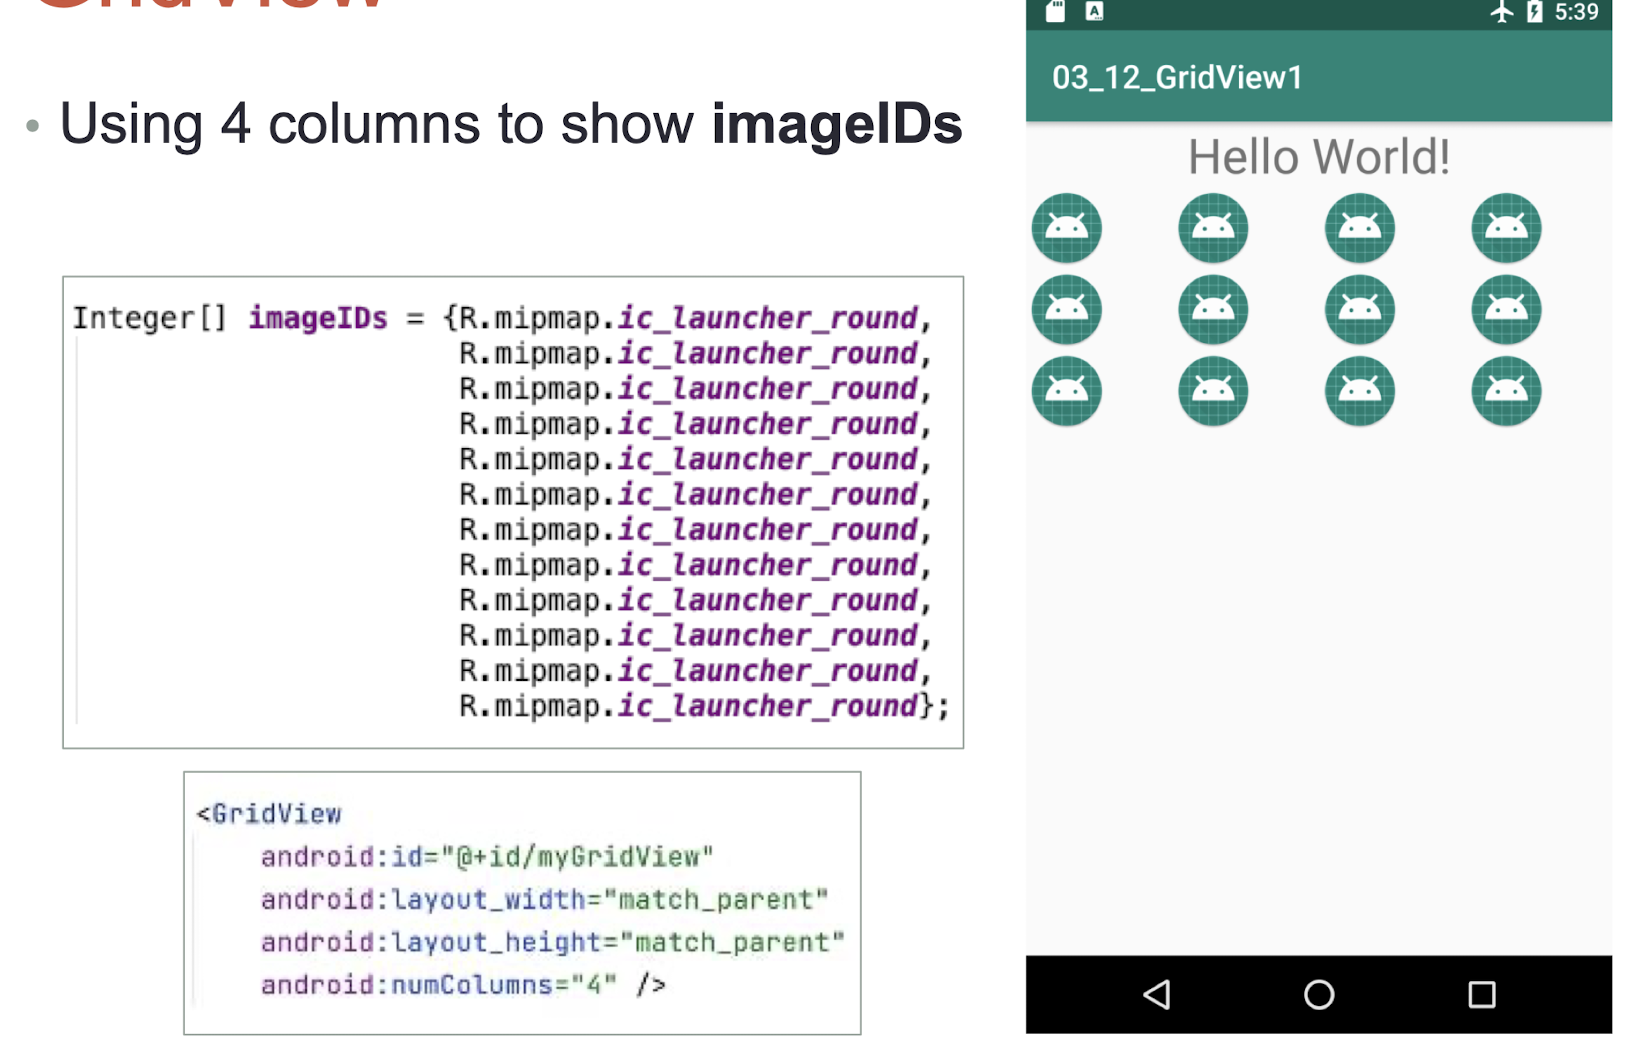
9. Data Persistence
- SharedPreferences
- Internal and External Storage
- SQLite database
- Content Providers
Overview:
Persisting data is an important topic in application development because users typically expect to reuse data in the future
For Android, there are primarily three basic ways of persisting data:
- A lightweight mechanism known as shared preferences to save small chunks of data
- Traditional file systems
- A relational database management system through the support of SQLite databases
9.1 SharedPreferences
Android provides the SharedPreferences object to help you save simple application data.
There are 2 ways to use SharedPreferences
- Use the
PreferenceActivityclass to create preferences and modify data during runtime - Programmatically retrieving and modifying the preferences values using the
SharedPreferencesclass
- Use the
- The interface shows a form layout to demonstrate SharedPreferences
Define SharedPreferences
1 | |
Save SharedPreferences
1 | |
Load SharedPreferences
1 | |
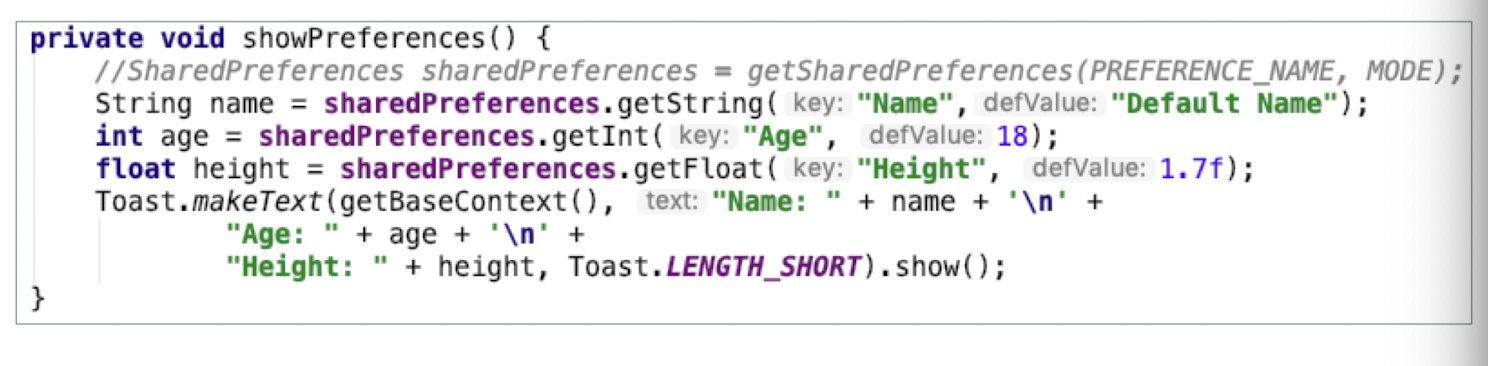
Button Event
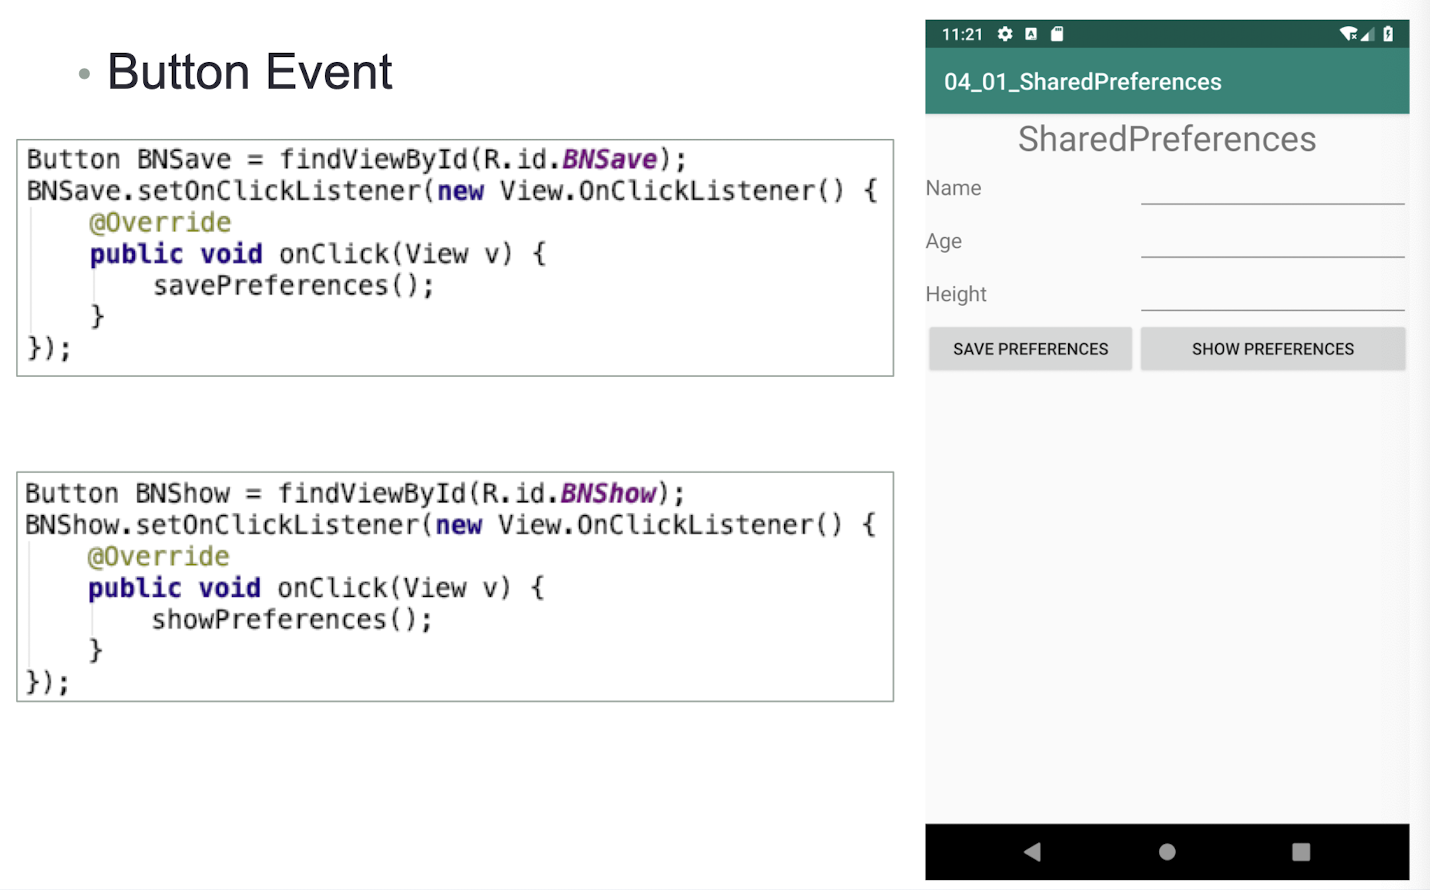
Data is stored in xml format, located at
/data/data/<package name>/shared_prefs/SaveSetting.xml
XML:
1 | |
9.2 SharedPreferences (2 Apps)
- To allow the access of SharedPreferences of another app, 3 conditions must be satisfied:
- The MODE of the Preferences to be shared is set to MODE_PRIVATE
- MODE_PRIVATE: File creation mode: the default mode, where the created file can only be accessed by the calling application or all applications sharing the same user ID.
- The visitor must know the package name and SharedPreferences name to access via Context, and use the same sharedUserID (Three things to know)
- The visitor must know the name and type of every data to retrieve
The 2 apps must use the same userID
In AndroidManifest.xml of the apps
Add the sharedUserID in the manifest tag
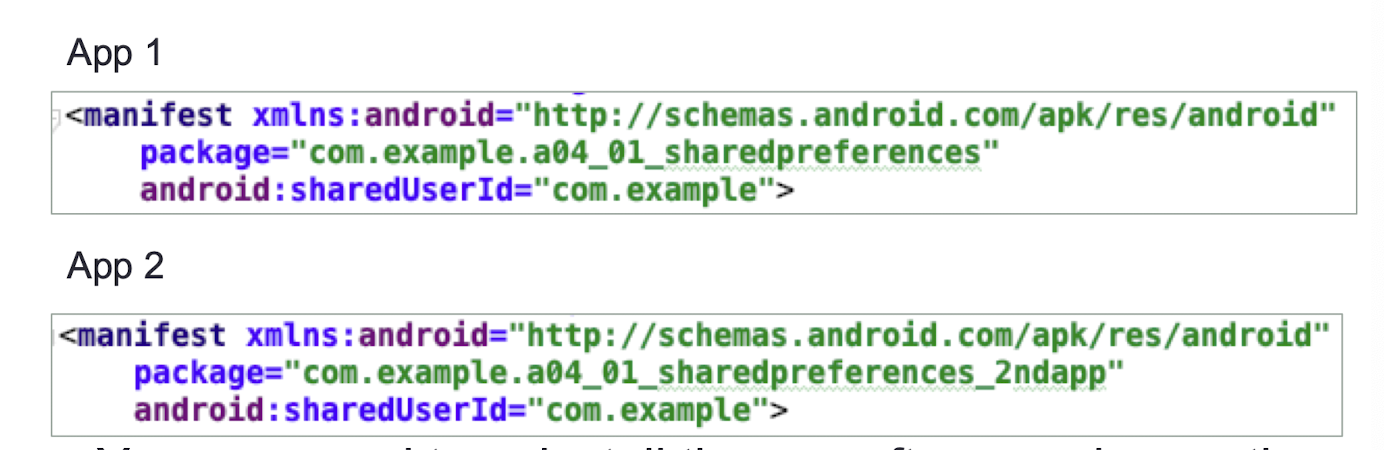
- You may need to uninstall the app after you change the sharedUserId
In App 2, build the same interface
- No need for the buttons as we will load the sharedPreferences from App1
- Define SharedPreference
- OnCreate()
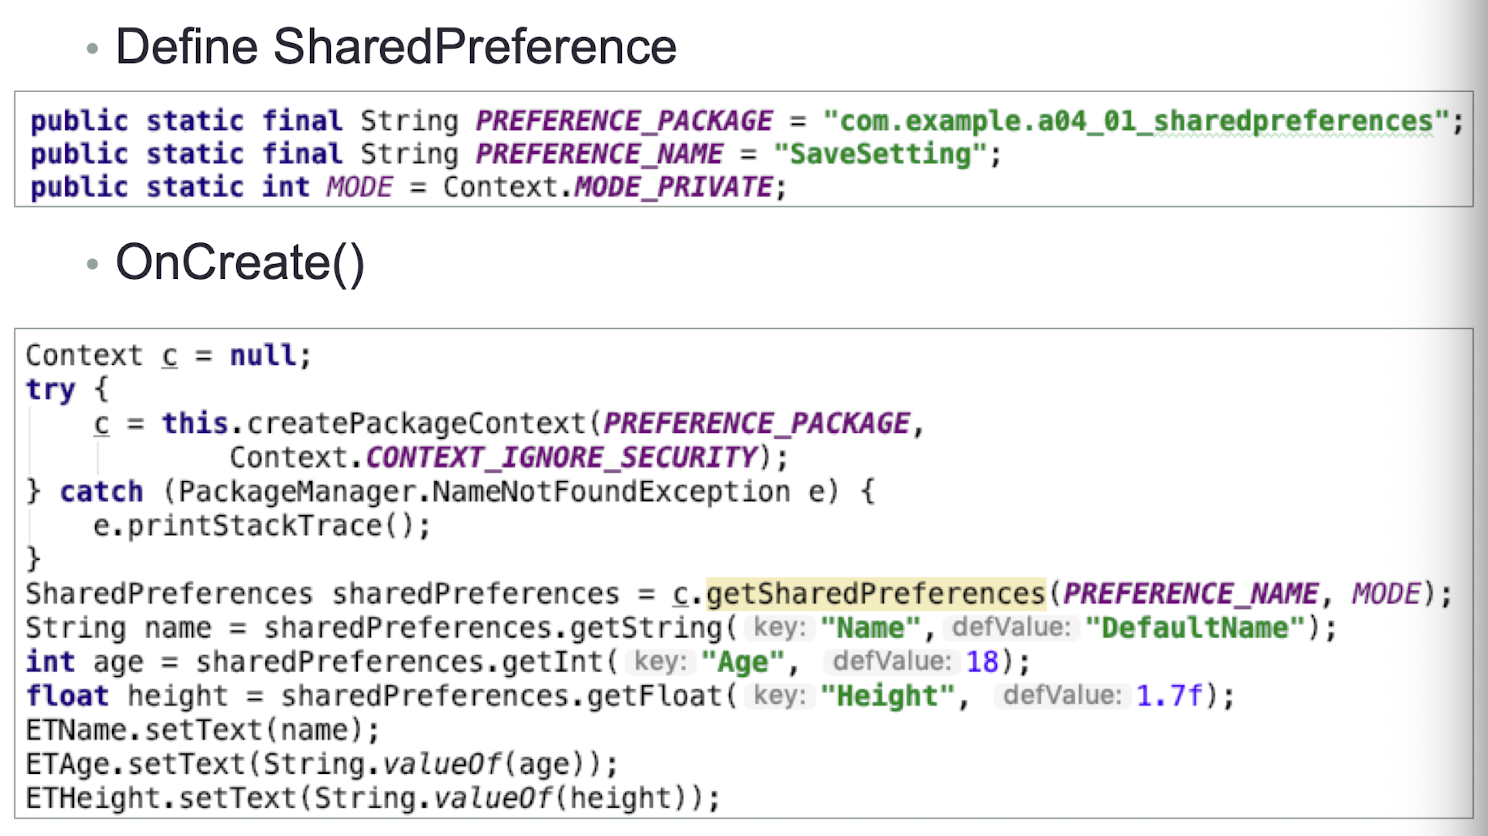
9.3 Persisting Data to Files
- The SharedPreferences object enables you to store data that is best stored as name/value pairs
- for example, user ID, birth date, gender, driver’s license number, and so on
- However, sometimes you might prefer to use the traditional file system to store your data
- For example, you might want to store the text of poems you want to display in your applications
- In Android, you can use the classes in the java.io package to do so
9.4 Internal Storage
- Store private data on the device memory, in directory
/data/data/<package name>/files- Emulator may have its own default directory
- Use getFilesDir() to get the filesystem directory
- Cannot be accessed by other apps
- When uninstall the app, files will also be removed.
- Two commonly used functions:
openFileOutput()openFileInput()
A simple app to demonstrate internal file input and output
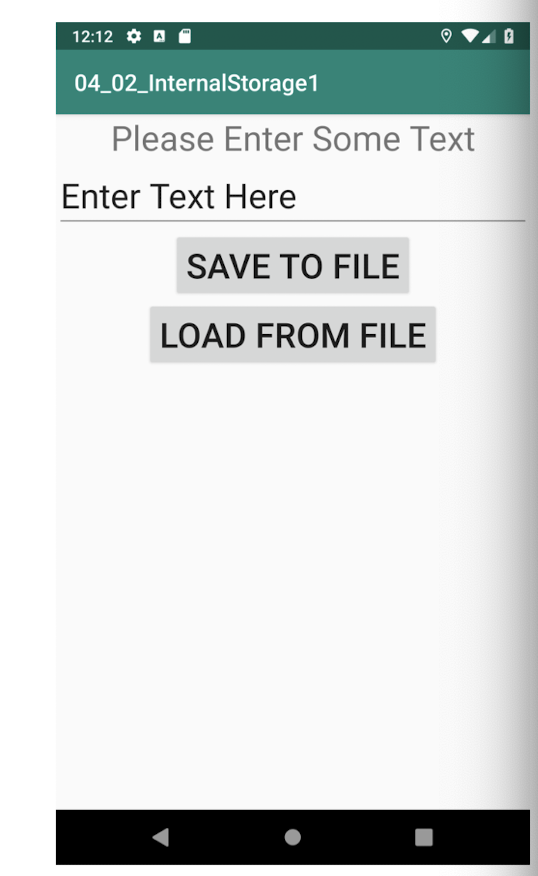
9.4.1 Internal Storage – Save
- To save text into a file, you use the
FileOutputStreamclass - The
openFileOutput()method opens a named file for writing, with the mode specified
1 | |
MODE_PRIVATEconstant is to indicate that the created file can only be accessed by the calling application- As long as you use MODE_PRIVATE for your files on the internal storage, they are never accessible to other apps
- The other mode options, MODE_WORLD_READABLE and MODE_WORLD_WRITEABLE, have been deprecated since API level 17
- To convert a character stream into a byte stream, you use an instance of the
OutputStreamWriterclass, by passing it an instance of theFileOutputStreamobject
1 | |
- Use the
write()method to write the string to the file - To ensure that all the bytes are written to the file, use the
flush()method - Finally, use the
close()method to close the file
1 | |
- Save data to an internal file
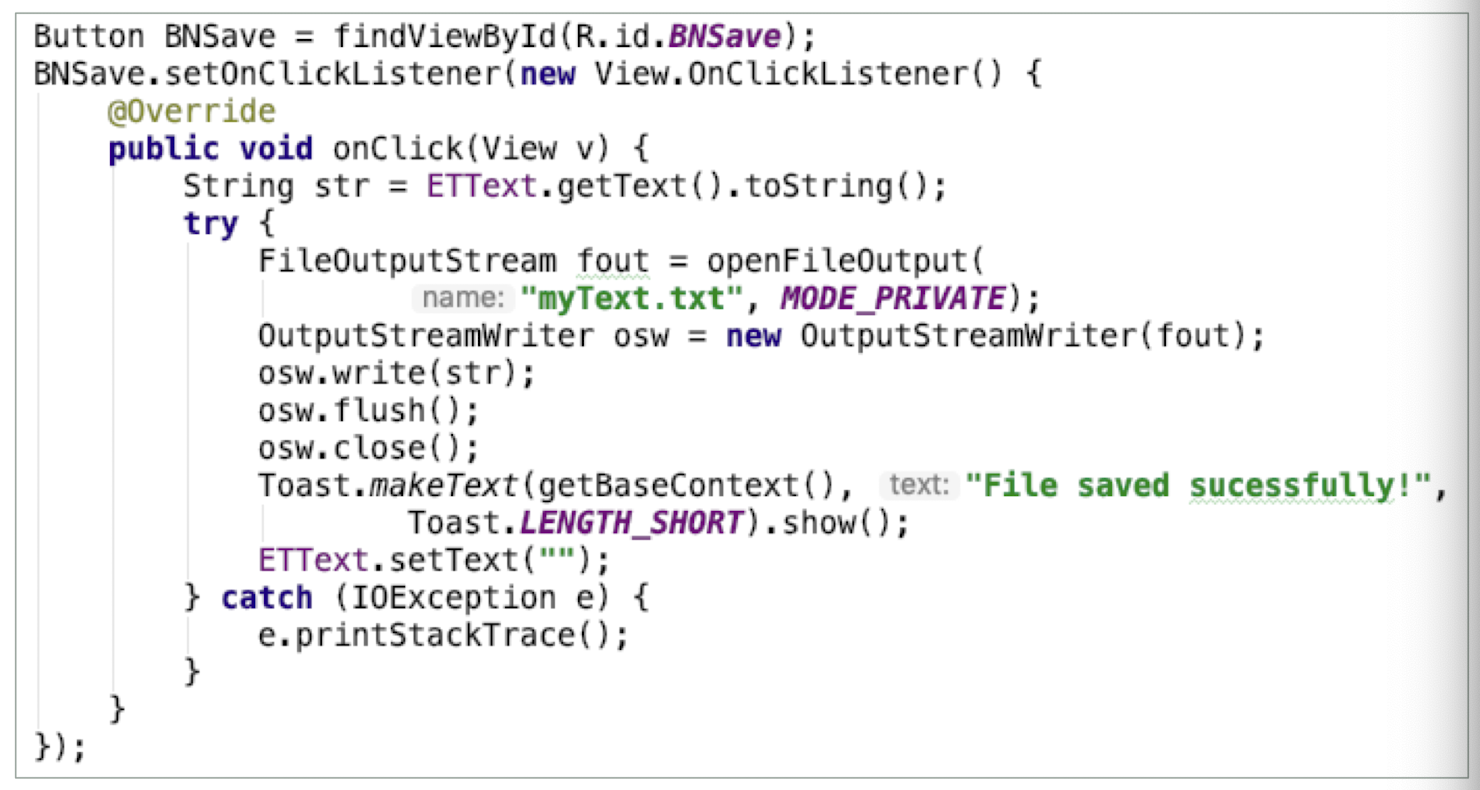
9.4.2 Internal Storage – Read
- To read the content of a file,
- Use the
FileInputStreamclass, together with theInputStreamReaderclass
1 | |
openFileInputmethod opens a private file associated with this Context’s application package for reading and it does not require any modeBecause you do not know the size of the file to read, the content is read in blocks of 100 characters into a buffer (character array)
- The characters read are then copied into a String object
1 | |
- The
read()method of theInputStreamReaderobject checks the number of characters read and returns – 1 if the end of the file is reached
Read data from an internal file
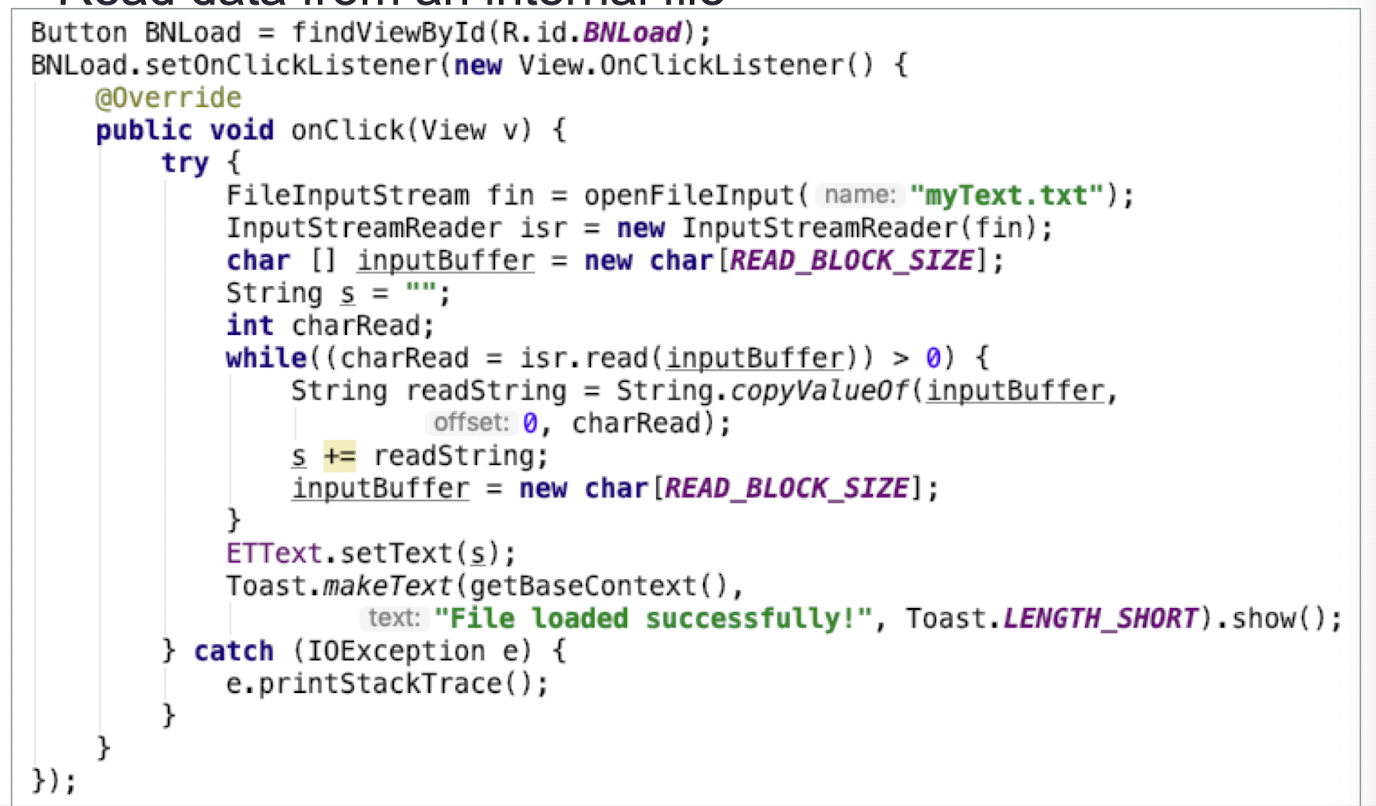
9.4.3 Other Useful APIs
getFilesDir()- Gets the absolute path to the filesystem directory where your internal files are saved.
getDir()- Creates (or opens an existing) directory within your internal storage space.
deleteFile()- Deletes a file saved on the internal storage.
fileList()- Returns an array of files currently saved by your application.
9.5 External Storage
It would be useful to save data to external storage (such as an SD card) because of its larger capacity, as well as the capability to share the files easily with other users
All files are in the SD card can be:
- globally read
- modified by the any users
- External storage can be unmounted by users
Always check the availability using
Environment.getExternalStorageState()A simple app to demonstrate external file input and output
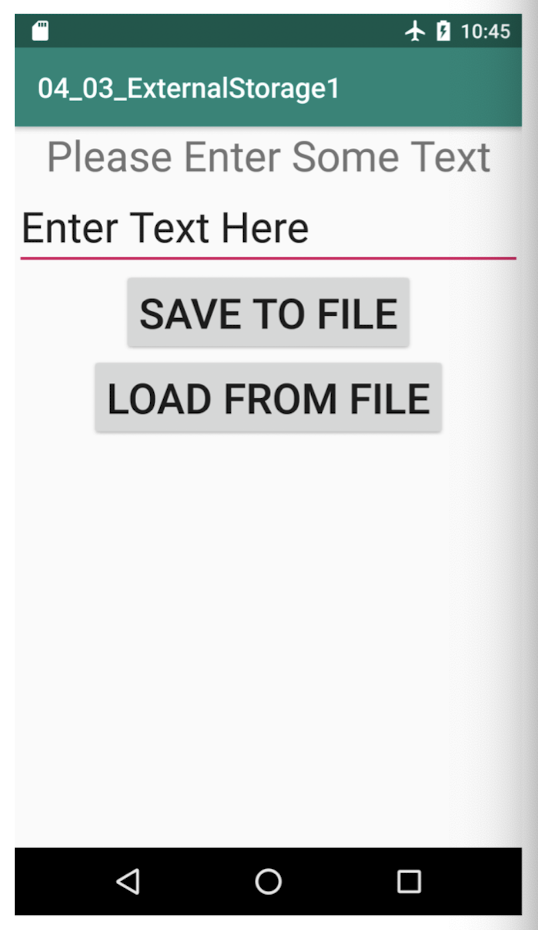
9.5.1 External Storage – Getting the path
getExternalFilesDir()method returns the full path to the external storageTypically, it should return the
/sdcardpath for a real device, and/mnt/sdcardfor an Android emulatorNever try to hardcode the path of the SD card, as manufacturers may choose to assign a different path name to the SD card

9.5.2 External Storage - Save
- Save data to an external file
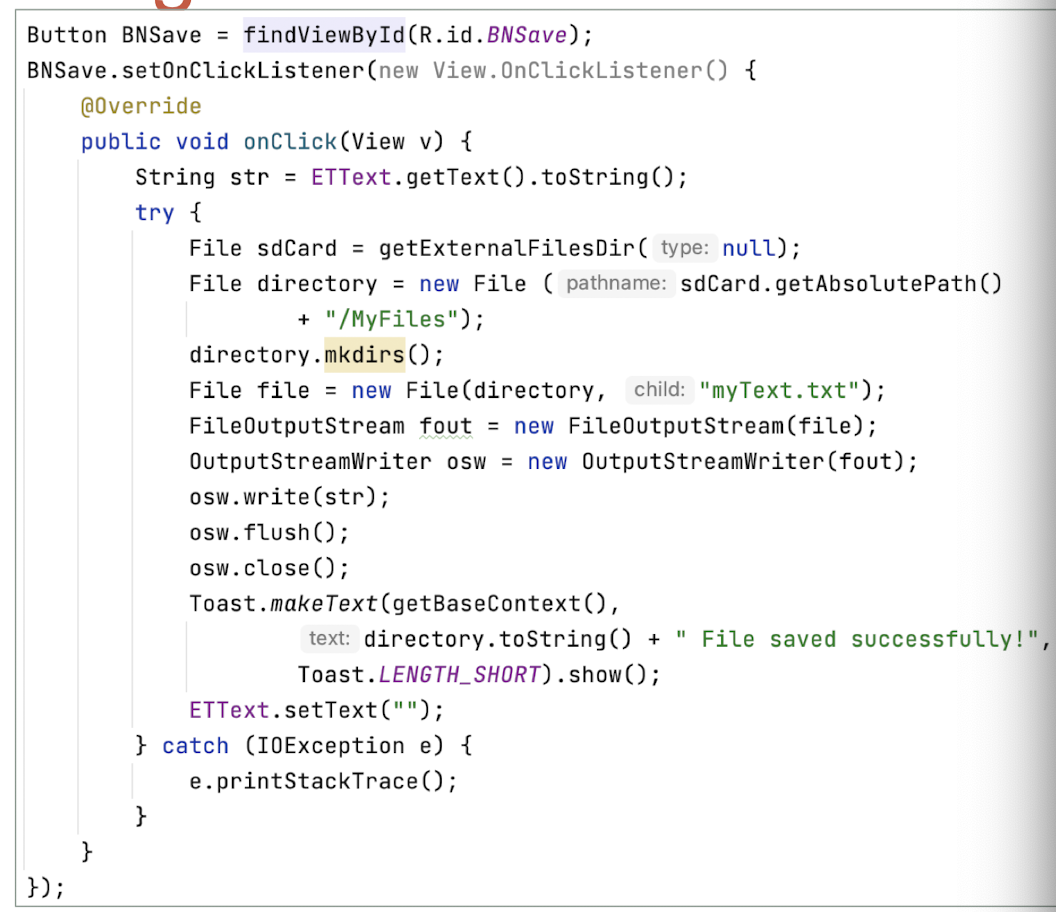
9.5.3 External Storage - Read
- Read data from an external file
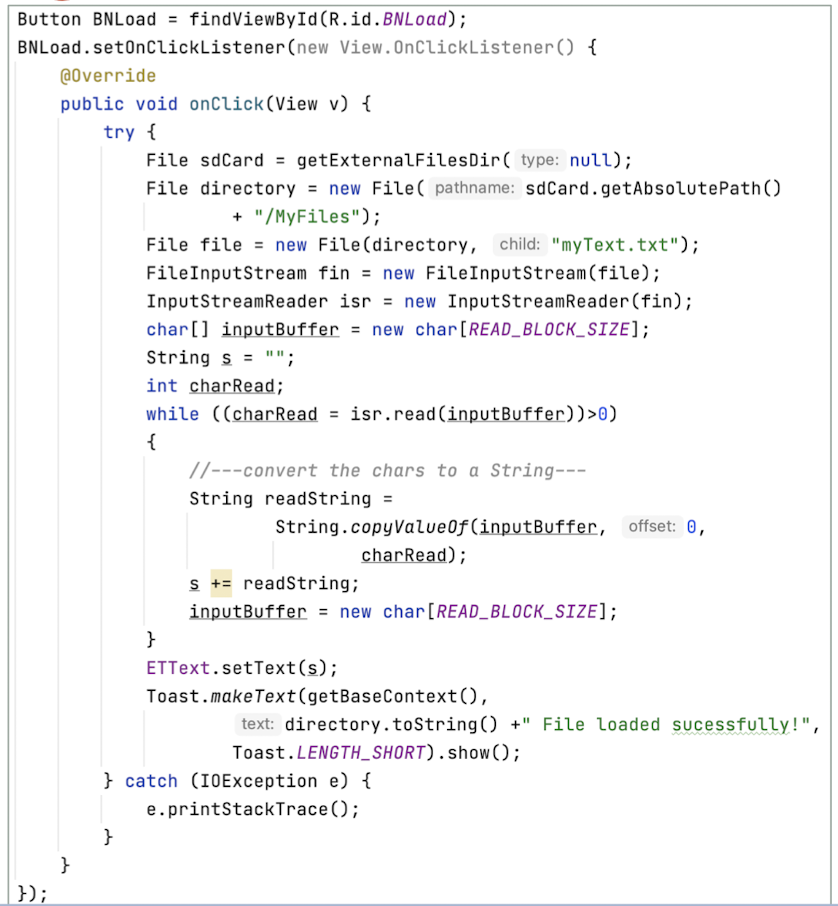
9.5.4 Choosing the Best Storage Option
The SharedPreferences object, internal storage, and external storage. Which one should you use in your applications to save data?
- SharedPreferences object:
- If you have data that can be represented using name/value pairs, then use the SharedPreferences object
- For example, if you want to store user preference data such as username, background color, date of birth, or last login date, then the SharedPreferences object is the ideal way to store this data
- Internal storage
- If you need to store ad-hoc data then using the internal storage is a good option.
- For example, your application (such as an RSS reader) might need to download images from the web for display.
- In this scenario, saving the images to internal storage is a good solution.
- You might also need to persist data created by the user, such as when you have an application that enables users to take notes and save them for later use.
- External storage
- There are times when you need to share your application data with other users
- For example, you might create an Android application that logs the coordinates of the locations that a user has been to, and subsequently, you want to share all this data with other users
- In this scenario, you can store your files on the SD card of the device so that users can easily transfer the data to other devices (and computers) for use later.
9.6 Creating and Using Databases
- So far, all the techniques you have seen are useful for savin simple sets of data
- For saving relational data, using a database is much more efficient
- For example, if you want to store the test results of all the students in a school, it is much more efficient to use a database to represent them because you can use database querying to retrieve the results of specific students
- Moreover, using databases enables you to enforce data integrity by specifying the relationships between different sets of data
- Android uses the SQLite database system
- The database that you create for an application is only accessible to itself;
- other applications will not be able to access it
9.7 SQLite
- Open source embedded SQL database developed by D. Richard Hipp in 2000
- Self-contained
- Serverless
- Zero-configuration
- Transactional: Atomic, Consistent, Isolated, Durable
- C /C++ API, but widely deployed
- http://www.sqlite.org/
- Can run on Windows, Linux, Unix, Mac OS, and embedded OS (e.g., Android, iOS, Palm OS, Symbian, Windows Mobile, etc.)
9.7.1 DBAdapter Helper Class
- A good practice for dealing with databases is to create a helper class to encapsulate all the complexities of accessing the data so that it is transparent to the calling code
- A
DBAdapterclass creates, opens, closes, and uses a SQLite database
Constants for the database
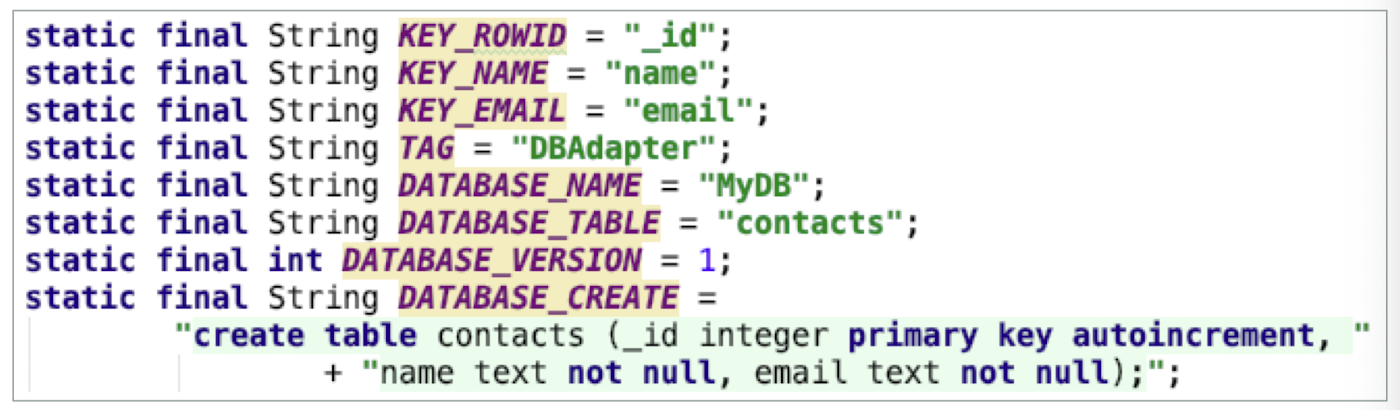
- the
DATABASE_CREATEconstant contains the SQL statement for creating the contacts table within the MyDB database
Within the DBAdapter class, a private class that extends the SQLiteOpenHelper class is used
SQLiteOpenHelperis a helper class in Android to manage database creation and version management- The
onCreate()andonUpgrade()methods must be overriden
1 | |
- The
onCreate()andonUpgrade()methods
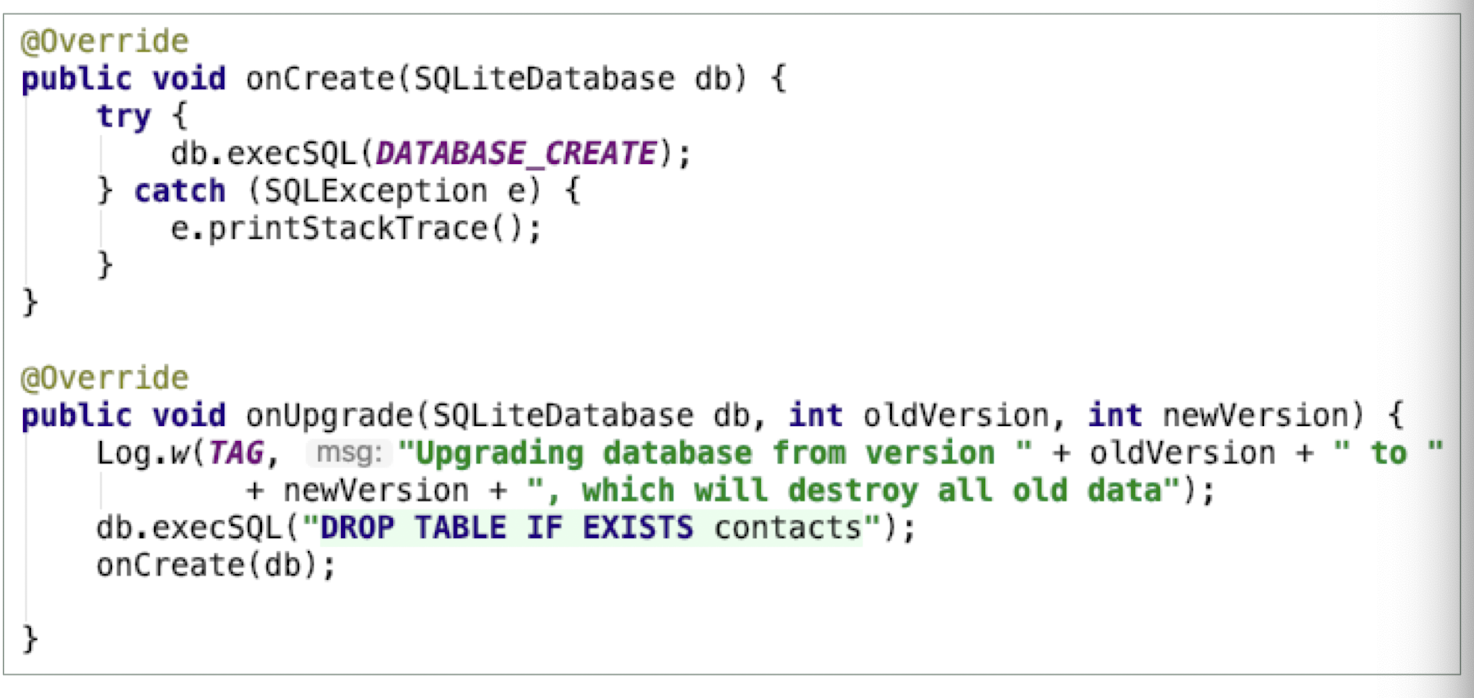
- Database operation methods
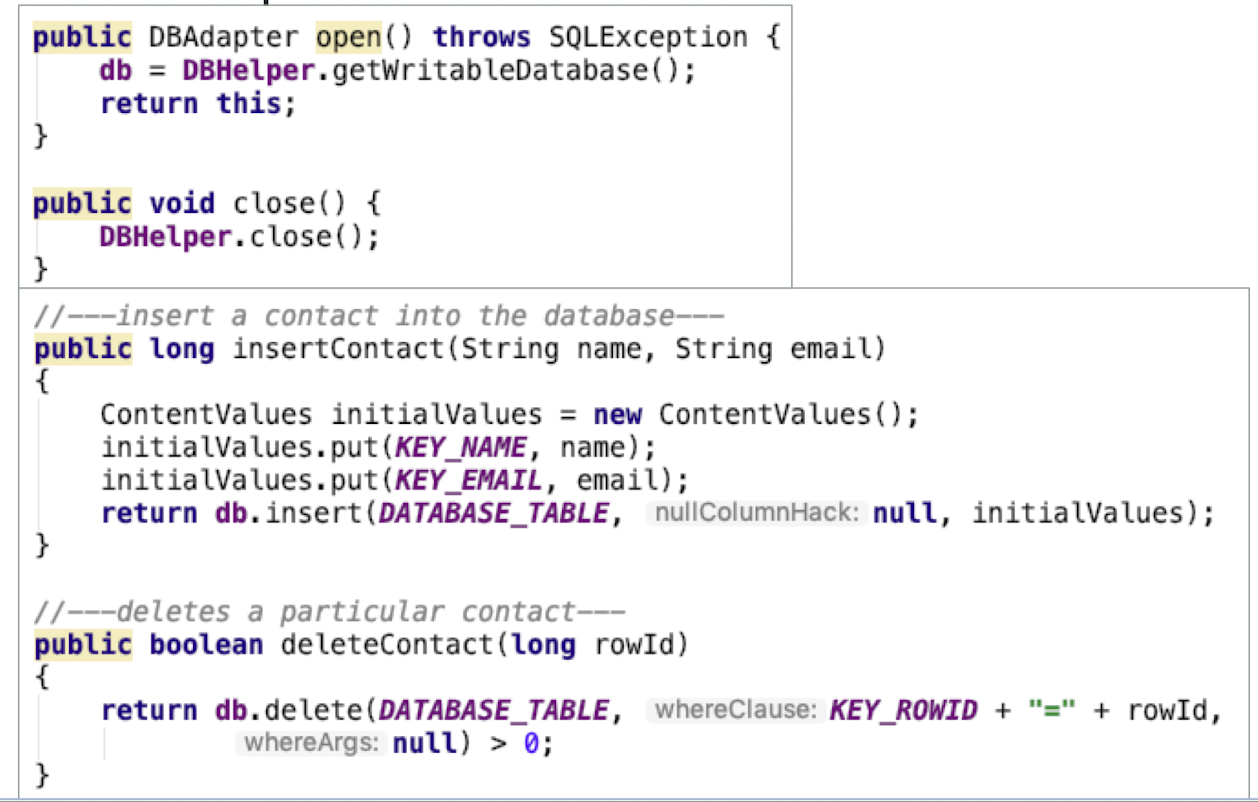
- Database operation methods
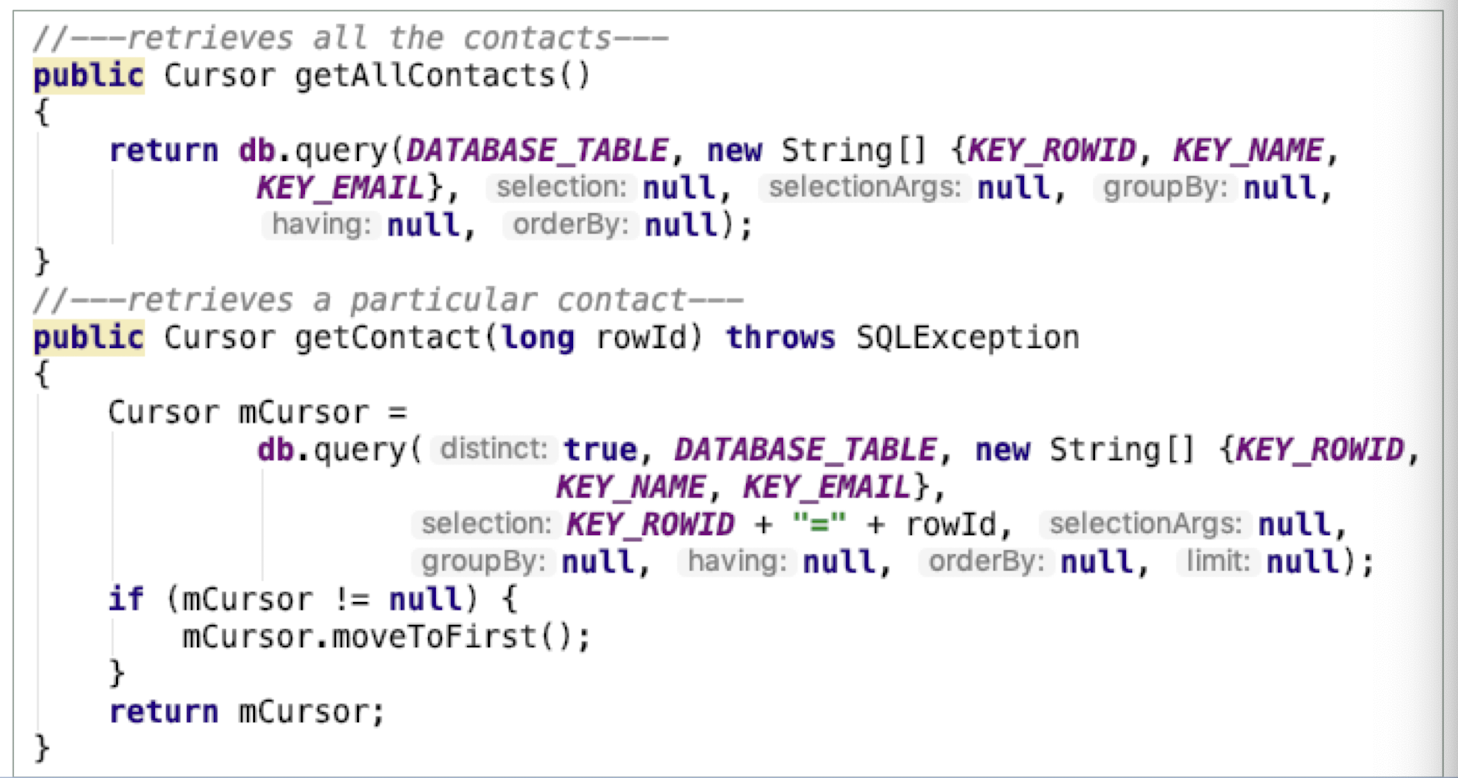
- Database operation methods
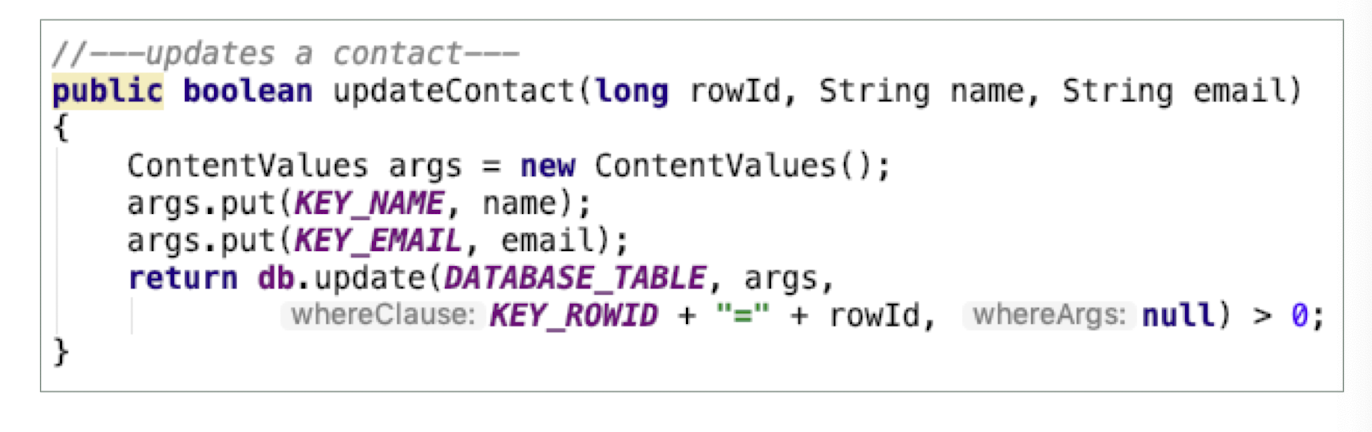
9.7.2 Cursor
Android uses the
Cursorclass as a return value for queries.Think of the Cursor as a pointer to the result set from a database query.
Using Cursor enables Android to more efficiently manage rows and columns as needed
You use a
ContentValuesobject to store name/value pairs. Itsput()method enables you to insert keys with values of different data types.
| function | description |
|---|---|
| moveToFirst | Move the cursor to the first entry. This method will return false if the cursor is empty. |
| moveToNext | Move the cursor to the next entry |
| moveToPrevious | Move the cursor to the previous entry |
| getCount | Get the number of rows in the cursor |
| getColumnIndexOrThrow | Returns the zero-based index for the given column name, or throws IllegalArgumentException if the column doesn’t exist |
| getColumnName | Returns the column name at the given zero-based column index |
| getColumnNames | Returns a string array holding the names of all of the columns in the result set |
| getColumnIndex | Returns the zero-based index for the given column name, or - 1 if the column doesn’t exist |
| moveToPosition | Move the cursor to an absolute position |
| getPosition | Returns the current position of the cursor in the row set |
9.7.3 DBAdapter Helper Class
- To create a database in your application using the DBAdapter class, you create an instance of the DBAdapter class
1 | |
- The constructor of the DBAdapter class will then create an instance of the DatabaseHelper class to create a new database
1 | |
- Add a contact to the table
1 | |
- Retrieving all contacts from a table
1 | |
- Retrieving a contact from a table
1 | |
- Updating a contact in a table
1 | |
- Deleting a contact from a table
1 | |
9.8 Content Provider
- One of Android’s 4 basic components (Activity, Service, Broadcast Receiver, Content Provider)
- Content provider is the recommended way to share data across packages and applications
- Share data between applications
- Contacts <——> SMS
- Calendar <——> Phone
- ⋯⋯
- No public area for storing data on Android
- Think of a content provider as a data store
- How it stores its data is not relevant to the application using it
- However, the way in which packages can access the data stored in it using a consistent programming interface is important
- A content provider behaves very much like a database
- you can query it, edit its content, and add or delete content
- However, unlike a database, a content provider can use different ways to store its data. The data can be stored in a database, in files, or even over a network
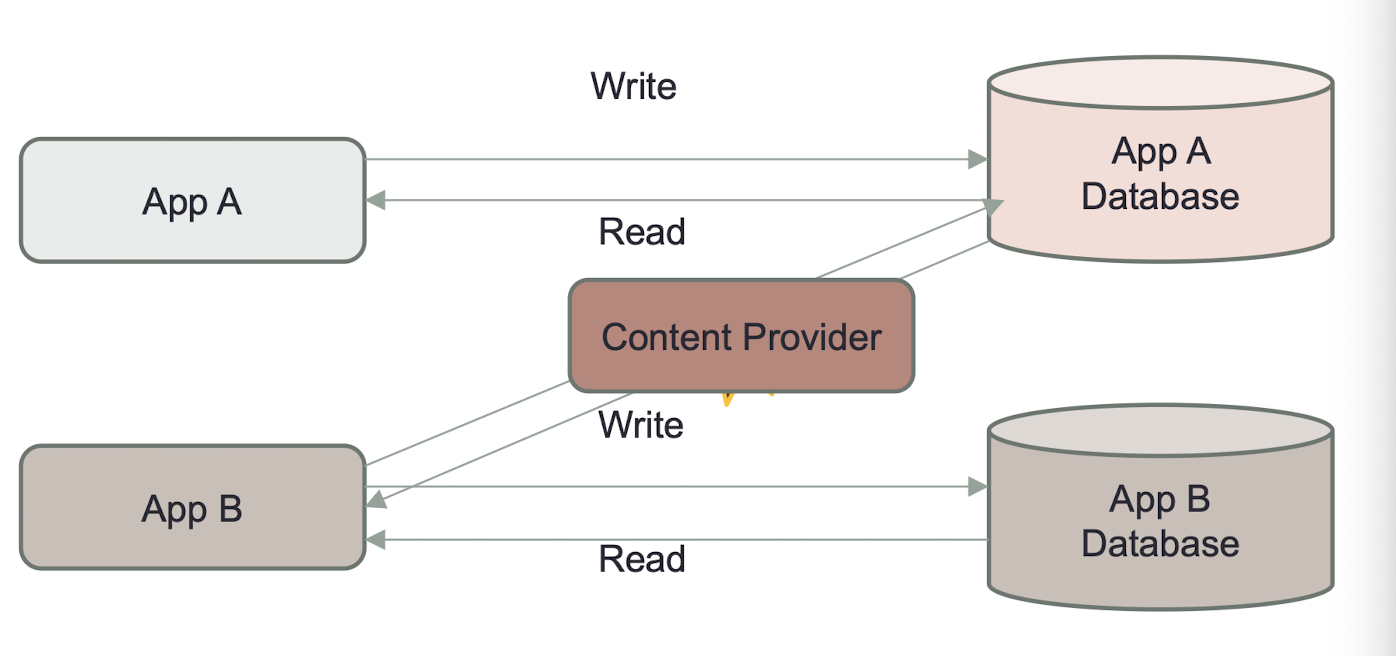
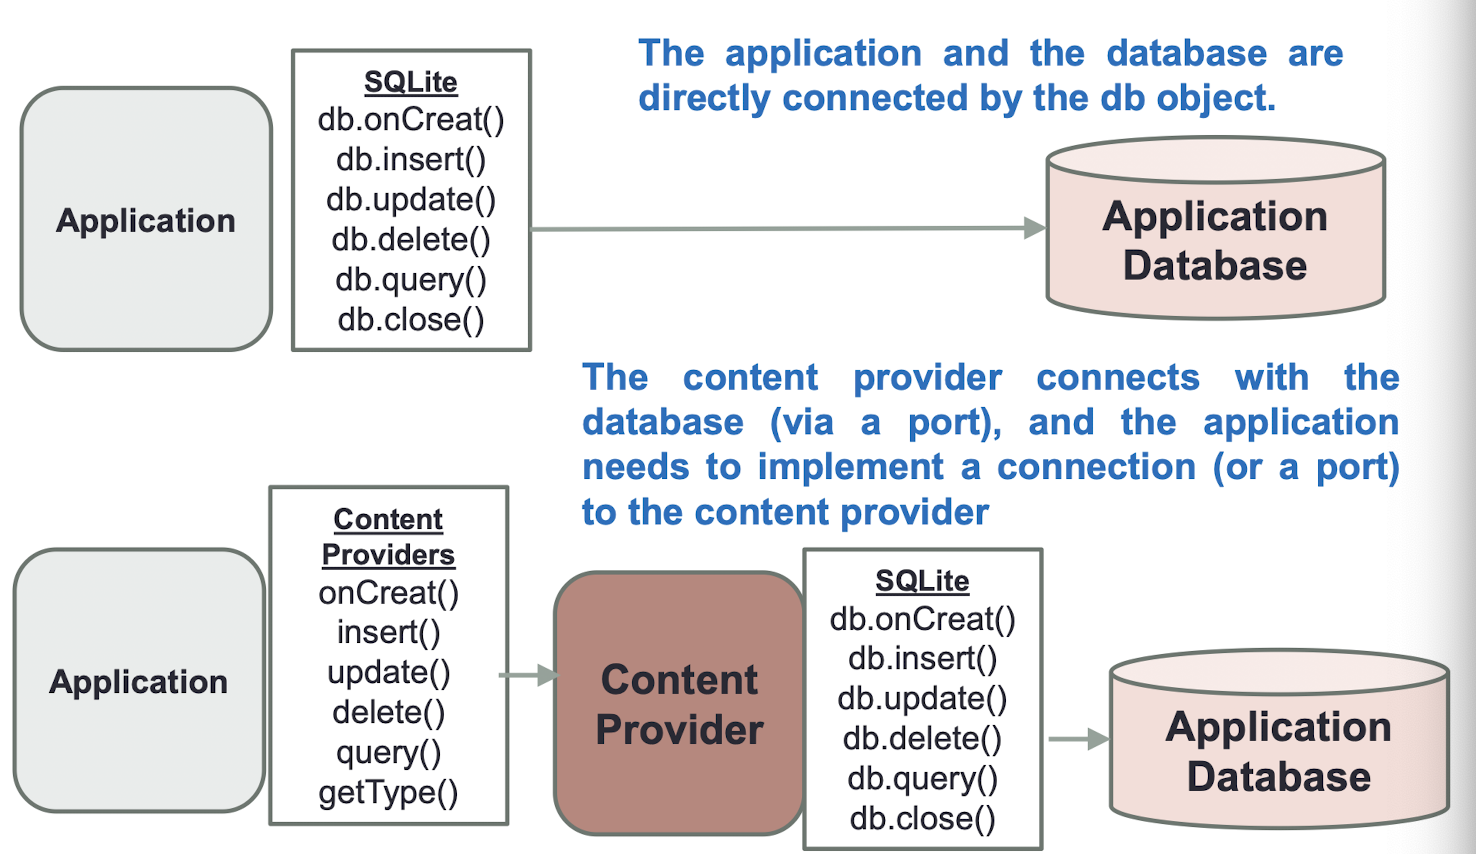
Android ships with many useful content providers, including the following:
- Browser
- Stores data such as browser bookmarks, browser history, and so on
- CallLog
- Stores data such as missed calls, call details, and so on
- Contacts
- Stores contact details
- MediaStore
- Stores media files such as audio, video, and images
- Settings
- Stores the device’s settings and preferences
9.8.1 Basic Idea
- Data operation functions (insert, delete, update, etc.) are implemented in the
ContentProviderclass to documents, database or network - These functions in
ContentProviderare called indirectly via theContentResolverclass with URI - Each data is represented by an REST style URI
Besides the many built-in content providers, you can also create your own content providers
- To query a content provider, you specify the query string in the form of a Uniform Resource Identifier (URI), with an optional specifier for a particular row
- Here’s the format of the query URI:
<standard_prefix>://<authority>/<data_path>/<id>
- Here’s the format of the query URI:
The various parts of the URI are as follows:
- The standard prefix for content providers is always
content:// - The authority specifies the name of the content provider. An example would be contacts for the built-in Contacts content provider
- The data path specifies the kind of data requested. For example, if you are getting all the contacts from the Contacts content provider then the data path would be people, and the URI would look like this:
content://contacts/people - The id specifies the specific record requested. For example, if you are looking for contact number 2 in the Contacts content provider, the URI would look like this:
content:// contacts/people/2
9.8.2 URI examples
- content://media/internal/audio/artists
- content://media/internal/audio/artists/12
- content://call_log/calls
- You needn’t remember them, most of them are defined as constant under the package android.provider.*
More URI Examples
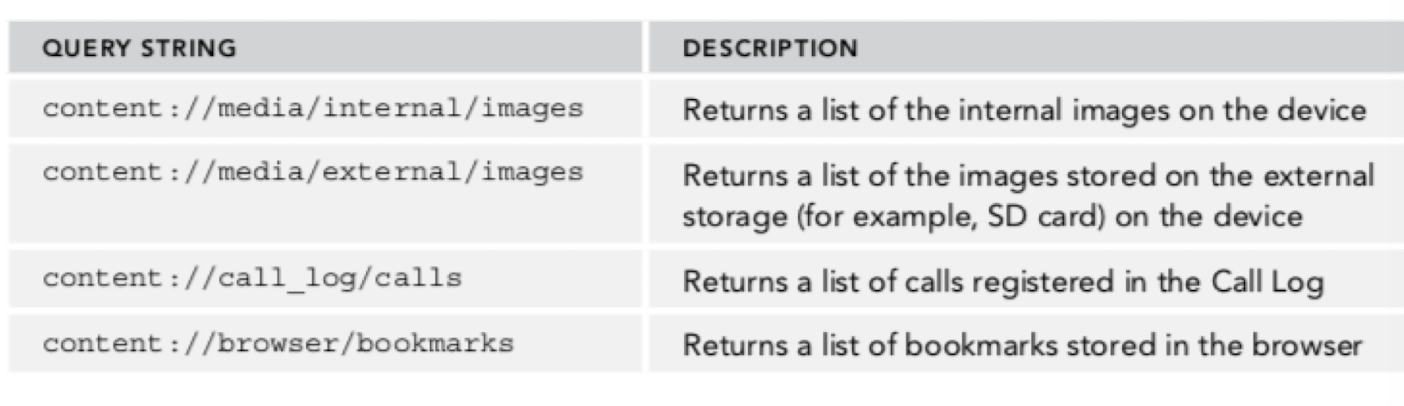
9.8.3 Using a Content Provider
Retrieve the contacts stored in Contacts application and display them in the ListView
- URI for accessing the Contacts application:
1 | |
- Check that the app has permission to access the Contacts
1 | |
- The CursorLoader class (only available beginning with Android API level 11 and later) performs the cursor query on a background thread and therefore does not block the application UI
- Similr to the query() method
1 | |
- The
SimpleCursorAdapterobject maps a cursor to TextViews (or ImageViews) defined in your XML file (activity_main.xml). It maps the data (as represented by columns) to views (as represented by views):

1 | |
- To access the Contacts application, you need to have the
READ_CONTACTSpermission in your AndroidManifest.xml file

9.8.4 The CursorLoader class
Projection
1 | |
The
projectionparameter for the CursorLoader class controls how many columns are returned by the queryProjection
- the
_ID,DISPLAY_NAME, andHAS_PHONE_NUMBERfields are retrieved
- the
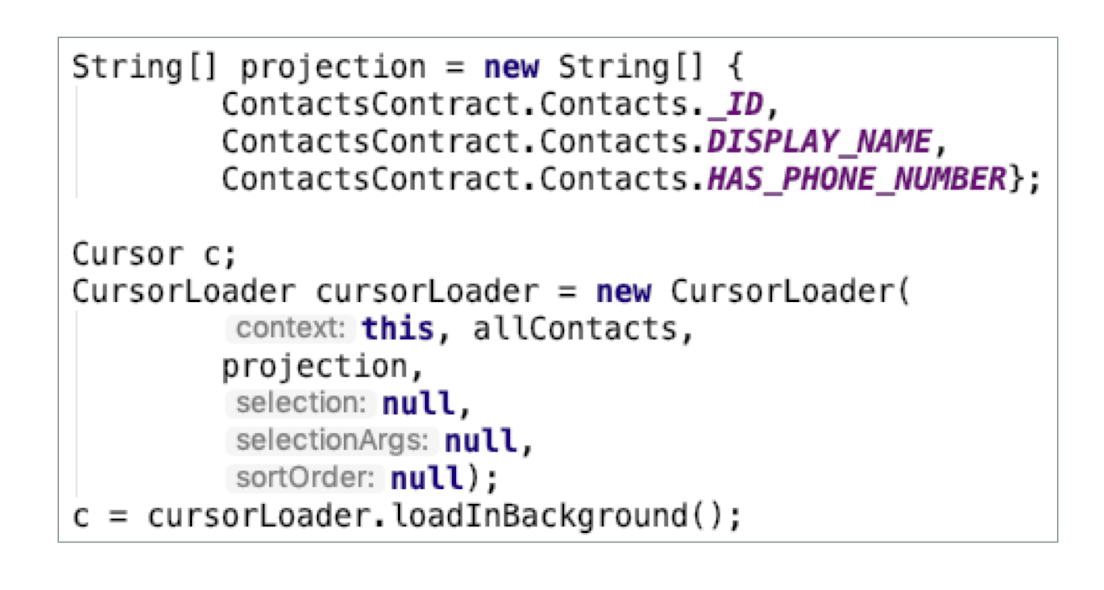
- Filtering
- The selection and selectionArgs parameters for the CursorLoader class enable you to specify a SQL WHERE clause to filter the result of the query
- Using the
selectoinArgsparameter, you can specify the values for the WHERE clause, as well as the variable.
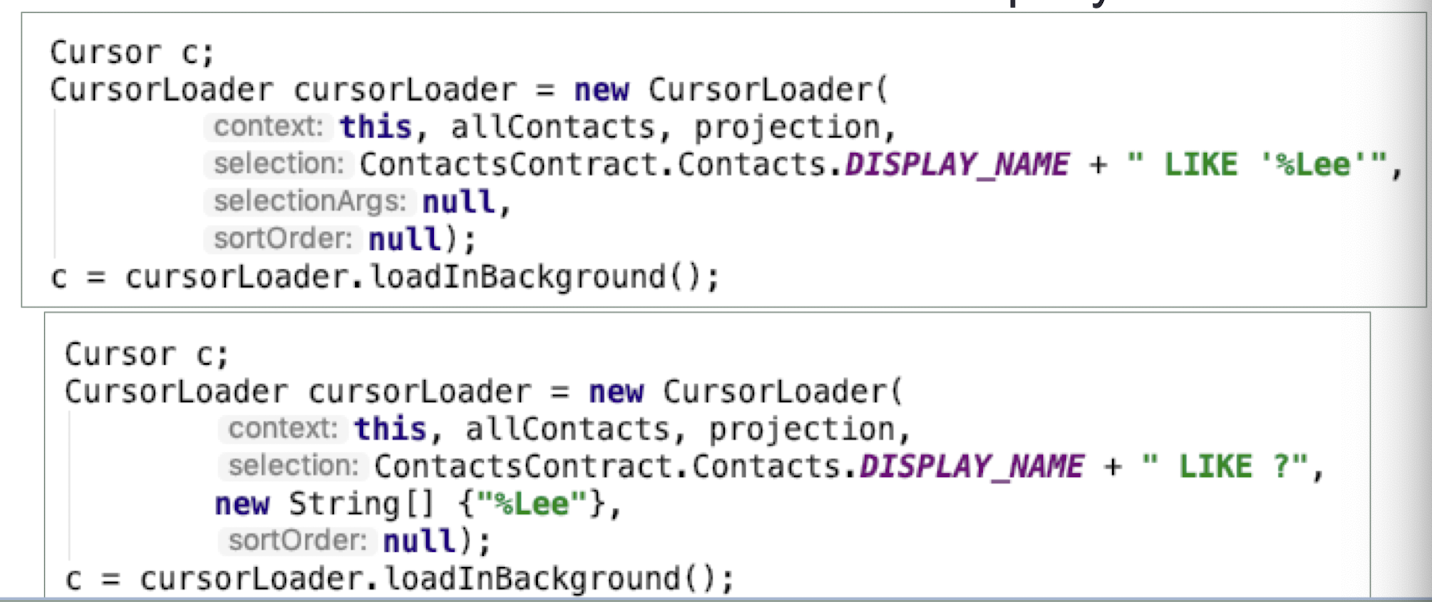
- Sorting
- The sortOrder parameter of the CursorLoader class enables you to specify a SQL ORDER BY clause to sort the result of the query
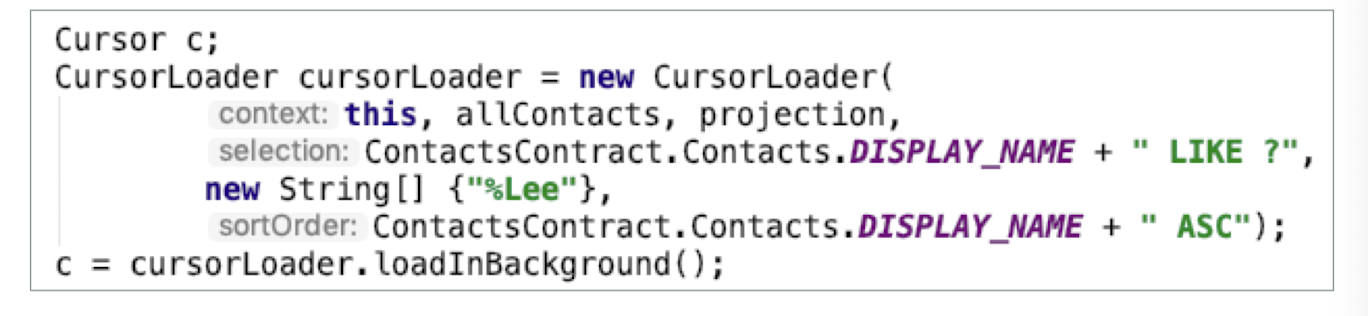
9.8.5 Create your own Content Providers
- Creating your own content provider in Android is relatively simple
- Inherit the abstract ContentProvider class
- Override the various methods defined within it
- onCreate(), query(), getType(), insert(), delete(), and update()
- Add description in AndroidManifest.xml
Create Content Provider
- Functions need to be overrided in Content Providers
- onCreate()
- query()
- getType()
- insert()
- delete()
- update()
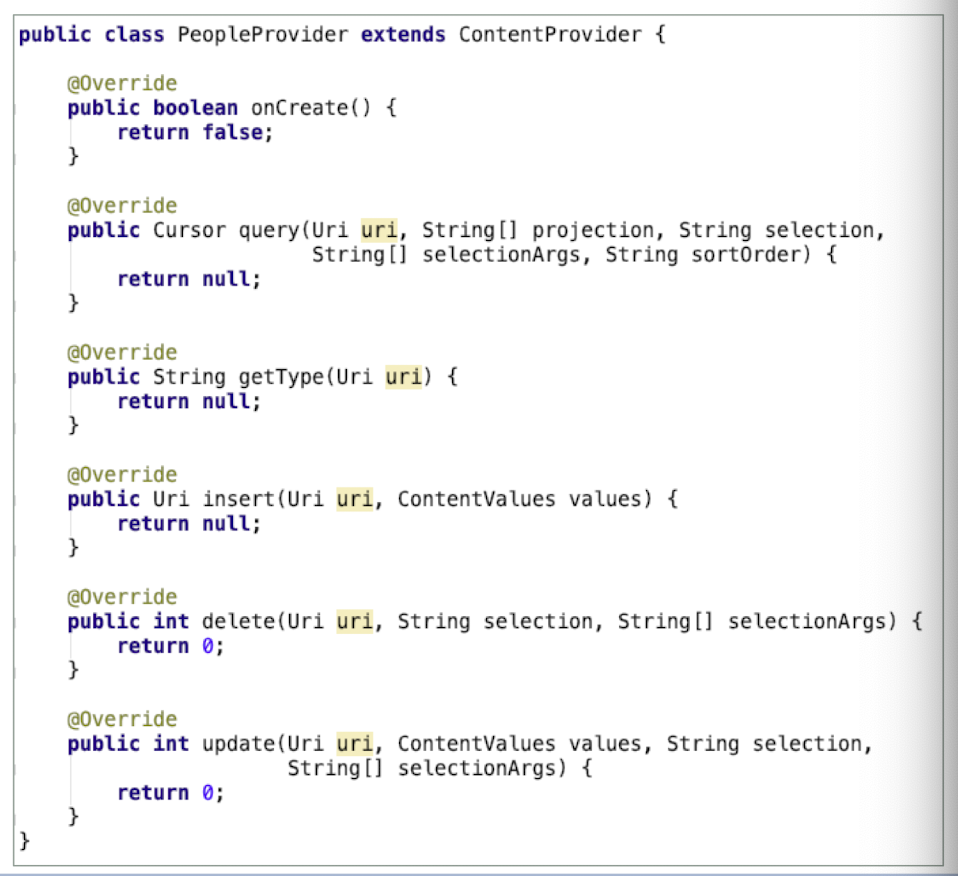
- Declare
CONTENT_URIand other constants
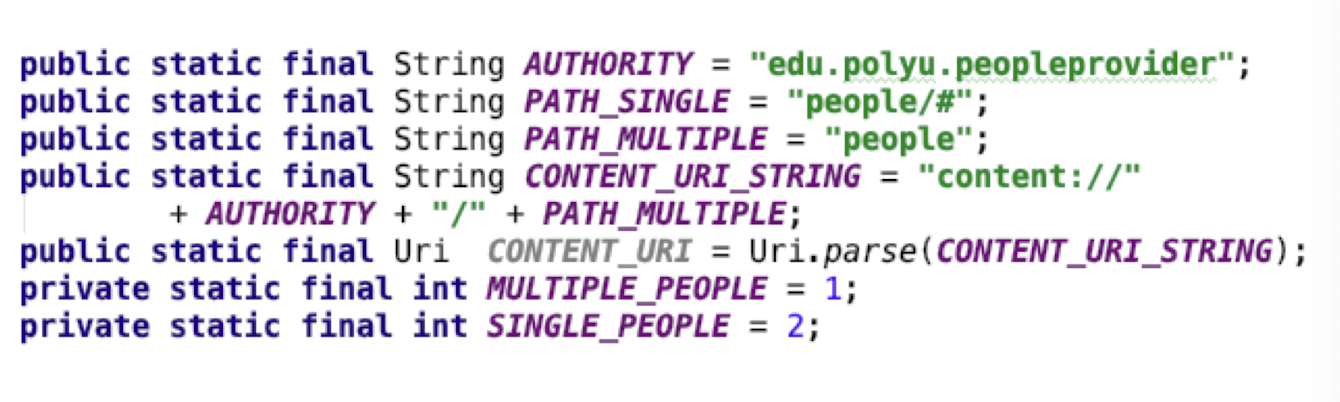
Register Content Provider
- Register Content Provider in AndroidManifest.xml
- Register with the
<provider>tag

- The above registered a content provider instance called PeopleProvider with authority “edu.polyu.peopleprovider”
9.8.6 Content Resolver
- ContentProvider is called via ContentResolver with URI
Developers only need to know the URI and the data types of the data set for data operations
Every Android components (e.g., Activity, Service, etc.) has a ContentResolver object
- It can be acquired by calling
getContentResolver()
1 | |
9.8.7 Content Provider - Query
Once ContentResolver is acquired, the query() function can be used to obtain the target data set
Below is a query for data
ID = 2(where it is defined in the URI)
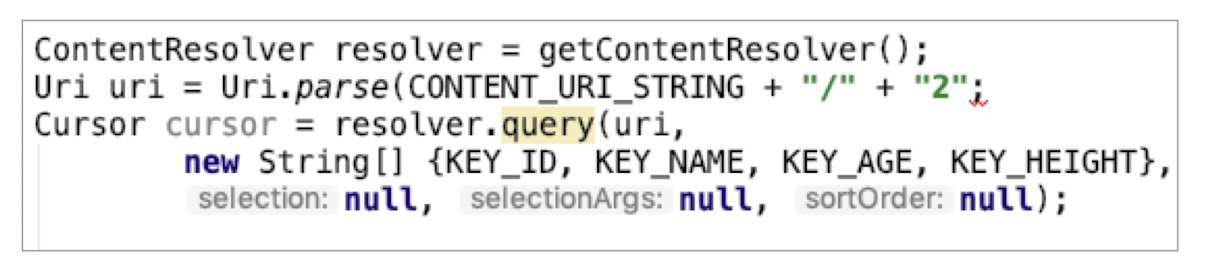
CONTENT_URIdefined earlier can be used to return the whole set of dataThe
query()function in ContentResolver is a bit different from that of SQLiteDatabase
1 | |
uridefines the data set to queryprojectiondefines the list of columns to returnselectionand selection Args define the query criteriasortOrderdefines how the rows are sorted
9.8.8 Content Provider - Insert
- Use
Insert()to add single data entry orbulkInsert()to add multiple data entries

9.8.9 Content Provider - Delete
- Use
delete()to erase entries
1 | |
- To erase a single entry, the data ID can be defined in the URI
- To erase multiple entries, the criteria can be defined in selection
- Delete data with ID=2
1 | |
- Delete data with ID > 4 with selection
1 | |
9.8.10 Content Provider - Update
- Use
update()to edit entries
1 | |
- Similar to
delete() - The ID of the data entry to update can be defined in the URI
- Condition to update can be defined in selection (3rd parameter)
- Update data with ID=7

9.8.11 Content Provider and Content Resolver
ContentProvider has no UI, it only provides a ContentProvider for data exchange with other Apps
SQLite Database is used at the bottom layer
- Every Android components (Activity, Service, etc) has a ContentResolver object and can be acquired by calling getContentResolver()
9.9 SQL – Select statement
9.9.1 SELECT statement: retrieval
1 | |
- Find products with standard price less than $275
1 | |
- To display without duplicate rows
1 | |
- To check for the null value
1 | |
| Operator | Meaning |
|---|---|
= |
Equal to |
> |
Greater than |
> = |
Greater than or equal to |
< |
Less than |
< = |
Less than or equal to |
< > |
Not equal to |
!= |
Not equal to |
SELECT: Comparison Operators
- Which orders have been placed after 10/24/2010?
1 | |
- What furniture does Pine Valley carry that isn’t made of Cherry?
1 | |
SELECT: Alias
- Alias is an alternative column name or table name
1 | |
Results:
- NAME CUSTOMER_ADDRESS
- Home Furnishings 1900 Allard Ave.
Note:
AScan be omitted in the SELECET clause.AScannot be included in FROM clause.
SELECT: Using Expressions
An expression has an operator acting on numeric columns
Operators include: *, / , +, –
Expressions in parentheses are executed first, followed by ‘*’ and ‘/’ and then ‘+’ and ‘-’, from left to right
Suppose there are 100 units for each of the products .What is the total value for each product?
1 | |
SELECT: Using Functions
- Functions include
- COUNT (*), COUNT, MIN, MAX, SUM, and AVG
- COUNT adds up the number of rows selected by a query that do not contain NULL
- COUNT (*) adds up all the rows selected by a query
- SUM and AVG can only be used with numeric columns
- Using functions will result in a one-row answer
- How many different items were ordered on order number 1004?
1 | |
SELECT: Using Wildcards
- Wildcard used in
SELECTclause*(means all)
1 | |
- Wildcards used in
WHEREclause%(means any collection of characters)
1 | |
- will find ‘Computer Desk’, ‘8-Drawer Desk’, etc.
_(means exactly one character)
1 | |
- will find ‘3-Drawer Desk’, ‘8-Drawer Desk’, etc.
SELECT: Boolean Operators
Include AND, OR, and NOT operators for customizing conditions in WHERE clause
If multiple operators are used, NOT is evaluated first, then AND, then OR
List product description, finish, and price for all desks and all tables that cost more than $300.
1 | |
Note: All desks will be listed; even those that cost 300 or less.
SELECT: Boolean Operators
- List product description, finish, and price for all desks and tables that cost more than $300.
1 | |
SELECT: Ranges
- Which products have a price between $200 and $300?
1 | |
SELECT: IN and NOT IN Lists
- List all customers who live in warmer states.
1 | |
Note:
- State IN (‘FL’,’TX’,’CA’)
- is equivalent to
- State = ‘FL’ OR State = ‘TX’ OR State = ‘CA’
Using IN operator is more efficient than separate OR conditions.
Sorting Results: ORDER BY
- Referring to the previous query, list the results alphabetically by state, and alphabetically by customer within each state.
1 | |
Note:
- If sorting from high to low, use DESC as a keyword placed after the column to sort.
- Oracle sorts NULLs last.
Categorizing Results : GROUP BY
GROUP BY is useful when paired with functions
- GROUP BY categorizes records into subgroups
- functions provide summary information for each subgroup
- using functions together with GROUP BY could result in multiple rows answers (one row answer for each subgroup)
Count no. of customers with addresses in each state we ship.
1 | |
Qualifying Results: HAVING
- Acts like a WHERE clause
- Use together with GROUP BY
- Identifies (sub)groups that meet a criterion rather than rows
Find only states with more than one customer.
1 | |
Note: Only groups with total number of customers greater than 1 are included in final result.
10. Networking
- Messaging
- SMS Messaging
- Sending Email
- Socket and HTTP
- Wi-Fi
- GPS Positioning
- Bluetooth
- NFC
10.1 SMS Messaging
- SMS messaging is one of the main functions on a mobile phone today—for some users, it’s as necessary as the device itself
- Android comes with a built-in SMS application that enables you to send and receive SMS messages
in some cases, you might want to integrate SMS capabilities into your Android application.
Such a capability also means you would have to pay the fees incurred from sending all those SMS messages
- The free Android emulator provides that capability
- The four-digit number that appears above your emulator is its “phone number.” The first emulator session that you open is typically 5554.
10.2 Sending SMS Messages
- A simple app to demonstrate sending SMS message programmatically within the app itself
- In AndroidManifest.xml
- Ask user to grant permission
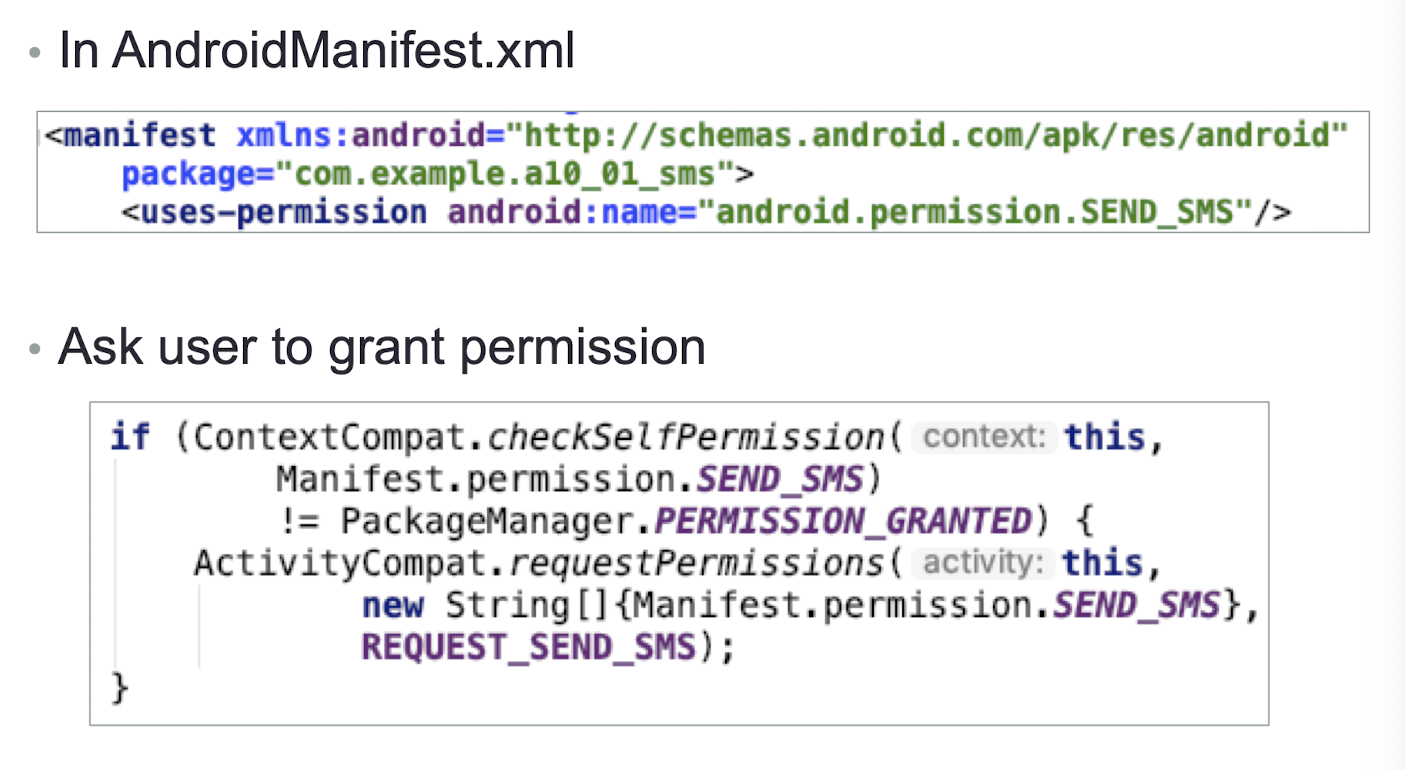
- SmsManager class is used to send an SMS message programmatically
- Unlike other classes, you do not directly instantiate this class
- Instead, you call the getDefault() static method to obtain an SmsManager object and send the SMS message using the sendTextMessage() method
1 | |
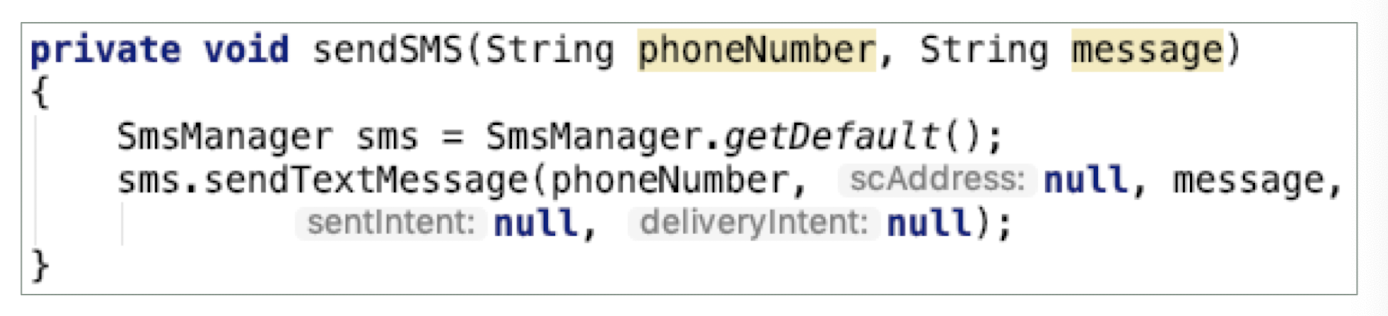
- The five arguments to the sendTextMessage() method:
- destinationAddress - Phone number of the recipient
- scAddress - Service center address; use null for default SMSC
- Text - Content of the SMS message
- sentIntent - Pending intent is broadcast when the message is successfully sent
- deliveryIntent - Pending intent is broadcast when the message is delivered to the recipient
A Pending Intent specifies an action to take in the future
Button’s Event
1 | |
- Open 2 emulators, try to send SMS messages to each other
- Note: you would have to pay the fees incurred from sending all those SMS messages on a real Android device using your sim card
10.3 Class Exercise 10.
- The default SMS app of the Android OS will receive the SMS message
- You can also implement the Broadcast Receiver to receive the SMS in your own app
- To listen for incoming SMS messages, you create a BroadcastReceiver class
- When an intent is received, the onReceive() method is called, which needs to be overridden
Declare a class variable
- Create the BroadcastReceiver
1 | |
Class Exercise 10.1
- Now, you have the SMSReceiver object, what else do you need to set up in order to listen to the SMS receive broadcast?
- Refer to the “Sending SMS Messaging” and the steps to register the BroadcastReceiver in Lecture 7 Air Plane Mode Changed Broadcast Receiver example.
- The permission required is android.permission.RECEIVE_SMS
- The name of the Broadcast is android.provider.Telephony.SMS_RECEIVED
In AndroidManifest.xml
Ask user to grant permission
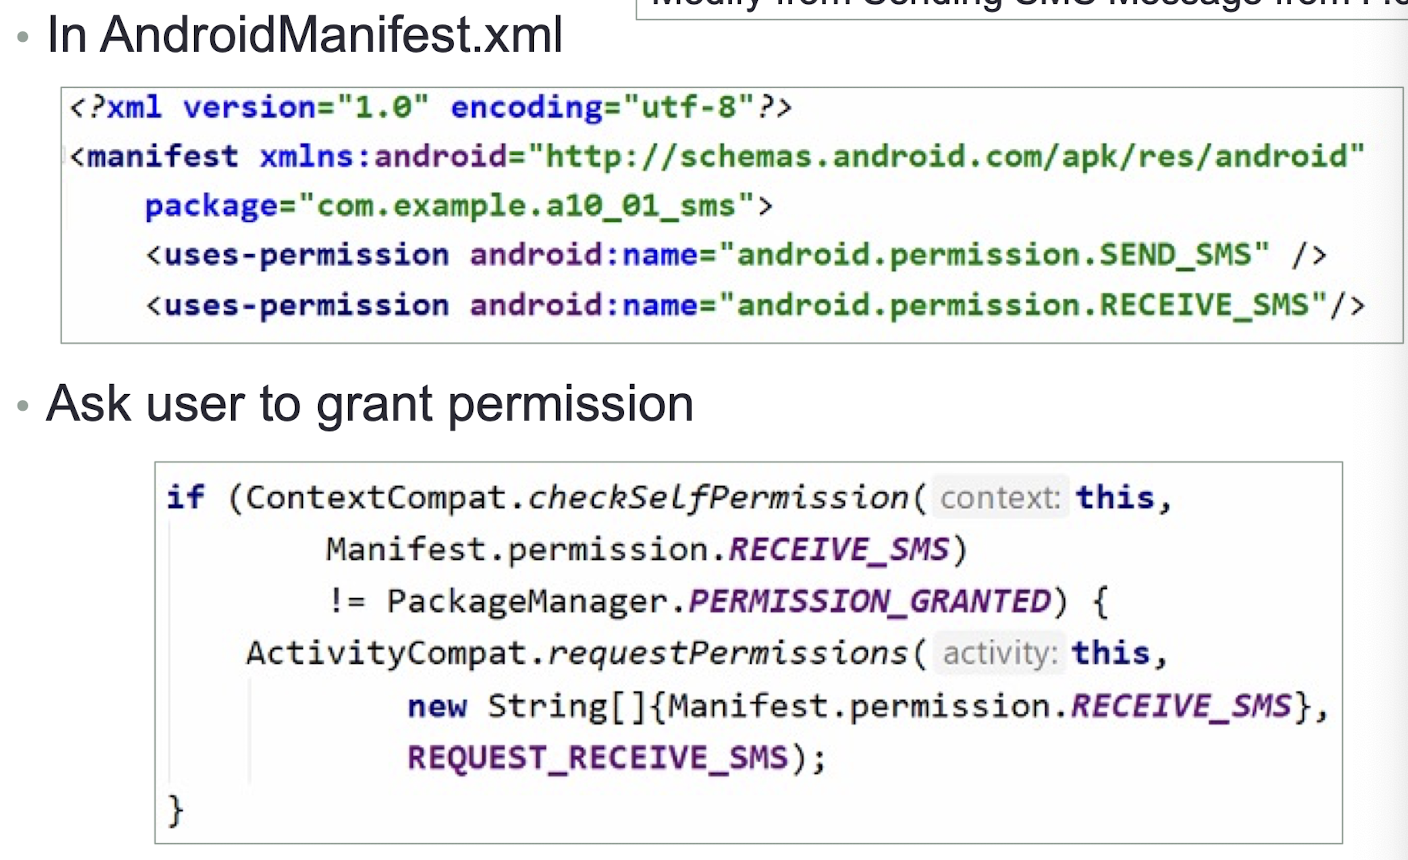
- Register IntentFilter
1 | |
10.4 BroadcastReceivers SMS Sent/Delivery
- BroadcastReceiver for sent and delivery SMS
1 | |
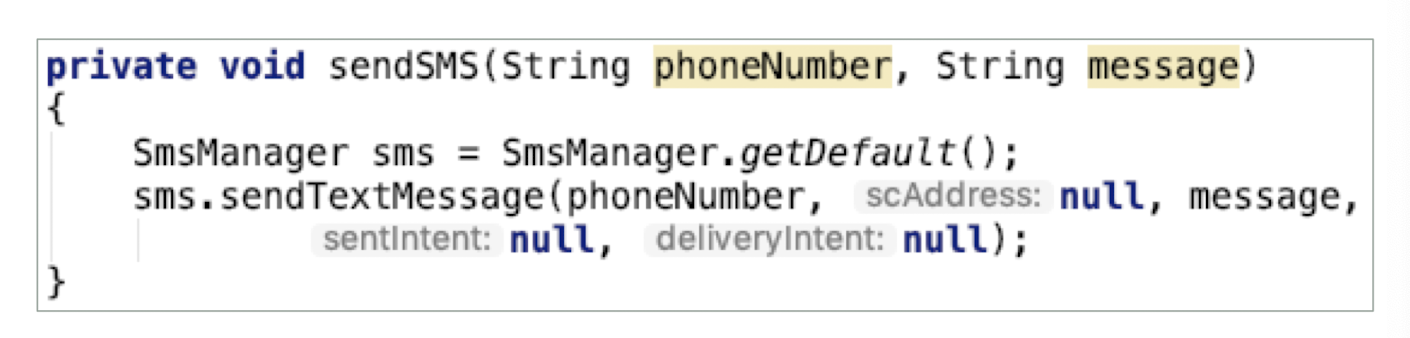
sentIntent - Pending intent is broadcast when the message is successfully sent
deliveryIntent - Pending intent is broadcast when the message is delivered to the recipient
Create 2 Pending intent instances and BRs
1 | |
- Set up the Broadcasts
1 | |
1 | |
1 | |
- Establish the receiving of the broadcasts
1 | |
- Use the Pending Intents
1 | |
https://www.usna.edu/Users/cs/adina/teaching/it472/spring2020/course/page.php?shortname=mobileos&id=
10.5 Sending Email
- Like SMS messaging, Android also supports email
The Gmail/Email application on Android enables you to configure an email account using POP3 or IMAP
Besides sending and receiving emails using the Gmail/Email application, you can also send email messages programmatically from within your Android application
A simple app to demonstrate sending Email message programmatically
Built-in Email application is launched when “Send Email” Button is clicked
- You use an Intent object and set the various parameters using the setData(), putExtra(), and setType() methods
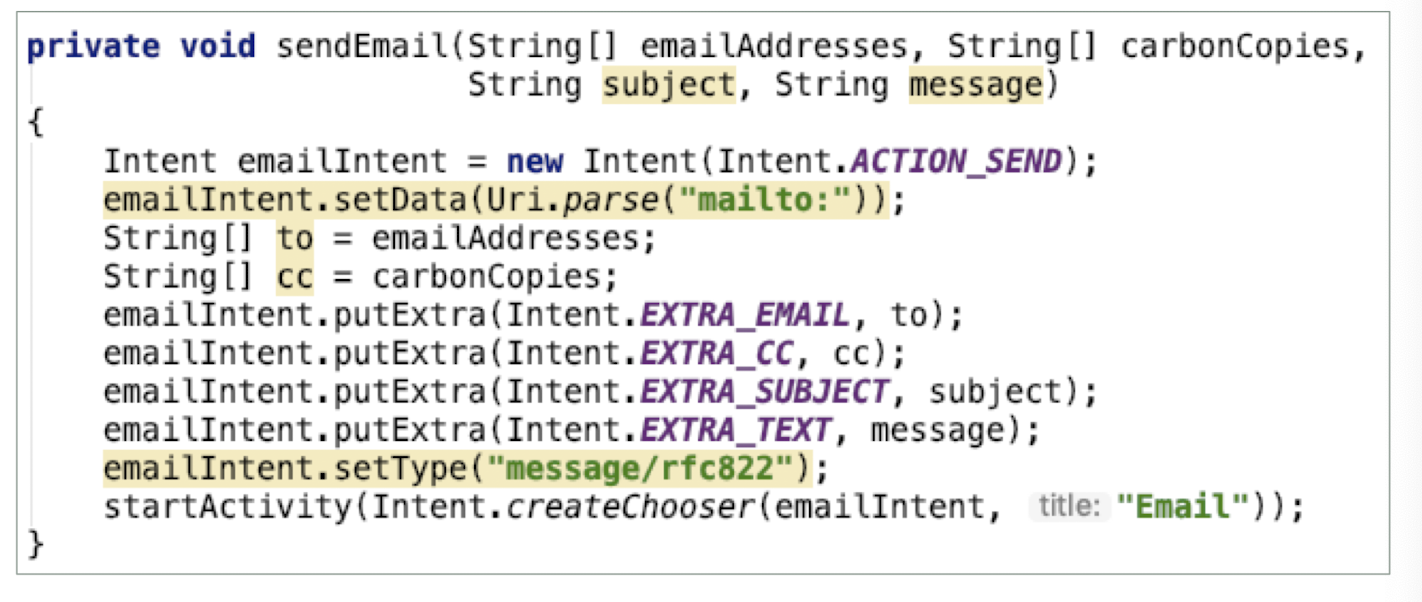
- Button’s Event
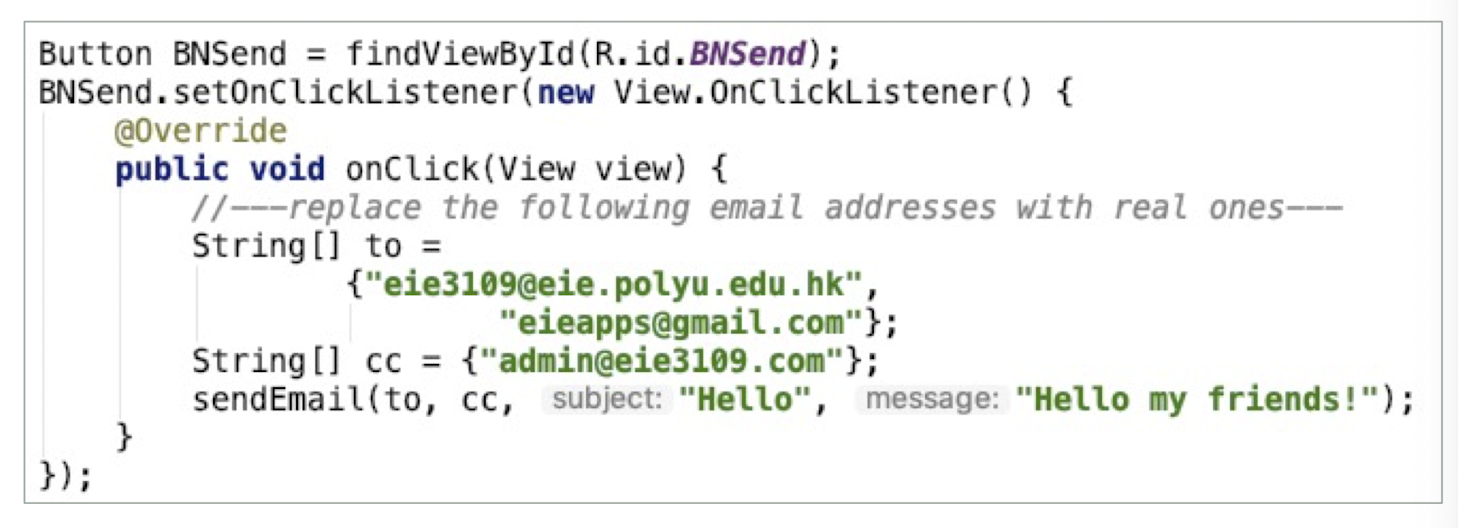
Class Question 10.2
Modify the XML and Button’s Event so that user can input all the fields required to send an email
Think carefully on the design of multiple email addresses in to and cc fields
References
Slides of EIE3109 Mobile Systems and Application Development, The Hong Kong Polytechnic University.
个人笔记,仅供参考
PERSONAL COURSE NOTE, FOR REFERENCE ONLY
Made by Mike_Zhang